


 Loading...
Philips TD6726/BH199P, TD6726/BH191P, TD6726/BG051P, TD6626/BH301P, TD6626/BH191P User Manual
...
Guarantee
Dear Customer,
Thank you for purchasing this Philips product which has been designed and manufactured to the highest quality standards.
If, unfortunately, something should go wrong with this product Philips guarantees free of charge labour and replacement parts irrespective of the country where it is repaired during a period of 12 months from date of purchase. This international Philips guarantee complements the existing national guarantee obligations to you of dealers and Philips in the country of purchase and does not affect your statutory rights as a customer.
The Philips guarantee applies provided the product is handled properly for its intended use, in accordance with its operating instructions and upon presentation of the original invoice or cash receipt, indicating the date of purchase, dealer’s name and model and production number of the product.
The Philips guarantee shall not apply if:
•the documents have been altered in any way or made illegible;
•the model or production number on the product has been altered, deleted, removed or made illegible;
•repairs or product modifications and alterations have been executed by unauthorised service organisations or persons;
•damage is caused by accidents including but not limited to lightning, water or fire, misuse or neglect.
Please note that the product is not defective under this guarantee in the case where modifications become necessary in order for the product to comply with local or national technical standards that apply in countries for which the product was not originally designed and/or manufactured. Therefore always check whether a product can be used in a specific country.
In case your Philips product is not working correctly or is defective, please return your phone to the place of purchase or the Philips National Service Centre. In the event you require service whilst in another country a dealer address can be given to you by the Philips Consumer Help Desk in that country.
In order to avoid unnecessary inconvenience, we advise you to read the operating instructions carefully before contacting your dealer.
In case your Philips product is not working correctly or is defective, please contact:
Philips service centre
1 Great Central Way Butlers Leap Rugby
Warwickshire, CV213XH UK Phone: 0870 900 9070

MAIN ACCESS MENU
Standby mode
SHARED
PRV PHONEBK INTERCOM SERVICES SETTINGS CALL LOG REDIAL
 Shared phonebook
Options: Add
Change
Voice dial
Delete
 Private phonebook
Options: Add
Change
Delete
Internal list:
base and handsets
Options: Rename
Cancel registration
List of network services
Options: Change
Delete
Add
 Miscellaneous settings
Options:
1 Handset sounds
2 Handset settings
3 Base station settings
4 Answer phone
5 Line settings
6 Security
List of incoming calls and messages
Options: Store
Play
Delete
List of outgoing calls (redial)
Options: Store
Delete
Delete all
1.1Earpiece volume (p. 38)
1.2Loudspeaker volume (p. 38)
1.3Headset volume (p. 39)
1.4Ringer type (p. 39)
1.5Ringer volume (p. 39)
1.6Key tones (p. 39)
1.7Earpiece tone (p. 39)
1.8Loudspeaker tone (p. 39)
1.9Headset tone(p. 39)
1.0CLI ringer (p. 39)
2.1Language (p. 40)
2.2Back light (p. 40)
2.3Display contrast (p. 40)
2.4Keypad lock (p. 41)
2.5Babysit mode (p. 41)
2.6Base selection (p. 41)
2.7Registering handset (p. 41)
3.1Base ringer type (p. 42)
3.2Base ringer volume (p. 42)
3.3Set date & time (p. 42)
3.4Direct dial keys (p. 43)
3.5Registration mode (p. 43)
4.1Answer mode (p. 44)
4.2Record memo (p. 44)
4.3Personal OGM (p. 45)
4.4Record ringer (p. 45)
4.5Rings before answer (p. 46)
4.6Voice prompts (p. 46)
4.7Record quality (p. 46)
4.8Remote control (p. 46)
 5.1 Dial mode (p. 47)
5.2Network type (p. 47)
5.3Operator type (p. 47)
5.4Recall type (p. 48)
5.6View total time (p. 48)
5.7Music on hold (p. 48)
5.8Pause insertion (p. 48)
5.9Automatic prefix (p. 48)
5.0Prefix setup (p. 48)
6.1Call barring (p. 49)
6.2Prefixes (p. 49)
6.3Pin code protection (p. 49)
6.4Change Pin code (p. 50)

|
|
|
Contents |
|
SECURITY ......................................................................................... |
|
|
|
8 |
Security information ................................................................................. |
|
|
|
8 |
Power connection ..................................................................................... |
|
|
|
8 |
Telephone connection .............................................................................. |
|
|
|
8 |
Environmental protection ......................................................................... |
|
|
|
8 |
INSTALLATION ............................................................................... |
|
|
|
9 |
Choosing the location of the charging unit and base station .................... |
9 |
|||
Installing the charging unit on a level surface |
................................................ |
9 |
||
Wall mounting the charging unit |
.................................................................... |
|
|
9 |
Installing the base station ............................................................................... |
|
|
|
9 |
Installing or replacing batteries .............................................................. |
|
|
|
10 |
Power supply .......................................................................................... |
|
|
|
10 |
Charging and discharging batteries ........................................................ |
|
|
10 |
|
Test ......................................................................................................... |
|
|
|
10 |
USING THE TELEPHONE ............................................................ |
|
|
|
11 |
Operating in "standby mode" ................................................................. |
|
|
|
11 |
Making a call from the handset .............................................................. |
|
|
|
12 |
Making a call from the Zenia Voice 6326 base station .......................... |
13 |
|||
Dialling a number using the |
to |
direct dial keys.............................. |
13 |
|
Dialling an emergency number using the |
key ....................................... |
13 |
||
Making a call from the Zenia Voice 6626 base station .......................... |
14 |
|||
Answering a call from the handset ......................................................... |
|
|
14 |
|
Redial list ................................................................................................ |
|
|
|
15 |
Purpose ......................................................................................................... |
|
|
|
15 |
Viewing the redial list .................................................................................. |
|
|
|
15 |
Deleting an entry .......................................................................................... |
|
|
|
16 |
Storing an entry ............................................................................................ |
|
|
|
17 |
Answering a call from the base station (6326 and Voice 6626) ............ |
18 |
|||
Adjusting handset or base station volume during a call ......................... |
18 |
|||
Switching on loudspeakers from the handset |
......................................... |
18 |
||
Putting an incoming call on hold ............................................................ |
|
|
|
19 |
Recording a conversation from the Zenia Voice 6626 handset only .....19 |
||||
Call log ................................................................................................... |
|
|
|
20 |
Identifying the caller ..................................................................................... |
|
|
|
20 |
Call log function ........................................................................................... |
|
|
|
20 |
Viewing the list of unanswered calls ............................................................ |
|
|
20 |
|
Viewing the call log ...................................................................................... |
|
|
|
20 |
Deleting an entry from the call log ............................................................... |
|
|
21 |
|
Storing an entry from the call log ................................................................. |
|
|
22 |
|
Contents |
1 |

Private and shared phonebooks .............................................................. |
23 |
Storing your callers telephone numbers ....................................................... |
23 |
Viewing a phonebook entry .......................................................................... |
24 |
Making a call ................................................................................................ |
24 |
Deleting an entry from a phonebook ............................................................ |
24 |
Modifying a phonebook entry ...................................................................... |
25 |
Voice dial (Zenia Voice 6626) ............................................................... |
25 |
Recording voice dial ..................................................................................... |
25 |
Making a call via voice dial .......................................................................... |
26 |
Listening to a voice dial ............................................................................... |
27 |
Deleting a voice dial ..................................................................................... |
27 |
USING THE INTERCOM .............................................................. |
28 |
Making an internal call (intercom) ......................................................... |
28 |
From the handset .......................................................................................... |
28 |
From the base station .................................................................................... |
28 |
Transferring an external call to another handset .................................... |
29 |
From the base station .................................................................................... |
29 |
From the handset .......................................................................................... |
29 |
Answering an internal call ..................................................................... |
30 |
Starting a conference call ....................................................................... |
30 |
Selecting the room monitor (Babysit mode) .......................................... |
30 |
USING THE ANSWER PHONE |
|
(ZENIA VOICE 6626 ONLY) ......................................................... |
31 |
Using the answer phone from the handset ............................................. |
31 |
Switching the answer phone on or off .......................................................... |
31 |
Screening and intercepting incoming calls .................................................. |
32 |
Listening to messages received .................................................................... |
32 |
Deleting a message received ........................................................................ |
33 |
Using the answer phone from the base station ....................................... |
33 |
Switching the answer phone on or off .......................................................... |
33 |
Screening and intercepting incoming calls ................................................... |
33 |
Listening to messages received .................................................................... |
34 |
Deleting a message ....................................................................................... |
34 |
Deleting all messages ................................................................................... |
34 |
Recording a personal OGM .......................................................................... |
34 |
Recording a memo (local message) .............................................................. |
35 |
Remote control of the answer phone ...................................................... |
35 |
Checking messages remotely ................................................................. |
35 |
2 |
Contents |

SYSTEM CONFIGURATION ........................................................ |
36 |
|
Overview of the configuration menu ..................................................... |
36 |
|
Settings ........................................................................................................ |
36 |
|
Using keypad shortcuts ................................................................................ |
37 |
|
Handset sound settings ........................................................................... |
38 |
|
1.1 |
Earpiece volume .................................................................................... |
38 |
1.2 |
Loudspeaker volume .............................................................................. |
38 |
1.3 |
Headset volume ..................................................................................... |
39 |
1.4 |
Ringer type ............................................................................................ |
39 |
1.5 |
Ringer volume ....................................................................................... |
39 |
1.6 |
Switching key tones on/off .................................................................... |
39 |
1.7 |
Earpiece tone ......................................................................................... |
39 |
1.8 |
Loudspeaker tone ................................................................................... |
39 |
1.9 |
Headset tone ........................................................................................... |
39 |
1.0 |
CLI ringer (with caller identification) ................................................... |
39 |
Handset settings ...................................................................................... |
40 |
|
2.1 |
Selecting a language .............................................................................. |
40 |
2.2 |
Switching the screen back light on ........................................................ |
40 |
2.3 |
Display contrast ..................................................................................... |
40 |
2.4 |
Locking and unlocking the keypad ........................................................ |
41 |
2.5 |
Selecting the Babysit mode ................................................................... |
41 |
2.6 |
Selecting the base station ....................................................................... |
41 |
2.7 |
Registering a handset to a base station .................................................. |
41 |
Base settings ........................................................................................... |
42 |
|
3.1 |
Selecting the ringer type (base station) .................................................. |
42 |
3.2 |
Adjusting the ringer volume (base station) ............................................ |
42 |
3.3 |
Setting date and time ............................................................................. |
42 |
3.4 |
Storing direct dial keys (6326 base station only) ................................... |
43 |
3.5 |
Putting the base station into registration mode ...................................... |
43 |
Answer phone settings (Zenia Voice 6626) ........................................... |
44 |
|
4.1 |
Selecting the answer mode .................................................................... |
44 |
4.2 |
Recording a memo (local message) ....................................................... |
44 |
4.3 |
Recording a personal OGM ................................................................... |
45 |
4.4 |
Recording a personal ringer (Zenia Voice 6626 only) .......................... |
45 |
4.5 |
Modifying the number of rings before answer ...................................... |
46 |
4.6 |
Activating/ deactivating voice prompts ................................................. |
46 |
4.7 |
Record quality ........................................................................................ |
46 |
4.8 |
Switching remote control on .................................................................. |
46 |
Line settings ........................................................................................... |
47 |
|
5.1 |
Selecting the dial mode .......................................................................... |
47 |
5.2 |
Selecting the network type ..................................................................... |
47 |
5.3 |
Selecting the operator type .................................................................... |
47 |
5.4 |
Selecting flash time ................................................................................ |
48 |
5.6 |
Displaying/deleting total time for your calls ......................................... |
48 |
Contents |
3 |

5.7 |
Switching music on hold on/off ............................................................. |
48 |
5.8 |
Inserting a pause between digits ............................................................. |
48 |
5.9 |
Automatically inserting a prefix ............................................................. |
48 |
5.0 |
Setting up prefixes .................................................................................. |
48 |
Security .................................................................................................. |
49 |
|
6.1 |
Setting call barring ................................................................................. |
49 |
6.2 |
Setting forbidden prefixes ...................................................................... |
49 |
6.3 |
Activating/ deactivating Pin code protection ......................................... |
49 |
6.4 |
Changing the Pin code ............................................................................ |
50 |
List of all handsets registered to the base station (RC code) ................. |
50 |
|
Renaming a handset ...................................................................................... |
50 |
|
Cancelling the registration of a handset to the base station .......................... |
50 |
|
List of network services ......................................................................... |
51 |
|
MAINTENANCE AND TROUBLESHOOTING .......................... |
52 |
|
Base station problems ............................................................................ |
52 |
|
Zenia 6326 and Zenia Voice 6626 base stations .......................................... |
52 |
|
Zenia 6326 base station ................................................................................ |
52 |
|
Zenia Voice 6626 base station ...................................................................... |
52 |
|
Zenia 6626 base station (continued) ............................................................ |
53 |
|
Problems with the handset ..................................................................... |
54 |
|
Maintenance ........................................................................................... |
55 |
|
Handset indicators .................................................................................. |
56 |
|
Base station indicators ........................................................................... |
56 |
|
Character table ....................................................................................... |
56 |
|
PERSONAL NOTES ....................................................................... |
57 |
|
INDEX |
............................................................................................. |
58 |
4 |
Contents |

Zenia 6326 base station
Loudspeaker

 Volume control keys
Internal call |
External call key |
key |
|
 On/off and busy
base station
indicator
Microphone
 to
to  keys: direct dial keys
Zenia Voice 6626 base station
|
Loudspeaker |
|
Answer phone |
Message |
|
indicator |
||
indicator |
||
|
||
|
Volume control |
|
Memo record |
keys |
|
|
||
key |
External call key |
|
|
||
Internal call |
On/off and busy |
|
key |
||
base station |
||
|
||
Microphone |
indicator |
|
|
Dial keys and answer phone controls
With a view to improving products and services, Philips reserves the right to modify the specifications mentioned in this publication, at any time and without notice
Copyright ã Philips 2000 - All rights reserved
Base station |
5 |

Handset overview
KEYS |
DESCRIPTION |
• Carries out operation displayed on the last line of the screen.
• Makes, accepts or ends a call.
•Cancels a character during input.
•Moves up one menu level.
•Enables you to use the "recall" function during a call.
•When pressed (for 2 seconds), returns to "standby mode", or
during input, deletes all characters of the line.
• Switches the handset or base station loudspeaker on or off.
• Also allows you to make and accept a call.
• During a conversation, increases volume level.
• Allows you to scroll through lists and menus to move around so that you can insert a character when entering a number or a name.
• When pressed (for 2 seconds), locks or unlocks keypad.
• Allows you to use keypad shortcuts for the configuration menu.
Overview of 6326 & 6626 base stations
KEYS |
6326 BASE STATION DESCRIPTION |
|
• Internal call key. |
to |
• Direct dial keys. |
|
• Emergency dial number. |
KEYS |
6626 BASE STATION DESCRIPTION |
|
• Makes, accepts or finishes a call. |
|
• Internal call key. |
|
• Repeat previous message. |
|
• Message play. |
|
• Play next message. |
|
• Record function. |
|
• Play personal OGM. |
|
• Delete message. |
|
• Activate answer phone. |
|
• Stop message play or record. |
|
• Deactivate answer phone. |
|
• Memo record function (local message). |
|
• Also allows you to use the "recall" function while in a call. |
6 |
Overview |
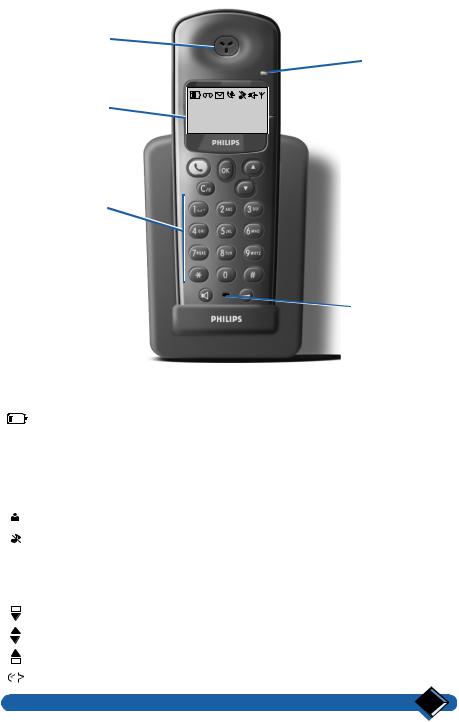
Handset on charging unit
Earpiece
Display
Alphanumeric
keypad
Incoming call or new messages indicator
|
|
|
10 MAY |
10:05 |
|
Philips 1
SHARED
Microphone
Overview of display screen
l E t
Displayed |
Indicates battery charge or discharge status. |
Displayed |
Answer phone is on. |
Flashing |
Answer phone is receiving or answering a call. |
Displayed |
Answer phone has messages. |
Flashing |
Answer phone has new messages. |
Displayed |
An external call is in progress. |
Flashing |
Answer phone is receiving or answering a call. |
|
An external call is coming in. |
Displayed |
An internal call is in progress. |
Flashing |
An internal call is coming. |
Displayed |
"Silent" mode is on. |
/ |
Displayed |
Handset loudspeaker is on. |
||
|
|
|
Flashing |
Base station loudspeaker is on. |
|
|
|
Displayed |
Link with base station is ok. |
A |
Not |
Handset is not registered to any base station. |
||
|
|
|
displayed |
Handset is out of reach of base station. |
|
|
|
Displayed |
The current entry is at the beginning of the list. |
|
|
|
||
|
|
|
||
|
|
|
Displayed |
The current entry is in the middle of the list. |
|
|
|
Displayed |
The current entry is at the end of the list. |
|
|
|
Displayed |
The selected entry of the shared phonebook is associated with a voice recognition |
|
|
|
signal. |
|
|
|
|
|
|
Handset |
7 |
Security
Your telephone features the most advanced technology for even greater ease and comfort of use.
Security information
For all countries, using this product is subject to approval by the authorities concerned. The wording of this approval appears on the label affixed to the back of the base station.
The  marking on the product certifies compliance with technical regulations applicable at the date of approval (including user safety and electromagnetic interference) in accordance with the following guidelines: 73/23/CEE, 89/336/CEE, 91/263/CEE and 93/68/CEE.
•Avoid all contact with liquids.
•In order to avoid all risk of electric shock, never try to open the handset or the base station. Leave repairs to our after-sales service.
•Avoid all contact between the battery load contacts and conductor items (keys, metal clips, jewelry, etc.).
Power connection
This product is designed for 230 V single-phase alternating current and is not suitable for IT facilities as defined in the EN 60-950 standard.
Mains supply is classified at dangerous voltage security level, as defined in the EN 60-950 standard.
This device can only be shut off completely by unplugging the power cable from the wall socket. The socket must be located near the device and easy to reach.
This device is not meant to operate in case of power failure. In order to call emergency services, please make sure that you always have access to a telephone not requiring power supply. If a power cut occurs while in a call, the telephone hangs up automatically and date and time may need resetting.
Telephone connection
Electric voltage of the telephone network corresponds to TNV-3 classification (Telecommunication Network Voltage), as defined in the EN 60-950 standard.
Environmental protection
Your telephone handset also benefits from the Philips EcoDesign program, which takes into account the relation between product and environment during its entire service life.
Please remember to observe the local regulations regarding the disposal of your packaging materials, exhausted batteries and old phone and where possible promote their recycling.
European agreement
"The equipment has been approved pursuant to Commission Decision 99/303/ EC for pan-European single terminal connection to the public switched telephone network (PSTN). However, due to differences between the individual PSTNs provided in different countries, the approval does not, of itself, give an unconditional assurance of successful operation on every PSTN network termination point.
In the event of problems, you should contact your equipment supplier in the first instance."
 : Product for use only in UK.
8 |
Security |

Installation
: "This equipment is not designed for making emergency telephony calls when the power fails. Alternative arrangements should be made for access to emergency services".
Choosing the location of the charging unit and base station
Place the charging unit near a 220 V/ 240 V - 50 Hz wall socket.
In order to reduce possible interference, do not place the charging unit and the base station at less than 50 cm from any other electronic equipment (telephone, TV set, computer, etc.).
The charging unit and the base station can be placed on a flat surface (desk) or wall mounted.
Do not install the charging unit:
•in a damp room,
•near a heat source,
•near obstacles, like thick walls or metallic structures.
Installing the charging unit on a level surface
•Plug the power cable into the charging unit.
•Place the charging unit on a level surface.
•Plug the power cable into a wall socket.
•Place the telephone handset on the charging unit.
 : Only use the power cable supplied with the device.
Wall mounting the charging unit
•Drill two holes into the wall, with vertical spacing of 65 mm, and insert the screws.
•Plug the power cable into the charging unit.
•Hang the charging unit on the screws.
•Plug the power cable into the wall socket.
•Place the telephone handset on the charging unit.
 : Only use the power cable supplied with the device.
Installing the base station
Make sure the wall socket is connected to the correct 220 V - 240 V mains voltage.
•Plug the power cable into the connector (base station symbol . . .), then into the wall socket.
•Plug the telephone cable into the connector (base station symbol t), then into the telephone wall socket.
Installation |
9 |
Installing or replacing batteries Power supply
Your telephone handset is powered by two rechargeable NiMh batteries, type AAA/ R03.
When replacing the batteries, please use the following model: PHILIPS MULTILIFE R03NM, or PANASONIC 650 mAh.
• Press the top of the battery compartment lid and slide it down.
• Insert new batteries according to the marking.
• Slide the lid back in place.
NiMh batteries must be disposed of in accordance with applicable waste disposal regulations.
: Never use non-rechargeable batteries, and only use recommended models.
The manufacturer disclaims responsibility if these recommendations are not followed.
Charging and discharging batteries
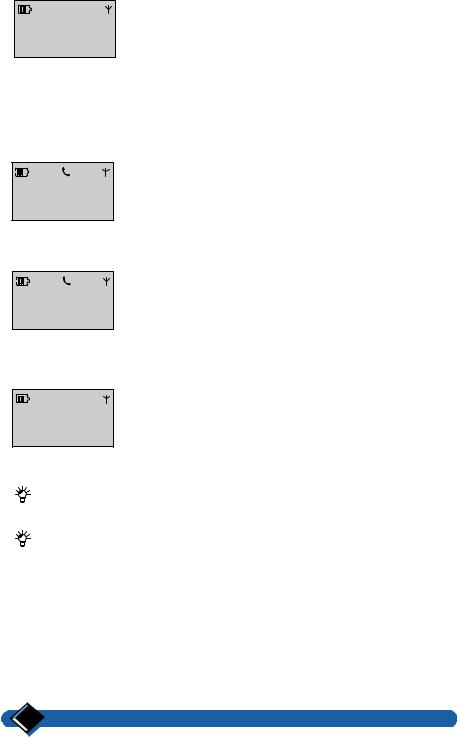
On first use or when new batteries have been inserted, charge the batteries for at least 12 hours. This precaution will prolong battery life.
A symbol located at the top of the display will appear permanently to indicate the battery charging status.
Each bar of the  symbol represents about 1/3 of maximum charging capacity. While the batteries are being charged, the charge indicator
  flashes and shows the following symbols in sequence


 . When the
  symbol is displayed, the batteries are fully charged.
: The charging status indicator is only relevant after the first charging cycle has been completed.
: After a complete discharge of the batteries, the symbol only appears after a few minutes of charge.
If the  symbol is displayed, batteries need charging. During a call, the handset switches off after a few minutes.
Test
When the handset and the base station have been installed, proceed as follows to make a call:
• Make sure the A symbol on the display is visible (if not, register the handset to the base station (see “2.7 Registering a handset to a base station”, page 41 ).
• Press the  key; the t symbol is displayed and you hear the tone.
•Dial a number; the figures appear on the display and the number is dialled automatically.
If a problem occurs during this test, check the battery charging status (see
“Charging and discharging batteries”, page 10 ), the charging unit and the connection of the base station to the telephone line and the wall socket.
10 |
Installation |

Using the telephone
Operating in "standby mode"
• Standby display:
|
|
|
|
|
|
10 MAY |
10:05 |
|
|
|
Philips 1 |
|
|
SHARED |
|
|
|
• "Standby mode" is the starting point for all other operations.
To choose a function from this mode, press the appropriate scroll keys  or
or  , as many times as required, in order to view the various menus which you have access to.
The following menus are at your disposal:
• "SHARED" (Shared phonebook),
• "PRV PHONEBK" (Handset phonebook),
• "INTERCOM" |
(Internal list), |
• "SERVICES" |
(List of services), |
• "SETTINGS" |
(Configuration), |
• "CALL LOG" |
(List of incoming calls), |
• "REDIAL" |
(List of outgoing calls). |
The selected menu is displayed on the last line of the screen.
To view one of these menus, press the  key, the initial screen of the selected menu is displayed.
To go back to "standby mode", press the  key for 2 seconds.
Using the telephone |
11 |
Making a call from the handset
PREDIAL 012345
RECORD
From "standby mode", dial the number on the keypad (up to 26 digits).
The dialled number is displayed on two lines as you enter the digits.
To correct an error:
•move the cursor using the scroll arrows  or
or  ,
,
•use the  key to delete a character in front of the cursor,
•pressing this key for 2 seconds deletes the whole line.
CALL...
0123456789
REDIAL
EXTERNAL LINE |
|
Time |
0’13 |
HOLD
END OF CALL |
|
Time |
5’30 |
VIEW TOTALS
Press the  key.
key.
The t symbol is displayed at the top of the screen.
The number is dialled automatically and the display shows:
•the indication "Call",
•the number called.
Within 10 seconds, the duration of the call will be displayed. Use the  key to put an external line on hold, (see “Putting an incoming call on hold”, page 19).
To hang up, press the  key again.
The display shows:
•the message "END OF CALL",
•the total duration of the call.
To find out about the total duration of your calls, press the
 key.
key.
Within 4 seconds, the handset reverts to "standby mode".
:You can also press the  key to answer a call and simultaneously switch on the handset loudspeaker. To hang up, press the
  key again.
:It is also possible to make a call by pressing the  , key before dialling the number.
12 |
Using the telephone |

Making a call from the Zenia Voice 6326 base station
The handsfree speakerphone allows calls to be made or accepted without using a handset .
Dialling a number using the  to
to  direct dial keys
To use these keys you must have previously stored the numbers (see “3.4 Storing direct dial keys (6326 base station only)”, page 43).
Press the  key.
key.
The green light starts flashing and you hear the dial tone.
Press one of the direct dial keys  to
to  .
.
The number corresponding to the selected key is dialled automatically. The loudspeaker on the base station amplifies the sound.
You can adjust the loudspeaker volume with the  (increase) or
  (decrease) keys.
To hang up, press the  key again.
The green light stops flashing.
Dialling an emergency number using the  key
key
First of all, the emergency number must have been entered using the telephone handset (see “3.4 Storing direct dial keys (6326 base station only)”, page 43).
Press the  key.
key.
The emergency number is dialled automatically. The green light starts flashing and you hear the dial tone.
The loudspeaker and the microphone of the base station are switched on automatically.
You can adjust the loudspeaker volume with the |
(increase) or |
(decrease) |
keys. |
|
|
To hang up, press the  key again.
The green light stops flashing.
Using the telephone |
13 |

Making a call from the Zenia Voice 6626 base station
Press the  key.
key.
The green light starts flashing and you hear the dial tone.
Dial the number using keys  to
to  on the keypad.
The number is dialled automatically.
The loudspeaker and the microphone of the base station are switched on automatically. Speak in the direction of the microphone.
You can adjust the loudspeaker volume using the  (increase) or (decrease) keys.
To hang up, press the  key again.
The green light stops flashing.
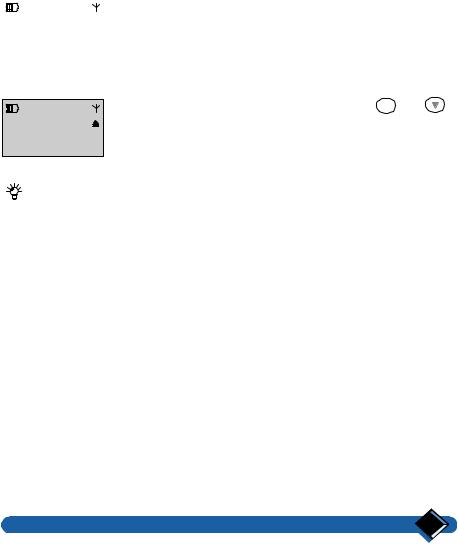
Answering a call from the handset
When an incoming call is received, the handset rings. The green light and the t symbol flash.
|
|
|
|
|
|
|
|
|
|
|
|
|
|
|
|
|
|
|
|
RINGING |
|
RINGING |
|
|
|
||||
|
|
RINGING |
|||||||
|
|
|
|
|
01712345678 |
|
SMITH |
||
|
|
|
|
|
|
||||
|
SILENCE |
|
|
SILENCE |
|
01712345678 |
|||
|
|
|
|
|
SILENCE |
||||
|
|
|
|
|
|
|
|
|
|
: You can stop the handset from ringing without answering the call by pressing the 
 key. Your base station will continue ringing and the
  symbol appears.
: If the network supplies the caller's number, it appears on the screen. Also, the name is shown if it is stored in one of the phonebooks.
To answer the call, press the  key. The t symbol stops flashing.
: You can also press the  key to answer the call and switch on the handset loudspeaker simultaneously.
To hang up, press the  key again.
 : Caller indentification is subject to network selection.
14 |
Using the telephone |
Redial list
Purpose
Your ZENIA telephone stores the telephone numbers of the last 10 external calls that you have made from the handset.
You can view the list, call back your callers directly from the list, or you can modify it.
You can also store the telephone number in the shared or private phonebook.
Viewing the redial list
You can view the external call.
|
|
|
|
|
|
10 MAY |
10:05 |
|
|
|
Philips 1 |
|
|
REDIAL |
list of outgoing calls when in "standby mode" or during an
From "standby mode", press the scroll keys  to go to the "REDIAL" menu (Redial list).
The indication "REDIAL" appears on the last line of the display.
Validate by pressing the  key.
key.
The first entry in the redial list appears on the screen.
REDIAL LIST 06543210
To scroll through the list, press the scroll keys  and as many times as required.
OPTIONS
:You can directly dial the telephone number corresponding to the entry viewed by pressing the  key.
key.
Using the telephone |
15 |
Deleting an entry
|
|
|
|
From "standby mode", go to the redial list. |
|
|
|
|
|
|
|
|
|
|
10 MAY |
Philips 1 |
10:50 |
The entry corresponding to the last call is displayed. |
|
|
|
|
||
|
|
|
|
|
|
|
REDIAL |
|
|
|
Scroll through the list by pressing the scroll keys |
and |
|||
REDIAL LIST |
as many times as required. |
|
|
||
The entry to be deleted is displayed. |
|
||||
06543210 |
|
||||
OPTIONS |
Press the |
key. |
|
|
|
|
Using the scroll keys |
and |
, select the "Delete" option |
||
|
to delete the currently displayed entry. |
|
|||
REDIAL LIST |
The selected option is displayed. |
|
|
||
Delete |
|
|
|||
SELECT |
Validate by pressing the |
key. |
|
|
|
REDIAL LIST |
A validation beep is heard and the "Deleted!" prompt is |
||||
Deleted! |
displayed. |
|
|
|
|
The current entry is deleted and the next one is displayed.
16 |
Using the telephone |
Storing an entry
From "standby mode", go to the redial list.
The entry corresponding to the last outgoing call made is displayed.
REDIAL LIST 01712345678
OPTIONS
REDIAL LIST
Store
SELECT
ENTER NAME:
RECORD
Scroll through the list by pressing the scroll keys  and
and
 as many times as required.
The number to be stored is displayed.
Press the  key.
key.
Using the scroll keys  and
and  , select the "Store" option.
The selected option is displayed.
Press the  key.
key.
Use the keypad to enter a new name (maximum 14 characters).
Depending on the character to be entered, press the appropriate key once or several times (see “Character table”, page 56). Use the 
 key to delete the character in front of the cursor.
Press the  key to confirm the new name.
The handset prompts you to select the phonebook where you wish to store the telephone number.
SELECT LIST
Shared
SELECT
SHARED
Stored
Select the phonebook using the scroll keys  or (shared or private phonebook).
The selected phonebook is displayed on the second line of the display.
Press the  key to select phonebook selection.
The confirmation prompt "Stored" is displayed.
The handset goes back to the redial list.
Using the telephone |
17 |
Loading...