


Video Cassette Recorder
VR960BPH
Owner’s Manual
I m p o r t a n t !
Return your Warranty Registration Card within 10 days. See why inside.
Return your Warranty Registration card today to ensure you receive all the benefits you’re entitled to.
Once your PHILIPS purchase is registered, you’re eligible to receive all the privileges of owning a PHILIPS product. So complete and return the Warranty Registration Card enclosed with your purchase at once. And take advantage of these important benefits.
Warranty |
Owner |
Model |
|
Verification |
Confirmation |
Registration |
|
Registering your product within |
Your completed Warranty |
Returning your Warranty |
|
10 days confirms your right to |
|||
Registration Card serves as |
Registration Card right away |
||
maximum protection under the |
|||
verification of ownership in the |
guarantees you’ll receive all |
||
terms and conditions of your |
|||
event of product theft or loss. |
the information and special |
||
PHILIPS warranty. |
|||
|
offers which you qualify for |
||
|
|
||
|
|
as the owner of your model. |
|
|
|
|
Congratulations on your purchase, and welcome to the “family!”
|
|
|
T |
I O N |
N |
E |
|
|
|||
|
|
R |
A |
|
|
|
|
|
|
|
|
|
|
|
|
|
|
|
|
D |
|||
|
|
|
|
|
|
|
|
|
E |
|
|
S |
T |
YHurry!IH |
E |
||||||||
I |
|
|
|
|
|
|
|
|
|
||
|
|
|
|
|
|
|
|
|
|
D |
|
G |
|
|
|
|
|
|
|
|
|
|
|
|
|
|
|
|
|
|
|
|
|
W |
|
R |
|
|
|
|
|
|
|
|
|
||
E |
|
|
|
|
|
|
|
|
|
|
|
|
|
|
|
|
|
|
|
|
|
T |
I |
|
S |
|
|
|
|
|
|
|
|||
|
|
|
A |
D |
0 |
1 |
N |
|
|
||
|
|
|
|
|
|
|
|
||||
Dear PHILIPS product owner:
Thank you for your confidence in PHILIPS. You’ve selected one of the best-built, best-backed products available today. And we’ll do everything in our power to keep you happy with your purchase for many years to come.
As a member of the PHILIPS “family,” you’re entitled to protection by one of the most comprehensive warranties and outstanding service networks in the industry.
What’s more, your purchase guarantees you’ll receive all the information and special offers for which you qualify, plus easy access to accessories from our convenient home shopping network.
And most importantly you can count on our uncompromising commitment to your total satisfaction.
All of this is our way of saying welcome-and thanks for investing in a PHILIPS product.
 Sincerely,
Robert Minkhorst
President and Chief Executive Officer
P.S. Remember, to get the most from your PHILIPS product, you must return your Warranty Registration Card within 10 days. So please mail it to us right now!
Know these
safetysymbols
CAUTION
RISK OF ELECTRIC SHOCK
DO NOT OPEN
CAUTION: TO REDUCE THE RISK OF ELECTRIC SHOCK, DO NOT REMOVE COVER (OR BACK). NO USER-SERVICEABLE PARTS INSIDE. REFER SERVICING TO QUALIFIED SERVICE PERSONNEL.
This “bolt of lightning” indicates uninsulated material within your unit may cause an electrical shock.
For the safety of everyone in your household, please do not remove product covering.
The “exclamation point” calls  attention to features for which you should read the enclosed literature closely to prevent operating and
maintenance problems.
WARNING: TO PREVENT FIRE OR SHOCK HAZARD, DO NOT EXPOSE THIS EQUIPMENT TO RAIN OR MOISTURE.
CAUTION: To prevent electric shock, match wide blade of plug to wide slot, and fully insert.
ATTENTION: Pour éviter les choc électriques, introduire la lame la plus large de la fiche dans la borne correspondante de la prise et pousser jusqu’au fond.
For Customer Use
Enter below the Serial No. which is located on the rear of the cabinet. Retain this information for future reference.
Model No. ______________
Serial No. ______________
Visit our World Wide Web Site at http://www.philips.com
Introduction 3
Welcome to your VCR owner’s manual.
This manual has seven sections: Setting Up Your VCR; Description of Controls; Basic Operations; Recording; Playing; Additional Features; and Information You May Need. The instructions explain all of the VCR’s features, which are listed below.
Features
•Automatic Channel Setup
•Automatic Clock Setting
•Automatic Head Cleaner/Head Cleaning Warning
•Blue Background
•Child Lock
•Controller for Cable Box or Direct Broadcasting System (DBS)
•Daylight-Savings Time
•Digital Studio Picture Control (DSPC)
•Hi-Fi Stereo Tape Playback
•Index Search
•Multi-Channel Television Sound (MTS) System
•19 Micron Head
•On-Screen Menus in English, Spanish, or French
•Program Overlap Warning
•Quick Programming
•Record End Search
•Record Link
•Remote Control with Capability to Operate TV, Cable Box, and Direct Broadcast System (DBS)
•Repeat Play
•S-VHS ET
•S-VHS Recording
•ShowGuardTM-Indefinite Timer Recording Memory
•Skip Search
•SmartPictureTM
•Turbo Timer
•VCR Plus+ Programming System
•Video Stabilizer
Safety Precautions
Warning: To prevent fire or shock hazard, do not expose this equipment to rain or moisture.
Federal Communications Commission (FCC) Warning: Any unauthorized changes or modifications to this equipment void the user’s authority to operate it.
This VCR, equipped with a High Quality (HQ) System, is compatible with existing Video Home System (VHS) equipment. Philips Consumer Electronics recommends that you use only video cassette tapes that are labelled with the 


 mark or the S-VHS mark. The use of other tapes may result in poor picture quality and excessive deposits on the video heads, which may not be covered by the warranty if damage occurs.
Note to the Cable TV System Installer: This reminder is provided to call the Cable TV system installer’s attention to Article 820-40 of the National Electrical Code, which provides guidelines for proper grounding – in particular, specifying that the cable ground shall be connected to the grounding system of the building, as close to the point of cable entry as possible.
Declaration of Conformity
Model Number: VR960BPH Trade Name: Philips
Responsible Party: Philips Consumer Electronics P.O. Box 14810
Knoxville, TN 37914-1810 (865) 521-4316
The ENERGY STAR® name and logo are registered marks of the U.S. Environmental Protection Agency. As an ENERGY STAR® Partner, Philips Consumer Electronics has determined that this product meets
the ENERGY STAR® guidelines for energy efficiency.
SmartPicture and ShowGuard are trademarks of Philips Consumer Electronics. VCR Plus+C3 and PlusCode are registered trademarks of Gemstar Development Corporation. The VCR Plus+ system is manufactured under license from Gemstar Development Corporation.
Copyright 2000 Philips Consumer Electronics. All rights reserved.
Helpful Hint
•Your new product, its packaging, and this manual contain materials that can be recycled and reused. Specialized companies can recycle your product to increase the amount of reusable materials and to minimize the amount that needs to be properly disposed.
Your product uses batteries that should not be thrown away when depleted but should be disposed of as small chemical waste. Please find out about the local regulations on disposal of your old products, batteries, manual, and packaging whenever you replace existing equipment.

4 Table of Contents |
|
Setting Up Your VCR |
|
Introduction . . . . . . . . . . . . . . . . . . . . . . . . . . . . . . . . . . . . . . . . . . . . . . . . . . . |
. . . .3 |
Table of Contents . . . . . . . . . . . . . . . . . . . . . . . . . . . . . . . . . . . . . . . . . . . . . . . |
. . . .4 |
Before Using Your VCR . . . . . . . . . . . . . . . . . . . . . . . . . . . . . . . . . . . . . . . . . . |
. . . .5 |
Hookups without a Cable Box . . . . . . . . . . . . . . . . . . . . . . . . . . . . . . . . . . . . . . |
. .6-7 |
Hookups with a Cable Box/Direct Broadcast System . . . . . . . . . . . . . . . . . . . . . |
. .8-9 |
Turning on Your VCR . . . . . . . . . . . . . . . . . . . . . . . . . . . . . . . . . . . . . . . . . . . . . |
10-11 |
Automatic Channel Setup . . . . . . . . . . . . . . . . . . . . . . . . . . . . . . . . . . . . . . . . . . |
12-13 |
Setting the Clock . . . . . . . . . . . . . . . . . . . . . . . . . . . . . . . . . . . . . . . . . . . . . . . . |
14-18 |
Daylight-Savings Time . . . . . . . . . . . . . . . . . . . . . . . . . . . . . . . . . . . . . . . . . . . . |
. . .19 |
Language Selection . . . . . . . . . . . . . . . . . . . . . . . . . . . . . . . . . . . . . . . . . . . . . . . |
. . .20 |
Description of Controls |
|
Display Panel . . . . . . . . . . . . . . . . . . . . . . . . . . . . . . . . . . . . . . . . . . . . . . . . . . . |
. . .21 |
Front Panel . . . . . . . . . . . . . . . . . . . . . . . . . . . . . . . . . . . . . . . . . . . . . . . . . . . . |
. . .22 |
Rear Panel . . . . . . . . . . . . . . . . . . . . . . . . . . . . . . . . . . . . . . . . . . . . . . . . . . . . |
. . .23 |
Remote Control Buttons . . . . . . . . . . . . . . . . . . . . . . . . . . . . . . . . . . . . . . . . . . |
24-25 |
On-Screen Status Displays . . . . . . . . . . . . . . . . . . . . . . . . . . . . . . . . . . . . . . . . . |
. . .26 |
Setting the Remote Control to Operate a TV . . . . . . . . . . . . . . . . . . . . . . . . . . |
. . .27 |
Setting the Remote Control to Operate a Cable Box/DBS . . . . . . . . . . . . . . . . |
. . .28 |
Basic Operations |
|
Playing . . . . . . . . . . . . . . . . . . . . . . . . . . . . . . . . . . . . . . . . . . . . . . . . . . . . . . . . |
. . .29 |
Recording . . . . . . . . . . . . . . . . . . . . . . . . . . . . . . . . . . . . . . . . . . . . . . . . . . . . . |
. . .30 |
Recording |
|
S-VHS Recording . . . . . . . . . . . . . . . . . . . . . . . . . . . . . . . . . . . . . . . . . . . . . . . |
. . .31 |
S-VHS ET . . . . . . . . . . . . . . . . . . . . . . . . . . . . . . . . . . . . . . . . . . . . . . . . . . . . . |
. . .32 |
Recording One Channel/Watching Another . . . . . . . . . . . . . . . . . . . . . . . . . . . |
. . .33 |
One-Touch Recording . . . . . . . . . . . . . . . . . . . . . . . . . . . . . . . . . . . . . . . . . . . . |
. . .34 |
Record Link . . . . . . . . . . . . . . . . . . . . . . . . . . . . . . . . . . . . . . . . . . . . . . . . . . . |
. . .35 |
Setting Up the VCR Plus+ Programming System . . . . . . . . . . . . . . . . . . . . . . . . . |
36-37 |
Timer Recording with the VCR Plus+ Programming System . . . . . . . . . . . . . . . . |
38-39 |
Quick Programming . . . . . . . . . . . . . . . . . . . . . . . . . . . . . . . . . . . . . . . . . . . . . . |
40-43 |
Turbo Timer . . . . . . . . . . . . . . . . . . . . . . . . . . . . . . . . . . . . . . . . . . . . . . . . . . . |
. . .44 |
Program Review . . . . . . . . . . . . . . . . . . . . . . . . . . . . . . . . . . . . . . . . . . . . . . . . |
. . .45 |
Program Overlap Warning . . . . . . . . . . . . . . . . . . . . . . . . . . . . . . . . . . . . . . . . . |
. . .46 |
Timer Recording Speed Setting . . . . . . . . . . . . . . . . . . . . . . . . . . . . . . . . . . . . . |
. . .47 |
Rerecording (Tape Duplication) . . . . . . . . . . . . . . . . . . . . . . . . . . . . . . . . . . . . . |
. . .48 |
Connecting the Controller . . . . . . . . . . . . . . . . . . . . . . . . . . . . . . . . . . . . . . . . |
. . .49 |
Setting the Controller to Operate a Cable Box . . . . . . . . . . . . . . . . . . . . . . . . . |
50-51 |
Setting the Controller to Operate a DBS . . . . . . . . . . . . . . . . . . . . . . . . . . . . . . |
52-53 |
Playing |
|
Multi-Channel Television Sound System . . . . . . . . . . . . . . . . . . . . . . . . . . . . . . . |
54-55 |
Hi-Fi Stereo Tape Playback . . . . . . . . . . . . . . . . . . . . . . . . . . . . . . . . . . . . . . . . |
. . .56 |
Video Stabilizer . . . . . . . . . . . . . . . . . . . . . . . . . . . . . . . . . . . . . . . . . . . . . . . . . |
. . .57 |
SmartPicture . . . . . . . . . . . . . . . . . . . . . . . . . . . . . . . . . . . . . . . . . . . . . . . . . . . |
. . .58 |
Digital Studio Picture Control . . . . . . . . . . . . . . . . . . . . . . . . . . . . . . . . . . . . . . |
. . .59 |
Search Options . . . . . . . . . . . . . . . . . . . . . . . . . . . . . . . . . . . . . . . . . . . . . . . . . |
. . .60 |
Playback Options . . . . . . . . . . . . . . . . . . . . . . . . . . . . . . . . . . . . . . . . . . . . . . . . |
. . .61 |
Additional Features |
|
Child Lock . . . . . . . . . . . . . . . . . . . . . . . . . . . . . . . . . . . . . . . . . . . . . . . . . . . . . |
. . .62 |
Blue Background . . . . . . . . . . . . . . . . . . . . . . . . . . . . . . . . . . . . . . . . . . . . . . . . |
. . .63 |
Automatic Operation Features . . . . . . . . . . . . . . . . . . . . . . . . . . . . . . . . . . . . . |
. . .64 |
Information You May Need |
|
Glossary . . . . . . . . . . . . . . . . . . . . . . . . . . . . . . . . . . . . . . . . . . . . . . . . . . . . . . |
. . .65 |
Helpful Hints . . . . . . . . . . . . . . . . . . . . . . . . . . . . . . . . . . . . . . . . . . . . . . . . . . . |
66-67 |
Limited Warranty . . . . . . . . . . . . . . . . . . . . . . . . . . . . . . . . . . . . . . . . . . . . . . . . |
68-69 |
Specifications . . . . . . . . . . . . . . . . . . . . . . . . . . . . . . . . . . . . . . . . . . . . . . . . . . . |
. . .70 |
Index . . . . . . . . . . . . . . . . . . . . . . . . . . . . . . . . . . . . . . . . . . . . . . . . . . . . . . . . . |
. . .71 |
Accessories . . . . . . . . . . . . . . . . . . . . . . . . . . . . . . . . . . . . . . . . . . . . . . . . . . . . |
. . .72 |

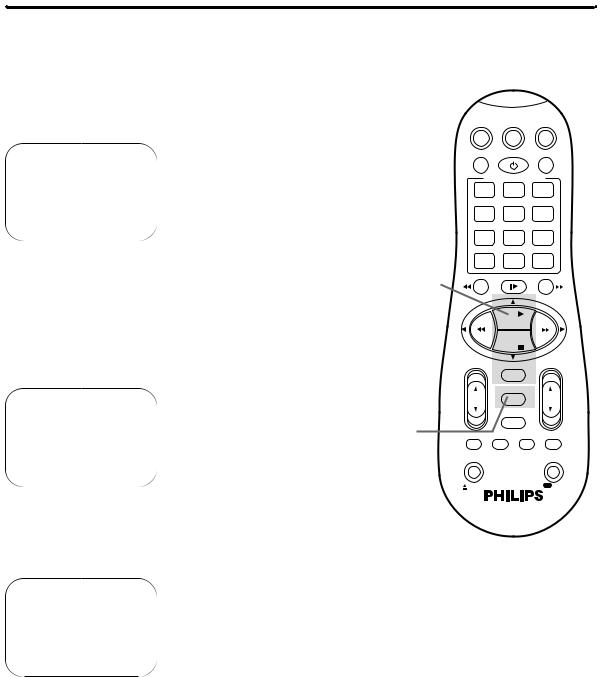
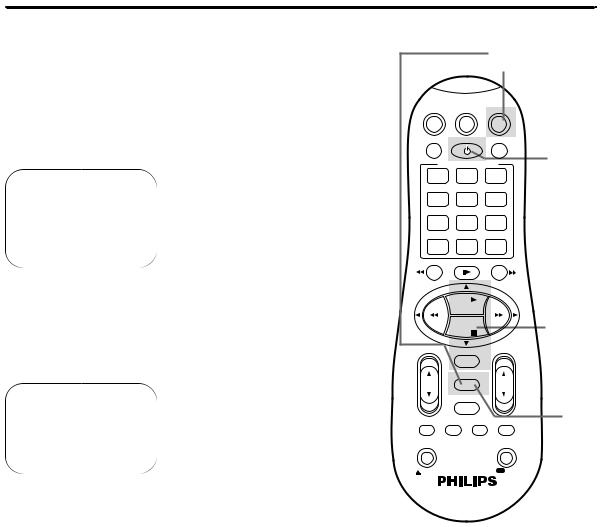
Putting Batteries in the Remote Control
1
To remove the battery compartment lid, push in the tab, then pull up the lid.
2
Place two AA batteries inside the battery compartment with their + and – ends aligned as indicated.
3
Replace the battery compartment lid.
Using the Remote Control
•Do not put objects between the remote control and the VCR.
•Point the remote control at the device you are operating.
•Press the VCR button before pressing other VCR buttons; press the TV button before pressing other TV buttons; press the CBL/DBS button before pressing other Cable Box/DBS buttons.
Details are on pages 24-25 and 27-28.
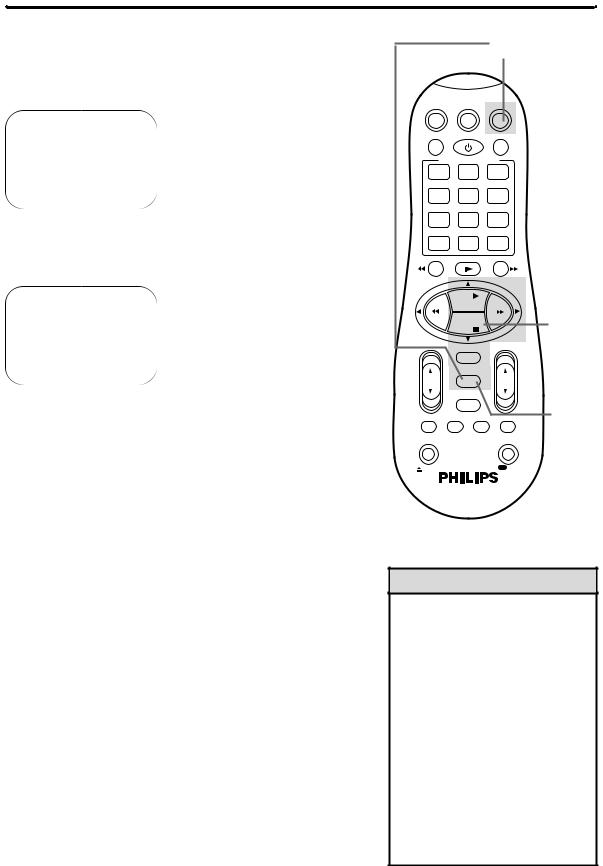
Erase Protection
Video cassettes have record tabs to ensure that recordings are not erased accidentally.
1
To prevent accidental erasure, break off the tab with a screwdriver.
2
To record again, cover the hole with cellophane tape.
VCR Maintenance/Video Head Cleaning
•Remove any light adhesive stick-on notes from the video cassette before putting the cassette in the VCR. Removable labels can jam the VCR.
•Periodic maintenance is required to maintain your VCR’s performance. Your VCR automatically cleans the video heads each time you insert a tape. However, the heads may become dirty. “USE CLEANING CASSETTE” may appear on the screen, or “U:01” may appear on the VCR display panel. Details are on page 67.
Before Using Your VCR 5
1
2
3
1
2
Helpful Hints
•The remote control and its batteries are supplied.
•Do not mix alkaline and manganese batteries.
•Do not mix old and new batteries.
•A thin, plastic cover may protect the front panel of your VCR. Before using the VCR, lift a corner of the plastic, then peel it off.

6 Hookups without a Cable Box
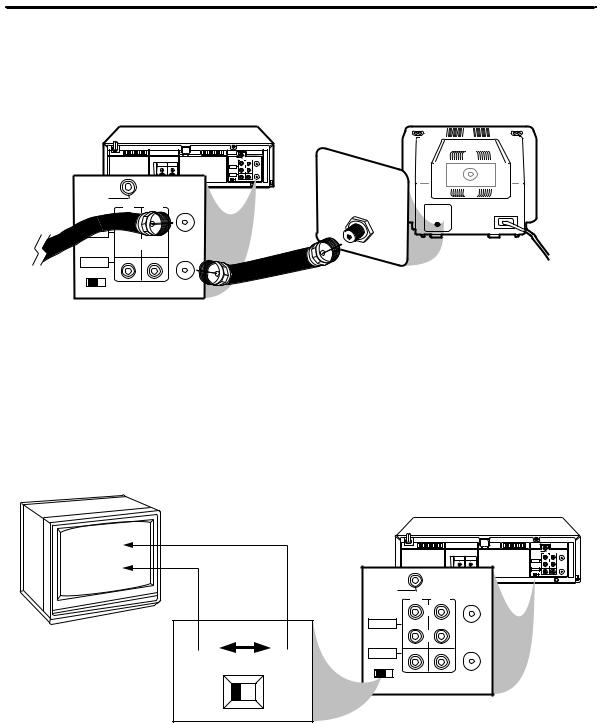
The basic VCR/TV connection – antenna/cable to VCR to TV – is shown below. If you have a Cable Box or a Direct Broadcast System, please refer to pages 8-9. After you hook up the VCR, please go to pages 10-11 to turn on the VCR.
1
Disconnect the antenna or cable from your TV.
Antenna
Indoor/Outdoor
(300 ohm)
75Ω |
|
ANT |
/ |
CABLE |
|
OR
Cable
(75 ohm)
75Ω ANT / CABLE
ANTENNA IN
Jack
(on back of TV)
2
Connect the antenna or cable to the ANT(enna) IN Jack on the back of the VCR.
Antenna
Indoor/Outdoor
(300 ohm)
UT |
CABLE |
IN OUT ANT.IN |
BOX |
|
|
R |
|
UT |
|
.IN |
OR |
AUDIO |
|
L |
|
RF OUT |
|
VIDEO |
|
CH3 CH4 |
Cable
(75 ohm)
Hookups without a Cable Box (cont’d) 7
3
Connect the RF coaxial cable (supplied) to the RF OUT Jack on the back of the VCR and to the ANTENNA IN Jack on the TV. (You may use either a snap-on type or screw-on type of coaxial cable, whichever you prefer. A snap-on type is supplied.)
|
|
CABLE |
IN |
OUT |
ANT.IN |
|
|
BOX |
|||
S |
IN |
OUT |
|
R |
|
|
AUDIO |
|
|
|
|
V |
|
|
|
L |
|
I |
|
|
|
RF OUT |
|
D |
|
|
|
|
Antenna |
CABLE |
IN OUT ANT.IN |
or Cable |
BOX |
|
|
|
 L
L 
RF OUT
VIDEO
CH3 CH4
|
75V |
|
|
|
|
||
|
AN |
/ |
|
|
C |
T |
|
|
AB |
|
|
|
|
LE |
|
|
Antenna In Jack |
|
RF coaxial cable |
(on back of TV) |
|
example only |
||
|
4
Plug in the TV and the VCR.
5
Set the CH3/CH4 switch on the back of the VCR to CH3 or CH4, whichever channel is not used or least used in your area. To operate your VCR with your TV, set the TV to the same channel. For example, when playing a tape, if the CH3/CH4 switch is set to CH3, the TV should be on channel 3.
H |
4 |
C |
|
or |
3 |
H |
|
C |
|
CH3 / CH4
Switch
CH3 CH4
6
|
|
|
|
CABLE |
IN |
OUT ANT.IN |
|
|
|
|
BOX |
||
|
|
S |
IN |
OUT |
R |
|
|
|
|
|
|||
|
|
|
AUDIO |
|
|
|
|
|
V |
|
|
L |
|
|
|
I |
|
|
RF OUT |
|
|
|
D |
|
|
|
|
|
|
E |
|
H4 |
|
|
|
|
O |
|
|
|
|
CABLE |
IN |
OUT |
ANT.IN |
|
|
|
BOX |
|
|
||||
|
|
R |
|
|
|
|
AUDIO |
|
|
|
|
|
|
|
|
L |
|
|
|
|
VIDEO |
|
|
RF OUT |
|
|
|
|
|
|
|
|
|
|
CH3 CH4 |
|
|
|
|
|
|
You are ready to turn on the VCR. Please go to pages 10-11 before turning on the VCR.
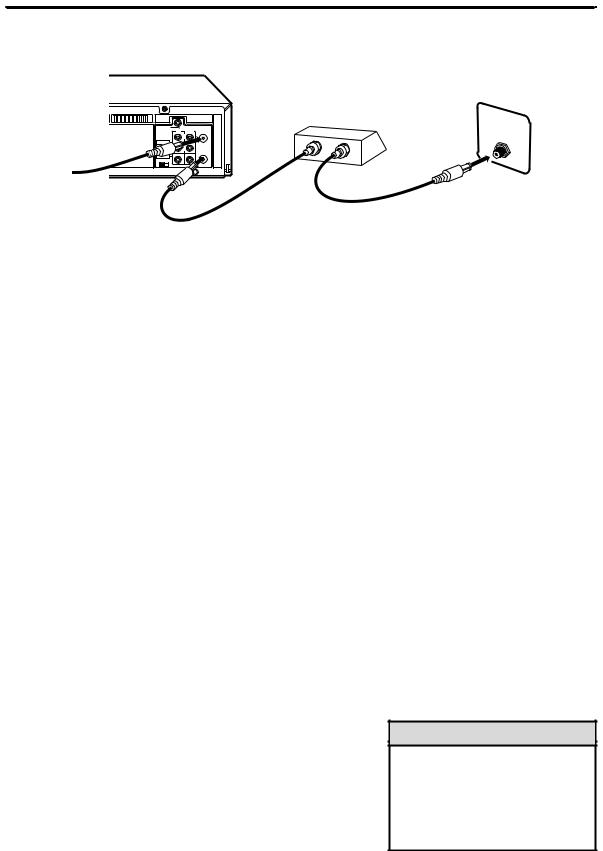
8 Hookups with a Cable Box/Direct Broadcast System
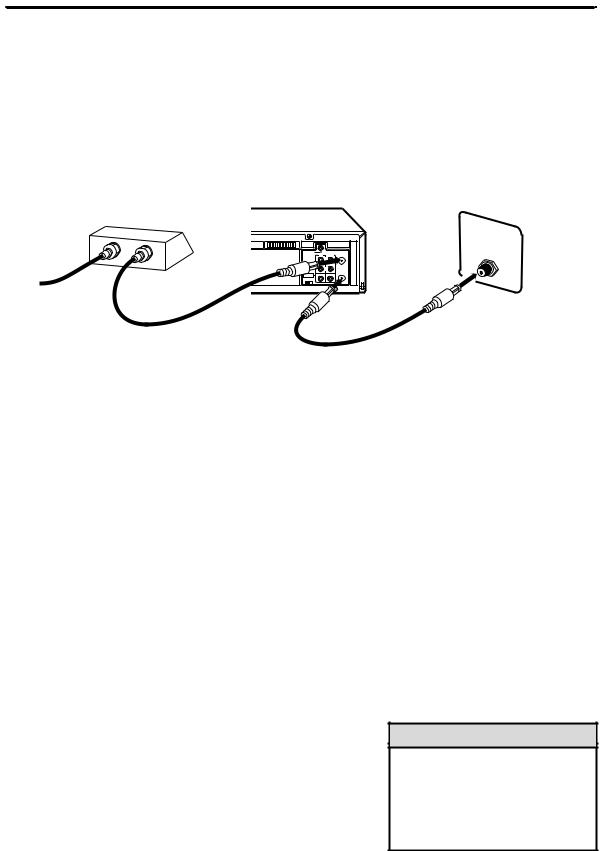
There are two ways to connect your Cable Box/DBS to the VCR. With this connection:
•You may view any channel.
•You must select channels at the Cable Box/DBS. Channels cannot be changed at the VCR.
•You may not view a channel other than the one you are recording.
•You may not set up channels at the VCR.
•You can only program a timer recording for one channel at a time if you are not using the Controller. Set the TV and the VCR to the Cable Box/DBS output channel (channel 03 or 04); set the CH3/CH4 switch to the same channel. Set your Cable Box/DBS to the channel you want to record. When you enter the channel you want to record in a timer recording, select channel 03 or 04 (the Cable Box/DBS output channel). (This is step 3 on page 40.) Leave the Cable Box/DBS on for a timer recording.
•To set up the Controller, see pages 49-53.
VCR
Cable Box/DBS
|
IN |
|
|
|
OUT |
CABLE |
|
|
|
||
1 |
|
BOX IN OUT ANT.IN |
|
S IN |
OUT |
||
V |
O |
||
L |
|||
I |
|||
|
D |
RF OUT |
|
|
E |
O |
|
|
O |
CH3 CH4 |
Cable signal
|
75Ω |
|
|
AN |
/ |
|
T |
|
|
CA |
|
|
BLE |
|
|
|
|
|
|
|
TV’s
ANTENNA IN jack
3RF coaxial cable
2RF coaxial cable
Connections
1
Connect a Cable signal to the IN jack on the Cable Box/DBS.
2
Use an RF coaxial cable (supplied) to connect the OUT jack on the Cable Box/DBS to the ANT(enna) IN jack on the VCR.
3
Use a second RF coaxial cable to connect the RF OUT jack on the VCR to the TV’s ANTENNA IN jack.
Recording/Viewing Any Channel
1
With the VCR on and in VCR position (the VCR light will appear on the display panel), use the CH(annel) 8/9 button to set the VCR to the Cable Box/DBS output channel (channel 03 or 04).
2
Set the TV to the same channel to which you set the VCR. Set the CH3/CH4 switch on the VCR to the same channel.
3
Select the channel you want to view/record at the Cable Box/DBS.
Helpful Hint
•If you are using Record Link, use audio and video cables to connect the AUDIO/VIDEO OUT jacks on the Cable Box/DBS to the AUDIO/VIDEO IN jacks on the back of the VCR. Details are on page 35.
Hookups with a Cable Box/Direct Broadcast System (cont’d) 9
With this connection:
•You may watch one channel while recording another.
•You may not record scrambled channels.
VCR
|
|
|
Cable Box/DBS |
|
|
|
|
|
|
CABLE |
IN OUT ANT.IN |
|
75Ω |
|
|
|
|
BOX |
|
|
|||
|
|
|
|
A |
|
|
|
|
IN OUT |
|
|
C |
NT |
/ |
|
|
|
IN |
A |
|
|||
S |
|
|
BLE |
||||
V |
|
|
OUT |
|
|
|
|
I |
|
|
L |
|
|
|
|
D |
|
|
RF OUT |
|
|
|
|
E |
|
CH3 CH4 |
|
|
|
|
|
O |
|
|
|
|
|
|
|
1Cable signal
3RF coaxial cable
2RF coaxial cable
Connections
1
Connect a Cable signal to the VCR’s ANT(enna) IN jack.
2
Use an RF coaxial cable (supplied) to connect the RF OUT jack on the VCR to the IN jack on the Cable Box/DBS.
3
Use a second RF coaxial cable to connect the OUT jack on the Cable Box/DBS to the TV’s ANTENNA IN jack.
Recording One Channel/Watching Another
1
Put the Cable Box/DBS on the same channel as the VCR’s CH3/CH4 switch. Set the TV to the Cable Box/DBS output channel (03 or 04).
Then, with the VCR in VCR position (the VCR light will appear on the display panel), use the CH(annel) 8/9 button to select the channel you want to record at the VCR. Start the recording.
TV’s
ANTENNA IN jack
2
Press the VCR/TV button once to put the VCR in TV position. (The VCR light will disappear.)
3
Select the channel you want to watch at the Cable Box/DBS.
Helpful Hint
•When you play a tape, make sure the Cable Box/DBS is set to the same channel as the CH3/CH4 switch on the VCR. Set the TV to the Cable Box/DBS output channel (03 or 04).
10 Turning on Your VCR
•Before turning on your VCR, make sure there are batteries in the remote control and the VCR, TV, and Cable Box/DBS (if applicable) are connected.
•The menus will continue to appear every time you turn on the VCR until you complete the steps on pages 10-11.
•If you want to set up the Controller now, you must first connect the Controller. See page 49 before continuing.
•Leave the Cable Box turned on if you plan to set up the Cable Box Controller now.
•If you plan to set up the Controller now, set the Cable Box to a channel other than channel 09.
•Read through these steps before you begin; the process will be easier if you familiarize yourself with this information before beginning.
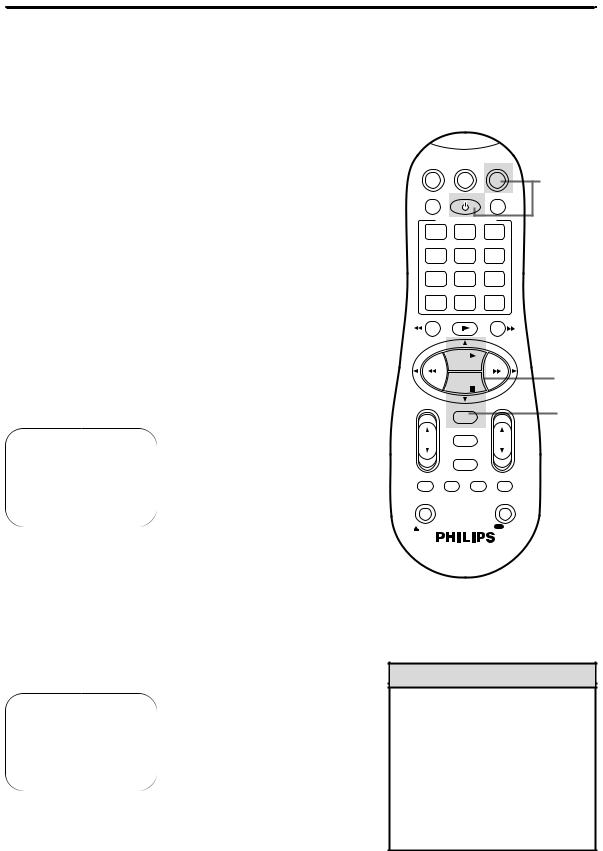
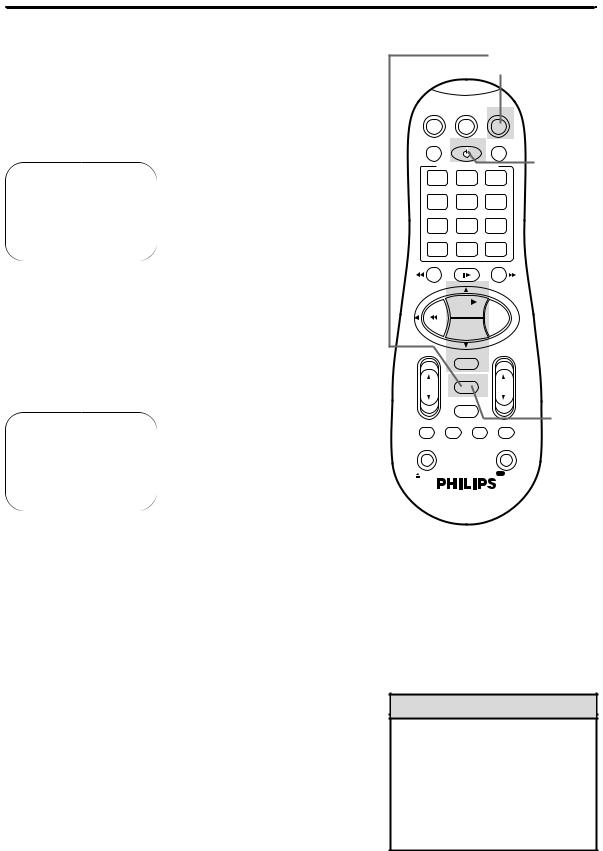
1
Press the VCR button, then press the POWER button.
2
Turn on the TV. Set it to channel 3 or 4, whichever channel the CH3/CH4 switch on the back of the VCR is set to (or your Cable Box/DBS output channel, if applicable). The menu shown below will appear.
ENGLISH ESPAÑOL FRANÇAIS
SELECT: 89 |
CONFIRM: OK |
END: MENU |
|
3
Press the PLAY 8 or STOP 9 button to select the language of the on-screen displays and menus.
2 Turn on the TV.
CBL / DBS |
|
TV |
|
|
|
VCR |
1 |
|||
|
VCR/TV |
|
|
POWER SMARTPICTURE |
||||||
|
QUICK PROGRAMMING |
|
||||||||
|
1 |
|
+ |
2 |
|
+ |
|
3 |
|
|
|
START |
............. |
STOP |
............. |
DATE |
|
||||
|
4 |
|
- |
5 |
|
- |
|
6 |
|
|
|
|
|
|
DAILY |
|
|
WEEKLY |
|
||
|
7 |
|
|
8 |
|
|
|
|
9 |
|
|
SPEED |
|
DBS |
|
|
|
|
|
||
|
ALT |
|
|
0 |
|
|
|
CLEAR |
|
|
|
|
|
STILL/SLOW |
|
|
|
||||
- |
.... |
|
|
..... |
... |
+ |
- |
|||
- .... |
|
|
|
|||||||
REW |
|
|
|
|
|
|
|
FF |
3 |
|
|
|
|
|
PLAY |
|
|
|
|
|
|
|
|
|
|
STOP |
|
|
|
|
||
|
VOL |
|
OK/STATUS |
|
CH |
4 |
||||
|
|
|
|
MENU |
|
|
|
|
||
|
|
|
|
TIMER |
|
|
|
|
|
|
TURBO |
AUDIO/ |
SKIP |
|
REC END |
||||||
TIMER |
MUTE |
SEARCH |
SEARCH |
|||||||
|
EJECT |
|
|
|
|
|
|
|
REC /OTR |
|
4
Press the OK/STATUS button. The menu shown below will appear.
CABLE BOX CONTROLLER
OFF
AOFF |
CH.=CHANNEL |
ON CH. 2 |
ON CH. 7 |
ON CH. 3 |
ON CH. 8 |
ON CH. 4 |
ON CH. 9 |
ON CH. 5 ON A/V FRONT |
|
ON CH. 6 |
ON A/V REAR |
SELECT: , 9 |
CONFIRM:OK |
END:MENU |
|
Helpful Hints
•Auto or – – : – – may appear on the display panel until the clock is set.
•If you do not want to set up channels now, press the MENU button at step 6. TUNER NOT SET will appear on the screen briefly.
•You may not set up channels at step 6 if you are using a Cable Box/DBS.
Turning on Your VCR (cont’d) 11
5
If you do not want to set up the Cable Box Controller now, press the OK/STATUS button to leave the Controller turned OFF. The display shown below will appear on the screen. Proceed to step 6. You may set up the Controller later by following the instructions on pages 49-53.
If you do want to set up the Cable Box Controller now, follow steps 5-8 on pages 50-51 now.
7Wait for the VCR to set up channels.
CBL / DBS |
TV |
VCR |
CONNECT ANTENNA OR CABLE
TO VCR FOR AUTO CH. SET
READY: OK
END: MENU
6
Press the OK/STATUS button to begin automatic channel setup. AUTO CH. SET PROCEEDING PLEASE WAIT will appear on the screen. The VCR will memorize all of the channels you receive, so when you scan through channels using the CH(annel) 8/9 button, you’ll only scan through channels that you receive.
7
When channels are set up, AUTO CH. SET COMPLETED will appear on the screen briefly.
|
VCR/TV |
|
POWER SMARTPICTURE |
||||
|
QUICK PROGRAMMING |
|
|||||
|
1 |
+ |
2 |
+ |
3 |
|
|
|
START |
............. |
STOP |
............. |
DATE |
|
|
|
4 |
- |
5 |
- |
6 |
|
|
|
|
|
DAILY |
|
|
WEEKLY |
|
|
7 |
|
8 |
|
|
9 |
|
|
SPEED |
|
DBS |
|
|
|
|
|
ALT |
|
0 |
|
|
CLEAR |
|
|
|
STILL/SLOW |
|
|
|||
- |
.... |
|
..... |
... + |
- |
||
- .... |
|
|
|||||
REW |
|
|
|
|
|
FF |
|
|
|
|
PLAY |
|
|
|
|
STOP 

 5-6
5-6
VOL |
OK/STATUS |
CH |
|
MENU |
|
|
TIMER |
|
TURBO |
AUDIO/ SKIP |
REC END |
TIMER MUTE SEARCH SEARCH
EJECT |
REC /OTR |
12 Automatic Channel Setup
Although your VCR may automatically memorize the channels you receive when you turn it on for the first time, this function lets you set up channels again. Make each entry within one minute of the previous entry.
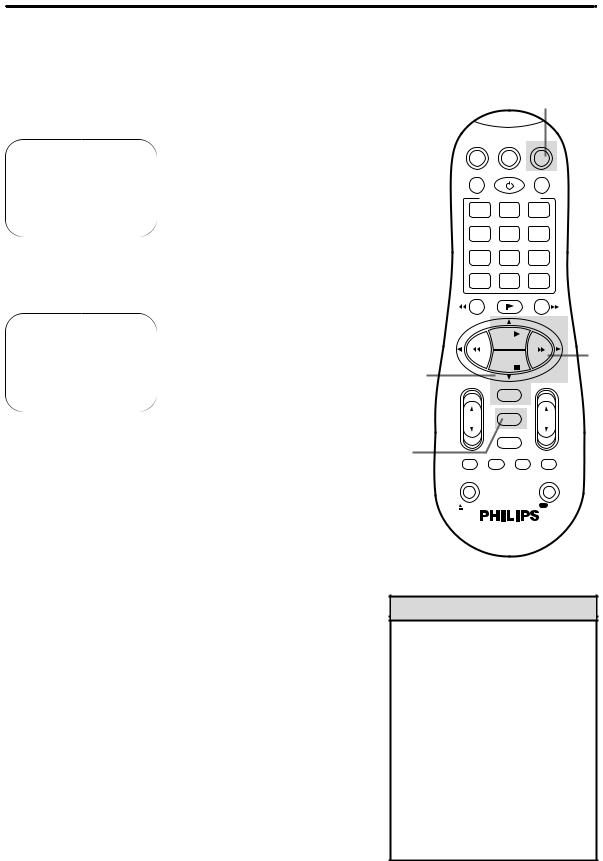
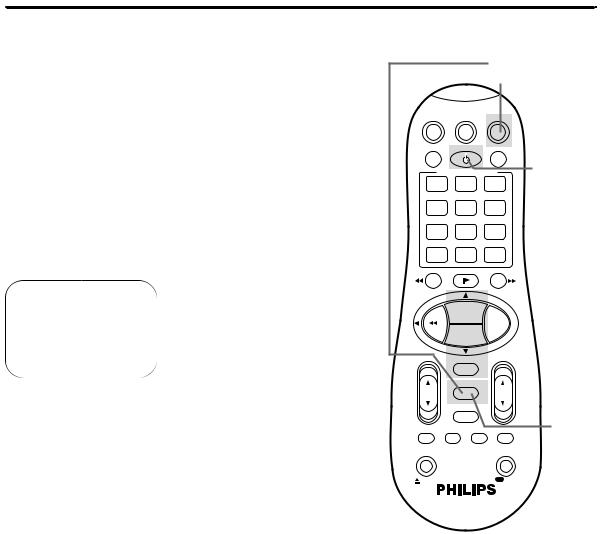
1
Press the VCR button, then press the MENU button.
VCR SET UP TUNER SET UP INITIAL SET UP
SELECT: 89 |
CONFIRM: OK |
END: MENU |
|
2
Press the PLAY 8 or STOP 9 button to select TUNER
SET UP, then press the OK/STATUS button.
5Wait for the VCR to set up channels.
|
|
|
|
|
1 |
||
CBL / DBS |
|
TV |
|
|
VCR |
|
|
|
VCR/TV |
|
POWER SMARTPICTURE |
||||
|
QUICK PROGRAMMING |
|
|||||
|
1 |
+ |
2 |
+ |
|
3 |
|
|
START |
............. |
STOP |
............. |
DATE |
|
|
|
4 |
- |
5 |
- |
|
6 |
|
|
|
|
DAILY |
|
WEEKLY |
|
|
|
7 |
|
8 |
|
|
9 |
|
|
SPEED |
|
DBS |
|
|
|
|
|
ALT |
|
0 |
|
CLEAR |
|
|
- |
- |
STILL/SLOW |
|
+ |
- |
||
|
|
|
|
||||
|
................ |
|
|
||||
CABLE/ANTENNA CABLE AUTO CH. PROGRAMMING ADD/DELETE CH.
SELECT: 89 |
CHANGE: ’ |
END: MENU |
|
3
Press the FF - button repeatedly so that ANT (if you have an antenna) or CABLE (if you have a cable connection) appears beside CABLE/ANTENNA.
2,4
1
REW |
FF |
PLAY |
3 |
STOP |
VOL OK/STATUS CH
MENU
TIMER
TURBO AUDIO/ |
SKIP REC END |
TIMER MUTE SEARCH SEARCH
4
Press the STOP 9 button to select AUTO CH. PROGRAMMING, then press the OK/STATUS button. AUTO CH. SET PROCEEDING PLEASE WAIT and a scale that shows the progress of channel setup will appear on the screen. The VCR will memorize all the channels you receive.
5
Wait for a few minutes while the VCR sets up channels.
When programming is complete, AUTO CH. SET COMPLETED will appear on the screen. Then, the programming of the lowest channel number placed in the VCR’s memory will appear on the screen. Now when you press the CH(annel) 8/9 button, you will scan only through channels you receive.
EJECT |
REC /OTR |
Helpful Hints
•The two Line Input modes will always be stored in the VCR’s memory at channel 00. To select A/V IN FRONT or A/V IN REAR, press 0, 0 so that A/V IN appears briefly, then press the CH(annel) 8/9 button so that A/V IN FRONT or A/V IN REAR appears on the screen briefly. To exit Line Input mode, use the CH(annel) 8/9 button to select a channel other than 00.
•The VCR may automatically set CABLE or ANT even if you do not select it.

|
Automatic Channel Setup (cont’d) 13 |
Adding/Deleting Channels |
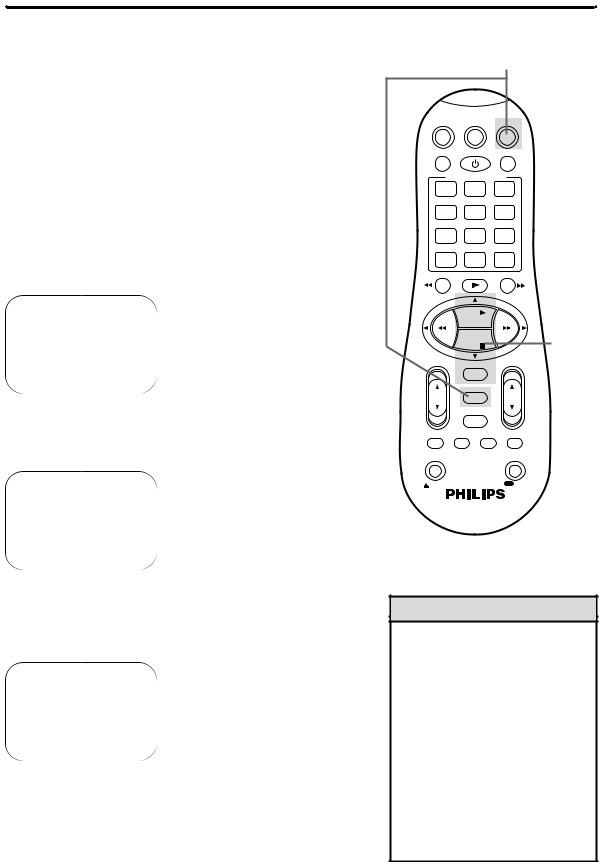
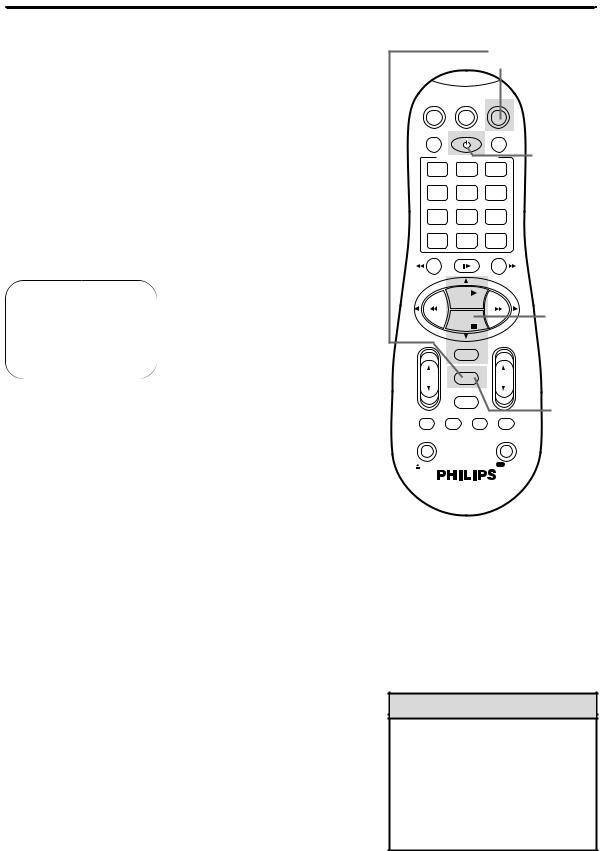
1 |
1 |
Press the VCR button, then press the MENU button.
VCR SET UP TUNER SET UP INITIAL SET UP
SELECT: 89 |
CONFIRM: OK |
END: MENU |
4 |
2 |
Press the PLAY 8 or STOP 9 button to select TUNER
SET UP, then press the OK/STATUS button.
CABLE/ANTENNA CABLE AUTO CH. PROGRAMMING ADD/DELETE CH.
SELECT: 89 |
CHANGE: - |
2-5 |
|
END: MENU |
|
||
3 |
|
1,6 |
|
Press the PLAY 8 or STOP 9 button to select |
|||
|
|||
ADD/DELETE CH., then press the OK/STATUS button. |
|
||
124 |
DELETED |
|
|
125 |
DELETED |
|
|
01 – – – –> |
DELETED |
|
|
02 |
ADDED |
|
|
03 |
ADDED |
|
|
SELECT: 89 OR 0-9 |
|
|
|
CHANGE: - |
END: MENU |
|
|
CBL / DBS |
|
TV |
|
|
|
VCR |
|
|||
|
VCR/TV |
|
|
POWER SMARTPICTURE |
||||||
|
QUICK PROGRAMMING |
|
||||||||
|
1 |
|
+ |
2 |
|
+ |
|
|
3 |
|
|
START |
............. |
STOP |
............. |
|
DATE |
|
|||
|
4 |
|
- |
5 |
|
- |
|
|
6 |
|
|
|
|
|
DAILY |
|
|
WEEKLY |
|
||
|
7 |
|
|
8 |
|
|
|
|
9 |
|
|
SPEED |
|
DBS |
|
|
|
|
|
||
|
ALT |
|
|
0 |
|
|
|
CLEAR |
|
|
|
|
|
STILL/SLOW |
|
|
|
|
|||
- |
.... |
|
|
...... |
.. |
+ |
- |
|||
- .... |
|
|
|
|||||||
REW |
|
|
|
|
|
|
|
FF |
|
|
|
|
|
|
PLAY |
|
|
|
|
|
|
|
|
|
|
STOP |
|
|
|
|
|
|
|
VOL |
|
OK/STATUS |
|
|
CH |
|
|||
|
|
|
|
MENU |
|
|
|
|
|
|
|
|
|
|
TIMER |
|
|
|
|
|
|
TURBO |
AUDIO/ |
SKIP |
|
REC END |
||||||
TIMER |
MUTE |
SEARCH |
SEARCH |
|||||||
|
EJECT |
|
|
|
|
|
|
|
REC /OTR |
|
4 |
4 |
Use the Number buttons, the CH(annel) 8/9 button, or |
the PLAY 8 or STOP 9 buttons to select the channel you want to add or delete. An arrow will appear beside the selected channel.
5
Press the FF - button so that DELETED or ADDED appears beside the channel number.
6
Press the MENU button. Programming of the last channel you added or deleted will appear on the screen.
14 Setting the Clock
There are four ways to set the VCR’s clock: Manually, with Time Zone Selection, with Manual PBS Channel Selection, or with Automatic PBS Channel Selection. Cable Box/DBS users must set the clock manually. Before you set the clock, make sure:
•The VCR power is on.
•The VCR light appears on the display panel. If it does not, press the VCR/TV button once.
•Channels are set up. Details are on page 12.
•You make each entry within one minute of the previous entry. To set the clock manually, follow the steps on pages 14-15. To use Time Zone Selection, go to page 16. To use Manual PBS Channel Selection, go to page 17. To use Automatic PBS Channel Selection, go to page 18.
Manual Clock Setting
1
Press the VCR button, then press the MENU button.
VCR SET UP TUNER SET UP INITIAL SET UP
SELECT: 89 |
CONFIRM: OK |
END: MENU |
|
2
Press the PLAY 8 or STOP 9 button to select INITIAL
SET UP, then press the OK/STATUS button.
CLOCK |
|
LANGUAGE |
ENGLISH |
VCR PLUS+ CH. |
|
CABLE BOX |
|
DBS RECEIVER |
|
SELECT: 89 |
CONFIRM: OK |
END: MENU |
|
3
Press the PLAY 8 or STOP 9 button to select CLOCK, then press the OK/STATUS button. CABLE BOX USERS SET CLOCK MANUALLY will appear briefly.
TIME |
– – : – – AM |
DATE |
01/01/00 |
AUTO CLOCK ON |
|
PBS CH. |
AUTO |
D.S.T. |
AUTO |
TIME ZONE |
AUTO |
SET: 89 |
NEXT: OK |
END: MENU |
|
1
CBL / DBS |
|
TV |
|
|
VCR |
|
|
|
VCR/TV |
|
POWER SMARTPICTURE |
||||
|
QUICK PROGRAMMING |
|
|||||
|
1 |
+ |
2 |
+ |
|
3 |
|
|
START |
............. |
STOP |
............. |
|
DATE |
|
|
4 |
- |
5 |
- |
|
6 |
|
|
|
|
DAILY |
|
WEEKLY |
|
|
|
7 |
|
8 |
|
|
9 |
|
|
SPEED |
|
DBS |
|
|
|
|
|
ALT |
|
0 |
|
CLEAR |
|
|
- |
|
STILL/SLOW |
|
. + |
- |
||
- .... |
....... |
||||||
|
.... |
|
|
|
|||
REW |
|
|
|
|
|
FF |
|
|
|
|
PLAY |
|
|
|
|
STOP |
2-3 |
|
VOL |
OK/STATUS |
CH |
|
|
MENU |
|
|
|
TIMER |
|
|
TURBO |
AUDIO/ |
SKIP |
REC END |
TIMER |
MUTE |
SEARCH |
SEARCH |
EJECT |
|
|
REC /OTR |
Helpful Hints
•To program the VCR so its clock will automatically move forward one
hour in April and turn back one hour in October, see page 19.
•To make corrections, follow steps 1-3, then press the OK/STATUS button until the item you want to correct is flashing. Press the PLAY 8 or
STOP 9 button to enter the correct information. When you are finished, press the MENU button.
•The menu may appear differently at step 3 if you are using a Controller
or a Cable Box/DBS.
Setting the Clock (cont’d) 15
4
Press the PLAY 8 or STOP 9 button repeatedly to set the TIME. Every time you press the PLAY 8 or STOP 9 button, the time changes in one-minute increments. If you press and hold the PLAY 8 or STOP 9 button, the time changes in 30-minute increments.
When the time is correct, press the OK/STATUS button.
TIME |
10 : 45PM |
|
DATE |
01/01/00 |
|
AUTO CLOCK OFF |
|
|
D.S.T. |
ON |
|
SET: 89 |
NEXT: OK |
|
END: MENU |
|
|
5 |
|
4-7 |
Press the PLAY 8 or STOP 9 button repeatedly to set |
||
the DATE (month and day). Every time you press the PLAY |
||
8 or STOP 9 button, the day changes in one-day increments. If |
|
|
you press and hold the PLAY 8 or STOP 9 button, the day |
|
|
changes in 15-day increments. |
|
|
When the month and day are correct, press the |
|
|
OK/STATUS button. |
|
|
TIME |
10 : 45PM |
8 |
DATE |
06/21/00 |
|
AUTO CLOCK OFF |
||
D.S.T. |
ON |
|
SET: 89 |
NEXT: OK |
|
END: MENU |
|
|
6
Press the PLAY 8 or STOP 9 button repeatedly to set the
YEAR. When the year is correct, press the OK/STATUS button. The day of the week will appear automatically.
TIME |
10 : 45PM |
DATE |
06/21/00 |
|
WEDNESDAY |
AUTO CLOCK OFF |
|
D.S.T. |
ON |
SET: 89 |
NEXT: OK |
END: MENU |
|
7
Press the OK/STATUS button once again to skip “AUTO CLOCK” and go to “D.S.T.” (Daylight Savings Time). Press the PLAY 8 or STOP 9 button to set D.S.T. to ON or OFF. If AUTO CLOCK is OFF, you may set D.S.T. to ON or OFF only. For more information, please see page 19.
8
CBL / DBS |
|
TV |
|
|
VCR |
|
||
VCR/TV |
|
|
POWER SMARTPICTURE |
|||||
QUICK PROGRAMMING |
|
|||||||
1 |
|
+ |
2 |
|
+ |
|
3 |
|
START |
............. |
STOP |
............. |
DATE |
|
|||
4 |
|
- |
5 |
|
- |
|
6 |
|
|
|
|
DAILY |
|
WEEKLY |
|
||
7 |
|
|
8 |
|
|
|
9 |
|
SPEED |
|
DBS |
|
|
|
|
||
ALT |
|
|
0 |
|
|
CLEAR |
|
|
|
|
STILL/SLOW |
|
|
|
|||
- ..-...... |
........ |
+ |
- |
|||||
REW |
|
|
|
|
|
|
FF |
|
|
|
|
PLAY |
|
|
|
|
|
|
|
|
STOP |
|
|
|
|
|
VOL |
|
OK/STATUS |
|
CH |
|
|||
|
|
|
MENU |
|
|
|
|
|
|
|
|
TIMER |
|
|
|
|
|
TURBO |
AUDIO/ |
SKIP |
|
REC END |
||||
TIMER |
MUTE |
SEARCH |
SEARCH |
|||||
EJECT |
|
|
|
|
|
|
REC /OTR |
|
Press the MENU button.
16 Setting the Clock (cont’d)
Time Zone Selection
1
Press the VCR button, then press the MENU button.
2
Press the PLAY 8 or STOP 9 button to select INITIAL
SET UP, then press the OK/STATUS button.
CLOCK |
|
LANGUAGE |
ENGLISH |
VCR PLUS+ CH. |
|
CABLE BOX |
|
DBS RECEIVER |
|
SELECT: 89 |
CONFIRM: OK |
END: MENU |
|
3
Press the PLAY 8 or STOP 9 button to select CLOCK, then press the OK/STATUS button. CABLE BOX USERS SET CLOCK MANUALLY will appear briefly.
(If AUTO CLOCK is set to OFF, TIME ZONE will not be available in the menu. If this happens, press the OK/STATUS button to select AUTO CLOCK, then press the PLAY 8 or STOP 9 button to set AUTO CLOCK to ON.)
TIME |
– – : – – AM |
DATE |
01/01/00 |
AUTO CLOCK ON |
|
PBS CH. |
AUTO |
D.S.T. |
AUTO |
TIME ZONE |
AUTO |
SET: 89 |
NEXT: OK |
END: MENU |
|
4
Press the OK/STATUS button repeatedly to select TIME ZONE.
5
Press the PLAY 8 or STOP 9 button repeatedly to select your Time Zone, then press the OK/STATUS button.
6
Press the MENU button.
7
An on-screen message will ask you to turn off the VCR. Press the POWER button to turn off the VCR.
Auto will flash in the display panel until the clock is set. Leave the VCR turned off until the time appears on the display panel.
If – – : – – appears on the display panel after you turn off the VCR, the VCR could not find the time. Use a different method to set the clock.
1
CBL / DBS |
|
TV |
|
VCR |
|
VCR/TV |
|
POWER SMARTPICTURE |
7 |
||
QUICK PROGRAMMING |
|||||
1 |
+ |
2 |
+ |
3 |
|
START |
|
STOP |
|
DATE |
|
4 |
- |
5 |
- |
6 |
|
|
............. |
DAILY |
............. |
WEEKLY |
|
7 |
8 |
9 |
|
||
|
|
|
|||
SPEED |
|
DBS |
|
|
|
ALT |
|
0 |
|
CLEAR |
|
STILL/SLOW
- ..-...... |
........ |
+ |
- |
REW |
|
|
FF |
|
PLAY |
|
|
STOP 
 2-5
2-5
VOL |
OK/STATUS |
CH |
|
|
|
MENU |
|
6 |
|
|
TIMER |
|
||
TURBO |
AUDIO/ |
SKIP |
REC END |
|
TIMER |
MUTE |
SEARCH |
SEARCH |
|
EJECT |
|
|
REC /OTR |
|
Helpful Hints
•When the power plug is connected to an AC outlet, the correct time will appear on the display panel of the VCR when the power is off.
•Press the OK/STATUS button repeatedly to make the time appear on the display panel when the VCR
power is on.
Setting the Clock (cont’d) 17
Manual PBS Channel Selection
1
Press the VCR button, then press the MENU button.
2
Press the PLAY 8 or STOP 9 button to select INITIAL
SET UP, then press the OK/STATUS button.
3
Press the PLAY 8 or STOP 9 button to select CLOCK, then press the OK/STATUS button. (If AUTO CLOCK is set to OFF, PBS CH. will not be available in the menu. If this happens, press the OK/STATUS button to select AUTO CLOCK, then press the PLAY 8 or STOP 9 button to set AUTO CLOCK to ON.)
TIME |
– – : – – AM |
DATE |
01/01/00 |
AUTO CLOCK ON |
|
PBS CH. |
AUTO |
D.S.T. |
AUTO |
TIME ZONE |
AUTO |
SET: 89 |
NEXT: OK |
END: MENU |
|
4
Press the OK/STATUS button repeatedly to select PBS CH.
5
Press the PLAY 8 or STOP 9 button repeatedly to select the station number of your PBS channel.
1
CBL / DBS |
TV |
VCR |
VCR/TV |
|
POWER SMARTPICTURE |
7 |
||
QUICK PROGRAMMING |
|||||
1 |
+ |
2 |
+ |
3 |
|
START |
............. |
STOP |
............. |
DATE |
|
|
|
||||
4 |
- |
5 |
- |
6 |
|
|
|
DAILY |
|
WEEKLY |
|
7 |
|
8 |
|
9 |
|
SPEED DBS
|
ALT |
|
0 |
CLEAR |
|
|
- |
- |
STILL/SLOW |
|
+ |
- |
|
... |
........ |
|||||
|
..... |
|
|
|
||
REW |
|
|
|
|
FF |
|
PLAY
STOP 

 2-5
2-5
VOL |
OK/STATUS |
CH |
|
|
|
MENU |
|
|
|
|
TIMER |
|
6 |
|
TURBO |
AUDIO/ |
SKIP |
REC END |
|
TIMER |
MUTE |
SEARCH |
SEARCH |
|
EJECT |
|
|
REC /OTR |
|
6
Press the MENU button.
7
An on-screen message will ask you to turn off the VCR. Press the POWER button to turn off the VCR.
Auto will flash in the display panel until the clock is set. Leave the VCR power off until the clock is set.
If – – : – – appears on the display panel after you turn off the VCR, the VCR could not find the time. Repeat steps 1 - 6 above, entering a different PBS channel at step 5. Or, use a different method to set the clock.
18 Setting the Clock (cont’d)
Automatic PBS Channel Selection
1
Press the VCR button, then press the MENU button.
2
Press the PLAY 8 or STOP 9 button to select INITIAL
SET UP, then press the OK/STATUS button.
3
Press the PLAY 8 or STOP 9 button to select CLOCK, then press the OK/STATUS button. (If AUTO CLOCK is set to OFF, PBS CH. will not be available in the menu. If this happens, press the OK/STATUS button to select AUTO CLOCK, then press the PLAY 8 or STOP 9 button to set AUTO CLOCK to ON.)
TIME |
– – : – – AM |
DATE |
01/01/00 |
AUTO CLOCK ON |
|
PBS CH. |
AUTO |
D.S.T. |
AUTO |
TIME ZONE |
AUTO |
SET: 89 |
NEXT: OK |
END: MENU |
|
4
Press the OK/STATUS button repeatedly to select PBS CH.
5
Press the PLAY 8 or STOP 9 button repeatedly so that
AUTO flashes beside PBS CH.
6
Press the MENU button.
7
An on-screen message will ask you to turn off the VCR. Press the POWER button to turn off the VCR.
Auto will flash in the display panel until the clock is set. Leave the VCR power off until the clock is set. If – – : – – appears on the display panel after you turn off the VCR, the VCR could not find the time. Use a different method to set the clock.
|
|
|
|
|
|
|
1 |
|
|
|
CBL / DBS |
|
TV |
|
|
VCR |
|
|
|||
|
VCR/TV |
|
|
POWER SMARTPICTURE |
7 |
|||||
|
QUICK PROGRAMMING |
|
||||||||
|
1 |
|
+ |
2 |
|
+ |
|
3 |
|
|
|
START |
|
STOP |
|
DATE |
|
||||
|
4 |
|
- |
5 |
|
- |
|
6 |
|
|
|
|
|
............. |
DAILY |
............. |
WEEKLY |
|
|
||
|
7 |
|
8 |
|
|
9 |
|
|
||
|
|
|
|
|
|
|
|
|||
|
SPEED |
|
DBS |
|
|
|
|
|
||
|
ALT |
|
|
0 |
|
|
CLEAR |
|
|
|
|
|
|
STILL/SLOW |
|
|
|
|
|||
- |
..... |
|
|
........ |
+ |
- |
|
|||
- ... |
|
|
|
|
|
|||||
REW |
|
|
|
|
|
|
FF |
|
2-5 |
|
|
|
|
|
PLAY |
|
|
|
|
|
|
|
|
|
|
STOP |
|
|
|
|
||
|
VOL |
|
|
|
|
|
|
CH |
|
|
|
|
OK/STATUS |
|
|
|
|||||
|
|
|
|
MENU |
|
|
|
|
|
|
|
|
|
|
TIMER |
|
|
|
|
6 |
|
TURBO |
AUDIO/ |
SKIP |
|
REC END |
||||||
TIMER |
MUTE |
SEARCH |
SEARCH |
|||||||
|
EJECT |
|
|
|
|
|
|
REC /OTR |
|
|
Helpful Hints
•To display the time on the display panel, press the OK/STATUS button repeatedly.
•If you live near the boundary of an adjacent time zone, your PBS channel may come from a different time zone. Use Time Zone Selection to set your clock. Details are on page 16.
Daylight-Savings Time 19
Follow the steps below to program the VCR so its clock will move forward one hour in April and turn back one hour in October.
1
Press the VCR button, then press the MENU button.
2
Press the PLAY 8 or STOP 9 button to select INITIAL
SET UP, then press the OK/STATUS button.
CLOCK |
|
LANGUAGE |
ENGLISH |
VCR PLUS+ CH. |
|
CABLE BOX |
|
DBS RECEIVER |
|
SELECT: 89 |
CONFIRM: OK |
END: MENU |
|
3
Press the PLAY 8 or STOP 9 button to select CLOCK, then press the OK/STATUS button. (If AUTO CLOCK is set to OFF, PBS CH. and TIME ZONE will not appear in the menu.) CABLE BOX USERS SET CLOCK MANUALLY will appear on the screen briefly.
TIME |
10:45AM |
DATE |
01/01/00 |
|
SATURDAY |
AUTO CLOCK ON |
|
PBS CH. |
AUTO |
D.S.T. |
AUTO |
TIME ZONE |
AUTO |
SET: 89 |
NEXT: OK |
END: MENU |
|
4
Press the OK/STATUS button repeatedly to select D.S.T.
5
Press the PLAY 8 or STOP 9 button so that ON, OFF, or
AUTO appears beside D.S.T.
Select ON to make the clock adjust itself according to the VCR’s calendar. Select OFF to turn off the feature. Select AUTO to make the clock adjust itself according to the signal it receives from the PBS channel. If AUTO CLOCK is set to OFF, you may only set D.S.T. to ON or OFF.
6
Press the MENU button.
7
An on-screen message may ask you to turn off the VCR. Press the POWER button to turn off the VCR. Auto will flash in the display panel until the clock is set. Leave the VCR power off until the clock is set. If – – : – – appears on the display panel after you turn off the VCR, the VCR could not find the time. Use a different method to set the clock.
|
|
|
|
|
|
1 |
|
|
|
CBL / DBS |
|
TV |
|
|
VCR |
|
|
||
VCR/TV |
|
|
POWER SMARTPICTURE |
7 |
|||||
QUICK PROGRAMMING |
|
||||||||
1 |
|
+ |
2 |
|
+ |
|
3 |
|
|
START |
............. |
STOP |
............. |
DATE |
|
|
|||
4 |
|
- |
5 |
|
- |
|
6 |
|
|
|
|
|
DAILY |
|
WEEKLY |
|
|
||
7 |
|
|
8 |
|
|
|
9 |
|
|
SPEED |
|
DBS |
|
|
|
|
|
||
ALT |
|
|
0 |
|
|
CLEAR |
|
|
|
|
|
STILL/SLOW |
|
|
|
|
|||
- ...-..... |
........ |
+ |
- |
|
|||||
REW |
|
|
|
|
|
|
FF |
|
|
|
|
|
PLAY |
|
|
|
|
|
2-5 |
|
|
|
STOP |
|
|
|
|
||
VOL |
|
OK/STATUS |
|
CH |
|
|
|||
|
|
|
MENU |
|
|
|
|
6 |
|
|
|
|
TIMER |
|
|
|
|
||
TURBO |
AUDIO/ |
SKIP |
|
REC END |
|
||||
TIMER |
MUTE |
SEARCH |
SEARCH |
|
|||||
EJECT |
|
|
|
|
|
|
REC /OTR |
|
|
20 Language Selection
Follow the steps below to change the language of the on-screen displays and menus.
1
Press the VCR button, then press the MENU button.
VCR SET UP TUNER SET UP INITIAL SET UP
SELECT: 89 |
CONFIRM: OK |
END: MENU |
|
2
Press the PLAY 8 or STOP 9 button to select INITIAL
SET UP, then press the OK/STATUS button.
CLOCK |
|
LANGUAGE |
ENGLISH |
VCR PLUS+ CH. |
|
CABLE BOX |
|
DBS RECEIVER |
|
SELECT: 89 |
CONFIRM: OK |
END: MENU |
|
3
Press the PLAY 8 or STOP 9 button to select
LANGUAGE.
4
Press the FF - button repeatedly until your preferred language appears.
5
Press the MENU button.
|
|
|
|
|
|
1 |
|
|
|
CBL / DBS |
|
TV |
|
|
VCR |
|
|
||
VCR/TV |
|
|
POWER SMARTPICTURE |
|
|||||
QUICK PROGRAMMING |
|
|
|||||||
1 |
|
+ |
2 |
|
+ |
|
3 |
|
|
START |
............. |
STOP |
............. |
DATE |
|
|
|||
4 |
|
- |
5 |
|
- |
|
6 |
|
|
|
|
|
DAILY |
|
WEEKLY |
|
|
||
7 |
|
|
8 |
|
|
|
9 |
|
|
SPEED |
|
DBS |
|
|
|
|
|
||
ALT |
|
|
0 |
|
|
CLEAR |
|
|
|
|
|
STILL/SLOW |
|
|
|
|
|||
- ..-...... |
........ |
+ |
- |
|
|||||
REW |
|
|
|
|
|
|
FF |
|
|
|
|
|
PLAY |
|
|
|
|
|
2-4 |
|
|
|
STOP |
|
|
|
|
||
VOL |
|
OK/STATUS |
|
CH |
|
||||
|
|
|
|
||||||
|
|
|
MENU |
|
|
|
|
|
|
|
|
|
TIMER |
|
|
|
|
5 |
|
TURBO |
AUDIO/ |
SKIP |
|
REC END |
|||||
TIMER |
MUTE |
SEARCH |
SEARCH |
||||||
EJECT |
|
|
|
|
|
|
REC /OTR |
|
|
Helpful Hint
•If you accidentally select Spanish or French and need English, follow these steps.
1)Press the VCR button, then press the MENU button.
2)Press the PLAY 8 or STOP 9 button to select SISTEMA INICIAL or
PROGRAMM. INITIALE, then press the OK/STATUS button.
3) Press the PLAY 8 or STOP 9 button to select LENGUAJE or LANGUE.
4) Press the FF - button repeatedly so that the English menu appears.
5) Press the MENU button.
Display Panel 21
VCR Display Panel |
|
S-VHS Indicator |
|
|
|||
Information about VCR operations appears here. Different |
|||
Appears while playing a tape |
|||
information appears at different times. The display is |
|||
recorded in S-VHS or S-VHS ET |
|||
brighter when the VCR power is on. The display dims |
|||
format, or while recording on an S- |
|||
automatically when you turn off the VCR power. |
|||
VHS tape or in S-VHS ET format. |
|||
|
|
||
Cassette Compartment |
|
|
|
|
|
|
|
||
Insert a tape here. |
|
|
|
|
|
|
|
|
Tape Speed |
|
|
|
|
|
|
|
|
|
Lights |
TIMER Light |
|
VR960B 4-HEAD HI-FI STEREO |
SUPER VHS ET |
|
|
|
These lights |
||
This light appears |
|
POWER |
|
|
|
|
indicate the |
||
|
|
VIDEO CASSETTE RECORDER |
|
|
|
|
|
|
|
when a timer |
|
|
|
TURBO TIMER . SMARTPICTURE . MULTIBRAND TV CONTROL |
REC / OTR |
|
|
current tape speed. |
|
|
|
|
|
|
|
PLAY |
|
|
|
recording is |
|
VIDEO |
L AUDIO R |
STILL / PAUSE S-VHS ET |
|
MENU |
/ |
|
This VCR will play |
|
|
|
|
|
|
|
STOP/EJECT |
|
tapes recorded in |
|
|
|
|
-15dB6 |
|
OK/ |
|
|
|
programmed or |
|
|
|
+8 |
VCR |
CHANNEL |
|
|
|
|
|
|
L NORM |
STATUS |
|
|
|
||
|
|
|
|
4 |
|
|
|
|
|
|
|
|
|
0 |
|
|
|
|
|
is in progress. |
|
|
|
|
|
|
|
TURBO |
LP speed, but LP |
|
|
|
|
|
|
|
DRIVE |
||
|
|
|
|
|
|
|
|
|
|
Details are on |
|
|
|
|
|
|
|
|
will not appear on |
pages 38-44. This |
|
|
|
|
|
|
|
|
the display panel. |
light blinks rapidly |
|
|
|
|
|
|
|
|
This VCR will not |
if the VCR is |
|
+8 |
|
|
|
|
|
|
record in LP speed. |
turned off to set |
|
|
|
|
|
|
|
Details are on pages |
|
|
4 |
|
|
|
SP SLP |
|
|
||
a Timer |
|
|
|
|
|
|
|
41 and 65. |
|
|
0 |
|
|
|
|
|
|
||
Recording but a |
|
6 |
|
|
|
|
|
|
|
tape is not in the |
|
-15dB |
|
VCR |
|
|
|
|
|
L |
NORM |
|
|
|
|
|
|
||
VCR. |
|
|
|
|
|
|
|||
|
|
|
|
|
|
|
|
|
|
Audio Level indicator |
|
|
|
|
Clock/Counter/Remaining Tape Time/Channel |
|||||||
|
|
|
||||||||||
This indicates the audio |
|
|
Display |
|||||||||
playback levels. NORM |
|
|
Each time you press the OK/STATUS button, |
|||||||||
appears only when MONO is |
|
|
information on the display panel will change. When tape |
|||||||||
selected. Details are on page 56. |
|
|
playback is stopped, press the OK/STATUS button |
|||||||||
|
|
|
|
|
|
|
|
|
|
|
|
repeatedly to see: the current time (when the clock is |
TURBO TIMER indicators |
|
|
|
|
|
|
|
set); the real-time counter; remaining tape time; and the |
||||
|
|
|
|
|
|
current channel number. During tape playback, press |
||||||
|
|
|
||||||||||
These indicate the START |
|
|
||||||||||
|
|
the OK/STATUS button repeatedly to see the real-time |
||||||||||
time and STOP time when you |
|
|
counter, the remaining tape time or the current time. |
|||||||||
are setting a TURBO TIMER. |
|
|
If CL is flashing beside the clock when the VCR power |
|||||||||
Details are on page 44. |
|
|
is off, Child Lock is activated. Details are on page 62. |
|||||||||
Remaining Tape Time Indicator |
|
|
Line Input Mode |
|||||||||
|
||||||||||||
|
|
When L-F appears on the display panel, you have |
||||||||||
This indicates that the remaining tape |
|
|
selected A/V IN FRONT. Your audio and video cables |
|||||||||
time currently appears on the display |
|
|
should be connected to the AUDIO/VIDEO In jacks on |
|||||||||
panel. |
|
|
the front of the VCR if you are dubbing tapes. |
|||||||||
|
|
|
|
|
|
|
|
|
|
|
|
When L-1 appears here, you have selected A/V IN |
Cassette-Inside Light |
|
|
|
|
|
|
|
REAR. Your audio and video or S-Video cables should |
||||
|
|
|
|
|||||||||
This light appears when a tape is in the |
|
|
be connected to the AUDIO/VIDEO or AUDIO/S- |
|||||||||
|
|
VIDEO In jacks on the back of the VCR if you are |
||||||||||
VCR. It blinks when a tape is being |
|
|
||||||||||
|
|
dubbing tapes. |
||||||||||
ejected. This light blinks rapidly if the VCR |
|
|
||||||||||
|
|
To select A/V IN FRONT or A/V IN REAR, press 0, |
||||||||||
is turned off to set a Timer Recording but |
|
|
||||||||||
|
|
then press the CH(annel) 8/9 button so that A/V IN |
||||||||||
there is not a tape in the VCR. |
|
|
||||||||||
|
|
FRONT or A/V IN REAR appears on the screen. |
||||||||||
|
|
|
|
|
|
|
|
|
|
|
|
|
Operation indicators |
|
|
|
|
|
|
|
|
|
|
|
To exit Line Input mode, press the Number buttons or |
|
|
|
|
|
|
|
|
|
|
|
the CH(annel) 8/9 button to select another channel. |
|
These indicators tell you the current |
|
|
||||||||||
|
|
Details are on page 48. |
||||||||||
operation of the VCR. |
|
|
TURBO TIMER Mode |
|||||||||
|
||||||||||||
: Play, Forward and Reverse Searching |
|
|
Turbo Timer information appears here. Details are on |
|||||||||
3 |
|
|
|
|
|
|
|
|
|
|
|
|
\:Record |
|
|
page 44. |
|||||||||
\55: Record Pause |
|
|
|
VCR Light |
||||||||
|
|
|
||||||||||
355: Still Picture |
|
|
This light appears when the VCR is in VCR position. |
|||||||||
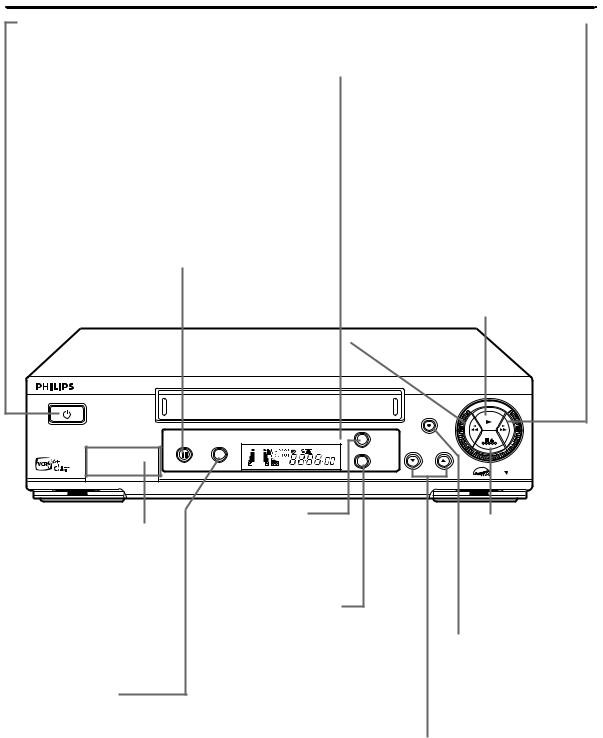
22 Front Panel
POWER Button |
|
Fast Forward - Button |
|
|||
|
||||||
Press to turn the VCR power on and off. |
|
When tape playback is stopped, press to |
||||
|
|
|
|
|
fast forward the tape at high speed. |
|
Remote Sensor |
|
|
|
|
During tape playback, press to fast |
|
|
|
|
forward the tape while the picture stays |
|||
Receives a signal from your remote control so |
|
|||||
|
on the screen. Details are on page 61. |
|||||
you can operate your VCR from a distance. Press |
|
|||||
|
Press to change the setting of a VCR |
|||||
the VCR button on the remote control before |
|
|||||
|
menu item. |
|||||
pressing other VCR operation buttons. |
|
|||||
|
Rewind / Button |
|||||
|
|
|
|
|
||
|
|
|
|
|
||
STILL/PAUSE Button |
|
When tape playback is stopped, press to |
||||
|
rewind the tape at high speed. During |
|||||
During tape playback, press once to freeze the |
|
|||||
|
tape playback, press to rewind the tape |
|||||
picture. Press repeatedly to advance the Still |
|
|||||
|
while the picture stays on the screen. |
|||||
picture frame by frame. During tape playback, |
|
|||||
|
Details are on page 61. |
|||||
press and hold for three seconds to start Slow |
|
|||||
|
Press to return to a previous VCR menu. |
|||||
Motion playback. Details are on page 61. During |
|
|||||
|
PLAY Button |
|||||
recording, press to temporarily stop the |
|
|||||
recording. Details are on page 30. |
|
Press to play a tape. Press to release |
||||
|
|
|
|
|
Slow, Still or Search mode and return to |
|
|
|
|
|
|
normal playback. Details are on page 61. |
|
|
|
|
|
|
|
|
Front VIDEO/AUDIO |
|
MENU Button |
|
STOP/EJECT |
|
|
Press to access or |
|
|||
In Jacks |
|
|
Button |
||
|
remove the VCR menu. |
|
|||
Connect cables coming from |
|
|
Press once to stop the |
||
|
|
|
|
||
the VIDEO and AUDIO OUT |
|
|
|
|
tape. When tape |
Jacks of another VCR or a |
|
|
|
|
playback is stopped, |
camcorder here. Details are on |
OK/STATUS Button |
|
press to eject the tape. |
||
page 48. To access these jacks, |
|
|
|||
Press to go to the next VCR |
|
|
|||
gently flip down the plastic |
|
|
|
||
|
menu. Press to see the |
|
|
||
cover. |
|
|
REC(ord)/OTR Button |
||
|
status display. Details are on |
|
|||
|
|
|
Press once to record. |
||
|
|
page 26. Press repeatedly to |
|
||
|
|
|
Details are on page 30. Press |
||
|
|
see the real-time counter, |
|
||
|
|
|
repeatedly to start a One- |
||
S-VHS ET Button |
|
remaining tape time, the |
|
||
|
|
Touch Recording. Details |
|||
Press to select S-VHS ET ON |
|
current channel, or the |
|
||
|
|
are on page 34. |
|||
or OFF. S-VHS ET allows |
|
current time on the display |
|
||
|
|
|
|||
recording with S-VHS picture |
|
panel. Details are on page 21. |
CHANNEL 8/9 Buttons |
||
quality on VHS cassettes. |
|
|
|
|
|
VR960B 4-HEAD HI-FI STEREO |
|
|
|
|
|
VIDEO CASSETTE RECORDER |
|
|
|
|
|
POWER |
|
SUPER VHS ET |
|
|
|
|
|
TURBO TIMER . SMARTPICTURE . MULTIBRAND TV CONTROL |
REC / OTR |
|
|
|
|
|
|
PLAY |
|
|
|
|
|
MENU |
STOP/EJECT |
VIDEO L AUDIO R |
STILL / PAUSE S-VHS ET |
|
|
|
|
|
|
+8 |
|
CHANNEL |
|
|
|
4 |
SP SLP |
|
|
|
|
0 |
|
OK/ |
|
|
|
6 |
|
|
|
|
|
-15dB |
VCR |
|
|
|
|
L NORM |
STATUS |
TURBO |
|
|
|
|
|
|
DRIVE |
Details are on page 32. |
|
|
|
Press to scan through the VCR’s |
|
|
|
|
channels. During tape playback, |
||
|
|
|
|
||
|
|
|
|
press to manually adjust the |
|
|
|
|
|
tracking. Details are on page 64. |
|
|
|
|
|
Press to select an item in the |
|
|
|
|
|
VCR menu. |
|
 Loading...