


 Loading...
Philips TCD288/CXBAAAYP, TCD288/CXBAAAAE, TCD288/CWBAAAOP, TCD288/DUAAAAAP, TCD288/CUBAAAAP User Manual
...
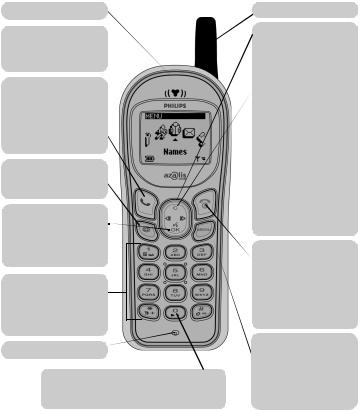
Discover your Phone
Earpiece
Screen
Idle screen displays the time, date and network name.
Green "Pick up" key D
-Press to answer a call.
-Press to dial a number, or name displayed on the screen.
-In WAP mode, corresponds to a softkey.
WAP @
- Press to access WAP browser.
OK O
Idle mode:
- Long press for voice dial or voice command.
Alphanumeric keypad
-Press keys to enter numbers and text.
-Long press on a key to activate hotkey function.
Microphone
Language
-Long press 0 to choose a language in which the telephone functions will be displayed.
Antenna
Compass key
Use this key to navigate in the menus, the OK key is used to validate information.
Cancel/back key C
 Idle mode:
-Long press to lock/unlock the keypad*.
Navigation mode:
-Press to return to previous menu.
Edit mode:
-Press to delete a character.
-Long press to delete all characters.
WAP mode:
-Press to go back one page.
-Long press to exit browser.
Red "Hang up" Rand  "On/Off" key
-Long press to switch your phone on/off.
-Press to end a call.
-In WAP mode, corresponds to a softkey.
Menu M
 - Press to enter carousel menu. - Press to return to idle screen.
WAP mode:
- Press to open the browser menu.
* The keypad automatically unlocks when you receive a call. You can still place an emergency call.
L NOTE:
Philips continuously strives to improve its products, and the information and specifications described in this user manual are subject to change without notice.
Philips tries to ensure that all information in this user manual is correct, but does not accept liability for any error, omission or discrepancy between this user manual and the product described.

Quick Reference
Switch on/off: |
|
Long press r |
||||||||||||||||||||||||||||
Enter PIN: |
1. |
Enter PIN code on keypad |
||||||||||||||||||||||||||||
|
|
|
|
|
|
|
|
|
|
|
2. |
Press oto confirm |
||||||||||||||||||
Make a call: |
1. |
Enter phone number on keypad |
||||||||||||||||||||||||||||
|
|
|
|
|
|
|
|
|
|
|
2. |
Press dto dial |
||||||||||||||||||
Answer a call: |
|
Press d |
||||||||||||||||||||||||||||
End a call: |
|
Press r |
||||||||||||||||||||||||||||
Use Names List: |
1. |
Press >to access |
||||||||||||||||||||||||||||
|
|
|
|
|
|
|
|
|
|
|
2. |
Press < >to select name |
||||||||||||||||||
|
|
|
|
|
|
|
|
|
|
|
3. |
Press dto dial |
||||||||||||||||||
Enter a Name: |
|
Select <New> from the Names list |
||||||||||||||||||||||||||||
|
|
|
|
|
|
|
|
|
|
|
|
|
|
|
|
|
|
|
|
|
|
|
|
|
|
|
|
|
|
|
Access and tour the menu: 1. Press M
2.Press < > to select a menu
3.Press oto confirm
4.Press < > to select a submenu
5.Press oto confirm
Return to previous menu: Press C
Return to idle screen: |
Press M |
Visit our site and register on line @ http://www.pcc.philips.com
PHILIPS |
|
|
OK |
|
|
|
|
|
|
Favourites |
|
|
|
Service numbers |
|
||
|
|
|
WAP |
|
Last page |
|
|
|
Launch |
||
|
|
|
|
||
Network |
Services |
OK |
|
|
|
|
|
|
|
||
|
|
|
Help |
|
Settings |
Voice command |
Call settings |
|
Oper. services* |
|
|
|
|
Access settings |
|||
|
|
|
|
||
|
|
OK |
Main |
Names |
|
Hotkeys |
Sounds |
Settings |
Menu |
OK |
Read SMS |
|
|
|
|
||
|
|
|
|
|
SMS settings |
|
|
|
|
|
|
|
|
|
|
|
|
|
|
|
|
|
|
|
|
|
|
|
Messages |
|
|
|
|
|
|
|
|
|
|
Send SMS |
||||
|
|
|
|
|
|
|
|
Extras |
|
|||
Time and Date |
|
Display |
|
|
||||||||
|
|
|
||||||||||
|
|
|
|
|
|
|
||||||
|
|
|
|
|
|
|
||||||
|
|
|
|
|
|
|
|
|
|
|
|
|
|
|
Call list |
Broadcast SMS |
|
Security |
Organiser |
Mailboxes |
||
|
||||
* Subscription dependent. |
Please contact your operator for further details. |
|
||

Table of contents
Discover your Phone
Introduction
Symbols used in this guide
Before your first call
The SIM card
PIN and PUK codes
Insert the SIM card
The battery
Insert the battery Attach the battery cover Remove the battery Charge the battery
Screen
Phone Functions
Switch on/off Idle Screen Make a call Answer a call End a call Emergency call Text Entry
The Carousel
Main Menus
Names
<New> Send SMS Voice Dial
Change or Delete
1Messages
3 |
Send SMS or Reply |
|
Read SMS |
||
|
||
3 |
SMS Settings |
|
3 |
Signature |
|
Delivery report |
||
3 |
Auto save SMS |
|
3 |
Broadcast SMS |
|
Reception |
||
4 |
Topics |
|
5 |
||
District code |
||
5 |
Mailboxes |
|
5 |
Call List |
|
6 |
||
6 |
|
7 |
Organiser |
|
Events |
||
|
8Day view, Week view and
8Month view
8Extras
9Call counters
9Accumulated call timers Accumulated cost
10 Show
10 |
Reset |
10 |
Cost limit |
Show balance |
|
13 |
Cancel cost limit |
Charge rate |
|
13 |
Last Call Information |
14-> Euro <- Euro
14 |
Brick game |
|
15 |
||
Calculator |
||
15 |
||
Alarm Clock |
||
15 |
||
Voice memo |
||
|
16
17
18
18
18
18
18
18
19
19
19
19
20
21
21
21
22
22
22
22
22
22
23
23
23
23
23
23
24
24
24
25
25
1 |

Settings
Sounds
Ringer volume Ringer
Key tones New SMS tone Vibra alert
Organiser alerts
Display
Zoom Contrast
Security
Keypad lock Public names Call barring Call restriction Change codes PIN protection
Time and date
Clock display Set date and time
Hotkeys
Voice command
Network
Register again Preferred list
Call settings
Call forward Any key answer Call waiting Caller ID
Network Services
Touchtones (DTMF) Make a second call Autoredial
Answer a second call Conference call
Operator services
2 |
26 |
WAP |
39 |
|
26 |
Launch the Browser |
40 |
|
26 |
|||
Favourites |
42 |
||
27 |
|||
28 |
Last Page |
42 |
|
28 |
|||
28 |
Settings |
42 |
|
28 |
|||
29 |
Images |
42 |
|
29 |
Status icons |
43 |
|
29 |
Access settings |
43 |
|
29 |
|||
29 |
Gateway |
43 |
|
29 |
Security |
43 |
|
29 |
|||
Home page |
43 |
||
29 |
|||
30 |
Phone Number |
44 |
|
30 |
Login |
44 |
|
30 |
|||
Password |
44 |
||
30 |
|||
|
|
||
30 |
Glossary |
45 |
|
31 |
Precautions |
46 |
|
33 |
|||
34 |
Environmental care |
50 |
|
|
|
||
34 |
Troubleshooting |
51 |
|
34 |
Index |
53 |
|
34 |
|||
34 |
Declaration of |
|
|
35 |
|
||
35 |
conformity |
56 |
|
35 |
Philips Authentic |
|
|
36 |
|
||
Accessories |
58 |
||
36 |
|
|
|
36 |
|
|
|
37 |
|
|
|
37 |
|
|
|
37 |
|
|
|
39 |
|
|
Introduction
Thank you for purchasing your Philips Az@lis 288.
This guide will help you to learn easily and quickly how to use your phone.
Symbols used in this guide
Ringer volume A function displayed on your phone screen.
1 |
Represents a key on your phone keypad. |
C < > o Represent a function on the compass key. Long press: Press and hold the key for 2 seconds.
Activate/deactivate Pressing the same key (called a toggle key) or using </ >will alternate between different options: ex. Activate and Deactivate.
Press M -> Settings -> Call settings -> Call forward
This represents a series of commands to tour the menu until you reach the specific function being discussed. The most important
point to remember is the necessity to press o key AFTER EACH
LEVEL before you can tour the next level. So, the above example is:
Press M-> Settings o-> Call settings o -> Call forward o
Before your first call
The SIM card
To use your phone, you must insert a valid SIM card for your GSM subscription.
This card contains your telephone number. It also has memory to store the phone numbers and messages you wish to retain. If you use this card on another phone, you still have the same phone number, stored numbers and messages.
PIN and PUK codes
The PIN code is a secret code in your SIM card to protect it from abusive use. If you or anyone else enters a wrong PIN code 3 times, your SIM card is blocked. To unblock it, you must request the PUK code from your Network Operator.
3
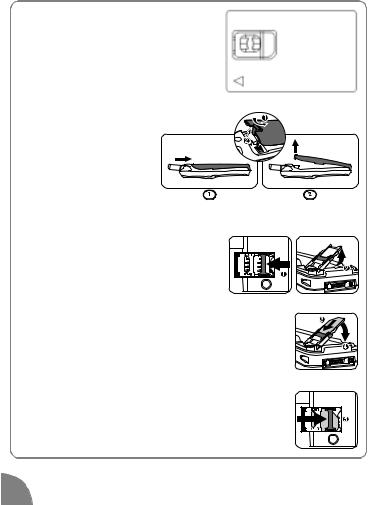
Insert the SIM card
1Remove the SIM card from your card.
2 Remove the battery cover.
1 Press on the battery cover latch at the back of the phone.
2 Lift off the battery cover.
3 Push the metal retaining clip to the left and lift the cardholder.
4 Slide the SIM card into its slot until it stops.
Please ensure that the clipped corner is in the identical position as on the drawing.
5Close the cardholder and push the clip to
the right.
4 |
The battery
Your phone is powered by a rechargeable battery.
•To optimise the battery capacity, please allow the battery to fully discharge 3 times in a row. To then maintain optimal battery capacity, do not wait until the battery indicator reaches low. This level is reached when only one bar is displayed in the battery indicator, see page 7.
•If you do not use the phone for several days, you should disconnect the battery.
•For a full recharging please allow the charger to be connected for 53 mns.
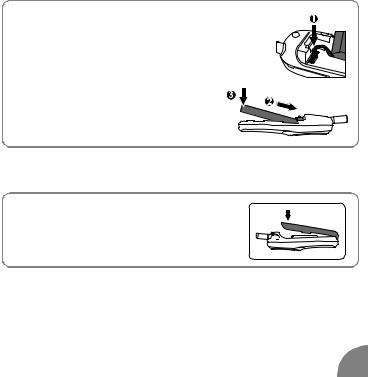
Insert the battery
1Plug the connector into the socket. If you cannot plug the connector, try again reversing the plug.
2 Tilt battery and press lightly against the battery latch.
3 Press the battery downwards.
Attach the battery cover
1Hook the battery cover onto the hinges on the bottom of the phone.
2 Press the top down until latch catches.
5 |
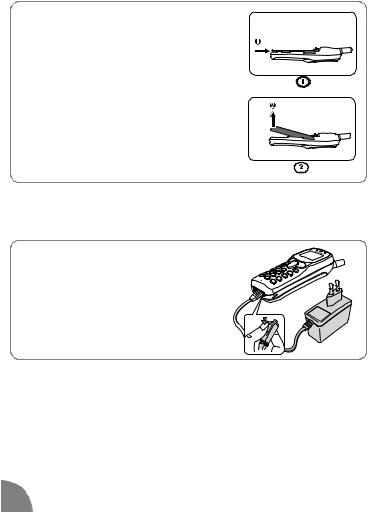
Remove the battery
1Press bottom of battery lightly against battery latch.
2 Lift bottom of battery and slide it out of the phone.
3 Unplug the connector from its slot.
When disconnecting the battery, the settings for date and time will be lost.
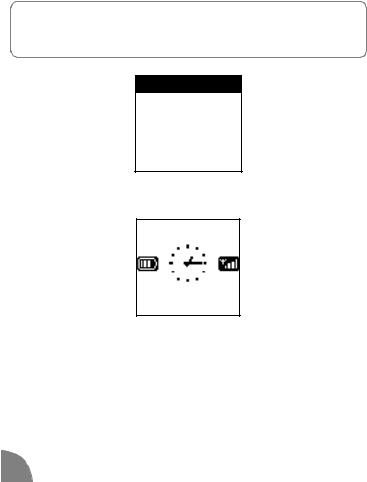
Charge the battery
With the battery inside the phone:
1 Plug the connector into the right socket at the base of the phone.
2 Plug the transformer unit into an easily accessible AC power socket.
LNOTE:
The only way to turn off the charger is to unplug it, so use an easily accessible AC power socket. You can connect the charger to an IT supply (Belgium only).
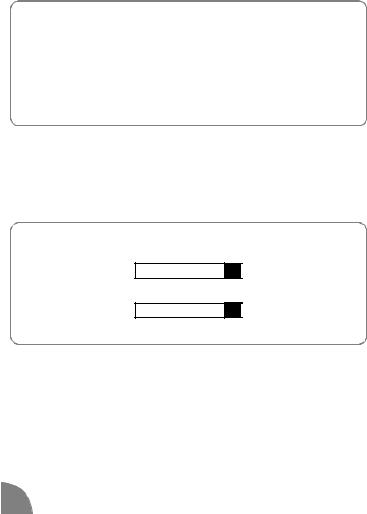
Bars moving battery is charging
Bars steady battery is fully charged*
Battery outline flashing (see Troubleshooting page 51).
*Keeping the mobile plugged to the charger when the battery is fully charged does not damage the phone.
6 |
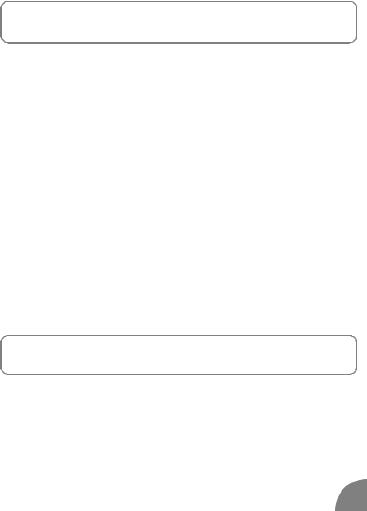
Screen
The screen displays information regarding various functions of your phone.
Network Name
12 jun 2000
 Alarm clock
Your alarm clock is activated.
 Silent
Your phone will not ring when receiving a call.
 Network
a Network: your phone is connected to a network
sReception quality: the more bars are shown the better the reception is.
 Vibrator
Your phone will vibrate when receiving a call.
 Keypad lock
Protects the keys from being pressed accidentally.
 SMS message
You have received a new message.
 SMS full
Memory for messages is full. You must delete old messages before you can receive new ones.
 Battery
One bar = low charge, 4 bars = full charge. If battery outline is flashing see Troubleshooting page 51.
 Call Forward Unconditional to number
All your incoming voice calls are being forwarded to a number other than voice mail.
 Call Forward Unconditional to voice mailbox
All your incoming voice calls are being forwarded to voice mail.
 Home zone
A zone designated by your network operator. Subscription dependent.
 Roaming
Displayed when your phone is registered to a network other than your own, especially when you are abroad.
 Voice Mail
You have received a new voice mail. 
7
Phone Functions
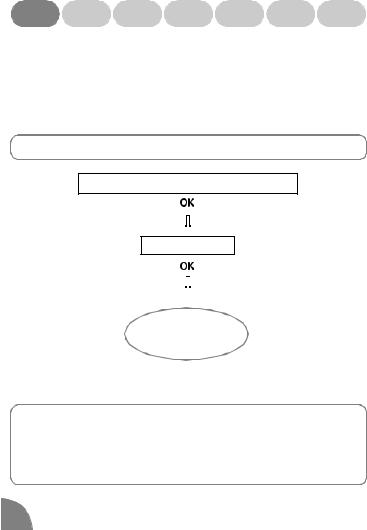
Switch on/off
1Long press r to switch on/off.
2Enter your PIN code if requested then press oto confirm.
PIN CODE
Idle Screen
Network Name
12 jun 2000
When the idle screen is displayed your phone is ready to use.
-If the network name is not displayed, the network is not currently available. You may be in a bad reception area (perhaps in a tunnel or between tall buildings). If possible, move to a different location.
8 |
Make a call
1Enter the phone number using the keypad.
2Press d to dial.
•Press Cto delete the previous digit.
•Press </ >to move through digits.
•Long press *to obtain "+" symbol on the screen for the International prefix.
Other easy quick ways to make a call:
•Press >to access Names list. Press </ >to select a name or press the key corresponding to the first letter of the name you wish to call. Press dto dial.
•Press <to access Call List to redial last called numbers or reply to last received or missed calls. Press <or >to select a number. Press dto dial.
•Long press on a key that is set up for Flash dial (see page 31).
•Long press oto access Voice dial. Pronounce the voice tag, (see page 15).
Answer a call
When receiving a call, your phone can ring and / or vibrate. Depending on your subscription, the caller's number may be displayed, if the caller has enabled this information to be transmitted. If this number is in the Names list, the corresponding name is displayed instead of the number.
1 Press d to answer a call.
2Press r to reject a call.
During a conversation, you can:
•Lower/raise earpiece volume by pressing </ >.
•Mute the microphone by pressing Mand selecting Mute.
•Enter a number you want to save by using the keypad. It reappears after the call.
9 |
•Find a phone number by pressing :
M to access Names list, </ >to select name and oto confirm. Press Mto return to your call screen.
End a call
1Press r to end a call.
Emergency call
Depending on the network operator, the emergency number can be dialled without the SIM card inserted. 112 is the standard emergency number for GSM networks (except for UK : 999).*
1 Enter 112 using the keypad.
2Press d.
LNOTE:
* This number depends on the country where you make the call. Please contact your Operator.
Text Entry
Text can be entered in editing screens in two different ways:
IBasic Text Entry Each key allows you to obtain several characters. Quickly press the same key several times to reach the desired character:
Example:
to enter "my hat!"
To obtain |
m |
y |
space |
h |
a |
t |
! |
Press |
6 |
9 |
1 |
4 |
2 8 |
0 |
|
once |
3 times |
once |
twice |
once once |
9 times |
|
|
quickly |
|
quickly |
|
quickly |
10 |

Key |
Characters |
|
|
1 |
space 1 @ _ # = < > ( ) & £ $ ¥ |
|
|
2 |
A B C 2 À Ä Å Æ Ç |
|
|
3 |
D E F 3 É E ∆ Φ |
|
|
4 |
G H I 4 Γ Ι |
|
|
5 |
J K L 5 Λ |
|
|
6 |
M N O 6 Ñ Ò Ö |
|
|
7 |
P Q R S 7 β Π Θ Σ |
|
|
8 |
T U V 8 Ü Ù |
|
|
9 |
W X Y Z 9 Ø Ω Ξ Ψ |
|
|
0 |
. 0 , / : ; " ' ! ¡ ? ¿ * + - % |
|
|
* |
Switch between Basic Text Entry / T9™ / digits / symbols |
|
|
# |
Switch between Upper / Lower / Auto Case |
|
|
IIT9™ uses ONE key press per letter. The word changes after every keystroke so, don't pay too much attention to how the word appears on the display until you
have pressed all the appropriate keys. Tegic Euro. Pat. App. 0842463 T9™ proposes a final series of probable
words and you confirm the one you select.
11 |
1Press * to enter T9™ mode unless T9™ symbol is already displayed.
2Press keys 2to 9(one press per letter indicated on the key) to spell the word you want to write.
3Press 0 to scroll the words T9™ proposes and select the one you want.
4Press 1 to confirm your word. T9™ inserts it in your message and adds a space.
•Press Cto delete the previous digit.
•Press M to return to idle screen.
•Press <or >to move cursor left or right.
Example: to enter the word "home":
1Press 4 6 6 3. The screen displays the first word of a list: Good.
Good T9
2Press 0 to scroll and select Home.
Home T9
3Press 1 to confirm Home.
12 |
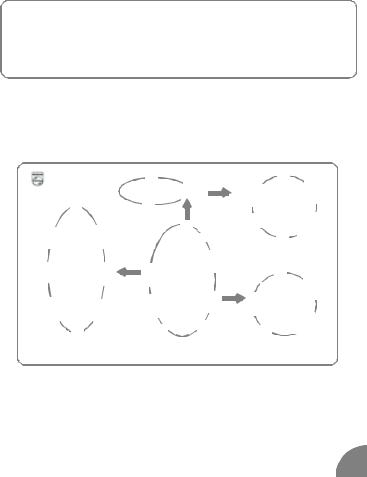
The Carousel
The carousel menu enables you to access the functions of your phone. Here’s an overview :
1Press M to access the carousel.
2 Press < / > to tour the menus and menu options. 3 Press o to confirm a choice of menu and option.
4Press M to return to the idle screen.
Main Menus
Press M. Press </ >to select a function from the carousel displayed on the screen then press oto confirm.
PHILIPS |
|
|
OK |
|
Favourites |
Service numbers |
|
|
WAP |
Launch |
Last page |
|
||
|
|
Services OK
Network
|
Help |
Settings |
Voice command |
Oper. services* |
|
Call settings |
Access settings |
|
|
|
|
|
OK |
Main |
Names |
|
Hotkeys |
Sounds |
Settings |
Menu |
OK |
Read SMS |
|
|
|
|
||
|
|
|
|
|
SMS settings |
Time and Date |
Display |
Extras |
|
Messages |
Send SMS |
|
|
||||
|
|
|
|
||
|
|
|
|
Call list |
Broadcast SMS |
Security |
|
Organiser |
Mailboxes |
||
|
|
||||
* Subscription dependent. |
Please contact your operator for further details. |
|
|||
13 |
Names Messages Call list Organiser Extras |
Settings |
Operator |
|
services |
|||
|
|
Names 
This is your directory of names and numbers you wish to store. They are stored in your SIM card. The capacity only depends on it. For further information, please contact your operator.
Press M-> Names -> Select a name from the list displayed on the screen.
<New>, Names, Own Number, Emergency,
Telephone Number
|
|
|
|
|
|
|
|
|
|
|
|
|
|
|
|
|
|
|
|
|
|
|
|
|
|
|
|
|
|
|
|
|
|
|
|
|
|
|
|
|
|
|
|
|
|
|
|
|
|
|
Call |
||||||||
|
|
|
|
|
|
|
|
|
|
|
|
|
||
|
|
|
|
|
|
|
|
|||||||
|
Change |
|
|
|
|
|
|
|
|
Send SMS |
||||
|
|
|
|
|
|
|
|
|
|
|
|
|||
|
|
|
|
|
|
|
|
|
|
|
|
|
|
|
Delete |
|
|
|
Voice Dial |
||||||||||
<New>
1Press </ > to select <New> to enter a new name and number, then press oto confirm.
2Use the Basic Text Entry mode to enter the name (see page 10).
3Enter the telephone number, then press oto confirm.
14 |
Names Messages Call list Organiser Extras |
Settings |
Operator |
|
services |
|||
|
|
Send SMS
1 Press </ > to select a name.
2Press o o.
3Press </ > to select Send SMS. See "Send SMS or Reply" page 17.
Voice Dial
You can dial a number simply by long pressing o and then pronouncing the voice tag you associated with that number. To set up a voice tag for someone not in the Names list, first create a <New> entry.
1 Press </ > to select name.
2Press o o.
3Press </ > to select Voice Dial.
4 Press o and the screen displays Add voice tag?
5Press o o.
6At screen message Speak now, clearly pronounce a short voice tag.
7Repeat this a second time following instructions on your screen.
LNOTE:
In a very noisy environment your phone may not recognise your tag. Please repeat or move to another location.
Change or Delete
1 Press </ > to select name.
2Press o o.
3 Press </ > to select Change or Delete.
15 |
Loading...