


Philips 26HFL5662H, 42HFL4482F, 37HFL4482F, 42HFL5682H, 32HFL4462F User Manual 2
...User Manual
22HFL5662H
26HFL5662H
32HFL4462F
32HFL5662D
32HFL5662H
32HFL5662L
37HFL4482F
37HFL5682D
37HFL5682L
42HFL4482F
42HFL5682D
42HFL5682H
42HFL5682L

Contents
1 Notice |
1 |
Safety information and useful tips |
1 |
Important Safety Instructions |
2 |
OSS declaration |
3 |
Cleaning and care |
3 |
Environmental care |
4 |
2 Your TV |
5 |
Standalone installation and side controls |
5 |
Guest remote control (optional) |
6 |
Philips Hospitality setup remote control |
|
(not included in box) |
7 |
RC2573GR setup remote control |
|
(not included in box) |
7 |
3 |
Installation |
8 |
|
Smart Installation |
8 |
|
Install TV Channels |
9 |
|
|
|
4 |
Home Screen |
13 |
|
Watch TV |
13 |
|
Smart Features |
13 |
|
USB |
14 |
|
TV Settings in Guest Menu |
14 |
|
|
|
5 |
Option |
16 |
|
|
|
6 |
Hotel Setting |
17 |
|
Hotel and Room Information |
17 |
|
Channel Map Setup |
17 |
|
Guest TV Settings |
18 |
|
PPV/VOD Options |
19 |
|
Installer TV Settings |
21 |
|
SmartClone |
23 |
|
TV Upgrade |
24 |
|
|
|
7 |
Overview of TV connectors and |
|
|
controls |
26 |
|
|
|
8 |
Glossary |
28 |
1 Notice
Know these
safety symbols
This “bolt of lightning” indicates uninsulated material within your unit may cause an electrical shock. For the safety of everyone in your household, please do not remove product covering.
The “exclamation point” calls attention to features for which you should read the enclosed literature closely
to prevent operating and maintenance problems.
WARNING: To reduce the risk of fire or electric shock, this apparatus should not be exposed to rain or moisture and objects filled with liquids, such as vases, should not be placed on this apparatus.
CAUTION: To prevent electric shock, match wide blade of plug to wide slot, fully insert.
ATTENTION: Pour éviter les choc électriques, introduire la lame la plus large de la fiche dans la borne correspondante de la prise et pousser jusqu’au fond.
Healthcare TV models
(22HFL5662H, 26HFL5662H, 32HFL5662H, 42HFL5682H)
Class 1 Warning
WARNING
THIS TELEVISION IS CONSIDERED TO BE A DEVICE WITH CLASS 1 CONSTRUCTION AND IT SHALL BE CONNECTED TO A MAINS SOCKET OUTLET WITH A PROTECTIVE EARTHING CONNECTION.
Pendant control Instruction manual Marking
CAUTION
INSTALLER: THIS PRODUCT IS NOT PROVIDED WITH A PENDANT CONTROL; HOWEVER, IT IS EXPECTED THAT THIS INSTITUTION (OR HOSPITAL) WILL PROVIDE ONE FOR ATTACHMENT TO THE APPROPRIATE RECEPTACLE ON THE PRODUCT.
AS PART OF THE INSTALLATION, EXAMINE THE PENDANT CONTROL TO DETERMINE WHETHER A MARKING SIMILAR TO THE ONE BELOW APPEARS ON IT: ‘CAUTION – RISK OF FIRE IF USED IN OXYGEN ENRICHED ATMOSPHERE – RETURN TO HOOK OR HOLDER AFTER USE.’ IF THE ABOVE NOTICE IS NOT PROVIDED ON THE PENDANT CONTROL, REMOVE THE LABEL PROVIDED WITH THESE INSTRUCTIONS AND ATTACH IT TO THE PENDANT CONTROL.
Safety information and useful tips
1.Two people are required to lift and carry a TV that weighs more than 55 lb (25 kg). Improper handling of the TV can cause serious injury.
2.If you place the TV set on a solid surface. Ensure the surface is level and that it can withstand the weight of the TV.
3.Installing the TV on the wall requires special skill that should only be performed by a qualified personnel. You should not attempt to do the work yourself. Philips bears no responsibility for improper mounting or mounting that results in accident or injury. Make sure that the wall mount is being fixed securely enough so that it meets safety standards.
4.This TV is compatible with the VESA wall mounting standard. Please contact your local electronics supplier for a VESA compliant bracket to wall mount this TV. Before you mount your TV on a wall, ensure the wall is suitable to carry the weight of the TV.
5.Do not insert the power plug in the wall socket before all connections are made.
6.Do not touch any part of the TV, power lead, or aerial lead during lightning storms.
7.Do not leave the TV in stand-by mode for an extended period of time. Instead, disconnect the TV from the mains.
8.The TV set is always connected to the mains. Disconnection of the TV set can be done by:
•unplugging the mains cord located at the back of TV set, or
•unplugging the mains plug from the mains socket outlet.
BPull the power lead by the plug - do not pull by the wire.
9.Ensure the power cord is fully inserted into the TV mains socket and the wall socket.
10.If the TV is mounted on a swivel base or swivel arm, ensure no strain is placed on the power cord when the TV is swivelled. Strain on the power cord can loosen connections and cause arcing or fire.
11.Verify that the mains supply voltage in your location corresponds to the voltage printed on the sticker at the rear of the TV.
12.The mains plug or appliance coupler is used as the disconnect device, the disconnect device shall remain readily operable.
13.An all-pole MAINS SWITCH is used as the disconnect device, the location on the apparatus and the function of the switch shall be described, and the switch shall remain readily operable.
1
Important Safety Instructions
Read before operating equipment
1. |
Read these instructions. |
|
17. Tilt / Stability - All televisions must comply with recommended |
2. |
Keep these instructions. |
|
international global safety standards for tilt and stability properties of its |
3. |
Heed all warnings. |
|
cabinet design. |
4. |
Follow all instructions. |
|
• Do not compromise these design standards by applying excessive |
5. |
Do not use this apparatus near water. |
|
pull force to the front, or top, of the cabinet which could ultimately |
6. |
Clean only with a dry cloth. |
|
overturn the product. |
7. |
Do not block any ventilation openings. Install in accordance with the |
• Also, do not endanger yourself, or children, by placing electronic |
|
|
manufacturer’s instructions. |
|
equipment/toys on the top of the cabinet. Such items could |
8. |
Do not install near any heat sources such as radiators, heat registers, |
unsuspectingly fall from the top of the set and cause product damage |
|
|
stoves, or other apparatus (including amplifiers) that produce heat. |
and / or personal injury. |
|
9. |
Do not defeat the safety purpose of the polarized or grounding-type |
18. Wall or Ceiling Mounting - The appliance should be mounted to a |
|
|
plug. A polarized plug has two blades with one wider than the other. A |
wall or ceiling only as recommended by the manufacturer. For use only |
|
|
grounding type plug has two blades and a third grounding prong. The wide |
with VESA Wall Mount Bracket. |
|
|
blade or the third prong are provided for your safety. If the provided plug |
19. Power Lines - An outdoor antenna should be located away from power |
|
|
does not fit into your outlet, consult an electrician for replacement of the |
lines. |
|
|
obsolete outlet. |
|
20. Outdoor Antenna Grounding - If an outside antenna is connected |
10. |
Protect the power cord from being walked on or pinched particularly at |
to the receiver, be sure the antenna system is grounded so as to provide |
|
|
plugs, convenience receptacles, and the point where they exit from the |
some protection against voltage surges and built up static charges. Section |
|
|
apparatus. |
|
810 of the National Electric Code, ANSI/NFPA No. 70-1984, provides |
11. |
Only use attachments/accessories specified by the manufacturer. |
information with respect to proper grounding of the mats and supporting |
|
12. |
Use only with a cart, stand, tripod, bracket, or table specified by the |
structure grounding of the lead-in wire to an antenna-discharge unit, size |
|
|
manufacturer, or sold with the apparatus. When a cart is used, |
|
of grounding connectors, location of antenna-discharge unit, connection to |
|
use caution when moving the cart/apparatus combination to |
|
grounding electrodes and requirements for the grounding electrode. See |
|
avoid injury from tip-over. |
S3125A |
Figure below. |
13. |
Unplug this apparatus during lightning storms or when unused |
|
21. Object and Liquid Entry - Care should be taken so that objects do |
|
for long periods of time. |
|
not fall and liquids are not spilled into the enclosure through openings. |
14. |
Refer all servicing to qualified service personnel. Servicing is required when |
Warning: To reduce the risk of fire or electric shock, this apparatus |
|
|
the apparatus has been damaged in any way, such as power-supply cord |
should not be exposed to rain or moisture and objects filled with liquids, |
|
|
or plug is damaged, liquid has been spilled or objects have fallen into the |
such as vases should not be placed on this apparatus. |
|
|
apparatus, the apparatus has been exposed to rain or moisture, does not |
22. Battery Usage CAUTION - To prevent battery leakage that may |
|
|
operate normally, or has been dropped. |
|
result in bodily injury, property damage, or damage to the unit: |
15. |
This product may contain lead or mercury. Disposal of these materials may |
• Install all batteries correctly, with + and - alignment as marked on the |
|
|
be regulated due to environmental considerations. For disposal or recycling |
unit. |
|
|
information, please contact your local authorities or the Electronic |
• Do not mix batteries (old and new or carbon and alkaline, etc.). |
|
|
Industries Alliance: www.eiae.org. |
|
• Remove batteries when the unit is not used for a long time. |
16. |
Damage Requiring Service - The appliance should be serviced by |
• The batteries (batteries installed) shall not be exposed to excessive |
|
|
qualified service personnel when: |
|
heat such as sunshine, fire or the like. |
|
A. The power supply cord or the plug has been damaged; or |
|
23. CAUTION -These servicing instructions are for use by qualified service |
|
B. Objects have fallen, or liquid has been spilled into the appliance; or |
personnel only. To reduce the risk of electric shock, do not perform any |
|
|
C. The appliance has been exposed to rain; or |
|
servicing other than that contained in the operating instructions unless you |
|
D. The appliance does not appear to operate normally or exhibits a |
are qualified to do so. |
|
|
marked change in performance; or |
|
|
|
E. The appliance has been dropped, or the enclosure damaged. |
LAMP(S) INSIDE THIS PRODUCT CONTAIN MERCURY AND MUST |
|
|
|
|
BE RECYCLED OR DISPOSED OF ACCORDING TO LOCAL, STATE OR |
|
|
|
FEDERAL LAWS. |
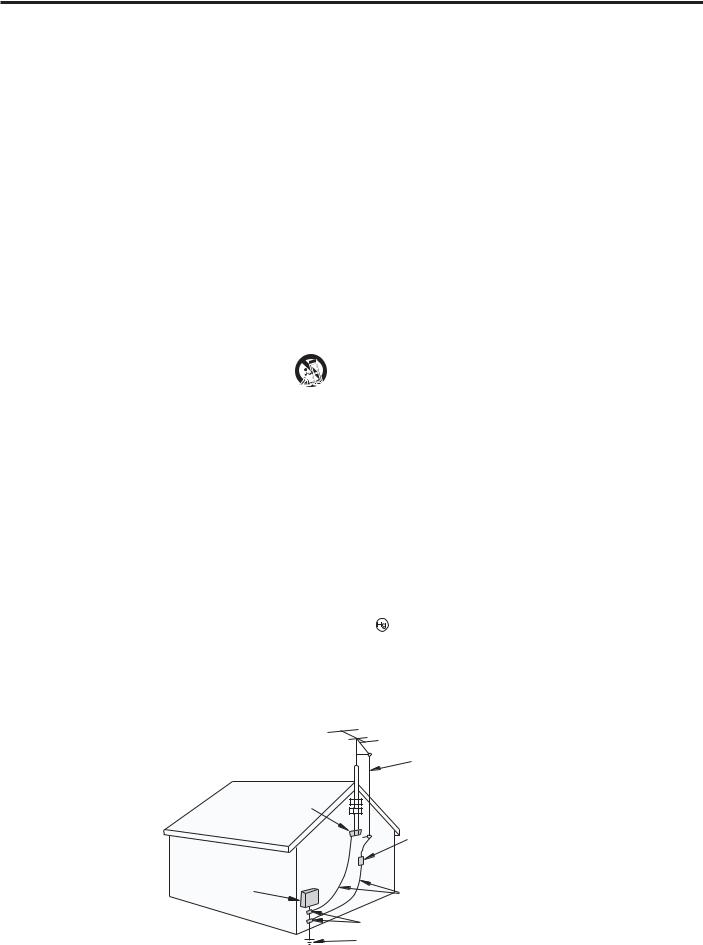
EXAMPLE OF ANTENNA GROUNDING AS PER
NATIONAL ELECTRICAL CODE (NEC)
|
ANTENNA |
|
|
LEAD IN WIRE |
|
|
GROUND |
|
|
CLAMP |
|
|
ANTENNA |
|
|
DISCHARGE UNIT |
|
ELECTRIC |
(NEC SECTION 810-20) |
|
|
||
SERVICE |
(NEC SECTION 810-21) |
|
EQUIPMENT |
||
GROUND CLAMPS |
||
|
GROUND CLAMPS |
|
|
POWER SERVICE GROUNDING ELECTRODE SYSTEM |
|
|
(NEC ART 250, PART H) |
Note to the CATV system installer: This reminder is provided to call the CATV system installer’s attention to Article 820-40 of the NEC that provides guidelines for proper grounding and, in particular, specifies that the cable ground shall be connected to the grounding system of the building, as close to the point of cable entry as practical.
2

2010 © Koninklijke Philips Electronics N.V. All rights reserved.
Specifications are subject to change without notice. Trademarks are the property of Koninklijke Philips Electronics N.V or their respective owners. Philips reserves the right to change products at any time without being obliged to adjust earlier supplies accordingly.
The material in this manual is believed adequate for the intended use of the system. If the product, or its individual modules or procedures, are used for purposes other than those specified herein, confirmation of their validity and suitability must be obtained. Philips warrants that the material itself does not infringe any United States patents. No further warranty is expressed or implied.
Philips can’t be held responsible neither for any errors in the content of this document nor for any problems as a result of
the content in this document.
Errors reported to Philips will be adapted and published on the Philips support website as soon as possible.
Warranty
No components are user-serviceable. Do not open or remove covers to the inside of the product.
Repairs may only be done by Philips Service Centers and official repair shops. Failure to do so shall void any warranty, stated or implied. Any operation expressly prohibited in this manual, any adjustments, or assembly procedures not recommended or authorised in this manual shall void the warranty.
Pixel characteristics
This LCD product has a high number of colour pixels. Although it has effective pixels of 99.999% or more, black dots or bright points of light (red, green or blue) may appear constantly on the screen. This is a structural property of the display (within common industry standards) and is not a malfunction.
OSS declaration
Open source software
This television contains open source software. Philips BU Hospitality hereby offers to deliver or make available, upon request, for a charge no more than the cost of physically performing source distribution, a complete machine-readable copy of the corresponding source code on a medium customarily used for software interchange.
To obtain the source code, write to:
Philips Singapore Pte Ltd.
Philips BU Hospitality
Software Development Manager
620A Lorong 1, Toa Payoh
Singapore 319762
This offer is valid for three years after the date of purchase of this product.
Federal Communications Commission Notice
This equipment has been tested and found to comply with the limits for a Class B digital device, pursuant to part 15 of the FCC Rules. These limits are designed to provide reasonable protection against harmful interference in a residential installation. This equipment generates, uses, and can radiate radio frequency energy and, if not installed and
used in accordance with the instructions, may cause harmful interference to radio communications. However, there is no guarantee that interference will not occur in a particular
installation. If this equipment does cause harmful interference to radio or television reception, which can be determined by turning the equipment off and on, the user is encouraged to try to correct the interference by one or more of the following measures:
•Reorient or relocate the receiving antenna.
•Increase the separation between the equipment and the receiver.
•Connect the equipment into an outlet on a circuit different from that to which the receiver is connected.
•Consult the dealer or an experienced radio or television technician for help.
Modifications
The FCC requires the user to be notified that any changes or modifications made to this device that are not expressly approved by Philips Consumer Electronics may void the user’s authority to operate the equipment.
Cables
Connections to this device must be made with shielded cables with metallic RFI/EMI connector hoods to maintain compliance with FCC Rules and Regulations.
Canadian notice
This Class B digital apparatus meets all requirements of the Canadian Interference-Causing Equipment Regulations.
Avis Canadien
Cet appareil numérique de la classe B respecte toutes les exigences du Règlement sur le matériel brouilleur du Canada.
Cleaning and care
•Do not touch the screen with anything hard as this may scratch, mark or damage the screen permanently.
•Do not rub with dust clothes containing chemical treatment.
•Do not touch the surface with bare hands or a greasy cloth (some cosmetics are harmful to the screen).
•Unplug the TV before cleaning the screen.
•When the surface becomes dusty, wipe gently with absorbent cotton or other soft materials like chamois soaks. Do not use acetone, toluene and alcohol cleaners because they cause chemical damage.
•Do not use liquid or aerosol cleaners.
•Wipe off saliva or water droplets as soon as possible. Long time contact with the screen causes deformations and color fading.
3
Screen care and sterilization
Avoid stationary images as much as possible. Stationary images are images that remain on-screen for extended periods of time. Examples include: on-screen menus, black bars and time displays. If you must use stationary images, reduce screen contrast and brightness to avoid screen damage.
Unplug the TV before cleaning.
Use a damp (not wet) cloth with only non-aggressive cleaners to wipe the TV. Use another damp (not wet) cloth to clean off the cleaning agent residue from the surface of the TV.
Recommended cleaning agents include:
•Bleach solution (10:90 concentration of bleach to water).
•Denatured alcohol (comprising of 80%-90% ethanol, 10%-20% methanol) Risk of damage to the TV screen! Never touch, push, rub or strike the screen with any object.To avoid deformations and color fading, wipe off water drops as soon as possible.
Environmental care
•Your product is designed and manufactured with high quality materials and components, which can be recycled and reused.
•The packaging of this product is intended to be recycled. Contact your local authorities for information about how to recycle the packaging.
For product recycling information, please visitwww.recycle.philips.com
Please act according to your local rules and do not dispose of your old products with your normal household waste. Correct disposal of your old product helps to prevent potential negative consequences for the environment and human health.
•Like all LCD products, this set contains a lamp with mercury; please dispose of according to all local, state and federal laws. Philips pays a lot of attention to produce environment-friendly products in green focal areas.Your new TV contains materials which can be recycled and reused. At the end of its life, specialized companies can dismantle the discarded TV
to concentrate the reusable materials and to minimize the amount of materials to be disposed of. Please ensure you dispose of your old TV according to local regulations. Disposal of used batteries The batteries supplied do not contain the heavy metals mercury and cadmium. Nevertheless, in many areas batteries may not be disposed of with your household waste. Please ensure you dispose of batteries according to local regulations.
Copyright
VESA, FDMI and the VESA Mounting Compliant logo are trademarks of the Video Electronics Standards Association.
Manufactured under licence from Dolby Laboratories. Dolby and the double-D symbol are trademarks of Dolby Laboratories.
Energy Star® qualified products and practices help you save money and reduce Greenhouse gas emissions by meeting strict energy efficiency guidelines set by the U.S. Environmental Protection Agency and U.S. Department of Energy.
4
2 Your TV
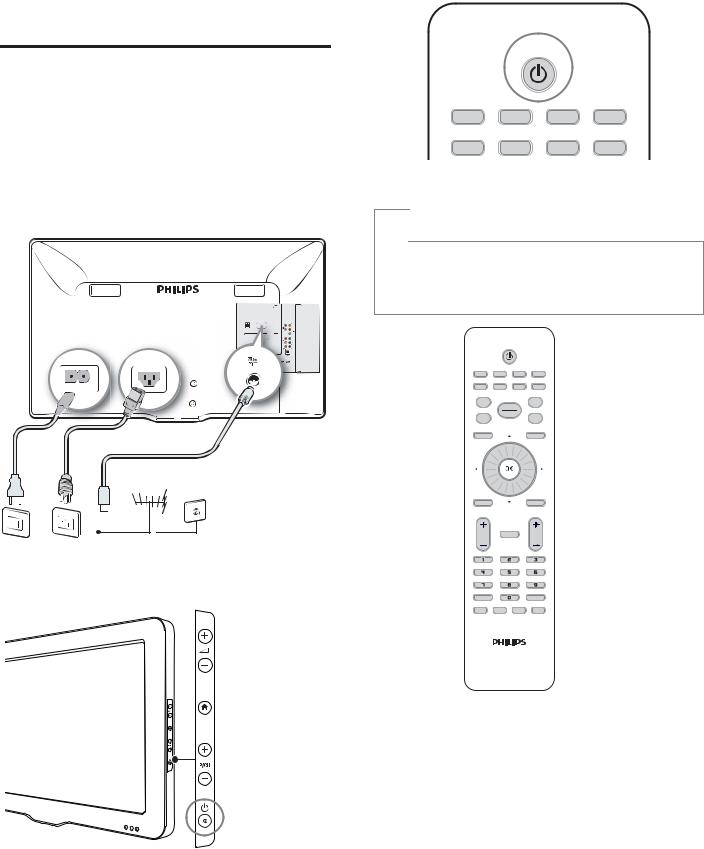
Standalone installation and side controls
This section describes how to install the TV channels automatically.
1.Connect the RF signal from the wall socket to the TV.
2.Plug the power cord into the power outlet.
•2-pin power cord (for D/L models)
•3-pin power cord (for H models)
TV ANTENNA
Cable
3.Turn the TV on.
• Press B(POWER) at the side of the TV.
• Press BPower on the setup remote control.
A B C D
EF G RESET/UPGRADE
4.Press RC5 SETUP to display the setup menu.
 Note
Note
•The setup remote control is not included in the box. Contact your Philips authorized agent or dealer to acquire the setup remote control.
Setup remote control might differ from the illustration.
A B C D
EF G RESET/UPGRADE
RECALL/INFO GUIDE
BACK/PP |
HOME |
OPTIONS |
|
|
MENU |
ALARM/CLOCK |
SMART |
TELETEXT |
|
CC |
|
MUTE |
|
TV |
|
P |
VOL |
|
|
|
|
|
|
ABC |
DEF |
GHI |
JKL |
MNO |
PQRS |
TUV |
WXYZ |
AV |
|
SLEEP |
RC5 GUEST RC5 SETUP RC6 GUEST RC6 SETUP
HOSPITALITY
5
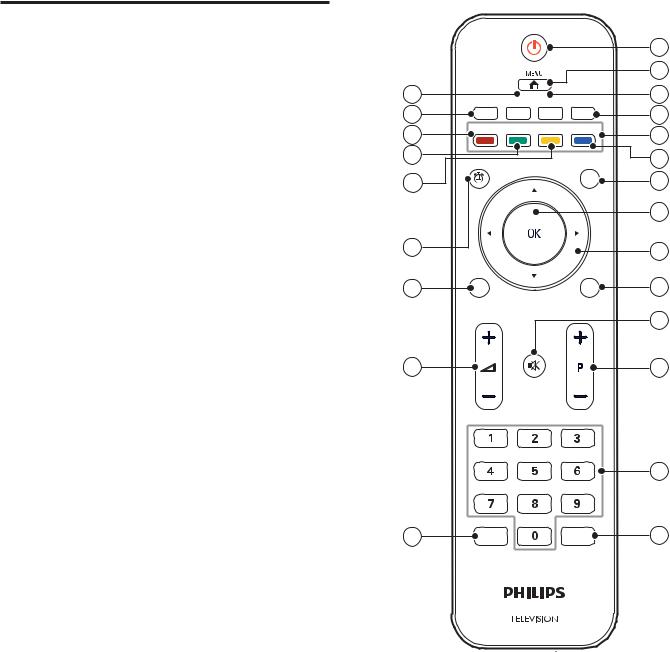
Guest remote control (optional)
aPOWER: Press to turn on/off the TV from or to standby mode.
bHOME: Toggles the main menu on or off.
cSOURCE: Selects connected devices.
dOPTIONS: Selects different options.
eCOLOR buttons: Selects tasks or options.
fForward button: Fast forward feature.
gUSB/MEDIA: Access the USB files or photos.
hOK: Confirm an entry or selection.
iNavigation buttons: Navigates through the menus.
jSMART FEATURES: Direct access to Smart Features.
kMute: Mute or restores audio output.
lProgram +/-: Switches to the next or previous channel.
m0-9 Numeric buttons: Selects a channel or setting.
nFORMAT: Launches the picture FORMAT menu.
oBACK: Going back to the previous menu.
pVolume +/-: Increases or decreases volume.
qSMART GUIDE: Direct access to SMART GUIDE menu.
rCLOCK: Unused button.
sBackward button: Fast reverse feature.
tSTOP: Stop button.
uPLAY/PAUSE: Select Play or Pause a picture.
vCC: Enables Closed Caption.
wSLEEP: Enable Sleeptimer feature.
23 |
CC |
SLEEP |
SOURCE |
OPTIONS |
22 |
|
|
|
|
21 |
Æ/ |
Ê |
¢ |
∫ |
20 |
CLOCK |
|
|
USB/MEDIA |
|
|
|
19
18
17
SMART |
SMART |
GUIDE |
FEATURES |
16
BACK |
FORMAT |
15
1
2
3
4
5
6
7
8
9
10
11
12
13
14
6

Philips Hospitality setup remote control (not included in box)
A B C D
EF G RESET/UPGRADE
RECALL/INFO GUIDE
BACK/PP |
HOME |
OPTIONS |
|
|
MENU |
ALARM/CLOCK |
SMART |
TELETEXT |
|
CC |
|
MUTE |
|
TV |
|
P |
VOL |
|
|
|
|
|
|
ABC |
DEF |
GHI |
JKL |
MNO |
PQRS |
TUV |
WXYZ |
AV |
|
SLEEP |
RC5 GUEST |
RC5 SETUP RC6 GUEST |
RC6 SETUP |
HOSPITALITY
RC2573GR setup remote control (not included in box)
RC2573GR is an optional remote control. It is used for Philips Commercial Solutions features and SmartCard settings. It can be purchased separately.
aSlide this button up to enter into Guest mode or slide this button down to enter into Setup mode.
bE button: It has the same function as OK button.
1
0
2
7
3 Installation
Smart Installation
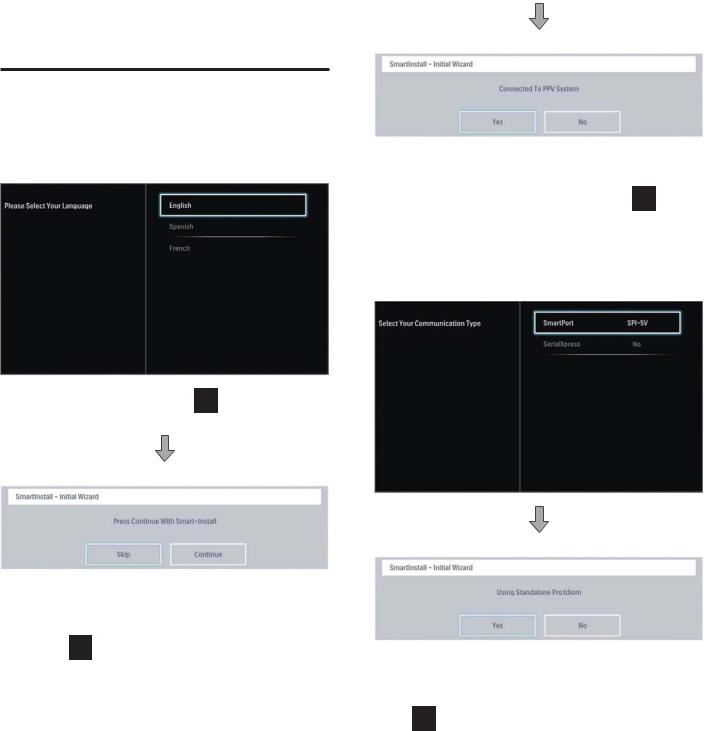
In the 1st time (Virgin) installation, the OSD will instruct you step by step to do the TV installation setting.
1. Please Select Your Language
•Choose a language and press  to select and proceed to the next step.
2.SmartInstall – Initial Wizard
•In the option, you can choose either “Skip” or “Continue” to continue the Smart Install.
•In the first time set up, choose “Continue” option and press  to enter the next step
3.SmartInstall – Connection to Paid-Per-View System
•In the option, you can choose “Yes” or “No” to Connected To PPV System.
•Choose either the “No” option and press  to enter the next step.
•Or for a PPV system installation, choose “Yes”. The Screen Menu will request for selection of
Communication Type which includes SmatPort (select No, SPI-5V, SPI-3V3) and Serial Express.
4.SmartInstall – Standalone Proidiom selection
•In the option, you can choose “Yes” or “No” to Using Standalone Pro:Idiom.
•In the first time set up, choose “No” option and press  to enter the next step.
After above setting is completed, you will enter the following setting OSD.
8
 Loading...