


Colour Television
14"/20"/21"
Instructions for use
14PT1582
20PT1582
21PT1582
3139 125 27303
INSTALLATION |
2 |
|
5 cm |
• |
|
|
|
|
|
• |
5 cm |
|
5 cm |
|
• |
|
|
|
|
|
|
• |
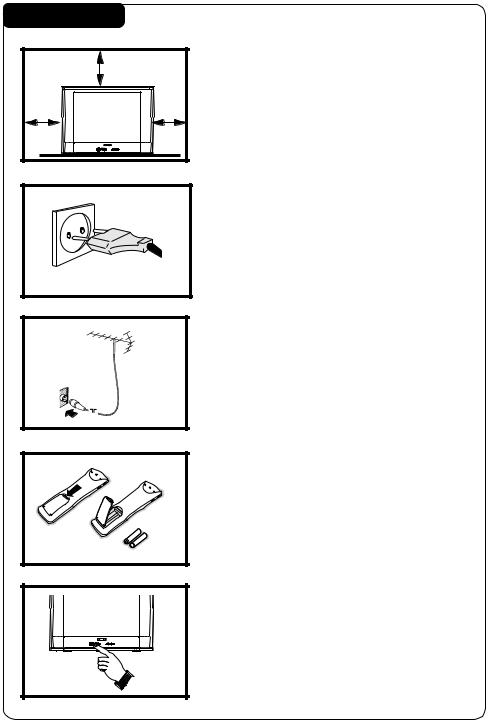
Positioning of the TV set
Place TV set on a solid base (e.g. a TV/Video cabinet)
Leave at least 5 cm around each side of TV set for ventilation to avoid over-heating.
Do not place TV set near a radiator or other sources of heat.
Do not place TV set where it can be exposed to rain or excessive moisture.
Mains Connection
•For correct mains voltage, refer to type sticker at the rear of the TV set
•Consult your dealer if mains supply is different. Note : This diagram is not representative of the actual plug and socket.
Antenna Connections
•Connect the aerial plug to the antenna socket ¬on the backcover.
•Insert the mains plug into a wall socket.
Use of Remote Control
•Insert correct type of batteries into the compartment.
•Ensure the batteries are placed in the right direction.
Switching on the set
•Press the mains power button to switch on/off the TV.
•If the set is on standby mode (indicator is red), press STANDBY button on the remote control to switch on set.
CONNECTING PERIPHERAL EQUIPMENT |
3 |
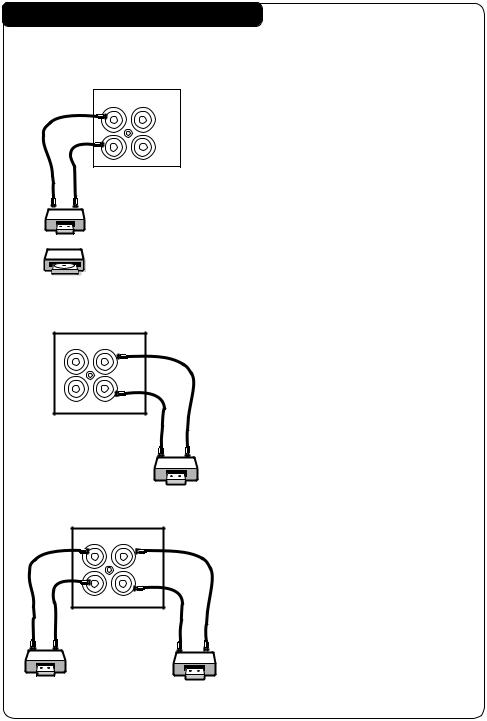
Equipment such as VCR, Laser disc player, VCD, etc. can be connected to the video and audio (AV) sockets at the rear of the TV. Switch off mains power of the TV and equipment before making any connections.
in out
VIDEO
AUDIO
VCR
OR
Laser
disc
player
Connection for Playback
•Connect the Video Output socket of the VCR/laser dissc player to the AV “in” socket at the rear of the TV to playback programmes.
in out
VIDEO
AUDIO
VCR
in out
VIDEO
AUDIO
Connection for recording
1. From the TV channel you are watching
•Connecct input sockets of the VCR to the Monitor “out” sockets at the rear of the TV to do recording.
2. From one VCR to another VCR
•Connect the sockets of the VCR which you wish to record from to the Input sockets at the rear of the TV.
•Connect the sockets of the receiving VCR to the Monitor “out” sockets at the rear of the
TV.
VCR 1 |
VCR 2 |

FUNCTIONS OF TV FRONT CONTROLS/SOCKETS |
4 |
INSTALL /
MENU
|
n |
˝ |
˙ |
¸ ˚ |
|
|
VIDEO |
AUDIO |
|
¸ CHANNEL ˚ |
14PT1582 |
|
|
L VOLUME K |
|
||
|
1 |
|
|
|
20PT1582 |
|
2 |
|
|
|
|
3 |
4 |
5 |
6 |
7 |
|
|
|
|
|
INSTALL / |
|
|
|
|
|
MENU |
|
|
3 |
|
|
˝ ˙ ¸ ˚ |
|
|
|
|
|
L VOLUME K |
¸CHANNEL ˚ |
|
n |
VIDEO |
AUDIO |
|
21PT1582 |
|
1 |
|
|
|
|
|
2 |
|
|
|
|
3 |
4 |
|
5 |
6 |
7 |
1. |
Mains Power button |
Switch mains power on or off. |
2. |
Standby light indicator |
Indicate red light when standby mode is activated. |
3. |
Remote Sensor |
Aim remote control handset at remote sensor when |
|
|
operating the TV. |
4. |
Headphone socket |
Connect headphone jack to socket for personal listening. |
5. |
AV “in” sockets |
Connect to Video “out” and Audio “out” sockets of VCR |
|
|
laser disc player, etc. |
6.Volume ˝ / ˙ button Adjust sound volume louder/softer.
7.Channel ¸ / ˚button Select channel in ascending/descending order.
Note : You can enter the main menu by pressing both the Volume ˝/ ˙buttons at the same time.
Press Channel ¸/ ˚button to select items on the menu.
Press Volume ˝/ ˙button to activate sub-menu.
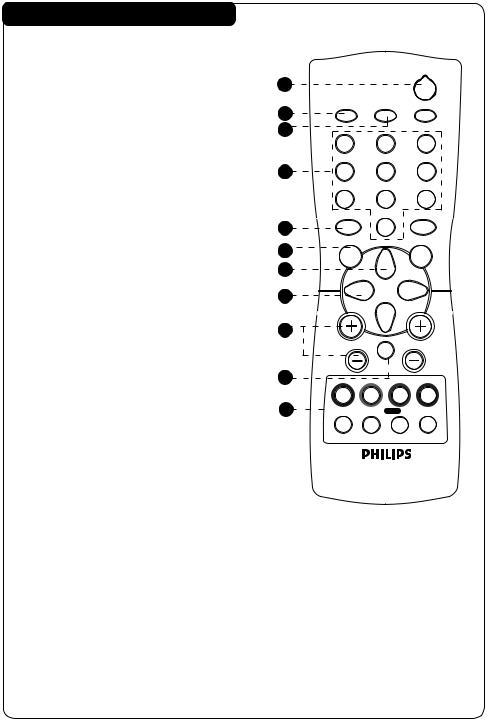
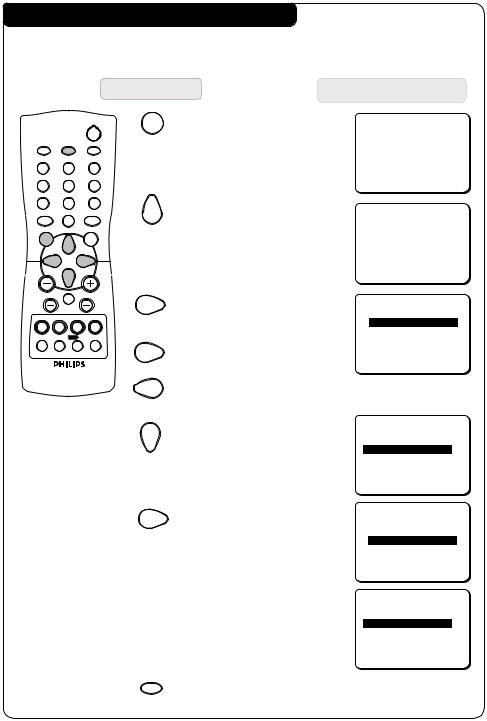
FUNCTIONS OF REMOTE CONTROL
1.STANDBY
Switch off set temporarily to standby mode. (The red light indicator lights up when set is on standby mode). To switch on set, press STANDBY or any DIGIT button.
2.AV
Selects AV channels.
3.OSD (On-Screen Display)
–Displays channel number and sound transmission mode.
–Allows you to exit menu from screen.
4.DIGIT (0 - 9)
Allows you select a channel. For a 2-digit channel number, the second digit must be entered before the
“ – “ sign disappears.
5.SMART SOUND
Allows you to access 4 different types of sound settings and select your preferred setting.
6.MENU
To display or exit menu from screen.
7.CURSOR UP
Allows you to select the next item on the menu.
8.CURSOR LEFT
Allows you to access the sub-menus and adjust the settings.
9.VOLUME + / –
Increases / decreases volume.
10.MUTE
Mutes sound. To restore sound, press button again.
11.TELETEXT
Not applicable.
5
1 |
|
|
2 |
|
|
|
|
2 |
AV |
OSD |
SLEEP |
|
|
|
|
3 |
1 |
2 |
3 |
|
|||
4 |
4 |
5 |
6 |
|
7 |
8 |
9 |
|
SMART |
|
SMART |
5 |
± |
0 |
` |
6 |
MENU |
|
INC. |
|
|
SURR. |
|
7 |
|
|
|
|
|
|
|
8 |
|
|
|
9 |
|
|
|
|
A |
H |
CH |
10 |
|
|
|
11 |
|
SURF A/CH 4 |
|
|
b |
h f |
e |
FUNCTIONS OF REMOTE CONTROL |
6 |
2
AV |
OSD |
SLEEP |
12
1 2 3
4 5 6
7 |
8 |
9 |
|
|
SMART |
|
SMART |
13 |
|
± |
0 |
` |
||
MENU |
|
INC. |
14 |
|
|
SURR. |
|
||
|
|
|
||
|
|
|
15 |
|
|
|
|
16 |
|
|
|
|
17 |
|
A |
H |
CH |
|
|
|
SURF A/CH 4 |
18 |
||
b |
h f |
e |
||
|
||||
|
|
|
19 |
|
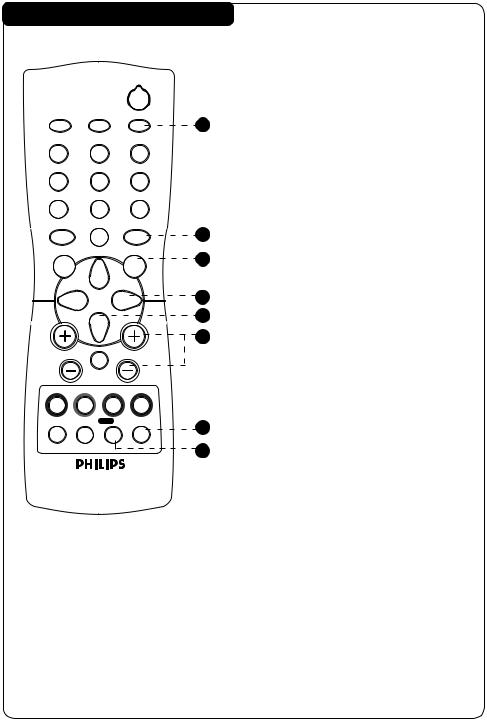
12.SLEEPTIMER
Allows you to select a time period after which the set will switch to standby mode automatically. You can set the timer from OFF mode up to a maximum of 240 minutes.
13.SMART PICTURE
Allows you to access 4 different types of picture settings and select your preferred setting.
14.INCREDIBLE SURROUND
Not applicable.
15.CURSOR RIGHT
Allows you to access the sub-menus and adjust the settings.
16.CURSOR DOWN
Allows you to select the next item on the menu.
17.CHANNEL + / –
Allows you to select channel in ascending or descending order.
18.4
Not applicable for 4 feature.
19.SURF / ALTERNATE CHANNEL
–When surf mode is activated through the main menu, it allows you to select up to a maximum of 8 channels and view quickly the selected channels .
–It also allows you to alternate between the last viewed channel and the present channel if alternate channel mode is activated.
AUTOMATIC TUNING OF THE TV CHANNELS |
7 |
Selecting the language and Automatic Tuning |
|
Press button |
Result on TV Screen |
|
|
2 |
AV |
OSD |
SLEEP |
1 |
2 |
3 |
4 |
5 |
6 |
7 |
8 |
9 |
SMART |
SMART |
|
± |
0 |
` |
MENU |
INC. |
|
SURR. |
||
A |
H |
CH |
|
SURF A/CH |
4 |
b h f e
MENU 1. Enter main menu.
BLUE MUTE |
|
OFF |
INSTALLATION |
É |
|
BRIGHTNESS IIIII |
28 |
|
COLOUR |
IIII |
18 |
CONTRAST |
IIIIIIII 38 |
|
2. Select INSTALLATION.
3.Enter installation menu. LANGUAGE option is highlighted.
4.Select your desired
OR language.
5. Select AUTO STORE.
6. Start automatic tuning.
7.After tuning is completed, the installation menu
will appear.
SURF |
A/CH |
|
BLUE MUTE |
|
OFF |
INSTALLATION |
É |
|
BRIGHTNESS IIIII |
28 |
|
COLOUR |
IIII |
18 |
LANGUAGE |
ENGLISH |
|
AUTO |
STORE |
É |
SWAP |
|
É |
LANGUAGE |
ENGLISH |
AUTO STORE |
É |
SWAP |
É |
SKIP |
É |
AUTOSTORE 050 MHZ CHANNEL 1
LANGUAGE |
ENGLISH |
AUTO STORE |
É |
SWAP |
É |
SKIP |
É |
OSD
8. Exit menu from screen.
 Loading...