


OWNER’S MANUAL 200 c

SYMBOL INSTRUCTIONS
Raise needle |
Raise presser foot |
Lower presser foot |
This houshold sewing machine is designed to comply with IEC/EN 60335-2-28 and UL1594
IMPORTANT SAFETY INSTRUCTIONS
When using an electrical appliance, basic safety precautions should always be followed, including the following:
Read all instructions before using this household sewing machine.
DANGER - To reduce the risk of electric shock:
•A sewing machine should never be left unattended when plugged in. Always unplug this sewing machine from the electric outlet immediately after using and before cleaning.
•Always unplug before relamping. Replace bulb with same type rated 5 Watt.
WARNING - To reduce the risk of burns, fire, electric shock, or injury to persons:
•Do not allow to be used as a toy. Close attention is necessary when this sewing machine is used by or near children or infirm person.
•Use this sewing machine only for its intended use as described in this manual. Use only attachments recommended by the manufacturer as contained in this manual.
•Never operate this sewing machine if it has a damaged cord or plug, if it is not working properly, if it has been dropped or damaged, or dropped into water. Return the sewing machine to the nearest authorised dealer or service center for examination, repair, electrical or mechanical adjustment.
•Never operate the sewing machine with any air openings blocked. Keep ventilation openings of the sewing machine and foot control free from the accumulation of lint, dust, and loose cloth.
•Keep fingers away from all moving parts. Special care is required around the sewing machine needle.
•Always use the proper needle plate. The wrong plate can cause the needle to break.
•Do not use bent needles.
•Do not pull or push fabric while stitching. It may deflect the needle causing it to break.
•Switch the sewing machine off (“0”) when making any adjustment in the needle area, such as threading needle, changing needle, threading bobbin, or changing presser foot, etc.
•Always unplug the sewing machine from the electrical outlet when removing covers, lubricating, or when making any other user servicing adjustments mentioned in the instruction manual.
•Never drop or insert any object into any opening.
•Do not use outdoors.
•Do not operate where aerosol (spray) products are being used or where oxygen is being administrated.
•To disconnect, turn all controls to the off (“0”) position, then remove plug from outlet.
•Do not unplug by pulling on cord. To unplug, grasp the plug, not the cord.
SAVE THESE INSTRUCTIONS

CONTENTS |
|
PRINCIPAL PARTS OF THE MACHINE............................................................................................................ |
6 |
BUTTONS OF THE MACHINE .......................................................................................................................... |
7 |
LCD SCREEN .................................................................................................................................................... |
9 |
PATTERN CHART ........................................................................................................................................... |
10 |
ACCESSORIES ............................................................................................................................................... |
11 |
CONNECTING THE MACHINE TO THE POWER SOURCE .......................................................................... |
12 |
START SEWING .............................................................................................................................................. |
13 |
Speed adjustment lever.................................................................................................................................... |
13 |
Foot control ...................................................................................................................................................... |
13 |
REPLACING THE NEEDLE............................................................................................................................. |
14 |
CHANGING THE PRESSER FOOT................................................................................................................. |
14 |
ADJUSTING PRESSER FOOT PRESSURE................................................................................................... |
15 |
MATCHING NEEDLE/ FABRIC/ THREAD ...................................................................................................... |
15 |
TYPE OF PRESSER FOOT CHART ............................................................................................................... |
16 |
WINDING THE BOBBIN .................................................................................................................................. |
17 |
INSERTING THE BOBBIN............................................................................................................................... |
19 |
THREADING THE UPPER THREAD............................................................................................................... |
20 |
USING THE NEEDLE THREADER ................................................................................................................. |
22 |
TOP THREAD TENSION ................................................................................................................................. |
23 |
BRINGING UP THE BOBBIN THREAD .......................................................................................................... |
24 |
CUTTING THE THREAD ................................................................................................................................. |
24 |
PRESSER FOOT LIFT..................................................................................................................................... |
25 |
RAISE OR LOWER THE FEED DOGS ........................................................................................................... |
25 |
OPERATION BUTTONS .................................................................................................................................. |
26 |
Reverse button ................................................................................................................................................. |
26 |
Auto-lock button .............................................................................................................................................. |
27 |
Needle up/down button .................................................................................................................................... |
27 |
FUNCTION BUTTONS..................................................................................................................................... |
28 |
Stitch width button ............................................................................................................................................ |
28 |
Stitch length button........................................................................................................................................... |
29 |
MODE selection button .................................................................................................................................... |
29 |
Pattern mirroring button.................................................................................................................................... |
30 |
MEMORY BUTTONS ....................................................................................................................................... |
31 |
Memory button ................................................................................................................................................. |
31 |
Clear button...................................................................................................................................................... |
31 |
Arrow button ..................................................................................................................................................... |
31 |
SELECTION BUTTONS................................................................................................................................... |
32 |
Direct pattern selection buttons........................................................................................................................ |
32 |
Number buttons................................................................................................................................................ |
32 |
USEFUL SKILLS ............................................................................................................................................. |
33 |
Sewing corners................................................................................................................................................. |
33 |
Reverse ............................................................................................................................................................ |
33 |
Free arm........................................................................................................................................................... |
33 |
Sewing on heavy fabric .................................................................................................................................... |
34 |
STRAIGHT STITCHES AND NEEDLE POSITION.......................................................................................... |
35 |
Changing the needle position........................................................................................................................... |
35 |
Changing the stitch length................................................................................................................................ |
35 |
ZIGZAG STITCHES ......................................................................................................................................... |
35 |
Adjusting the stitch length ................................................................................................................................ |
35 |
4

Adjusting the stitch width.................................................................................................................................. |
35 |
STRETCH STITCHES...................................................................................................................................... |
36 |
OVERCASTING STITCHES ............................................................................................................................ |
37 |
Using the overcasting foot................................................................................................................................ |
37 |
Using the standard foot .................................................................................................................................... |
37 |
BLINDHEM....................................................................................................................................................... |
38 |
BUTTON SEWING ........................................................................................................................................... |
39 |
BUTTONHOLE STITCHING ............................................................................................................................ |
40 |
Making a buttonhole on stretch fabrics............................................................................................................. |
43 |
BAR TACK STITCH ......................................................................................................................................... |
44 |
EYELET STITCH.............................................................................................................................................. |
45 |
DARNING STITCH........................................................................................................................................... |
46 |
ZIPPER INSERTION........................................................................................................................................ |
48 |
QUILTING......................................................................................................................................................... |
49 |
SCALLOP EDGES........................................................................................................................................... |
49 |
FREE-MOTION, DARNING, EMBROIDERY AND MONOGRAMMING .......................................................... |
50 |
Darning............................................................................................................................................................. |
50 |
Embroidery ....................................................................................................................................................... |
51 |
Monogramming ................................................................................................................................................ |
51 |
MIRRORING .................................................................................................................................................... |
52 |
MEMORY.......................................................................................................................................................... |
53 |
Program patterns or letters............................................................................................................................... |
53 |
Add patterns or letters ...................................................................................................................................... |
54 |
Clear patterns or letters.................................................................................................................................... |
54 |
Recall and sew the memorized pattern ............................................................................................................ |
55 |
WARNING FUNCTIONS .................................................................................................................................. |
56 |
Warning animation message display................................................................................................................ |
56 |
Instruction animation message display ............................................................................................................ |
56 |
Warning beeping sound.................................................................................................................................... |
56 |
REPLACING THE LIGHT BULB ..................................................................................................................... |
57 |
MAINTENANCE............................................................................................................................................... |
58 |
Cleaning the screen ......................................................................................................................................... |
58 |
Cleaning the sewing machine surface.............................................................................................................. |
58 |
Cleaning the hook ............................................................................................................................................ |
58 |
TROUBLESHOOTING GUIDE......................................................................................................................... |
60 |
QUICK REFERENCE CHART ......................................................................................................................... |
62 |
5
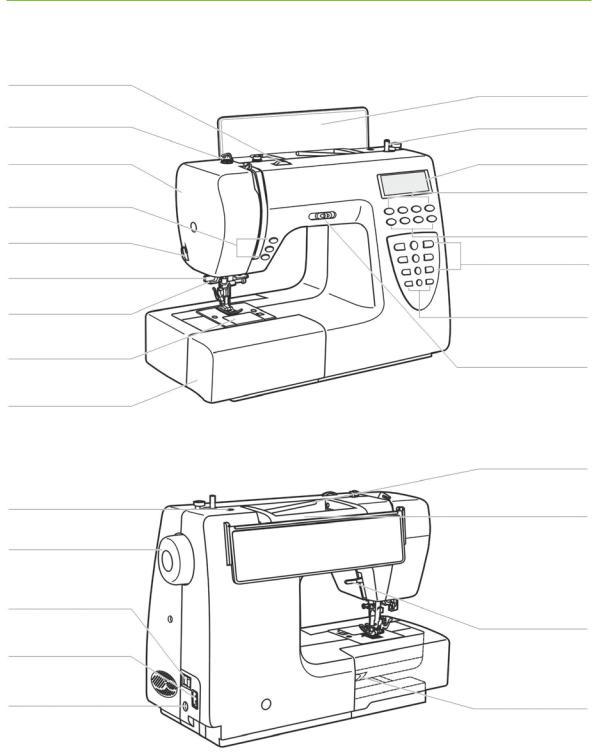
PRINCIPAL PARTS OF THE MACHINE
Tension dial
Presser foot pressure
Face plate
Operation buttons 
Thread cutter
Buttonhole lever
Needle threader
Needle plate
Accessory tray
Hole for second spool pin
Handwheel
Main power switch
Power cord
Foot control connector
Pattern plate
Bobbin winder
LCD screen  Function buttons
 Memory buttons
 Selection buttons
 Function buttons
Speed adjustment lever
Horizontal spool pin
Handle
Presser foot lift
Feed dog adjustment lever
6
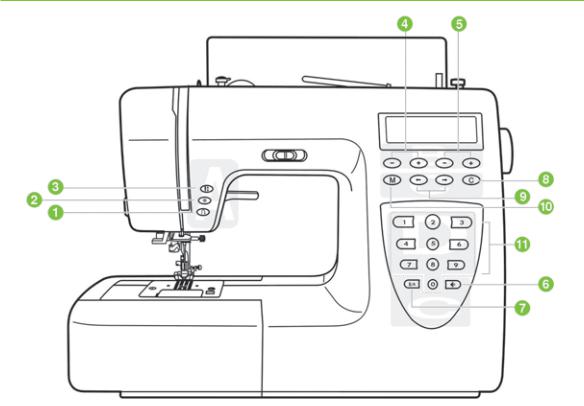
BUTTONS OF THE MACHINE
A. Operation buttons
1.Reverse button
Hold down this button to sew either backwards or a reinforcement stitch at a low speed.
2.Auto-lock button
Hold down this button to sew locking stitches immediately or at the end of the current pattern and automatically stop.
3.Needle up/down button
Press this button to move the needle either up or down.
B. Function buttons
4.Stitch length
Press this button to adjust the length of the stitch.
7

5.Stitch width
Press this button to adjust the width of the stitch.
6.Pattern mirroring
Press this button to sew a mirrored pattern.
7.Mode selection
Press this button to select direct mode, utility and decorative pattern mode or block letter mode.
C. Memory buttons
8.Clear button
If an incorrect pattern is selected or programmed, pressing this button will clear it.
9.Arrow button
Press the “  “ button or “
  “ button until the desired stitch number in the programmed combination is displayed.
10.Memory button
Press this button to enter or store the programmed pattern combination in the memory.
D. Selection buttons
11.Direct pattern selection and number buttons
Instant access to direct pattern or press the pattern number to select the desired pattern.
8
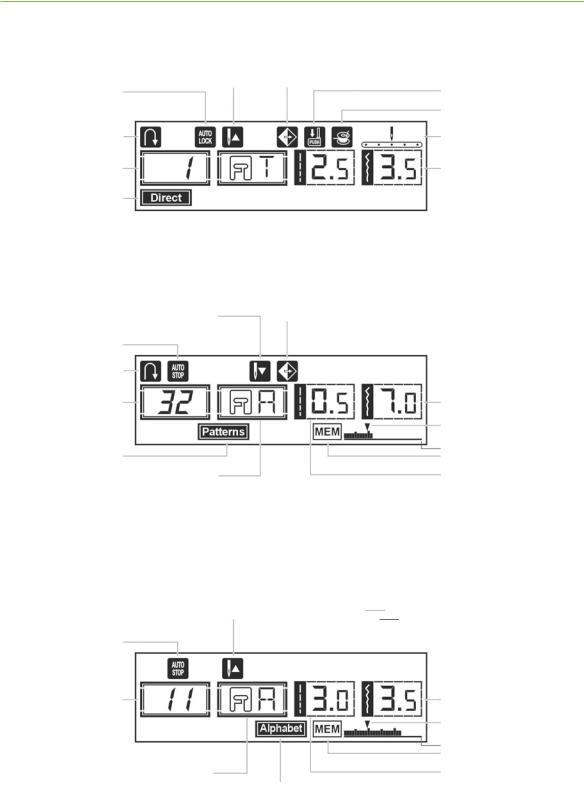
LCD SCREEN
Direct Pattern
Needle up Mirror
Auto-lock
Reverse
Pattern number
Direct mode
Pattern
Needle down |
Mirror |
Auto-stop
Reverse
Pattern number
Normal mode
Suggested presser foot
Alphabet
Needle up
Auto-stop
Pattern number
Suggested presser foot
Alphabet mode
Buttonhole lever
Bobbin winding
Needle position
Stitch width
Stitch width
Current position in the programmed memory
Total space in the memory Memory
Stitch length
Stitch width
Current position in the programmed memory
Total space in the memory Memory
Stitch length
9
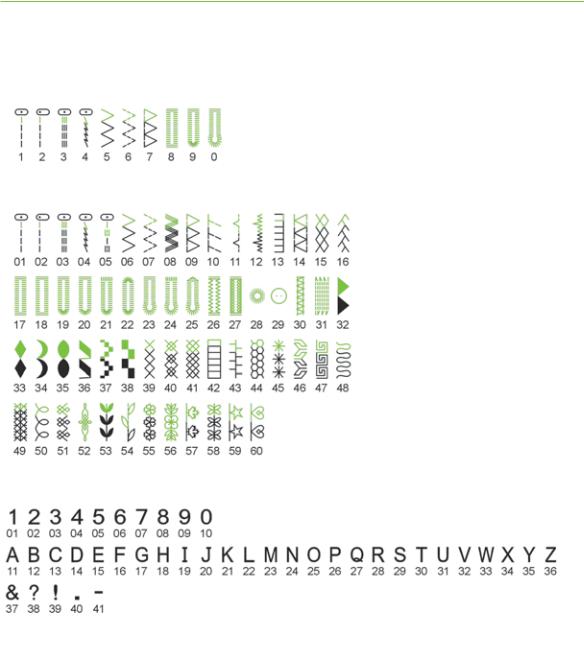
PATTERN CHART
The portion marked in color on the chart below shows the one unit of each pattern.
A.Direct selection patterns
B.Pattern selection by number
C. Alphabet
10
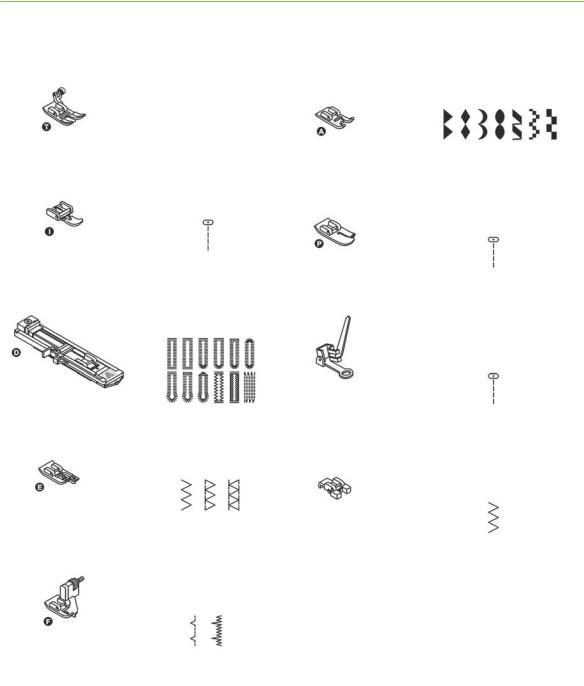
ACCESSORIES
1.Standard foot (T)
2.Zipper foot (I)
3.Buttonhole foot (D)
4.Overcasting foot (E)
5.Blindhem foot (F)
6.Satin stitch foot (A)
7.Button sewing foot
8.1/4˝ Quilting foot (P)
9.Free-motion/darning foot
10.Pack of needles
11.Spool pin felt
12.Second spool pin
13.Brush/ Seam ripper
14.Spool cap (Large)
15.Spool cap (Small)
16.Seam guide
17.Bobbin
18.Screwdriver (L & S)
19.Hard cover
1 |
2 |
3 |
4 |
5 |
6 |
7 |
8 |
9 |
10 |
11 |
12 |
13 |
14 |
15 |
16 |
17 |
18 |
19
11
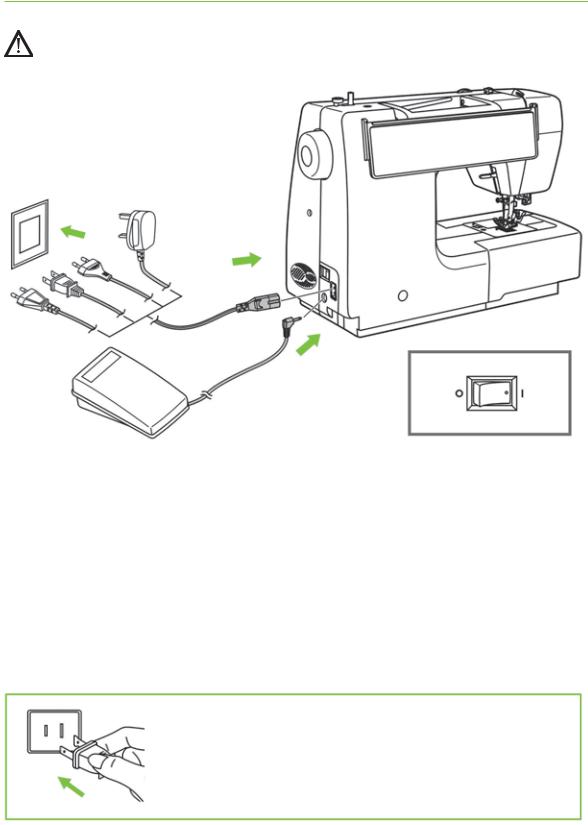
CONNECTING THE MACHINE TO THE POWER SOURCE
Caution: Always make sure that the machine is unplugged from power source and the main switch is on “O” when the machine is not in use and before inserting or removing parts.
OFF ON
Connecting the machine
Before connecting the power supply, make sure that the voltage and frequency shown on the machine is conforming with your electrical power.
Place the machine on a stable table.
1.Connect the power line cord to the machine by inserting the 2-hole plug into the terminal box.
2.Connect the power line plug to the electric outlet.
3.Turn on the power switch.
4.The light bulb will light up when the switch is turned on.
To disconnect, turn the power switch to the off position, then remove plug from outlet.
For the USA and Canada
This appliance has a polarized plug (one blade wider than the other), to reduce the risk of electrical shock; this plug will fit in a polarized outlet only one way. If the plug does not fit fully in the outlet, reverse the plug. If it still does not fit, contact a qualified electrician. Do not modify the plug in any way.
12
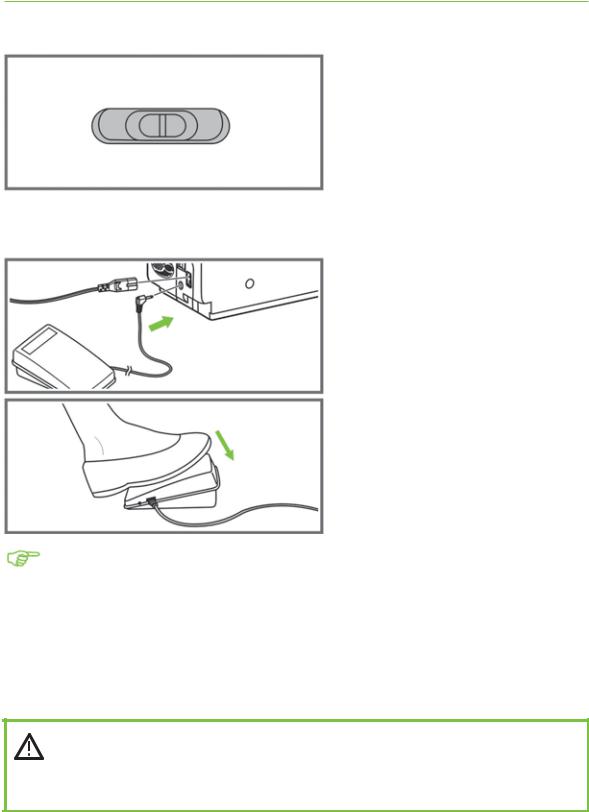
START SEWING
Speed adjustment lever
The speed adjustment lever can control the sewing speed. To increase the speed, slide the lever to right. To decrease the sewing speed, slide the lever to the left.
Foot control
With the sewing machine turned off, insert the foot control plug into its connector on the sewing machine.
Turn on the sewing machine, and then slowly depress the foot control to start sewing.
Release the foot control to stop the sewing machine.
Please Note: The setting of the speed control slide will limit the maximum speed of the machine.
Attention: Consult a qualified electrician if in doubt as how to connect the machine to the power source. Unplug the power cord when the machine is not in use.
The appliance must be used with the foot controller C-9000.
13
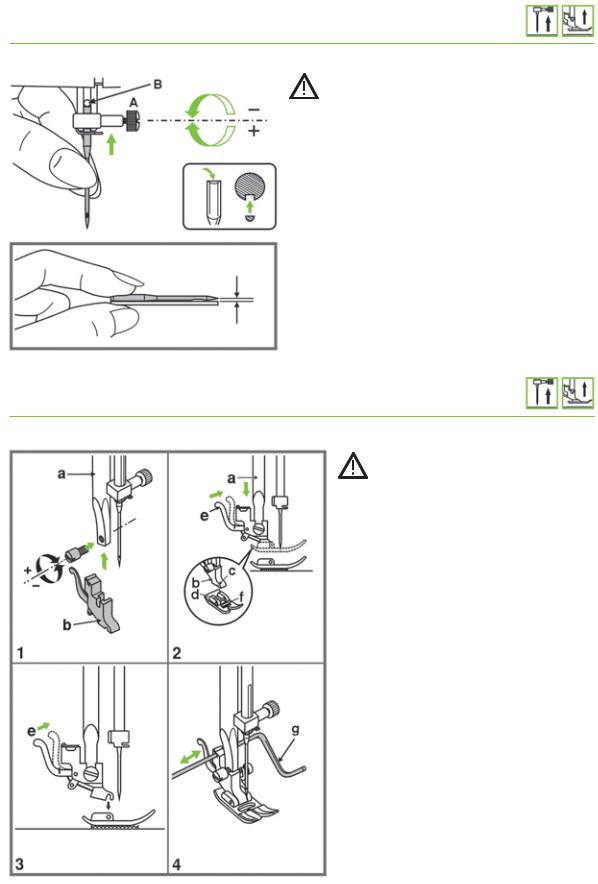
REPLACING THE NEEDLE
Attention: Turn power switch to off (“O”) when carrying out any of the operations below.
Change the needle regularly, especially if it is showing signs of wear and causing problems.
Insert the needle following the illustrated instructions.
A.Loosen the needle clamp screw and tighten again after inserting the new needle.
The flat side of the shaft should be towards the back.
B.Insert the needle as far up as it will go.
Needles must be in perfect condition. Problems can occur with:
-Bent needles
-Blunt needles
-Damaged points
CHANGING THE PRESSER FOOT
Attention: Turn power switch to off (“O”) when carrying out any of the operations below.
Attaching the presser foot holder (1)
Raise the presser foot bar (a). Attach the presser foot holder (b) as illustrated.
Attaching the presser foot (2)
Lower the presser foot holder (b) until the cut-out (c) is directly above the pin on the foot (d).
Raise the lever (e).
Lower the presser foot holder (b) and the presser foot (f) will engage automatically.
Removing the presser foot (3)
Raise the presser foot.
Raise the lever (e) and the foot will disengage.
Attaching the seam guide (4)
Attach the seam guide (g) in the slot as illustrated. Adjust according to need for hems, pleats, quilting, etc.
14
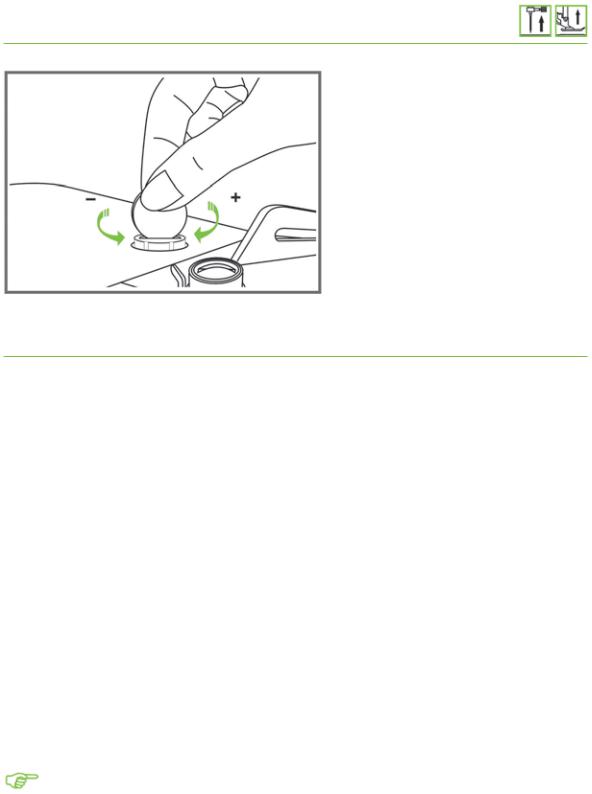
ADJUSTING PRESSER FOOT PRESSURE
The presser foot pressure of the machine has been pre-set and requires no adjustments for most fabric weights.
However, if you choose to adjust the presser foot pressure, turn the presser adjusting screw with a coin.
For sewing very heavy fabric, loosen the pressure by turning the screw counter clockwise, and for thin fabric, tighten by turning it clockwise.
MATCHING NEEDLE/ FABRIC/ THREAD
Needle, fabric, thread selection guide
NEEDLE SIZE |
FABRICS |
THREAD |
|
|
|
|
|
9-11 (70-80) |
Lightweight fabrics-thin |
Light-duty thread in cotton, |
|
|
cottons, voile, silk, muslin, |
nylon, polyester or cotton |
|
|
interlocks, cotton knits, tricot, |
wrapped polyester. |
|
|
jerseys, crepes, woven |
|
|
|
polyester, shirt & blouse |
|
|
|
fabrics. |
|
|
|
|
|
|
11-14(80-90) |
Medium weight fabrics-cotton, |
Most threads sold are medium |
|
|
satin, sailcloth, double knits, |
size and suitable for these |
|
|
lightweight wool. |
fabrics and needle sizes. Use |
|
14 (90) |
Medium weight fabrics-cotton |
polyester threads on synthetic |
|
materials and cotton on natural |
|||
|
duck, wool, heavier knits, |
||
|
woven fabrics for best results. |
||
|
terrycloth, denims. |
||
|
Always use the same thread |
||
|
|
||
16 (100) |
Heavyweight fabrics-canvas, |
||
on top and bottom. |
|||
|
wool, outdoor tent and quilted |
||
|
|
||
|
fabrics, denims, upholstery |
|
|
|
material (light to medium). |
|
|
|
|
|
|
18 (110) |
Heavy wool, overcoat fabrics, |
Heavy duty thread, carpet |
|
|
upholstery fabrics, some |
thread. |
|
|
leathers and vinyls. |
|
|
|
|
|
Please Note:
-In general, fine threads and needles are used for sewing fine fabrics, and thicker threads are used for sewing heavy fabrics.
-Always test thread and needle size on a small piece of fabric which will be used for actual sewing.
-Use the same thread for needle and bobbin.
15
TYPE OF PRESSER FOOT CHART
PRESSER FOOT |
APPLICATION |
PRESSER FOOT |
APPLICATION |
|
|
|
|
Standard foot (T) |
General sewing, |
|
|
|
Patchwork stitches, |
Satin stitch foot (A) |
Satin stitch |
|
Decorative stitching, |
|
|
|
Smocking, |
|
|
|
Fagoting, etc. |
|
|
|
|
|
|
|
Inserting zippers |
|
|
|
|
|
Quilting |
Zipper foot (I) |
|
1/4˝ Quilting foot (P) |
|
|
|
|
|
|
Buttonhole sewing |
|
Free-motion/Darning/ |
|
|
|
Embroidery/ |
|
|
|
Monogramming |
|
|
Free-motion/darning foot |
|
Buttonhole foot (D) |
|
|
|
|
|
|
|
|
Overcasting |
|
|
|
|
Button sewing foot |
Button sewing |
Overcasting foot (E) |
|
|
|
|
|
|
|
|
Blind hem stitching |
|
|
Blindhem foot (F) |
|
|
|
|
|
|
|
16
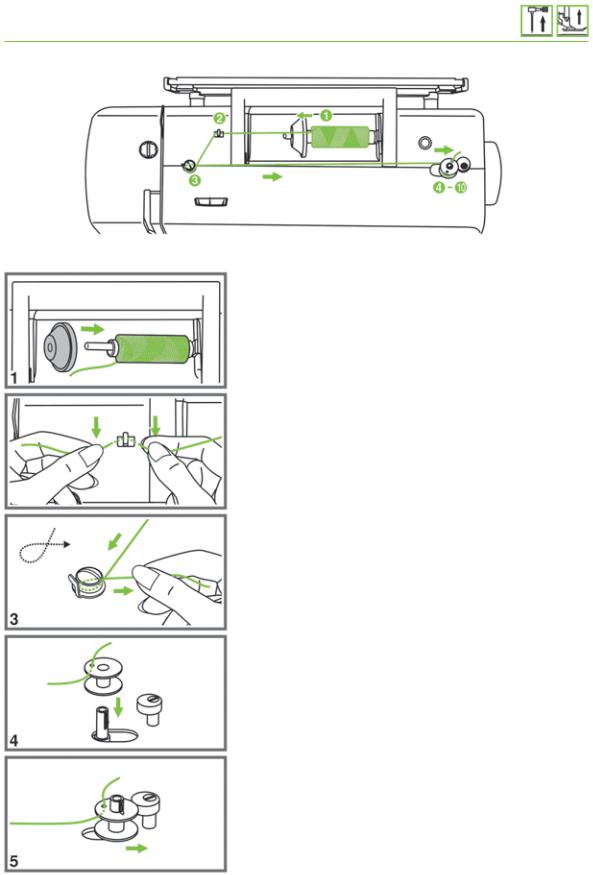
WINDING THE BOBBIN
Bobbin winding
1.Place the thread and spool cap onto the spool pin. For smaller spools of thread, place spool cap with the small side next to the spool or use the small spool cap.
2.Snap the thread into the thread guide.
3.Wind the thread clockwise around the bobbin winder tension discs.
4.Place the thread end through one of the inner holes in the bobbin as illustrated and place empty bobbin on the spindle.
5.Hold on to the thread tail and push the bobbin to right.
17
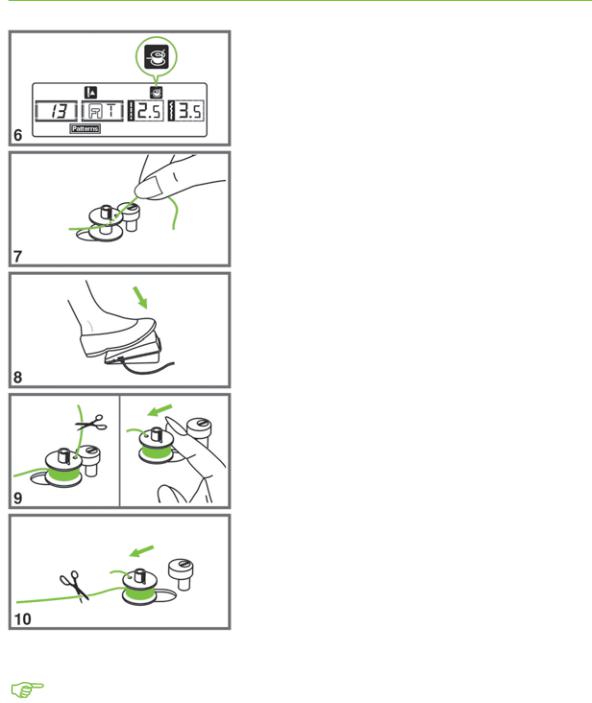
6.When the bobbin winder spindle is pushed to the right, “bobbin winding position”, the symbol “  “ is shown on the LCD screen.
It will disappear from the LCD screen when the bobbin winder spindle is push to the left, “sewing position”.
7.Hold the thread tail securely in one hand.
8.Press on the foot control to start the sewing machine.
9.After the bobbin has wound a few turns stop the machine and cut the thread near the hole of the bobbin. Continue filling the bobbin until it is full. The motor stops automatically when the bobbin is full. Stop the machine. Push the bobbin winder spindle to left.
10.Cut the thread and then remove the bobbin.
Please Note: When the bobbin winder switch is pushed to the right, “bobbin winding position”, the machine will not sew and the handwheel will not turn. To start sewing, push the bobbin winder switch to the left “sewing position”.
18

INSERTING THE BOBBIN
Attention: Turn power switch to off (“O”) before inserting or removing the bobbin.
When inserting or removing the bobbin, the needle must be fully raised.
1. Remove bobbin cover. Insert the bobbin in the bobbin case with the thread running in a counterclockwise direction (arrow).
2. Pull the thread through the slit (A).
3. Pull the thread toward the left and along the inside of the spring until it slips into the notch (B) being sure that the thread does not slip out of the slit (A).
4. Pull out about 15 cm (6 inches) of thread and slide on the bobbin cover (C).
19
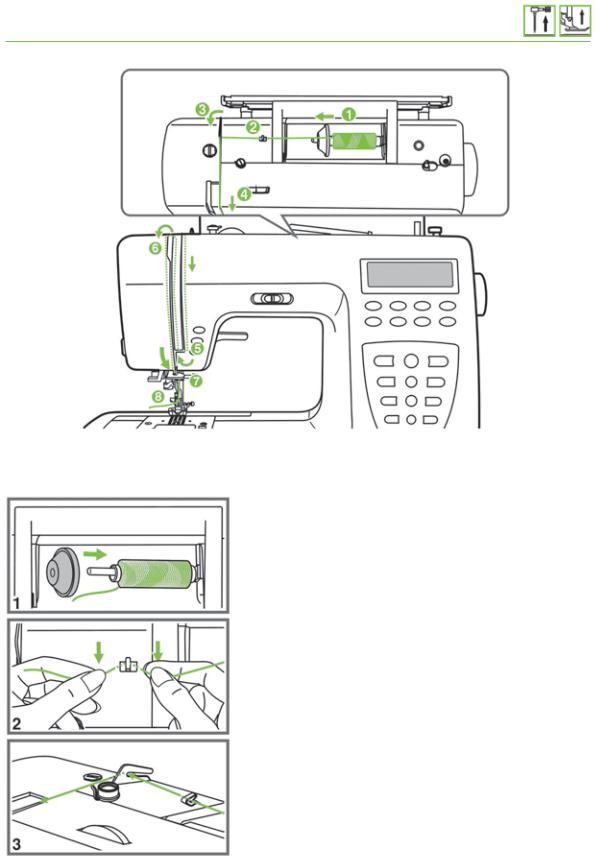
THREADING THE UPPER THREAD
 Please Note: It is important to thread correctly to prevent sewing problems.
Start by raising the needle to its highest point by turning the hand wheel toward you. Raise the presser foot lift to open the tension discs.
1.Lift up the spool pin. Place the spool of thread on the spool pin so that the thread comes from the front of the spool, then place the spool cap at the end of the spool pin.
2.Pull the thread from the spool through the upper thread guide.
3.Guide the thread around the thread guide pulling the thread through the pre-tension spring as illustrated.
20
 Loading...