


4 - Familiarisation
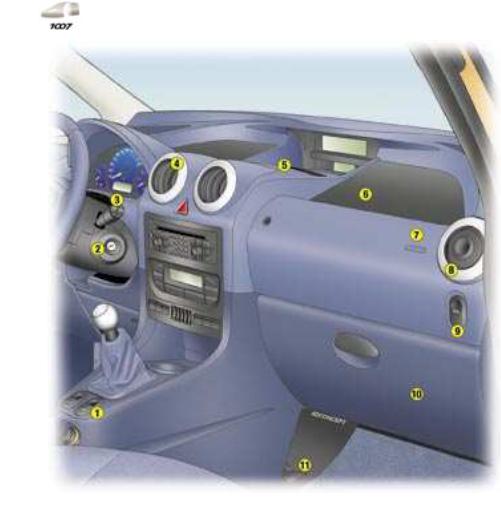
DRIVING POSITION
1. Driver's air bag. Horn.
2. Steering column air bag.
3. Steering wheel height and depth adjustment.
4. Electric exterior mirror controls. Headlamp adjustment.
5. Lights and direction indicators controls.
6. Instrument panel.
7. Cruise control switches.
8. Manual gearbox gear lever.
9. Driver's electric window control.
10. Driver's footwell air outlet.
11. Bonnet release.
12. Fascia fuse box.
13. Electric "Sésame" door controls (driver and passenger).
14. Adjustable and closing side vent.
 28-02-2005
Familiarisation - 5
DRIVING POSITION
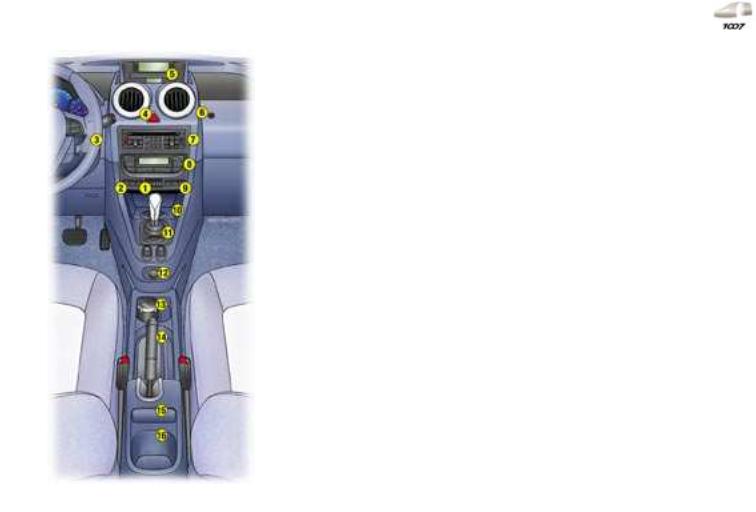
1. Passenger's electric window control.
2. Steering lock and ignition.
3. Wipers, trip computer and audio equipment controls.
4. Adjustable and closing central vents.
5. Windscreen deicing and demisting vent.
6. Fascia storage tray.
7. Passenger air bag.
8. Adjustable and closing side vent.
9. Passenger electric "Sésame" door control.
10. Glove box/CD changer/Video sockets/Disarming of the passenger air bag*.
11. Passenger footwell air outlet.
* According to country.
 28-02-2005
6 - Familiarisation
DRIVING POSITION
1. |
Coin storage. |
12. |
Lighter/12 V socket. |
|
2. |
Deactivation of the rear parking |
13. |
Can holder/Enclosed storage |
|
|
assistance. |
|
compartment/Movable ashtray. |
|
|
Central locking from the inside. |
14. |
Handbrake. |
|
|
Deactivation of the ESP/ASR |
15. |
Mobile storage compartment. |
|
|
system. |
16. |
Bottle holder. |
|
3. |
"2 Tronic" gearbox steering |
|||
|
|
|||
|
wheel controls. |
|
|
|
4. |
Hazard warning lights. |
|
|
|
5. |
Multifunction display. |
|
|
|
|
Passenger seat belts |
|
|
|
|
unfastening/not fastened |
|
|
|
|
warning lights*. |
|
|
|
6. |
Temperature sensor. |
|
|
|
7. |
Audio RD3 or RT3 GPS audio/ |
|
|
|
|
telephone. |
|
|
|
8. |
Heating or air conditioning |
|
|
|
|
controls. |
|
|
|
9. |
Deactivation of the interior |
|
|
|
|
alarm or map holder. |
|
|
|
10. |
Storage compartment with can |
|
|
|
|
holder. |
|
|
|
11. |
"2 Tronic" gearbox gear lever. |
|
|
* According to country.
 28-02-2005
Familiarisation - 7
KEYS
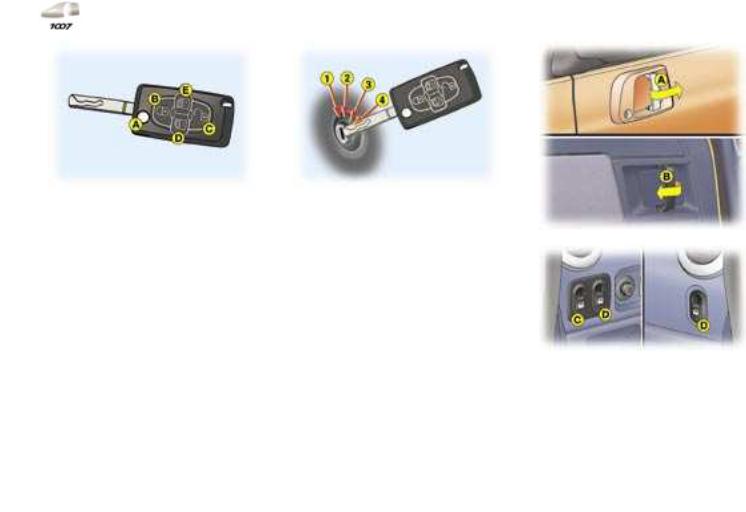
A.Unfolding/Folding of the key.
B.Normal locking or deadlocking. Locating of the vehicle.
C.Unlocking.
D.Unlocking and opening/closing of the driver's "Sésame" door.
E.Unlocking and opening/closing of the passenger "Sésame" door.
STARTING
1.Stop position.
2.Accessories position (1st notch).
3.On position (2nd notch).
4.Starting position.
"SÉSAME" DOORS
A. Exterior manual opening. B. Interior manual opening. C. Driver's electric control.
D. Passenger electric control.
: 97 |
: 103 |
 28-02-2005
8 - Familiarisation
ELECTRIC WINDOWS
A.Front windows manual or automatic opening and closing control.
1.Driver's electric window.
2.Passenger electric window.
: 102
ELECTRIC MIRRORS
B.Exterior mirrors selection, adjustment or folding control.
1.Selection of the driver's mirror.
2.Central position "¢".
3.Selection of the passenger mirror.
4.Folding of the mirrors.
: 82
STEERING WHEEL
ADJUSTMENT
C.Steering wheel height and depth adjustment locking and release control.
1.Control locked.
2.Control released.
: 82
 28-02-2005

Familiarisation - 9
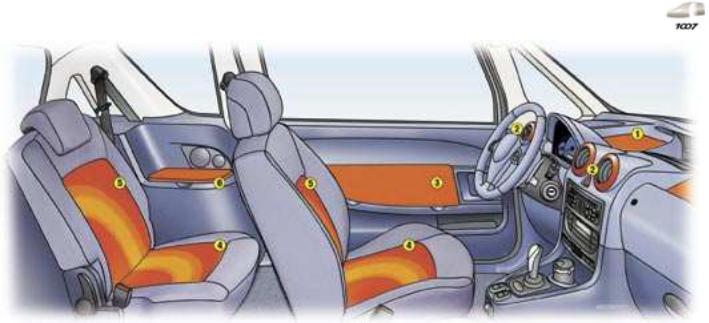
FRONT SEATS
1. Forwards-backwards |
3. Seat back angle adjustment. |
adjustment. |
|
5.Head restraint height and angle adjustment.
2. Driver's seat height adjustment. |
4. Access to the rear seats. |
6. Heated seat control. |
: 83
 28-02-2005
10 - Familiarisation
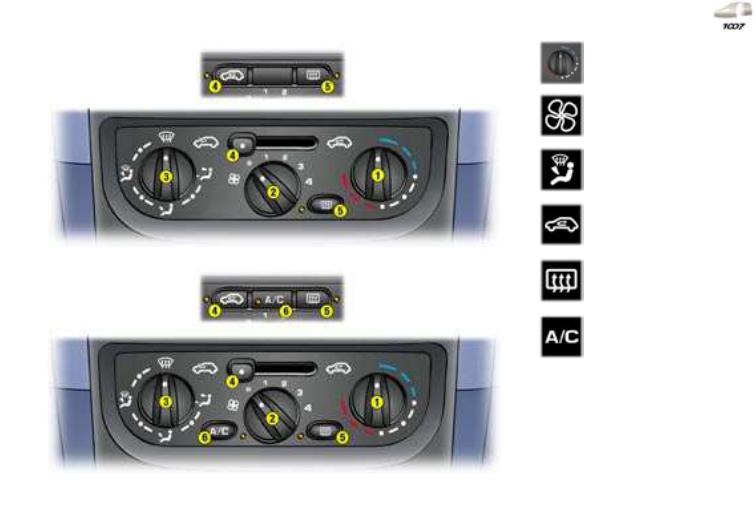
HEATING |
: 76 |
AIR CONDITIONING |
: 78 |
1.Temperature adjustment.
2.Air low adjustment.
3.Air distribution adjustment.
4.Air intake/
Air recirculation.
5.Rear screen and exterior mirrors demisting.
6.Air conditioning on/off.
 28-02-2005
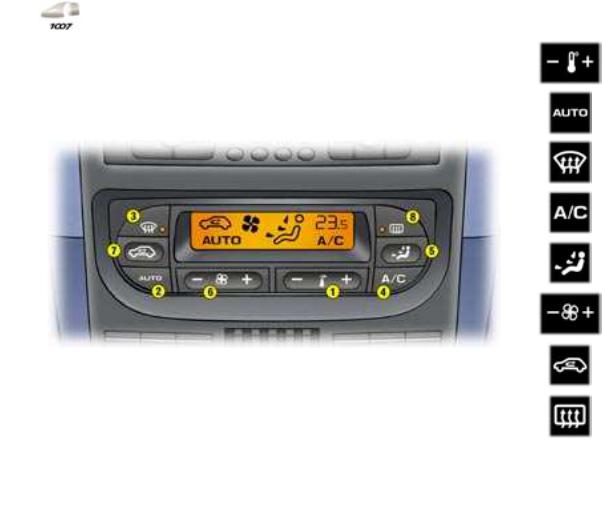
Familiarisation - 11
1. Temperature
adjustment.
2. Automatic comfort program.
3. Automatic visibility program.
4. Air conditioning on/off.
5. Air distribution adjustment.
6. Air low adjustment.
|
7. Air intake/ |
AUTOMATIC AIR CONDITIONING |
Air recirculation. |
|
8. Rear screen and exterior mirrors demisting.
: 80
 28-02-2005
12 - Familiarisation
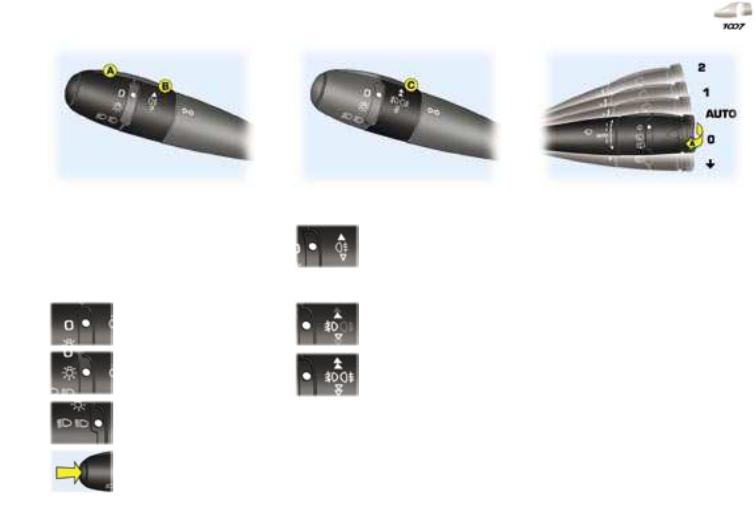
LIGHTS STALK |
Ring B |
The position is indicated on the in- |
Rear fog lamp |
strument panel by the corresponding |
|
indicator light. |
|
Ring A |
Ring C |
Lights off |
Front fog lamps |
Side lights |
Front fog lamps and |
|
rear fog lamp |
Dipped headlamps/ |
|
Main beam headlamps |
|
Automatic switching on |
|
of the lights |
|
|
: 108 |
WIPERS STALK
Windscreen wipers
2.Fast wipe.
1.Normal wipe.
I. Intermittent wipe. or
AUTO. Automatic wipe.
0.Park.
êSingle wipe.
A.Wash-wipe.
: 110
 28-02-2005
Familiarisation - 13
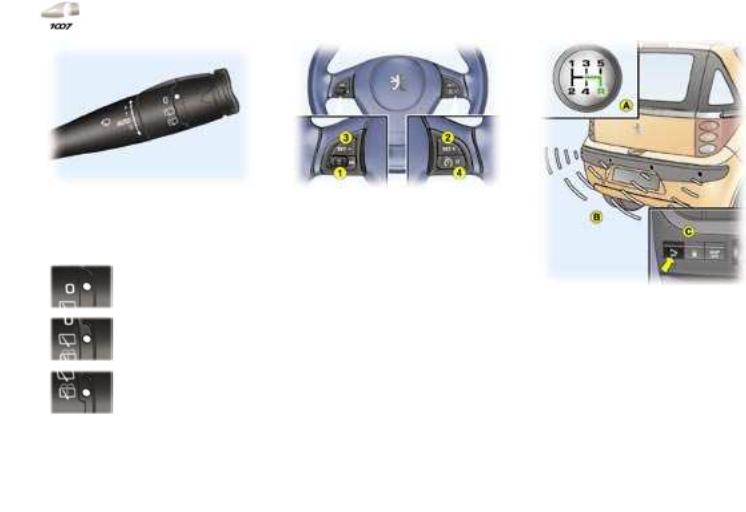
WIPERS STALK
Rear wiper
Park.
Intermittent wipe.
Wash-wipe.
: 111
CRUISE CONTROL
1.Activation/Cancellation of the system.
2.Storing of a speed/Increasing of the stored speed.
3.Storing of a speed/Decreasing of the stored speed.
4.Deactivation/Recalling of the stored speed.
In order for it to be stored, the vehicle speed must be above 25 mph (40 km/h), with at least fourth gear engaged on the manual gearbox (second gear on the "2 Tronic" gearbox).
: 131
REAR PARKING ASSISTANCE
A.Activation.
B.Detection.
C.Deactivation/Reactivation.
When reverse gear is engaged, you are guided by an audible signal during the reversing manoeuvre.
: 132
 28-02-2005
14 - Familiarisation
DISARMING THE PASSENGER AIR BAG*
1.Opening of the glove box.
2.Insertion of the key.
3.Selection of the "OFF" position.
4.Removal of the key retaining the position.
Passenger air bag disarmed
This warning light comes on on the instrument panel throughout the period of disarming.
* According to country.
: 125
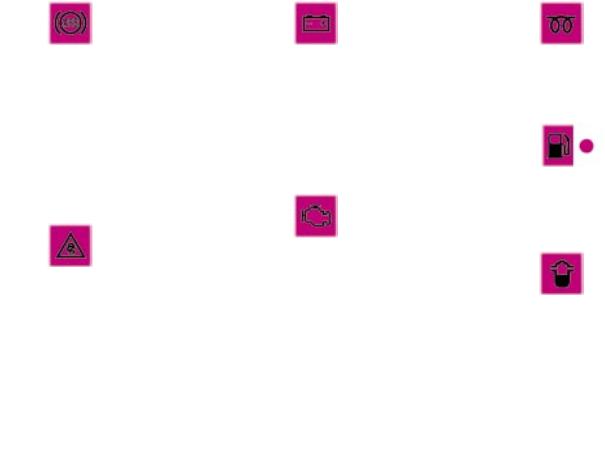
FILLING WITH FUEL
1.Opening of the fuel iller lap.
2.Opening and hooking of the fuel tank cap.
Capacity of the fuel tank:
Approximately 40 litres.
Type of petrol:
Unleaded RON 95/RON 98.
Type of Diesel: Diesel.
Low fuel level
When this warning light comes on on the instrument panel, you have enough fuel left to drive approximately 30 miles (50 km).
: 107
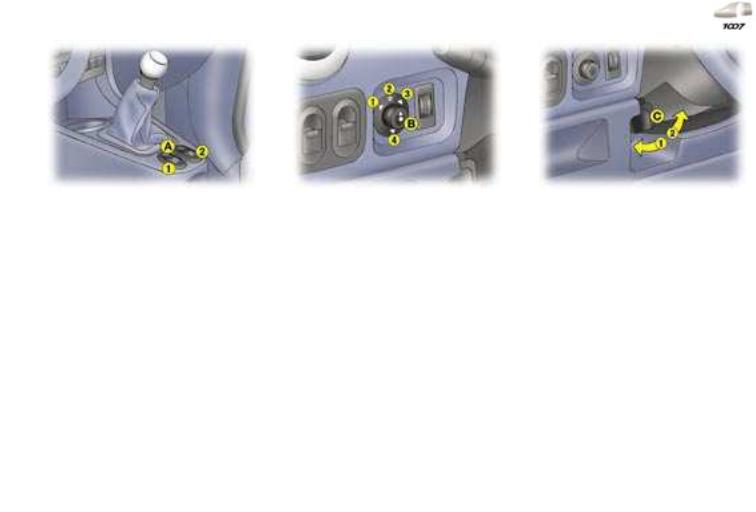
OPENING THE BONNET
A.Internal control.
B.External control.
C.Bonnet strut.
: 133
 28-02-2005
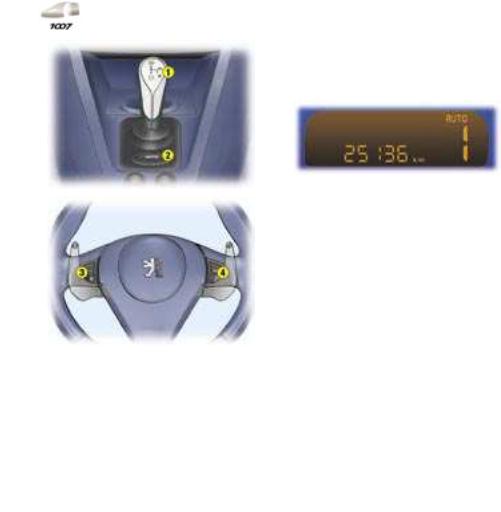
"2 TRONIC" GEARBOX
This 5-speed controlled manual gearbox offers a choice between the comfort of automatic regulation or the pleasure of manual gear changes.
1.Gear lever.
2."AUTO" button.
3."-" steering wheel control.
4."+" steering wheel control.
Instrument panel display
The gear or the mode selected appears on the instrument panel display.
N: neutral. R: reverse.
1 2 3 4 5: gears engaged. AUTO: automated mode.
T: automated snow mode.
Moving off
Press the brake pedal while starting the engine.
The gearbox systematically starts in automated mode.
Engage irst gear or reverse using the gear lever 1.
Familiarisation - 15
Normal driving
Leave the gearbox in automated mode for automatic changing of the gears.
or
Switch to sequential mode to change the gears manually:
-press button 2,
-pull the steering wheel control 4 or push the gear lever 1 forwards to change up,
-pull the steering wheel control 3 or pull the gear lever 1 backwards to change down.
Return to automated mode by pressing button 2 again.
The different statuses appear on the instrument panel display.
Driving on slippery surfaces
Irrespective of the mode used, the gearbox will select the automated snow mode automatically in cases of poor grip.
The "snow" symbol appears on the instrument panel display.
: 128
 28-02-2005
16 - Familiarisation
"CAMÉLÉO" INTERIOR
You have a customising kit which |
1. |
Fascia covering. |
4. |
Seat cushion trims. |
enables you to make your vehicle's |
2. |
Vent trims. |
5. |
Seat back trims. |
passenger compartment unique and |
||||
attractive. |
3. |
Door panel trims. |
6. |
Rear side storage compartment |
|
||||
|
|
|
|
cover trims. |
: 113
 28-02-2005

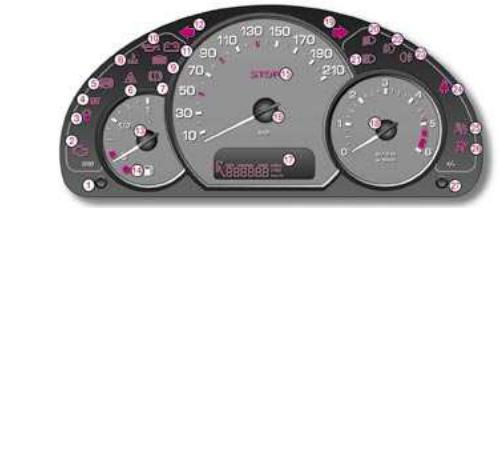
PETROL MANUAL GEARBOX AND "2 TRONIC" GEARBOX INSTRUMENT PANELS
1 - Trip distance recorder zero reset and total/trip distance recorder display button.
2 - Engine diagnostics warning light.
3 - Anti-lock braking system (ABS) warning light.
4 - Electronic stability control (ESP/ ASR) warning light.
5 - Handbrake, brake luid level and electronic brake force distribution warning light.
 28-02-2005
6 - Maximum coolant temperature warning light.
7 - Engine oil pressure warning light.
8 - Battery charge warning light.
9 - Left direction indicator.
10- Fuel gauge.
11- Low fuel level warning light.
12- Central STOP warning light.
Instruments and controls - 17
13- Speedometer.
14- Engine oil level gauge, service indicator, "2 Tronic" gearbox indicator*, trip computer* and total/trip distance recorder.
15- Rev counter.
16- Right direction indicator.
17- Dipped headlamps indicator light.
18- Main beam headlamps indicator light.
19- Front fog lamps indicator light.
20- Rear fog lamp indicator light.
21- Seat belt not fastened warning light.
22- Passenger air bag disarmed warning light**.
23- Front, side and curtain air bags warning light.
24- Lighting rheostat button.
*According to version.
**According to country.
18 - Instruments and controls
DIESEL MANUAL GEARBOX INSTRUMENT PANEL
1 - Trip distance recorder zero reset and total/trip distance recorder display button.
2 - Engine diagnostics warning light.
3 - Water in diesel ilter warning light**.
4 - Diesel engine pre-heat warning light.
5 - Anti-lock braking system (ABS) warning light.
6 - Electronic stability control (ESP/ ASR) warning light.
 28-02-2005
7 - Handbrake, brake luid level and electronic brake force distribution warning light.
8 - Maximum coolant temperature warning light.
9 - Low coolant level warning light.
10 - Engine oil pressure warning light.
11 - Battery charge warning light.
12 - Left direction indicator.
13 - Fuel gauge.
14 - Low fuel level warning light.
15 - Central STOP warning light.
16- Speedometer.
17- Engine oil level gauge, service indicator, trip computer* and total/trip distance recorder.
18- Rev counter.
19- Right direction indicator.
20- Dipped headlamps indicator light.
21- Main beam headlamps indicator light.
22- Front fog lamps indicator light.
23- Rear fog lamp indicator light.
24- Seat belt not fastened warning light.
25- Passenger air bag disarmed warning light**.
26- Front, side and curtain air bags warning light.
27- Lighting rheostat button.
*According to version.
**According to country.
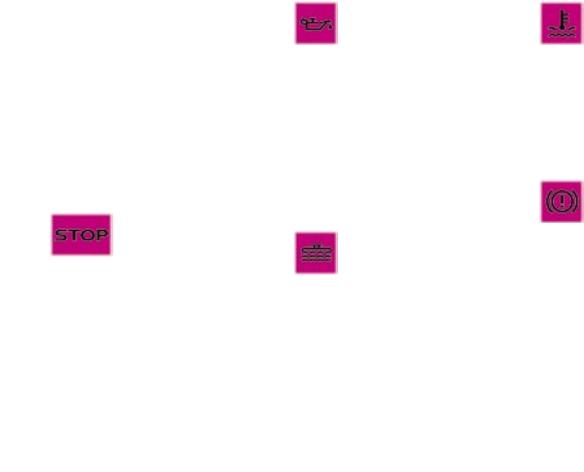
WARNING LIGHTS
A permanently lit warning light or one lashing, with the engine running, indicates an operating fault of the unit concerned. The illumination of certain warning lights may be accompanied by an audible signal and a message on the multifunction display. Do not ignore this warning: consult a PEUGEOT dealer.
If the central STOP warning light comes on when you are driving, stop your vehicle immediately, where it is safe to do so.
Central STOP warning light
This comes on for a few seconds each time
the ignition is switched on. Linked to the warning lights:
-''engine oil pressure and temperature'',
-''low coolant level'',
-"maximum coolant temperature",
-'handbrake'', ''low brake luid level'', and ''electronic brake force distribution''.
You must stop if the light comes on with the engine running.
Consult a PEUGEOT dealer.
 28-02-2005
Engine oil pressure and temperature warning light
This comes on for a few seconds each time the ignition is switched on.
Linked to the central STOP warning light.
If this warning light comes on, with the engine running, it indicates one of the following:
-insuficient oil pressure,
-a lack of oil in the lubrication circuit. Top up the level,
-an oil temperature which is too high. The warning light is acompanied by an audible signal. To lower the oil temperature, reduce your speed.
You must stop.
Consult a PEUGEOT dealer.
Low coolant level warning light (Diesel)
This comes on for a few seconds each time the igni-
tion is switched on.
Linked to the central STOP warning light.
Wait for the engine to cool before topping up the level.
The cooling circuit is pressurised.
In the event of breakdown and to prevent any risk of burns, unscrew the cap by two turns to allow the pressure to drop.
When the pressure has dropped, remove the cap and top up the level.
You must stop.
Consult a PEUGEOT dealer.
Instruments and controls - 19
Maximum coolant temperature warning light
This comes on for a few seconds each time the ignition is switched on.
Linked to the central STOP warning light.
If this warning light comes on, with the engine running, it indicates an abnormal increase in the temperature of the coolant.
You must stop.
Consult a PEUGEOT dealer.
Handbrake, low brake luid level and Electronic Brake Force Distribution warning light
This comes on for a few seconds each time the ignition is switched on.
Linked to the central STOP warning light.
If this warning light comes on, with the engine running, it indicates one of the following:
-that the handbrake is applied or not fully released, if the vehicle is moving,
-an excessive drop in brake luid level (if the warning light remains on even when the handbrake is released),
-a fault in the Electronic Brake Force Distribution.
You must stop.
Consult a PEUGEOT dealer.
20 - Instruments and controls
Anti-lock braking system (ABS) warning light
This comes on for a few seconds each time the ignition is switched on.
If the warning light remains on or comes on above 8 mph (12 km/h), this indicates an ABS malfunction.
However, the vehicle retains conventional servo-assisted braking.
Lighting of this warning light, accompanied by an audible signal, indicates an ABS fault.
Consult a PEUGEOT dealer.
Electronic stability control system (ESP/ASR) warning light
This comes on for a few seconds each time the ignition is switched on.
While the engine is running and the vehicle is moving, it lashes if the system is activated.
It comes on permanently when it is disarmed.
 28-02-2005
Battery charge warning light
This comes on for a few seconds each time the igni-
tion is switched on.
If it comes on, with the engine running, it indicates one of the following:
-faulty operation of the charging circuit,
-slack battery or starter terminals,
-a cut or slack alternator belt,
-an alternator failure.
Consult a PEUGEOT dealer.
Engine diagnostics warning light
This comes on each time the ignition is switched on and remains on until the engine is
started.
If it comes on, with the engine running, it indicates a fault in the injection, ignition or emission control system. There is a risk of damage to the catalytic converter (petrol engine only).
Consult a PEUGEOT dealer.
Diesel engine pre-heat warning light
Wait until the warning light goes out before starting the engine.
If the temperature is high enough, the warning light comes on for less than one second. You can start the engine without waiting.
Low fuel level warning light
This comes on for a few seconds each time
the ignition is switched on.
When this light irst comes on, you have enough fuel to drive approximately 30 miles (50 km) (The tank capacity is approximately 40 litres).
Water in diesel ilter indicator*
This comes on for a few seconds each time the igni-
tion is switched on.
If it comes on, with the engine running, this indicates that there is a risk of damage to the injection system.
Consult a PEUGEOT dealer as soon as possible.
* According to country.

Seat belt not fastened warning light
When the ignition is switched on, this indicator light comes on if the driver (and/or a passenger)
has not fastened his seat belt.
Above 12 mph (20 kmh), this warning light lashes for two minutes accompanied by an audible signal which becomes progressively louder. Once the two minutes have elapsed, the warning light remains on until the driver (and/or the passenger) fastens his seat belt.
Passenger air bag disarmed warning light*
This comes on for a few seconds each time the ignition is switched on.
If the passenger air bag is disarmed, the warning light remains on.
Always consult a PEUGEOT dealer if the warning light lashes.
Instruments and controls - 21
Front, steering column, side and curtain air bags warning light
This comes on for a few seconds each time the ignition is switched on.
With the engine running, illumination of this warning light, accompanied by an audible signal, indicates a fault in the front, side or curtain air bags.
Consult a PEUGEOT dealer.
 28-02-2005

22 - Instruments and controls
INSTRUMENT PANEL DISPLAY
After switching on the ignition, three functions are shown in succession:
-engine oil level indicator,
-service indicator,
-total distance recorder (total and trip distances).
Note: the total and trip distances are displayed for thirty seconds, when the ignition is switched off, on opening and closing the driver's door as well as on locking the vehicle.
It also displays the "2 Tronic" gearbox positions and operating modes selected.
If your vehicle is itted with the monochrome screen A, this displays the trip computer data.
Engine oil level indicator
When the ignition is switched on, the engine oil level is indicated for approximately 5 seconds.
Lack of oil
Flashing indicates a lack of oil which could damage the engine.
If the lack of oil is conirmed by a check using the dipstick, it is essential that the level is topped up.
Oil level gauge fault
Check the oil level using the dipstick.
If the level is correct, the lashing indicates an actual malfunction of the engine oil level gauge.
Contact a PEUGEOT dealer.
The level read on the dipstick will only be correct if the vehicle is on level ground and the engine has been off for more than 15 minutes.
 28-02-2005
Service indicator
This indicates when the next service is due in accordance with the manufacturer's servicing schedule.
The point at which the next service is due is calculated from the last indicator zero reset. It is determined by two parameters:
-the distance travelled,
-the time which has elapsed since the last service.
Note: the distance remaining before the next service may be weighted by the time factor, depending on the user's driving habits.
Operation
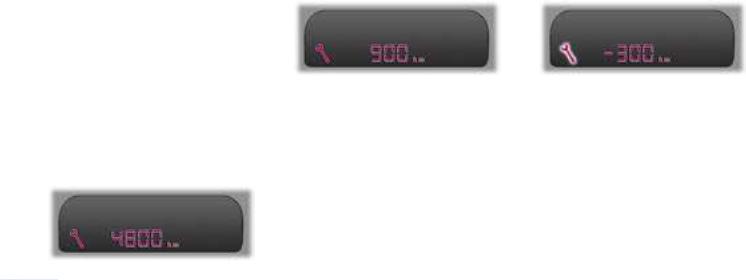
For 5 seconds after the engine oil level indication, the spanner symbolising the servicing operations comes on; the distance recorder display indicates the number of miles [kilometres] (rounded off) remaining until the next service.
Example: 4,800 miles/km remain before the next service. For ive seconds after the engine oil level indication, the display indicates:
10 seconds after the ignition was switched on, the distance recorder resumes its normal operation and the display indicates the total or trip distance or the last trip computer information displayed before the ignition was switched off.
The distance remaining to the next service is less than 1,000 miles/km.
Example: 900 miles/km remain before the next service.
For 5 seconds after the engine oil level, the indicator displays:
10 seconds after the ignition was switched on, the distance recorder resumes its normal operation and the spanner remains lit.
It indicates that a service must be carried out soon. The display indicates the total or trip distance.
Instruments and controls - 23
The service is overdue.
The service spanner lashes for 5 seconds after each engine oil level.
Example: the service is overdue by 300 miles/km, your vehicle must be serviced as soon as possible.
For 5 seconds after the engine oil level, the display indicates:
10 seconds after the ignition was switched on, the distance recorder resumes its normal operation and the service spanner remains lit. The display indicates the total or trip distance.
Note: the service spanner may also come on if more than two years have elapsed since the last service.
 28-02-2005
24 - Instruments and controls
Service indicator zero re-set
Your PEUGEOT dealer carries out this operation after each service.
However, if you carry out the service yourself, the re-set procedure is as follows:
FSwitch off the ignition,
FPress and hold the trip recorder re-set button,
FSwitch on the ignition.
The display begins a countdown.
When the display shows "= 0" and the service symbol disappears, release the button.
Important: after this operation, if you wish to disconnect the battery, lock the vehicle and wait for at least ive minutes, otherwise the zero re-set will not be registered.
Total/trip distance recorder
Briely pressing the button alternates between the total and trip distance displays.
To reset the trip distance recorder to zero, when it is displayed press the button until zeros appear.
Lighting rheostat
With the lights on, press the button to vary the intensity of the lighting of the instruments and controls. When the lighting reaches the required brightness, release the button.
 28-02-2005
"2 Tronic" gearbox indicator
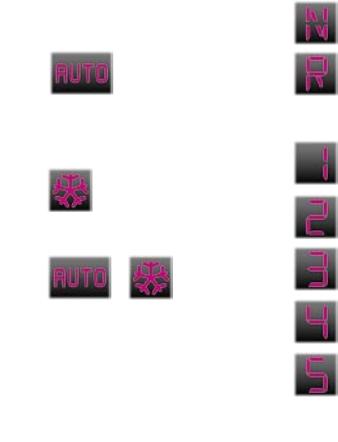
"AUTO" indicator light
This comes on when the "AUTO" automated operation mode is selected.
It is switched off on switching to the sequential operation mode.
"T" indicator light
In the automated mode, if the gearbox detects poor grip, this indicator light comes on.
"AUTO" and "T" indicator lights
These lash simultaneously in the event of a malfunction.
Instruments and controls - 25
Gear lever positions:
"Neutral"
"Reverse"
Sequential operating mode:
1st gear
2nd gear
3rd gear
4th gear
5th gear
 28-02-2005
26 - Instruments and controls
TRIP COMPUTER |
Monochrome screen A |
Monochrome screen B |
|
|
|
|
|
|
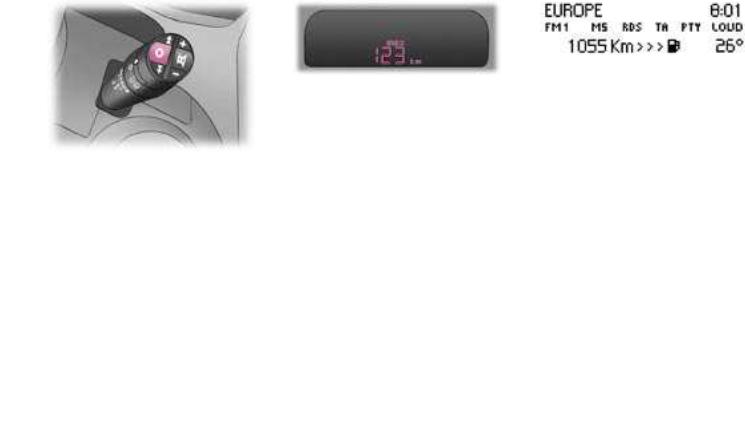
Each successive press of the button marked "O", located on the end of the wiper stalk, permits displaying of the trip computer data in succession depending on the multifunction display:
If you have the monochrome screen A, the following data will appear on the instrument panel display:
-the remaining range,
-the current consumption,
-the average consumption,
-the average speed.
Zero reset
Press the stalk for more than two seconds.
-the remaining range
-the distance travelled
-the average consumption
-the current consumption
-the average speed
Zero reset
Press the stalk for more than two seconds.
 28-02-2005
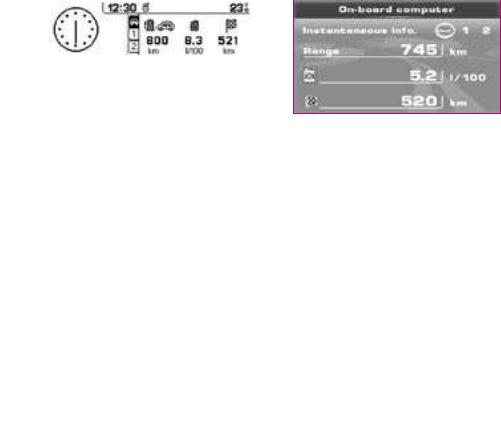
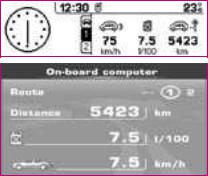
Monochrome screen CT |
Colour screen DT |
|
|
|
|
-the 'vehicle' tab with:
•range, current consumption and the distance still to be driven,
-tab '1' (route '1') with:
•the distance driven, the average consumption and the average speed calculated over route "1",
-tab '2' (route '2') with the same features.
Zero re-set
When the required route is displayed, press the button for more than two seconds.
 28-02-2005
-the "Current information" with:
•the range,
•the current consumption,
•the distance still to be driven.
-'Route 1' with:
•the distance travelled,
•the average consumption,
•the average speed,
-'Route 2' with the same features.
Zero re-set
When the required route is displayed, press the button for more than two seconds.
Instruments and controls - 27
Range
This shows the distance that can still be covered with the fuel remaining in the tank.
Note: this igure may increase if there is a change in the style of driving or the road surface, producing a signiicant drop in current consumption.
When the range is less than 20 miles (30 km), three segments are displayed. After illing with fuel, the range is displayed when it exceeds 62 miles (100 km).
If horizontal segments are displayed for long periods instead of digits, contact a PEUGEOT dealer.
Current consumption
This is the average quantity of fuel consumed during the last few seconds.
This function is displayed only when the vehicle is travelling at a speed greater than 20 mph (30 km/h).
Average consumption
This is the average fuel consumption since the computer was last set to zero.
Distance travelled
This indicates the distance travelled since the computer was last set to zero.
28 - Instruments and controls
Distance remaining to be travelled
This is the distance remaining to the destination. It can either be calculated by the navigation if guidance is activated, or entered by the user, minus the distance covered since the distance was entered.
Note: if digits are missing, dashes are displayed in their place.
Average speed
This is the average speed calculated since the computer was last set to zero (with the ignition on).
The routes
The routes "1" and ''2'' are independent but have identical application.
Route "1" for example allows you to make daily calculations and route "2" monthly calculations.
 28-02-2005
Speciic features of the monochrome screen CT and the colour screen DT
General menu
Press the "MENU" button to access the general menu.
Select the icon ''On-board computer'' using the dial, then validate to access the ''On-board computer'' menu.
The ''On-board computer'' menu offers various choices:
-On-board computer coniguration,
-Diagnostics.
'On-board computer' context menu
The context menu associated with the "On-board computer" application appears as a superimposed display when the on-board computer is the application currently being used in the main screen window.
Briely press the continuous application 'On-board computer' button to select one of the following functions:
-Warning log,
-Distance to destination.
On-board computer coniguration
This function allows the distance to the destination to be input (when guidance is not activated; otherwise this information is given by the navigation system) and also changing of the units of measurement (°C or °F, km and litres or miles and gallons).
Diagnostics
This function permits displaying of the warning log, the equipment load level and the number of satellites which can detected by the system.
Warning log
This summarises the active warning messages by displaying them in succession on the multifunction display.
Distance to destination
When guidance is not activated, this enables an approximate value to be entered to make all the on-board computer calculations possible.
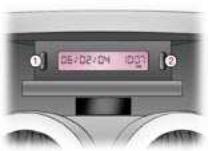
MONOCHROME SCREEN A
Presentation
This displays the following information:
-the time,
-the date,
-the outside temperature by pressing button 1 or 2 (the temperature lashes if there is a risk of ice),
-the status of the accesses (doors, boot, ...),
-the warning messages (e.g.: "ASR/ ESP fault") and information messages (e.g.: "Economy mode") displayed temporarily, can be cleared by pressing button 1 or 2.
If you have the monochrome screen A, the trip computer data appears on the instrument panel display.
Multifunction displays - 29
Parameter coniguration
Press button 1 for two seconds to access the settings.
Then, individual presses on this button allow you to scroll through the various parameters:
-language in which the information is displayed,
-hour,
-minutes,
-year,
-month,
-day,
-time format (12 or 24 hour mode),
-temperature unit (degrees Celsius or Fahrenheit).
Pressing button 2 allows you to change the parameter selected. Maintain the pressure for rapid scrolling.
After ten seconds without action, the screen returns to the normal display and the modiied data is recorded.
 28-02-2005
30 - Multifunction displays
MONOCHROME SCREEN B
Presentation
This displays the following information:
-the time,
-the date,
-the outside temperature (if there is a risk of ice, you are warned by a message),
-the audio equipment displays,
-the status of the accesses (doors, boot, ...),
-the warning messages (e.g. "Battery charge fault") or information messages (e.g. "Passenger air bag deactivated''), displayed temporarily, can be cleared by pressing button 1 or 2,
-the trip computer.
Parameter coniguration
Press button 1 for two seconds to access the settings.
Then, individual presses on this button allow you to scroll through the various parameters:
-language in which the information is displayed,
-unit of distance (km or miles),
-unit of temperature (Celsius or Fahrenheit),
-time format (12 or 24 hour mode)
-hour,
-minutes,
-year,
-month,
-day,
Pressing button 2 allows you to change the parameter selected. Maintain the pressure for rapid scrolling.
After ten seconds without action, the screen returns to the normal display and the modiied data is recorded.
 28-02-2005
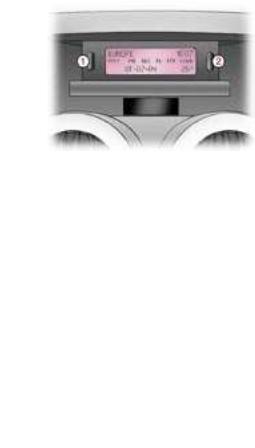
MONOCHROME SCREEN CT
Presentation
This displays the following information:
-the time,
-the date,
-the outside temperature (if there is a risk of ice, you are warned by a message),
-the audio source displays (radio, CD, ...),
-the telematic system displays (telephone, services, ...),
-the status of the accesses (doors, boot, ...),
-the warning messages (e.g.: "Fuel level low") and vehicle function status messages (e.g.: "Passenger air bag deactivated") displayed temporarily,
-the trip computer display,
-the satellite navigation system displays.
 28-02-2005
This system is controlled by the RT3 GPS audio/telephone keypad.
In order to enable you to use all of your system's functions, you have two CD-Roms:
-one, "Coniguration", contains the software and the various display languages and spoken information,
-the other, "Navigation", contains the satellite navigation system map data.
General menu
Press the "MENU" button on the RT3 audio/telephone to access the general menu and select one of the following applications:
-navigation - guidance,
-audio functions,
-trip computer,
-directory,
-telematics,
-coniguration.
For further details regarding these functions, refer to the corresponding section.
Multifunction displays - 31
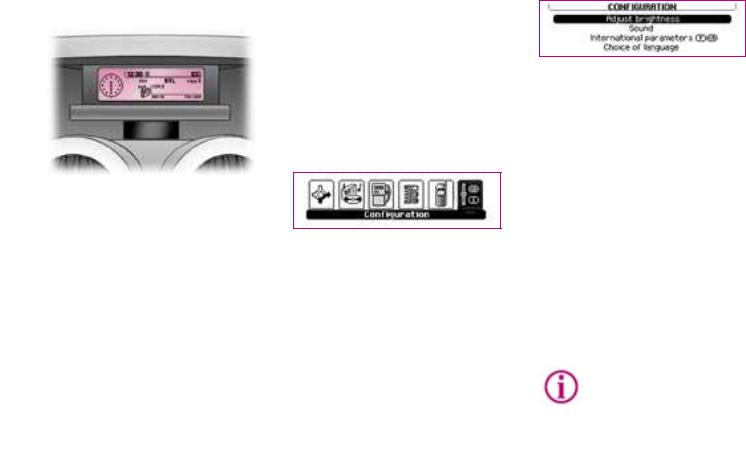
Parameter coniguration
The "Coniguration" menu provides access to the following parameters:
•"Brightness setting": setting of the brightness of the display,
•"Sound": setting of the voice synthesiser (for the male/female voice parameter: insert the coniguration CD-Rom); setting of the voice commands,
•"International parameters": setting of the date and time (12 or 24 hour mode, adjustment of the minutes on GPS); selection of the units (l/100 - °C or mpg - °F),
•"Selection of the language": selection of the language of the display, information and voice commands (German, English, Spanish, French, Italian, Dutch, Portuguese: insert the coniguration CD-rom ).
For safety reasons, coniguration of the multifunction displays by the driver must take place when stationary.
32 - Multifunction displays
COLOUR SCREEN DT
Presentation
This displays the following information:
-the time,
-the date,
-the outside temperature (if there is a risk of ice, you are warned by a message),
-the audio source displays (radio, CD, ...),
-the telematic system displays (telephone, services, ...),
-the status of the accesses (doors, boot, ...),
-the warning messages (e.g.: "Fuel level low") and vehicle function status messages (e.g.: "Passenger air bag deactivated") displayed temporarily,
-the trip computer display,
-the satellite navigation system displays.
 28-02-2005
This system is controlled by the RT3 GPS audio/telephone keypad.
In order to enable you to use all of your system's functions, you have two CD-Roms:
-one, "Coniguration", contains the software and the various display languages and spoken information,
-the other, "Navigation", contains the satellite navigation system map data.
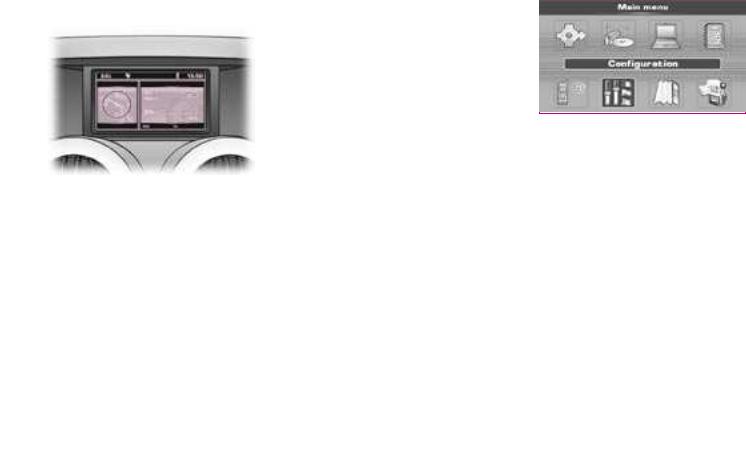
General menu
Press the "MENU" button on the RT3 audio/telephone to access the general menu and select one of the following applications:
-navigation - guidance,
-audio functions,
-trip computer,
-directory,
-telematics,
-coniguration,
-map,
-video.
For further details regarding these functions, refer to the corresponding section.
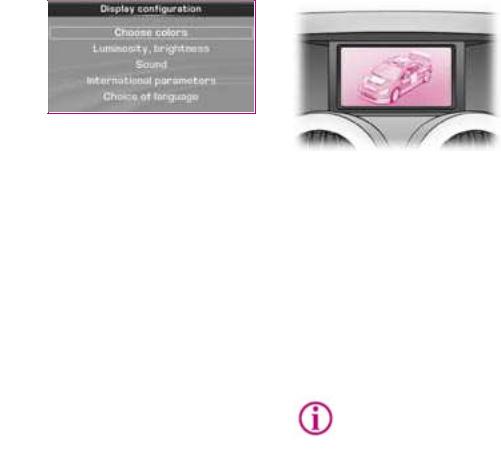
Parameter coniguration
The "Display coniguration" menu provides access to the following parameters:
•"Select the colours": selection from the palette of colours available for the display,
•"Brightness and intensity": setting of the brightness and intensity of the display,
•"Sound": setting of the voice synthesiser (for the male/female voice parameter: insert the coniguration CD-Rom); setting of the voice commands,
•"International parameters": setting of the date and time (12 or 24 hour mode, adjustment of the minutes on GPS); selection of the units (l/100 - °C or mpg - °F),
•"Selection of the language": selection of the language of the display, information and voice commands (German, English, Spanish, French, Italian, Dutch, Portuguese: insert the coniguration CD-rom ).
 28-02-2005
Video
You can connect video equipment (camcorder, digital camera, ...) to the three video sockets, located in the glove box.
Videos can only be displayed when stationary.
Select the "Video" menu from the general menu:
-"Activate video mode" to activate/ deactivate the video,
-"Video parameters" to set the display format, the brightness, the contrast and the colours.
Pressing the "MODE" or "DARK" button disconnects the display from the video.
Successive presses on the "SOURCE" button permit the selection of an audio source other than that of the video.
For safety reasons, coniguration of the multifunction displays by the driver must take place when stationary.
Multifunction displays - 33
A FEW DEFINITIONS...
Superimposed display
This is a window which appears temporarily over the current application to announce a change of status of another application.
Permanent application
This is the main application currently in use, displayed as the main screen window.
Contextual menu
This is a menu, limited to the main functions of the main application currently in use, displayed as the main screen window.
 Loading...