


 Loading...
Reproduced for Historical & Reference purposes by Paul M. Provencher - http://whitemetal.com
Introduction ...................................................................................................................................................... |
1 |
Major working parts of the ASAHI PENTAX Spotmatic II ......................................................................... |
2 |
Specifications .................................................................................................................................................... |
4 |
Short operating course ................................................................................................................................... |
6 |
How to hold your camera ............................................................................................................................... |
8 |
Film Loading...................................................................................................................................................... |
9 |
Film wind and rewind .................................................................................................................................... |
10 |
Bright field focusing....................................................................................................................................... |
11 |
Microprism....................................................................................................................................................... |
11 |
Automatic Diaphragm*...................................................................................................................................... |
12 |
Shutter ............................................................................................................................................................. |
13 |
Cautions..................................................................................................................................................... |
13 |
Depth-of-field guide ...................................................................................................................................... |
13 |
Depth-of-field tables: .................................................................................................................................... |
14 |
Range of light measurement........................................................................................................................ |
16 |
Mercury Battery.............................................................................................................................................. |
17 |
Flash Synchronization ................................................................................................................................... |
18 |
Self-Timer........................................................................................................................................................ |
19 |
Infra-red Photography .................................................................................................................................. |
19 |
How to make deliberate double exposure ................................................................................................. |
19 |
Important Notes ............................................................................................................................................. |
20 |
How to take care of your camera ............................................................................................................... |
22 |
Interchangeable Lenses ................................................................................................................................ |
24 |
Fixed Focus Setting ....................................................................................................................................... |
24 |
Super-Multi-Coated (SMC) Takumars........................................................................................................ |
24 |
DIFFERENCE OF ANGLE OF TAKUMAR LENSES ........................................................................................ |
25 |
SPECIFICATIONS OF TAKUMAR LENSES ................................................................................................... |
35 |
Complete System of Asahi Pentax Accessories for Close-Ups, Macrophotography, |
|
Photomicrography, and other Miscellaneous Accessories ...................................................................... |
37 |
Super-Lite II Electronic Flash ...................................................................................................................... |
43 |
Spotmeter III.................................................................................................................................................. |
44 |
ASAHI PENTAX Prism Binoculars................................................................................................................. |
45 |
ASAHI PENTAX Telescopes........................................................................................................................... |
46 |
GUIDE BOOK FOR ASAHI PENTAX SYSTEM OF PHOTOGRAPHY............................................................ |
47 |
WARRANTY POLICY........................................................................................................................................ |
49 |
Reproducers Comments........................................................................................................................................ |
52 |
Reproduced for Historical & Reference purposes by Paul M. Provencher - |
2 |
http://whitemetal.com |
|

Introduction
Your Asahi Pentax Spotmatic II is the finest photographic instrument on the market. The Super-Multi-Coating" on the Takumar lens, developed by Pentax and available only on Spotmatic II Takumars, reduces flare and boosts contrast to a degree far beyond what was previously possible in optical technology. It is a tougher coating than is available on any competitive lenses and results in pictures with more detail and richer colors than is possible with any other system at any price
The Spotmatic II itself is an outgrowth and refinement of the original Spotmatic which introduced through-the-lens metering to the world of photography. Its stopped-down metering system is the most accurate method for perfect exposure determination. It also automatically gives you a depth-of-field preview. It is an averaging system for the easiest and most dependable exposures in typical picture-taking situations. This metering system has been refined and improved each year in the Spotmatic to a degree of accuracy unmatched in the industry.
The original Spotmatic was the most compact 35mm SLR made. The Spotmatic II retains that same traditional compactness and classic feel. It also is designed for use with the accessories from the Pentax system, including all of the superb Takumar lenses ranging from the ultra-wide-angle 17mm Takumar up to the super-telephoto 1000mm Takumar. The Pentax system can grow with you as your interests develop in any direction.
We are very proud of the Pentax Spotmatic II. We are sure you will be, too.
Reproduced for Historical & Reference purposes by Paul M. Provencher - http://whitemetal.com
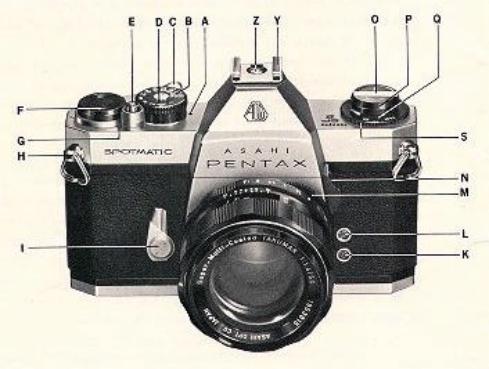
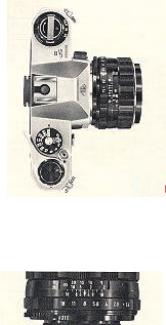
Major working parts of the ASAHI PENTAX Spotmatic II
A - Shutter Speed Index |
G - 'Cocked' indicator |
B - Shutter Speed Dial |
H - D-ring lug |
C - Rapid wind lever |
I - Self-timer cocking lever |
D - ASA film speed setting |
J - Focusing ring |
E - Shutter Release |
K - X flash terminal |
F - Automatic reset exposure counter |
L - FP Flash terminal |
Reproduced for Historical & Reference purposes by Paul M. Provencher - |
2 |
http://whitemetal.com |
|
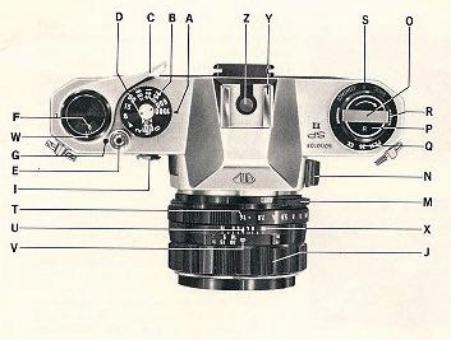
M - Preview lever |
T - Diaphragm ring |
N - Exposure meter switch |
U - Diaphragm and distance index |
O - Film rewind crank |
V - Distance scale |
P - Film rewind knob |
W - Exposure counter index |
Q - Film type reminder dial |
X - Depth-of-field guide |
R - Reminder dial selector |
Y - Hot shoe |
S - PF/X switch rim |
Z - Hot shoe flash contact |
Reproduced for Historical & Reference purposes by Paul M. Provencher - |
3 |
http://whitemetal.com |
|
Specifications
Type
35mm single-lens reflex with built-in light meter.
Film and Picture Size
35mm film (20 or 36 exposures). 24mm x 36mm
Standard Lenses
Super-Multi-Coated Takumar 50mm f/1.4 or 55mm Super-Multi-Coated Takumar f/1.8 with fully automatic diaphragm. Distance scale: 0.45m (1.5 feet) to infinity. Filter size: 49mm. With depth-of-field scale. Equipped with diaphragm preview lever which affords visual check of depth of field. Distance Scale: 45cm (18") to infinity.
Shutter
Focal plane shutter with single non-rotating dial (dial rotates to select shutter speed but remains stationary when exposure is made - this is a reference to earlier cameras that had shutter speed dials that rotated when the exposure was made). Speeds: B, 1-1/1000 sec. Film speed (ASA) setting dial and window on shutter speed dial. Built-in self-timer releases shutter in 5-13 seconds. Shutter curtains of special rubberized silk.
Warning Signal
The index of shutter speeds turns red when the shutter and film speed settings are off the meter's measurability range.
Finder
Pentaprism finder with microprism. Fresnel lens for instant focusing; 0.88x magnification with 50mm lens, and approximately life-size with 55mm lens.
Focusing
Turn the distance scale ring until the subject image in the viewfinder comes into sharp focus. Minimum focus distance: 0.45m (1.5 feet) (With 50/55mm lenses)
Reflex Mirror
Instant Return Type with special shock absorbers for minimum vibration.
Lens Mount
42mm threaded lens mount (Pentax-mount)
Reproduced for Historical & Reference purposes by Paul M. Provencher - |
4 |
http://whitemetal.com |
|
Film Advance
Ratchet type rapid wind lever (for film advance and shutter cocking). 10° preadvance and 160° advancing angle.
"Cocked" Indicator
A red disk appears in a small window alongside the shutter release button when the shutter is cocked, and blacks out when it is released.
Film Exposure Counter
Automatic re-set type.
Flash Synchronization
FP & X contacts for conventional flash cord connection. Electronic synchronization at 1/60 sec. Hot shoe with selectable sync (X or FP)
Exposure Meter
Built-in meter measures the brightness of the ground glass, and couples directly to the shutter and film speed settings. Film speed (ASA) setting ranges from 20 to 3200 (LV118 for ASA 100 film with standard lens.) Meter is powered with a mercury battery.
Film Rewind
Rapid rewind crank for speedy film take-up. Film rewind button on base of camera body releases film from take-up spool for rewind and rotates while film is being rewound.
Loaded Film Indicator
Loaded film reminder dial underneath film rewind knob is marked "20" or "36" in green (for color; tungsten type), in white (black and white), in orange (for color, daylight type) and "EMP" (empty).
Dimension
width 143mm (5.6") x height 93mm (3.66") x thickness 88mm (3.4")
Weight
853g (1 lb. 11 oz.) with 50mm f/1.4 lens. Body alone: 622 grams (1 lb, 4 oz.)
Reproduced for Historical & Reference purposes by Paul M. Provencher - |
5 |
http://whitemetal.com |
|

Short operating course
A mercury battery for the light meter is packed separately. Be sure to insert it into the battery housing when operating the camera. For battery insertion, refer to page 17.
1. SET FILM SPEED
Lift the outer ring of the shutter speed dial, turn it around and set the same number as the ASA number of the loaded film to the small red index which appears alongside the figure 1. Then cock the rapid wind lever.
2. SET SHUTTER SPEED
Turn the shutter speed dial and set the speed you wish to use to the index. When outdoors, set the speed to 1/125 sec., or faster, depending upon the lighting. When indoors, set it at 1/30, or in its neighborhood. Change the shutter speed later, when necessary. (Refer to 5 on next page.)
3. COMPOSE AND FOCUS
While viewing through the viewfinder, turn the distance scale ring with your thumb and index finger until you get the sharpest image of your subject at the microprism center of the finder
Reproduced for Historical & Reference purposes by Paul M. Provencher - |
6 |
http://whitemetal.com |
|

4.TURN ON THE LIGHT METER SWITCH
Push up the switch button with your thumb. Through the viewfinder, you will observe the movement of the meter's needle on the right side of the ground glass. Be sure to turn off the meter's switch when not actually taking readings.
5.ROTATE DIAPHRAGM RING
The needle moves up and down with the turn of the diaphragm ring. When the needle rests at the center, you will get correct exposure. If the needle does not come to the center no matter how far you turn the diaphragm ring, change the shutter speed. When the needle is off center and close to the (+) mark, you will get over-exposure: change the shutter speed to a faster setting. If the needle is closer to the (-) mark, you will get underexposure: change the shutter speed to a slower setting.
6. RELEASE THE SHUTTER
Hold your camera firmly and trip the shutter. When the shutter is released, the meter switch will automatically turn off, and the needle will remain fixed off and underneath the center. The diaphragm will reopen to its full aperture and the overall image will look brighter. Cock the rapid wind lever for the next picture. (When taking a series of pictures under the same lighting conditions, it is not necessary to repeat instructions 4 and 5.)
Reproduced for Historical & Reference purposes by Paul M. Provencher - |
7 |
http://whitemetal.com |
|
How to hold your camera
|
|
|
In horizontal position |
In vertical position B. |
In vertical position C. |
A. Hold the camera firmly |
Hold your camera tightly to |
Hold your camera tightly to |
with your left hand, and |
your forehead with your left |
your forehead with your left |
draw your arm close to |
hand, and drawn your right |
hand, raise your right arm |
your body. |
arm close to your body. |
and draw your left arm to |
|
|
your body. |
As a general rule, your camera should be held more firmly by the left hand which does not release the shutter. If you hold your camera with the right hand - the hand which releases the shutter - it may cause camera movement. Very often, pictures which are not sharp are due to movement of the camera. When you focus with the camera held horizontally (Position A), hold the lens barrel as illustrated. Cradle the camera with your left hand thumb and little finger. Turn the distance scale ring with your thumb and index finger. When holding the camera vertically, some people release the shutter with the thumb (Position B), while others release it with the index finger (Position C). Position C is more desirable for fast focusing and shooting. With the Asahi Pentax, whether held vertically or horizontally, you see your subject image through the taking lens, enabling you to compose, focus and shoot with a minimum of time and effort.
Reproduced for Historical & Reference purposes by Paul M. Provencher - |
8 |
http://whitemetal.com |
|
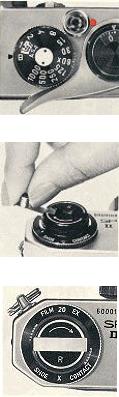
Film Loading
Film type reminder dial
Use the film type dial to show what type of film is in your camera. When you have pulled out the rewind knob to open the back when loading the film,
turn the dial selector so that the type of film appears in the window. To check whether the camera is loaded, turn the film rewind knob clockwise. If it turns freely, the camera is not loaded.
Avoid direct sunlight when loading your film.
1.Open the back by pulling out the rewind knob until the back cover snaps open.
2.Place the film cassette into the cassette chamber, and push back the rewind knob. Draw out the film leader and insert it into the slot of the take-up spool.
3.Advance the film by alternately turning the rapid wind lever and releasing
the shutter until both sprockets have properly engaged the film perforations. Close the back by pressing it firmly.
4. If the film is properly loaded, the rewind knob will turn counter-clockwise when you advance the film by turning the rapid wind lever.
Setting ASA film speed
The ASA film speed rating of all 35mm films is given in the data sheet packed with each roll of film. The higher the ASA number, the more sensitive the film.
Lift the outer ring of the shutter speed dial and rotate it until the ASA number of your film is opposite the red index mark.
Be sure to set your film speed on the shutter speed dial because the dial is connected to the exposure meter system.
Reproduced for Historical & Reference purposes by Paul M. Provencher - |
9 |
http://whitemetal.com |
|

1 The first portions of the film cannot be used for picture taking as they have already been exposed to light. Generally, two blank exposures should be made before taking your first picture. Cock the rapid wind lever until it stops. Watch to see that the film rewind knob automatically turns counter-clockwise, indicating that the film is moving from cassette to take-up spool. Trip the shutter.
Film wind and rewind
Cock the rapid wind lever for the first picture; the exposure counter automatically turns to '1', indicating that the first picture is ready to be taken.
2 After the final picture on the roll (20 or 36 exposures) has been taken, the rapid wind lever will not turn all the way as you stroke it. This indicates that the final picture has been taken on your film, and that the film must be rewound. Don't open the back of the camera, or all exposed frames will be ruined.
3 Unfold the film rewind crank.
4 Depress the film rewind release button. Turn the rewind crank to rewind the film into the film cassette. The film rewind crank permits rapid rewinding at a smooth, even rate. (Under some atmospheric conditions, erratic or too rapid rewinding will cause static electricity marks on the film.) You will feel the tension on the rewind crank lessen as the leader end of the film slips off the take-up spool.
Stop rewinding when you feel this happen. AVOID DIRECT SUNLIGHT WHEN UNLOADING YOUR FILM. (The rewind release button will return to normal position as you load your next film and turn the rapid wind lever.)
5 Pull out the film rewind knob (the back will open automatically), and remove the film cassette.
Reproduced for Historical & Reference purposes by Paul M. Provencher - |
10 |
http://whitemetal.com |
|
Bright field focusing
1 You can start viewing and focusing before and after cocking the rapid wind lever. When the automatic preview lever is in the "AUTO" (automatic) position, the meter is at "OFF", the diaphragm is fully open except for the moment of exposure.
2 Turn the distance scale ring until your subject image is clearly in focus. It is not always necessary for you to view and focus with the diaphragm fully open. In bright sunlight, you can easily focus with the diaphragm closed to f/5.6 or f/8 and still observe the depth of field. It is easier, however, to focus with the diaphragm fully open as your subject image is much brighter.
When the letters "MAN" appears beside the lever, the lens is in manual position; when "AUTO" appears, it is in the automatic position.
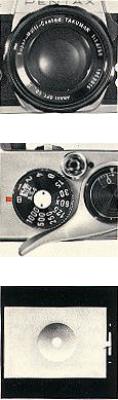
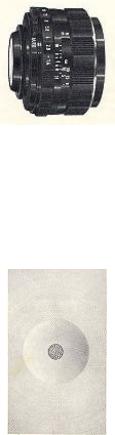
Microprism
Asahi Pentax cameras have a Fresnel lens with a microprism center underneath the ground glass. As you look through the finder, you will see that the Fresnel lens consists of many concentric rings which provide the brightest possible image on the ground glass.
The microprism is the center portion of this diagram. When your subject is in focus, the image in the microprism will be sharp and perfectly clear. If your subject is not in focus, the microprism will break the image up into many small dots, much like and engraver's screen. You can focus your subject on any portion of the ground glass.
Reproduced for Historical & Reference purposes by Paul M. Provencher - |
11 |
http://whitemetal.com |
|
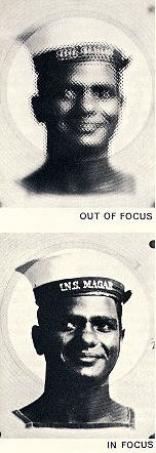
Automatic Diaphragm*
OUT OF FOCUS |
When the preview lever is in the "AUTO" |
|
(automatic) position, and the exposure meter is |
|
turned to "OFF", the fully automatic diaphragm |
|
is at its largest aperture at all times, except for |
|
the instant of exposure, no matter what |
|
aperture is set on the diaphragm ring. When |
|
you release the shutter, the diaphragm |
|
automatically stops down to the predetermined |
|
aperture and the shutter curtains start travelling |
|
instantly. When the exposure is completed, the |
|
diaphragm reopens to maximum aperture |
|
completely automatically and you are ready to |
|
compose, focus and shoot your next pictures. If |
|
you wish to visually check exact depth-of-field |
|
before making the exposure, move the preview |
|
lever to the "MAN" (manual) position. This stops |
|
the diaphragm to the aperture selected and |
|
shows you exactly how much depth-of-field will |
|
appear in your picture. The preview lever may |
|
be moved back to "AUTO" (automatic) position |
|
before or after making your exposure, or, if you |
|
are making pictures in bright sunlight, it may be |
|
left in manual position, which permits a constant |
|
check of depth of field. |
|
* When the exposure meter switch is turn to |
|
the "on" position, the lens diaphragm changes |
|
from the automatic to manual position even |
|
though the preview lever is in the "AUTO" |
|
(automatic) position. When the shutter is |
|
released, the lens diaphragm will automatically |
|
return to its automatic position if the lever is set |
|
on "AUTO" |
IN FOCUS |
|
Reproduced for Historical & Reference purposes by Paul M. Provencher - |
12 |
http://whitemetal.com |
|
Shutter
Turn the shutter speed dial clockwise or counter-clockwise to the shutter speed desired. The shutter speed may be set either before or
after cocking the rapid wind lever. As you cock the shutter by turning the rapid wind lever, the "cocked" indicator turns red showing that the shutter is cocked.
The indicator window blacks out as you trip the shutter button. For use of the X setting on the shutter speed dial, refer to page 18.
With the shutter speed dial set on B (bulb), the shutter will stay open as long as you depress the shutter button. As you release your finger from the shutter button, the shutter closes. When a long exposure is desired while using the B setting, attach a shutter release cable with a locking device to the shutter button. This will permit a "Time" exposure.
Cautions
1 At slow speeds - slower than 1/30 - support your camera rigidly or use a tripod to prevent movement of your camera.
2 To protect the shutter mechanism, trip the shutter release before putting the camera out of use for any extended period.
If you want to know how great the depth of field is at a certain aperture, look at the depth-of-field guide. In the above photograph, the distance scale is set at 5 meters…the lens is focused on a subject 5 meters away. The calibrations on each side of the distance index correspond to the diaphragm setting and indicate the range of in-focus distance for different lens apertures. For example, if the lens opening of f/8 is to be used, the range on the distance scale ring covered within the figure 8 on the depth-of- field guide indicates the
Depth-of-field guide
area in focus at the lens opening. You will note from the depth-of-field guide in the photograph that the range from approximately 10 to 25 feet is in focus. Note that as the lens apertures change, the effective depth of field also changes. For the depth of fields at different apertures and distances, refer to page 14 ~ 15.
Depth of field is the range between the nearest and farthest distances which are in focus at different lens apertures.
Reproduced for Historical & Reference purposes by Paul M. Provencher - |
13 |
http://whitemetal.com |
|
Depth-of-field tables:
Super-Multi-Coated Takumar 50mm lens
Distance |
0.45 |
0.6 |
1 |
1.5 |
2 |
5 |
10 |
∞ |
Scale \ |
m |
m |
m |
m |
m |
m |
m |
m |
f setting |
|
|
|
|
|
|
|
|
f/1.4 |
0.45 |
0.59 |
0.98 |
1.46 |
1.93 |
4.57 |
8.40 |
51.75 |
|
0.453 |
0.61 |
1.02 |
1.54 |
2.07 |
5.52 |
12.36 |
~ ∞ |
f/2 |
.045 |
.059 |
0.98 |
1.45 |
1.90 |
4.41 |
7.86 |
36.24 |
|
0.454 |
0.61 |
1.02 |
1.56 |
2.11 |
5.78 |
13.75 |
~ ∞ |
f/2.8 |
0.44 |
0.59 |
0.97 |
1.43 |
1.87 |
4.21 |
7.24 |
25.90 |
|
0.46 |
0.61 |
1.03 |
1.58 |
2.16 |
6.16 |
16.19 |
~ ∞ |
f/4 |
0.44 |
0.59 |
0.95 |
1.40 |
1.81 |
3.94 |
6.48 |
18.14 |
|
0.46 |
0.62 |
1.05 |
1.62 |
2.23 |
6.84 |
22.05 |
~ ∞ |
f/5.6 |
0.44 |
0.58 |
0.94 |
1.36 |
1.75 |
3.64 |
5.68 |
12.97 |
|
0.46 |
0.62 |
1.07 |
1.68 |
2.34 |
8.03 |
42.68 |
~ ∞ |
f/8 |
0.44 |
0.57 |
0.91 |
1.30 |
1.66 |
3.26 |
4.80 |
9.10 |
|
0.47 |
0.63 |
1.11 |
1.77 |
2.52 |
10.87 |
~ ∞ |
~ ∞ |
f/11 |
0.43 |
0.56 |
0.88 |
1.24 |
1.56 |
2.88 |
4.02 |
6.63 |
|
0.47 |
0.65 |
1.15 |
1.89 |
2.80 |
19.53 |
~ ∞ |
~ ∞ |
f/16 |
0.42 |
0.54 |
0.84 |
1.16 |
1.42 |
2.42 |
3.16 |
4.57 |
|
0.48 |
0.67 |
1.24 |
2.16 |
3.42 |
~ ∞ |
~ ∞ |
~ ∞ |
Depth-of-field table:
Super-Multi-Coated Takumar 55mm lens
Distance |
0.45 |
0.6 |
1 |
1.5 |
2 |
5 |
10 |
∞ |
Scale \ |
m |
m |
m |
m |
m |
m |
m |
m |
f setting |
|
|
|
|
|
|
|
|
f/1.8 |
0.45 |
0.59 |
0.98 |
1.46 |
1.93 |
4.57 |
8.39 |
51.27 |
|
0.45 |
0.61 |
1.02 |
1.54 |
2.07 |
5.52 |
12.38 |
~ ∞ |
f/2 |
0.45 |
0.59 |
0.98 |
1.46 |
1.92 |
4.53 |
8.24 |
46.15 |
|
0.45 |
0.61 |
1.02 |
1.54 |
2.08 |
5.59 |
12.72 |
~ ∞ |
f/2.8 |
0.45 |
0.59 |
0.98 |
1.44 |
1.89 |
4.36 |
7.70 |
32.98 |
|
0.45 |
0.61 |
1.03 |
1.56 |
2.12 |
5.86 |
14.27 |
~ ∞ |
f/4 |
0.44 |
0.59 |
0.97 |
1.42 |
1.85 |
4.13 |
7.01 |
23.10 |
|
0.46 |
0.61 |
1.04 |
1.59 |
2.17 |
6.33 |
17.48 |
~ ∞ |
f/5.6 |
0.44 |
0.58 |
0.95 |
1.39 |
1.80 |
3.87 |
6.27 |
16.52 |
|
0.46 |
0.62 |
1.05 |
1.63 |
2.25 |
7.09 |
24.97 |
~ ∞ |
f/8 |
0.44 |
0.58 |
0.93 |
1.34 |
1.73 |
3.53 |
5.41 |
11.58 |
|
0.46 |
0.62 |
1.08 |
1.70 |
2.38 |
8.65 |
70.27 |
~ ∞ |
f/11 |
0.44 |
0.57 |
0.91 |
1.29 |
1.64 |
3.18 |
4.62 |
8.44 |
|
0.47 |
0.63 |
1.11 |
1.79 |
2.57 |
11.93 |
~ ∞ |
~ ∞ |
f/16 |
0.43 |
0.56 |
0.87 |
1.22 |
1.52 |
2.73 |
3.71 |
5.82 |
|
0.47 |
0.65 |
1.17 |
1.96 |
2.95 |
32.75 |
~ ∞ |
~ ∞ |
Reproduced for Historical & Reference purposes by Paul M. Provencher - |
14 |
http://whitemetal.com |
|
Depth-of-field table:
Super-Multi-Coated Takumar 50mm lens
Distan |
1'6" |
2' |
3' |
5' |
10' |
15' |
30' |
∞ |
ce Scale |
|
|
|
|
|
|
|
m |
\ |
|
|
|
|
|
|
|
|
f |
|
|
|
|
|
|
|
|
setting |
|
|
|
|
|
|
|
|
f/1.4 |
1' 6.12" |
1' 11.8" |
2' 11.5" |
4' 10.4" |
9' 5.6" |
13' 9.7" |
25' 6.6" |
169' |
|
1' 6.13" |
2' 0.2" |
3' 0.6" |
5' 1.7" |
10' 7.2" |
16' 4.9" |
36' 4.2" |
9.2" |
|
|
|
|
|
|
|
|
∞ |
f/2 |
|
|
|
|
|
|
|
|
f/2.8 |
|
|
|
|
|
|
|
|
f/4 |
|
|
|
|
|
|
|
|
f/5.6 |
|
|
|
|
|
|
|
|
f/8 |
|
|
|
|
|
|
|
|
f/11 |
|
|
|
|
|
|
|
|
f/16 |
|
|
|
|
|
|
|
|
Depth-of-field table:
Super-Multi-Coated Takumar 55mm lens
Distan |
1'6" |
2' |
3' |
5' |
10' |
15' |
30' |
∞ |
ce Scale |
|
|
|
|
|
|
|
m |
\ |
|
|
|
|
|
|
|
|
f |
|
|
|
|
|
|
|
|
setting |
|
|
|
|
|
|
|
|
f/1.8 |
|
|
|
|
|
|
|
|
f/2 |
|
|
|
|
|
|
|
|
f/2.8 |
|
|
|
|
|
|
|
|
f/4 |
|
|
|
|
|
|
|
|
f/5.6 |
|
|
|
|
|
|
|
|
f/8 |
|
|
|
|
|
|
|
|
f/11 |
|
|
|
|
|
|
|
|
f/16 |
|
|
|
|
|
|
|
|
Reproduced for Historical & Reference purposes by Paul M. Provencher - |
15 |
http://whitemetal.com |
|
Loading...