


HE120 By-Pass
Drum Humidifier
OWNER’S MANUAL
|
Contents |
How Your Humidifier Works .................................................................................... |
2 |
Operating Your Humidifier ...................................................................................... |
2 |
Maintaining Your Humidifier .................................................................................... |
3 |
Checking Your Humidifier Operation ...................................................................... |
6 |
Troubleshooting Your Humidifier ............................................................................. |
6 |
69-1110EF-02
HE120 BY-PASS DRUM HUMIDIFIER
HOW YOUR HUMIDIFIER WORKS
Your Honeywell humidifier uses the principle that vapor (evaporated water) is created when warm air blows over a water soaked area. As the vapor circulates, the relative humidity rises.
Your humidity control monitors the relative humidity and activates the humidifier accordingly. The humidifier has a water supply that disburses water evenly over a humidifier pad. The warm dry air from the furnace passes over the humidifier pad and picks up the moist air to circulate it through your home.
Humidified air feels warmer and more comfortable so you may be able to lower your thermostat heating setpoint and save money on your heating fuel bills. The end result is that your humidifier gives you a comfortable environment that is also energy efficient.
OPERATING YOUR HUMIDIFIER
Your HE120 Honeywell humidifier is controlled by the Humidity Control that is installed either on the return air duct or on an interior wall in your living area. Choose the humidity control setting using the combination relative humidity/outdoor temperature setting scale on your humidity control. Match the dial setting to the outdoor temperature for optimizing the humidity level while reducing the moisture condensation on your windows. The table below can also be used to adjust the humidity control to the recommended setting.
|
|
|
M13608 |
|
|
|
|
At Outside |
Recommended |
At Outside |
Recommended |
Temperature |
Setting |
Temperature |
Setting |
-20°F (-29°C) |
Low |
+10°F (-12°C) |
Med |
-10°F (-23°C) |
Low |
+20°F (-7°C) |
High |
|
|
|
|
0°F (-18°C) |
Med |
Above 20° (-7°C) |
High |
|
|
|
|
NOTE: As the outside temperature drops, the recommended humidity control setting is lowered to accommodate for the effects of dewpoint. These settings should reduce the accumulation of moisture and ice on your windows and in other areas of your home.
Some indoor activities such as cooking, showering and clothes drying can cause excessive levels of humidity and start the accumulation of moisture on your windows.
NOTE: If this condition persists for more than a few hours, set the humidity control to the lowest setting to turn off the humidifier. If the condition does not improve, ventilate your home to remove the moisture.
69-1110EF—02 |
2 |
HE120 BY-PASS DRUM HUMIDIFIER
MAINTAINING YOUR HUMIDIFIER
A regular maintenance program prolongs the life of your humidifier and provides a more comfortable home. The frequency of cleaning will depend on the condition of your water.
You can use either hard or soft water in your humidifier, but hard water mineral deposits are more difficult to clean than soft water deposits.
Cleaning Humidifier
(Every 1 to 3 Months Depending on Water Quality)
 CAUTION
Voltage Hazard.
Can cause electrical shock and equipment damage.
Disconnect power and shut off water supply before installing or servicing.
IMPORTANT
Never oil any part of the humidifier.
Use the following steps to clean your Honeywell humidifier:
1.Disconnect the power and turn off the humidifier water supply.
2.Remove the humidifier cover by lifting the bottom of the cover upward.
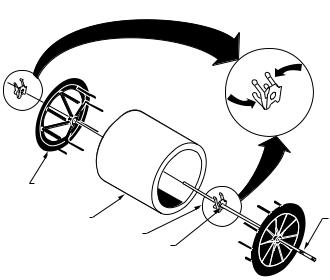
3.Lift up the drum shaft from the bearing end and slide it out of the motor coupling to remove the drum assembly. See Fig. 1.
NOTE: You will encounter some resistance when removing the drum shaft until you hear an audible click.
4.Remove the drum from the assembly.
3 |
69-1110EF—02 |

HE120 BY-PASS DRUM HUMIDIFIER
COVER |
BEARING END OF |
DRUM ASSEMBLY |
|
DRUM SHAFT |
|
HUMIDIFIER
HOUSING
WATER PAN
WATER VALVE
OPENING
M12252
Fig. 1. Removing Drive Assembly
5.Grasp the rubber valve seat between your thumb and forefinger and lift it upward to remove the valve seat from the valve. The seat is located inside the humidifier housing at the water valve opening. See Fig. 2.
LIFT THE RUBBER VALVE SEAT UPWARD
TO REMOVE IT FROM THE VALVE
M13617
Fig. 2. Float Valve Assembly
6.Raise up the float and remove the water pan.
69-1110EF—02 |
4 |
HE120 BY-PASS DRUM HUMIDIFIER
7.Refer to the drawing to disassemble the drum. See Fig. 3.
SQUEEZE
SLIGHTLY
TO INSTALL
OPEN
DRUM END
PAD |
METAL TABS |
TINNERMAN
DRUM SHAFT
CLOSED DRUM END 
M13609
Fig. 3. Drum Assembly
8.Clean all humidifier parts in a 50% solution of vinegar (or a humidifier cleaner) and water. Soak overnight to remove stubborn deposits.
NOTE: Replace humidifier pad yearly with the new Honeywell Drum Humidifier Pad (Part no. HC12A1015). The actual frequency depends on the quality of the water used.
9.After the humidifier components are clean, reassemble the humidifier by reversing the order of steps 1 through 7.
NOTE: Be sure that the drum shaft is completely seated-listen for the click.
10.Verify the humidifier operation by following the steps in the Checking Your Humidifier Operation section.
Start of Humidification Season
Replace the humidifier pad with a new Honeywell Drum Humidifier Pad (Part no. HC12A1015) at the beginning of the heating season. Follow the cleaning instructions to replace the pad and check for proper operation.
End of Humidification Season
Clean the humidifier and shut it off at the end of the heating season. Follow the cleaning instructions, steps 1 through 9, to shut down the device for the season.
5 |
69-1110EF—02 |
 Loading...