


BINOCULARS WITH A BUILT-IN DIGITAL CAMERA
Operating Manual
To ensure the best performance from your DIGIBINO, please read this Operating Manual before using the DIGIBINO.
Thank you for buying the Pentax DIGIBINO DB100. Please read this manual before using this product in order to get the most out of all the features and functions. Keep this manual safe, as it can be a valuable tool in helping you to understand this product’s capabilities.
Regarding copyrights
Images taken using the DIGIBINO that are for anything other than personal enjoyment cannot be used without permission according to the rights as specified in the Copyright Act. Please take care, as there are even cases where limitations are placed on taking pictures even for personal enjoyment during demonstrations, industrial enterprise or as items for display. Images taken with the purpose of obtaining copyrights also cannot be used outside the scope of use of the copyright as laid out in the Copyright Act, and care should be taken here also.
To users of the DIGIBINO
•There is a possibility that recorded data may be erased or that DIGIBINO may not function correctly when used in surroundings such as installations generating strong electromagnetic radiation or magnetic fields.
•The liquid crystal panel used in the LCD display is manufactured using extremely high precision technology. Although the level of functioning pixels is 99.99% or better, you should be aware that 0.01% or fewer of the pixels may not illuminate or may illuminate when they should not. However, this has no effect on the recorded image.
Regarding trademarks
•PENTAX, DIGIBINO are trademarks of Asahi Optical Co., Ltd.
•All other brands or product names are trademarks or registered trademarks of their respective companies.
The illustrations and the display screen of the LCD monitor in this manual may be different from the actual product.
FOR SAFE USE OF YOUR DIGIBINO
Sufficient attention has been paid to the safety of this product but please pay particular attention to the warnings indicated by the following symbols during use.
These symbols indicate that improper handling poses a high risk of causing death or serious injury.
These symbols indicate that improper handling poses a risk of causing injury or damage to the product or property.
 WARNING
NEVER look at the sun using the DIGIBINO.
•NEVER look at the sun using the DIGIBINO. Serious damage to the retina, or total loss of eyesight may occur.
•Do not leave the DIGIBINO in direct sunlight. Sun rays passing through this product will be intensified, and should they focus on flammable materials, fire may occur.
•Do not attempt to take the DIGIBINO apart or remodel the DIGIBINO, as there is a danger of receiving an electric shock.
•If the inside of the DIGIBINO should become exposed as a result of, for example, this product being dropped, please do not under any circumstances touch such exposed portions, as there is a danger of receiving an electric shock.
1

•Wrapping the strap of this product around your neck is also dangerous. Please take care that small children do not hang the strap around their necks.
•If the batteries fluid come in contact with your eyes, do not rub them. Flush your eyes with clean water and get medical attention immediately.
•If the batteries fluid come in contact with skin or clothes, wash affected areas thoroughly with water.
•Defective batteries could possibly become flammable. Do not attempt to touch the product if this occurs.
•Carefully remove the batteries if they explode or start smoking. Take care not to get burned if the batteries are hot.
•Some portions of the DIGIBINO heat up during use, so please take care, as there is a risk of low temperature burns if such portions are held for long periods of time.
•Do not use the DIGIBINO while walking as depth perception and peripheral vision are dramatically altered.
•Caution should be taken when adjusting the DIGIBINO barrels to avoid fingers being pinched.
•Using the DIGIBINO for an extended period of time may cause inflammation where the eyepieces and strap come in contact with skin.
•Do not swing the DIGIBINO by the neck strap.
2

Care to be Taken During Handling
•Do not direct the DIGIBINO to the sun with the lens barrier open. It may damage the image pickup device.
•When the DIGIBINO has not been used for a long time, confirm that it is still working properly, particularly prior to taking important pictures. Pentax is not responsible for consequential damages (costs incurred as a result of taking pictures, loss of benefits that were to be obtained through taking pictures) arising from failure of this product.
•Do not apply excessive force when adjusting the central focusing wheel, diopter adjusting ring, or eyepiece width.
•Ensure that this product is not subjected to substantial vibrations, shocks or pressure. Place this product on a cushion for protection when this product is subjected to the vibrations of a motorbike, car, or ship, etc.
•Do not use the DIGIBINO where it may come in contact with rain, water or any other liquid, because this product is not weather, water, or liquid resistant.
•The temperature range in which this product can be used is 0°C to 40°C (32°F to 104°F).
•Places of high temperature and humidity should be avoided. Particular care should be taken regarding vehicles, which can become very hot inside.
•The liquid crystal display will become black at temperatures of approximately 60°C (140°F) but will return to normal when normal temperatures are returned to.
•The response speed of the liquid crystal display becomes slow at low temperatures. This is due to the properties of the liquid crystal and is not a fault.
•If the DIGIBINO is subjected to rapid temperature changes, condensation may form on the inside and outside of this product. Therefore put the DIGIBINO in a bag or plastic bag, and take this product out when the difference in temperature has subsided.
•Avoid contact with garbage, dirt, sand, dust, water, toxic gases, salt, etc. as this may cause damage to the DIGIBINO. If rain or drops of water get onto the DIGIBINO, please wipe dry.
3

•Do not clean this product with organic solvents such as thinner or alcohol benzene.
•Storing the camera where pesticides and chemicals are handled should be avoided. Remove from case and store in a well-ventilated place to prevent the DIGIBINO from becoming moldy during storage.
•Periodic checks are recommended every 1 to 2 years in order to maintain high-perfor- mance.
Handling Batteries
•Use two size AA alkaline batteries, two size AA nickel hydride (NiMH) batteries, or one CR-V3 lithium battery pack.
•The number of digital photos you can take may be reduced depending on the shooting conditions, environment, and batteries.
•Manganese batteries cannot be used. Manganese batteries are short in service life and in addition heat generation may damage the DIGIBINO.
•Use the batteries correctly. Incorrect use may cause leakage, heat generation, and damage. When replacing a battery, place it correctly while noting the directions of the + and - markings.
•Generally, battery performance is temporarily deteriorated as temperature decreases. When the DIGIBINO is used in a cold environment, keep this product warm by holding it in some protection against cold or inside the clothes. Battery performance once deteriorated due to low temperature will be recovered when the batteries are returned to room temperature.
•The cathode or anode of a battery stained with sweat or oil may cause poor contact. Wipe it well with dry cloth before use.
•It is recommended to carry spare batteries when you go out for a long-term journey. Especially in foreign countries, compatible batteries may be unavailable depending on the region.
4

Contents
FOR SAFE USE OF YOUR DIGIBINO ······················································································ 1 Care to be Taken During Handling ···························································································· 3 Contents ···································································································································· 5 Contents of the Operating Manual ···························································································· 7 Names of Parts ·························································································································· 8 Checking the Contents of the Package ··················································································· 10
Getting Started .......................................................................................................................... |
|
11 |
Attaching the Strap ·················································································································· 11 |
||
Adjusting the Eyepiece Width |
·································································································· 11 |
|
Adjusting the Diopter Control |
·································································································· 13 |
|
Using the DIGIBINO as Binoculars ·················································································· 14 |
||
Installing Batteries ··················································································································· 15 |
||
Setting the Date/Time ·············································································································· 18 |
||
Quick Start ................................................................................................................................. |
|
20 |
Taking Pictures |
························································································································ 20 |
|
Taking Pictures Using the LCD Monitor ··········································································· 21 |
||
Playing Back Pictures ·············································································································· 22 |
||
Playing Back a Single Image ··························································································· 22 |
||
Playing Back the Last Image Taken (One-touch View) ···················································· 23 |
||
Modes and Menus ..................................................................................................................... |
|
24 |
Changing the Mode ················································································································· 24 |
||
Using the Menus ······················································································································ 25 |
||
How to Use the Menus ···································································································· 25 |
||
Menu List |
························································································································· 27 |
|
Taking Pictures .......................................................................................................................... |
|
29 |
Displaying Shooting Information ······························································································ 29 Selecting the Image Quality (Resolution) ················································································ 30 Changing the Size of the Subject (Digital Zoom) ···································································· 31 Continuous Shooting ··············································································································· 32
5

Playback/Deleting ...................................................................................................................... |
33 |
Displaying Image Information ·································································································· 33 Nine-image Display (Thumbnail) ····························································································· 34 Playing Back Images Continuously (Slideshow) ····································································· 36 Zoom Display (Special Zoom) ································································································· 37 Deleting Images ······················································································································· 38
Deleting the Last Image Taken (One-touch Deletion) ······················································ 38 Deleting a Single Image ·································································································· 39 Deleting All Images ·········································································································· 40 Saving Important Images from Deletion (Protect) ··································································· 42 Viewing Images on a TV ·········································································································· 43
Settings ...................................................................................................................................... |
44 |
Initializing All Memory (Format) ······························································································· 44 Setting the Date Style ·············································································································· 45 Adjusting the Date/Time ·········································································································· 46 Changing the Display Language ····························································································· 47 Turning the Beep On/Off ·········································································································· 48 Auto Power Off Function ·········································································································· 49
Resuming from the Auto Power Off status ······································································ 50 Resetting to Default Settings (Reset) ······················································································ 51
Viewing Images with a PC ........................................................................................................ |
52 |
Viewing Images with Windows PC ·························································································· 52 Installing the software (only for Windows 98SE) ····························································· 53 Connecting the DIGIBINO and PC ·················································································· 56 Viewing images on your PC ···························································································· 56 Disconnecting the DIGIBINO from your PC ···································································· 57
Viewing Images with Macintosh ······························································································ 59 Installing the software ······································································································ 60 Connecting the DIGIBINO and your Macintosh ······························································· 61 Viewing images on your Macintosh ················································································· 62 Disconnecting the DIGIBINO from your Macintosh ························································· 62
Appendix .................................................................................................................................... |
63 |
Messages ································································································································ 63 Troubleshooting ······················································································································· 64 Main Specifications ·················································································································· 66 WARRANTY POLICY ·············································································································· 67
6

Contents of the Operating Manual
This Operating manual contains the following chapters.
● Getting Started
This chapter explains how to use the DIGIBINO as binoculars, and what you need to do after pur chasing this product before you start taking pictures. Be sure to read it and follow the instructions.
● Quick Start
This chapter explains the simplest way to take pictures and play back images. Use it if you want to start taking pictures straightaway.
● Modes and Menus
This chapter explains common operations such as how to change the mode, and how to use the menus. For more details, refer to the respective “Taking Pictures”, “Playback/Deleting” and “Settings” chapters.
● Taking Pictures
This chapter explains the various ways of capturing images and how to set the relevant functions.
● Playback/Deleting
This chapter explains how to play back images on the DIGIBINO or on a TV and how to delete images.
● Settings
This chapter explains how to set the DIGIBINO’s functions.
● Viewing Images with a PC
This chapter explains how to view recorded images with a PC using the software included CD-ROM.
● Appendix
This tells you about the messages displayed on the LCD monitor and what to do in the event of trouble.
7

Names of Parts
Objective lenses
Right cover
USB/Video output terminal cover
Tripod socket
LCD monitor (when closed)
Left cover
Battery chamber cover
Slide lever Lens barrier
(when open: taking images)
Opening the LCD monitor
Caution
Do not apply excessive force when opening the LCD monitor.
8
Central focusing wheel
Left diopter adjusting ring
LCD monitor (when opened)
MENU button
buttons
OK button
 Strap lug
DISPLAY button
Shutter release
button
Eyepiece lenses
Status lamp |
Strap lug |
Right diopter adjusting ring
9
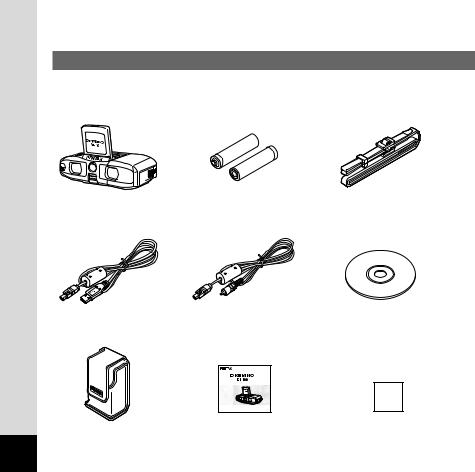
Checking the Contents of the Package
Main Unit (DB100) |
Size AA alkaline batteries (2) |
Strap |
USB cable |
Video cable |
Software (CD-ROM) |
|
|
(K-SW1) |
Operating Manual
Soft case Operating Manual (this manual) Warranty card
10
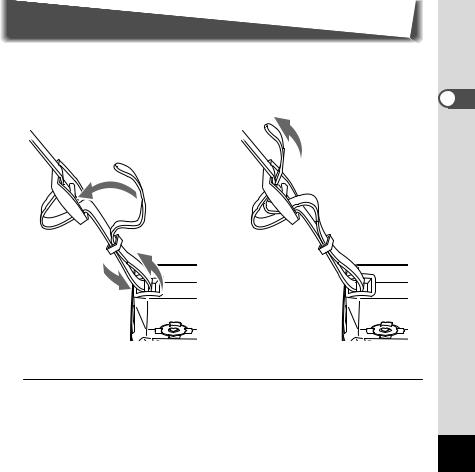
Attaching the Strap
Attach the included strap as shown in the illustrations below.
¡ |
™ |
3
2
1
Caution
Pentax will assume no responsibility for damage that may occur if the product is dropped due to the incorrect attachment of the strap.
Started Getting
11
Started Getting
12
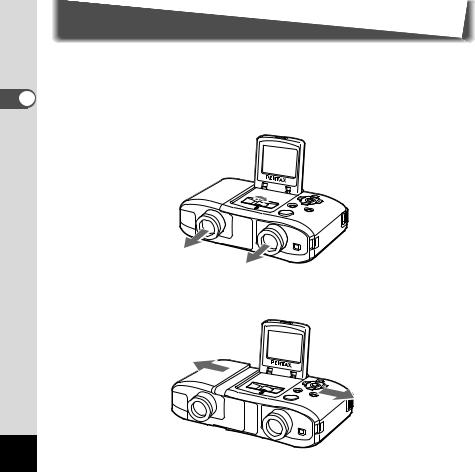
Adjusting the Eyepiece Width
The DIGIBINO eyepiece distance adjusts for optimal viewing through the eyepiece lenses.
¡ Raise the LCD monitor.
™ Turn the central focusing wheel to slide out the eyepiece lenses.
£While looking at an object through both the right and left eyepiece lenses, slide the cover outward or inward to adjust the eyepiece separation so you can see a single image with both eyes.
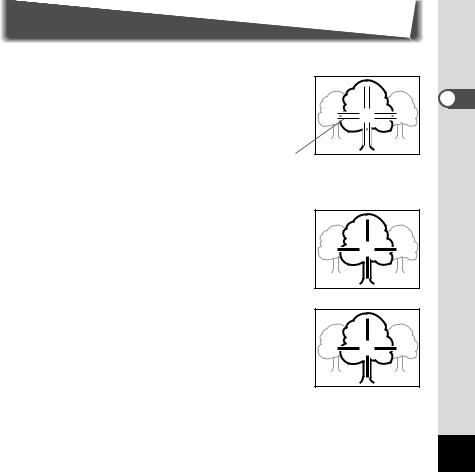
Adjusting the Diopter Control
The DIGIBINO diopter can be adjusted according to your eyesight.
¡ Direct the DIGIBINO to a light area and look through the right eyepiece lens with your right eye.
Neither the object nor the indication are sharp.
Indication
™ Turn the right diopter adjusting ring until the indication appears sharp.
At this stage, the object may not appear sharp.
£ Next, turn the central focusing wheel until the object appears sharp with your right eye.
Now, you can view both the indication and object sharply with your right eye.
Started Getting
13

Started Getting
¢Turn the left diopter adjusting ring until the object appears sharp with your left eye.
Now, you can view the object in focus with both eyes and the indication appears sharp with your right eye.
Caution
The diopter and focus must be adjusted completely to obtain properly focused images when shooting photos.
Once you finish these adjustments, all you have to do thereafter is to turn the central focusing wheel to focus on desired objects. It automatically adjusts the focus of the binoculars and camera together.
Using the DIGIBINO as Binoculars
Once you finish eyepiece width, diopter, and focus adjustments, you can use the DIGIBINO as binoculars. No batteries are required for using the DIGIBINO as binoculars.
Use the central focusing wheel to focus on objects.
14
Installing Batteries
Batteries that can be used in the DIGIBINO
The following batteries can be used in the DIGIBINO:
Size AA alkaline batteries (2), size AA nickel hydride (NiMH) batteries (2), CR-V3 lithium battery pack (1)
Caution
•Size AA manganese batteries cannot be used.
•Refer to “Handling Batteries” (p. 4).
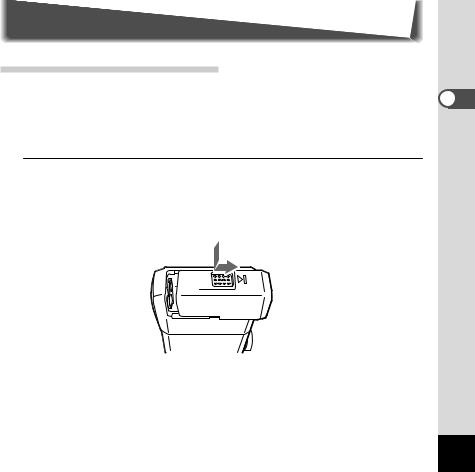
¡Pull the battery chamber cover toward the eyepiece lens while pressing the side of the cover.
Started Getting
15
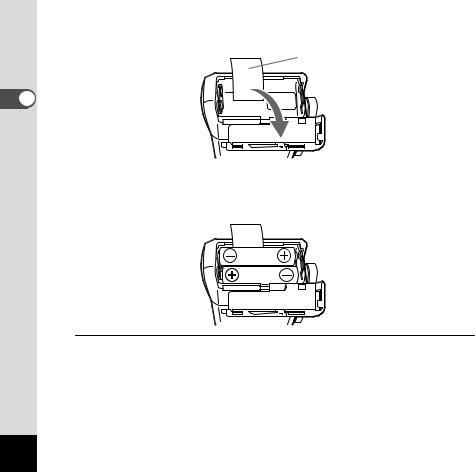
™ Open the battery chamber cover.
Battery takeup tape
Started Getting |
£ Insert two size AA batteries into the battery chamber with the battery |
takeup tape underneath. Insert the batteries correctly with regard to polarity (+ and –) marked on the battery and battery chamber.
Caution
•If the batteries are placed in wrong directions, power cannot be turned on.
•If a CR-V3 lithium battery pack is inserted, also make sure the polarity marks.
•Be sure to place the battery takeup tape under the batteries. Otherwise, you may find it hard to remove the batteries.
¢Close the battery chamber cover.
After closing the battery chamber cover, slide it toward the objective lenses to lock it.
16

Battery Level Indicator
You can check the battery level by viewing the symbol  displayed on the LCD monitor.
|
(lit green) |
: Adequate power remains. |
|
||
|
||
|
(lit green) |
: Battery is running low. |
|
||
|
||
|
(lit yellow) |
: Battery is running very low. |
|
||
|
||
|
(lit red) |
: Battery is exhausted. |
[Battery depleted] |
: After the message is displayed, the DIGIBINO will turn off. |
|
Memo
•If the power switch is turned on while the batteries are nearly dead, the status lamp by the right eyepiece lens continues blinking red and green.
•If the DIGIBINO does not operate properly because of a sudden voltage drop etc., replace the old batteries with new ones.
Started Getting
17
Started Getting
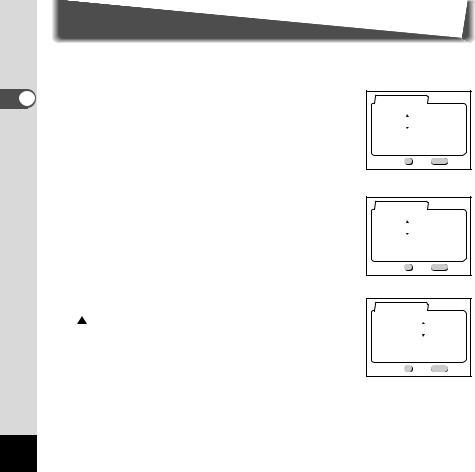
Setting the Date/Time
When the DIGIBINO power is turned on for the first time, the screen for setting the date and time appears. Set the current date and time.
¡Raise the LCD monitor, and then press the DISPLAY button.
The DIGIBINO will turn on and the Date Adjust screen will be displayed on the LCD monitor.
™ Press  or
or  button to change the year.
£ Press  button.
and  will be displayed above and below the month.
Date Adjust |
|
|
|
2002 / |
1 / |
1 |
|
00 : 00 |
|
||
OK |
Ok |
MENU |
Exit |
Date Adjust |
|
|
|
2003 / |
1 / |
1 |
|
00 : 00 |
|
||
OK |
Ok |
MENU |
Exit |
Date Adjust |
|
|
|
2003 / |
1 / |
1 |
|
00 : 00 |
|
||
OK |
Ok |
MENU |
Exit |
18
¢Press  or
or  button to change the month, and then press
  button.
∞Repeat Step 4 to change the [day] [hour] and [minutes].
Date Adjust |
|
|
|
2003 / |
2 / |
1 |
|
00 : 00 |
|
||
OK |
Ok |
MENU |
Exit |
|
|
|
Getting |
Date Adjust |
|
|
Started |
|
|
|
|
2003 / |
2 / 16 |
|
|
11 : 30 |
|
||
OK |
Ok |
MENU |
Exit |
§When you have finished the settings, press the OK button when the clock reaches 00 seconds.
The screen confirming the settings will be displayed and the DIGIBINO is ready to take a picture.
Memo
•If the MENU button is pressed, the setting is canceled but shooting is enabled. In this case, the Date Adjust screen appears again when the power is turned on next. You can change the settings after they have been made. Refer to “Adjusting the Date/Time” (p.46).
•The time display is 24-hour display format.
19
Start Quick
Quick Start
Taking Pictures
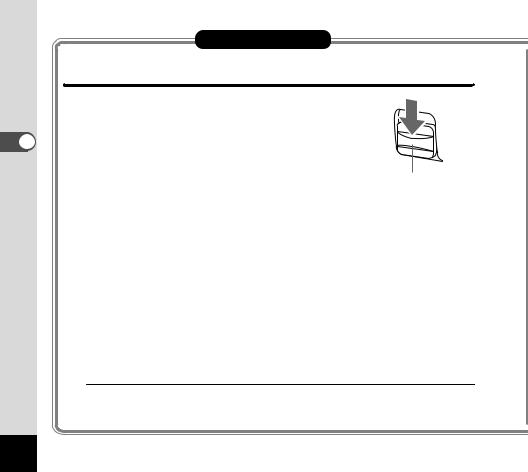
¡Lower the slide lever.
The lens barrier opens.
You hear a confirmation beep, the status lamp blinks red and green, and the power turns on.
Slide lever
™ Raise the LCD monitor.
£While looking through the binoculars, turn the central focusing wheel to adjust the focus.
¢Press the shutter release button.
You will hear a confirmation beep and the status lamp will glow green for about one second.
The image will be recorded in the memory.
When the status lamp turns off, you can take the next picture.
When you move the slide lever up and close the lens barrier, the power turns off.
Caution
If the shutter speed is slower than 1/125 second, the status lamp will blink red (camera shake alarm) after taking the picture. Check the recorded image on the LCD monitor.
20
 Loading...