


IntelliTouch ScreenLogic
User’s Guide
© 2006 Pentair Water Pool and Spa, Inc.
1620 Hawkins Ave., Sanford, NC 27330 • (919) 566-8000
10951 West Los Angeles Ave., Moorpark, CA 93021 • (805) 553-5000
All rights reserved. Information in this document is subject to change without notice.
IntelliTouch, IntelliFlo, IntelliBrite, Swimming Colors, MobileTouch, SAm, SAL, and FIBERworks Pentair Pool Products and the Pentair Water Pool and Spa Inc. logo are registered trademarks of Pentair Water Pool and Spa Inc. Other trademarks and trade names may be used in this document to refer to either the entities claiming the marks and names or their products. Pentair Water Pool and Spa disclaims proprietary interest in marks and names of others.
P/N 520493 - Rev C. 11/27/06
i
Contents |
|
Introduction.............................................................................................. |
1 |
Introduction ............................................................................................................ |
1 |
IntelliTouch System Overview ................................................................................ |
1 |
IntelliTouch System Components .......................................................................... |
2 |
Load or Power Center ........................................................................................... |
2 |
IntelliTouch Personality Kits ................................................................................... |
2 |
IntelliTouch Interfaces ............................................................................................ |
3 |
IntelliTouch ScreenLogic in your home .................................................................. |
4 |
IntelliTouch ScreenLogic Interface Kits .................................................................. |
5 |
IntelliTouch ScreenLogic Interface Accessory Kits ................................................ |
5 |
PDA and Tablet Overview ........................................................................ |
7 |
Personal Digital Assistant (PDA) Description ........................................................ |
8 |
PDA Front and Side Views .................................................................................... |
8 |
PDA Rear View ...................................................................................................... |
9 |
In-Wall Touch Screen .......................................................................................... |
10 |
Tablet Overview .................................................................................................... |
11 |
Tablet Controls and Lights .................................................................................... |
11 |
Using your ScreenLogic Interface ....................................................................... |
13 |
Important Precautions (Tablet, PDA, and In-wall Touch Screen) ......................... |
13 |
Cold Boot/Power On-Off/Reset (Tablet and In-wall Touch Screen) ..................... |
13 |
Cold Boot/Power On-Off/Reset (PDA) ................................................................ |
13 |
Save System Settings (Tablet and In-Wall Touch Screen) .................................. |
13 |
Low Battery Condition (Tablet and PDA) ............................................................. |
14 |
Power ON and OFF (Tablet and PDA) ................................................................ |
14 |
Battery and Power Management (Tablet) ............................................................ |
14 |
Battery and Power Management (PDA) .............................................................. |
14 |
Installation .............................................................................................. |
15 |
Before You Begin ................................................................................................. |
16 |
Tools Required..................................................................................................... |
16 |
Connection Steps Summary ............................................................................... |
16 |
ScreenLogic Location Requirements .................................................................. |
17 |
Less walls and ceilings equals better wireless reception .................................... |
17 |
Cable Distance Limits ......................................................................................... |
18 |
Recommended Wireless Router and Protocol adapter Location ........................ |
18 |
Wireless router and Protocol adapter with existing Indoor Control Panel ............ |
19 |
Adding a Wireless Extender Wall-Plug for Large Homes/Properties ................... |
20 |
Connecting without Broadband Internet Access .................................................. |
21 |
Connecting to your Home Network with Broadband Access ............................... |
22 |
Connecting to an existing home network ............................................................. |
22 |
Installing the Wireless Extender Wall-Plugs for Large Homes/Properties ........... |
22 |
Connect to the Protocol Adapter .......................................................................... |
24 |
Connecting to the Personality Board ................................................................... |
25 |
Start up the IntelliTouch ScreenLogic System for the first time ........................... |
27 |
To start up the system ......................................................................................... |
27 |
IntelliTouch ScreenLogic User’s Guide
ii
Contents (Continued) |
|
Configuring ScreenLogic ..................................................................... |
29 |
Accessing IntelliTouch ScreenLogic Configuration Program ............................... |
30 |
Installing IntelliTouch ScreenLogic Software on a PC or Laptop (iTC15 Kit only) |
30 |
Start the Configurator Utility on the Tablet or In-Wall Touch Screen ..................... |
30 |
Start ScreenLogic Program ................................................................................. |
31 |
Start the Configurator Utility on the PDA .............................................................. |
31 |
Exit ScreenLogic Program .................................................................................. |
31 |
Transfer Time from the Configurator Utility .......................................................... |
31 |
Compatibility with IntelliTouch Systems ............................................................... |
31 |
ScreenLogic Configuration and Maintenance Screen ......................................... |
32 |
General Settings (Step 1 of 5) ............................................................................. |
32 |
Changing the Display to Show Fahrenheit to Celsius ......................................... |
34 |
Calibrating Temperature Sensors ........................................................................ |
34 |
Setup Circuits (Step 2 of 5) ................................................................................. |
35 |
Special Lights Button ........................................................................................... |
36 |
Feature Circuit Configuration Button ................................................................... |
36 |
Feature Macro Circuits Overview ........................................................................ |
37 |
Freeze Protection ................................................................................................ |
37 |
Assign a Circuit Name and Function ................................................................... |
38 |
IntelliTouch Circuit Functions ............................................................................... |
39 |
IntelliTouch Circuit Names ................................................................................... |
40 |
Creating a Feature Circuit Macro ........................................................................ |
41 |
Creating Custom Names for Auxiliary Circuits .................................................... |
42 |
Display a Circuit Function Button on the Main Screen......................................... |
42 |
IntelliTouch Indoor Control Panel Circuit Names .................................................. |
42 |
Configure Other Equipment (Step 3 of 5) ............................................................ |
43 |
Configuring Valve Actuators (Controlled by AUX or Feature Circuit) .................... |
44 |
Configuring Valve Actuators ................................................................................. |
45 |
Setting up Additional Equipment .......................................................................... |
46 |
Setting up a Two-Speed Pump ............................................................................ |
46 |
Setup Solar Equipment and Heat pump options .................................................. |
47 |
Set a Cool-Down Cycle for the Heater ................................................................ |
47 |
Enable Manual Spa Heat Control ......................................................................... |
48 |
Chlorine Generator .............................................................................................. |
48 |
Activate the Chlorinator Control Interface ............................................................ |
48 |
Configure IntelliFlo (Step 4 of 5) ........................................................................... |
49 |
Configure iS10 Spa-Side Remote (Step 5 of 5) ................................................... |
53 |
Configure iS4, iS10, and QT4 QuickTouch .......................................................... |
54 |
IntelliTouch ScreenLogic User’s Guide
iii
Contents (Continued) |
|
Using ScreenLogic ................................................................................ |
53 |
Home Screen ...................................................................................................... |
56 |
Main Screen ........................................................................................................ |
57 |
Configuring Pool and Spa Heating System Options ............................................ |
59 |
Change the Pool and Spa Temperature ............................................................... |
60 |
Changing Pool Heat Settings ............................................................................... |
60 |
Changing Spa Heat Settings ................................................................................ |
60 |
Main Lights Screen .............................................................................................. |
60 |
Color Lights Tab................................................................................................... |
61 |
Dim Lights ........................................................................................................... |
62 |
Special Lighting Features .................................................................................... |
63 |
Lights Screen: Configure Set Colors Tab (Color Set) .......................................... |
64 |
Color Set Lighting Feature ................................................................................... |
66 |
Set up Swimming Colors (Color Swim) .............................................................. |
66 |
Color Sync ........................................................................................................... |
67 |
Switching Lights All on/All off ............................................................................... |
67 |
Lights Screen: IntelliBrite ..................................................................................... |
68 |
Color light show and fixed color buttons .............................................................. |
68 |
Save and Recall buttons...................................................................................... |
68 |
Schedule Screen ................................................................................................. |
69 |
Schedule Feature ................................................................................................ |
70 |
Schedule: Run Once Screen .............................................................................. |
71 |
Run-Once Timer.................................................................................................. |
72 |
Schedule: Egg Timer Screen .............................................................................. |
73 |
Setting the Egg Timer (Count Down) ................................................................... |
74 |
History Screen ..................................................................................................... |
75 |
Equipment: System Status Screen ..................................................................... |
76 |
System Error Messages...................................................................................... |
77 |
System Delay Cancel Feature ............................................................................ |
77 |
Enable/Disable Spa-Side Remotes ..................................................................... |
77 |
Chlorinator Status and Controls Screen .............................................................. |
78 |
Equipment: Chlorinator Screen ........................................................................... |
78 |
IntelliFlo Status and IntelliFlo Controls Screen ..................................................... |
79 |
Equipment: IntelliFlo Screen ................................................................................ |
79 |
IntelliFlo Status and IntelliFlo 4x160 Controls Screen .......................................... |
81 |
Frequently Asked Questions (FAQs) and Troubleshooting................ |
83 |
ScreenLogic Tips and FAQs ................................................................................ |
84 |
ScreenLogic Technical Support Questions ......................................................... |
84 |
Why does the Configuration program say “Looking for Controller”? .................... |
84 |
My ScreenLogic device stopped responding to inputs or is acting strangely. ...... |
84 |
How do I exit the ScreenLogic program while using the |
|
Tablet or In-wall Touch Screen? ........................................................................... |
85 |
ScreenLogic Error Messages .............................................................................. |
85 |
My Tablet or PDA wireless settings have been deleted accidentally, |
|
what do I do? ...................................................................................................... |
85 |
How many ScreenLogic Protocol adapters can I install in an |
|
IntelliTouch system .............................................................................................. |
85 |
IntelliTouch ScreenLogic User’s Guide
iv
Contents (Continued) |
|
My Tablet and/or PDA lost the wireless connection to the |
|
ScreenLogic Wireless Router or Range Extender. How do I reconnect? |
............ 86 |
I can’t locate the ScreenLogic program on my PDA - How do I install it? |
............ 87 |
PDA First Time Setup Instructions....................................................................... |
87 |
Charging the PDA ................................................................................................ |
87 |
Setting up the PDA for the first time..................................................................... |
87 |
PDA Tips and FAQs ............................................................................................. |
89 |
PDA On/Off Button (Turn off Backlight) ............................................................... |
89 |
How can I calibrate the PDA screen? .................................................................. |
89 |
Starting Up the Tablet ........................................................................................... |
89 |
What is the first thing I should do with the Digital Tablet or PDA?........................ |
89 |
Why doesn’t the Digital Tablet or PDA come charged so |
|
that I can turn it on right away? ............................................................................ |
89 |
Do I need to load any software to get started? .................................................... |
90 |
Is there anything I should NOT do with the device while |
|
I am learning to use it? ........................................................................................ |
90 |
Is there anything I need to assemble before I turn it on? ...................................... |
90 |
How do I begin to use the Digital Tablet and in-Wall Touch |
|
Screen immediately? ........................................................................................... |
90 |
“Connecting Please Wait” message.................................................................... |
91 |
How do I make the panel brighter/darker? ........................................................... |
91 |
How do I switch the Tablet off? ............................................................................ |
91 |
My Digital Tablet will not switch on ....................................................................... |
91 |
My Digital Tablet will not switch off ....................................................................... |
91 |
I changed my mind immediately after recovering from |
|
Suspend mode and wish to put the device into Suspend again. |
|
Why is it that the Suspend button appears nonresponsive? ............................... |
91 |
The Tablet comes with protective rubber grip handles and |
|
a shoulder strap – what do they offer and how do I use them? ........................... |
92 |
The Tablet comes with a desktop cradle – what are its functions? ..................... |
92 |
Cleaning the Touch Screen ................................................................................. |
92 |
IntelliFlo Alarms and Warnings ............................................................................ |
93 |
IntelliFlo 4x160 Alarms and Warnings .................................................................. |
94 |
Appendix ................................................................................................ |
95 |
The wireless router that came with my ScreenLogic kit |
|
does not reliably reach the area where I primarily use |
|
my Tablet and/or PDA .......................................................................................... |
96 |
Range Extender Kit Description .......................................................................... |
96 |
ScreenLogic Wireless Connection Kit ................................................................. |
97 |
Connecting remotely to your system ................................................................... |
98 |
HomeLogic Management and Control Solution ................................................... |
99 |
In-Wall Touch Screen Installation ....................................................................... |
100 |
Glossary ............................................................................................... |
102 |
IntelliTouch ScreenLogic User’s Guide

v
IMPORTANT SAFETY PRECAUTIONS


 Important Notice:
Attention Installer: This manual contains important information about the installation, operation and safe use of this product. This manual should be given to the owner and/or operator of this equipment.
 WARNING - Before installing this product, read and follow all warning notices and instructions which are included. Failure to follow safety warnings and instructions can result in severe injury, death, or property damage. Call (800) 831-7133 for additional free copies of these instructions.
 CAUTION - Danger of explosion if battery is incorrectly replaced. Replace only with the same type recommended by the manufacturer. Dispose of used batteries according to the manufacturer’s instructions.
Rechargeable Lithium-ion battery disposal
Unwanted lithium ion battery packs may be returned to your local recycling center or the battery manufacturer for disposal.
Digital and in-wall Tablet and PDA Enclosure
Dismantling or opening the device enclosure or case will void warranty and may possibly cause electric shock.
CE (EU) Declaration of Conformity
This product conforms to the essential protection requirements of the European Council Directive 89/ 336/EEC that relates to electromagnetic compatibility, EN55022:1998, Class B; and EN61000- 3-2, 3-3, 4-2, 4-3, 4-4, 4-5, 4-6, 4-8, and 4-11.
Modifications
The FCC requires the user to be notified that any changes or modifications made to this device that are not expressly approved by DT Research can invalidate FCC approval.
IntelliTouch ScreenLogic User’s Guide

vi
IMPORTANT SAFETY PRECAUTIONS (CONTINUED)
 FCC Regulatory Safety Notice - The wireless products devices have been tested and found to comply with the limits for a Class B digital device, pursuant to Part 15 of the FCC Rules. These limits are designed to provide reasonable protection against harmful interference in a residential installation. These devices generates, uses and can radiate radio frequency energy and, if not installed and used in accordance with the instructions, may cause harmful interference to radio communications. However, there is no guarantee that interference will not occur in a particular installation. If this equipment does cause harmful interference to radio or television reception, which can be determined by turning the equipment off and on, the user is encouraged to try to correct the interference by one or more of the following measures:
•Reorient or relocate the receiving antenna.
•Increase the separation between the equipment and receiver.
•Connect the equipment into an outlet on a circuit different from that to which the receiver is connected.
•Consult the dealer or an experienced radio/TV technician for help.
•Modifications not expressly approved by the party responsible for FCC compliance could void the user’s authority to operate the equipment.
CAUTION: FAILURE TO COMPLY MAY RESULT IN SERIOUS INJURY
Please review the following material carefully. Failure to follow the instructions, or failure to heed the warnings contained in this manual could lead to serious injury.
Special Battery Cautions:
The following are special precautions you should take when using and handling batteries.
·Do not expose batteries to direct sunlight or extreme heat.
·Do not submerge batteries in liquid.
·Do not incinerate batteries.
·Do not handle damaged or leaking battery packs.
·Do not attempt to discharge batteries by short-circuiting them.
·Do not attempt to charge batteries with a charger other than one approved for use with the Digital Tablet or PDA.
·Do not leave or operate the Digital Tablet or PDA, in an excessively hot environment such as a closed vehicle under hot sunshine or beside a fire, or heater. Do not leave PDA or Digital Tablet exposed to excessive heat for any period of time. Excessive heat exposure may result in melting, or cause the electronics/battery to overheat resulting in fire.
·Use only the supplied batteries and AC Adapter. Failure to follow this instruction may result in battery burst or liquid leak, and may cause fire, or injury.
·Store and Dispose of all batteries in accordance with the instructions contained herein. Never dispose of the battery by burning. Any such action may result in excessive heating, explosion, or fire.
·Do not disassemble, modify, puncture, or strike any battery with force or allow batteries to become wet. Any such action may result in excessive heat, explosion, or ignition.
IntelliTouch ScreenLogic User’s Guide

vii
IMPORTANT SAFETY PRECAUTIONS (CONTINUED)
CAUTION: Danger of explosion if battery is incorrectly replaced.
•Replace only with the same type recommended by the manufacturer.
•Dispose of used batteries according to the manufacturer’s instructions.
•Rechargeable Lithium-ion battery disposal
•Unwanted lithium ion battery packs may be returned to the battery manufacturer for disposal.
•Enclosure: Dismantling or opening the device enclosure or case will void warranty and may possibly cause electric shock. Avoid exposure to water.
IntelliTouch ScreenLogic User’s Guide
viii
About this User’s Guide
This manual describes the how to set up and use IntelliTouch ScreenLogic, including how to configure your IntelliTouch system using the Configurator utility, and how to use the ScreenLogic program to control basic everyday pool and spa operations to advanced setup functions that only need to be performed once.
This manual includes the following sections:
•Introduction (page 1): IntelliTouch system description.
•PDA, In-Wall Touch Screen, and Tablet Overview (page 7): Basic description of control functions for the PDA, In-wall Touch Screen, and Tablet.
•Installation (page 15): How to install the Protocol adapter and wireless router. Also, location recommendations.
•Configuring ScreenLogic (page 29): Description of each Configurator utility dialog. Each dialog description is followed by more detailed information and examples of the features.
•Using ScreenLogic (page 53): Description of ScreenLogic user screens. Each screen description is followed by more detailed information about how to use ScreenLogic features.
•FAQs and Troubleshooting (page 83): Frequently asked questions about using your Tablet, PDA and ScreenLogic. Also includes troubleshooting information.
•Appendix (page 95): Tablet specifications and operating information. Also, includes information about HomeLogic management and control solutions.
•Glossary (page 101): Glossary of terms used in this manual.
Technical Support
Sanford, North Carolina (8 A.M. to 5 P.M.)
Moorpark, California (8 A.M. to 5 P.M.)
Phone: (800) 831-7133
Fax: (800) 284-4151
Web site: visit www.pentairpool.com and www.starite.com
Related IntelliTouch Manuals
IntelliTouch User’s Guide |
(P/N 520102) |
IntelliTouch Personality Kit User’s Guide |
(P/N 520101) |
IntelliTouch Load Center and Power Center User’s Guide |
(P/N 520100) |
IntelliTouch Expansion Kit User’s Guide |
(P/N 520271) |
IntelliTouch ScreenLogic User’s Guide
1
Introduction
Welcome! Your Pentair IntelliTouch ScreenLogic Pool and Spa control system will change the way you view pool and spa controls. This innovation in pool and spa automation offers complete freedom for you while having full automation control over your pool, spa, lights, heater, cleaners and much more. You can now schedule multiple start and stop times to control your lights, heater, spa jets, and filter pumps. The ScreenLogic historical data feature monitors energy use for your pool, spa and lighting equipment and also records pool, spa, and air temperatures. This historical data provides a convenient way to help you conserve energy. Using the wireless Digital Tablet or Personal DigitalAssistant (PDA) you can now control your pool and spa from anywhere inside or outside your home.An in-wall Touch Screen and a program for your PC are also available. IntelliTouch ScreenLogic is a scalable system that can be upgraded to a completely integrated home automation solution including audio, security, climate, irrigation and more. For more information about using the ScreenLogic system with the home automation system by HomeLogic, refer to “HomeLogic Management and Control Solution,” page 100.
This manual describes how to install, configure, and operate the IntelliTouch ScreenLogic system. Before learning how the IntelliTouch ScreenLogic system works, familiarize yourself with the various wireless and wired controllers included with each IntelliTouch Personality kit.
IntelliTouch System Overview
IntelliTouch systems offer the flexibility to handle from five to 40 circuits that can be used to control any combination of pumps, lights, water features, etc. As an added benefit, user-configurable circuits can also be used to control these combinations of features and more. The Feature Macro circuits feature allows any number of circuits to be combined on a single button. This gives you the ability to set up “themes” with custom names all with a press of a button. (Not available with IntelliTouch model i5 or i5S).
IntelliTouch users can also dim any high voltage incandescent light such as PentairAmerlites and SpaBrites up to eight levels using the IntelliTouch Dimmer Module (P/N 520406). The dimmer module supports multiple lights from 100 watts up to 1,000 watts and installs in a standard relay location. Any number of dimmers (up to 10 maximum) may be used with a maximum combined load of 4,000 Watts in a single IntelliTouch load center.
In the home
The IntelliTouch system can utilize multiple wired and wireless controllers including the Digital Tablet, Personal DigitalAssistant (PDA), the wired in-wall Touch Screen, Indoor Control Panel, and the wireless MobileTouch control panel, and even your existing home PC. Amaximum of four ScreenLogic interfaces can be used. For example, four Tablets, or four PDA’s, or four in-wall Touch Screen’s, or four PC’s in any combination.
Around the pool
Located near your spa, the iS10 or iS4 spa-side remote provide control buttons for various pool and spa functions. The iS10 spa-side remote also provides a temperature display.
At the equipment pad
Near the pump, filter, and other equipment will be located a metal box known as the “load center” or “power center.” This is where high voltage from the junction box at the home is distributed to the various pool equipment. The pool service person can periodically check pool operations from this unit. The load center is also where the various IntelliTouch controllers interface with the other equipment.
Mounted on of top the valves you may also find motorized valve actuators used to change the flow of water through the plumbing. There may also be temperature sensors and cabling to the heater. There should be no need for anyone other than your service person to periodically check this equipment.
IntelliTouch ScreenLogic User’s Guide
2
IntelliTouch System Components
The main required components of an IntelliTouch system are the Load or Power Center, IntelliTouch Personality Kits, and the Interfaces:
Load or Power Center
•Load Center: Provides a larger footprint (17" W x 23" H) Includes built-in sub panel (125AMPS) capable of holding up to eight 1 inch breakers. Also includes five 25AMP three HP relays, 110/240 V transformer with secondary side circuit protection. Multiple knockouts for different sizes of conduit are supplied as well as a GFCI side knockout. The Load Center provides ample space for all high and low voltage wiring needs.
•Power Center: Offers a smaller footprint (17" W x 17" H) than the Load Center. The Power Center does not include a circuit breaker base. Users should choose this enclosure if they already have existing circuit breakers/sub-panel for their equipment.
•Expansion Kits: Models i5X and i10X, offer five or ten additionalAuxiliary Circuits for systems i9+3, i9+3S and i10+3D. Each IntelliTouch Expansion Kit requires a Load Center (P/N 520136) or Power Center (P/N 520137). Up to three Expansion Kits and Load or Power Centers may be added to a system, for control of up to 38Auxiliary Circuits (40 auxiliary circuits for i10+3D).
IntelliTouch Personality Kits
There are several types of IntelliTouch control systems available for different pool/spa configurations:
•Shared Equipment: Pool and spa combinations with shared filtration system – Pool owners can enjoy the convenience of motorized valves for water flow separation between pool and spa. The Personality Kit models are:
•i5(P/N520505)-Fourauxiliarycircuitsplusfilterpumpoperation.Fiverelaysareincludedin the Load Center.
•i7+3 (P/N 520507) - Six auxiliary circuits plus filter pump operation and the +3 option (create a Featurecircuitforvalveactuatorswithoutusinganexistingoutputauxiliarycircuit).Tworelays are included in the kit and five in the Load Center.
•i9+3 (P/N 520509) - Eight auxiliary circuits plus filter pump operation and the +3 option (create aFeaturecircuitforvalveactuatorswithoutusinganexistingoutputauxiliarycircuit).Fourrelays are included in the kit and five in the Load Center.
•Dual Equipment: Pool and Spa with Dual Sets of Equipment – The IntelliTouch i10+3D (P/N 520510) system provides advanced automation for a pool and spa using two separate sets of equipment. This IntelliTouch Personality Kit controls ten pump and/or lighting circuits and two heaters. The Personality Kit includes, eight auxiliary circuits plus filter pump operation and the +3 option (create a Feature Macro circuit for valve actuators without using an existing output auxiliary circuit). Five relays are included in the kit and five in the Load Center.
•Single Equipment: Pool Only or Spa OnlyApplications – The IntelliTouch i5S (P/N 520506) and i9+3S provide advanced automation for a single body of water. The i5S (P/N 520506) Personality Kits includes four auxiliary circuits plus filter pump operation. There are five relays in the IntelliTouch Load Center. The i9+3S (P/N 520508) Personality Kits includes eight auxiliary circuits plus filter pump operation and the +3 option (create a Feature Macro circuit for valve actuators without using an existing output aux circuit). Four relays are included in the kit and five in the Load Center.
IntelliTouch ScreenLogic User’s Guide
3
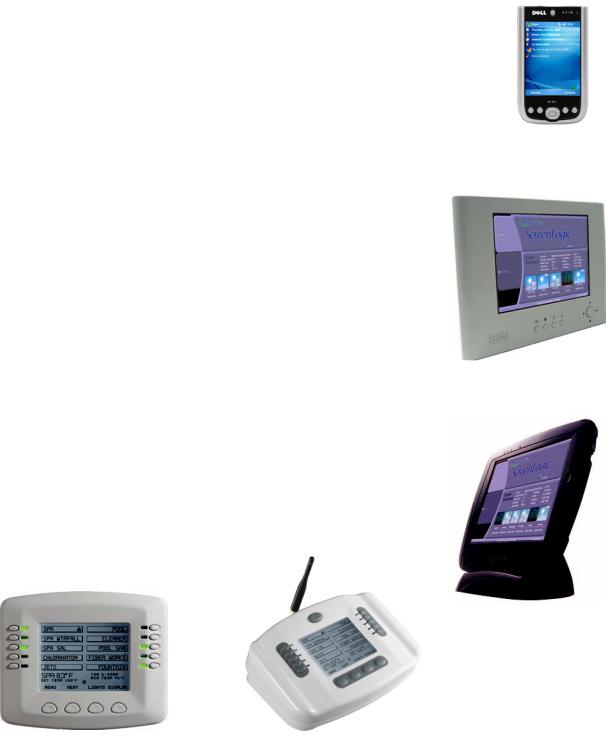
IntelliTouch Interfaces
Pool and Spa owners can choose one or more of the following interface options to control the IntelliTouch system throughout their home.
•iTC15 Kit (P/N 520500) – Includes Protocol Interface Adapter and wireless router that connects to existing Desktop or Laptop PC. This allows control of IntelliTouch pool and spa systems via PC (requires PC with an Ethernet connection, and Windows XP operating system).
•iTC25 Kit (P/N 520501) – Includes Wireless Personal DigitalAssistant (PDA) with 3.5" color touch screen custom configured for IntelliTouch systems, wireless router, and a Protocol InterfaceAdapter.
•iTC35 Kit (P/N 520502) – Includes in-wall color touch screen with Ethernet (RJ45) connection and Protocol InterfaceAdapter and wireless router. The in-wall Touch screen is custom configured for IntelliTouch systems.
•iTC45 Kit (P/N 520503) – Includes wireless Tablet with color touch screen, Protocol InterfaceAdapter, and wireless router. The Tablet is custom configured for IntelliTouch systems.
•Indoor Control Panel (P/N 520138) – 3.75’’monochrome backlit LCD control panel. Connects to Personality board in Load Center.
•MobileTouch (P/N 520340) – 3.75’’monochrome backlit LCD wireless control panel with transceiver antenna .Allows any IntelliTouch wired system to also have a wireless remote with all the capabilities of the Indoor Control Panel. With an average range of 300 feet, pool owners have system control anywhere around the home or yard. Powered by a rechargeable lithium-ion battery. Includes anAC adapter for recharging.
PDA
In-Wall Touch Screen
Digital Tablet
Indoor Control Panel |
MobileTouch |
IntelliTouch ScreenLogic User’s Guide
4
3 |
5 |
9 |
|
10
1
7
8
4
2 6
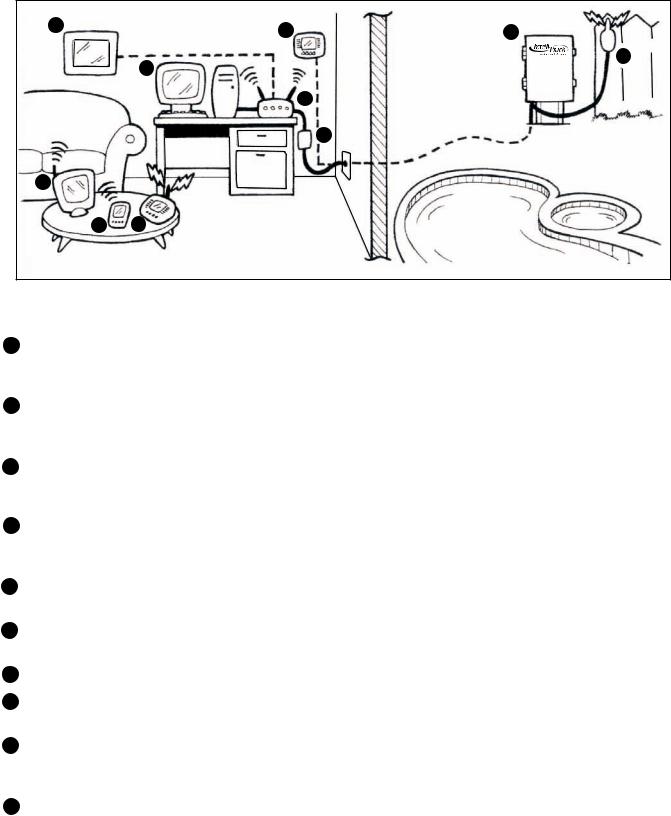
IntelliTouch ScreenLogic in your home
1Personal Computer (PC): Existing home owner’s PC or Laptop. Connects to a wireless router and the IntelliTouch Protocol adapter for control of IntelliTouch pool/spa systems. Requires a PC/Laptop (Windows XP) with Ethernet/ RJ45 adapter installed.
2Personal Digital Assistant (PDA): This wireless PDA with a color touch screen enables you to control your pool and spa features using the IntelliTouch ScreenLogic interface.The PDA is custom configured for IntelliTouch systems.
3In-wallTouch Screen: A color display with Ethernet (RJ45) connector. Connects to the provided wireless router and Protocol adapter via Ethernet (RJ45) for control of IntelliTouch pool and spa systems.The in-wall Touch Screen is custom configured for IntelliTouch systems.
4Wireless Tablet: This control panel consists of a color touch screen. Receives and transmits commands via wireless router and Protocol adapter for control of IntelliTouch pool/spa systems. The Tablet is custom configured for IntelliTouch systems.
5Indoor Control Panel: This control panel consists of a 3.75’’ monochrome backlit LCD and connects to the Personality Board in the Load Center or Power Center for control of IntelliTouch pool and spa systems.
6MobileTouch: This wireless control panel has a 3.75’’ monochrome backlit LCD. Receives and transmits commands via the Transceiver antenna located at the Load or Power Center.
7Wireless router: Connects to the PC or Laptop via Ethernet connection to the Protocol adapter.
8Protocol adapter: Connects to wireless router via Ethernet connection and to Personality board (Load/Power Center) via a four-wire 22-AWG cable.
9Load Center or Power Center. The main control center. Includes the Outdoor Control Panel that controls pump, heater, and light relays. Receives commands via Protocol adapter, and wireless and wired control panels connected to the Personality board.
10MobileTouchTransceiver antenna: This antenna is connected to the Personality board. Sends and receives commands to and from the MobileTouch control panel.
Note: For IntelliTouch ScreenLogic connection details, refer to page 21 and 22.
IntelliTouch ScreenLogic User’s Guide
5
IntelliTouch Interface ScreenLogic Kits
The following items are included in your IntelliTouch Interface ScreenLogic Kit.As you unpack your IntelliTouch ScreenLogic Kit, please check to make sure that you received the items listed below. If any item is missing or damaged, contact your authorized dealer, or contact Technical Support (see page viii).
PC Interface (iTC15 Kit - P/N 520500)
•Protocol adapter.
•Wireless router (802.11b/g) withAC adapter.
•IntelliTouch ScreenLogic User’s Guide (this manual).
•CD-ROM containing IntelliTouch ScreenLogic PC user interface software.
Personal Digital Assistant (PDA) (iTC25 Kit - P/N 520501) - see page 8
•Personal DigitalAssistant (PDA) with built-in Wi-Fi 802.11b wireless LAN adapter with antenna. Refer to the manufacturers documentation for kit contents.
•Wireless router (802.11b/g) withAC adapter.
•Protocol adapter.
•IntelliTouch ScreenLogic User’s Guide (this manual).
•CD-ROM containing IntelliTouch ScreenLogic PC user interface software.
In-Wall Touch Screen (iTC35 Kit - P/N 520502) - see page 10
•In-wall Touch Screen, Cradle, and AC adapter.
•Wireless router (802.11b/g) withAC adapter.
•Protocol adapter.
•IntelliTouch ScreenLogic User’s Guide (this manual).
•CD-ROM containing IntelliTouch ScreenLogic PC user interface software.
Digital Wireless Tablet (iTC45 Kit - P/N 520503) - see page 11
•Digital Tablet (with internal battery pack), stylus, built-in Wi-Fi 802.11b wireless LAN adapter with antenna.
•Wireless router (802.11b/g) withAC adapter.
•Protocol adapter.
•IntelliTouch ScreenLogic User’s Guide (this manual).
•CD-ROM containing IntelliTouch ScreenLogic PC user interface software.
IntelliTouch ScreenLogic Interface Accessory Kits
Up to a total of four ScreenLogic interfaces can be used with an IntelliTouch system. If you need additional interfaces, first order one of the ScreenLogic interface kits listed above, then order one or more of the following accessory interfaces accessory kits:
•PDA, CD-ROM and manual (P/N 520497)
•In-Wall Touch Screen, CD-ROM and manual (P/N 520498)
•Tablet, CD-ROM and manual (P/N 520499)
Note: The above Accessory Kits interfaces do not include a Protocol adapter or wireless router.
IntelliTouch ScreenLogic User’s Guide
6
Blank Page
IntelliTouch ScreenLogic User’s Guide

7
PDA, in-Wall Touch Screen
and Tablet Overview
IntelliTouch ScreenLogic User’s Guide

8
Personal Digital Assistant (PDA) Description
The iTC25 (P/N 520501) Interface Kit includes a wireless touch screen PDA which is custom configured with the IntelliTouch ScreenLogic Pool and Spa control application. This device also offers a wide range of capabilities. For more detailed information about the PDA, refer to the manufacturers documentation shipped with the device.
PDA Front and Side Views
The following describes the PDA controls and functions:
infrared sensor (top)
audio connector (top)
microphone
lanyard hook
lock button 
on/off button for WLAN/Bluetooth wireless technology 
record button
Calendar button 
Contacts button
 CompactFlash card and Secure Digital memory card slots (top)
 wireless light
 mylar protector tab
 power button
 touch screen
 Home button
 Inbox button
 Navigator button
Infrared Sensor: The infrared sensor lets you transfer files from your device to another infrared-compatible device without using cable connections. Not used by IntelliTouch ScreenLogic.
Microphone: Use to record audio. Not used by IntelliTouch ScreenLogic.
CompactFlash and Secure Digital Memory Card Slots: Not used by IntelliTouch ScreenLogic.
Wireless Light: Illuminates when transmitting and receiving data.
Stylus: Use the stylus to write or draw on the screen. To remove the stylus, pull it straight up and out of the holder. To avoid losing the stylus, store the stylus in the holder when you are not using it. Ensure that the stylus is oriented correctly when you replace it in the slot.
IntelliTouch ScreenLogic User’s Guide
9
PDA Front and Side Views (Continued)
Power Button: Press the power button to turn the device on or off. Press and hold the power button to dim the display. Repeat to light the display.
•When the device is connected to external power and the main battery is fully charged, the power button light is solid green.
•When the battery charge is low, the power button light flashes amber.
•When the battery is being charged, the power button light is solid amber.
•When the device relays a notification, the power button light rapidly flashes green.
Touch Screen: Use the touch screen and the stylus to enter information into your device.
On/Off Button for WAN/Bluetooth® wireless technology: This button turns the wireless device on and off. Tap it twice to confirm the switching off or on of WLAN/Bluetooth. Bluetooth is not used by IntelliTouch ScreenLogic. Switch off the wireless device to conserve power.
Current wireless status |
Switch |
Change wireless status |
|
||
WLAN |
Bluetooth |
|
WLAN |
Bluetooth |
|
Off |
Off |
|
On |
On |
|
On |
Off |
|
Off |
Off |
|
Off |
On |
|
Off |
Off |
|
On |
On |
|
Off |
Off |
|
Home Button: Press this button to launch the Home window or to turn on the device.
Navigator Button: Press the right, left, top, or bottom of the navigator button to move the cursor on the screen. Press the center to enter a selection.
Contacts Button: Press this button to launch Contacts or to turn on the device.
Calendar Button: Press this button to launch Calendar or to turn on the device.
Record Button: Press this button to start recording audio.
Lock Button: Use lock the device, keys and touch screen.
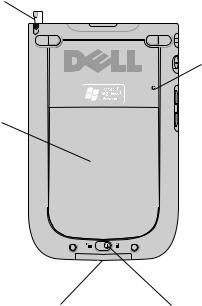
Stylus
Battery cover (inside)
|
Reset |
PDA Rear View |
|
||
|
Battery Lock: Use this switch to release and remove the |
|
|
button |
|
|
|
battery. |
|
|
Battery cover: Battery cover. |
|
|
Cradle/Sync/Cable Connector: Connect a cradle or sync |
|
|
cable. |
|
|
Reset Button: Reboots the PDA. |
Cradle/Sync and |
Battery lock |
Cable Connector |
|
IntelliTouch ScreenLogic User’s Guide

10
In-Wall Touch Screen
The iTC35 (P/N 520502) Interface Kit includes an in-wall color touch screen which is custom configured with the IntelliTouch ScreenLogic Pool and Spa control application. The operating software is Windows CE .NET bringing with it numerous applications, including support for Internet browsing, Windows Media Player, local e-mail client, and word processing. For in-wall touch screen installation instructions, see “In-Wall Touch Screen Installation,” page 97.
In-Wall Touch Screen Controls
The following describes the in-wall Touch Screen controls:
7 |
1 |
2 |
3 |
4 |
6 |
5 |
In-Wall Touch Screen (Controls)
1Virtual Keyboard Toggle Button: Open and close virtual keyboard. To input text into the Digital Tablet, press this button to display the virtual keyboard. Tap the desired letters to enter text. Press the button again to close the keyboard. Note: Tap the Ctrl key, then the Q key to exit the IntelliTouch ScreenLogic program. Double-tap the IntelliTouch ScreenLogic icon on the Windows Desktop to restart the program.
2Cradle USB (ActiveSync) interface: Enable. Push to Enable USB (ActiveSync) link between PC and Cradle with device secure on Cradle. Not used by IntelliTouch ScreenLogic program.
3Launches Internet Explorer Browser: Only works if you are connected to a Broadband Internet connection.
4Minimize: Desktop Minimize current application and return to Desktop. Does not work when IntelliTouch ScreenLogic is running.
5Center Button - Suspend or Power/Reset:
•Quick push enters or exits Suspend Mode
•Push and Hold to Power Off device (hold for about four seconds until display goes off); then Push to restart and complete (Cold) Boot process. (Only required if Tablet stops responding).
Navigation buttons:
Volume Down: Push on left edge of button.
Volume Up: Push on right edge of button.
Brightness Up: Push on upper edge of button.
Brightness Down: Push on lower edge of button.
6Microphone: Microphone opening. Does not work when IntelliTouch ScreenLogic is running.
7Mono Speaker: Mono speaker opening. Does not work when IntelliTouch ScreenLogic is running.
IntelliTouch ScreenLogic User’s Guide
11
Tablet Overview
The iTC45 (P/N 520503) Interface Kit includes a wireless touch screen Tablet which is custom configured with the IntelliTouch ScreenLogic Pool and Spa control application. Featuring a robust magnesium alloy enclosure, the
2 lb tablet with 8.4 in TFT display is powered by the Intel XScale processor providing “instant-on” capability with extended use between battery recharge. The operating software is Windows CE .NET bringing with it numerous applications, including support for Internet browsing, Windows Media Player, local e-mail client, and word processing.
Tablet Controls and Lights
The following describes the Tablet controls and lights:
|
Record Light |
|
|
|
PC Card Slot |
Network Light |
Microphone |
CF Card Slot |
|
Battery Light |
|
|||
9 |
|
|
|
10 |
Power/Reset |
|
|
|
Record |
or Suspend |
|
|
|
button |
|
|
|
|
(Disabled) |
|
|
|
|
Headphone |
|
|
|
3 |
Jack |
|
|
|
1 |
2 |
|
|
|
4 |
|
Note: Press button 5 to display the virtual keyboard.
Tap the Ctrl key, then the Q key to exit the
ScreenLogic program.
USB Port (Host)
5 6 7 8
Power DC Input
Cradle Interface
1Volume Down: Push on left edge of oval button.
2Volume Up: Push on right edge of oval button.
3Brightness Up: Push on upper edge of oval button.
4Brightness Down: Push on lower edge of oval button.
5Virtual Keyboard Toggle Button: Open and close virtual keyboard. To input text into the Digital Tablet, press this button to display the virtual keyboard. Tap the desired letters to enter text. Press the button again to close the keyboard. Note: Tap the Ctrl key, then the Q key to exit the IntelliTouch ScreenLogic program. Double-tap the IntelliTouch ScreenLogic icon on the Windows Desktop to restart the program.
IntelliTouch ScreenLogic User’s Guide

12
Tablet Functions (Continued)
6Cradle USB (ActiveSync) interface: Push to Enable USB (ActiveSync) link between PC and Cradle with device secure on Cradle. Not used by IntelliTouch ScreenLogic program.
7Launches Internet Explorer Browser: Only works if you are connected to a Broadband Internet connection.
8Minimize: Desktop Minimize current application and return to Desktop. Does not work when IntelliTouch ScreenLogic is running.
9Suspend or Power/Reset:
•Quick Push enters or exits Suspend Mode
•Push and Hold to Power Off device (hold for about four seconds until display goes off); then Push to restart and complete (Cold) Boot process. (Only required if Tablet stops responding)
10 Record (Right-Edge) Button: Not used by IntelliTouch ScreenLogic.
Tablet Lights
There are three lights (LEDs) on the Tablet:
•Record LED: The record LED (left LED) is accessible by applications. Agreen LED indicates that the Digital Tablet is recording from its internal microphone.
•Network LED: When the network LED (middle LED) is solid green it indicates that the network adapter is detected and functional.
•Battery LED: When the battery LED (right LED) is solid green, it means that the batteries are fully charged. When it is blinking amber, it indicates that the battery is charging. This will only happen when the Digital Tablet is plugged into the AC power. In the absence ofAC power, the steady green state indicates a full or good battery level; when the battery charge is low, it will glow a steady amber; when the battery level is critically low, it will blink in amber rapidly.
IntelliTouch ScreenLogic User’s Guide
13
Using your ScreenLogic Interface
Please read the following important information before operating your ScreenLogic interface.
Important Precautions (Tablet, PDA, and In-wall Touch Screen)
Before you use this device, please read this manual for setup procedures, safety precautions, and other important information. Please review the contents even if you are an experienced user. If you have any problems, contact Technical Support. For Technical Support contact information refer to page viii.
•The Digital Tablet and PDAmust be used and stored inside.
•Keep the Digital Tablet, PDA, and in-Wall touch screen dry. Do not expose the device to moisture.
•Always exercise care when operating and handling the Digital Tablet, PDA, and in-wall touch screen.
•Do not apply excessive pressure to the display screen.
•Avoid exposing the panel screen to direct sunlight or other heat source for an extended period of time. Where possible, the Tablet and PDAshould be facing away from direct lighting to reduce glare.
•If the AC adapter is used to recharge or power the device, DO NOT use any AC adapter other than the one provided with the device or acquired from the manufacturer or its distributors.
•Never attempt to disassemble the Digital Tablet, PDA, or in-wall touch screen. You will lose any product warranty on the product.
Cold Boot/Power On-Off/Reset (Tablet and In-Wall Touch Screen)
You may use the Suspend Button to cold-boot or Restart the Digital Tablet in the unlikely event of device lockup. To execute, hold the button for over four seconds to “Power Off” the device. The device will be turned off. This Reset/Power Off will clear your software settings and data if they are not properly saved to flash memory (see “Save Tablet System Settings” below). Push again on Suspend Button for a brief moment to restart/reboot the device. To cold-boot or restart the in-wall touch screen, press and hold for four-seconds the round four-way directional button on the front of the in-wall touch screen.
Cold Boot/Power On-Off/Reset (PDA)
Insert the stylus into the reset hole on the back of the PDA to cold-boot or reset. (Only required if the PDA stops responding or has wireless connection problems.)
Save System Settings (Tablet and In-Wall Touch Screen)
Make sure to save your system registries settings in flash memory in the event of a Reset/Power Off. Your system settings such as date, time, screen brightness can be saved in flash memory.
To save your settings do the following:
1.Tap Start > Settings > Control Panel > Registries Save/Restore.
2.Tap the Save Current Settings check box.
3.Tap OK in Message dialog, to save your settings into persistent storage.
4.Tap OK again to confirm.
5.Tap OK to exit.
IntelliTouch ScreenLogic User’s Guide
14
Low Battery Condition (Tablet and PDA)
Awarning message will be generated during a low battery condition and the Tablet and PDAwill shortly thereafter be placed into (Forced) Suspend mode if operation continues without external supply of power.
When a low battery condition occurs, the PDAwill notify you that its battery is low, then it will automatically turn off the wireless radio to conserve battery life. Please recharge the PDA and re-enable its wireless radio by pressing the wireless On/Off button (see page 8).
After the Digital Tablet enters the (Forced) Suspend mode due to the Low Battery condition:
•If over two to four hours elapse without using the AC adapter or the external battery pack to resume system operation or recharge the battery, the battery power will drain entirely. If the Tablet is reactivated then, the device is reset and the process amounts to a cold boot. You can also reactivate the system by briefly pressing the Suspend button with a connected AC adapter or charged external battery.
Power ON and OFF (Tablet and PDA)
•The battery shipped with your device should be low in power – please be prepared to use theAC adapter with the Tablet and PDAin setting up the device for the first time and to fully charge the internal battery pack.
•Depending on the origin of your device, the Tablet and PDAis generally delivered in a “Power Off” state. To start (Cold Boot or “Power On”) the Tablet and PDAfor the first time, push briefly on the Suspend or Power/Reset button located at the upper left edge of the device with the AC adapter connected to the device.
Battery and Power Management (Tablet)
The Tablet is equipped with an internal Li-Ion battery pack that is capable of supporting approximately 2.5 hours of continuous operation. The period between battery recharge can be significantly lengthened by putting the device into Suspend mode through the Suspend button whenever the device is not in use.
Note: The Tablet battery pack may be recharged with the providedAC adapter connected directly to the DC-in jack on the Tablet or connected to the Tablet cradle.
Battery and Power Management (PDA)
The PDA is equipped with an internal Li-Ion battery pack that is capable of supporting approximately 3.5 hours of continuous operation.
IntelliTouch ScreenLogic User’s Guide

15
Installation
IntelliTouch ScreenLogic User’s Guide

16
Before You Begin
Your IntelliTouch ScreenLogic PDA, wireless Tablet, and in-wall touch screen are pre-configured and ready for operation. The system hardware includes a Protocol adapter, a wireless router, and your choice of wired or wireless interface. The following describes the different set up options which depend on the type of Personality Kit being used:
•iTC15 Kit (P/N 520500) – Includes Protocol InterfaceAdapter and wireless router that connects to existing Desktop or Laptop PC. This allows control of IntelliTouch pool and spa systems via PC (requires PC with an Ethernet connection, and Windows XP operating system).
•iTC25 Kit (P/N 520501) – Includes Wireless Personal DigitalAssistant (PDA) with 3.5" color touch screen custom configured for IntelliTouch systems, wireless router, and a Protocol InterfaceAdapter.
•iTC35 Kit (P/N 520502) – Includes in-wall color touch screen with Ethernet (RJ45) connection and Protocol InterfaceAdapter and wireless router. The Touch screen device is custom configured for IntelliTouch systems.
•iTC45 Kit (P/N 520503) – Includes wireless digital Tablet with color touch screen, Protocol Interface Adapter, and wireless router. The Tablet device is custom configured for IntelliTouch systems.
Tools Required
•Wire stripping tool (for stripping cable wires)
•Ethernet connector tool (for custom Ethernet cabling)
Connection Steps Summary
Before connecting the ScreenLogic interface, the IntelliTouch Load Center and Personality Kit should already be installed. The recommended ScreenLogic installation steps are:
1Switch power off to the IntelliTouch Load Center: Before connecting cables to the IntelliTouch Protocol adapter, switch off the power source to the Load Center.
2Review the location requirements before installing the wireless router and Protocol adapter (pages 17 - 23).
3Connect the IntelliTouch Protocol Adapter (pages 24 - 25): Connect a 22-gauge four-wire cable to the IntelliTouch Protocol adapter and to one of the available COM ports on the Personality board located in the Load Center. If both ports are in use, you can wire into the COM port connection block.
4Connect to the Wireless Router (page 21 - 23): Connect an Ethernet cable from the IntelliTouch Protocol adapter to the IntelliTouch wireless router ports 1-4.
5Start up the IntelliTouch ScreenLogic System (page 27): Verify cable connections. Power-up the Load Center and wireless router.
IntelliTouch ScreenLogic User’s Guide
17
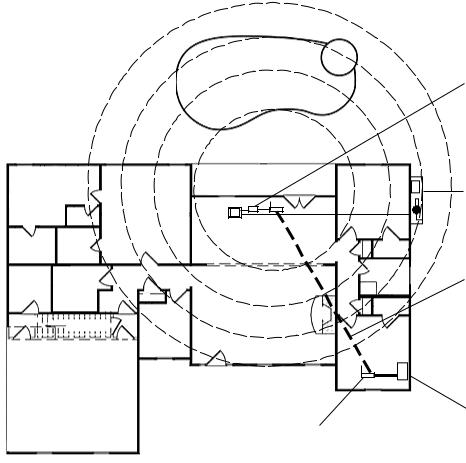
ScreenLogic Location Requirements
The IntelliTouch wireless router and the Protocol adapter must be located inside in a dry environment, preferably near the home owner’s DSL/Cable modem.
To ensure optimum wireless connection, placement of the IntelliTouch wireless router inside the home is important. Ideally, the wireless router should be positioned in the room nearest to the pool and spa location or close to where the wireless tablet or PDA will be primarily used.
Less walls and ceilings equals better wireless reception
Your IntelliTouch ScreenLogic wireless router allows the PDA, Digital Tablet, or a wireless laptop to access the ScreenLogic interface from anywhere in and around your home up to approximately 150 feet from the wireless router. However, keep in mind that range is limited by the number of walls, ceilings, or other objects that the wireless signals must pass through. Typical ranges vary depending on the types of materials and background RF noise in your home. The following information can help maximize the wireless transmission and reception range:
1.Keep the number of walls and ceilings between the wireless router and the Tablet or PDA to a minimum - Each wall or ceiling can rob your wireless router of 3-90 ft. of range. Position your IntelliTouch wireless router so that the number of walls or ceilings are minimized.
2.Consider the direct line between your IntelliTouch wireless router and Tablet or PDA area of operation. A wall that is 1.5 feet thick, at a 45 degree angle, appears to be almost 3 feet thick to the wireless signal. At a two-degree angle it looks over 42 feet thick! Try to make sure that the wireless router is positioned so that the signal travels straight through a wall or ceiling for better reception.
3.Building materials make a difference -A solid metal door or aluminum studs may have a negative effect on range. Try to position the IntelliTouch wireless router so that the signal passes through drywall or open doorways and not other materials.
4.Keep your IntelliTouch wireless router away (at least 3-6 feet) from electrical devices that generate RF noise like microwaves, monitors, electric motors, UPS units, etc.
5.If you are using 2.4 GHz cordless phones or X-10 (wireless products such as ceiling fans, lights, and home security systems), your wireless connection might degrade dramatically or drop completely. Anything using the 2.4 GHz frequency could interfere with your wireless network.
6.For the average sized home, range should not be a problem. If you experience low or no signal strength in areas of your home that you wish to access, consider repositioning the IntelliTouch wireless router. Alternatively, you may consider adding the Range Extender Kit (P/N 520561) to transfer the wireless signal to the area of the home where the wireless Tablet or PDA will be primarily used. For Range Extender connection details, refer to page 19. For more information about the Range Extender, see page 86.
7.If you have an existing wireless router in your home, it may cause interference depending on how close in proximity it is to the ScreenLogic wireless router supplied in your ScreenLogic Kit. To minimize interference, try to maximize the distance between these two devices.
IntelliTouch ScreenLogic User’s Guide

18
Location Requirements (continued)
Cable Distance Limits
Depending upon your location requirements, you may choose to have a long Ethernet cable run and a short fourwire cable run or vice-versa. The recommended cable limits are:
•Ethernet cable distance limit = 300 feet
•Four-wire cable distance limit = 1500 feet
Recommended Wireless Router and Protocol adapter Location
Note:Afirstfloorinstallationlocationisrecommendedtomaximizethewirelesssignalstrength.However,if anupstairsinstallationistheonlyoption,forthebestreceptionitisrecommendedthattheScreenLogic wireless router be located on the floor directly above where theTablet or PDAwill be primarily used.
Advantages:
•Good wireless coverage to back of home and pool/spa area
•Minimal Protocol adapter cable wiring Disadvantage:
•Requires Ethernet cable connection to existing wired or wireless router connected to DSL or Cable modem. Note: Only required if you plan to access the Internet. Use of the ScreenLogic interface does not require an Internet connection.
•Requires Serial cable run from Protocol adapter to Load Center
Note: For wireless Tablet and PDA interfaces: If the Ethernet cable pull as shown is not possible or practical, you can use the Range Extender Kit (P/N 520561) which will transfer the wireless signal to the room in your home where the wireless Tablet and/or PDA are primarily used. For more information, refer to page 20 and 86.
FAMILY ROOM
Pool
KITCHEN
Weak
Spa
Medium
Very strong
WAN
LIVING ROOM
STUDY
Port 1-4
Existing wired or wireless router
ScreenLogic Protocol Adapter and Wireless Router (wireless router requires an AC wall outlet)
Equipment Pad/
Load Center
Ethernet (CAT5) cable connects ScreenLogic wireless router WAN port to existing wired or wireless router port 1-4
Existing
DSL/Cable
Modem
IntelliTouch ScreenLogic User’s Guide
19
Wireless router and Protocol adapter with existing Indoor Control Panel (option)
In some cases the homeowner will already have an existing IntelliTouch Indoor Control Panel. The fourwire conductor cable used to connect to the ScreenLogic Protocol adapter can tap in the Indoor Control Panel’s four-wire connector or cable.
Advantage:
•Can tap into existing IntelliTouch Indoor Control Panel connector or cable
•Minimal Protocol adapter serial cable wiring
•Good wireless coverage to back of home and pool/spa area
Disadvantage:
•Requires Ethernet cable connection to existing wired or wireless router connected to DSL or Cable modem. This is only required if you plan to access the Internet. Use of the ScreenLogic interface does not require an Internet connection. See note at bottom of page.
Weak
Medium
FAMILY ROOM
Spa
Pool
Verystrong
Protocol ScreenLogic Adapter taps into existing IntelliTouch Indoor Control Panel and connects to the wireless router via Ethernet cable
Equipment Pad/Load
Center
KITCHEN
|
Ethernet (CAT5) cable |
|
|
connects ScreenLogic |
|
|
wireless router WAN port to |
|
LIVING ROOM |
existing wired or wireless |
|
router port 1-4 |
||
|
||
STUDY |
|
|
|
Existing DSL or Cable |
|
Existing wired or |
modem |
|
|
||
wireless router |
|
Note: For wireless Tablet and PDA interfaces: If the above Ethernet cable pull is not possible or practical, you can use the Range Extender Kit (P/N 520561) which will transfer the wireless signal to the room in your home where the wireless Tablet and/or PDA are primarily used. For more information, refer to page 20 and 86.
IntelliTouch ScreenLogic User’s Guide
20
Adding Range Extender Kit for Large Home and Properties
For larger homes and properties it may be necessary to install the wireless Range Extender kit (P/N 520561). The wireless Range Extender kit transfers the wireless signal for better coverage where you primarily use your Tablet and/or PDA. The wireless Range Extender kit consists of two wall-plugs that plug into your home’sAC power wall outlets. The first wireless extender wall-plug connects to the ScreenLogic wireless router via an Ethernet cable (RJ45/CAT5). The second wall-plug does not require connection wires. This wireless extender wall-plug picks up and broadcasts the ScreenLogic wireless router signal for better coverage in the area of the home where the wireless Tablet and/or PDAare primarily used. For more information about the Range Extender, see page 86.
Advantages:
•Better wireless coverage for larger homes and properties
•Good wireless coverage to back of home and pool/spa area
•Use your home’s electrical wiring instead of running an Ethernet cable Disadvantage:
•Requires Serial cable run from Protocol adapter to Load Center
Second wireless
range extender Spa
wall-plug
Pool
FAMILY ROOM
KITCHEN
LIVING ROOM
STUDY
IntelliTouch Protocol Adapter connected to Load Center (*)
|
Existing DSL |
|
or Cable |
ScreenLogic |
modem |
wireless router, and |
Existing wired |
first wireless range |
|
extender wall-plug |
or wireless |
(via Ethernet cable) |
router |
Note (*) A wireless connection is available from the Protocol Adapter to the Load Center. This eliminates the existing hard wire connection from inside your home to the equipment pad. For more information see “ScreenLogic Wireless Connection Kit” on page 97.
IntelliTouch ScreenLogic User’s Guide
 Loading...