


®
Installation/Operation
KBD300A
Universal Keyboard
C527M-L (3/04)
Pelco • 3500 Pelco Way • Clovis, CA 93612-5699 USA • www.pelco.com
In North America and Canada: Tel (800) 289-9100 or FAX (800) 289-9150
International Customers: Tel +1 (559) 292-1981 or FAX +1 (559) 348-1120
[ 2 ] Pelco Manual C527M-L (3/04)
CONTENTS |
|
Section |
Page |
IMPORTANT SAFETY INSTRUCTIONS ........................................................................................................... |
5 |
REGULATORY NOTICES .................................................................................................................................. |
6 |
DESCRIPTION ................................................................................................................................................. |
7 |
INSTALLATION – CM6700 MODE .................................................................................................................. |
9 |
Connecting a Keyboard to the Local Keyboard Port ............................................................................. |
9 |
Connecting Keyboards to the Remote Keyboard(s) Port ...................................................................... |
9 |
INSTALLATION – CM6800 MODE ................................................................................................................ |
11 |
Connecting KBD300A Direct-Powered Keyboards ............................................................................. |
11 |
Connecting KBD300A Remote Keyboards .......................................................................................... |
13 |
INSTALLATION – CM6700 ASCII MODE ...................................................................................................... |
15 |
RS-232 Interface (CM6700) ................................................................................................................ |
15 |
RS-422 Interface (CM6700) ................................................................................................................ |
17 |
INSTALLATION – CM6800 ASCII MODE ...................................................................................................... |
19 |
RS-232 Interface (CM6800) ................................................................................................................ |
19 |
RS-485 Interface (CM6800) ................................................................................................................ |
21 |
INSTALLATION – DIRECT MODE .................................................................................................................. |
24 |
Connecting the Keyboard ................................................................................................................... |
24 |
SWITCH SETTINGS ...................................................................................................................................... |
26 |
PROGRAMMING AND OPERATION .............................................................................................................. |
27 |
Scanning Functions ............................................................................................................................ |
31 |
Programming Limit Stops ................................................................................................................... |
32 |
Zones .................................................................................................................................................. |
33 |
SPECIFICATIONS ........................................................................................................................................... |
34 |
PRODUCT WARRANTY AND RETURN INFORMATION ................................................................................ |
39 |
Pelco Manual C527M-L (3/04) |
[ 3 ] |
List of Illustrations |
|
||
Figure |
|
Page |
|
1 |
Wiring Diagram for Local/Remote Keyboards ................................................................................... |
10 |
|
2 |
Keyboard Cabling Diagram ................................................................................................................. |
10 |
|
3 |
Data Cables Plugged into COM 5 and 6 (CM6800-48X8 Shown) ...................................................... |
12 |
|
4 |
Connecting Remote Keyboards (CM6800-48X8 Shown) .................................................................... |
14 |
|
5 |
RS-232 Interface Connections (CM6700) ........................................................................................... |
16 |
|
6 |
RS-422 |
Interface Connections (CM6700) ........................................................................................... |
18 |
7 |
RS-232 |
Interface Connections (CM6800-48X8 Shown) ..................................................................... |
20 |
8 |
RS-485 |
Interface Connections (CM6800-48X8 Shown) ..................................................................... |
22 |
9 |
COM Port Connections and RJ-45 Connector Pin-Outs ..................................................................... |
23 |
|
10 |
Direct Keyboard and Receiver Wiring ................................................................................................ |
25 |
|
11 |
Keyboard Rear Panel .......................................................................................................................... |
27 |
|
12 |
Keyboard Functions ............................................................................................................................ |
30 |
|
List of Tables |
|
|
Table |
|
Page |
A |
KBD300A Operational Features ........................................................................................................... |
8 |
B |
Keyboard Addresses ........................................................................................................................... |
26 |
C |
Keyboard Modes ................................................................................................................................ |
26 |
D |
Keyboard Functions ............................................................................................................................ |
27 |
E |
KBD300A Button Functions ................................................................................................................ |
30 |
F |
Operating Scan Functions with Various Receivers ............................................................................ |
31 |
G |
Limit Set Codes .................................................................................................................................. |
32 |
H |
Zone Programming Procedure ............................................................................................................ |
33 |
[ 4 ] Pelco Manual C527M-L (3/04)
IMPORTANT SAFETY INSTRUCTIONS
Read these instructions.
Keep these instructions.
Heed all warnings.
Follow all instructions.
Do not use this apparatus near water.
Clean only with dry cloth.
Do not block any ventilation openings. Install in accordance with the manufacturer’s instructions.
Do not install near any heat sources such as radiators, heat registers, stoves, or other apparatus (including amplifiers) that produce heat.
Only use attachments/accessories specified by the manufacturer.
Refer all servicing to qualified service personnel. Servicing is required when the apparatus has been damaged in any way, such as power-supply cord or plug is damaged, liquid has been spilled or objects have fallen into the apparatus, the apparatus has been exposed to rain or moisture, does not operate normally, or has been dropped.
Apparatus shall not be exposed to dripping or splashing and that no objects filled with liquids, such as vases shall be placed on the apparatus.
WARNING: To reduce the risk of fire or electric shock, do not expose this apparatus to rain or moisture.
Installation should be done only by qualified personnel and conform to all local codes.
Unless the unit is specifically marked as a NEMA Type 3, 3R, 3S, 4, 4X, 6, or 6P enclosure, it is designed for indoor use only and it must not be installed where exposed to rain and moisture.
CAUTION: These servicing instructions are for use by qualified service personnel only. To reduce the risk of electric shock do not perform any servicing other that contained in the operating instructions unless you are qualified to do so.
Only use replacement parts recommended by Pelco.
Pelco Manual C527M-L (3/04) |
[ 5 ] |
REGULATORY NOTICES
This device complies with part 15 of the FCC Rules. Operation is subject to the following two conditions:
(1) this device may not cause harmful interference, and (2) this device must accept any interference received, including interference that may cause undesired operation.
RADIO AND TELEVISION INTERFERENCE
This equipment has been tested and found to comply with the limits of a Class B digital device, pursuant to part 15 of the FCC rules. These limits are designed to provide reasonable protection against harmful interference in a residential installation. This equipment generates, uses, and can radiate radio frequency energy and, if not installed and used in accordance with the instructions, may cause harmful interference to radio communications. However there is no guarantee that the interference will not occur in a particular installation. If this equipment does cause harmful interference to radio or television reception, which can be determined by turning the equipment off and on, the user is encouraged to try to correct the interference by one or more of the following measures:
•Reorient or relocate the receiving antenna.
•Increase the separation between the equipment and the receiver.
•Connect the equipment into an outlet on a circuit different from that to which the receiver is connected.
•Consult the dealer or an experienced radio/TV technician for help.
You may also find helpful the following booklet, prepared by the FCC: How to Identify and Resolve RadioTV Interference Problems. This booklet is available from the U.S. Government Printing Office, Washington D.C. 20402.
Changes and Modifications not expressly approved by the manufacturer or registrant of this equipment can void your authority to operate this equipment under Federal Communications Commissions rules.
[ 6 ] Pelco Manual C527M-L (3/04)
DESCRIPTION
The KBD300A Universal Keyboard has many operational features (refer to Table A) and can be used in numerous operational modes:
CM6700 Mode: Program and operate the CM6700 Matrix Switcher/Controller Unit (SCU). Also control a Genex® multiplexer from a CM6700. Multiple keyboards can be used in this mode.
CM6800 Mode: Program and operate the CM6800 Matrix Switcher/Controller Unit (SCU). Also control a Genex multiplexer from a CM6800 SCU. Multiple keyboards can be used in this mode.
Direct P Mode: Control up to 16 receivers connected directly to the keyboard. A separate system, such as an MS500 or VA6100 Switcher, is needed to route video to the monitor.
NOTE: The KBD300A keyboard can also be used in Direct Mode to program a CM9760-MDA Master Distribution Amplifier. Refer to the CM9760-MDA manual for details.
NOTE: The KBD300A keyboard has an auto-centering joystick. Be certain the joystick remains in the neutral (vertical) position as power is applied to the keyboard. Do not move or hold down the joystick until after the red digit LEDs have finished flashing the firmware revision.
The latest firmware release (version 5.00) allows three additional modes:
CM6700 ASCII Mode: This mode supports the CM6700 matrix auxiliary commands. The F1, F2, and F3 keys control the CM6700-MXB relays that are on the matrix bay. To enable this mode, DIP switch 7 must be ON and DIP switch 8 must be OFF.
CM6800 ASCII Mode: This mode supports the CM6800 GPI commands. The F1, F2, and F3 keys control the relays on an REL2064 that is connected to a CM6800 switcher. To enable this mode, DIP switch 7 must be ON and DIP switch 8 must be ON.
Direct D Mode: This mode is similar to the Direct P Protocol, except that the same set of commands is now sent in Direct D Protocol. To enable Direct D mode, DIP switches 5 and 7 must be ON.
NOTE: You must upgrade your KBD firmware to version 5.00 if the application requires you to select two-digit monitor numbers.
Pelco Manual C527M-L (3/04) |
[ 7 ] |
Table A. KBD300A Operational Features
|
CM6700/ |
Direct |
CM6700 |
CM6800 |
Direct |
Function |
CM6800 |
P* |
ASCII** |
ASCII** |
D** |
|
|
|
|
|
|
Automatically recognize the mode |
Yes |
Yes |
No |
No |
No |
|
|
|
|
|
|
Select cameras (control only for Direct Mode) |
Yes |
Yes |
Yes |
No |
Yes |
|
|
|
|
|
|
Select monitors |
Yes |
No |
Yes |
Yes |
No |
|
|
|
|
|
|
Control lenses |
Yes |
Yes |
Yes |
Yes |
Yes |
|
|
|
|
|
|
Set and call presets/patterns |
Yes |
Yes |
Yes |
Yes |
Yes |
|
|
|
|
|
|
Create Zones |
Yes |
No |
Yes |
No |
Yes |
|
|
|
|
|
|
Control latching receiver auxiliaries |
Yes |
Yes |
Yes |
Yes |
Yes |
|
|
|
|
|
|
Control momentary receiver auxiliaries |
Yes |
Yes |
Yes |
Yes |
Yes |
|
|
|
|
|
|
Control multiplexer |
Yes |
No |
Yes |
Yes |
No |
(main monitor output for CM6700/6800 mode) |
|
|
|
|
|
|
|
|
|
|
|
Control Matrix Switcher |
Yes |
No |
Yes |
Yes |
No |
|
|
|
|
|
|
Program Matrix Switcher |
Yes |
No |
No |
No |
No |
|
|
|
|
|
|
Sequencing |
Yes |
No |
Yes |
Yes |
No |
|
|
|
|
|
|
Operate frame, auto, and random scans |
Yes |
Yes |
Yes |
Yes |
Yes |
|
|
|
|
|
|
Program and operate patterns |
Yes |
Yes |
Yes |
Yes |
Yes |
|
|
|
|
|
|
Control CM6700 auxiliaries |
Yes |
No |
Yes |
No |
No |
|
|
|
|
|
|
Control CM6800 GPIs |
Yes |
No |
No |
Yes |
No |
*Firmware version 2.00 and higher |
|
|
|
|
|
**Firmware version 5.00 and higher |
|
|
|
|
|
[ 8 ] Pelco Manual C527M-L (3/04)
INSTALLATION – CM6700 MODE
There are two keyboard ports on the CM6700 SCU.
The LOCAL KEYBOARD port is for connecting a single keyboard within a distance of 25 feet (7.6 meters). The REMOTE KEYBOARD(S) port is for connecting additional remote keyboards.
Connecting a Keyboard to the Local Keyboard Port
Use the data cable that is supplied with the keyboard. Plug one end of the cable into the RJ-45 connector on the rear of the keyboard and the other end into the LOCAL KEYBOARD port on the SCU (refer to Figure 1). Set the keyboard switches according to the instructions in the Switch Settings section. Go to step 2 to install remote keyboards, or go to step 10.
Connecting Keyboards to the Remote Keyboard(s) Port
NOTE: A KBDKIT or KBDKIT-X is required for this application. The KBDKIT consists of two RJ-45 wall blocks and a 120 VAC to 12 VAC transformer. The KBDKIT-X is for 230 VAC. Use one KBDKIT for each keyboard.
Refer to Figures 1 and 2 for the following steps.
Decide on a suitable location for each keyboard and wall block. Keyboards must be within 25 feet (7.6 meters) of the wall block. Wall blocks must be within 6 feet (1.8 m) of the nearest suitable electrical outlet. Do not mount the wall block at this time.
Run wall block interconnect cable (user-supplied) from the SCU to the closest keyboard location, then to the next nearest location, and the next, etc.
Communication to the keyboards is RS-485. Maximum cable distance for RS-485 communication over 24-gauge wire is 4,000 feet (1,219 m). Pelco recommends using shielded twisted pairs cable that meets or exceeds the basic requirements for EIA RS-485 applications.
Remove the wall block cover and make cable connections at each wall block.
At each wall block, wire the transformer to pins 3 and 4. Polarity is unimportant.
Replace the cover on the wall block. Secure the wall block to a suitable surface. A double-sided sticky pad is provided to mount the wall block.
Set the switches for each keyboard according to the instructions in the Switch Settings section.
Plug in all keyboard data cables.
Plug the KBDKIT or KBDKIT-X transformer into a suitable outlet.
To initialize the keyboard, wait five seconds after powering-up the CM6700, enter the number for the monitor you are viewing (1-4), and press MON. The LED display shows the number entered.
NOTE: You must re-initialize whenever power is cycled.
Go to the Programming and Operation section and program and test for proper operation.
Pelco Manual C527M-L (3/04) |
[ 9 ] |

|
|
|
|
KBD |
|
|
|
|
|
|
LOCAL |
|
|
|
|
|
KEYBOARD |
|
|
LOCAL |
|
|
1 |
|
|
KEYBO ARD |
25-FOOT KEYBOARD DATA CABLE |
||
|
|
|
|||
|
|
|
CM6700 |
|
|
|
USER-SUPPLIED CABLE |
3 |
|
ADDITIONAL |
|
|
|
|
|||
|
|
|
|
KEYBOARDS |
|
|
|
6 COVERREPLACE |
|
6 COVERREPLACE |
|
|
|
KBD |
|
KBD |
|
|
|
2 |
7 |
2 |
|
|
8 |
|
7 |
||
KBDKIT |
|
8 |
|
||
|
|
|
|
|
SET SWITCHES |
|
25-FOOT KEYBOARD |
|
25-FOOT KEYBOARD |
|
|
|
|
DATA CABLE |
|
DATA CABLE |
|
|
|
REMOTE KEYBOARDS |
|
01225 |
|
|
|
|
|
|
|
Figure 1. Wiring Diagram for Local/Remote Keyboards
|
LOCAL |
|
|
RJ-45 WALL BLOCK TERMINALS |
|
|
4 |
5 |
|
3 |
6 |
T+ T- |
2 |
7 |
R- R+ |
|
|
|
1 |
8 |
USER-SUPPLIED CABLE |
4 |
TERMINAL |
|
|
4 |
|
|
|
TERMINAL |
||
|
TX+ |
1 |
|
TX+ |
1 |
|
TX- |
2 |
|
TX- |
2 |
5 |
AC |
3 |
5 |
AC |
3 |
AC |
4 |
AC |
4 |
||
|
GND |
5 |
|
GND |
5 |
|
|
6 |
|
|
6 |
|
RX- |
7 |
|
RX- |
7 |
|
RX+ |
8 |
|
RX+ |
8 |
12 VAC |
|
|
|
12 VAC |
|
9 |
|
|
|
|
9 |
01226
Figure 2. Keyboard Cabling Diagram
[ 10 ] Pelco Manual C527M-L (3/04)
INSTALLATION – CM6800 MODE
You can connect up to eight KBD300A keyboards to any of the following ports:
For the CM6800-48X8:
COM 5 (one direct-powered keyboard or up to eight remotely connected keyboards) COM 6 (same as COM 5)
COM 7 (up to eight remotely connected keyboards) COM 8 (same as COM 7)
The total number of KBD300A Series keyboards connected to the CM680-48X8 cannot exceed 16.
For the CM6800-32X6:
COM 4 (up to eight remotely connected keyboards)
COM 5 (one direct-powered keyboard or up to eight remotely connected keyboards)
The total number of KBD300A Series keyboards connected to the CM6800-32X6 cannot exceed eight.
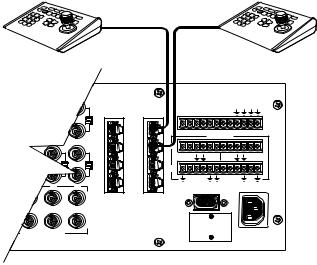
Connecting KBD300A Direct-Powered Keyboards
For direct-powered local keyboards, use COM 5 and 6 (serial ports 5 and 6) for the CM6800-48X8 and use COM 5 (serial port 5) for the CM6800-32X6. Each port can power one KBD300A keyboard. A KBDKIT(-X) is required if the distance between the CM6800 and the keyboard exceeds 25 feet (7.6 m).
Refer to Figure 3 (CM6800-48X8 shown).
Using the 25-foot (7.6 m) straight data cable supplied with the keyboard, plug one end into the RJ-45 connector on the rear of the keyboard. Plug the other end into either COM 5 or 6 on the CM6800-48X8 or COM 5 on the CM6800-32X6.
Set the keyboard switches according to the instructions in the Switch Settings section.
Go to the next section, Connecting KBD300A Remote Keyboards. Go to step 1 to install remote keyboards, or go to step 9.
Pelco Manual C527M-L (3/04) |
[ 11 ] |
MAXIMUM NUMBER OF KEYBOARDS POWERED BY COM 5 & 6: 1 PER PORT NOTE: THE TOTAL NUMBER OF KBD300A SERIES
KEYBOARDS CONNECTED TO THE CM6800 CANNOT EXCEED 16.
KBDKIT(-X) REQUIRED WHEN WIRING MORE THAN 1 KEYBOARD TO A PORT.
KBD300A |
KBD300A |
16
1
2
31 |
32 |
3 |

 4 3 4
4 3 4
7 8
VIDE O O UTPUTS
|
AL AR M |
C O M |
1 2 3 4 5 6 7 8 |
5 |
|
|
|
|
|
|
|
|
|
|
|
|
|
C O NTR O L |
|
|
|||
6 |
PTZ |
|
|
|
|
|
|
|
|
|
A |
T |
T |
R |
R |
T |
T |
R |
R B |
7 |
|
+ |
- |
+ |
- |
+ |
- |
+ |
- |
O UT |
|
|
|
|
|
|
|
|
|
|
|
|
|
|
|
|
|
|
|
8 |
|
|
1 |
|
|
2 |
|
3 |
|
|
|
|
|
|
|
|
|||
|
|
|
|
C O M 1 |
|
|
|
|
|
|
|
|
|
|
|
|
|
120/230~ |
|
|
|
|
|
|
|
|
|
50/60 HZ |
|
|
|
|
|
|
|
|
|
25 WATT S |
|
CM6800 COM 5 & 6 |
|
KBD300A |
|
|||||||
RJ-45 PIN-OUTS |
RJ-45 PIN-OUTS |
|
||||||||
1 |
Rx+ |
|
|
|
|
|
1 |
Tx+ |
|
|
2 |
Rx- |
|
|
|
2 |
Tx- |
|
|||
|
|
|
|
|||||||
3 |
KBD 12V |
3 |
12V |
|
||||||
4 |
KBD GROUND |
4 |
12V |
|
||||||
5 |
GROUND |
|
|
5 |
GROUND |
|
||||
|
|
|
||||||||
6 |
NC |
6 |
NC |
|
||||||
7 |
Tx- |
|
|
|
7 |
Rx- |
|
|||
|
|
|
|
|||||||
8 |
Tx+ |
|
|
8 |
Rx+ |
20108 |
||||
|
|
|||||||||
Figure 3. Data Cables Plugged into COM 5 and 6 (CM6800-48X8 Shown)
[ 12 ] Pelco Manual C527M-L (3/04)
 Loading...