


TransTube® 112/212 EFX Operation Manual
For more information on other great Peavey products, go to your local Peavey dealer or online at www.peavey.com
Intended to alert the user to the presence of uninsulated “dangerous voltage” within the product’s enclosure that may be of sufficient magnitude to constitute a risk of electric shock to persons.
Intended to alert the user of the presence of important operating and maintenance (servicing) instructions in the literature accompanying the product.
CAUTION: Risk of electrical shock — DO NOT OPEN!
CAUTION: To reduce the risk of electric shock, do not remove cover. No user serviceable parts inside. Refer servicing to qualified service personnel.
WARNING: To prevent electrical shock or fire hazard, do not expose this appliance to rain or moisture. Before using this appliance, read the operating guide for further warnings.
Este símbolo tiene el propósito, de alertar al usuario de la presencia de “(voltaje) peligroso” sin aislamiento dentro de la caja del producto y que puede tener una magnitud suficiente como para constituir riesgo de descarga eléctrica.
Este símbolo tiene el propósito de alertar al usario de la presencia de instruccones importantes sobre la operación y mantenimiento en la información que viene con el producto.
PRECAUCION: Riesgo de descarga eléctrica ¡NO ABRIR!
PRECAUCION: Para disminuír el riesgo de descarga eléctrica, no abra la cubierta. No hay piezas útiles dentro. Deje todo mantenimiento en manos del personal técnico cualificado.
ADVERTENCIA: Para evitar descargas eléctricas o peligro de incendio, no deje expuesto a la lluvia o humedad este aparato Antes de usar este aparato, Iea más advertencias en la guía de operación.
Ce symbole est utilisé dans ce manuel pour indiquer à l’utilisateur la présence d’une tension dangereuse pouvant être d’amplitude suffisante pour constituer un risque de choc électrique.
Ce symbole est utilisé dans ce manuel pour indiquer à l’utilisateur qu’il ou qu’elle trouvera d’importantes instructions concernant l’utilisation et l’entretien de l’appareil dans le paragraphe signalé.
ATTENTION: Risques de choc électrique — NE PAS OUVRIR!
ATTENTION: Afin de réduire le risque de choc électrique, ne pas enlever le couvercle. Il ne se trouve à l’intérieur aucune pièce pouvant être reparée par l’utilisateur. Confiez I’entretien et la réparation de l’appareil à un réparateur Peavey agréé.
AVERTISSEMENT : Afin de prévenir les risques de décharge électrique ou de feu, n’exposez pas cet appareil à la pluie ou à l’humidité. Avant d’utiliser cet appareil, lisez attentivement les avertissements supplémentaires de ce
manuel.
Dieses Symbol soll den Anwender vor unisolierten gefährlichen Spannungen innerhalb des Gehäuses warnen, die von Ausreichender Stärke sind, um einen elektrischen Schlag verursachen zu können.
Dieses Symbol soll den Benutzer auf wichtige Instruktionen in der Bedienungsanleitung aufmerksam machen, die Handhabung und Wartung des Produkts betreffen.
VORSICHT: Risiko — Elektrischer Schlag! Nicht öffnen!
VORSICHT: Um das Risiko eines elektrischen Schlages zu vermeiden, nicht die Abdeckung enfernen. Es befinden sich keine Teile darin, die vom Anwender repariert werden könnten. Reparaturen nur von qualifiziertem
Fachpersonal durchführen lassen.
ACHTUNG: Um einen elektrischen Schlag oder Feuergefahr zu vermeiden, sollte dieses Gerät nicht dem Regen oder Feuchtigkeit ausgesetzt werden. Vor Inbetriebnahme unbedingt die Bedienungsanleitung lesen.
2

ENGLISH
TRANSTUBE® EFX AMPLIFIERS
Combining today’s hottest effects with the killer tone of Peavey’s patented TransTube circuitry, the EFX Series offers unbelievable replication of tube amp characteristics. Nine footswitchable digital effects allow these two-channel amps to create a vast array of awesome sounds, without using external effects processors. If external effects are still desired, EFX amps allow patching via an ultra-quiet effects loop. Both the 112 and the 212 models are ruggedly constructed units representing years of research and development in amplifier design and manufacturing. From userfriendly controls to specially voiced speakers, these amps demonstrate Peavey’s commitment to quality performance and unsurpassed durability. Plugging into an EFX amp puts the sound you want at your discretion, allowing you to concentrate on the reason you play ... the music!
FEATURES
112 EFX
•65 W into 8 Ohms
•12" Blue Marvel® speaker
•High gain input
•Clean channel with separate volume, EQ, and voicing controls
•Lead channel with separate preand post-gain, EQ, and gain/voicing controls
•9 digital effects
- Tremolo |
- Octaver |
- Rotary speaker |
- Funk wah |
- Delay |
- Reverb |
- Flanger |
- Chorus |
- Phaser |
•T. Dynamics® control
•Headphone jack
•Effects loop
212 EFX
•100 W into 4 Ohms (80 W into 8 Ohms internal)
•Two 12" Blue Marvel speakers
•High and low gain inputs
•Clean channel with separate volume, EQ, and voicing controls
•Lead channel with separate preand post-gain, EQ, and gain/voicing controls
•9 digital effects
- Tremolo |
- Octaver |
- Rotary speaker |
- Funk wah |
- Delay |
- Reverb |
- Flanger |
- Chorus |
- Phaser |
•T. Dynamics control
•Effects loop with level control
•Preamp out and power amp in
•External speaker jack
•Presence control
•Resonance switch
3

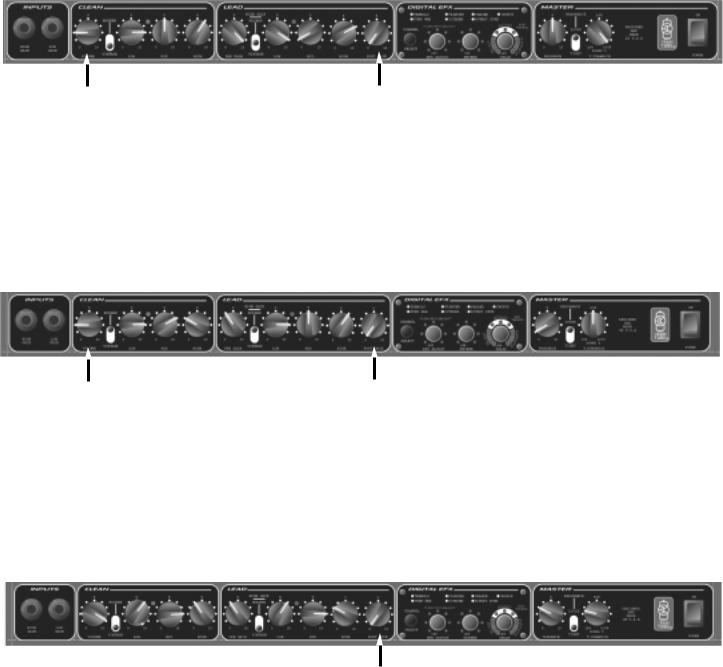
FEATURES AND CONTROLS
FRONT PANEL
6
1 |
2 |
3 |
4 |
5 |
7 |
8 |
9 |
10 |
11 |
12 |
13 |
14 |
15 |
16 |
17 |
18 |
(1)INPUT (HIGH GAIN)
This 1/4" mono jack is designed to accommodate most any guitar output signal. Input signal gain can be adjusted by the PRE GAIN (7) control (Lead channel only).
(2)INPUT (LOW GAIN) *212 Only
This 1/4" mono jack is designed to accommodate instruments with extremely high outputs that might overdrive the high gain input. It is -6 dB from the high gain input. If both inputs are used simultaneously, both will be low gain.
(3)VOLUME
This control sets the overall level of the Clean channel.
(4)MODERN / VINTAGE SWITCH
This switch selects the voicing of the Clean channel. The MODERN position reflects the tones of current amplifier design. The VINTAGE position changes the EQ and adds brightness to simulate classic amp design.
(5)CLEAN CHANNEL EQ
These passive controls allow adjustment of LOW, MID, and HIGH frequencies. The tonal changes produced by these controls will vary depending on the position of the MODERN / VINTAGE SWITCH (4). The “0” position is maximum cut; the “10” position is maximum boost.
(6)ACTIVE CHANNEL LEDs
These indicators signify the active channel. Green indicates Clean channel activation; red indicates Lead channel activation.
(7)PRE GAIN
This control adjusts the input gain of the Lead channel. Increasing input gain will increase preamp distortion and sustain.
(8)MODERN / VINTAGE / HIGH GAIN SWITCH
This switch selects both the gain and voicing of the Lead channel. The MODERN position increases gain and notches (cuts) mid frequencies to establish a “hard rock/metal” tone. The VINTAGE position replicates overdriven classic tube amps, while the HIGH GAIN setting increases gain and changes the EQ to allow leads/solos to “cut through.”
4
(9)LEAD CHANNEL EQ
These passive controls allow adjustment of LOW, MID, and HIGH frequencies. The “0” position is maximum cut; the “10” position is maximum boost.
(10)POST GAIN
This control sets the overall gain of the Lead channel.
(11)CHANNEL SELECT
This switch selects the channel (Lead or Clean). The ACTIVE CHANNEL LEDs (6) indicate the active channel — green for Clean; red for Lead.
(12)EFX ADJUST
Pressing this control selects the effect. A yellow LED adjacent to the effect name will illuminate to indicate the selected effect. Rotating this control clockwise changes the parameter of the active effect according to the descriptions below. The surrounding LED ring indicates relative value of the parameter being adjusted.
EFX ADJ PARAMETERS |
|
Tremolo - Rate increase |
Funk Wah - Sensitivity increase |
Octaver - Wet/Dry mix |
Rotary Speaker - Rate increase |
Flanger - Rate increase |
Phaser - Rate increase |
Chorus - Rate increase/depth decrease |
|
EFX amps are built with factory settings loaded into the presets. To return to the factory settings, press and hold both the EFX ADJUST (12) and DELAY (14) controls while turning the amp on.
(13)REVERB
This control adjusts the overall reverb level. The surrounding LED ring indicates level.
(14)DELAY
This control adjusts delay type, time, and volume. Three types of delay are available: SLAP (1 repeat), ECHO (3-4 repeats), or INFINITE (5-6 repeats). The LEDs in each section of the control indicate which type is active and volume level. Pressing the control twice sets the delay time to the interval between presses.
(15)PRESENCE *212 Only
This active tone control boosts high frequencies from no boost at the “0” position to 6 dB boost at the “10” position.
(16)RESONANCE SWITCH *212 Only
This switch adjusts the amplifier’s damping factor. Damping is the ability of an amplifier to control speaker cone motion after a signal disappears. In the TIGHT position, vibration is reduced quicker than in the LOOSE position. The increased resonation in the LOOSE position simulates a larger speaker enclosure.
(17)T. DYNAMICS®
This control adjusts the power amp output level from 10% to 100%. When set to lower levels, the tube power compression simulation will be much more pronounced.
5
(18)POWER SWITCH
This switch applies power to the unit in the “ON” position. One of the ACTIVE CHANNEL LEDs (6) will illuminate to indicate that the unit is on. Pressing the lower portion of the switch turns the unit off.
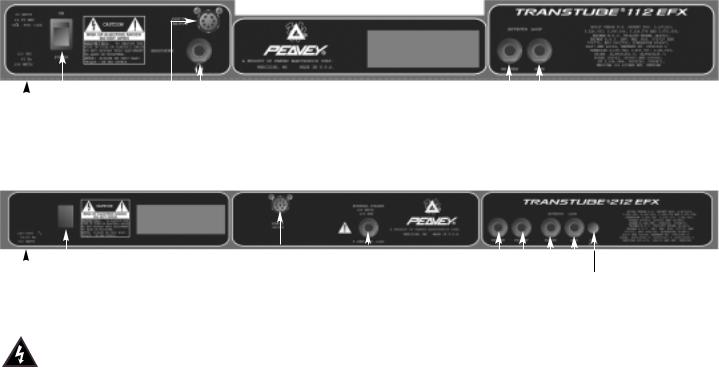
BACK PANEL
Due to differences in the layout and features of the back panel, both the 112 and 212 back panels are presented. Refer to the illustration that identifies your model.
112 EFX
|
|
|
|
|
|
|
|
|
|
|
|
|
|
|
|
19 |
|
18 |
20 |
21 |
22 |
|
|
|
|
|
|
|
|
|
|
212 EFX
|
|
|
|
|
|
|
|
|
|
|
|
|
|
|
|
|
|
|
|
|
|
|
|
|
|
|
|
|
|
|
|
|
|
|
|
|
|
|
|
|
|
|
|
19 |
|
23 |
20 |
24 |
25 |
26 |
22 |
|
27 |
|
|
|
|
|
|
|
|
|
|
|
|
(19)IEC CONNECTOR
This is a standard IEC power connector. An AC mains cord having the appropriate AC plug
and ratings for the intended operating voltage is included. The mains cord should be connected to the amplifier before connecting to a suitable AC outlet.
U.S DOMESTIC AC MAINS CORD
The mains cord supplied with the unit is a heavy-duty, 3-conductor type with a conventional 120 VAC plug with ground pin. If the outlet used does not have a ground pin, a suitable grounding adapter should be used, and the third wire should be grounded properly.
Never break off the ground pin on any equipment. It is provided for your safety.
NOTE: FOR UK ONLY
If the colors of the wires in the mains lead of this unit do not correspond with the colored markings identifying the terminals in your plug, proceed as follows: (1) The wire that is colored green and yellow must be connected to the terminal that is marked by the letter E, the earth symbol, colored green, or colored green and yellow. (2) The wire that is colored blue must be connected to the terminal that is marked with the letter N or the color black. (3) The wire that is colored brown must be connected to the terminal that is marked with the letter L or the color red.
6

(20)REMOTE SWITCH CONNECTOR
This 8-pin DIN connector is provided for the connection of the PFC 3 footswitch (included). The footswitch cable should be connected before the amp is powered up. See the FOOTSWITCH section of this manual for explanation of switch operation.
(21)HEADPHONE JACK
This 1/4" stereo (TRS) connector accepts standard stereo headphones. Using this jack interrupts the signal to the speaker, making it ideal for quiet practice situations.
(22)EFFECTS LOOP
These 1/4" mono (TS) jacks allow signal to be sent to and returned from external effects processors. Using shielded cables, patch from SEND to the input of the external device, and from the output of the device to RETURN. Only devices that do not increase signal gain should be used in this loop.
(23)GROUND POLARITY SWITCH
This 3-position, rocker-type switch should normally be placed in the center “0” position. If hum or noise is noticed coming from the speakers, the switch may be placed in the “+”or “-” position to minimize hum/noise. If changing the polarity does not alleviate the problem, consult your authorized Peavey dealer, the Peavey factory, or a qualified service technician.
NOTE: This feature only provided on 120 Volt models.
(24)EXTERNAL SPEAKER JACK
This 1/4" mono (TS) jack allows the connection of an external speaker cabinet(s). It is wired in parallel with the internal speakers. External enclosures must be capable of handling
100 Watts and have a minimum impedance of 8 Ohms.
(25)POWER AMP IN
This 1/4" jack allows the connection of line level signals directly to the power amp.
(26)PREAMP OUT
This 1/4" jack allows patching to mixing consoles, tape recorders, etc. Use a shielded cable to patch from this jack to the input of the device receiving the signal. This patch does not affect the operation of the amplifier or the signal continuing to the power amp and speakers.
(27)EFFECTS LEVEL
This switch selects the EFFECTS LOOP (22) sensitivity to avoid overdriving effects with no input level control.
7

FOOTSWITCH
EFX |
CHANNEL |
MODULATION |
DELAY |
SELECT |
|
|
REVERB |
|
|
|
PFCTM3 |
2 |
|
3 |
|
|
|
1 DOUBLE-CLICK |
|
|
|||
MODE |
|
PRESET |
TO STORE PRESET |
|
PRESET |
|
PRESET |
28 |
29 |
30 |
31 |
32 |
33 |
34 |
35 |
MODE SELECT
The PFC 3 footswitch operates in two modes: EFX Select mode and Preset Select mode. Pressing the MODE SWITCH (28) selects between the two modes. The active mode is indicated by the MODE LED (29). Illumination of the LED indicates EFX Select Mode; a dark LED indicates Preset Select Mode. Controls and indicators 30-35 perform different functions relative to the active mode.
PRESET SELECT MODE
In this mode, all three switches control effects presets. Their corresponding LEDs indicate which preset is active. Once desired settings are achieved utilizing the effects controls on the front panel, double-click one of the Preset switches (30, 33, or 35) to store the settings.
To return to the last saved settings for a Preset, press the desired Preset switch once.
For a detailed explanation on creating and storing presets, refer to the TWEAK FEATURES section of this manual on the following page.
EFX SELECT MODE
NOTE: When entering this mode, the current preset will remain active.
In this mode, SWITCH 1 (30) selects between the Lead and Clean channels. The CHANNEL LED (31) will illuminate when the Lead channel is active. SWITCH 2 (33) toggles between two effects and their respective settings. This switch may be used as an on/off switch if one of the settings has no effects active. To use the MODULATION LED (32) as a status indicator, the “off” (or lower setting) should be made with the LED dark, and the “on” (or higher setting) made with the LED illuminated. SWITCH 3 (35) toggles between two reverb and delay settings. As with effects settings, this switch may be used as an on/off for reverb and delay. Both functions change simultaneously when this switch is depressed.
8
TWEAK FEATURES
EFX amplifiers offer hidden features to further adjust the parameters of the digital effects. In addition to the adjustments described in the EFX ADJ PARAMETERS section of this manual, additional tweaks may be made to customize effects to user preference. Tweaks are made by pressing and holding the EFX ADJUST (12) control while simultaneously rotating the REVERB (13) control.
The EFX ADJUST control must be pressed for at least one second to enter Tweak Mode. Reverb setting will not be affected while in Tweak Mode. The LED ring surrounding the control will now reflect the value of the effect being tweaked. As in standard parameter changes, the effect being tweaked will be the active effect as indicated by the LED adjacent to the effect name.
TWEAK ADJ PARAMETERS |
|
|
Tremolo - Intensity |
Funk Wah - Decay time |
Phaser - Depth |
Flanger - Depth |
Rotary Speaker - Wet/Dry mix |
Chorus - Wet/Dry mix |
To recover the factory settings for both Standard and Tweak Modes, press the EFX ADJUST (12) control and hold for one second to enter Tweak Mode, then press the DELAY (14) control.
CREATING AND STORING A CUSTOM PRESET
The following steps explain the creation and storage of two different effects/settings, as well as two different settings for Delay/Reverb. The Flanger and Octaver effects were selected at random. These steps will accomplish custom presets using any of the effects.
1.Assure the footswitch is in the EFX Select Mode by pressing the MODE SWITCH (28) if necessary. The MODE LED (29) will illuminate.
2.Use SWITCH 1 (30) to select Lead or Clean channel. The CHANNEL LED (31) will illuminate for Lead channel.
3.Select the position of SWITCH 2 (33). The MODULATION LED (32) may be illuminated or dark at the discretion of the user.
4.Select Flanger and adjust rate to preference using the EFX ADJUST (12) control on the front panel (standard adjustment).
5.Press and hold the EFX ADJUST (12) control while adjusting Flanger depth to preference with the REVERB (13) control on the front panel (tweak).
6.Press SWITCH 2 (33) to change to the other Modulation position.The MODULATION LED
(32)will illuminate or go dark depending on its status in step 5.
7.Select Octaver and adjust wet/dry mix to preference using the EFX ADJUST (12) control on the front panel (standard adjustment).
8.Select the position of SWITCH 3 (35). The DELAY/REVERB LED (34) may be illuminated or dark at the discretion of the user.
9.Adjust reverb to preference using the REVERB (13) control on the front panel.
10.Press SWITCH 3 (35) to change to the other Delay/Reverb position. The DELAY/REVERB LED (34) will illuminate or go dark depending on its status in step 10.
11.Adjust delay type, time, and volume to preference using the DELAY (14) control.
12.Set the position of SWITCH 2 (33) and SWITCH 3 (35) to the settings preferred as defaults. (Default setting is the one that is active when the preset is selected.)
13.Press the MODE SWITCH (28) to return to the Preset Mode.
14.Double-click PRESET 1, 2, or 3 (30, 33, or 35) to store the settings in that location.
9
SUGGESTED SETTINGS
These are general settings to achieve the sound of various musical styles. The exact settings will depend on such things as the type of guitar being played and effects settings. The 212 EFX is used for demonstration, but the settings, with the exception of the Presence and Resonance controls, are also applicable to the 112 EFX.
CLEAN |
METAL |
Your Preference |
Your Preference |
JAZZ |
MODERATE DISTORTION |
Your Preference |
Your Preference |
CLEAN BLUES |
DIRTY BLUES |
Your Preference
10
11
TRANSTUBE® EFX BLOCK DIAGRAM
112 EFX
LEAD
PRE
INPUT(S)
VINTAGE
CLEAN
MORE
VINTAGE
|
EFFECTS |
POWER |
|
|
|
LOOP |
|
|
|
AMP |
|
|
|
|
|
|
SEND |
RETURN |
|
EQUALIZATION |
POST |
|
|
LOW MID HIGH |
|
12” SPEAKER |
|
|
|
|
T. DYNAMICS |
|
|
|
|
HEADPHONE OUT |
SWITCH |
|
|
|
|
LOGIC |
|
DIGITAL |
|
|
|
|
|
|
|
|
|
EFFECTS |
|
|
MODERN HIGH GAIN |
|
|
|
|
|
|
FOOTSWITCH |
|
|
EQUALIZATION |
212 EFX |
|
|
|
|
|
|
||
LOW |
MID HIGH |
|
|
RESONANCE |
|
|
|
|
|
|
|
EFFECTS |
|
PRESENCE |
|
|
LOOP |
|
|
|
|
|
|
|
VOLUME |
|
SEND RETURN |
PREAMP |
POWER |
|
|
|
OUT |
AMP IN |
|
|
|
|
POWER |
SWITCH |
|
|
|
AMP |
LOGIC |
|
|
|
12” SPEAKERS |
|
|
|
|
T. DYNAMICS |
MODERN
EXT. SPEAKER
112 EFX SPECIFICATIONS
Power Amplifier Section:
Power measured with T. Dynamics® @ 100% (5% THD, 1 kHz, 120 VAC line)
Rated Power and Load:
65 W RMS into 8 Ohms
Frequency Response:
+3, -0 dB 100 Hz to 20 kHz @ 50 W RMS into 8 Ohms
Hum and Noise:
Greater than 90 dB below rated power
Power Consumption:
Domestic: 200 W @ 60 Hz, 120 VAC Export: 200 W @ 50/60 Hz, 220-230 VAC
Preamp Section:
Preamp specs measured a 1 kHz with controls preset as follows:
Channel Select - Clean
Clean Mode Switch - Modern
Low and High EQ - 10
Mid EQ - 0
Lead Pre and Post Gain - 10
Lead Mode Switch - Vintage
Effects - Off
Nominal Levels - Clean Volume @ 5
Minimum Levels - Clean Volume @ 10
Preamp High Gain Input:
Impedance: High Z, 250 k Ohms
Nominal Input Level: -12.6 dBV, 234 mV RMS Minimum Input Level: -23 dBV, 70 mV RMS Maximum Input Level: 0 dBV, 1 V RMS
Effects Send:
Load Impedance: 1 k Ohms or greater
Nominal Output Level:
Effects Level: -8.4 dBV, 380 mV RMS
Effects Return:
Impedance: High Z, 22 k Ohms Designed Input Level:
Effects Level: -8.4 dBV, 380 mV RMS (Switching jack provides Effects Send to Effects Return connection when not used.)
System Hum and Noise @ Nominal Input Level:
(20 Hz to 20 kHz unweighted) Greater than 76 dB below rated power
Equalization:
Clean Channel:
Special Low, Mid, and High passive EQ
Modern/Vintage Switch: Two distinct EQ voicings
Lead Channel:
Low, Mid, and High passive EQ Vintage/Modern/High Gain Switch: Three different EQ
and Gain voicings Presence fixed: 2 dB @ 7 kHz
Resonance fixed: 3 dB @ resonant frequency of cabinet
External Footswitch Functions:
Channel select; effects control
Dimensions:
18” H x 21.5” W x 10.75” D
(457 mm H x 546 mm W x 273 mm D)
Weight:
34.5 lbs. (16 kg)
Features and specifications subject to change without notice.
12
212 EFX SPECIFICATIONS
Power Amplifier Section:
Power measured with T. Dynamics® @ 100% (5% THD, 1 kHz, 120 VAC line)
Rated Power and Load:
80 W RMS into 8 Ohms
100 W RMS into 4 Ohms
Frequency Response:
+0, -3 dB 100 Hz to 20 kHz @ 65 W RMS into 8 Ohms
Hum and Noise:
Greater than 90 dB below rated power
Power Consumption:
Domestic: 300 W @ 60 Hz, 120 VAC
Export: 300 W @ 50/60 Hz, 220-230/240 VAC
Preamp Section:
Preamp specs measured @ 1 kHz with controls preset as follows:
Channel Select – Clean
Clean Mode Switch – Modern
Low and High EQ – 10
Mid EQ – 0
Lead Pre and Post Gain – 10
Lead Mode Switch – Vintage
Effects – Off
Nominal Levels – Clean Volume @ 5
Minimum Levels – Clean Volume @ 10
Preamp High Gain Input:
Impedance: High Z, 250 k Ohms
Nominal Input Level: -14 dBV, 200 mV RMS Minimum Input Level: -23 dBV, 68 mV RMS Maximum Input Level: 0 dBV, 1 V RMS
Preamp Low Gain Input:
Impedance: High Z, 44 k Ohms
Nominal Input Level: -8 dBV, 400 mV RMS Minimum Input Level: -17 dBV, 136 mV RMS Maximum Input Level: +6 dBV, 2 V RMS
Effects Send:
Load Impedance: 1 k Ohms or greater Nominal Output Level:
Effects Level Switch “Out”: -10 dBV, 0.32 V RMS Effects Level Switch “In”: 0 dBV, 1 V RMS
Effects Return:
Impedance: High Z, 22 k Ohms
Effects Level Switch “Out”: -10 dBV, 0.32 V RMS Effects Level Switch “In”: 0 dBV, 1 V RMS
Preamp Output:
Load Impedance: 1 k Ohms or greater
Nominal Output Level: 0 dBV, 1 V RMS
Power Amp Input:
Impedance: High Z, 22 k Ohms
System Hum and Noise @ Nominal Input Level:
(20 Hz to 20 kHz unweighted) Greater than 78 dB below rated power
Equalization:
Clean Channel:
Special Low, Mid, and High passive EQ Modern/Vintage Switch: Two distinct EQ and
Gain voicings
Lead Channel:
Low, Mid, and High passive EQ Vintage/Modern/High Gain Switch: Three different
EQ voicings
Presence:
+6 dB @ 5 kHz
Resonance:
+ 6 dB @ resonant frequency of cabinet
External Footswitch Functions:
Channel select; effects control
Dimensions:
20.75" H x 26.75" W x 11.63" D
(527 mm H x 679 mm W x 295 mm D)
Weight:
54.3 lbs. (25 kg)
Features and specifications subject to change without notice.
13

ESPAÑOL
TRANSTUBE® EFX AMPLIFICADORES
Combinando los mejores efectos con el gran tono de los circuitos patentados TransTube de Peavey, la serie EFX ofrece replicas increíbles de las características de los amplificadores de bulbos. Nueve efectos controlados por pedalera permiten que estos amplificadores de dos canales creen un amplio rango de sonidos espectaculares, sin usar procesadores de efectos externos. Si se desea usar efectos externos, los amplificadores EFX permiten que sean parchados por medio de su circuito de efectos ultra silencioso. Tanto el modelo 112 como el 212 son unidades de construcción sólida que representan años de diseño y fabricación de amplificadores. Desde sus fáciles controles para bocinas específicas, estos amplificadores demuestran el compromiso de Peavey a la alta calidad y durabilidad inigualable. Conectarse a un amplificador EFX pone el sonido que quieres a tu alcance, permitiéndote concentrarte en la razón por la que tocas... la música.
CARACTERÍSTICAS
112 EFX
•65 W a 8 ohmios
•Parlante de 12" Blue Marvel®
•Entrada de alta ganancia
•Canal limpio con controles separados de volumen, EQ, y color
•Canal líder con controles separados de ganancia pre y post, EQ y ganancia/color
•9 efectos digitales
- Tremolo |
- Octavador |
- Bocina Rotativa |
- wah Funk |
- Delay |
- Reverberación |
- Flanger |
- Chorus |
- Faser |
•Control T. Dynamics®
•Conectador de auriculares
•Circuito de efectos
212 EFX
•100 W a 8 ohmios (80 W a 8 Ohmios internos)
•Dos parlantes de 12" Blue Marvel®
•Entrada de alta y baja ganancia
•Canal limpio con controles separados de volumen, EQ, y color
•Canal líder con controles separados de ganancia pre y post, EQ y ganancia/color
•9 efectos digitales
- Tremolo |
- Octavado |
- Bocina rotativa |
- wah Funk |
- Delay |
- Reverberación |
- Flanger |
- Chorus |
- Faser |
•Control T. Dynamics®
•Circuito de efectos con control de nivel
•Salida de preamplificador y entrada de amplificador
•Conectador para bocina externa
•Control de presencia
•Interruptor de resonancia
14

CONTROLES Y CARACTERÍSITICAS
PANEL FRONTAL
6
1 |
2 |
3 |
4 |
5 |
7 |
8 |
9 |
10 |
11 |
12 |
13 |
14 |
15 |
16 |
17 |
18 |
(1)ENTRADA (GANANCIA ALTA)
Este conectador de 1/4" ha sido diseñado para aceptar casi todas las señales de guitarra. La ganancia de la señal de entrada puede ser ajustada por el control de PRE GANACIA (7) (sólo canal líder).
(2)ENTRADA (GANANCIA BAJA) *Sólo 212
Este conectador de 1/4" ha sido diseñado para aceptar señales altas de instrumentos que pueden saturar la entrada de alta ganancia. Esta entrada está a – 6 dB de la entrada de alta ganancia. Si se usan las dos entradas de manera simultanea, las dos serán de baja entrada.
(3)VOLUMEN
Este control ajusta el nivel general del canal limpio.
(4)INTERRUPTOR MODERNO/VINTAGE
Este interruptor selecciona el color del canal limpio. La posición MODERN refleja los tonos de amplificadores actuales. La posición VINTAGE cambia el ecualizador y añade brillo para simular el diseño de amplificadores clásicos.
(5)EQ DEL CANAL LIMPIO
Estos controles pasivos permiten el ajuste de frecuencias GRAVES, MEDIAS y AGUDAS. Los cambios de tono producidos por estos controles varían dependiendo de la posición del interruptor MODERN/VINTAGE (4). La posición “0” es máximo corte, la posición “10” representa máximo incremento.
(6)LEDs DEL CANAL ACTIVO
Estos indicadores representan el canal activo. Verde indica la activación del canal Limpio; rojo indica la activación del canal Líder.
(7)PRE GANACIA
Este control ajusta la ganancia de entrada del canal Líder. El incrementar la ganancia de entrada incrementará la distorsión del preamplificador y su duración (sustain).
(8)INTERRUPTOR MODERNO/VINTAGE/GANACIA ALTA
Este interruptor selecciona tanto la ganancia como el sonido del canal Líder. La posición MODERN incrementa la ganancia y corta las frecuencias medias para establecer un tono de “rock pesado o metal”. La posición VINTAGE imita la saturación de los amplificadores
15
 Loading...