


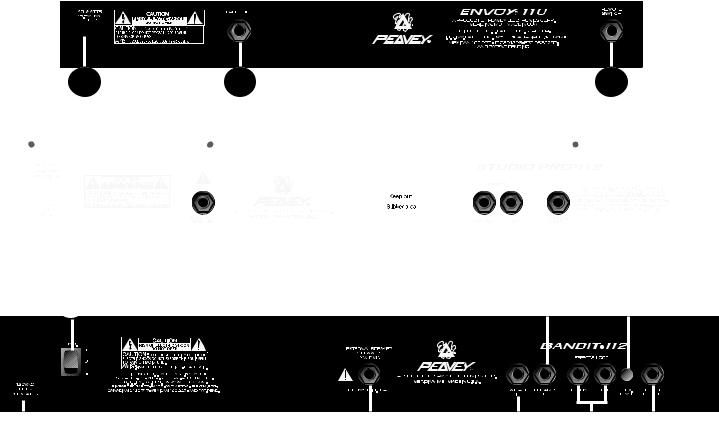
O p e r a t i n g G u i d e
Bandit ®112
Studio Pro® 112
Envoy®110
Intended to alert the user to the presence of uninsulated “dangerous voltage” within the product’s enclosure that may be of sufficient magnitude to constitute a risk of electric shock to persons.
Intended to alert the user of the presence of important operating and maintenance (servicing) instructions in the literature accompanying the product.
CAUTION: Risk of electrical shock — DO NOT OPEN!
CAUTION: To reduce the risk of electric shock, do not remove cover. No user serviceable parts inside. Refer servicing to qualified service personnel.
WARNING: To prevent electrical shock or fire hazard, do not expose this appliance to rain or moisture. Before using this appliance, read the operating guide for further warnings.
Este símbolo tiene el propósito, de alertar al usuario de la presencia de “(voltaje) peligroso” sin aislamiento dentro de la caja del producto y que puede tener una magnitud suficiente como para constituir riesgo de descarga eléctrica.
Este símbolo tiene el propósito de alertar al usario de la presencia de instruccones importantes sobre la operación y mantenimiento en la información que viene con el producto.
PRECAUCION: Riesgo de descarga eléctrica ¡NO ABRIR!
PRECAUCION: Para disminuír el riesgo de descarga eléctrica, no abra la cubierta. No hay piezas útiles dentro. Deje todo mantenimiento en manos del personal técnico cualificado.
ADVERTENCIA: Para evitar descargas eléctricas o peligro de incendio, no deje expuesto a la lluvia o humedad este aparato Antes de usar este aparato, Iea más advertencias en la guía de operación.
Ce symbole est utilisé dans ce manuel pour indiquer à l’utilisateur la présence d’une tension dangereuse pouvant être d’amplitude suffisante pour constituer un risque de choc électrique.
Ce symbole est utilisé dans ce manuel pour indiquer à l’utilisateur qu’il ou qu’elle trouvera d’importantes instructions concernant l’utilisation et l’entretien de l’appareil dans le paragraphe signalé.
ATTENTION: Risques de choc électrique — NE PAS OUVRIR!
ATTENTION: Afin de réduire le risque de choc électrique, ne pas enlever le couvercle. Il ne se trouve à l’intérieur aucune pièce pouvant être reparée par l’utilisateur. Confiez I’entretien et la réparation de l’appareil à un réparateur Peavey agréé.
AVERTISSEMENT : Afin de prévenir les risques de décharge électrique ou de feu, n’exposez pas cet appareil à la pluie ou à l’humidité. Avant d’utiliser cet appareil, lisez attentivement les avertissements supplémentaires de ce
manuel.
Dieses Symbol soll den Anwender vor unisolierten gefährlichen Spannungen innerhalb des Gehäuses warnen, die von Ausreichender Stärke sind, um einen elektrischen Schlag verursachen zu können.
Dieses Symbol soll den Benutzer auf wichtige Instruktionen in der Bedienungsanleitung aufmerksam machen, die Handhabung und Wartung des Produkts betreffen.
VORSICHT: Risiko — Elektrischer Schlag! Nicht öffnen!
VORSICHT: Um das Risiko eines elektrischen Schlages zu vermeiden, nicht die Abdeckung enfernen. Es befinden sich keine Teile darin, die vom Anwender repariert werden könnten. Reparaturen nur von qualifiziertem
Fachpersonal durchführen lassen.
ACHTUNG: Um einen elektrischen Schlag oder Feuergefahr zu vermeiden, sollte dieses Gerät nicht dem Regen oder Feuchtigkeit ausgesetzt werden. Vor Inbetriebnahme unbedingt die Bedienungsanleitung lesen.
2

ENGLISH
Envoy® 110, Studio® Pro 112 and Bandit® 112
TransTube® Series Instrument Amplifiers
Congratulations on your purchase of a Peavey TransTube® Series instrument amplifier. Whether you are a beginner or seasoned pro, you could not have found a more practical, feature-packed amplifier. Peavey’s patented TransTube circuitry has moved forward into the second generation of products, leading the industry in tube emulation. There is no other solid-state amp that more closely replicates the characteristics of a tube amp.
Three TransTube Series models are described in this book due to their similarities. These models are the Envoy® 110, Studio Pro® 112 and Bandit® 112. Where applicable, the differences in the units are noted. The lists below describe the main features and differences between the amps. Please read this manual in its entirety to ensure optimum and safe operation of your new TransTube amp.
COMMON FEATURES
•High and Low Gain Inputs to accommodate a variety of instruments
•Two distinct TransTube channels each featuring:
•Separate Volume/Gain controls
•Low, Mid and High EQ
•EQ/Gain voicing switches
•Channel select switch on front panel
•Spring reverb with reverb level control
•Remote footswitch capability
ENVOY 110 FEATURES
•10" Blue Marvel® speaker
•40 watt power amplifier
•Preamp output
•Headphone jack
•Footswitchable reverb and channel selection
STUDIO PRO 112 FEATURES
•12" Blue Marvel speaker
•65 watt power amplifier
•Effects send and return
•T. Dynamics® control
•External speaker jack
•Footswitchable reverb and channel selection
BANDIT 112 FEATURES
•12" Sheffield® 1230 speaker
•100 watt power amplifier (80 watts into internal speaker)
•Footswitchable effects loop and channel selection
•Effects level switch
•Preamp output
•Power amp input
•External speaker jack
•T-Dynamics® control
•Presence control
•Resonance switch
3

AC POWER
In order to apply power to your TransTube Series amp you must first identify its required AC supply voltage. The proper voltage for your unit is labeled on the upper left corner of the rear panel.
1.AC Power Cord (Under Chassis)
Locate the power cord tucked into the rear speaker compartment. This line cord provides the
AC power to the unit. Connect the line cord to a properly grounded AC supply. Damage to the equipment may occur if improper line voltage is used. (See voltage marking on unit.) Never remove or cut the ground pin of the line cord plug.
NOTE: FOR UK ONLY
As the colors of the wires in the mains lead of this apparatus may not correspond with the colored markings identifying the terminals in your plug, proceed as follows: (1) The wire which is colored green and yellow must be connected to the terminal which is marked by the letter E, or by the earth symbol, or colored green or green and yellow. (2) The wire which is colored blue must be connected to the terminal which is marked with the letter N, or the color black. (3) The wire which is colored brown must be connected to the terminal which is marked with the letter L or color red.
2.Power Switch (See Master Section Diagram page 7.)
Press this switch to the “ON” position to apply power. The Power LED (3) will illuminate to indicate the unit is on. Pressing the bottom portion of the switch will turn the amp off.
3.Power LED (See Master Section Diagram page 7.) This LED will illuminate to indicate the amp is on.
TRANSTUBE PREAMP
The TransTube preamp on your amplifier consists of three clearly labeled sections: Inputs, Clean (channel) and Lead (channel). Let’s look at each of these areas individually.
4
Inputs
The inputs of your TransTube Series on popular tube amplifiers. Always use instrument to the input.
4.High Gain Input
This is the standard input used work ideally when plugged into the Low Gain Input (5).
5.Low Gain Input
This 1/4" mono input is provided in overdriving (distorting) the are used simultaneously, their
respond exactly like the inputs found cables when connecting your
. Most electric guitars will High Gain Input is 6 dB louder than
extremely high outputs, which can result the Low Gain and High Gain inputs
CHANNELS
Your TransTube Series amp offers two-channel operation. Both the Clean and Lead channels provide a flexible platform for you to establish your favorite tone. The footswitch (optional on Envoy 110 and Studio Pro 112) allows remote switching between the two channels and is explained in detail on page 8 of this guide.
6
6. |
Channel Select |
|
|
|
|
|
|
|||
|
The Channel Select |
|
|
|
|
Preamp, LEAD or |
||||
|
CLEAN, is active. |
|
|
|
|
the footswitch |
||||
|
function of your amp |
|
|
|
|
|
|
|||
|
|
|
|
|
|
|
|
|
|
|
|
|
|
|
|
|
|
|
|
|
|
|
|
|
|
|
|
|
|
|
|
|
|
|
|
|
|
|
|
|
|
|
|
|
|
|
|
|
|
|
|
|
|
|
|
|
|
|
|
|
|
|
|
|
|
|
|
|
|
|
|
|
|
|
|
|
|
|
|
|
|
|
|
|
|
|
|
|
|
|
|
|
|
|
|
|
|
|
|
|
|
|
|
|
|
|
|
|
|
|
|
|
|
|
|
|
|
|
|
|
|
|
|
|
|
|
|
|
|
|
|
|
|
|
|
|
|
|
|
|
|
|
|
|
|
|
|
|
|
|
|
|
|
9
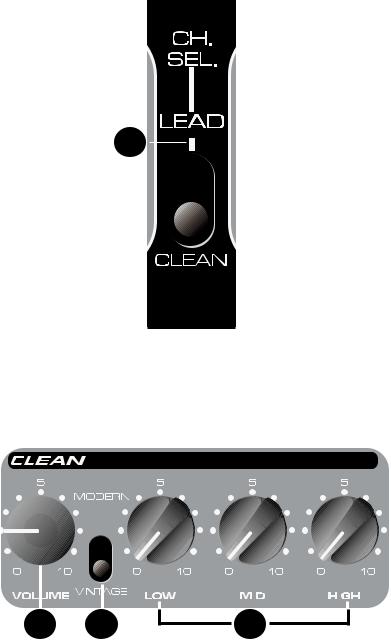
CLEAN CHANNEL
7.Volume
This control sets the volume level for the Clean channel. It is best to start with the control fully counterclockwise (minimum gain) and adjust clockwise until the desired level is achieved. After all EQ and voicing adjustments have been made to the channel, you may wish to reset this control.
8.Modern/Vintage Switch
This switch allows you to instantly change the voicing to reflect the tones of modern and vintage amplifiers. The MODERN position maintains a warm, standard voicing. The VINTAGE
5
position changes the overall function of the EQ and adds a hint of brightness to emulate some classic amp designs. Experiment with this switch, along with Clean EQ (9) adjustments, to capture your desired tone. You may refer to the Recommended Settings on page 11 for some creative starting points.
9.Clean EQ
The TransTube EQ featured on the Clean channel of your amp offers 3-band tone adjustment. Each EQ control is passive (does not add gain) and has a frequency range dependent on the position of the Modern/Vintage Switch. Reducing the control to the “0” position (fully counterclockwise) introduces maximum cut in level for the particular band. Low, Mid and High bands are available for adjustment.
|
|
|
|
|
|
|
|
|
|
|
|
|
|
|
|
|
|
|
|
|
|
|
|
|
|
|
|
|
|
|
|
|
|
|
|
|
|
|
|
|
|
|
|
|
|
|
|
|
|
|
|
|
|
|
|
|
|
|
|
|
|
|
|
|
|
|
|
|
|
|
|
|
|
|
|
|
|
|
|
|
|
|
|
|
|
|
|
|
|
|
|
|
|
|
|
|
|
|
|
|
|
|
|
|
|
|
|
|
|
|
|
|
|
|
|
|
|
|
|
|
|
|
|
|
|
|
|
|
|
|
|
|
|
|
|
|
|
|
|
|
|
|
|
|
|
|
|
|
|
|
|
|
|
|
|
|
|
|
|
|
|
|
|
|
|
|
|
|
|
|
|
|
|
|
|
|
|
|
|
|
|
|
|
|
|
|
|
|
|
|
|
|
|
|
|
|
|
|
|
|
|
|
|
|
|
|
|
|
|
|
|
|
|
|
|
|
|
|
|
|
|
|
|
|
|
|
|
|
|
|
|
|
|
|
|
|
|
|
|
|
|
|
|
|
|
|
|
|
|
|
|
|
|
|
|
|
|
|
|
|
|
|
|
|
|
|
|
|
|
|
|
|
|
|
|
|
|
|
|
|
|
|
|
|
|
|
10 |
|
|
|
11 |
|
|
12 |
|
|
|
|
|
|
|||
|
|
|
|
|
|
|
|
|
|
|
|
|||||||
|
|
|
|
|
|
|
|
|
|
|
|
|
||||||
|
|
|
|
|
|
|
|
|
|
|
|
|
|
|
|
|
|
|
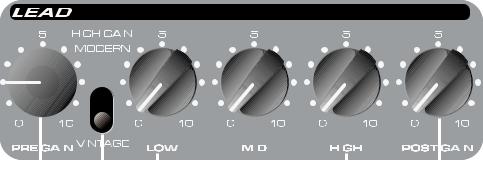
LEAD CHANNEL
10. |
Pre Gain |
|
|
The Pre |
control fully |
|
clockwise |
amount of |
|
distortion |
|
11. |
|
|
|
This switch |
the |
|
MODERN |
to |
|
establish |
VINTAGE |
|
position |
past. The |
|
HIGH GAIN |
a tighter |
|
response |
Gain settings. |
|
Experiment |
you obtain your |
|
desired |
creative |
|
starting |
|
12. |
Lead EQ |
|
|
The |
tone adjustment. |
|
Each EQ |
dependent on the |
|
position of |
“0” position |
|
(fully |
. Low, Mid and |
|
High bands |
|
13.Post Gain
Use this control to set the overall level of the Lead channel once your tone has been achieved. It is best to start with the control fully counterclockwise (minimum gain) and adjust clockwise until the desired level is achieved. After all EQ and voicing adjustments have been made to the channel, you may wish to reset this control.
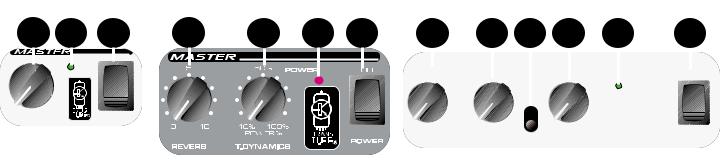
MASTER SECTION
The Master sections of the TransTube Series amps vary from unit to unit. Please read carefully. Each feature’s description identifies its applicable model(s).
Envoy® 110 |
Studio Pro® 112 |
Bandit® 112 |
14 |
2 |
14 |
15 |
2 |
14 |
16 |
17 |
15 |
2 |
adjusts the overall reverb level. This control is found on all three models. can be defeated by the Remote Switch (18) on the Envoy 110 and Studio
.
the power level of the amplifier from 10 percent to 100 percent power. settings, the power compression simulation will be much more
This control is found on the Studio Pro 112 and Bandit 112.
control boosts the extreme high frequencies by as much as 6 dB. This on Bandit 112 only.
to set the low frequency resonance of the speaker enclosure by varying the of the amplifier between two settings, TIGHT and LOOSE. In the TIGHT
has a higher damping factor causing the speaker/cabinet combination to
.The LOOSE position allows the characteristics of the power
ker combination to resonate more at low frequencies. Thus, the resonant the cabinet is used to produce more low end, simulating a larger cabinet. This
on the Bandit 112 only.
7
REAR PANEL
The rear panel features of the TransTube Series amps vary from unit to unit. Please read each carefully. Each feature’s description identifies its applicable model(s).
18
|
|
|
|
|
|
|
|
|
|
|
|
|
|
|
|
|
|
|
|
|
|
|
|
|
|
|
|
|
|
|
|
|
|
|
|
|
|
|
|
|
|
|
|
|
|
|
|
|
|
|
|
|
|
|
|
|
|
|
|
|
|
|
|
|
|
|
|
|
|
|
|
|
|
|
|
|
|
|
|
|
1 |
|
|
|
|
|
21 |
|
20 |
|
|
|
|
|
|
|
|
|
|
|
|
|
|
|
|
|
|
|
|
|
|
|
|
|
|
||||
|
|
|
|
|
|
|
|
|
|
|
|
|
|
|
|
|
|
|
|
|
|
|
|
|
|
|
|
|
|
|
|
|
|
|
|
||||
|
|
|
25 |
|
|
|
|
|
|
|
22 |
|
|
|
|
|
|
||
|
|
|
|
|
|
|
|
|
|
|
|
|
|
|
|
|
|
|
|
|
|
|
|
|
|
|
|
|
|
|
|
|
|
|
|
|
|
|
|
|
|
|
|
|
|
|
|
|
|
|
|
|
|
|
|
|
|
|
|
|
|
|
|
|
|
|
|
|
|
|
|
|
|
|
|
|
|
|
|
|
|
|
|
|
|
|
|
|
|
|
|
|
|
|
|
|
|
|
|
1 |
|
|
|
|
|
|
|
18 |
|
|
|
|
|
|
|
|
|
18.Remote Switch
This jack accepts the appropriate remote footswitch for your amp. The footswitch (optional on Envoy 110 and Studio Pro 112) is a multi-function type. It is used to select between the Clean and Lead channels. Additionally, the footswitch is used to activate/deactivate the Reverb on the Envoy 110 and Studio Pro 112 models. On the Bandit, the footswitch (included) provides channel selection and Effects Loop (20) defeat. The Channel Select Switch (6) must be in the LEAD position for the Remote Switch to work.
19.Headphones Jack
This stereo 1/4" jack accepts a standard pair of headphones. Using this jack defeats the output to the speaker making it ideal for quiet practice applications. This jack is featured on the Envoy 110 only.
NOTE: The remaining features apply to the Studio Pro 112 and/or the Bandit 112 models only.
20.Effects Loop
This pair of mono 1/4" jacks supply an effects SEND and RETURN path for the preamp signal. Connect the SEND jack to the input of external, low-level, signal processing equipment (effects). Return the signal from your external equipment to the RETURN jack. This is known as an Effects Loop since the signal exits your amp (send) and loops (return) back to it. On the Bandit 112, the effects loop can be swapped in and out of the signal path using the supplied Remote Switch (18).
8
21.External Speaker Jack
This 1/4" jack is provided for the connection of an external speaker cabinet such as the Peavey 412M. The minimum external speaker impedance is 8 ohms. This jack disconnects internal speaker when used on Studio Pro 112
NOTE: The remaining features apply to the Bandit 112 model only.
22.Preamp Out
The Preamp Output can be used to route the preamp signal to a mixing console, tape recorder, etc. Using a shielded instrument cable with mono 1/4" plugs, connect the Preamp Output to the input of your outboard equipment. This patch will not affect the normal operation of your amplifier.
23.Power Amp In
Connect line level signals from external equipment to this input. Inserting a plug into this mono 1/4" jack will prevent the TransTube preamp signal from being sent to the amplifier. In this configuration, the power amp only amplifies the signal introduced at the Power Amp In jack.
24.Effects Level
This switch selects the Effects Loop (20) operating level. When the switch is pressed to the “in” position the level is set for 0 dBV (1 V RMS). Placing the switch to the “out” position changes the level to -10 dBV (0.3 V RMS). Refer to the owner’s manual for your external effects to determine the correct position for this switch.
25
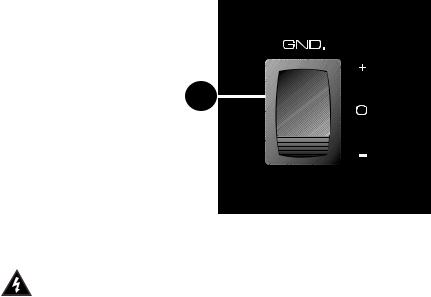
25.Ground Switch
Place this switch in the center position (0) during normal operation. If audible hum occurs,
position the ground switch in either the positive (+) or negative (-) position to minimize the noise. You may have to try both positions to see which is more quiet.
NOTE: Should the noise problem continue, consult an Authorized Peavey Dealer or Peavey Repair Center. THE GROUND SWITCH IS NOT FUNCTIONAL ON 220/240 VOLT MODELS.
9
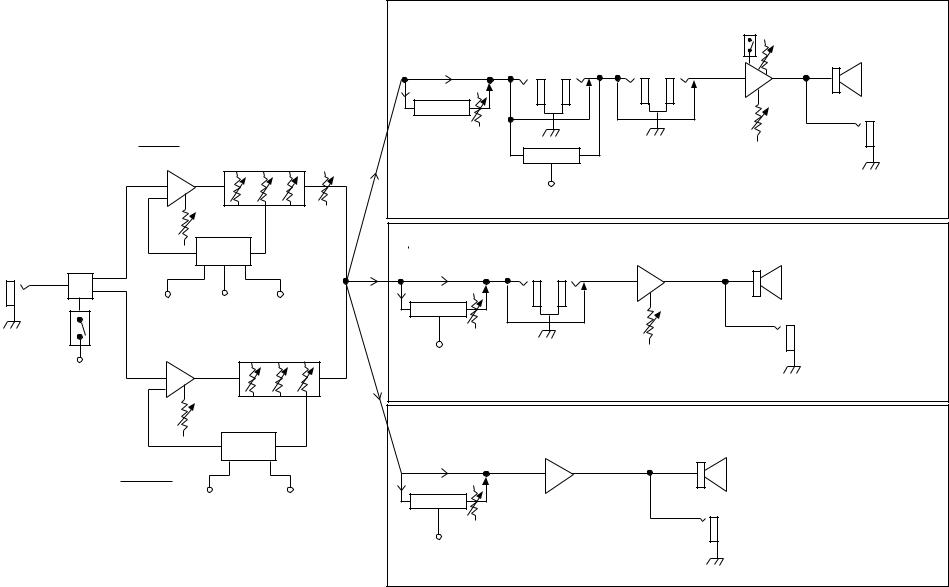
Envoy® 110, Studio® Pro 112 and Bandit® 112,
Level Diagram
10
|
|
BANDIT® 112® |
|
|
RESONANCE |
|
||
|
|
B |
ANDIT |
|
|
|
||
|
|
|
EFFECTS |
|
|
PRESENCE |
|
|
|
|
|
PRE |
PWR |
POWER |
|
||
|
|
|
SEND |
RETURN |
|
|||
|
|
|
|
|
OUT |
IN |
AMP |
12" |
|
|
|
|
|
|
|
|
SPEAKER |
|
|
REVERB |
|
|
|
|
|
|
LEAD |
|
|
LEVEL |
|
|
|
|
EXT. |
|
|
|
|
|
|
SPEAKER |
||
EQUALIZATION |
|
BYPASS |
|
|
T. DYNAMICS |
|
||
LO |
MID HI |
POST |
|
|
|
|
|
|
|
|
|
|
FOOT |
|
|
|
|
|
|
|
SWITCH |
|
|
|
|
|
|
PRE |
SWITCH |
|
|
SWITCH |
LOGIC |
|
INPUTS |
LOGIC |
|
|
|
|
||
|
VINTAGE |
MODERN |
HI |
|
|
|
GAIN |
|
|
|
LO MID HI |
|
FOOT |
|
|
|
SWITCH |
|
|
|
|
VOLUME |
|
|
|
SWITCH |
|
|
|
LOGIC |
|
|
CLEAN |
|
|
|
|
VINTAGE |
MODERN |
|
|
|
® |
® |
|
STUDIDIO PRO PROO |
112 |
POWER |
|||
|
|
|
|
EFFECTS |
AMP |
|
|
|
|
SEND RETURN |
12" |
|
|
|
|
|
|
|
|
|
|
|
SPEAKER |
REVERB |
|
|
|
|
|
|
LEVEL |
|
EXT. |
||
|
|
SPEAKER |
|||
|
|
|
|
|
|
FOOT |
|
|
|
|
T. DYNAMICS |
SWITCH |
|
|
|
|
|
ENVOY |
® |
|
® |
|
|
|
110 |
|
|
||
ENV O Y |
|
|
|
||
|
|
|
|
POWER |
|
|
|
|
|
AMP |
10" |
|
|
|
|
|
|
|
|
|
|
|
SPEAKER |
REVERB |
|
|
|
|
|
|
LEVEL |
|
HEADPHONES |
||
FOOT |
|
|
|
|
|
SWITCH |
|
|
|
|
|
RECOMMENDED SETTINGS
Clean |
|
|
|
|
|
|
|
|
|
Metal |
|
|
|||||||||||
|
|
|
|
|
|
|
|
|
|
|
|
|
|
|
|
|
|
|
|
|
|
|
|
|
|
|
|
|
|
|
|
|
|
|
|
|
|
|
|
|
|
|
|
|
|
|
|
|
|
|
|
|
|
|
|
|
|
|
|
|
|
|
|
|
|
|
|
|
|
|
|
|
|
|
|
|
|
|
|
|
|
|
|
|
|
|
|
|
|
|
|
|
|
|
|
|
|
|
|
|
|
|
|
|
|
|
|
|
|
|
|
|
|
|
|
|
|
|
|
|
|
|
|
|
|
|
|
|
|
|
|
|
|
|
|
|
|
|
|
|
|
|
|
Your |
Your Preference |
Preference |
|
|
|
Jazz |
|
|
|
|
|
Moderate Distortion |
|
|
||||||||||||
|
|
|
|
|
|
|
|
|
|
|
|
|
|
|
|
|
|
|
|
|
|
|
|
|
|
|
|
|
|
|
|
|
|
|
|
|
|
|
|
|
|
|
|
|
|
|
|
|
|
|
|
|
|
|
|
|
|
|
|
|
|
|
|
|
|
|
|
|
|
|
|
|
|
|
|
|
|
|
|
|
|
|
|
|
|
|
|
|
|
|
|
|
|
|
|
|
|
|
|
|
|
|
|
|
|
|
|
|
|
|
|
|
|
|
|
|
|
|
|
|
|
|
|
|
|
|
|
|
|
|
|
|
|
|
|
|
|
|
|
|
|
|
|
|
|
|
Your |
Your Preference |
Preference |
|
|
|
Clean Blues |
|
|
|
|
|
|
Dirty Blues |
|
|
|||||||||||||||||||
|
|
|
|
|
|
|
|
|
|
|
|
|
|
|
|
|
|
|
|
|
|
|
|
|
|
|
|
|
|
|
|
|
|
|
|
|
|
|
|
|
|
|
|
|
|
|
|
|
|
|
|
|
|
|
|
|
|
|
|
|
|
|
|
|
|
|
|
|
|
|
|
|
|
|
|
|
|
|
|
|
|
|
|
|
|
|
|
|
|
|
|
|
|
|
|
|
|
|
|
|
|
|
|
|
|
|
|
|
|
|
|
|
|
|
|


 **
**
Your Preference
NOTE: The Bandit 112 is used for demonstration purposes. The settings illustrated above are also applicable to the Envoy 110 and Studio Pro 112, with the exception of the resonance and presence controls.
11
ENVOY® 110
SPECIFICATIONS
POWER AMPLIFIER SECTION: Power @ Clipping: (Typically)
(5% THD, 1 kHz, 120V AC line)
40W RMS into 6 Ohms
Frequency Response:
+0, -2 dB 100 Hz to 20 kHz @ 35W RMS into 6 Ohms
Hum and Noise:
Greater than -86 dB below rated power
Power Consumption:
75W @ 60 Hz, 120V AC, Domestic
75W @ 50/60 Hz, 220-230/240V AC, Export
PREAMP SECTION:
The following specs are measured @ 1 kHz with the controls preset as follows:
Channel Select, Clean Clean Mode Switch, Modern Low and High @ 10
Mid @ 0
Lead Pre and Post Gain @ 10 Lead Mode Switch, Vintage Reverb @ 0
Nominal Levels are with Clean Volume @ 5 Minimum Levels are with Clean Volume @ 10
Preamp High Gain Input:
Impedance: High Z, 250 K Ohms
Nominal Input Level: -13 dBV, 225mV RMS Minimum Input Level: -22 dBV, 82mV RMS Maximum Input Level: +0 dBV, 1V RMS
Preamp Low Gain Input:
Impedance: High Z, 44k Ohms
Nominal Input Level: -7dBV, 450mV RMS Minimum Input Level: -16dBV, 164mV RMS Maximum Input Level: +6dBV, 2V RMS
Headphone Output:
Load Impedance: 16 Ohms or greater
Nominal Output Level: -3 dBV, 0.7V RMS
System Hum and Noise @ Nominal Input Level:
(20 Hz to 20 kHz unweighted)
Greater than 78 dB below rated power
Equalization:
Special Low, Mid, and High passive type EQ. Modern/Vintage switch (Clean):
Two distinct EQ voicings. Vintage/Modern/High Gain switch (Lead): Three different EQ and Gain voicings
External Footswitch Functions:
Select: Clean or Lead channel selection. Reverb: Reverb bypass
Dimensions (H x W x D):
16” H x 18.13” W x 9.5” D 40.1cm x 46.1cm x 24.1cm
Weight:
21.7 lbs. (9.84 kg)
Specifications subject to change without notice.
12
STUDIO® PRO 112 SPECIFICATIONS
POWER AMPLIFIER SECTION:
Rated Power and Load:
Power specs measured with T-Dynamics @ 100% 65W RMS into 8 Ohms
Power @ Clipping: (Typically)
(5% THD, 1 kHz, 120V AC line)
65W RMS into 8 Ohms
Frequency Response:
+3, -0 dB 100 Hz to 20 kHz @ 45W RMS into
8 Ohms
Hum and Noise:
Greater than 88 dB below rated power
Power Consumption:
200W @ 60 Hz, 120V AC, Domestic
200W @ 50/60 Hz, 220-230/240V AC, Export
PREAMP SECTION:
The following specs are measured @ 1 kHz with the controls preset as follows:
Channel Select, Clean Clean Mode Switch, Modern Low and High @ 10
Mid @ 0
Lead Pre and Post Gain @ 10 Lead Mode Switch, Vintage Reverb @ 0
Nominal Levels are with Clean Volume @ 5 Minimum Levels are with Clean Volume @ 10
Preamp High Gain Input:
Impedance: High Z, 250 K Ohms
Nominal Input Level: -12 dBV, 250mV RMS Minimum Input Level: -23 dBV, 71mV RMS Maximum Input Level: +0 dBV, 1V RMS
Preamp Low Gain Input:
Impedance: High Z, 44 k Ohms
Nominal Input Level: -6 dBV, 500mV RMS Minimum Input Level: -17dBV, 142mV RMS Maximum Input Level: +6 dBV, 2V RMS
Effects Send:
Load Impedance: 1k Ohms or greater
Nominal Output Level:
Effects Level -9dBV, 355 mV RMS
Effects Return:
Impedance: High Z, 22k Ohms Designed Input Level:
Effects Level -9dBV, 355 mV RMS (Switching jack provides Effects Send to Effects Return connection when not used.)
System Hum and Noise @ Nominal Input Level:
(20Hz to 20kHz unweighted)
Greater than 74dB below rated power
Equalization:
Special Low, Mid, and High passive type EQ Modern/Vintage switch (Clean): Two distinct
EQ voicings Vintage/Modern/High Gain switch (Lead):
Three different EQ and Gain voicings
External Footswitch Functions:
Select: Clean or Lead channel selection Reverb: Reverb bypass
Dimensions (H x W x D):
18” x 21.5” x 10.5”
45.7cm x 54.6cm x 26.7cm
Weight:
34.1 lbs. (15.47kg)
Specifications subject to change without notice.
13
BANDIT® 112
SPECIFICATIONS
POWER AMPLIFIER SECTION: Rated Power and Load:
Power specs measured with T-Dynamics @ 100% 80W RMS into 8 Ohms
100W RMS into 4 Ohms
Power @ Clipping: (Typically)
Effects Send:
Load Impedance: 1 k Ohms or greater Nominal Output Level:
Effects Level switch “out”: -10 dBV, 0.32V RMS
Effects Level switch “in”: 0 dBV, 1V RMS
(5% THD, 1 kHz, 120V AC line)
80W RMS into 8 Ohms
100W RMS into 4 Ohms
Frequency Response:
+0, -3 dB 100 Hz to 20 kHz @ 65W RMS into 8 Ohms
Hum and Noise:
Effects Return:
Impedance: High Z, 22k Ohms Designed Input Level:
Effects Level switch “out”: -10 dBV, 0.32V RMS
Effects Level switch “in”: 0dBV, 1V RMS (Switching jack provides Effects Send to Effects Return connection when not used.)
Greater than 88 dB below rated power
Power Consumption:
300W @ 60 Hz, 120V AC, Domestic
300W @ 50/60 Hz, 220-230/240V AC, Export
PREAMP SECTION:
The following specs are measured @ 1 kHz with the controls preset as follows:
Channel Select, Clean Clean Mode Switch, Modern Low and High @ 10
Mid @ 0
Lead Pre and Post Gain @ 10 Lead Mode Switch, Vintage Reverb @ 0
Nominal Levels are with Clean Volume @ 5 Minimum Levels are with Clean Volume @ 10
Preamp High Gain Input:
Impedance: High Z, 250 K Ohms
Nominal Input Level: -14 dBV, 185mV RMS Minimum Input Level: -23 dBV, 66mV RMS Maximum Input Level: +0 dBV, 1V RMS
Preamp Low Gain Input:
Impedance: High Z, 44 k Ohms
Nominal Input Level: -8 dBV, 380 mV RMS Minimum Input Level: -17 dBV, 136 mV RMS Maximum Input Level: +6 dBV, 2 V RMS
Preamp Output:
Load Impedance: 1 k Ohms or greater Nominal Output Level: 0 dBV, 1V RMS
Power Amp Input:
Impedance: High Z, 22k Ohms Designed Input Level: 0 dBV, 1V RMS
(Switching jack provides preamp output to power amp input connection when not used.)
System Hum and Noise @ Nominal Input Level:
(20 Hz to 20 kHz unweighted) Greater than 78 dB below rated power
Equalization:
Special Low, Mid, and High passive type EQ Modern/Vintage switch (Clean): Two distinct
EQ voicings Vintage/Modern/High Gain switch (Lead): Three different EQ and Gain voicings Presence: +6 dB @ 5 kHz
Push Resonance: +6 dB @ resonant frequency of cabinet
External Footswitch Functions:
Select: Clean or Lead channel selection Effects: Effects loop bypass
Dimensions (H x W x D):
19.75" x 23.63" x 11.5" 50.16cm x 60.02cm x 29.2cm
Weight:
43.9lbs. (19.91kg)
Specifications subject to change without notice.
14

ESPAÑOL
Envoy® 110, Studio Pro® 112 y Bandit® 112
de la Serie Transtube® de Amplificadores para Instrumentos
Felicitaciones por la compra de un amplificador para instrumento de la serie Transtube de Peavey. Seas un principiante o un profesional consagrado, no podrías haber encontrado un amplificador más práctico y con mejores características. Los circuitos patentados Transtube de Peavey han avanzado a la segunda generación de productos, siendo los primeros en la industria en emulación de bulbos. No hay otro amplificador de estado sólido que replique de manera más precisa las características de un amplificador de bulbos.
Tres modelos de la Serie Transtube son descritos en este libro debido a sus similitudes. Estos modelos son el Envoy® 110, StudioPro® 112 y Bandit® 112. En los lugares apropiados, las diferencias entre las unidades son marcadas. Las listas que siguen describen las características principales y las diferencias entre los amplis. Por favor lee este manual completamente para asegurar una óptima y segura operación de tu nuevo ampli Transtube.
CARACTERÍSTICAS COMUNES
•Entradas de ganancia alta y baja para acomodar una variedad de instrumentos
•Dos canales Transtube distintivos que presentan:
•Controles separados de volumen/ganancia
•Ecualizador de graves, medios y agudos
•Switches de ecualización/voces de ganancia
•Switch de selección de canal en el panel frontal
•Reverb de resorte con control de nivel de reverb
•Capacidad de uso de pedal remoto
CARACTERÍSTICAS DEL ENVOY 110
•Bocina Blue Marvel® de 10"
•Amplificador de poder de 40 Wats
•Salida de preamplificador
•Entrada para audífonos
•Selección de reverb y canal por medio de pedal
CARACTERÍSTICS DEL STUDIO PRO 112
•Bocina Blue Marvel de 12"
•Amplificador de poder de 65 Wats
•Envío y retorno para efectos
•Control de T-Dynamics®
•Conexión para bocinas externas
•Selección de reverb y canal por medio de pedal
CARACTERÍSTICAS DEL BANDIT 112
•Bocina Sheffield® 1230 de 12"
•Amplificador de poder de 100 Wats (80 Wats hacia la bocina interna)
•Selección de Circuito de efectos y canal por medio de pedal
•Switch de nivel de efectos
15
 Loading...