


Monarch®
Sierra Sport™ 2
9460™ Printer
TC9460OH Rev. AG 12/07 ©2004 Paxar Americas, Inc. a subsidiary of Avery Dennison Corp. All rights reserved.

Each product and program carries a respective written warranty, the only warranty on which the customer can rely. Paxar reserves the right to make changes in the product, the programs, and their availability at any time and without notice. Although Paxar has made every effort to provide complete and accurate information in this manual, Paxar shall not be liable for any omissions or inaccuracies. Any update will be incorporated in a later edition of this manual.
©2004 Paxar Americas, Inc. a subsidiary of Avery Dennison Corp. All rights reserved. No part of this publication may be reproduced, transmitted, stored in a retrieval system, or translated into any language in any form by any means, without the prior written permission of Paxar Americas, Inc.
WARNING
This equipment has been tested and found to comply with the limits for a Class A digital device, pursuant to Part 15 of the FCC Rules. These limits are designed to provide reasonable protection against harmful interference when the equipment is operated in a commercial environment. This equipment generates, uses, and can radiate radio frequency energy and, if not installed and used in accordance with the instruction manual, may cause harmful interference to radio communications. Operation of this equipment in a residential area is likely to cause harmful interference in which case the user will be required to correct the interference at his own expense.
RF Operation is subject to the following two conditions: (1) this device may not cause interference, and (2) this device must accept any interference including interference that may cause undesired operation of the device.
CANADIAN D.O.C. WARNING
This digital apparatus does not exceed the Class A limits for radio noise emissions from digital apparatus set out in the Radio Interference Regulations of the Canadian Department of Communications.
Le présent appareil numérique n’émet pas de bruits radioélectriques dépassant les limites applicables aux appareils numériques de la classe A prescrites dans le Réglement sur le brouillage radioélectrique édicte par le ministère des Communications du Canada.
Trademarks
9460, 9462, 9463, 9465, Monarch®, MPCL, and Sierra Sport 2 are trademarks of Paxar Americas, Inc.
Paxar® is a trademark of Paxar Corporation.
Avery Dennison® is a trademark of Avery Dennison Corporation. Bluetooth® is a trademark of Bluetooth SIG, Inc.
Adobe and Acrobat are registered trademarks of Adobe Systems Incorporated.
Avery Dennison Printer Systems Division
170 Monarch Lane
Miamisburg, Ohio 45342
T A B L E O F C O N T E N T S
GETTING STARTED .......................................................... |
1 |
-1 |
Introduction ................................................................. |
1 |
-1 |
Audience .................................................................... |
1 |
-1 |
Documentation ............................................................ |
1 |
-1 |
Printer Utilities ............................................................ |
1 |
-2 |
Unpacking the Printer ................................................... |
1 |
-2 |
Powering the Printer .................................................... |
1 |
-3 |
Installing the Battery .................................................... |
1 |
-3 |
Battery and Safety Information ................................... |
1 |
-5 |
Connecting the Communications Cable .......................... |
1 |
-7 |
Using the Display and Buttons ...................................... |
1 |
-9 |
Printing....................................................................... |
1 |
-9 |
LOADING SUPPLIES......................................................... |
2 |
-1 |
Loading for Non-Peel Mode........................................... |
2 |
-1 |
Tearing the Supplies ................................................. |
2 |
-3 |
Loading for Peel Mode ................................................. |
2 |
-4 |
CARE & MAINTENANCE.................................................... |
3 |
-1 |
Cleaning ..................................................................... |
3 |
-1 |
Clearing Label Jams .................................................... |
3 |
-4 |
TROUBLESHOOTING ........................................................ |
4 |
-1 |
Common Errors ........................................................... |
4 |
-2 |
SPECIFICATIONS ............................................................. |
A-1 |
|
Printer Specifications ................................................... |
A-1 |
|
Supply Specifications ................................................... |
A-2 |
|
Cable Pin-outs............................................................. |
A-3 |
|
i
ACCESSORIES ................................................................ |
B-1 |
Single Station Battery Charger ..................................... |
B-2 |
Four Station Battery Charger ........................................ |
B-2 |
AC Power Adapter ....................................................... |
B-2 |
Carrying Accessories ................................................... |
B-2 |
PRINTER OPTIONS .......................................................... |
C-1 |
Linerless .................................................................... |
C-1 |
Bluetooth.................................................................... |
C-1 |
ii

G E T T I N G S TA R T E D |
1 |
The Monarch® Sierra Sport2™ 9460TM printer is a portable, thermal-direct printer that prints on tags, labels, or receipt paper.
Introduction
This chapter includes information about
♦documentation.
♦printer utilities.
♦unpacking the printer.
♦installing the battery and battery information.
♦connecting the communications cable.
♦using the LCD screen and buttons.
Audience
The Operator's Handbook is for the person who prints and applies labels.
Additional Documentation
The online version of the Programmer's Manual, the
RCL Programmer's Manual, and the System Administrator's Guide are available on our Web site (www.paxar.com).
Note: Information in this document supercedes information in previous versions. Check our Web site for the latest documentation and release information.
Getting Started 1-1

Printer Utilities
The Monarch® MPCLTM Toolbox utilities are also available on our Web site (www.paxar.com) and are free to download. This group of development utilities helps you configure the printer, customize fonts, and download files.
Unpacking the Printer
After you unpack the printer, you may have (depending on your order):
♦a 9460 printer
♦one or more batteries
♦an AC power adapter (supply) or none
♦a hip/shoulder/hand strap or none
♦a cable
Note: Look through all of the packaging material for items. Keep all packaging material in case you need to move or return the printer.
If any items are missing, contact Paxar at the number listed on the back of this manual for replacement items.
About the Printer’s Power
There are two ways to power the printer:
♦Using a battery. See "Installing the Battery" for more information.
♦Using the optional AC power adapter. For more
information about the AC power adapter, refer to the 9463TM Operating Instructions included with the AC power adapter.
1-2 Getting Started
Installing the Battery
The battery can be installed with or without supplies loaded.
Note: Make sure the battery is charged before using it.
1.Turn off the printer if you are changing batteries.
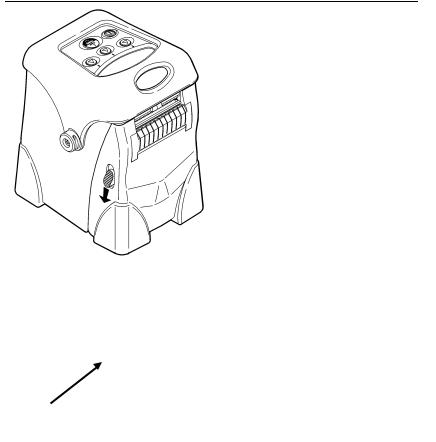
2.Open the supply door by pushing down on the release buttons located on both sides of the printer. The supply door should swing open.
Release
Button
3.Insert the connector end of the battery into the printer.
Getting Started 1-3

4.Close the supply door until the release buttons click into place.
5.Turn on the printer by pressing and holding P until the LCD screen comes on (about two seconds).
The display flashes printer version information, battery charging status, and then you will see:
Ready
p
1-4 Getting Started

Battery and Safety Information
♦You must charge a battery before using it. For optimal battery life, charge the battery within three months of receipt.
WARNING
Use only Monarch chargers (Monarch® 9462TM Single Station Charger or the Monarch® 9465TM Four Station Charger) designed for lithium-ion batteries when charging.
The battery might explode if placed on a different charger.
♦Take the battery out of the printer when storing the printer for a month or longer.
♦The optimal battery storage temperature is 50°F - 73°F (10°C - 23°C). For more information about storage temperatures, see Appendix A, “Specifications.” The battery may lose its charge capacity permanently if stored at temperatures less than 32°F (0°C) or greater than 104°F (40°C). For longest life, the battery should be stored in a cool, dry place.
♦The recommended temperature for charging is 68°F - 77°F (20°C - 25°C)
♦Charging time is approximately 1 to 3 hours.
♦Recycling Information - Do not throw in trash. Recycle to your local regulations. The Rechargeable Battery Recycling Corporation (RBRC®) is a non-profit organization created to promote recycling of rechargeable batteries. For more information about how to recycle batteries in your area, visit www.rbrc.org. Batteries can also be returned postage-paid to: ERC; 200 Monarch Lane Door #39; Miamisburg, OH 45342.
Getting Started 1-5

CAUTION
Do Not disassemble, short-circuit, heat above 80°C, or incinerate the battery. It may explode.
♦The battery should be charged immediately for either long-term storage or after the battery has been exhausted from a printing session. Frequent charging will actually prolong battery life and has no negative effects such as memory issues.
♦Do not let the battery get battery wet or come into contact with metal objects.
♦Do not use a battery with a cracked case.
♦It is normal for battery capacity to decrease up to 20% over the first 300 cycles of use.
♦The printer uses battery power even when the printer is not printing. Remove the printer's battery and place on a charger when the printer is not in use.
♦Many factors affect your battery's performance, including the quantity of labels printed, intervals of batches printed, percentage of black per label, and power management.
1-6 Getting Started
Connecting the Communications Cable
9-pin and 25-pin serial communication cables are available. For best results, use only Monarch® cables. See Appendix B, "Accessories" for part number information.
1.Open the hinged cable door by loosening the two screws and lifting up on the door.
 Screws
CAUTION
Do not use sharp objects around the printhead or touch the printhead with your fingers.
Both may damage the printhead and require a service charge.
Getting Started 1-7
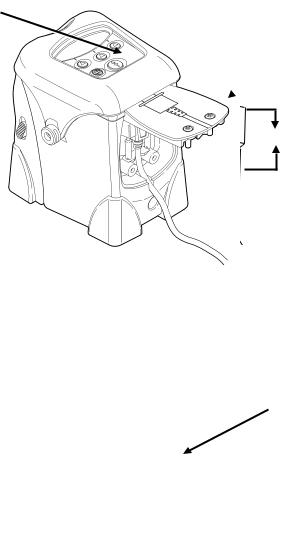
2.Plug the DB9 connector into the DB9 port.
DB9 Port
DB9
 Connector
2.5”
3.Place the cable in the cable cavity.
Cable in Cable
Cavity
4.Close the hinged cable door and tighten the screws.
To connect the optional AC power adapter, refer to the
9463 Operating Instructions included with it.
1-8 Getting Started
 Loading...