


Monarch
9825 Printer
TC9825QR Rev. AA 2/02 ©2002 Paxar Corporation. All rights reserved.
This Quick Reference contains supply loading and general care and maintenance procedures. For more detailed information, the Operator’s Handbook is on the enclosed CD-ROM or can be downloaded from our Web site (www.monarch.com). You can print this manual or order a hard-copy version (part number TC9825OH).
C o n n e c t i n g t h e C a b l e s
The power supply automatically switches between 115V or 230V. There are no operator settings required.
1.Plug the power cable into the socket. Plug the other end of the cable into a grounded electrical outlet.
2.Connect the communication cable into the appropriate port. Secure the cable with the connecting screws (serial) or spring clips (parallel).
If you are communicating with the host through the serial port, make sure the printer's communication values match those at the host. The factory default values are 9600 Baud, 8 bit data frame, 1 stop bit, no parity, and DTR flow control. Set the communication values on the printer to match those at the host.
3.Turn on the printer. Press ( I ) to turn on and ( O ) to turn off the printer.
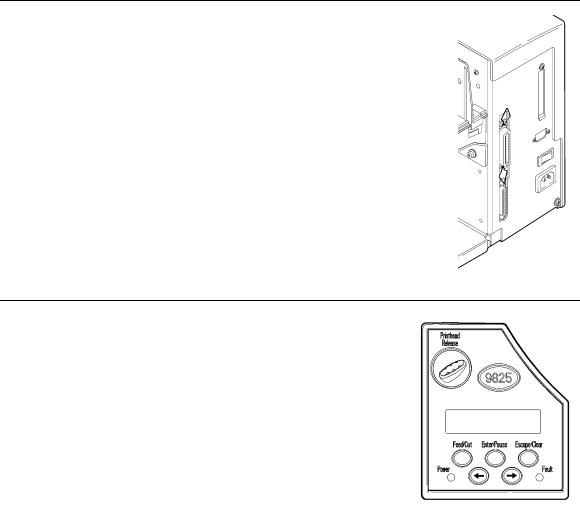
U s i n g t h e C o n t r o l P a n e l
The control panel has a two-line LCD display, 2 status lights, and five buttons. The control panel displays error codes/messages, and allows you to setup/configure the printer.
Power: The printer shows a steady green light when it is on.
Fault: The printer shows a steady amber light when it is out of labels or ribbon, or when you have a supply jam.
2
Feed/Cut: Prints a label in the on-demand mode, feeds a blank label if there is no print job, and prints a label with error information that is useful to your System Administrator if an error is displayed.
Enter/Pause: Pauses the current print job or resumes a paused print job. Selects the displayed menu item.
Escape/Clear: When an error is present, clears the error. When a job (batch) is
|
printing, cancels the print job (batch). Enters the offline menu |
|
mode or returns the display to the next higher menu. |
l |
Displays the previous menu item. |
r |
Displays the next menu item. |
l and r |
Prints test labels when you press the buttons at the same time. |
|
Hold for one second and release. |
L o a d i n g L a b e l s o r T a g s
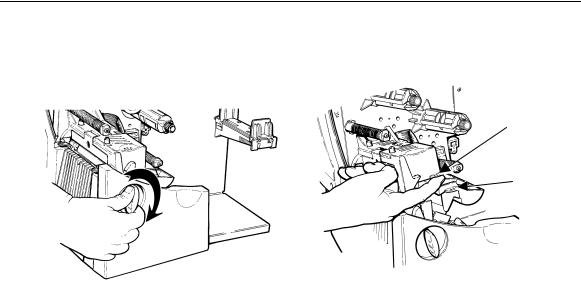
1.Open the cover.
2.Unlock the printhead by turning the retaining latch.
3.Lift printhead assembly using the printhead tab until the assembly locks into place.
Printhead
Tab
Deflector
Tab
4.Place the roll of supply on the supply holder. For labels, the supply unrolls from the top or the bottom. For tags, make sure the supply unrolls from the bottom, because tag rolls are wound face in. Do not pick up the printer by the supply holder.
3
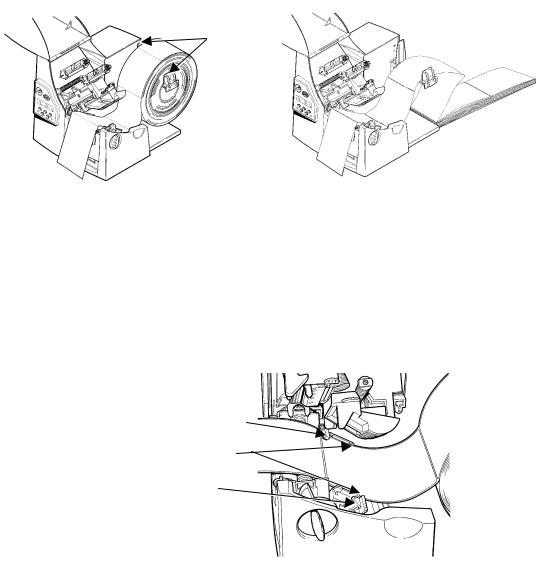
5.Adjust the supply holder guides so the sides barely touch the roll. Make sure the supply roll turns freely. If you are using fan-fold supplies, place the supply stack behind the printer, label side facing up.
Supply
Holder
Guides
6.Push down on the supply lever to unlock the supply guides.
7.Lay the label strip across the supply guide so that a few inches extend past the front of the printer. Tuck the supply under the nibs and in between the die cut sensor.
For fan-fold supplies, lay the label strip over the supply holder and across the supply guide so that a few inches extend past the front of the printer. Tuck the supply under the nibs and in between the die cut sensor.
8.Adjust the supply guides so they touch the supply. Push up on the supply lever to lock the supply guides into place.
Die Cut Sensor
Nibs
Supply
Lever
4
 Loading...