


Monarch® Renegade® 4
Printer
Operator’s Handbook
TC9490OH Rev. CB 3/01 |
©1995 Monarch Marking Systems, Inc. All rights reserved. |

Each product and program carries a respective written warranty, the only warranty on which the customer can rely. Monarch reserves the right to make changes in the product and the programs and their availability at any time and without notice. Although Monarch has made every effort to provide complete and accurate information in this manual, Monarch shall not be liable for any omissions or inaccuracies. Any update will be incorporated in a later edition of this manual.
WARNING
This equipment has been tested and found to comply with the limits for a Class A digital device, pursuant to Part 15 of the FCC Rules. These limits are designed to provide reasonable protection against harmful interference when the equipment is operated in a commercial environment. This equipment generates, uses, and can radiate radio frequency energy and, if not installed and used in accordance with the instruction manual, may cause harmful interference to radio communications. Operation of this equipment in a residential area is likely to cause harmful interference in which case the user will be required to correct the interference at his own expense.
CANADIAN D.O.C. WARNING
This digital apparatus does not exceed the Class A limits for radio noise emissions from digital apparatus set out in the Radio Interference Regulations of the Canadian Department of Communications.
Le présent appareil numérique n’émet pas de bruits radioélectriques dépassant les limites applicables aux appareils numériques de la classe A prescrites dans le Réglement sur le brouillage radioélectrique édicte par le ministère des Communications du Canada.
Trademarks
Monarch is a registered trademark of Monarch Marking Systems, Inc. 9490 is a trademark of Monarch Marking Systems, Inc.

Table of Contents
Chapter 1. Getting Started . . . . . . . . . . . . . . . . . . . . . . . . . . . . . |
1-1 |
Additional Optional Manuals . . . . . . . . . . . . . . . . . . . . . . . . 1-1
Audience . . . . . . . . . . . . . . . . . . . . . . . . . . . . . . . . . . . . . . . 1-2
Charging the Battery . . . . . . . . . . . . . . . . . . . . . . . . . . . . . . 1-2
Loading and Removing the Battery. . . . . . . . . . . . . . . . . . . 1-5
Connecting the AC Power Supply. . . . . . . . . . . . . . . . . . . . 1-6
Connecting the Shoulder Strap. . . . . . . . . . . . . . . . . . . . . . 1-7
Using the Trigger and LED . . . . . . . . . . . . . . . . . . . . . . . . . 1-8
Chapter 2. Loading Supplies . . . . . . . . . . . . . . . . . . . . . . . . . . . |
2-1 |
Opening the Printer. . . . . . . . . . . . . . . . . . . . . . . . . . . . . . . 2-1
Loading Ribbon. . . . . . . . . . . . . . . . . . . . . . . . . . . . . . . . . . 2-4
Reloading a Ribbon Cassette . . . . . . . . . . . . . . . . . . . . . . . 2-5
Loading Supplies . . . . . . . . . . . . . . . . . . . . . . . . . . . . . . . . 2-7
Loading for Peel Mode . . . . . . . . . . . . . . . . . . . . . . 2-7
Loading for Non-Peel Mode . . . . . . . . . . . . . . . . . 2-11
Chapter 3. Printing. . . . . . . . . . . . . . . . . . . . . . . . . . . . . . . . . . . . 3-1
Establishing Communications. . . . . . . . . . . . . . . . . . . . . . . 3-1
Connecting the Communications Cable . . . . . . . . . 3-1
Removing the Communications Cable . . . . . . . . . . 3-2
Communication Values . . . . . . . . . . . . . . . . . . . . . . 3-3
Printing in On-Demand Mode . . . . . . . . . . . . . . . . . . . . . . . 3-3
Printing in Continuous Mode. . . . . . . . . . . . . . . . . . . . . . . . 3-4
Interrupting a Print Job . . . . . . . . . . . . . . . . . . . . . . . . . . . . 3-4
i

9490 Operator’s Handbook
Chapter 4. Care and Maintenance . . . . . . . . . . . . . . . . . . . . . . . 4-1
Clearing Label Jams . . . . . . . . . . . . . . . . . . . . . . . . . . . . . . 4-2
Cleaning . . . . . . . . . . . . . . . . . . . . . . . . . . . . . . . . . . . . . . . 4-3
Cleaning the Battery Contacts . . . . . . . . . . . . . . . . . . . . . . 4-4
Chapter 5. Troubleshooting . . . . . . . . . . . . . . . . . . . . . . . . . . . . |
5-1 |
Printing a Test Label . . . . . . . . . . . . . . . . . . . . . . . . . . . . . . 5-1
LED Indicator . . . . . . . . . . . . . . . . . . . . . . . . . . . . . . . . . . . 5-2
Problems and Solutions . . . . . . . . . . . . . . . . . . . . . . . . . . . 5-3
Chapter 6. Using the Boot . . . . . . . . . . . . . . . . . . . . . . . . . . . . . |
6-1 |
Putting the Boot on the Printer . . . . . . . . . . . . . . . . . . . . . . 6-1 Taking the Boot off the Printer. . . . . . . . . . . . . . . . . . . . . . . 6-3
Chapter 7. Using the Cable Cover . . . . . . . . . . . . . . . . . . . . . . . 7-1
Attaching the Cable Cover . . . . . . . . . . . . . . . . . . . . . . . . . 7-1
Removing the Cable Cover. . . . . . . . . . . . . . . . . . . . . . . . . 7-2
Chapter 8. Specifications . . . . . . . . . . . . . . . . . . . . . . . . . . . . . . 8-1
Specifications . . . . . . . . . . . . . . . . . . . . . . . . . . . . . . . . . . . 8-1
Supply Sizes . . . . . . . . . . . . . . . . . . . . . . . . . . . . . . . . . . . . 8-2
Accessories and Options . . . . . . . . . . . . . . . . . . . . . . . . . . 8-2
Cable Pin Outs . . . . . . . . . . . . . . . . . . . . . . . . . . . . . . . . . . 8-3
ii
Chapter 1. |
Getting Started |
|
|
This printer is a portable, online-only unit used to print labels. The host must download data to the printer before the printer can print.
When you first receive the printer:
Charge and load the battery or load the AC power pack. See "Loading and Removing the Battery" or "Connecting the AC Power Supply."
Load supplies. See Chapter 2, "Loading Supplies."
Connect the printer to a host to receive print jobs. See Chapter 3, "Printing."
Make sure communication values at the printer and the host are the same. Ask yor System Administrator or see the MPCL II Programmer’s Manual for information on setting these values.
Additional Optional Manuals ––––––––––––––––––––––––––––––––
MPCL II Programmer’s Manual (TCMPCL2PM): explains how to design labels, create formats, and use online commands to control the printer.
MPCL II Optional Fonts Manual (TCMPCL2OF): explains how to use the optional fonts you can purchase separately.
TC9490OH Rev. C 3/97 |
1-1 |

9490 Operator’s Handbook
Audience–––––––––––––––––––––––––––––––––––––––––––––––––––
The Operator’s Handbook is designed for the person printing and applying labels.
This chapter tells you how to:
charge, load, and remove the battery
connect the AC power supply
attach the shoulder strap
use the printer’s trigger and LED.
Charging the Battery––––––––––––––––––––––––––––––––––––––––
The printer is shipped with a 13.2VDC NiCd battery and an 8-hour "trickle" battery charger. The battery can be used and recharged daily for approximately two years. When the battery is not in use and not recharging, the battery loses 2-3% of its charge per day. Environments with extreme heat increase the discharge rate.
Before operating the printer, you must charge the battery and load it into the printer. You can use any of these chargers:
8-hour "trickle" charger
1-hour "fast" charger
4-station charger.
See Chapter 6, "Specifications," for information on charger options.
wBefore using the charger, inspect the cord for bare wires. Do Not use a charger with bare wires. Only chargers approved for this printer should be used.
1-2 |
TC9490OH Rev. C 3/97 |

Chapter 1. Getting Started
Charge the battery:
before using it for the first time
before lengthy printing sessions
as soon as the LED indicates a "low battery" condition (slow flashing green for a low battery, fast alternating green/amber flashing for a "too low to operate" battery, or no LED for a dead battery).
n If you continue to print with a low battery, your print quality may deteriorate.
When using or storing the charger:
Do Not wrap the cord around the charger.
Do Not pull or put unusual stress on the cord.
c Before loading or removing the battery, turn the printer off.
TC9490OH Rev. C 3/97 |
1-3 |

9490 Operator’s Handbook
To charge the battery:
1.Turn the printer off. (|) indicates on and (O) indicates off.
2.The battery can be charged on or off the printer. Plug the connector on the charger cord into the socket on the battery as shown.
3.Plug the charger into a grounded electrical outlet of the correct voltage. Allow the battery to charge for a full 8 hours (when using the standard "trickle" charger).
n If you have a problem with short battery life, clean the battery contacts. See Chapter 4, "Care and Maintenance."
Battery
Charger
Battery
Contacts
Battery
Connector
1-4 |
TC9490OH Rev. C 3/97 |
Chapter 1. Getting Started
Loading and Removing the Battery––––––––––––––––––––––––––––
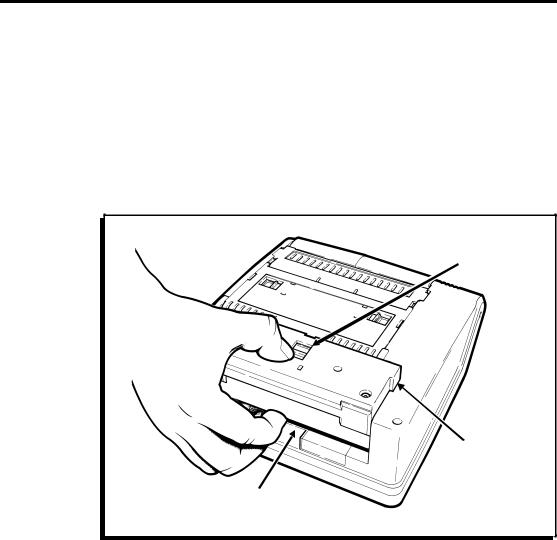
To load a battery:
1.Turn the printer off. (|) indicates on and (O) indicates off.
2.Turn the printer so the back of the printer faces you.
3.Insert the tabs on your battery into the slots of the battery well in the base of the printer. Push down until the latch clicks.
Latch
Tab
Finger
Depression
n To remove the battery, press down on the latch with your thumb while inserting your fingers into the depression. Lift the battery out of the well as shown.
TC9490OH Rev. C 3/97 |
1-5 |
9490 Operator’s Handbook
Connecting the AC Power Supply –––––––––––––––––––––––––––––
c Before you plug or unplug the power supply, turn the printer off. Only AC power supplies approved for this printer should be used. Using any other AC power supply may damage the printer.
To load the AC power pack:
1.Turn the printer off. (|) indicates on and (O) indicates off.
2.Turn the printer so the back of the printer faces you.
3.Insert the tabs on the AC power pack into the slots of the battery well in the base of the printer. Push down until the latch clicks.
Latch
Tab
Finger
Depression
n To remove the AC power pack, press down on the latch with your thumb while inserting your fingers into the depression. Lift the power pack out of the well as shown.
1-6 |
TC9490OH Rev. C 3/97 |
Chapter 1. Getting Started
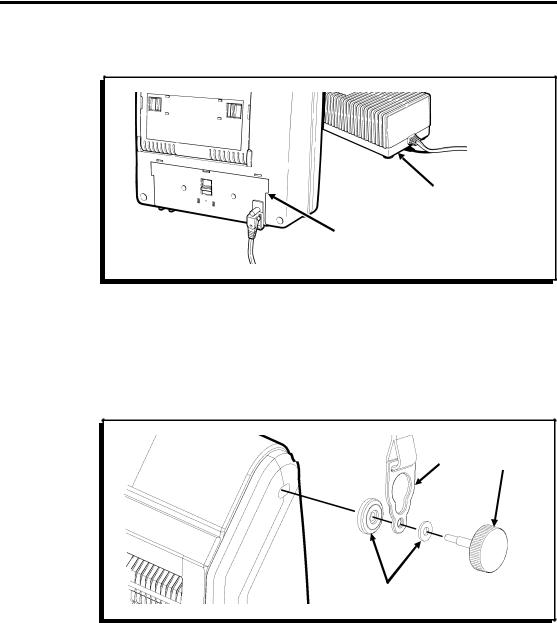
4.Plug the AC power supply into a grounded electrical outlet of the correct voltage.
AC Power
Supply
AC Power
Pack
Connecting the Shoulder Strap ––––––––––––––––––––––––––––––––
To connect the shoulder strap:
1.Assemble the strap, knob, and washers as shown.
2.Insert the assembly into the printer and tighten it.
Strap Knob
Washers
3. Repeat for the other side of the printer. c Do Not overtighten.
TC9490OH Rev. C 3/97 |
1-7 |
9490 Operator’s Handbook
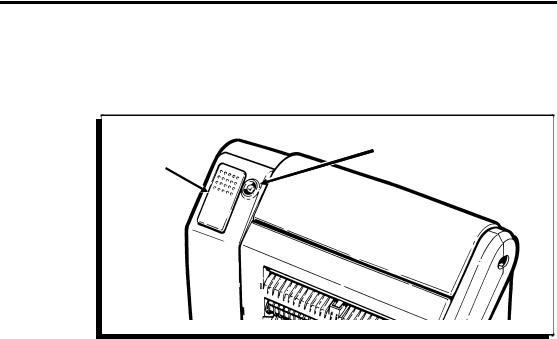
Using the Trigger and LED –––––––––––––––––––––––––––––––––––
The trigger and LED are located on the top of the printer as shown.
LED
Trigger
The trigger serves several purposes:
calibrates the first label or tag after you load supplies into the printer. See Chapter 2, "Loading Supplies."
prints labels. See Chapter 3, "Printing," for more information.
clears most error conditions. See Chapter 5, "Troubleshooting," for more information.
prints a test label. See Chapter 5, "Troubleshooting," for more information.
pauses or cancels a print job. See Chapter 3, "Printing," for more information.
The LED light indicates certain printer conditions or problems. The LED blinks or displays solid amber, green, or a combination of these colors. For example, a solid green or amber LED means the printer is turned on and operational. A fast-blinking green LED means the printer contains a print job and is ready to print. See Chapter 5, "Troubleshooting," for a complete description of LED indications.
1-8 |
TC9490OH Rev. C 3/97 |
Chapter 2. |
Loading Supplies |
|
|
The printer can print on labels. We recommend you use synthetic supplies to print serial or high-density bar codes.
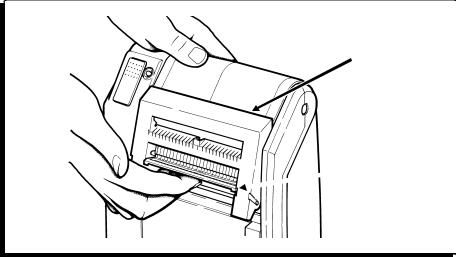
Opening the Printer –––––––––––––––––––––––––––––––––––––––––
Before loading ribbon or supplies, you must open the printer:
1.Insert your fingers into the depression beneath the faceplate and pull up.
Supply
Guide
 Faceplate
TC9490OH Rev. C 3/97 |
2-1 |
|
9490 Operator’s Handbook
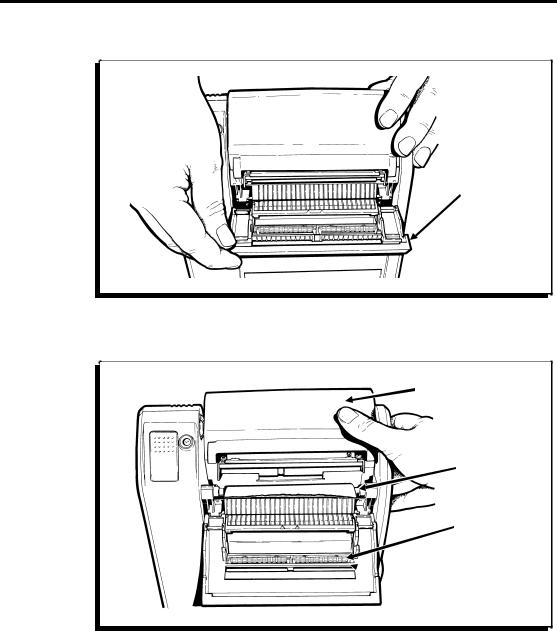
2. Pull the supply guide forward and down as shown.
Supply
Guide
3.Tip the printhead assembly up and over the platen roller as shown.
Printhead
Assembly
Platen
Roller
Pinch
Rollers
 Peel
Peel
Bar
2-2 |
TC9490OH Rev. C 3/97 |
|
Chapter 2. Loading Supplies
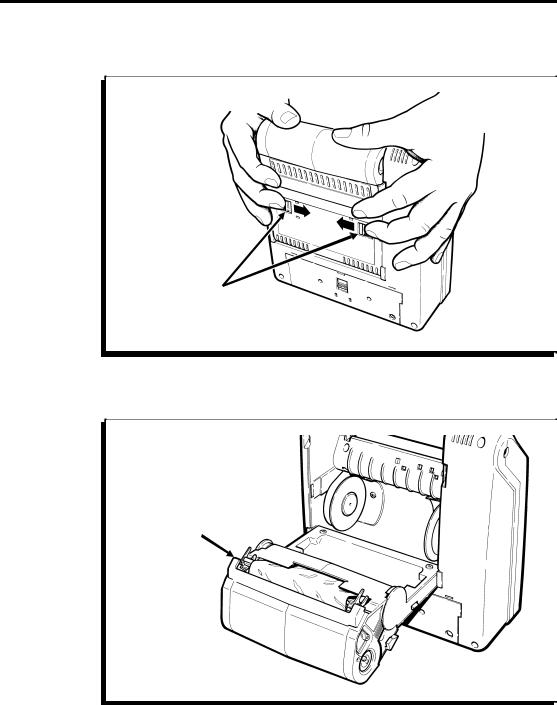
4.Slide the latches on the back of the printer toward the center.
Latches
5.Continue to push the printhead assembly toward the rear of the printer until it opens completely.
Printhead
Assembly
TC9490OH Rev. C 3/97 |
2-3 |
|
9490 Operator’s Handbook
6.To close the printer, push the printhead assembly toward the printer, close the supply guide and latch the faceplate into place.
Loading Ribbon ––––––––––––––––––––––––––––––––––––––––––––
Use ribbon when printing on thermal transfer supplies.
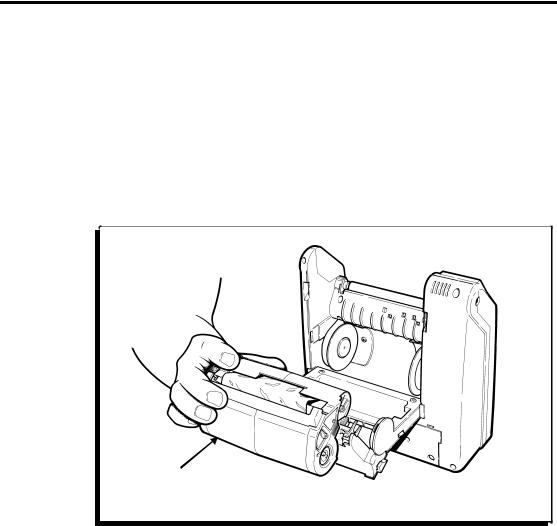
To load the ribbon cassette into the printer:
1. Open the printer and remove the ribbon cassette.
Ribbon
Cassette
2.Slide a new ribbon cassette onto the printhead assembly until it slips into place.
3.Close the printer.
2-4 |
TC9490OH Rev. C 3/97 |
|
 Loading...