


UF-790
Table of contents
 Loading...
Software
Operating Instructions
Document Manageme nt Sy stem, Printer and Class 2 Fax Mo de m
(For UF-490/525/590/790/890/990)
Before UsePrinter Section
System Section
Document Management
Troubleshooting
Before operating this software, please read
these instructions completely and keep these
operating instructions for future reference.
Section
English
Class 2 Fax Modem

Notification for UF-490/525/590/790/890/990
These models are designed with the Energy Conservation in mind, which will automatically
goes into the Sleep mode when it is not in use for a period of time (The factory default is 1
hour).
While the machine is in the Sleep mode, it will not wake up automatically by any print
command from a connected computer. If you attempt to print a document from your computer
to the machine while it is in the Sleep mode, an error message "LPT1 write error." will appears
on your computer.
Please press the ENERGY SAVER key on the control panel of the machine before starting a
print job from your computer.
If you wish to start printing at any time without having to press the ENERGY SAVER key to
wake up the machine first, you can change the setting of the Fax Parameter #34 from "3"
(SLEEP) to "2" (ENERGY-SAVER). This will stop the machine from switching into the Sleep
mode.
Please refer to the machine’s Operating Instructions (For Facsimile) for details.
2
The following trademarks and registered trademarks are used throughout this manual:
Microsoft, MS-DOS, Windows and Windows NT are registered trademarks of Microsoft
Corporation in the USA and other countries.
i386, i486 and Pentium are trademarks of Intel Corporation.
Centronics is a registered trademark of Centronics Data Computer Corporation.
TrueType is a registered trademark of Apple Computer, Inc.
All other trademarks identified herein are the property of their respective owners.
Copyright c 2000 - 2001 by Matsushita Graphic Communication Systems, Inc.
All rights reserved. Unauthorized copying and distribution is a violation of law.
Published in Japan.
The contents of these Operating Instructions are subject to change without notice.

Table of Contents
Before Use
Precautions.....................................................................................................................5
■ For User in USA ............................................................................................. 5
External View.................................................................................................................. 6
■ External View ....... ....... ...... ....... ...... ....... ...................................... ....... ...... ...... 6
Printer Section
Installing the Printer Driver ......................................................................................... 9
■ Windows 95/98/Me/NT/2000.......................................................................... 9
Configuring the Printer Driver Settings ....................................................................... 12
■ Windows 95/98/Me......................................................................................... 12
■ Windows NT 4.0 (Administrator) .................................................................... 21
■ Windows NT 4.0 (User).................................................................................. 29
■ Windows 2000 (Administrator)....................................................................... 34
■ Windows 2000 (User)..................................................................................... 43
Print Operation............................................................................................................... 48
■ Printing from Windows Applications............................................................... 48
■ Printing on Network........................................................................................ 49
Document Management System Section
Installing the Document Management System............................................................ 51
■ Windows 95/98/Me/NT/2000.......................................................................... 51
Document Manager........ ................................................................................................ 56
■ Main Window..................... ....... ...... ....... ...... ...... ....... ...... ................................ 56
■ Basic Operations............................................................................................ 58
■ Setting Plug-in................................................................................................ 60
■ File Menu........................................................................................................ 61
■ Edit Menu.................................................... ...... ....... ...... ....... ......................... 66
■ View Menu................... ...... ....... ...... ....... ...... ...... ....... ...... ....... ...... ....... ............ 67
■ Document Menu............................................................................................. 68
Image Converter........ ..... ................................................................................................ 70
■ General Description........................................................................................ 70
■ Windows 95/98/Me......................................................................................... 70
■ Windows NT 4.0............................................................................................. 71
■ Windows 2000................................................................................................ 72
Document Scanner..................................... ..... .... ..... ..... ................................................. 73
■ Main Window..................... ....... ...... ....... ...... ...... ....... ...... ................................ 73
■ Tool Menu ...................................................................................................... 75
■ Image Scanning ... ....... ...... ....... ...... ....... ...... ...... ....... ...... ................................ 77
Document Viewer........................................................................................................... 79
■ Main Window..................... ....... ...... ....... ...... ...... ....... ...... ................................ 79
■ Basic Operations............................................................................................ 81
■ Annotation Function ....................................................................................... 82
■ File Menu........................................................................................................ 83
■ Edit Menu.................................................... ...... ....... ...... ....... ......................... 87
■ View Menu................... ...... ....... ...... ....... ...... ...... ....... ...... ....... ...... ....... ............ 88
■ Page Menu..................................... ....... ...... ...... ....... ...................................... 89
■ Annotation Menu ............................................................................................ 92
■ Window Menu................................................................................................. 101
3

Table of Contents
Document Management System Section
Status Monitor................................................................................................................102
■ Task Bar Display......... ...................................... ....... ...... ....... ...... ....... ...... ...... 102
■ Task Bar Menu............................................................................ ....... ...... ...... 103
■ Display Status Details .................................................................................... 104
Configuration Editor ......................................................................................................107
■ Main Window ........................... ...... ...... ....................................... ....... ...... ...... 107
■ User Parameters Folder................................................................................. 109
■ Fax Parameters Folder .................................................................................. 110
■ Journal Folder................................................................................................ 111
■ Phone Book Setting Shortcut Activation Folder ............................................. 112
Phonebook Editor ..........................................................................................................113
■ Features......................................................................................................... 113
■ Activation Procedure...................................................................................... 114
■ Main Window ........................... ...... ...... ....................................... ....... ...... ...... 115
■ Retrieve/Write ................................................................................................ 117
■ Open/Save File .............................................................................................. 118
■ Insert Entry..................................................................................................... 120
■ Delete Entry ................................................................................................... 121
Panafax Desktop ............................................................................................................ 122
■ General Description ....................................................................................... 122
■ Sending Document ........................................................................................ 122
■ Managing the Personal Address Book........................................................... 127
■ Receiving Document...................................................................................... 131
■ Cover Sheet................................................................................................... 132
■ Tool Bar ......................................................................................................... 135
■ Setup Menu.................................................................................................... 136
■ Configuration Menu........................................................................................ 138
■ Client and Server Setting............................................................................... 140
4
Troubleshooting
Troubleshooting.............................................................................................................142
■ Printing operation fails ................................................................................... 142
■ Document is not printed correctly .................................................................. 143
■ Error messages displayed on the computer .................................................. 144
Appendix.........................................................................................................................145
■ Printing/Scanning Area .................................................................................. 145
■ Parallel Interface Connector .......................................................................... 146
Class 2 Fax Modem Section
Installing the Panasonic Class 2 Fax Modem..............................................................148
■ Installation (Windows 95/98/Me).................................................................... 148
■ Installation (Windows NT 4.0)........................................................................ 155
■ Installation (Windows 2000)........................................................................... 158

Before Use
Precautions
For User in USA
This equipment has been tested and found to comply with the limits for a Class B digital device, pursuant to
Part 15 of the FCC Rules. These limits are designed to provide reasonable protection against harmful
interference in a re sidential installation. This equi pment generates, uses and c an radiate radio frequency
energy and, if not installed and used in accordance with the in str uc ti ons , may cau se har mfu l int er fer enc e to
radio communications. However, there is no guarantee that interference will not occur in a particular
installation. If this e qui pme nt d oes c aus e har mf ul int er ferenc e to r ad io or tel ev isio n rec ep tion , wh ich c an be
determined by turnin g the equi pm ent off and on, th e us er is enc ouraged to try to correct the inter fer en ce by
one of the following measures:
1. Reorient or relocate the receiving antenna.
2. Relocate fax machine with respect to receiver or other equipment.
3. Connect fax machine into outlet on a circuit different from that to which the receiver is connected.
4. Consult the dealer or an experienced radio/TV technician for help.
Warning: To assure continued compliance, use only shielded interface cable when connecting the facsimile
machine parallel interface port to host computer. Also, any changes or modifications not expressly approved
by the party responsible for compliance could void the user’s authority to operate this equipment.
This device complies with Part 15 of the FCC Rules. Operation is subject to the following two conditions: (1)
This device may no t c aus e h ar mfu l i nte rfe renc e, a nd ( 2) t his de vi ce mu st ac ce pt an y inte r ferenc e r e cei v ed,
including interference that may cause undesired operation.
Responsible Party: Matsushita Electric Corporation of America
One Panasonic Way, Secaucus, NJ 07094
Technical Support: Panasonic Document Imaging Company/Technical Support Department
Two Panasonic Way, Secaucus, NJ 07094
1-800-225-5329
Email: consumerproducts@panasonic.com
Before Use
• You need to read the software license agreement before setting up the Printer Driver.
• You need to read the following precautions which is described in the Fax machine Operating Instructions.
1. Installation
2. Ventilation
3. Handling
4. Toner and Paper
5. For your safety
5
External View
External View
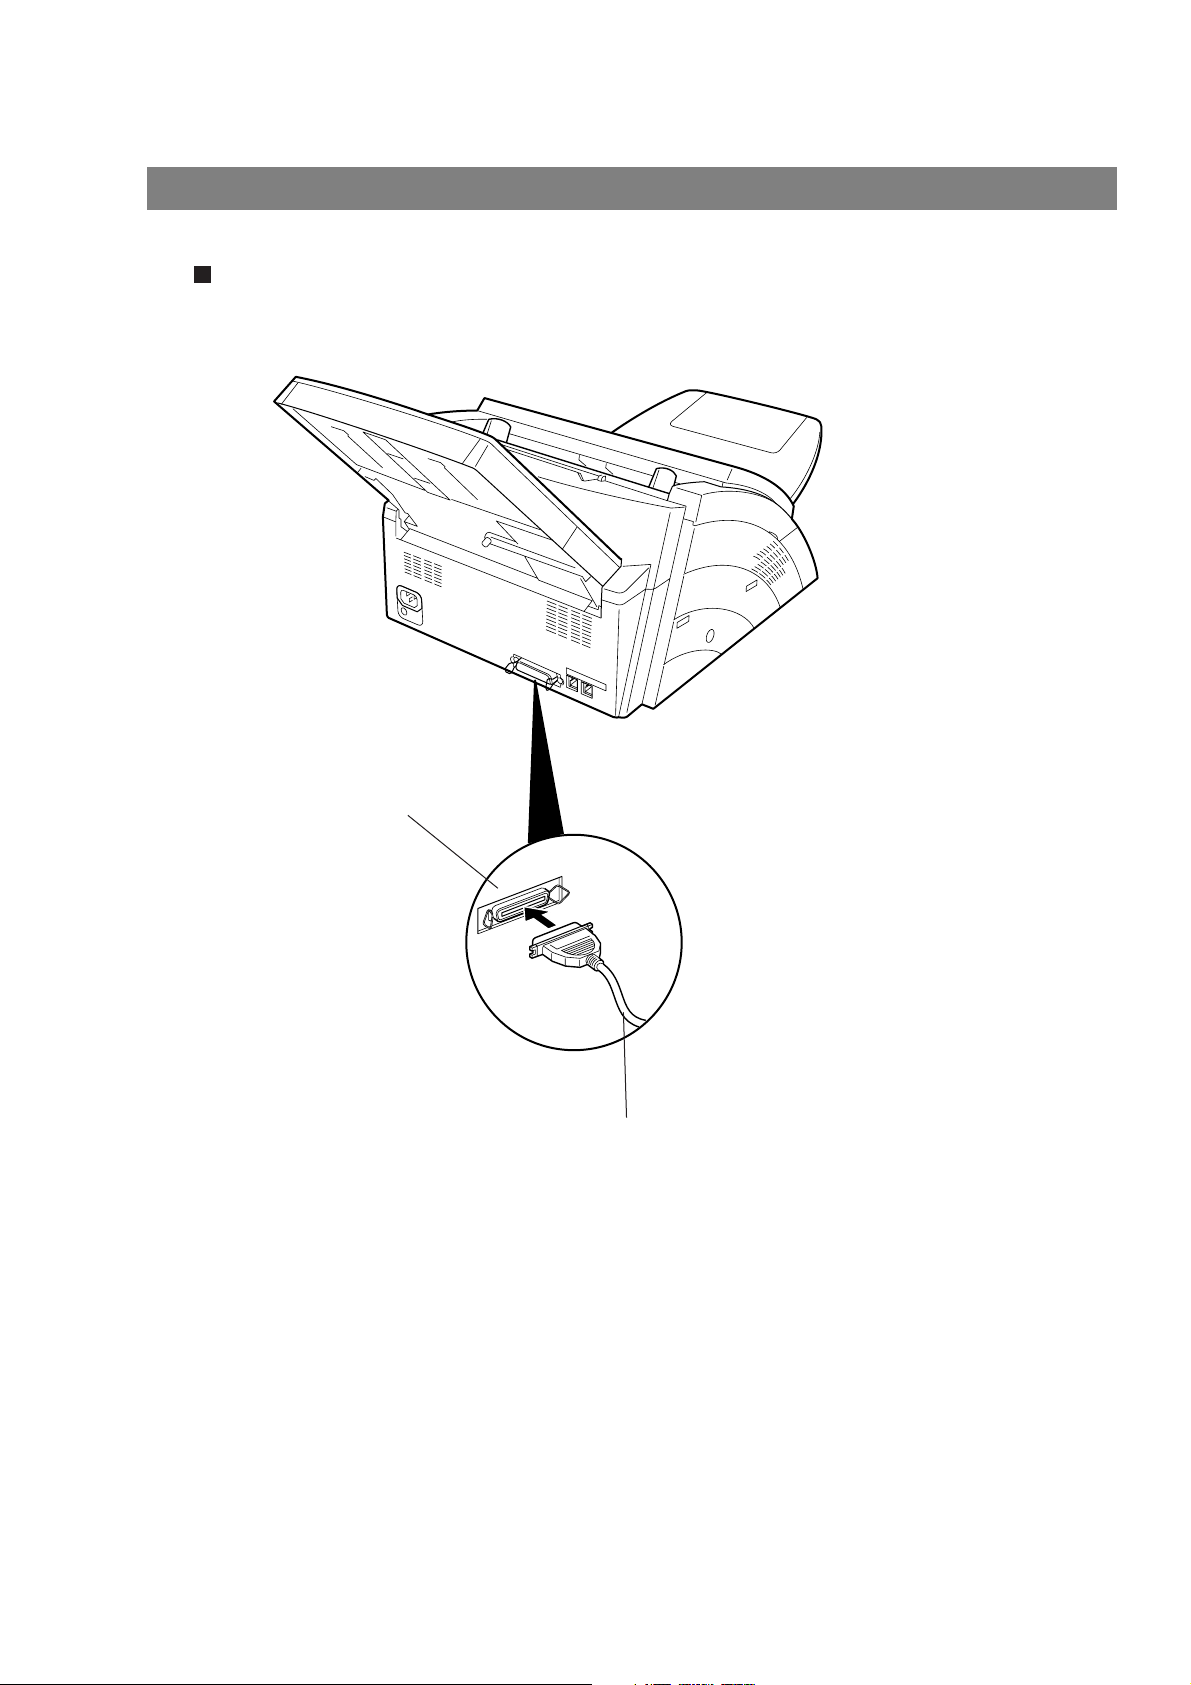
UF-490/525
Parallel Interface Connector
Connect to the PC
Parallel Interface Cable
(A cable does not come with the unit.) Use a cable of IEEE1284
specifications, with a maximum length of 20 ft (6m). Consult a
service provider for details.
6
External View
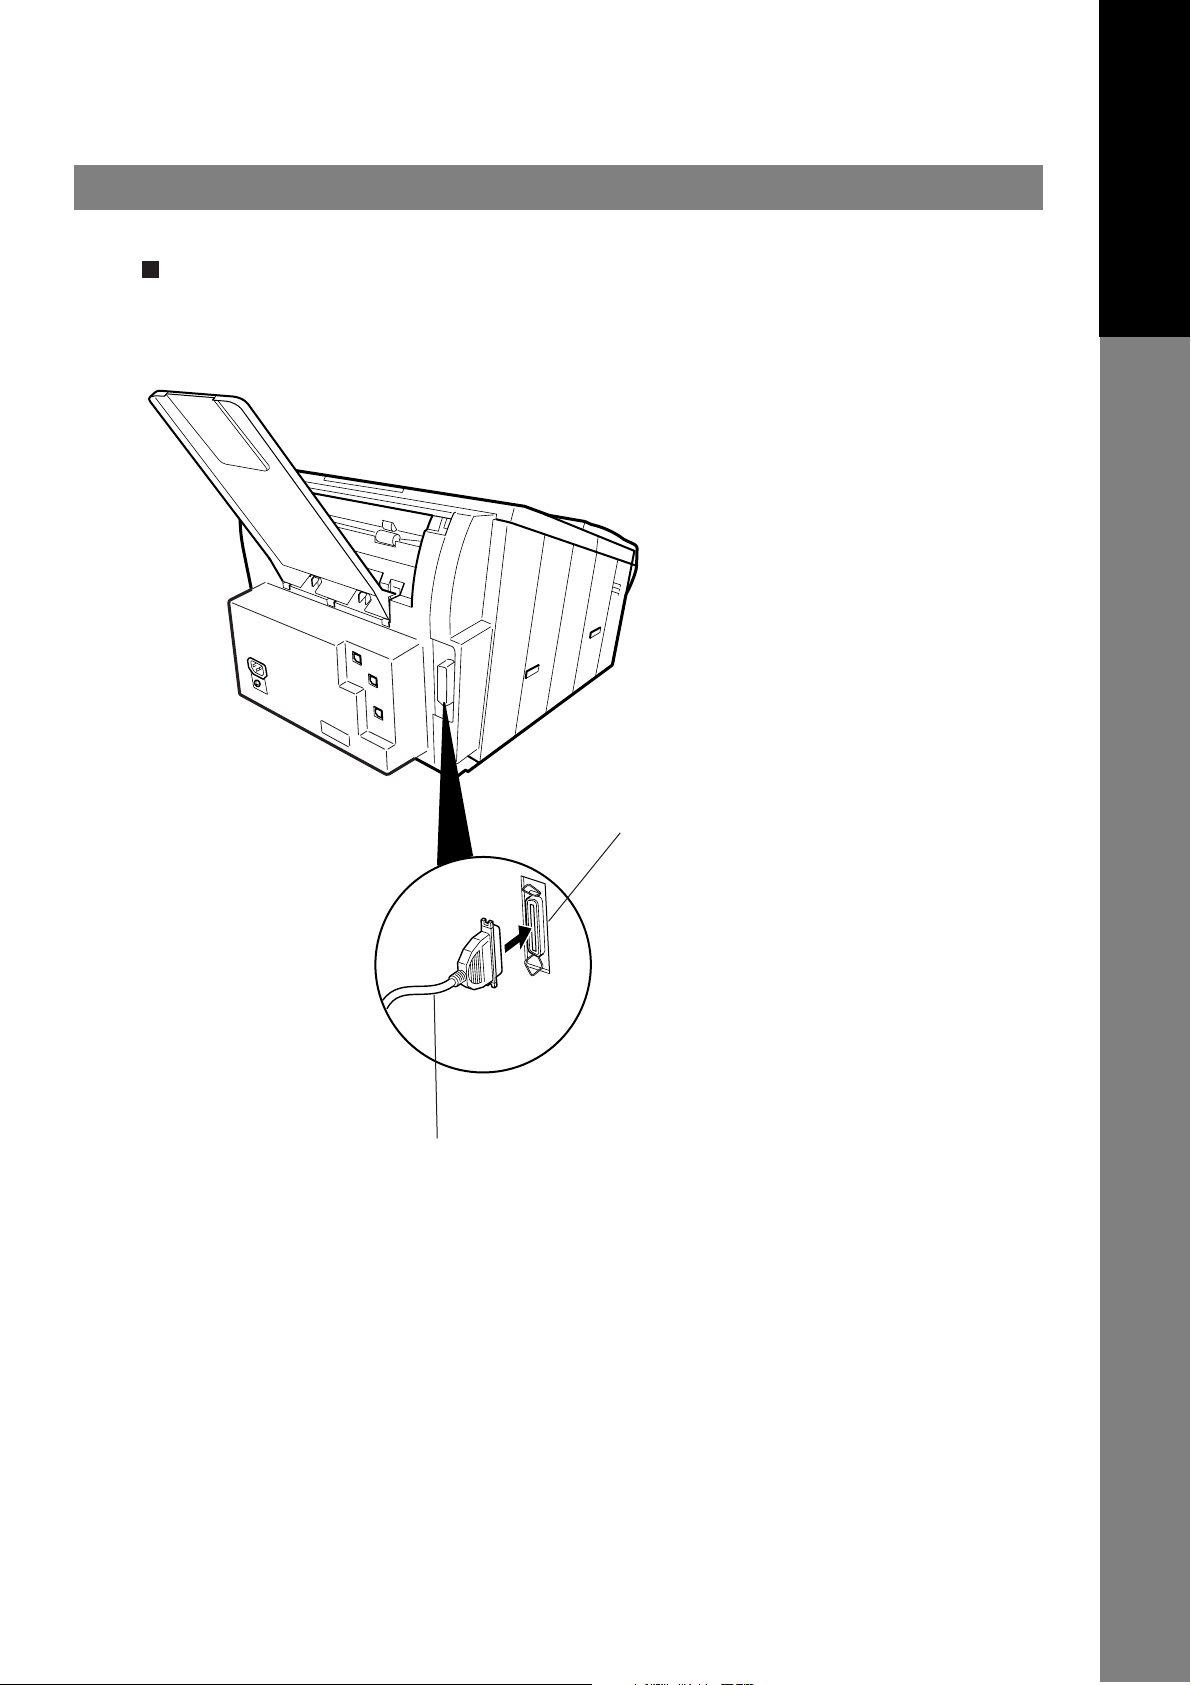
UF-590/790
External View
Before Use
Parallel Interface Connector
Connect to the PC
Parallel Interface Cable
(A cable does not come with the unit.) Use a cable of
IEEE1284 specifications, with a maximum length of 20 ft (6m).
Consult a service provider for details.
7

External View
External View
UF-890/990
Parallel Interface Connector
Connect to the PC
Parallel Interface Cable
(A cable does not come with the unit.) Use a cable of IEEE1284
specifications, with a maximum length of 20 ft (6m). Consult a
service provider for details.
8

Printer Section
Inst alling the Printer Driver
Windows 95/98/Me/NT/2000
1
2
3
Insert the Panas onic Document Mana gement
System CD-ROM.
Select your desired language.
Click on the button.
Next
Printer Section
4
Continued on the next page...
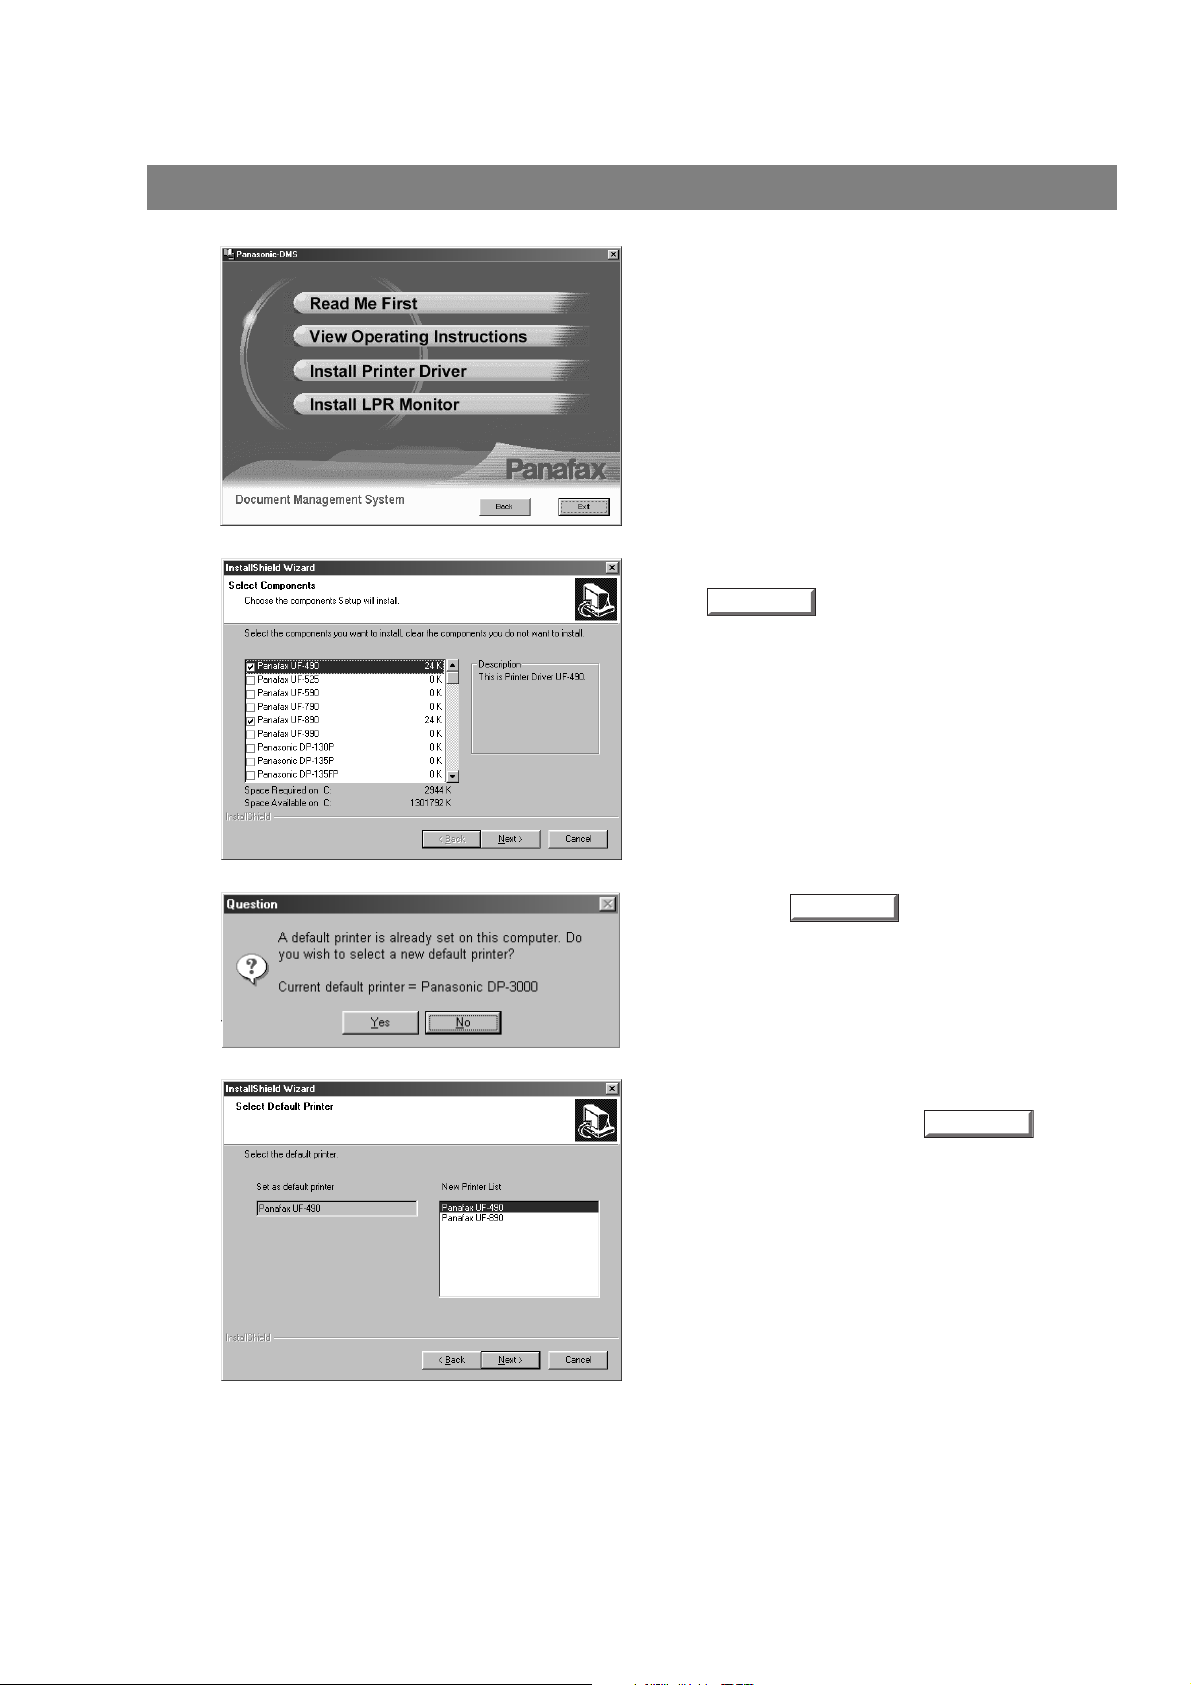
Click Printer Driver.
The Fax Gateway and Firmware Update
Note:
Utility is available for U.S.A. only.
9
Installing the Printer Driver
Windows 95/98/Me/NT/2000
5
6
Click Install Printer Driver.
Select your machine’s model(s) and click the
Next
button.
7
8
Click the button if you would like
to change your current default printer to the
one that you are installing.
Select your new default printer from the New
Printer List and click the button.
Yes
Next
10

Windows 95/98/Me/NT/2000
Installing the Printer Driver
9
10
The required files are copied.
When the setup process is completed, a
message is displayed prompting you to restart
your computer.
Click the button to restart your
Finish
Printer Section
computer.
The Panasonic/P anafax Pri nter Driver i s installed, a nd the Pa nasonic/P anafax P rinter ic on(s) are a dded to
the Printer folder.
NOTE
1. When installing on Win dows NT 4.0 an d Win dows 2000, log on to the c omput er/network with an
account rights of Administrator.
11
Configuring the Printer Driver Settings
Windows 95/98/Me
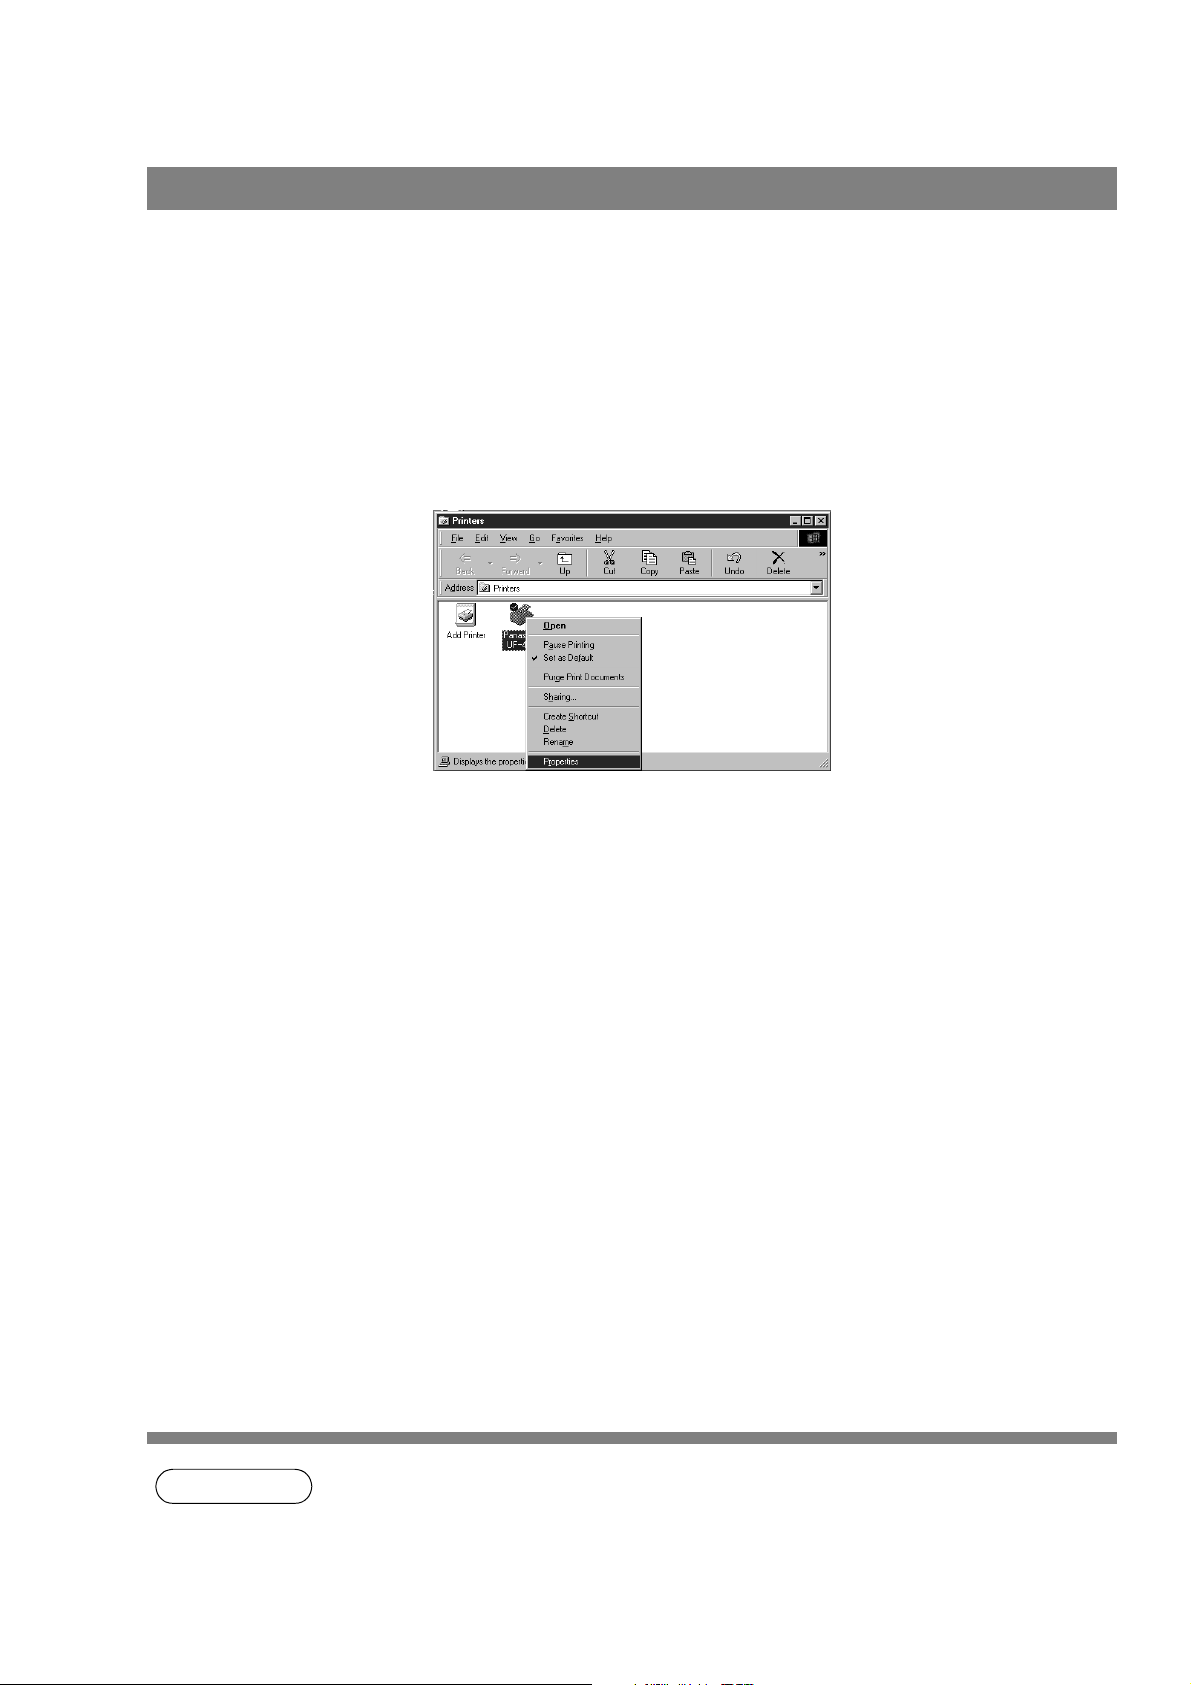
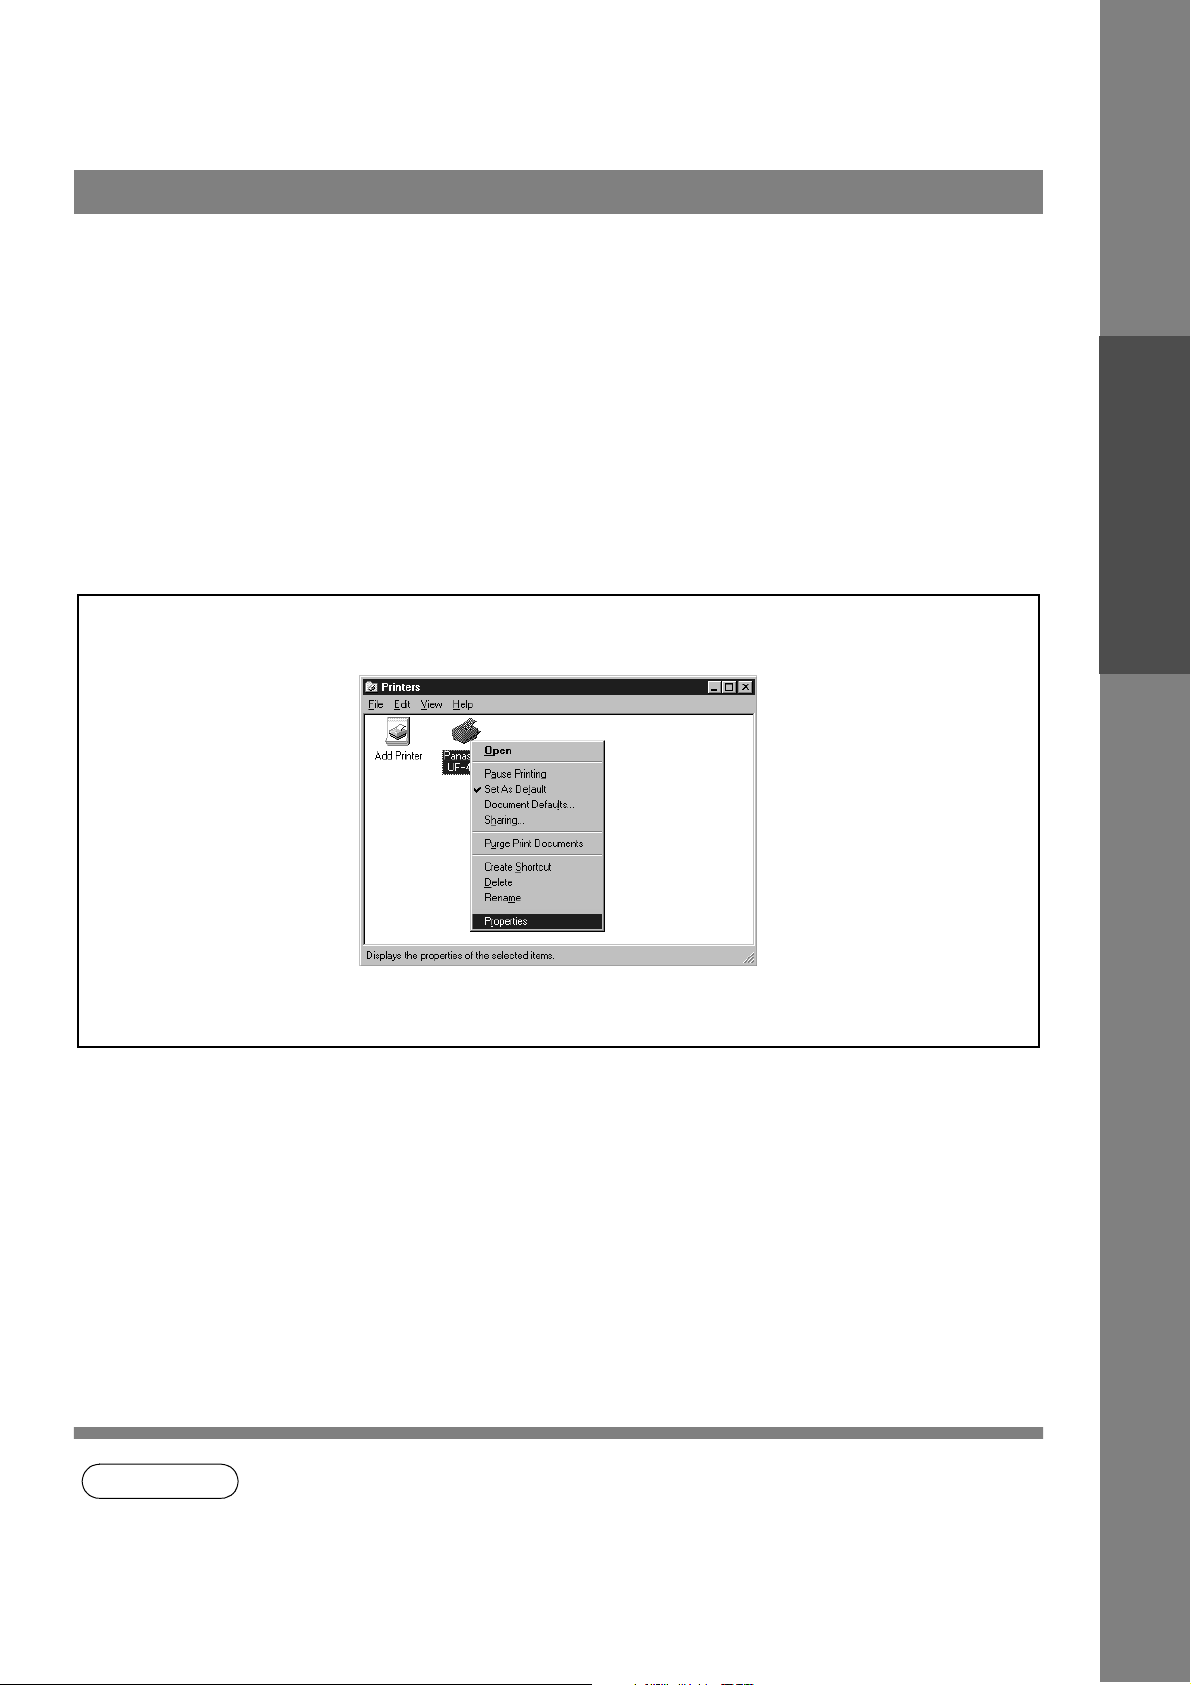
To change the printer settings, open the dialog box for the printer properties by the following steps.
Click the Start button, point to Settings, and then click
1
2
Printers.
Right-click on the desired printer icon in the printers
folder, and select Properties in the dropdown menu.
The printer properties dialog box appears.
12
NOTE
1. Upon printing, changing the properties of Paper/Layout, Handling, Quality and Device
Options is allowed by clicking Properties in the print dialog box of an application.
2. Management tab of the color of property dialog box is not used for the UF-490/525/590/790/
890/990.
3. Sharing Tab in property dialog box is not displayed unless printer sharing has been specified.
Windows 95/98/Me
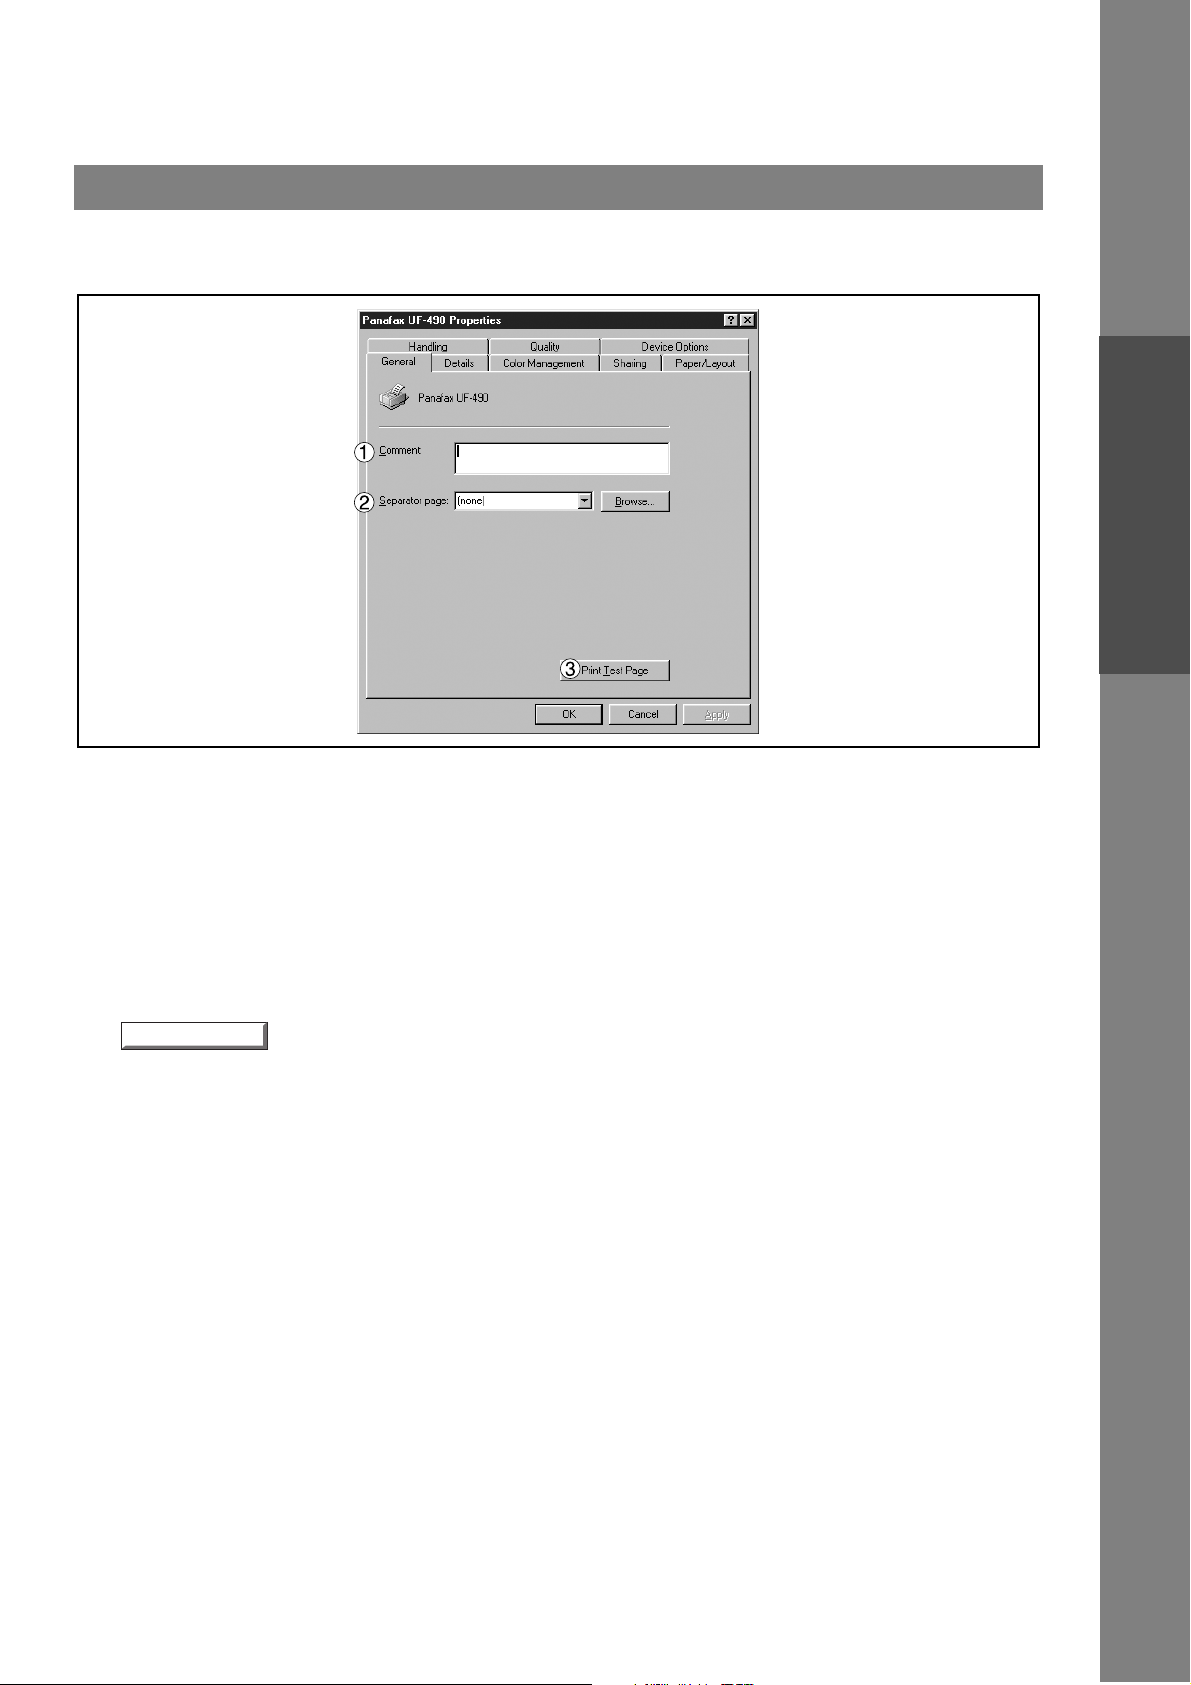
Print Test Page
General Tab
Configuring the Printer Driver Settings
Printer Section
1. Comment
Enter comments to the properties, if any.
If another user sets up this printer on his or her computer when sharing the printer, the comment specified
here will also appear on th at computer. However, the comment displayed for an already set-u p user will
remain unchanged even if the comment is modified later.
2. Separator page
This feature is not available on your machine.
3. button
Prints a test page. This allows the user to verify if the printer is installed properly.
13

Configuring the Printer Driver Settings
Capture Printer Port...
Add Port...
New Driver...
Spool Settings...
Windows 95/98/Me
Details Tab
1. Print to the following port
Displays either the port to which the printer is connected or the path to the network printer.
To change the printing destination, either sel ect the printing destination port from the list or enter the
network path here.
2. Print using the following driver
Displays the type of the printer driver. Specify the printer being used or a printer model which can be
emulated with the printer being used.
3. / button
Assigns a port to the network drive or cancels a port assigned to the network drive.
4. Timeout settings - Not selected
Specify the amount of time (in seconds) allowed to elapse before the printer becomes online. If the printer
is not online within this duration, an error message will be displayed.
5. Timeout settings - Transmission retry
Specify the amount of time (in seconds) allowed to el apse before the printer is rea dy for printing. If the
printer is not ready for printing within this duration, an error message will be displayed.
Increase this value if a timeout error occurs when printing a large document.
6. / button
Adds/deletes a new port or a new network path.
Delete Port...
End Capture...
14
7. button
Updates or modifies the printer driver.
8. button
Specify the method of sending (spool) documents from the program to the printer.

Configuring the Printer Driver Settings
Port Settings...
Windows 95/98/Me
• Spool Data Type
Select spool data type (EMF format or RAW format). Specifying RAW format results in longer time
before placing an application operational after printing on the application.
Note: Spooling by EMF format (metafile compression) may cause the following problems on some
application software.
1) Printing result is different from the screen display.
2) Printing requires excessive time.
• Enable bidirectional support
Be sure to check th e check box for "Enable bidirectional sup port" when installing the status monitor
(See page 102). Otherwise, printing may not function properly.
9. button
Modifies printer port settings.
Printer Section
15
Configuring the Printer Driver Settings
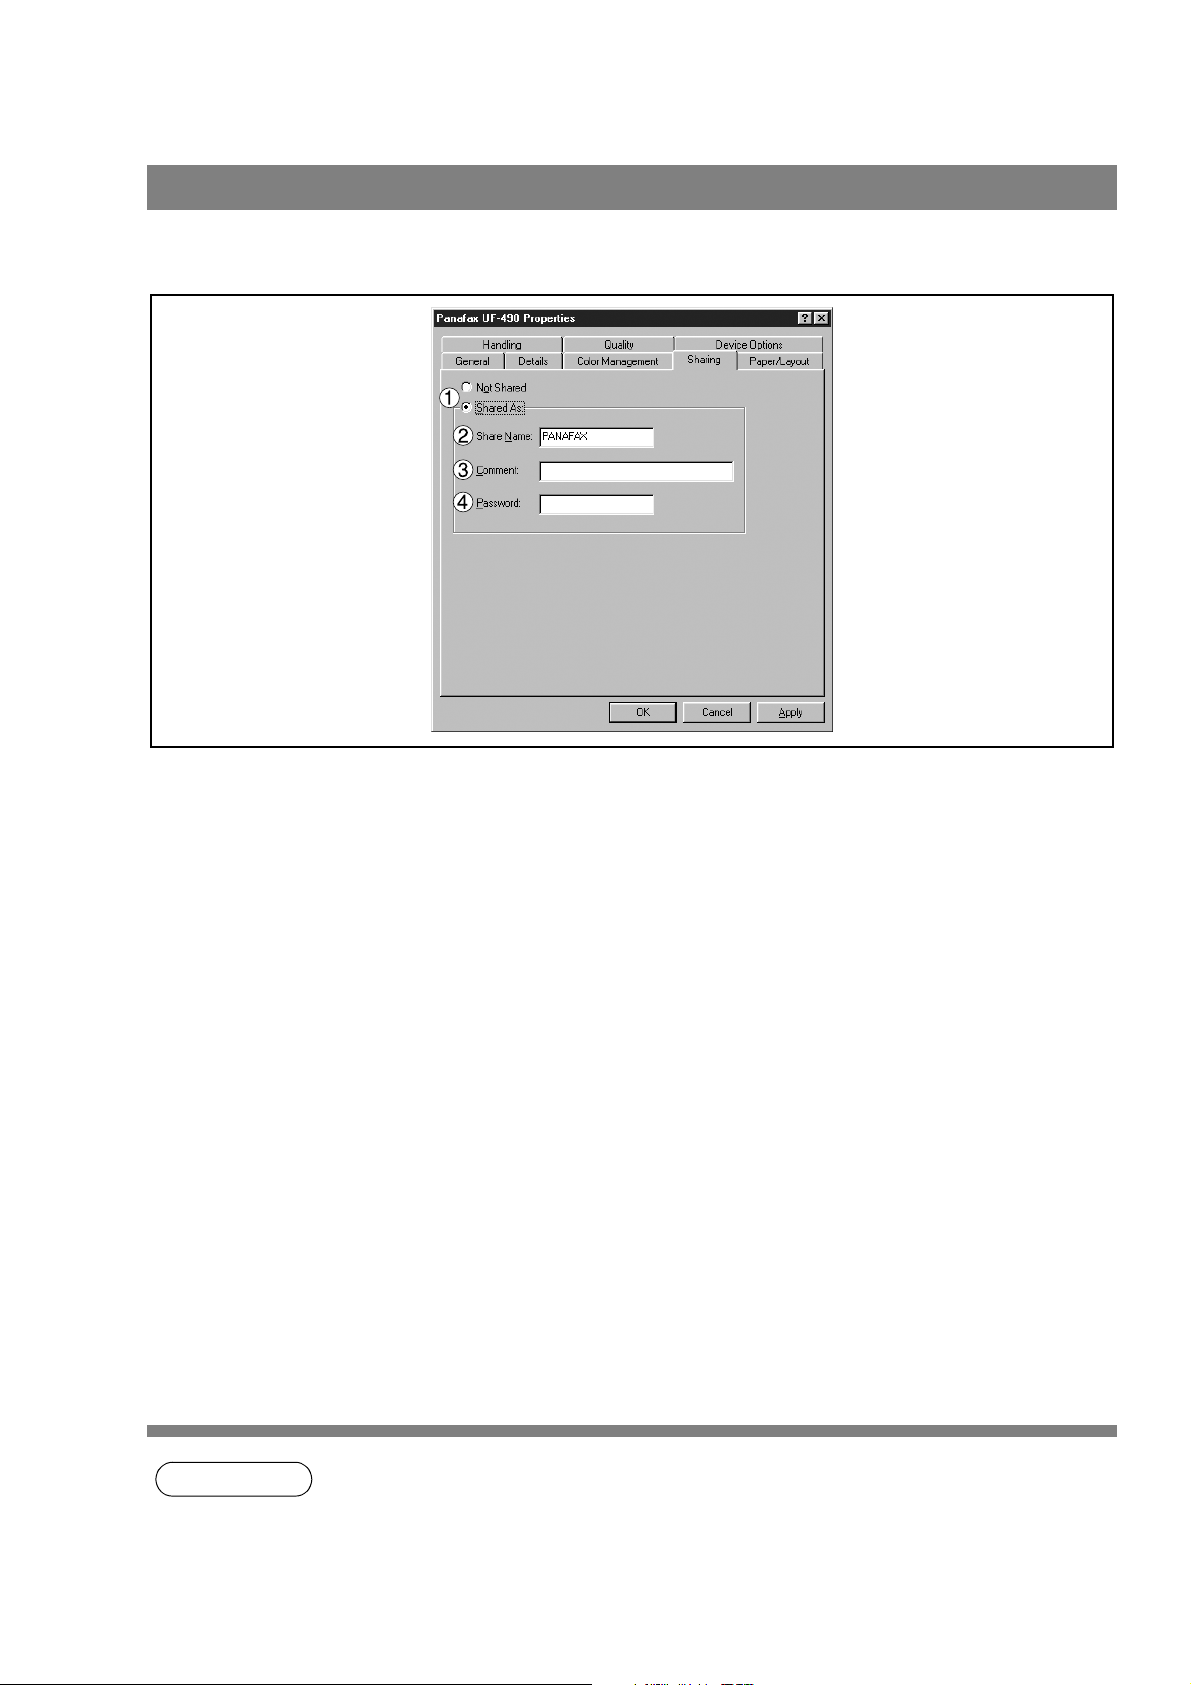
Windows 95/98/Me
Sharing Tab
1. Not Shared/Shared As
Select whether to display or use this printer with other computers.
2. Share Name
Specify the name of the sh ared pr inter. The displayed name c an be used as it i s or a n ew name m ay be
entered. The name s pecified at this time will be displ ayed when other users view infor mation about the
printer on the network.
3. Comment
You can enter comment regarding a shared printer (such as the type of printer and the location where it is
installed). When other users view information abou t the printer on the network, the c omment specified
here will be displayed.
4. Password
Specify a password when other users will connect to this printer.
Leave the box blank in order not to use any password.
16
NOTE
1. Sharing Tab in property dialog box is not displayed unless printer sharing has been specified.
Windows 95/98/Me
Restore Defaults
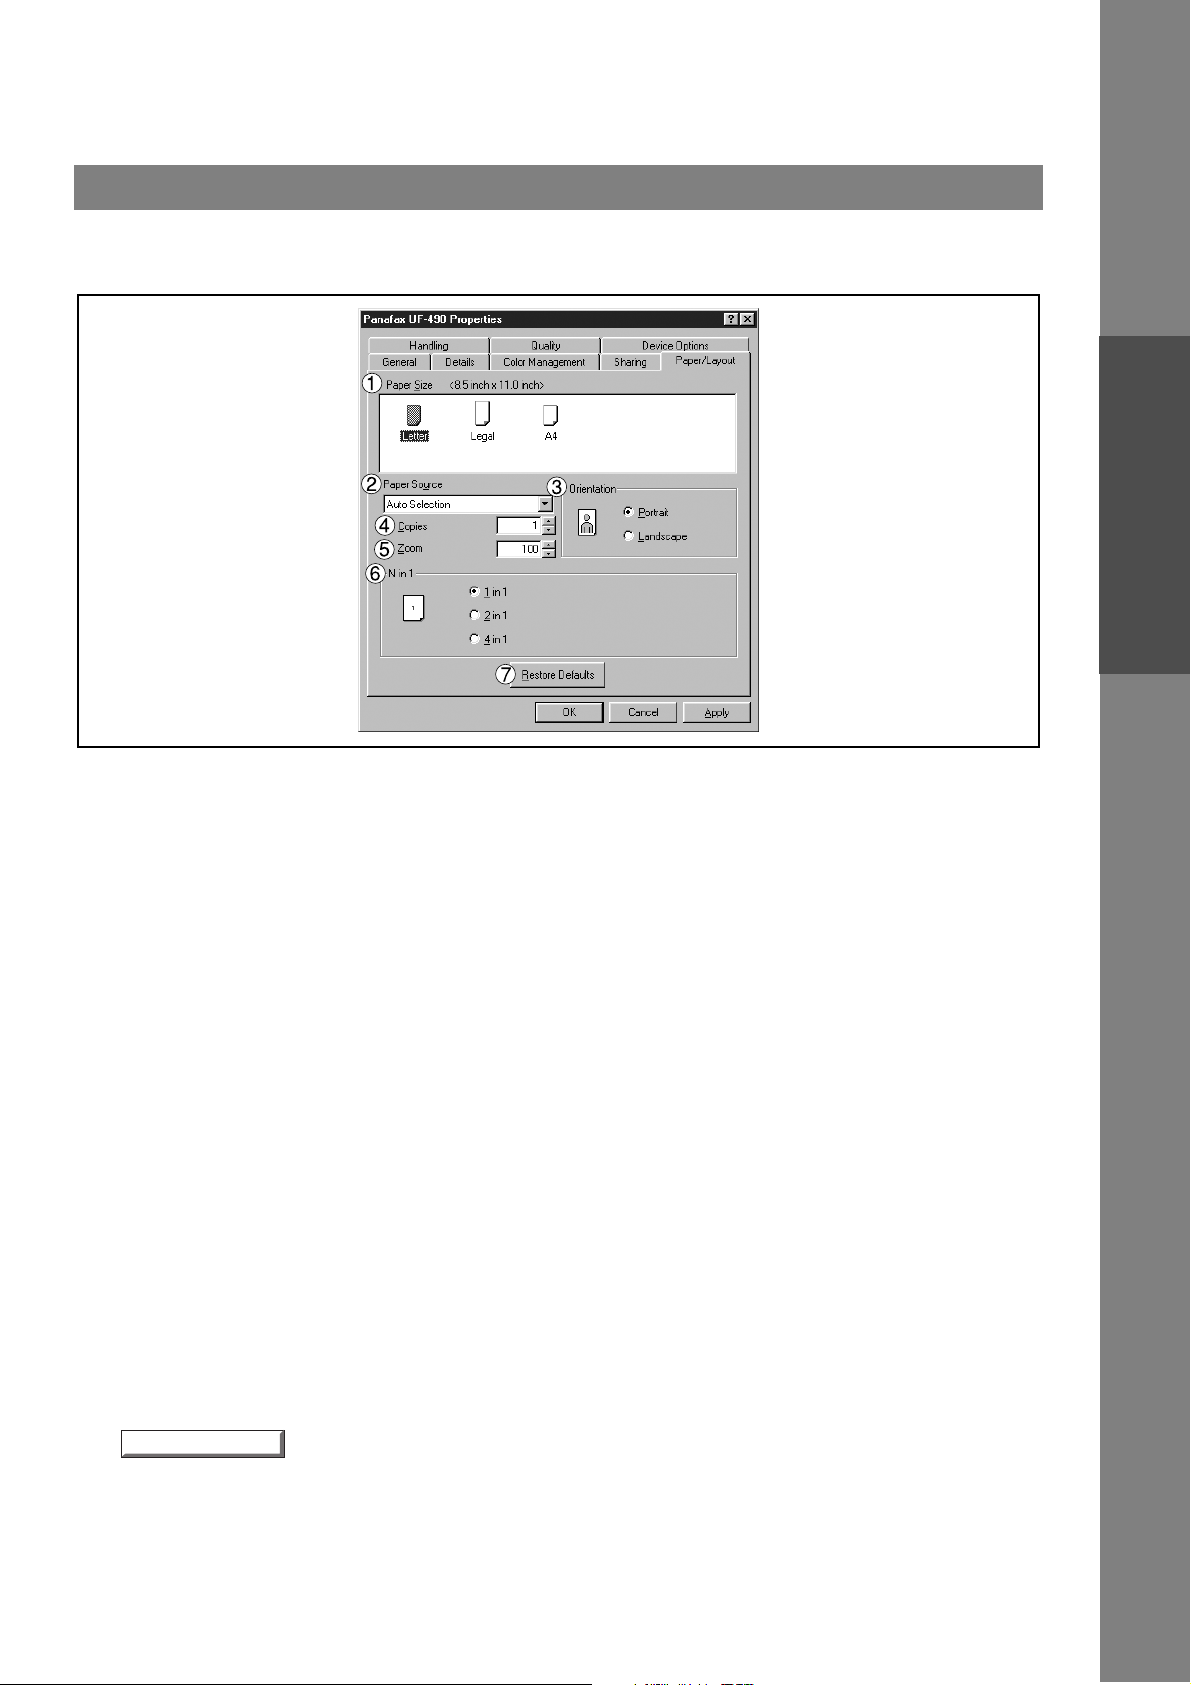
Paper/Layout Tab
Configuring the Printer Driver Settings
Printer Section
1. Paper Size
Select a document size.
2. Paper Source
Specify where the paper you want to us e is located in the machine. If you choose Auto Selection, the
printer driver will automatically select an appropriate tray according to the Paper Size.
3. Orientation
Select the print orientation (Portrait/Landscape).
4. Copies (1-99)
Specify the number of co pies to be pr inted. If the num ber of copies to be printed ca n be specif ied within
the application, ind icate one copy here an d specify the number o f copies in the Print di alog box of the
application.
5. Zoom (50-200)
Specify an enlarg ement or redu ction perc entage whe n printi ng doc uments. I f enla rgeme nt/reduct ion c an
be set within the application, indi cate 100% here and specify the enlargement/reduc tion percentage in
the Print dialog box of the application.
6. N in 1
For printing two or more pages on one sheet, specify a printing method.
Layout is selected by combining with "Orientation." Each layout is displayed with the icon.
• 2 in 1: Print 2 pages of documents zoomed out by 65 or 71% on one sheet.
• 4 in 1: Print 4 pages of documents zoomed out by 50% on one sheet.
7. button
Return all items in Paper/Layout Tab to standard settings (default).
17
Configuring the Printer Driver Settings
Restore Defaults
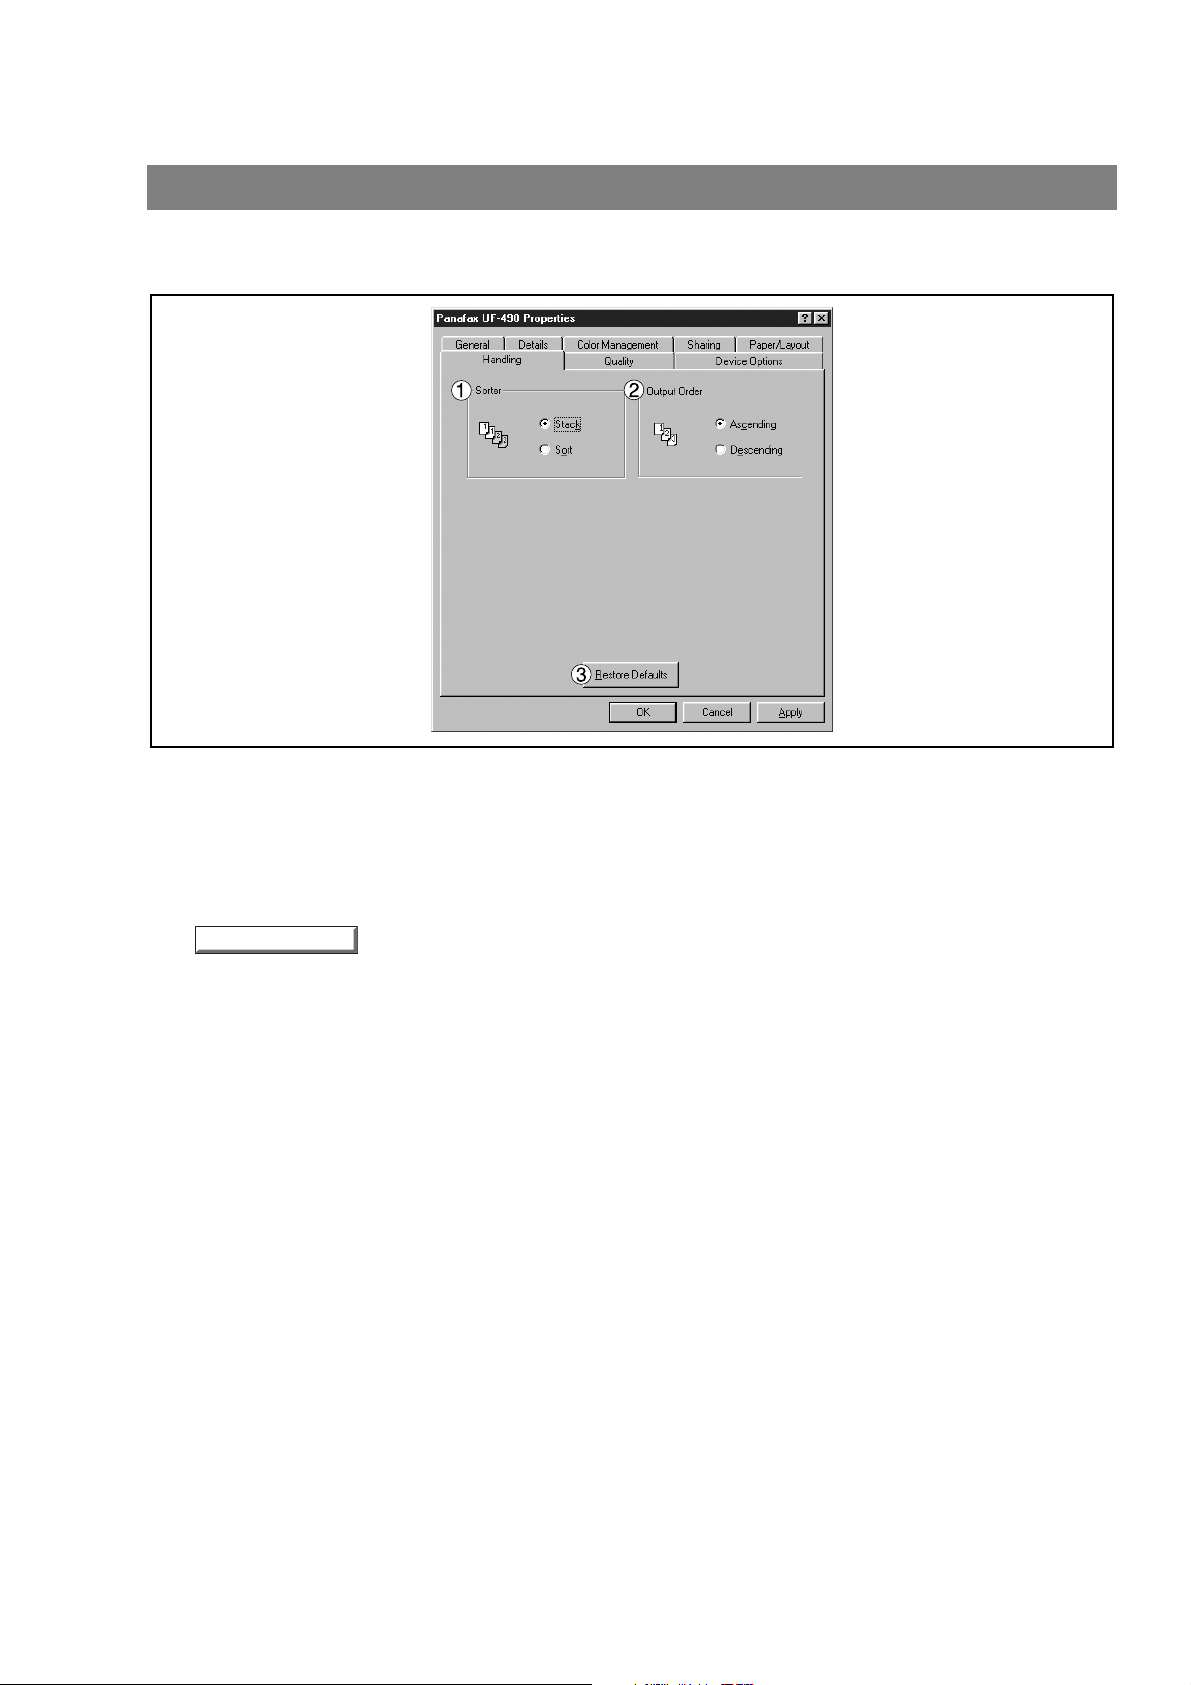
Windows 95/98/Me
Handling Tab
1. Sorter
Select whether to Stack or Sort when printing multiple copies.
2. Output Order
Specify the output order. <Ascending, Descending>
3. button
Return all items in the Handling Tab to standard settings (default).
18
Windows 95/98/Me
Restore Defaults
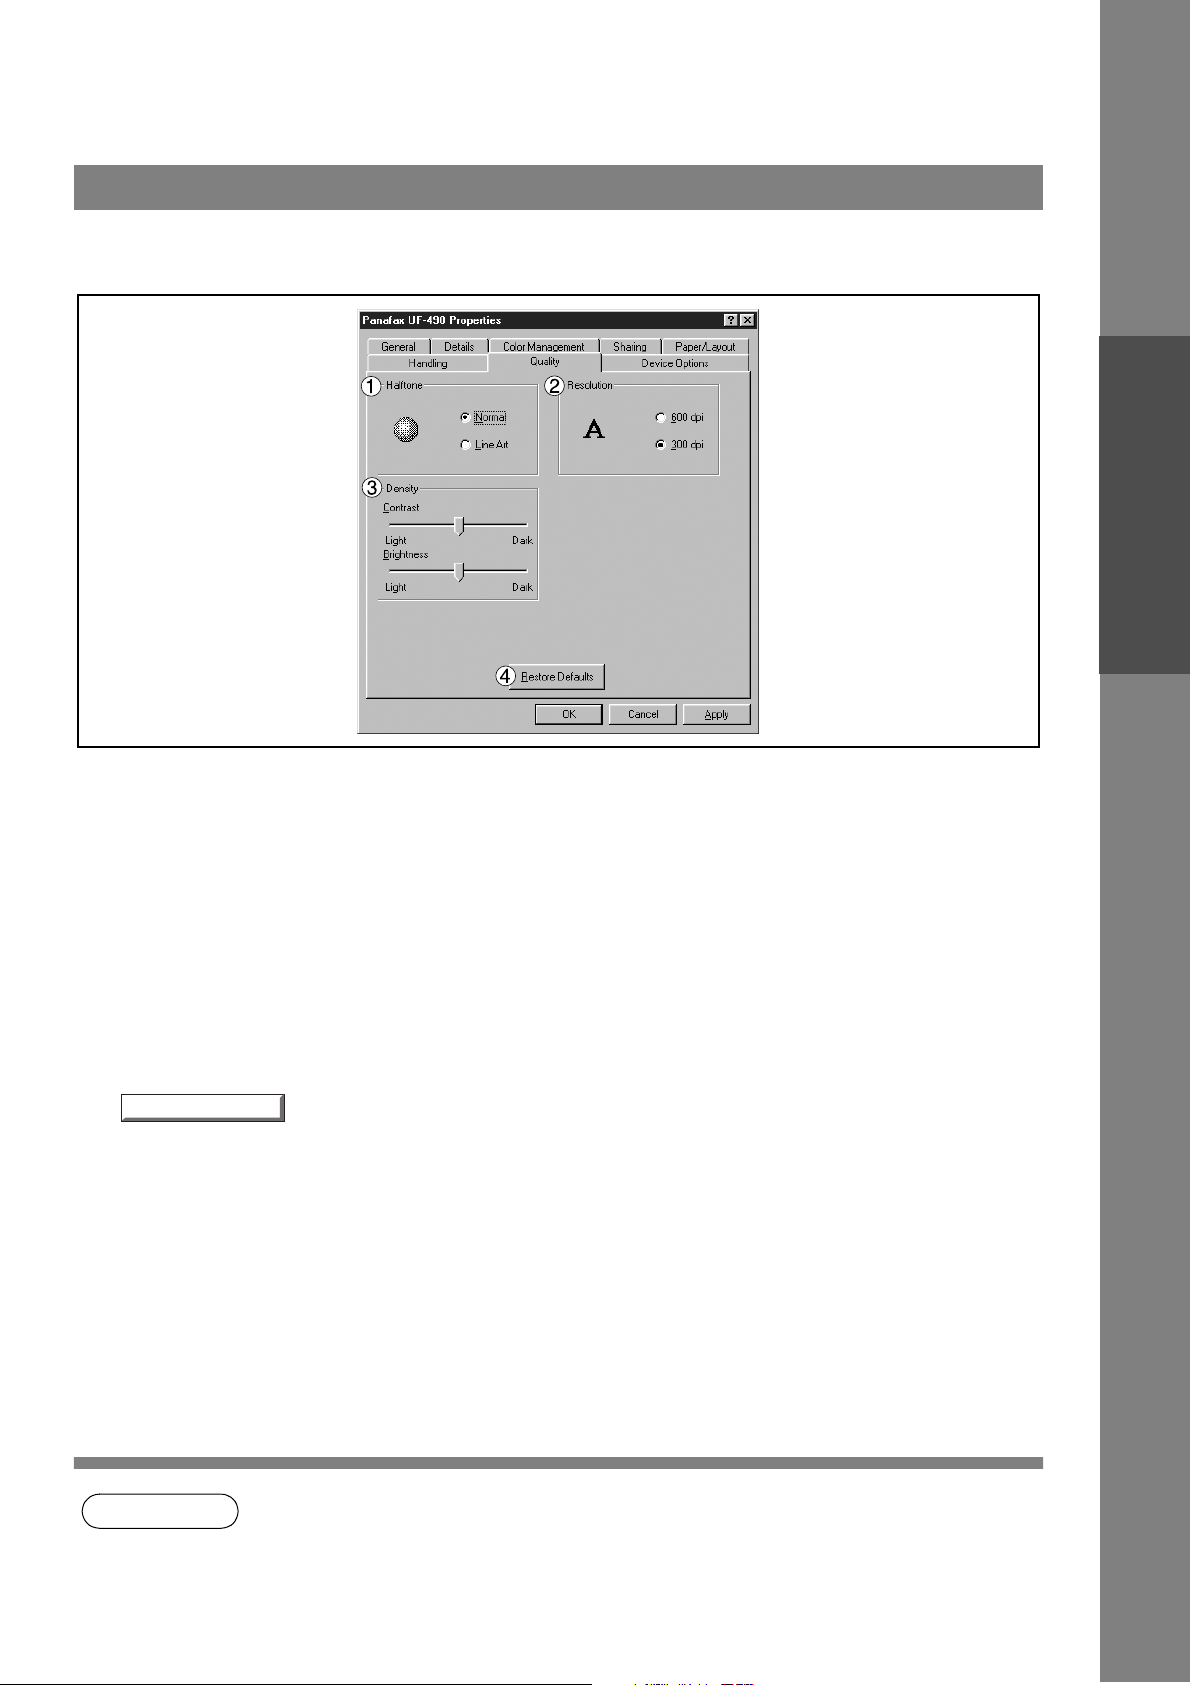
Quality Tab
Configuring the Printer Driver Settings
Printer Section
1. Halftone
Select method of e xpressing halftone. Select the setting according to the data to be p rinted and your
preference
• Normal: Select the halftoning method to be used. Sele ct it according to the details of data and your
preference.
• Line Art: Use when printing originals containing line drawings or text.
2. Resolution
Select the printer resolution (300dpi/600dpi).
3. Density
Adjust the printing density (Contrast and Brightness) as desired.
4. button
Return all items in the Quality Tab to standard settings (default).
NOTE
1. dpi (dot per inch) means the number of d ots cont ain ed in one in ch. Th e high er th e value i s, the
higher the resolution becomes.
2. Printing in 600 dpi resolution on UF-890/990 requires an optional D-RAM Memory Card
installed in the machine.
19

Configuring the Printer Driver Settings
About...
Windows 95/98/Me
Device Options Tab
1. Number of Paper Tray
Select the number of available paper trays for the printer if an optional Paper Feed Module is installed.
2. button
Displays the version information about the printer driver.
20
NOTE
1. Device Options Tab is specified in the printer properties.
2. The Number of Paper Tray setting is not available for UF-490/525.
Configuring the Printer Driver Settings
Windows NT 4.0 (Administrator)
To change the printer settings, open the dialog box for the printer properties by the following steps.
Log onto the computer/network with an acco unt rights of
1
2
3
Administrator.
Click the Start button, point to Settings, and then click
Printers.
Right-click on the printer icon in the printers folder, and
select Properties in the dropdown menu.
The printer properties dialog box appears.
Printer Section
NOTE
1. In Windows NT 4.0, setting the properties depends on the log-in account. This section
describes properties to be specified by an administrator (system manager).
2. See "Configuring the Printer Driver Settings (User)" for details of user properties. (See page
29)
21
Configuring the Printer Driver Settings
New Driver...
Separator Page...
Print Processor...
Print Test Page
Windows NT 4.0 (Administrator)
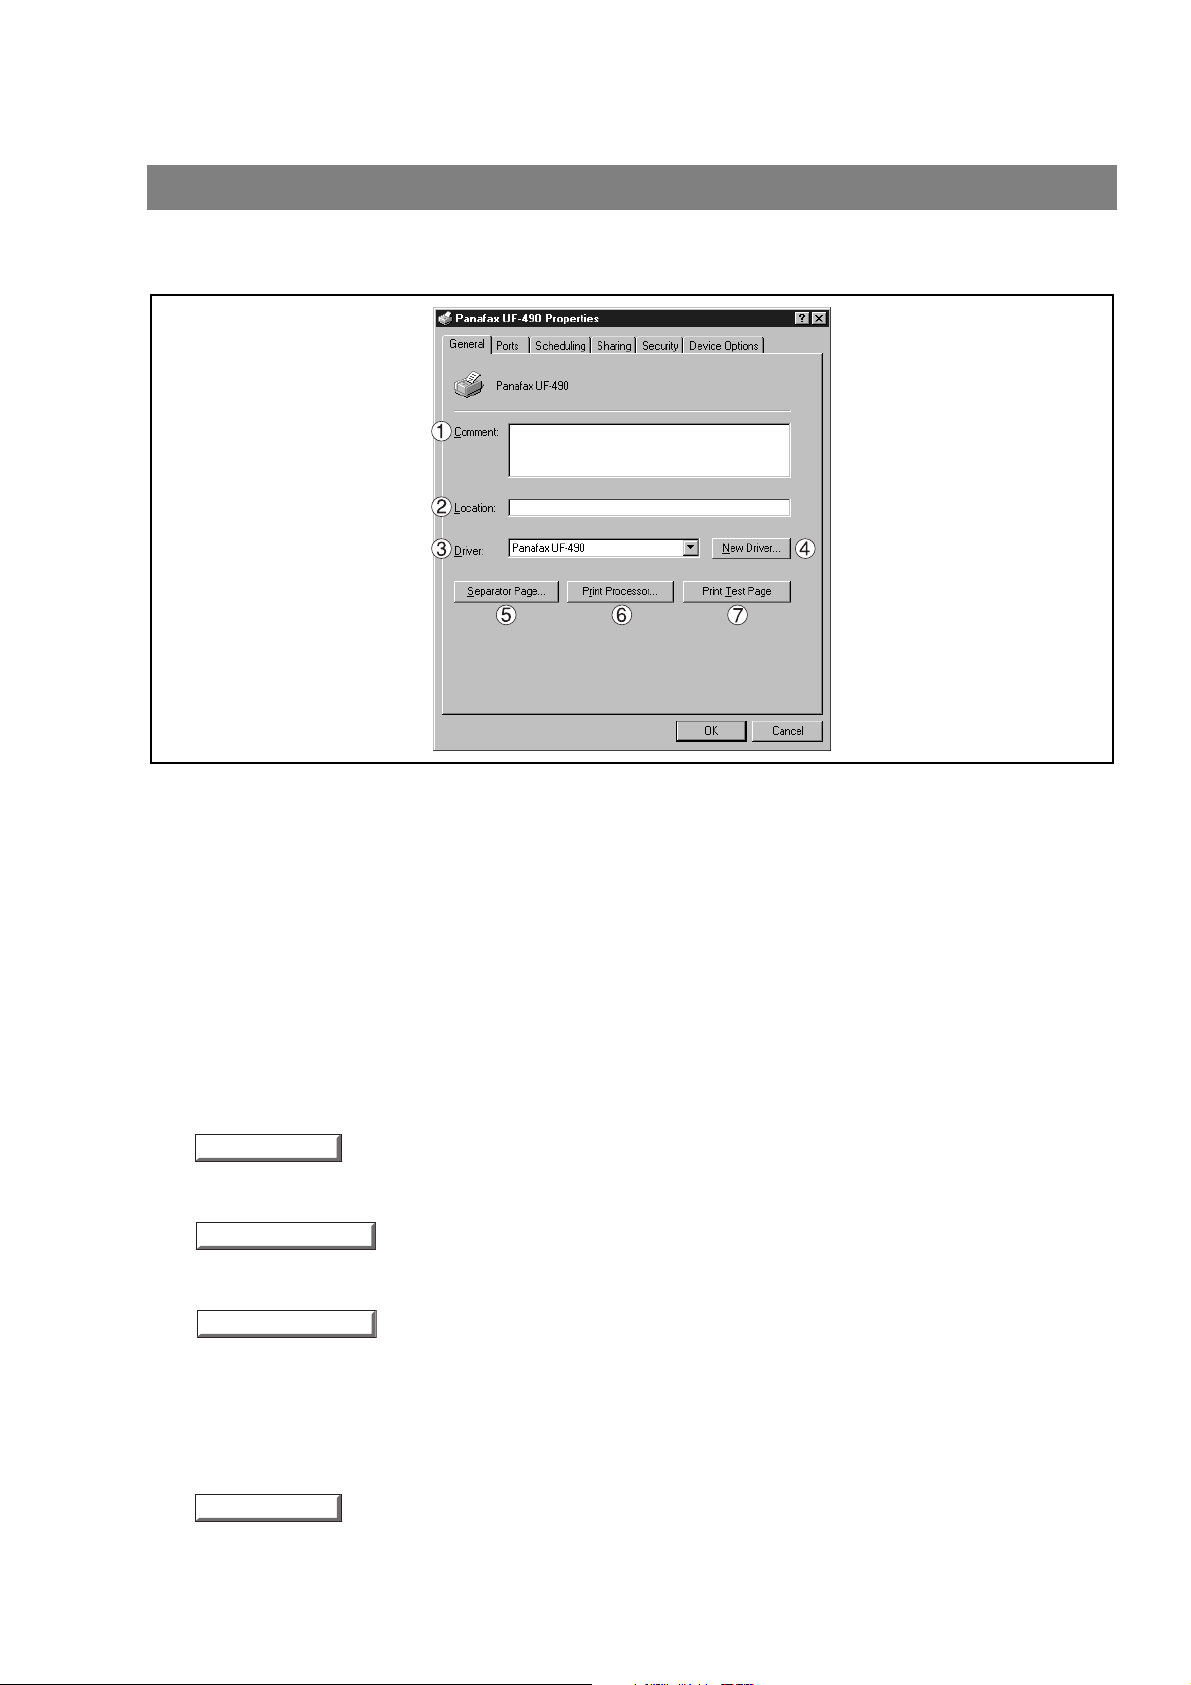
General Tab
1. Comment
Enter comments to described the printer, if desired.
If another user sets up this printer on his or her computer when sharing the printer, the comment specified
here will also appear on th at computer. However, the comment displayed for an already set-up user will
remain unchanged even if the comment is modified later.
2. Location
Specify the printer location.
3. Driver
Displays the print er driver type. Speci fy the printer being used or a printer mo del that can be emula ted
with the printer being used.
4. button
Updates or modifies the printer driver.
5. button
This feature is not available on your machine.
6. button
Specify the processor to be used for printing (Print Processor) and the data type (Default Data type).
22
The processor and da ta type affect the manner in which the printer functions in W indows NT. Norm ally
they do not need to be modified. However, modification might be necessary when the printer is used with
a special application.
7. button
Prints a test page. This allows the user to verify if the printer is installed properly.
Configuring the Printer Driver Settings
Add Port...
Delete Port...
Configure Port...
Windows NT 4.0 (Administrator)
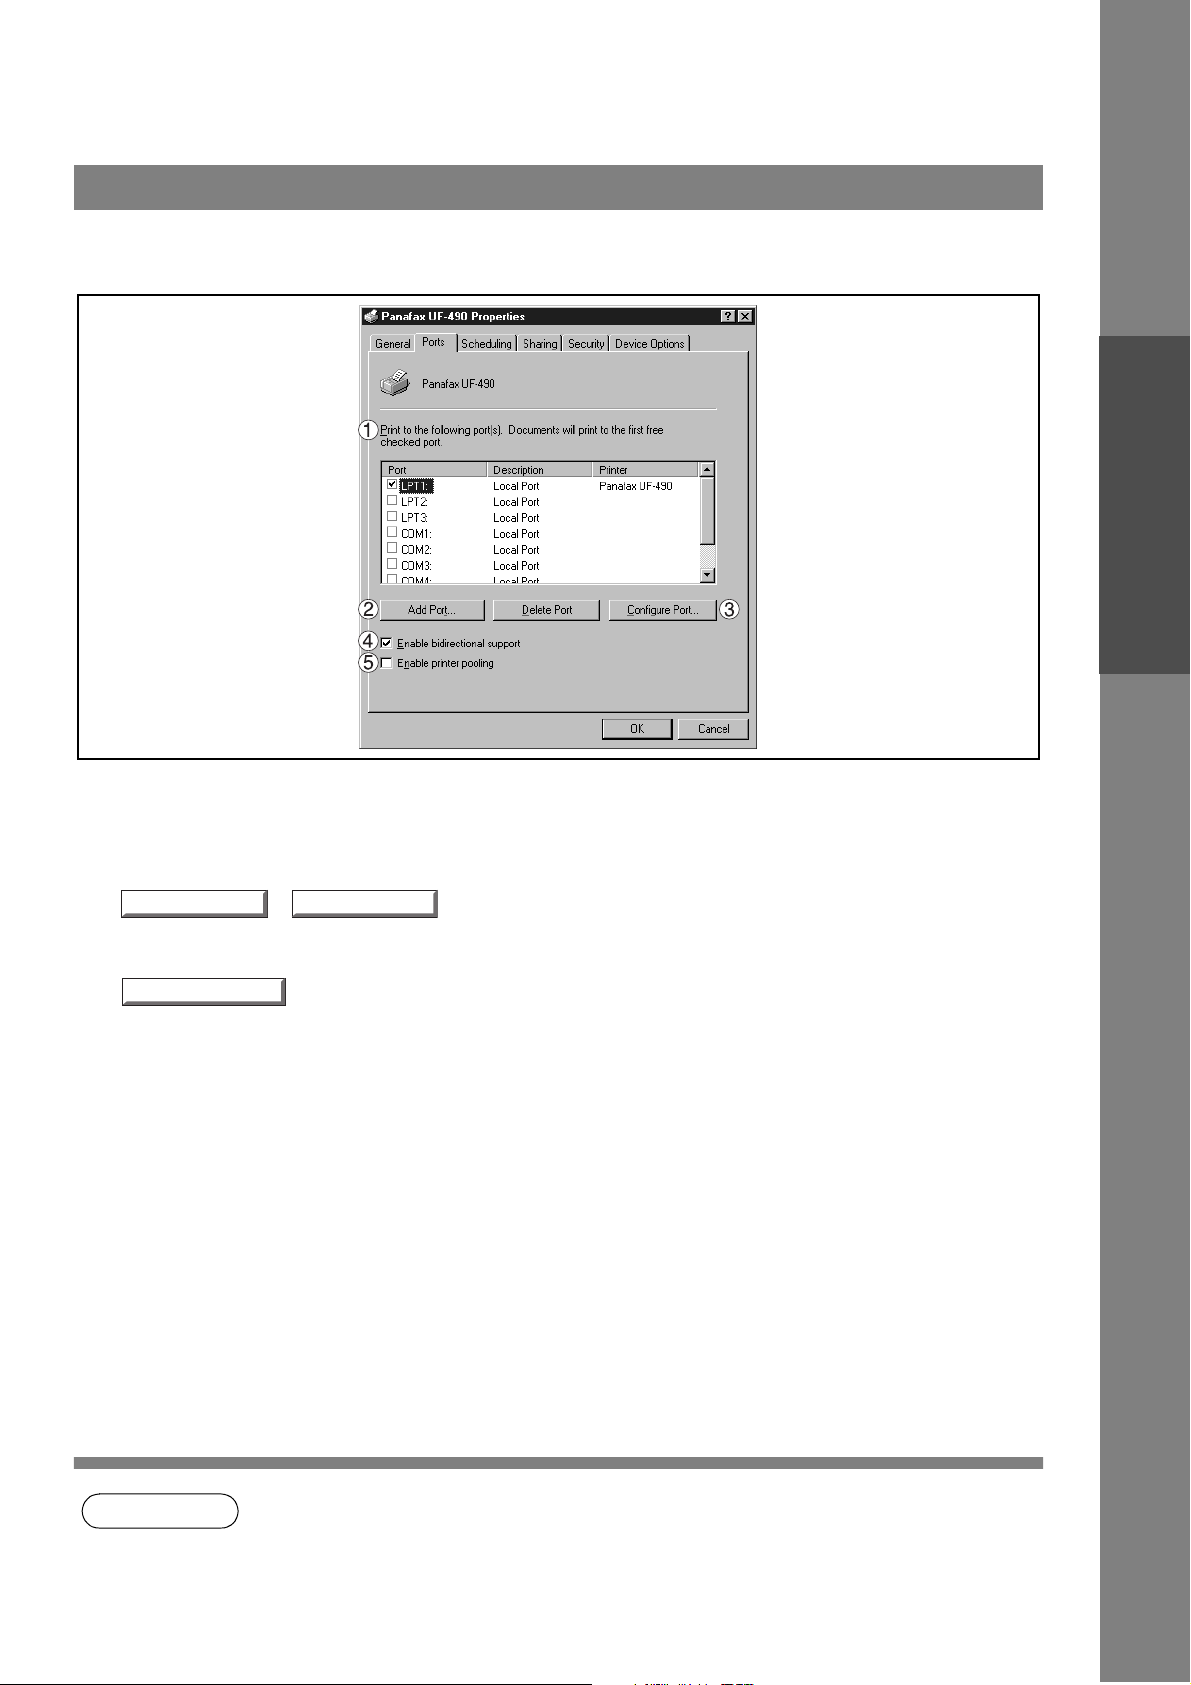
Ports Tab
Printer Section
1. Print to the fo l l owing port( s)
Displays a list of available ports for printing (Port), their status (Description) and printers that are
connected to these ports (Printer).
2. / button
Adds/deletes a new port or a new network path.
3. button
Configures the selected port. In case of a parallel port, Transmission Retry should be specified.
4. Enable bidirectional support
On a printer, this setting enab les rec eptio n of configu ratio n data a nd status data from comp uter. Be sure
to check this che ckbo x when install ing s tatus mon itor ( See page 102). Prin ting m ay be disa bled without
checking on the checkbox.
5. Enable printer pooling
Printer spool allows outputtin g data from one logical printer to two or more printers. Wi th printer spool
enabled, a transmitted printing job is output to the first printer that allows printing.
NOTE
1. Specify time (seconds) waiting for the printer to be ready for printin g. If a printer is not ready for
printing after the specified time has elapsed, an error message is displayed.
2. If a timeout error occurs frequently upon printing a large size document, specify a larger value
here.
23

Configuring the Printer Driver Settings
Windows NT 4.0 (Administrator)
Scheduling Tab
1. Available
Schedules the printer for operation. Specify operating hours when From-To is selected.
2. Priority
Sets printing priority. The slider allows the priority to be adjusted from 1 through 99.
3. Spool print documents... / Print directly to the printer
Specify how documents should be sent from the application to the printer.
4. Hold mismatched documents
The spooler compares document se ttings against printer setti ngs and holds printing o f a document if its
settings (Paper Size, Orientation, and so on) do not match the printer settings.
5. Print spooled documents first
Always prints spooled documents first regardless of printing priority.
6. Keep documents after they have printed
Holds documents in the pr int queue even after th ey ha ve be en pr in ted. Thes e doc um ents c an be pr in ted
again directly from the queue regardless of the state the application is in.
24
Configuring the Printer Driver Settings
Windows NT 4.0 (Administrator)
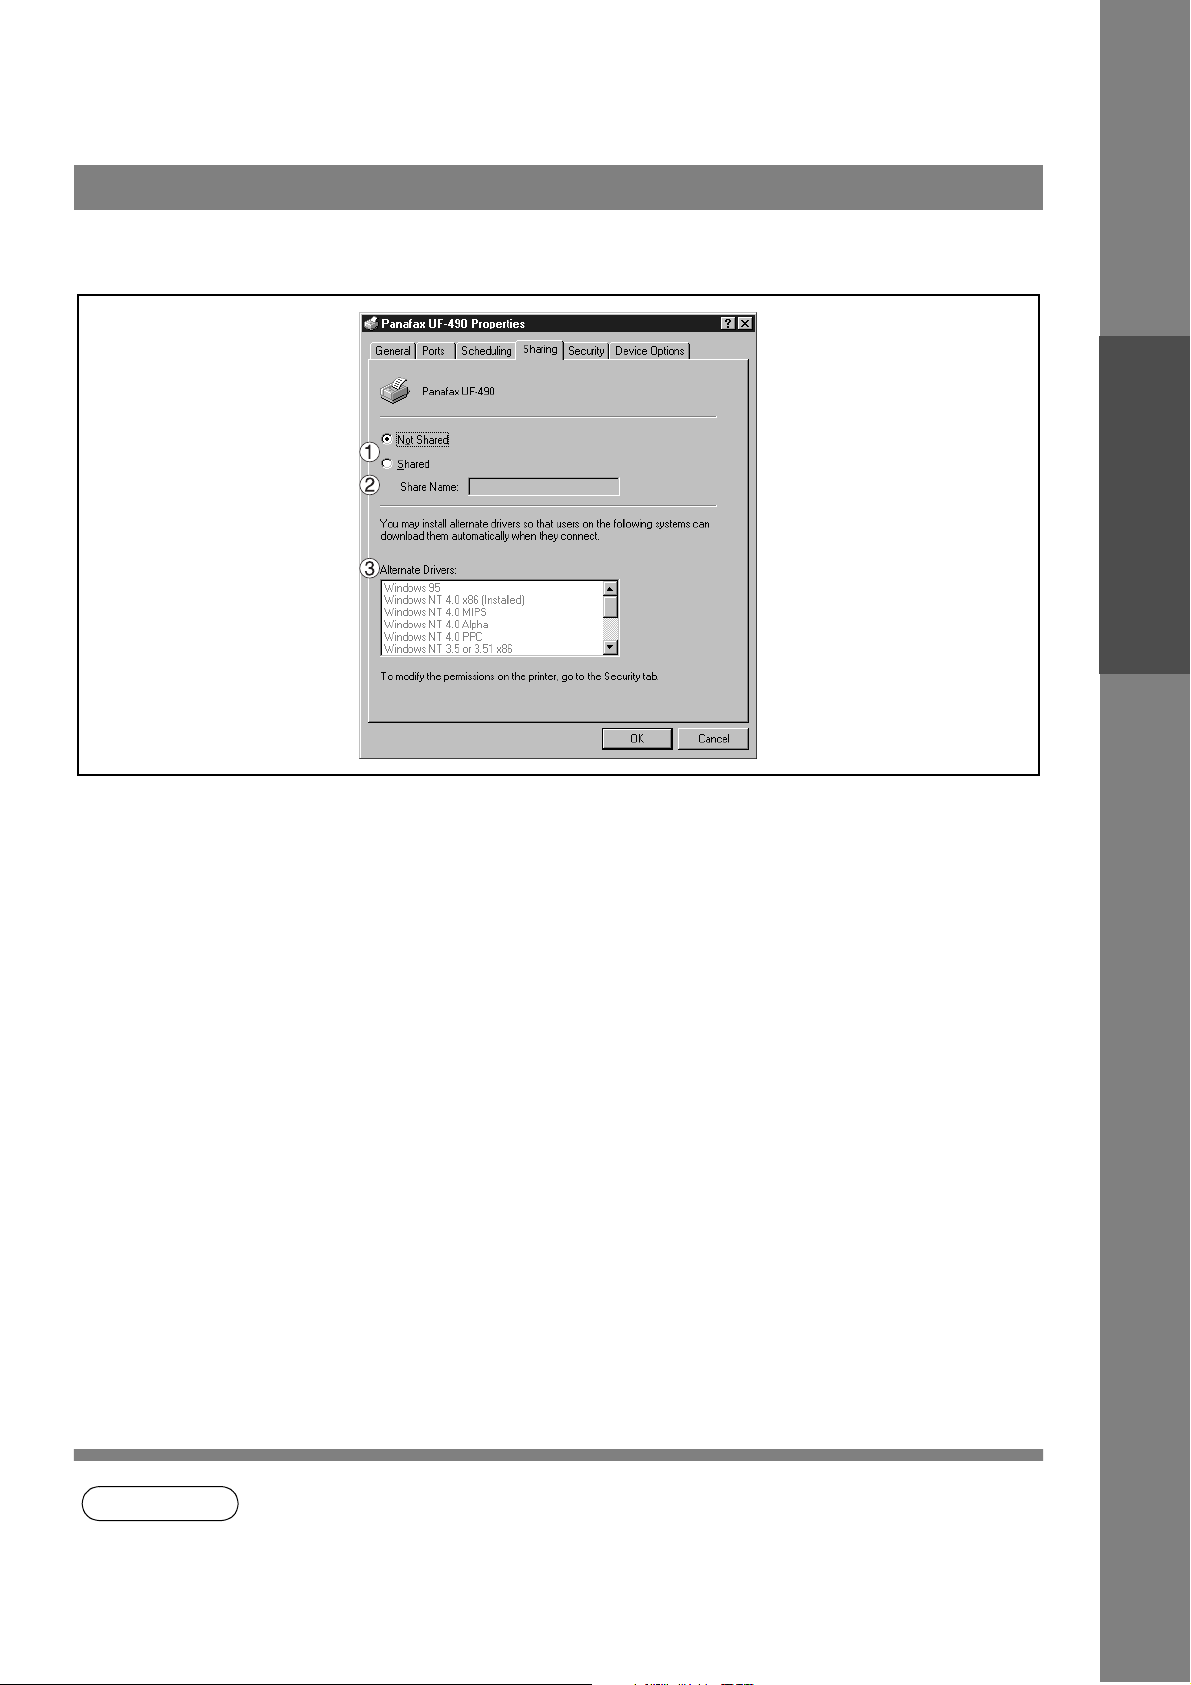
Sharing Tab
Printer Section
1. Not Shared/Shared
Select whether to display or use this printer with other computers.
2. Share Name
Specify the name of the sh ared printe r. The displayed nam e can b e used as it is or a new na me may be
entered. The name specified at this time will be displayed when other users vi ew information about the
printer on the network.
3. Alternate Drivers
Specify the operating systems of other computers that might share this printer.
NOTE
1. When sharing a printer on the network, the print driver is installed on one print server, other
computers will automatically copy and use that driver.
2. For this reason, the print server must be ready with printer drivers for all the operating systems
of all computers that will be sharing the printer.
25
Configuring the Printer Driver Settings
Permissions
Auditing
Ownership
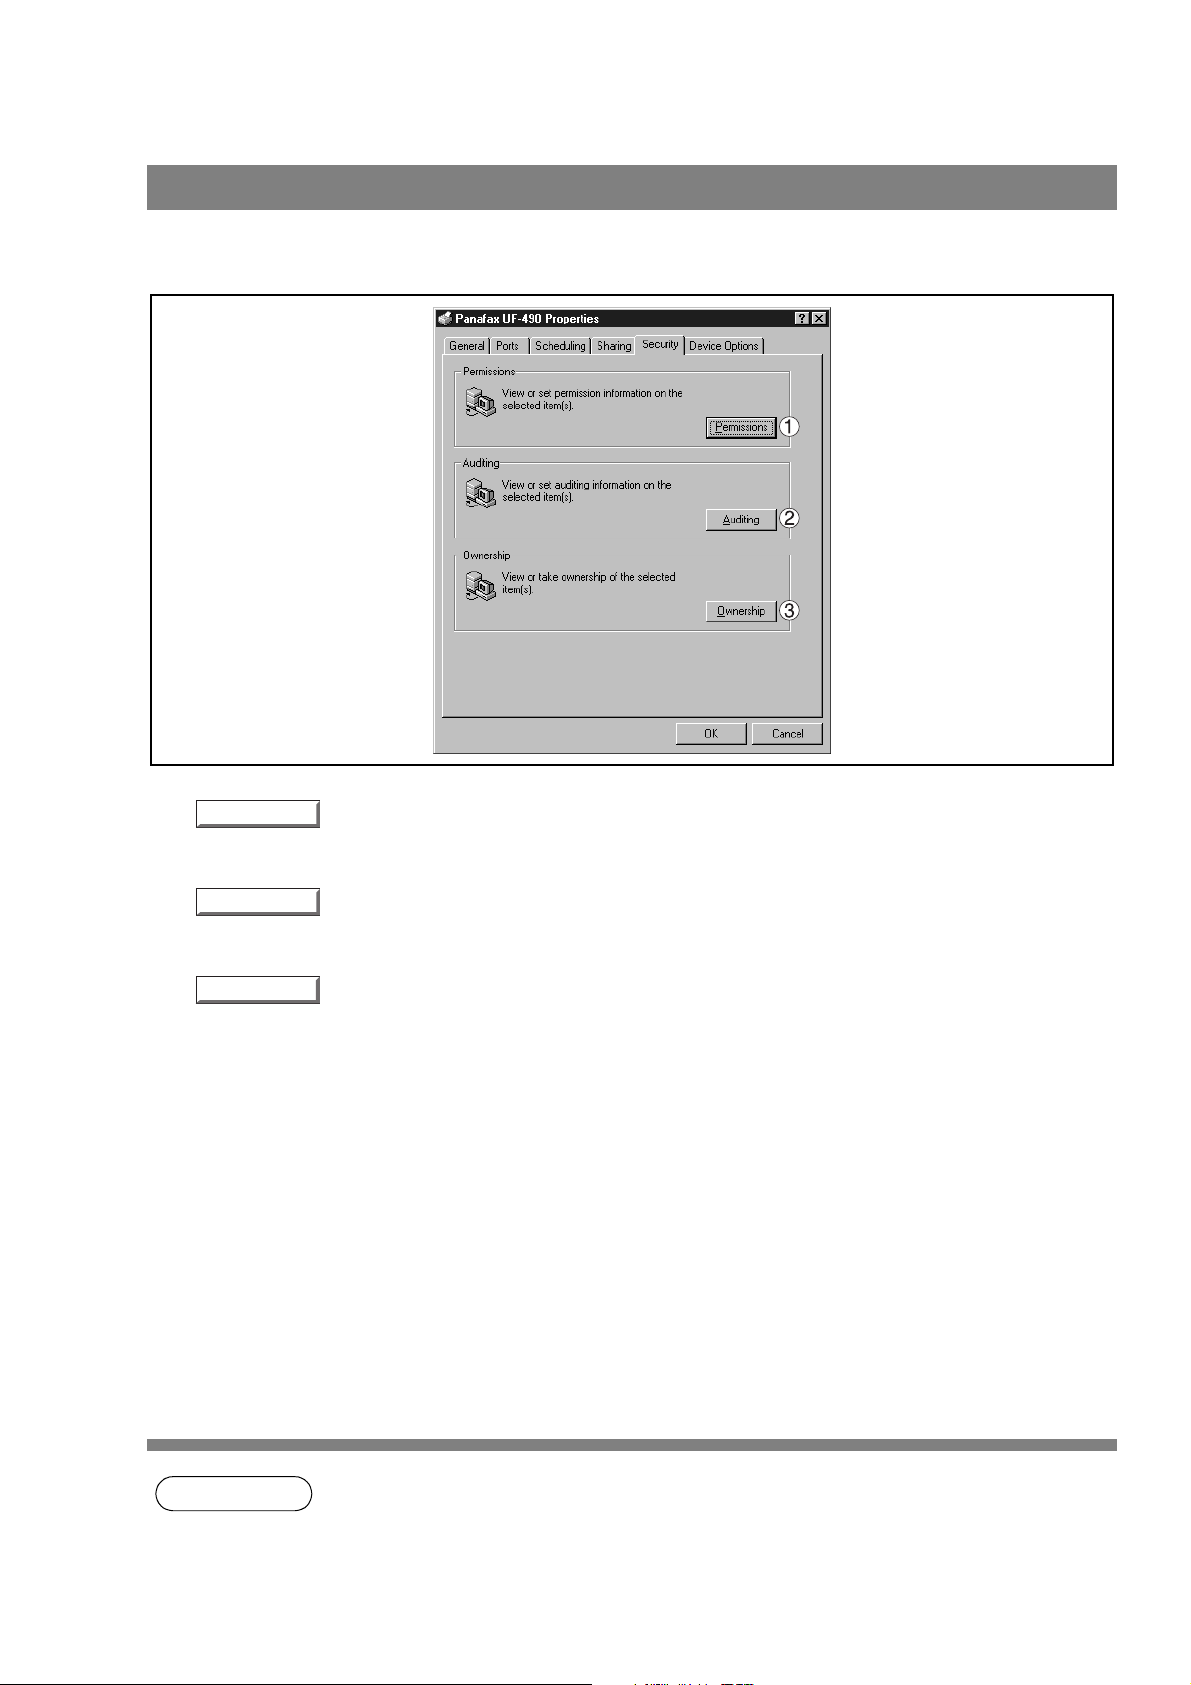
Windows NT 4.0 (Administrator)
Security Tab
1. button
Set printer access privileges.
2. button
Displays the persons who used this printer and how they used.
3. button
Set the ownership of the printer.
26
NOTE
1. In order to utilize these features, you need to have selected Audit... from User Manager’s
Policies and have enabled File and Object Access in the Audit Policy dialog box.
Configuring the Printer Driver Settings
Halftone Setup...
Windows NT 4.0 (Administrator)
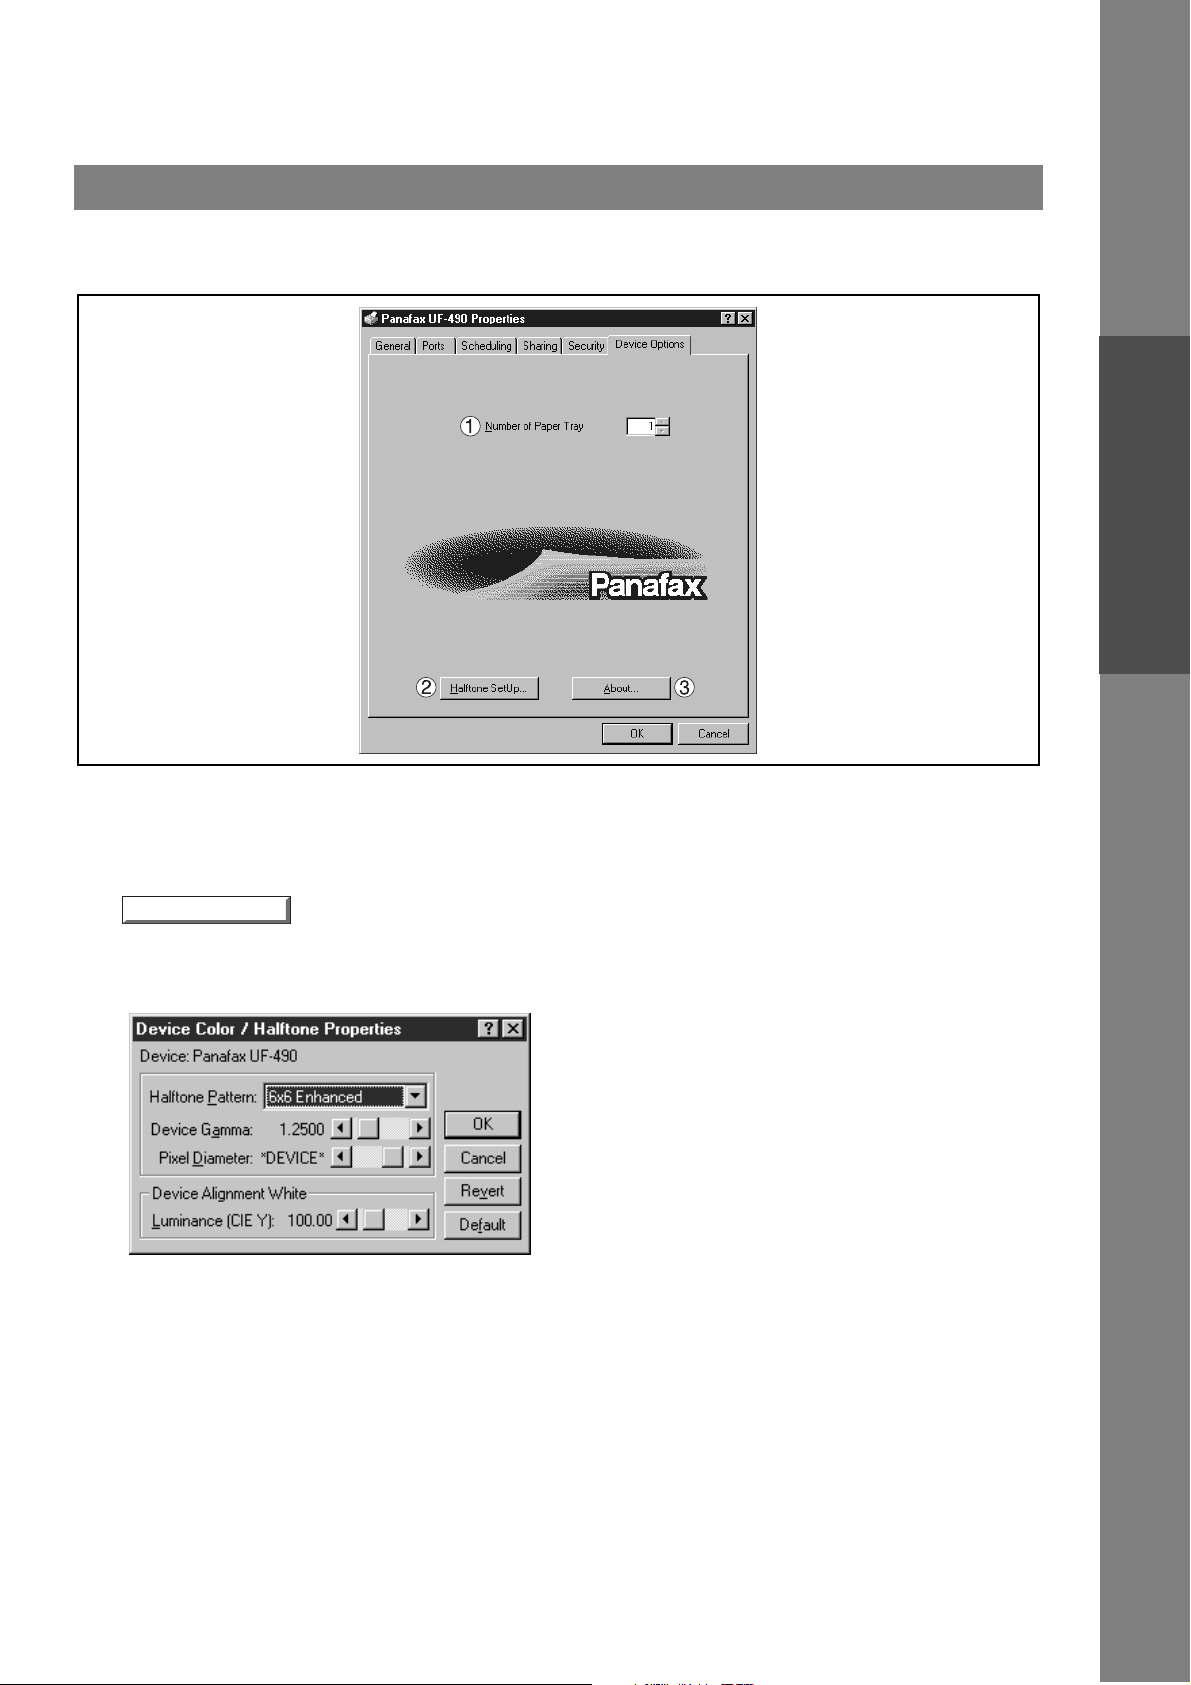
Device Option Tab
Printer Section
1. Number of Paper Tray
Select the number of available paper trays for the printer if an optional Paper Feed Module is installed.
2. Halftone Setup
button
Select the halftoning method to be used (halftones specific to the printer).
Select it according to the details of data and your preference.
• Halftone Pattern
Select the pixel size to be used for halftones.
The greater the value, the coarser the image would become. However, a larger value is suited to printing
in large areas.
The Enhanced pattern al low s p rinti ng a t a hi gh er reso lution using the same n umb er of pi x els. Ho wev er,
the pattern might generate unnatural lines, patterns, moire effects, and so on depending on the image to
be printed.
• Device Gamma
Adjust the gamma of print images (color intensities).
27

Configuring the Printer Driver Settings
About...
Windows NT 4.0 (Administrator)
• Pixel Diameter
Adjust the dark ness of the print im age. Manipulate t he slider to speci fy the pixel size. You can select
between specifying the real size in inches or specifying in percentage relative to the printer resolution.
• Luminance (CIE Y)
Adjust the luminosity of the print image.
3. button
Displays the version information about the printer driver.
28
NOTE
1. Device Option T ab specifies devi ce- spe ci fic set tings and settings of optiona l dev ic es . Re fer to
the operation manuals of the optional devices, or on-line manuals for settings items.
2. Settings specified in this section are saved as standard (default) settings of the printer.
3. The Number of Paper Tray setting is not available for UF-490/525.

Configuring the Printer Driver Settings
Properties...
Windows NT 4. 0 (Us e r)
To change the printer settings, open the dialog box for the printer properties by the following steps.
Select Print in the File menu of the application.
1
2
3
Click the button in the Print dialog box.
The dialog box for the printer properties appears. Click
the desired tabs of the dialog box and specify the
properties.
Printer Section
NOTE
1. In Windows NT 4.0, setting properties depends on the log-in account. This section describes
properties to be specified by a user, upon executing a print operation on an application. See
"Configur ing the Pr inter Dr iver Sett ings (Adm inistr ator)" f or details of adminis trator propert ies.
(See page 21)
29
Configuring the Printer Driver Settings
Restore Defaults
Windows NT 4.0 (User)
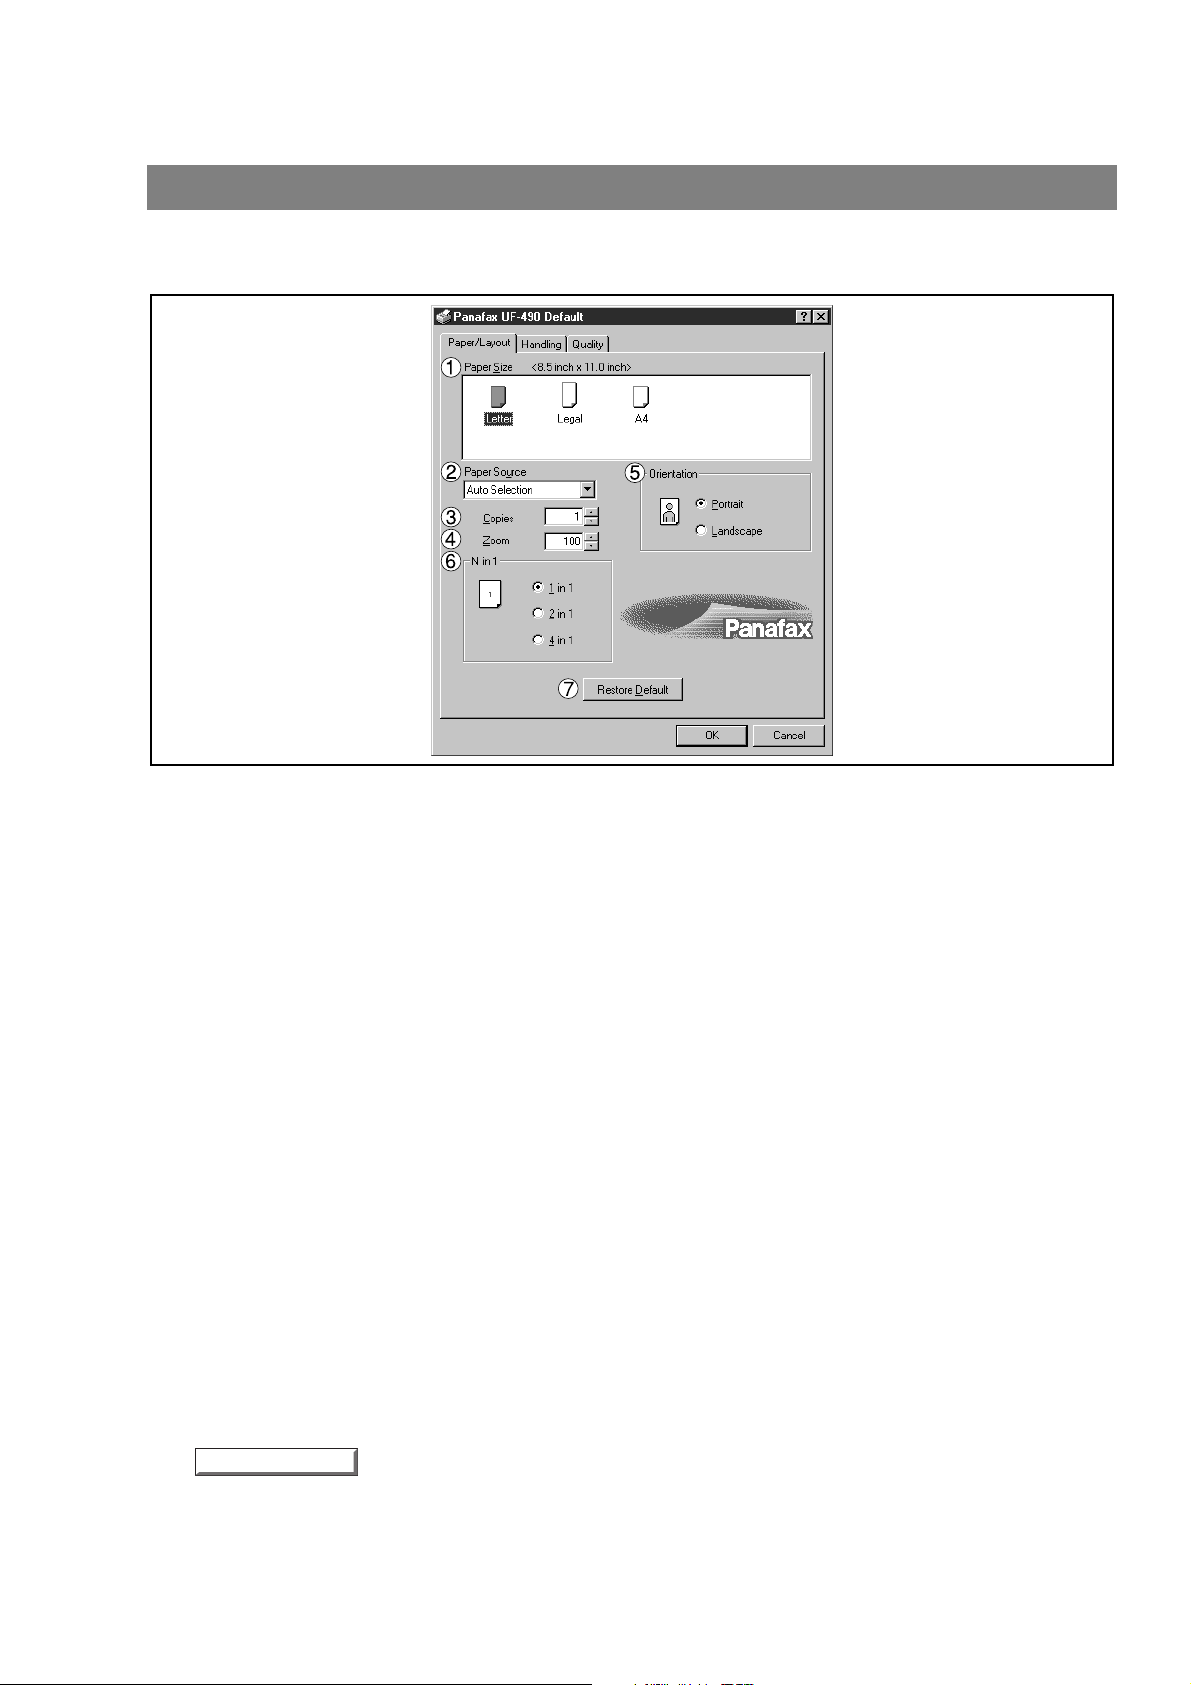
Main T ab
1. Paper Size
Select a document size.
2. Paper Source
Specify where the paper you want to us e is located in the machine. If yo u choose Auto Selection , the
printer driver will automatically select an appropriate tray according to the Paper Size.
3. Copies (1-99)
Specify the number of co pies to be pr inted. If the nu mber of cop ies to be printe d can be spec ified with in
the application, ind icate one copy here an d specify the number of c opies in the Print di alog box of the
application.
4. Zoom (50-200)
Specify custom zoom when printing a document by zooming in/out at a desired rate. If the zooming rate is
specifiable in an appl icati on, s pecify "1 00%" (s ame s ize) h ere. Specify a z oomin g rate in the pr int d ialog
box of the application.
5. Orientation
Select the print orientation (Portr ai t/Lan dscape).
6. N in 1
For printing two or more pages on one sheet, specify a printing method.
Layout is selected by combining with "Orientation." Each layout is displayed with the icon.
• 2 in 1: Print 2 pages of documents zoomed out by 65 or 71% on one sheet.
• 4 in 1: Print 4 pages of documents zoomed out by 50% on one sheet.
30
7. button
Return all items in the Main Tab to standard settings (default).
Loading...