


Panasonic CS-E9RKDW, CS-E12RKDW, CS-E15RKDW, CS-E18RKDW, CS-E24RKDW User Manual [ru]
...Operating Instructions
Air Conditioner
Model No.
Indoor Unit
CS-E7RKDW CS-E9RKDW CS-E12RKDW CS-E15RKDW CS-E18RKDW CS-E24RKDW CS-E28RKDS CS-ME21RKD
Outdoor Unit
Single Split
CU-E7RKD CU-E9RKD CU-E12RKD CU-E15RKD CU-E18RKD CU-E24RKD CU-E28RKD
Multi Split
CU-2E15PBD CU-2E18PBD CU-4E27PBD CU-5E34PBD U-3E18JBE U-4E23JBE
Operating Instructions |
2-12 |
|
|
Air Conditioner |
|
||
|
|
||
Thank you for purchasing Panasonic Air Conditioner. |
English |
||
Installation instructions attached. |
|
||
|
|
||
Before operating the unit, read these operating |
|
|
|
instructions thoroughly and keep them for future |
|
|
|
reference. |
|
|
|
Инструкции по эксплуатации |
13-26 |
|
|
Кондиционер воздуха |
|
||
|
кий |
||
Благодарим вас за приобретение кондиционера |
|
||
Panasonic. |
|
||
|
Руcc |
||
Инструкции по монтажу прилагаются. |
|
||
|
|
||
Перед началом эксплуатации данного устройства |
|
||
внимательно прочитайте инструкции по эксплуатации |
|
||
и сохраните их. |
|
|
|
Інструкція з експлуатації |
27-38 |
|
|
Кондиціонер |
Українська |
||
|
|||
Дякуємо за придбання кондиціонера компанії |
|
||
|
|
||
Panasonic. |
|
|
|
Інструкції зі встановлення додаються. |
|
|
|
Уважно прочитайте цю інструкцію перед |
|
|
|
експлуатацією кондиціонера і збережіть її для довідок |
|
||
у майбутньому. |
|
|
|
Пайдалану нұсқаулары |
39-51 |
|
|
Ауа желдеткіші |
|
||
|
Қазақша |
||
|
|
||
Panasonic ауа желдеткішін сатып алғаныңыз үшін рақмет.
Орнату нұсқаулары бірге беріледі. Құрылғыны пайдаланбас бұрын осы пайдалану
нұсқауларын мұқият оқыңыз жəне оларды болашақ анықтамалық үшін сақтап қойыңыз.
F569880
Provide fast cooling, maximum comfort, clean air and optimise energy saving
i AUTO-X Cooling when it counts, Comfort when it matters
i AUTO-X with the new Panasonic Thermal Enhancement Technology (P-TECh) is a unique Panasonic compressor control technology which enable compressor to achieve maximum frequency in a short time.
i AUTO-X also comes with new AEROWINGS - twin flaps that works dynamically to adjust airflow directions. AEROWINGS gives you fast cooling at start up by directing airflow downwards*, and comfort of shower cooling by directing airflow upwards*.
So, you get to enjoy instant fast cooling satisfaction on a hot day and cooling comfort that goes on all day long.
*Applicable for horizontal flap AUTO setting.
ECONAVI + INVERTER The Perfect Energy Saving Technology
ECONAVI detects where energy is normally wasted and adjusts cooling power depending on room conditions and activity levels. Then, INVERTER leverages ECONAVI sensor data and varies compressor rotation speed. This helps to optimize cooling operation and reduces wasteful cooling.
nanoe-G Purifies the air down to the smallest particles
Deactivates harmful micro-organisms such as viruses, bacteria, etc. to keep air clean. It also deactivates viruses and bacteria on the filter to keep inside of the unit clean.
See “To learn more...” for details.
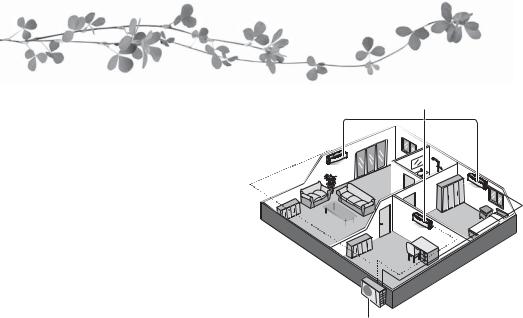
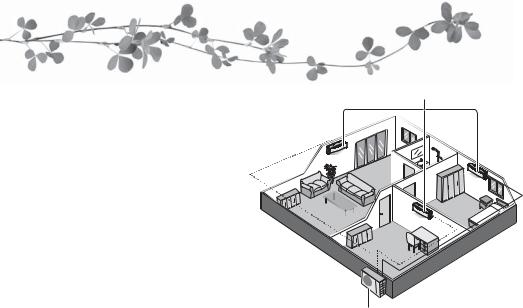
Multi air conditioner system
Multi air conditioner systems save space by letting you connect multiple indoor units to a single outdoor unit.
•For complete product features, please refer catalogue.
Indoor units
•It is possible to operate the indoor units individually or simultaneously. The priority of operation is placed on the first unit that turned on.
•During operation, HEAT and COOL modes cannot activate at the same time for different indoor units.
•The power indicator blinks to indicate the indoor unit is standing by for a different operation mode.
Indoor units
Outdoor unit
(CU-2E15PBD, CU-2E18PBD, CU-4E27PBD, CU-5E34PBD, U-3E18JBE, U-4E23JBE)
2
Quick guide
1


 2
2
3 
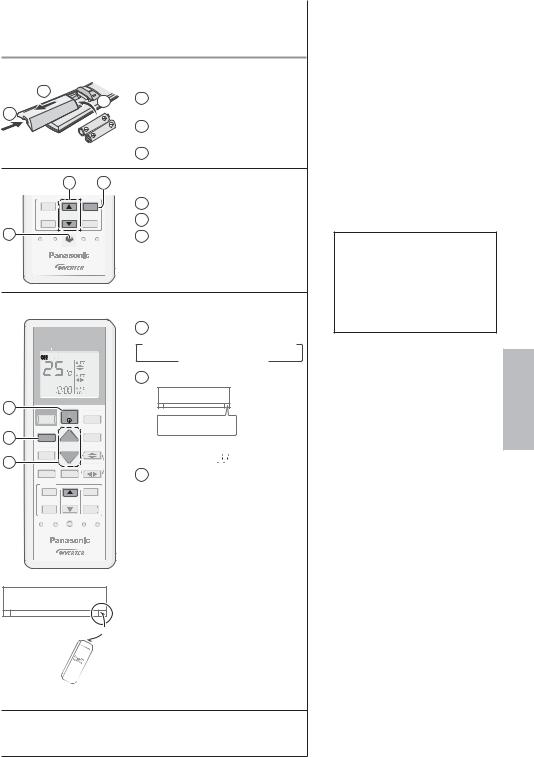
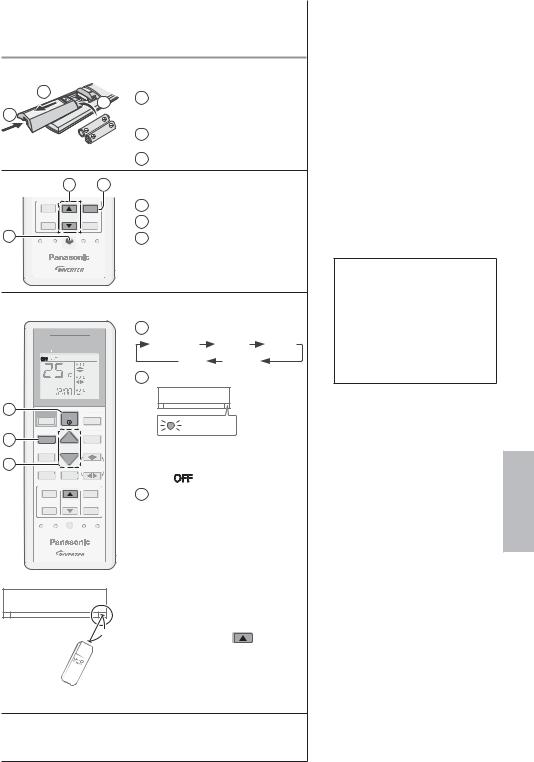
Inserting the batteries
1Pull out the back cover of remote control
2Insert AAA or R03 batteries (can be used ~ 1 year)
3Close the cover
|
2 |
3 |
Clock setting |
|
TIMER |
|
|
1 |
Press CLOCK |
ON |
|
SET |
||
1 |
2 |
3 |
2 |
Set the time |
OFF |
|
CANCEL |
||
1 |
|
AC RC |
3 |
Confirm |
SET CHECK CLOCK |
RESET |
|
|
|
Basic operation
|
AIR CONDITIONER |
||
|
|
MODE |
|
|
iAUTO-X |
|
|
2 |
i AUTO-X |
OFF/ON |
ECONAVI |
1 |
|
|
NANOE-G |
MODE |
|
|
|
|
AUTO |
TEMP |
|
|
COMFORT |
|
|
3 |
|
|
AIR SWING |
|
QUIET |
FAN SPEED |
|
|
TIMER |
|
|
|
ON |
|
SET |
|
1 |
2 |
3 |
|
OFF |
|
CANCEL |
|
|
|
AC RC |
|
SET CHECK |
CLOCK |
RESET |
 8m
8m
1 Select the desired mode
 i AUTO-X
  AUTO
AUTO  HEAT
HEAT
DRY COOL
COOL  2 Start/stop the operation


 POWER
POWER
•Please note that the OFF indication 


 is on to start.
3Select the desired temperature
•Selection range: 16 °C ~ 30 °C.
•Operating the unit within the recommended temperature may save energy.
HEAT : 20 °C ~ 24 °C. COOL: 26 °C ~ 28 °C.
DRY : 1 °C ~ 2 °C lower than room temperature.
•To dim or restore the unit’s
indicator brightness, press  and hold for 5 seconds.
•Use remote control within 8 m from the remote control receiver of the indoor unit.
The illustrations in this manual are for explanation purposes only and may differ from the actual unit. They are subject to change without notice for future improvement.
Table of contents |
|
Safety precautions................... |
4-5 |
How to use............................... |
6-7 |
To learn more... ...................... |
8-9 |
Cleaning instructions ................ |
10 |
Troubleshooting ....................... |
11 |
Information................................ |
12 |
Accessories
•Remote control
•AAA or R03 batteries × 2
•Remote control holder
•Screws for remote control holder × 2
English
3

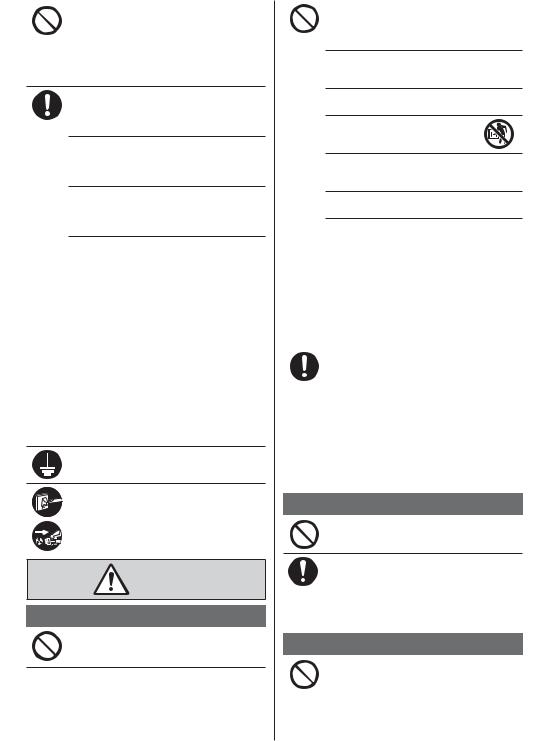
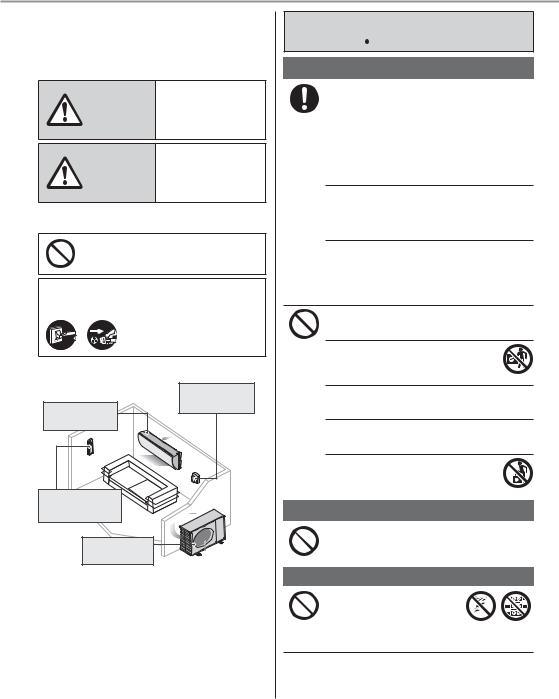
Safety precautions
To prevent personal injury, injury to others or property damage, please comply with the following:
Incorrect operation due to failure to follow instructions below may cause harm or damage, the seriousness of which is classified as below:
This sign warns of WARNING death or serious
injury.
This sign warns of CAUTION injury or damage to
property.
The instructions to be followed are classified by the following symbols:
This symbol denotes an action that is PROHIBITED.
These symbols denote actions COMPULSORY.
Power supply
Indoor unit 
 Air inlet
 Air outlet
Remote control
Air inlet
Outdoor unit 

 Air outlet
 WARNING
Indoor unit and outdoor unit
This appliance is not intended for use by persons (including children) with reduced physical, sensory or mental capabilities, or lack of experience and knowledge, unless they have been given supervision or instruction concerning use of the appliance by a person responsible for their safety. Children should be supervised to ensure that they do not play with the appliance.
Please consult authorised dealer or specialist to clean the internal parts, repair, install, remove and reinstall the unit. Improper installation and handling will cause leakage, electric shock or fire.
Confirm with authorised dealer or specialist on usage of any specified refrigerant type.
Using refrigerant type other than the specified may cause product damage, burst and injury etc.
Do not install the unit in a potentially explosive or flammable atmosphere. Failure to do so could result in fire.
Do not insert your fingers or other objects into the air conditioner indoor or outdoor unit, rotating parts may cause injury.
Do not touch the outdoor unit during lightning, it may cause electric shock.
Do not expose yourself directly to cold air for a long period to avoid excess cooling.
Do not sit or step on the unit, you may fall down accidentally.
Remote control
Do not allow infants and small children to play with the remote control to prevent them from accidentally swallowing the batteries.
Power supply
Do not use a modified cord, joint cord, extension cord or unspecified cord to prevent overheating and fire.
4
To prevent overheating, fire or electric shock:
•Do not share the same power outlet with other equipment.
•Do not operate with wet hands.
•Do not over bend the power supply cord.
•Do not operate or stop the unit by inserting or pulling out the power plug.
If the supply cord is damaged, it must be replaced by the manufacturer, service agent or similarly qualified persons in order to avoid a hazard.
It is strongly recommended to be installed with Earth Leakage Circuit Breaker (ELCB) or Residual Current Device (RCD) to prevent electric shock or fire.
To prevent overheating, fire or electric shock:
•Insert the power plug properly.
•Dust on the power plug should be periodically wiped with a dry cloth.
Stop using the product if any abnormality/ failure occurs and disconnect the power plug or turn off the power switch and breaker.
(Risk of smoke/fire/electric shock) Examples of abnormality/failure
•The ELCB trips frequently.
•Burning smell is observed.
•Abnormal noise or vibration of the unit is observed.
•Water leaks from the indoor unit.
•Power cord or plug becomes abnormally hot.
•Fan speed cannot be controlled.
•The unit stops running immediately even if it is switched on for operation.
•The fan does not stop even if the operation
is stopped.
Contact your local dealer immediately for maintenance/repair.
This equipment must be earthed to prevent electrical shock or fire.
Prevent electric shock by switching off the
 power supply and unplug:
- Before cleaning or servicing, - When extended non-use, or
- During abnormally strong lightning activity.
CAUTION
Indoor unit and outdoor unit
Do not wash the indoor unit with water, benzine, thinner or scouring powder to avoid damage or corrosion at the unit.
Do not use for preservation of precise equipment, food, animals, plants, artwork or other objects. This may cause quality deterioration, etc.
Do not use any combustible equipment in front of the airflow outlet to avoid fire propagation.
Do not expose plants or pet directly to airflow to avoid injury, etc.
Do not touch the sharp aluminium fin, sharp parts may cause injury.
Do not switch ON the indoor unit when waxing the floor. After waxing, aerate the room properly before operating the unit.
Do not install the unit in oily and smoky areas to prevent damage to the unit.
|
Do not dismantle the unit for cleaning purpose |
precautions |
|
|
Do not place a vase or water container on the |
||
|
to avoid injury. |
|
|
|
Do not step onto an unstable bench when |
|
|
|
cleaning the unit to avoid injury. |
|
|
|
unit. Water may enter the unit and degrade |
Safety |
|
|
shock. |
||
|
the insulation. This may cause an electric |
|
|
|
Do not open window or door for long time |
|
|
|
|
||
|
during operation. |
|
|
|
Prevent water leakage by ensuring drainage |
English |
|
|
- Kept clear of gutters and containers, or |
||
|
pipe is: |
|
|
|
- Connected properly, |
|
|
|
- Not immersed in water |
|
|
|
After a long period of use or use with any |
|
|
|
combustible equipment, aerate the room |
|
|
|
|
||
|
regularly. |
|
|
|
After a long period of use, make sure the |
|
|
|
installation rack does not deteriorate to |
|
|
|
prevent the unit from falling down. |
|
|
Remote control
Do not use rechargeable (Ni-Cd) batteries. It may damage the remote control.
To prevent malfunction or damage of the remote control:
•Remove the batteries if the unit is not going to be used for a long period of time.
•New batteries of the same type must be inserted following the polarity stated.
Power supply
Do not disconnect the plug by pulling the cord to prevent electric shock.
5

How to use
Single Single split system
Multi Multi split system
i AUTO-X To reach temperature quickly


 i AUTO-X
•The unit controls set temperature according to room temperature to accelerate room cooling.
i AUTO-X |
|
Set |
|
|
|
||||
|
|
temperature |
|
|
-1°C |
|
|
|
|
|
|
|
|
|
|
|
|
||
|
|
|
|
|
|
||||
|
|
|
Max = 4 hours |
||||||
•After max 4 hours, the set temperature is shifted according to AUTO COMFORT activity detection.
•Fan speed is fixed at AUTO, fan speed selection is
prohibited.
• During unit is off, press |
i AUTO-X |
will turn on the unit with |
|
i AUTO-X mode. |
|
•i AUTO-X mode can be cancelled by pressing the respective button again.
Multi • Outdoor control of this function is disabled with multiple indoor connection.
MODE |
To select operation mode |
i AUTO-X - To reach temperature quickly |
|
AUTO |
- For your convenience |
HEAT |
- To enjoy warm air |
COOL |
- To enjoy cool air |
DRY |
- To dehumidify the environment |
AUTO |
To maximise comfort |
COMFORT |
|
AUTO COMFORT |
|
QUIET |
To enjoy quiet operation |


 QUIET
QUIET
• This operation reduces airflow noise.
FAN SPEED To select fan speed
(Remote control display)
Sunlight sensor |
||
and remote |
||
control receiver |
||
Human activity |
Indicator |
|
(Green) |
||
sensor |
||
(Green) |
||
POWER |
||
TIMER |
(Orange) |
|
i AUTO-X |
(Orange) |
|
NANOE-G |
(Blue) |
|
AUTO COMFORT |
(Green) |
|
QUIET |
(Orange) |
|
Remote control display
AIR CONDITIONER
 MODE
MODE 


 iAUTO-X
i AUTO-X |
OFF/ON |
ECONAVI |
|
|
NANOE-G |
MODE |
|
|
AUTO |
TEMP |
|
COMFORT |
|
|
|
|
AIR SWING |
QUIET |
FAN SPEED |
|
TIMER |
|
|
ON |
|
SET |
1 |
2 |
3 |
OFF |
|
CANCEL |
|
|
AC RC |
SET CHECK |
CLOCK |
RESET |
Press and hold for approximately
10 seconds to show temperature setting in °C or °F.
Press to restore the remote control to default setting.
Not used in normal operations.
•For AUTO, the indoor fan speed is automatically adjusted according to the operation mode.
•If i AUTO-X mode is set, fan speed is fixed to AUTO. To adjust fan speed, cancel i AUTO-X mode.
Auto OFF/ON button
Use when remote control is misplaced or a malfunction occurs. Raise the front panel:
•To use in AUTO mode, press the button once.
•To use in COOL mode, press and hold the button until 1 beep is heard, then release.
• To use in HEAT mode, press and hold the button until 1 beep is heard, then release. And press again until 2 beeps are heard, then release.
• Press the button again to turn off.
6

See "To learn more..." for details.
ECONAVI To optimise energy saving
NANOE-G To purify the air


 NANOE-G
•nanoe-G starts automatically when the unit is turned on
with OFF/ON .
•Can be activated even when the unit is turned off. In this condition, the unit will operate as a fan with AUTO fan speed and flap swing.
Multi • This operation cannot be performed or will be stopped if other indoor unit is activating HEAT
mode.
To deactivate viruses/bacteria on the filter


 NANOE-G
  POWER
POWER
•After the unit is turned off, the nanoe-G in-filter deactivation may activate up to 150 minutes. Turning on the unit cancels this operation.
•To disable this operation in the future, press and hold
NANOE-G
 until a short beep sound is heard. This will not
disable the nanoe-G to purify the air.
• To restore the nanoe-G in-filter deactivation, press and
NANOE-G
hold  until a long beep sound is heard.
AIR SWING To adjust airflow direction
(Remote control display)
•Keeps the room ventilated.
•In COOL/DRY mode, if AUTO is set, the flaps swings left/ right and up/down automatically.
•In HEAT mode, if AUTO is set, the horizontal flap is fixed at the predetermined position. The vertical flap swings left/ right after the temperature rises.
•In i AUTO-X mode, if AUTO is set, the horizontal flap is fixed at the lower position and shift to the upper position after reaches set temperature.
The vertical flap movement depends on human activity sensor. If manual is set, the horizontal and vertical flap are fixed at the predetermined position.
•Do not adjust the flap by hand.
Auto Restart Control
•If power is resumed after a power failure, the operation will restart automatically after a period of time with previous operation mode and airflow direction.
•This control is not applicable when TIMER is set.
To set the timer
2 sets of ON and OFF timers are available to turn ON or OFF the unit at different preset times.
1 2 3
 TIMER
TIMER
ON SET
1 2 3
OFF CANCEL
1 Select ON or OFF |
|
Example: |
|
|
|
|||
|
timer |
|
|
OFF at 22:00 |
|
|
|
|
|
• Each time pressed: |
OFF |
|
|
|
|||
|
|
Cancel |
|
|
|
|
|
|
2 |
Set the time |
|
|
|
|
useto |
||
|
|
|
|
2 |
|
|
||
|
|
|
|
|
|
|
||
3 |
Confirm |
|
|
SET |
|
|
How |
|
|
|
|
|
|
|
|
||
|
|
|
|
TIMER |
|
|
English |
|
• To cancel ON or OFF timer, press ON |
or |
OFF |
||||||
|
||||||||
to select respective |
or |
then press |
CANCEL . |
|
||||
• If timer is cancelled manually or due to power |
|
|||||||
failure, you can restore the timer again by |
|
|
||||||
pressing ON |
or OFF |
to select respective |
or |
|
||||
|
then press |
SET . |
|
|
|
|
|
|
•The nearest timer setting will be displayed and will activate in sequence.
•When ON Timer is set, the unit may start earlier (up to 35 minutes) before the actual set time in order to achieve the desired temperature on time.
•Timer operation is based on the clock set in the remote control and repeats daily once set. For clock setting, please refer to Quick guide.
Note
ECONAVI |
AUTO |
COMFORT NANOE-G |
 , QUIET ,
  ,
, 
•Can be activated in HEAT, COOL and DRY mode and can be cancelled by pressing the respective button again.
i AUTO-X |
ECONAVI |
AUTO |
COMFORT |
,  , QUIET ,
• Cannot be selected at the same time.
7
To learn more...
Single Single split system
Multi Multi split system
Operation mode
i AUTO-X: The fast cooling is ideal when you come home on a hot day. AUTO: During operation mode selection the POWER indicator blinks.
Single |
• Unit selects operation mode every 10 minutes according to setting temperature and room temperature. |
Multi |
• Unit selects operation mode every 3 hours according to setting temperature, outdoor temperature and room |
|
temperature. |
HEAT : Unit takes a while to warm up. The POWER indicator blinks during this operation.
COOL: Provides efficient comfort cooling to suit your needs.
DRY : Unit operates at low fan speed to give a gentle cooling operation.
nanoe-G in-filter deactivation
Depending on the unit’s accumulated operation time, nanoe-G in-filter deactivation may activate only once a day after the unit turned off.
To remove the moisture left in the internal parts, the fan will operate for 30 minutes with flap opened slightly. This process only applicable when the unit is operated in COOL/DRY mode before turned off.Then, nanoe-G deactivates viruses/bacteria on the filter for 2 hours with fan stopped and flap closed.
Do not turn off the power supply during this operation. After power failure, this operation will not resume.
ECONAVI and AUTO COMFORT
ECONAVI |
|
AUTO |
|
Note |
|
or |
COMFORT |
|
|||
|
|
|
AIR SWING When manual AIR SWING is selected, |
||
|
|
|
|
||
The unit will start to initialise |
The human activity sensor |
the ECONAVI and AUTO COMFORT |
|||
operations will be cancelled. |
|||||
(for approximately 1 minute) |
and the sunlight sensor will |
||||
start to detect.
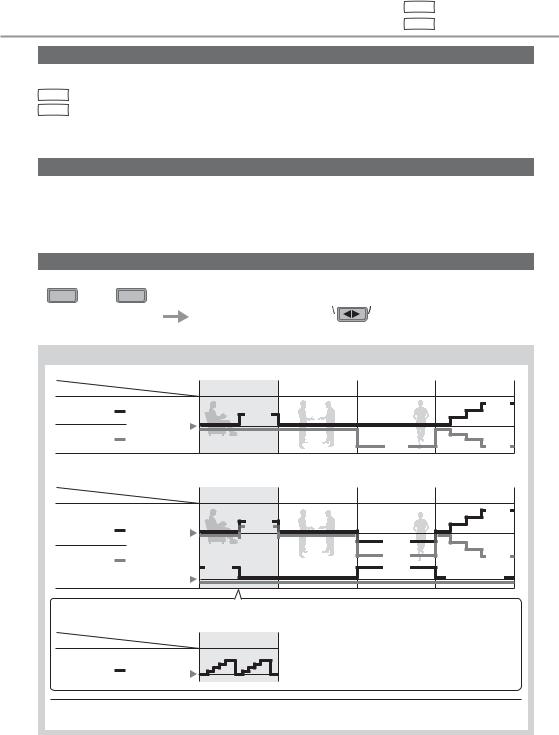
Human activity sensor operation
ECONAVI ; Detecting human presence and activity, the unit controls room temperature to save energy.
Mode |
Human |
Low activity |
Normal activity |
High activity |
Absent |
COOL/DRY |
|
+1 °C |
|
|
+2 °C |
Set |
|
|
|
||
|
|
|
|
|
|
HEAT |
temperature |
|
|
|
|
|
|
|
-2 °C |
-2 °C |
|
|
|
|
|
AUTO COMFORT ; Detecting human presence and activity, the unit controls room temperature to keep human comfortable consistently.
Mode |
Human |
Low activity |
Normal activity |
High activity |
Absent |
|
|
+1 °C |
|
|
+2 °C |
|
Set |
|
|
|
|
COOL/DRY |
+0.3 °C |
|
|
|
|
temperature |
|
|
|
|
|
|
|
|
-1 °C |
|
|
|
|
|
|
|
|
HEAT |
|
+1 tap* |
|
-2 °C |
-2 °C |
Set |
|
+1 tap |
|
||
|
|
0HGLXP )DQ |
|||
|
Fan Speed |
|
|
|
|
|
|
|
|
|
ECONAVI and AUTO COMFORT
Precise control of temperature during low activity to maximise energy saving.
Mode |
Human |
Low activity |
COOL/DRY |
Set |
|
temperature |
|
|
|
|
ECONAVI and AUTO COMFORT take advantage of the human nature that human being takes time to feel the temperature rise during low activity level; the unit adjusts temperature to maximise energy saving without sacrificing the comfort.
*During low activity, fan speed 1 tap up for first 15 minutes or until set temperature is reached.
**During human absence, maximum fan speed for COOL/DRY mode is medium fan.
8
The human activity sensor will also scan for area of heat source and movement in a room.
Detection area
• Based on area activeness horizontal airflow direction will adjust either fix
120º |
|
at predetermined position or swing left/right periodically. |
|
||
|
• The human activity sensor performance is influenced by indoor unit |
|
|
|
|
|
|
location, movement speed, temperature range, etc. |
7m
•The human activity sensor may:
-mistakenly detect an object with heat source & movement similar to human, such as pets, etc.
-mistakenly detect as non-heat source & movement if a human stays motionless for certain period of time.
•Do not place large objects near the sensor and keep away heating units or humidifier from the sensor’s detection area. They may cause sensor malfunction.
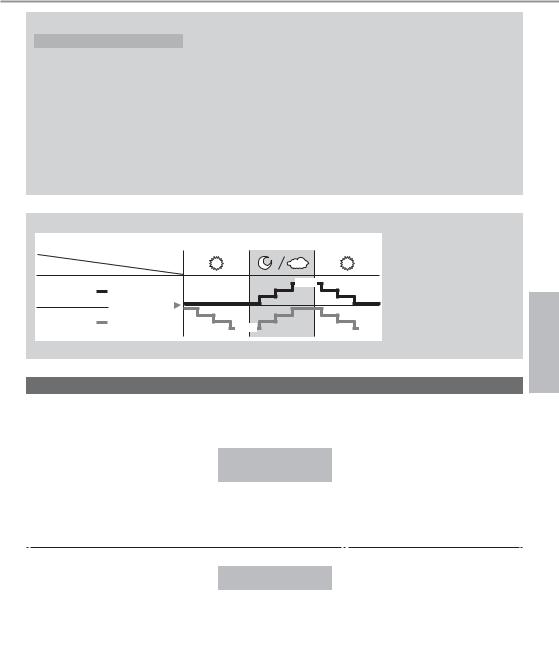
Sunlight Sensor operation
ECONAVI ; Detecting sunlight intensity, the unit adjust temperature to save energy.
Mode |
Ambient condition |
|
|
|
|
||
COOL/DRY |
|
+1 °C |
|
Set |
|
||
|
|
||
HEAT |
temperature |
|
|
-1 °C |
-1 °C |
||
|
ECONAVI is activated, the unit maintains set temperature until a high
sunlight intensity is detected. The sunlight sensor detects sunlight intensity during weather or day/night changes, and the unit adjusts temperature.
• In a room without window or with thick curtain, the sunlight sensor will judge as cloudy/night.
Operation conditions
Use this air conditioner under the following temperature range.
DBT : Dry bulb temperature
WBT : Wet bulb temperature
Single split outdoor unit
CU-E7RKD, CU-E9RKD, CU-E12RKD, |
Indoor |
Outdoor |
||||
CU-E15RKD, CU-E18RKD, CU-E24RKD, |
DBT |
WBT |
DBT |
WBT |
||
CU-E28RKD |
|
|||||
|
|
|
|
|
||
COOL |
Max. |
32 |
23 |
43 |
26 |
|
Min. |
16 |
11 |
10 |
- |
||
|
||||||
HEAT |
Max. |
30 |
- |
24 |
18 |
|
Min. |
16 |
- |
-10 |
- |
||
|
||||||
|
|
|
°C |
(temperature) |
||
Multi split outdoor unit
CU-2E15PBD, CU-2E18PBD, CU-4E27PBD, |
Indoor |
Outdoor |
||||
CU-5E34PBD, U-3E18JBE, U-4E23JBE |
DBT |
WBT |
DBT |
WBT |
||
COOL |
Max. |
32 |
23 |
46 |
26 |
|
Min. |
16 |
11 |
-10 |
- |
||
|
||||||
HEAT |
Max. |
30 |
- |
24 |
18 |
|
Min. |
16 |
- |
-15 |
-16 |
||
|
||||||
°C (temperature)
English To learn more...
9

Cleaning instructions
To ensure optimal performance of the unit, cleaning has to be carried out at regular intervals. Dirty unit may cause malfunction and you may see nanoe-G indicator blinks or error code “H99”. Please consult authorised dealer.
•Switch off the power supply and unplug before cleaning.
•Do not touch the aluminium fin, sharp parts may cause injury.
•Do not use benzine, thinner or scouring powder.
•Use only soap ( pH 7) or neutral household detergent.
•Do not use water hotter than 40 °C.
Indoor unit
Wipe the unit gently with a soft, dry cloth.
Human activity sensor
Do not hit or violently press or poke it with a sharp object. This can lead to damage and malfunction.
Front panel
Wash gently and dry.
Remove the front panel
2 Pull out
1 Raise
Close it securely
1 Insert at both sides
2Close down
3Press both ends of the front panel
4For CS-E18RKDW, CS-E24RKDW,
CS-E28RKDS, CS-ME21RKD: Press at center of the front panel.
Indoor unit |
|
Front panel |
Aluminium fin |
Human activity |
|
|
|
|
|
|
|
|
|
|
|
||
|
|
|
|
|
||
|
|
|
nanoe-G |
|||
sensor |
|
|
|
Generator |
||
Air filters |
||||||
|
|
|
||||
nanoe-G Generator
Every 2 weeks
• Clean with dry cotton bud.
• Do not touch during operation.
Air filters
Every 2 weeks
• Wash/rinse the filters gently with water to avoid damage to the filter surface.
•Dry the filters thoroughly under shade, away from fire or direct sunlight.
•Replace any damaged filters.
Remove air filter |
Attach air filter |
|
|
|
|
Insert into the unit
For seasonal inspection after extended non-use
•Checking of remote control batteries.
•No obstruction at air inlet and air outlet vents.
•Use Auto OFF/ON button to select COOL/ HEAT operation. After 15 minutes of operation, it is normal to have the following temperature difference between air inlet and air outlet vents:
COOL: ≥8 °C 
 HEAT: ≥14 °C
For extended non-use
•Activate HEAT mode for 2~3 hours to remove moisture left in the internal parts thoroughly to prevent mould growth.
•Turn off the power supply and unplug.
•Remove the remote control batteries.
10
Troubleshooting
The following symptoms do not indicate malfunction.
|
Symptom |
Cause |
|
Mist emerges from indoor unit. |
• Condensation effect due to cooling process. |
Water flowing sound during operation. |
• Refrigerant flow inside the unit. |
|
The room has a peculiar odour. |
• This may be due to damp smell emitted by the wall, carpet, |
|
|
|
furniture or clothing. |
|
Indoor fan stops occasionally during automatic fan |
• This helps to remove the surrounding odour. |
speed setting. |
|
|
Airflow continues even after operation has stopped. |
• Extraction of remaining heat from the indoor unit |
|
|
|
(maximum 30 seconds). |
|
Operation is delayed a few minutes after restarting. |
• The delay is a protection to the unit’s compressor. |
Outdoor unit emits water/steam. |
• Condensation or evaporation occurs on pipes. |
|
TIMER indicator is always on. |
• The timer setting repeats daily once set. |
|
POWER indicator blinks during HEAT mode with no |
• The unit is in defrost mode (and AIR SWING is set to AUTO). |
|
warm air supply (and flap is closed). |
|
|
Indoor fan stops occasionally during heating |
• To avoid unintended cooling effect. |
|
operation. |
|
|
POWER indicator blinks before the unit is switched |
• This is a preliminary step in preparation for the operation |
|
on. |
when the ON timer has been set. |
|
Cracking sound during operation. |
• Changes of temperature caused the expansion/contraction |
|
|
|
of the unit. |
|
Discoloration of some plastic parts. |
• Discoloration is subject to material types used in plastic parts, |
|
|
accelerated when exposed to heat, sun light, UV light, or |
|
|
environmental factor. |
|
Louder noise at outdoor unit during early |
• The compressor and fan rotate at higher speed to boost |
operation of i AUTO-X. |
cooling performance during initial operation. |
|
Dust may have collected around the front panel, |
• The dust accumulation is due to air purification effect of |
|
grilles and wall surrounding the unit after extended |
negative ions from nanoe-G. Remove the dust regularly with |
|
use. |
a clean dampened cloth. |
|
|
|
|
Check the following before calling for servicing.
|
Symptom |
Check |
|
Operation in HEAT/COOL mode is not working |
• Set the temperature correctly. |
efficiently. |
• Close all doors and windows. |
|
|
|
• Clean or replace the filters. |
|
|
• Clear any obstruction at the air inlet and air outlet vents. |
|
Noisy during operation. |
• Check if the unit has been installed at an incline. |
|
|
• Close the front panel properly. |
|
Remote control does not work. |
• Insert the batteries correctly. |
(Display is dim or transmission signal is weak.) |
• Replace weak batteries. |
|
The unit does not work. |
• Check if the circuit breaker is tripped. |
|
|
|
• Check if timers have been set. |
|
The unit does not receive the signal from the |
• Make sure the receiver is not obstructed. |
remote control. |
• Certain fluorescent lights may interfere with signal transmitter. |
|
|
|
Please consult authorised dealer. |
NON SERVICEABLE CRITERIAS
TURN OFF POWER SUPPLY AND UNPLUG then please consult authorised dealer under the following conditions:
•Abnormal noise during operation.
•Water/foreign particles have entered the remote control.
•Water leaks from Indoor unit.
•Circuit breaker switches off frequently.
•Power cord becomes unnaturally warm.
•Switches or buttons are not functioning properly.
The unit stops and the TIMER indicator blinks.
Use remote control to retrieve error code.
1 |
Press for |
TIMER |
|
|
ON |
|
SET |
||
|
5 seconds |
1 |
2 |
3 |
|
|
|||
|
|
OFF |
|
CANCEL |
3 |
Press for |
|
|
AC RC |
SET CHECK CLOCK |
RESET |
|||
5 seconds to quit checking
2Press until you hear beep sound, then write down the error code
4Turn the unit off and reveal the error code to authorised dealer
•For certain errors, you may restart the unit for limited operation with 4 beeps when operation starts.
English Cleaning instructions / Troubleshooting
11
Information
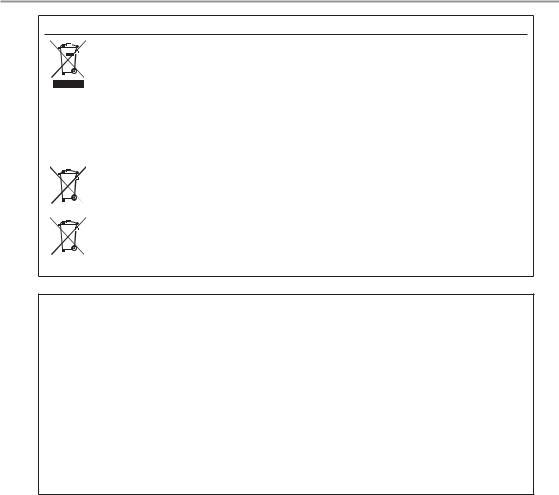
Information for Users on Collection and Disposal of Old Equipment and Used Batteries
These symbols on the products, packaging, and/or accompanying documents mean that used electrical and electronic products and batteries should not be mixed with general household waste.
For proper treatment, recovery and recycling of old products and used batteries, please take them to applicable collection points, in accordance with your national legislation and the Directives 2002/96/EC and 2006/66/EC.
By disposing of these products and batteries correctly, you will help to save valuable resources and prevent any potential negative effects on human health and the environment which could otherwise arise from inappropriate waste handling.
For more information about collection and recycling of old products and batteries, please contact your local municipality, your waste disposal service or the point of sale where you purchased the items. Penalties may be applicable for incorrect disposal of this waste, in accordance with national legislation.
|
|
|
|
For business users in the European Union |
|
|
|
|
|
|
|
|
|
|
|
|
|
|
If you wish to discard electrical and electronic equipment, please contact your dealer or supplier for |
|
|
|
|
|
|
|
|
|
further information. |
|
|
|
|
[Information on Disposal in other Countries outside the European Union] |
|
|
|
|
These symbols are only valid in the European Union. If you wish to discard these items, please contact |
|
|
|
|
your local authorities or dealer and ask for the correct method of disposal. |
|
|
|
|
|
|
|
|
|
Note for the battery symbol (bottom two symbol examples): |
|
|
|
|
This symbol might be used in combination with a chemical symbol. In this case it complies with the |
Pb |
requirement set by the Directive for the chemical involved. |
|||
|
||||
Declaration of Conformity
with the requirements of Technical Regulation on the Restriction Of the use of certain Hazardous Substances in Electrical and Electronic Equipment
(adopted by Order №1057 of Cabinet of Ministers of Ukraine)
The Product is in conformity with the requirements of Technical Regulation on the Restriction Of the use of certain Hazardous Substances in electrical and electronic equipment (TR on RoHS).
The content of hazardous substance with the exemption of the applications listed in the Annex №2 of TR on RoHS:
1.Lead (Pb) – not over 0,1wt % or 1000wt ppm;
2.Cadmium (Cd) – not over 0,01wt % or 100wt ppm;
3.Mercury (Hg) – not over 0,1wt % or 1000wt ppm;
4.Hexavalent chromium (Cr6+) – not over 0,1wt % or 1000wt ppm;
5.Polybrominated biphenyls (PBBs) – not over 0,1wt % or 1000wt ppm;
6.Polybrominated diphenyl ethers (PBDEs) – not over 0,1wt % or 1000wt ppm.
12
Инструкции по эксплуатации
Кондиционер
Модель №. Внутренний блок
CS-E7RKDW CS-E9RKDW CS-E12RKDW CS-E15RKDW CS-E18RKDW CS-E24RKDW CS-E28RKDS CS-ME21RKD
Наружный блок |
|
|
|
|
|
|
Сплит-система |
Мульти сплит-система |
|
||||
CU-E7RKD |
CU-2E15PBD |
|
||||
CU-E9RKD |
CU-2E18PBD |
|
||||
CU-E12RKD |
CU-4E27PBD |
|
||||
CU-E15RKD |
CU-5E34PBD |
|
||||
CU-E18RKD |
U-3E18JBE |
|
||||
CU-E24RKD |
U-4E23JBE |
|
||||
CU-E28RKD |
|
|
|
|
|
|
|
|
|
|
|
|
|
|
|
|
|
|
|
|
Название и адрес завода-изготовителя указаны на упаковке и на изделии.
Обеспечивается быстрое охлаждение, максимальный комфорт, чистый воздух
иоптимальный экономии энергии
iAUTO-X Охлаждение и комфорт — там, где это дейсвительно важно
i AUTO-X с новой технологией температурной оптимизации от Panasonic (P-TECh) является уникальной технологией управления компрессором Panasonic, позволяющей компрессору достигать максимальной частоты за короткий промежуток времени.
Для i AUTO-X также предусмотрена новая технология AEROWINGS — две заслонки, динамично регулирующие направление потока воздуха. AEROWINGS обеспечивает быстрое охлаждение при включении, когда поток воздуха направлен вниз*, а также рассеянное охлаждение, когда поток воздуха направлен вверх*.
Это обеспечивает пользователю моментальную прохладу в жаркий день с возможностью ее сохранения в течение длительного времени.
*Применимо для АВТОМАТИЧЕСКОЙ настройки горизонтальной заслонки.
ECONAVI + INVERTER Превосходная технология энергосбережения
ECONAVI определяет, где энергия напрасно растрачивается и регулирует мощность охлаждения в зависимости от комнатных условий и уровней активности. Затем ИНВЕРТОР использует сенсорный датчик ECONAVI и изменят скорость вращения компрессора. Благодаря этому обеспечивается оптимальный процесс охлаждения и сокращается нерациональный расход энергии.
nanoe-G Очищает воздух и удаляет даже самые мелкие частицы пыли
Поддерживает чистоту воздуха, устраняя из него вредные микроорганизмы, такие как вирусы, бактерии и т.д.
Также уничтожает вирусы и бактерии на фильтре для поддержания чистоты внутри аппарата.
Дополнительные сведения см. в разделе “Дополнительная информация...”.
Система с несколькими кондиционерами воздуха
Система с несколькими кондиционерами экономит место, позволяя вам подключить несколько внутренних блоков к одному наружному блоку.
•Чтобы ознакомиться со всеми функциями изделия, см. каталог.
Внутренние блоки
•Возможно индивидуальное или одновременное управление внутренними блоками. При выполнении функций приоритетным является первый включенный блок.
•Невозможно, чтобы разные внутренние блоки одновременно работали в режимах НАГРЕВА и ОХЛАЖДЕНИЯ.
•Мигание индикатора питания указывает на то, что внутренний блок находится в
ожидании другого режима работы.
Внутренние блоки
Наружный блок
(CU-2E15PBD, CU-2E18PBD, CU-4E27PBD,
CU-5E34PBD, U-3E18JBE, U-4E23JBE)
14
Краткая инструкция |
|
||||||||
|
1 |
|
|
|
Вставьте элементы питания |
||||
|
|
|
2 |
1 |
Потяните и снимите заднюю |
||||
|
|
|
|
||||||
3 |
|
|
|
|
крышку пульта дистанционного |
||||
|
|
|
|
|
|||||
|
|
|
|
|
управления |
|
|
||
|
|
|
|
|
|
|
|
||
|
|
|
|
|
2 |
Вставьтебатарейки(AAA илиR03) |
|||
|
|
|
|
|
|
(можетиспользоваться~ 1 год) |
|||
|
|
|
|
|
3 |
Закройте крышку |
|
||
|
|
2 |
|
3 |
Установка часов |
|
|||
|
TIMER |
|
|
|
1 |
Нажмите кнопку CLOCK |
|
||
|
ON |
|
SET |
|
|
||||
|
1 |
2 |
3 |
|
2 |
Установите время |
|
||
1 |
OFF |
|
CANCEL |
|
|||||
|
|
AC |
RC |
3 |
Подтверждение |
|
|||
SET CHECK |
CLOCK |
RESET |
|
|
|||||
|
|
|
|
|
|
|
|||
|
|
|
|
|
Основные функции |
|
|||
|
AIR CONDITIONER |
|
1 |
Выберите необходимый режим |
|||||
|
|
|
i AUTO-X |
AUTO |
HEAT |
||||
|
|
MODE |
|
|
|
||||
|
iAUTO-X |
|
|
|
|
|
DRY |
COOL |
|
|
|
|
|
|
|
|
|||
|
|
|
|
|
2 |
Включить/остановить работу |
|||
2 |
i AUTO-X |
OFF/ON |
ECONAVI |
|
|
POWER |
|
||
1 |
|
|
NANOE-G |
|
|
|
|||
MODE |
|
|
|
|
• Обратите внимание на то, что для |
||||
AUTO |
TEMP |
|
|
|
|||||
|
COMFORT |
|
|
|
|||||
3 |
|
|
|
|
|
включения устройства индикация |
|||
|
|
AIR SWING |
|
ВЫКЛЮЧЕНИЯ должна указывать |
|||||
|
QUIET |
FAN SPEED |
|
|
|
на |
. |
|
|
|
TIMER |
|
|
|
|
|
|
||
|
|
|
|
3 |
Выберите необходимую |
||||
|
ON |
|
SET |
|
|||||
|
1 |
2 |
3 |
|
|
температуру |
|
|
|
|
OFF |
|
CANCEL |
|
|
|
|||
|
|
|
• Диапазон выбора: |
|
|||||
|
|
|
AC |
RC |
|
|
|||
|
SET CHECK |
CLOCK |
RESET |
|
16 °C ~ 30 °C. |
|
|||
|
|
|
|
|
|
• Использование кондиционера |
|||
|
|
|
|
|
|
в диапазоне рекомендованных |
|||
|
|
|
|
|
|
температур способствует |
|||
|
|
|
|
|
|
экономии электроэнергии. |
|||
|
|
|
|
|
|
НАГРЕВ: 20 °C ~ 24 °C. |
|
||
|
|
|
|
|
|
ОХЛАЖДЕНИЕ: 26 °C ~ 28 °C. |
|||
|
|
|
|
|
|
ОСУШЕНИЕ: 1 °C ~ 2 °C |
|||
|
|
|
|
|
|
|
|
ниже комнатной |
|
|
|
|
|
|
|
|
|
температуры. |
|
|
|
|
|
8m |
• Нажмите и удерживайте |
в |
|||
|
|
|
|
|
|||||
|
|
|
|
|
течение 5 секунд, чтобы уменьшить или |
||||
|
|
|
|
|
восстановить яркость индикатора блока. |
||||
|
|
|
|
|
• Используйте пульт дистанционного |
||||
|
|
|
|
|
управления в радиусе 8 метров от |
||||
|
|
|
|
|
приемника сигнала дистанционного |
||||
|
|
|
|
|
управления внутреннего блока. |
||||
Иллюстрации в данном руководстве предназначены для пояснительных |
|||||||||
целей и могут отличаться для конкретного кондиционера. В связи с |
|||||||||
последующим совершенствованием конструкции могут вноситься изменения |
|||||||||
без предварительного уведомления. |
|
|
|
|
|||||
Содержание |
|
Меры предосторожности... |
16-17 |
Как пользоваться ............... |
18-19 |
Дополнительная |
|
информация... ..................20-21 |
|
Инструкции по чистке............. |
22 |
Устранение |
|
неисправностей ...................... |
23 |
Информация....................... |
24-26 |
Принадлежности
•Дистанционное управление
•Батарейки AAA или R03 × 2
•Держатель пульта дистанционного управления
•Винты для держателя пульта дистанционного управления × 2
Руccкий
15
Меры предосторожности
Во избежание получения травм, нанесения телесных повреждений другим лицам и ущерба имуществу следует соблюдать следующие инструкции:
Неправильная эксплуатация вследствие несоблюдения инструкций нанесет вред или ущерб, степень серьезности которых классифицируется следующим образом:
Этот символ
предупреждает о ПРЕДУПРЕЖДЕНИЕ смертельной опасности
или о риске получения серьезной травмы.
Этот символ
предупреждает об
ПРЕДОСТЕРЕЖЕНИЕ опасности травмы или нанесения вреда
имуществу.
Инструкции, которые следует выполнять, обозначаются следующими символами:
Этот символ обозначает действие как ЗАПРЕЩЕННОЕ.

 Эти символы обозначают действия как ОБЯЗАТЕЛЬНЫЕ.
Электросна-
бжение
Внутренний блок Воздухозаборник
Воздуховыпускное
отверстие
Дистанционное Воздухозаборник
управление
Наружный |
|
блок |
Воздуховыпускное |
|
отверстие |
 ПРЕДУПРЕЖДЕНИЕ
Внутренний и наружный блоки
Данное устройство может использоваться лицами с ограниченными физическими, чувствительными или умственными способностями (включая детей) или лицами с отсутствием опыта или знания только при условии, что они находятся под надзором или
получили от лица, ответственного за их безопасность, соответствующие инструкции по использованию изделия. Дети должны находиться под наблюдением. Необходимо следить за тем, чтобы они не играли с устройством.
Для чистки внутренних деталей, ремонта, установки, переноса и переустановки блока следует обращаться к официальному дилеру. Неправильная установка и обращение могут привести к утечке, поражению электрическим током или пожару.
Проконсультируйтесь с авторизованным дилером или специалистом относительно использования любого указанного типа хладагента.
Использование хладагента другого типа может привести к повреждению изделия, взрыву или телесным повреждениям и т. д.
Не устанавливайте блок в потенциально взрывоили огнеопасной среде. Несоблюдение данного условия может привести к пожару.
Не вставляйте пальцы или другие предметы в наружный или внутренний блок кондиционера, поскольку вращающиеся части могут нанести травму.
Не прикасайтесь к наружному блоку кондиционера во время грозы, это может привести к поражению электрическим током.
Во избежание переохлаждения не подвергайте себя прямому воздействию холодного воздуха в течение длительного времени.
Не садитесь и не становитесь на устройство, вы можете упасть.
Дистанционное управление
Держите пульт ДУ вдали от грудных и маленьких детей, во избежание случайного проглатывания батарей.
Электроснабжение
Во избежание перегрева и возникновения пожара не 

 используйте модифицированный

 шнур, сращенный шнур, удлинитель или шнур, не соответствующий техническим условиям.
16
 Loading...