


 Loading...
Operating Instructions
Commercial Microwave Ovens
NE-1257R/NE-1258R/NE-1757R/NE-2157R
HI MED DEF
PROG
A |
B |
POWER LEVEL
x2 x3
1 |
2 |
3 |
4 |
5 |
6 |
7 |
8 |
9 |
0 |
|
|
|
|
STOP/ RESET
START
Please read these instructions completely before operating this oven.
Before Calling for Service:
If failure code “F**” appears in the display, unplug oven and wait for
10 seconds before reconnecting. If normal operation does not resume, call the service agent with the information of failure code.

Contents
PRECAUTIONS TO AVOID POSSIBLE EXPOSURE TO EXCESSIVE |
|
|
|
|
|
|
|
|
||
MICROWAVE ENERGY . . . . . . . . . . . . . . . . . |
3 |
|||||||||
IMPORTANT SAFETY INSTRUCTIONS . . . . . . . . . . . |
. |
. . . |
|
. |
|
. |
|
3 |
||
Installation and Grounding Instructions . . . . . . . . . . . . |
. |
. . |
. . |
|
|
4 |
||||
Caution . . . . . . |
. . . . . . . . . . . |
|
|
|
|
|
4 |
|||
Power Source Voltage Adjustment . . . . . . . . . . . . . |
. |
. . . |
|
|
|
|
|
5 |
||
How Does The Microwave Work? . . . . . . . . . . . . . . |
. |
. . |
|
|
|
|
|
5 |
||
Outline Diagram . . . |
. . . . . . . . . . . . . . 6 |
|||||||||
How to Operate |
|
|
|
|
|
|
|
|
|
|
A. Manual Heating . |
single stage heating . . . . . . . . . |
. |
. . . |
|
. |
|
. |
. |
. |
7 |
. . . . . . . |
2 or 3 stage heating . . . . . . . . . |
. |
. . . |
|
. |
|
. |
. |
. |
8 |
B. Programmed Heating . . . . . . . . . . . . . . . . |
. |
|
|
|
9 |
|||||
C.Programming Number/Memory pads . single stage heating . |
. |
. . |
. . |
. . . . 9 |
||||||
. . . . . . . |
. . . . . . . . . . . . . . . . .2 or 3 stage heating . |
. |
. . |
. . |
. . . .10 |
|||||
D. Programming Double or Triple Quantity pad . . . . . . . . |
. |
. . |
. . |
. |
|
. |
. .11 |
|||
E.Program Lock . . . . . . . . . . . . . . . . . . . . . . . . . . . . . . . . . . . . . . . . . . . . . . . . . . . . . . .11
F.Beep Tone . . . . . . . . . . . . . . . . . . . . . . . . . . . . . . . . . . . . . . . . . . . . . . . . . . . . . . . .12
G.Program List . . . . . . . . . . . . . . . . . . . . . . . . . . . . . . . . . . . . . . . . . . . . . . . . . . . . . . .13
H.Cycle Counter . . . . . . . . . . . . . . . . . . . . . . . . . . . . . . . . . . . . . . . . . . . . . . . . . . . . . . .13
I.Air Filter . . . . . . . . . . . . . . . . . . . . . . . . . . . . . . . . . . . . . . . . . . . . . . . . . . . . . . . . .14
Installation Instructions for Stacking . . . . . . |
. |
. . . |
. . |
. |
. . . . |
15 |
|
Sanitary Counter Top Seal . . . . . . . . . . |
. |
. . . |
. . |
. |
|
15 |
|
Care of Your Oven . . . . . . . . . . . . . |
. |
. . . |
|
|
|
16 |
|
Self Diagnostics Failure Code Explanation . . . |
. |
. . . |
. . |
. |
. . . . . |
. |
. 17 |
Heating and Defrosting Time Charts . . . . . |
. |
. . . |
. . |
. |
. . . . |
. |
18 |
Technical Specifications . . . . . . . . . . |
. |
. . . |
. . |
. |
|
32 |
|
Owner’s Record |
See page 17 before calling |
||||||||
Toll Free |
|||||||||
|
|
|
|
|
|
|
|
||
Model No. |
|
|
Service Information |
||||||
Serial No. |
|
|
|||||||
To locate a convenient service agent call |
|||||||||
|
|
The serial number of this products |
|||||||
|
|
1-888-350-9590 |
|||||||
|
|
may be found on the side of the oven. |
|||||||
Dealer’s Name |
|
|
|||||||
Chef Support: 201-348-7305 |
|||||||||
Dealer’s Address |
|
|
www.panasonic.com/cmo |
||||||
Date of Purchase |
Virtual Test Kitchens |
||||||||
|
|
|
|
|
|
|
|
|
|

PRECAUTIONS
TO AVOID POSSIBLE EXPOSURE TO EXCESSIVE MICROWAVE ENERGY
(a)Do not attempt to operate this oven with the door open since open-door operation can result in harmful exposure to microwave energy. It is important not to defeat or tamper with the safety interlocks. Under normal conditions, the oven will not operate with the door open.
(b)Do not place any object between the oven front face and the door, or allow soil or cleaner residue to accumulate on sealing surfaces.
(c)Do not operate the oven if it is damaged. It is particularly important that the oven door close properly and that there is no damage to the :
(1)door (bent)
(2)hinges and latches (broken or loose)
(3)door seals and sealing surfaces.
(d)The oven should not be adjusted or repaired by anyone except properly qualified service personnel.
IMPORTANT SAFETY INSTRUCTIONS
Your microwave oven is a cooking device and you should use as much care as you use with a stove or any other cooking device.
When using this electric appliance, basic safety precautions should be followed, including the following:
WARNING–––To reduce the risk of burns, electric shock, fire, injury to persons or exposure to excessive microwave energy:
1. Read all instructions before using the appliance.
2. Read and follow “PRECAUTIONS TO AVOID
POSSIBLE EXPOSURE TO EXCESSIVE MICROWAVE ENERGY,” found on page 3.
3. This appliance must be grounded. Connect only to a properly grounded outlet. See “Grounding Instructions” found on page 4.
4. Install or locate this appliance only in accordance with the provided installation instructions found on page 4.
5. Do not cover or block any openings on this appliance.
6. Do not store or use this appliance outdoors. Do not use this product near water for example, near a kitchen sink, in a wet basement, or near a swimming pool, and the like.
7. Use this appliance only for its intended use as described in this manual. Do not use corrosive chemicals or vapors in this appliance. This type of oven is specifically designed to heat, or cook food. It is not designed for industrial or laboratory use.
8. When cleaning surfaces of door and oven that come together on closing the door, use only mild, non-abrasive soaps or detergents applied with a sponge or soft cloth.
9. As with any appliance, close supervision is necessary when used by children.
10.Do not operate this appliance if it has a damaged cord or plug, if it is not working properly, or if it has been damaged or dropped.
11.Do not immerse cord or plug in water.
12.Keep cord away from heated surfaces.
13.Do not let cord hang over edge of table or counter.
14.This appliance should be serviced only by qualified service personnel. Contact the nearest authorized service facility for examination, repair or adjustment.
15.Some products such as whole eggs and sealed containers (for example, closed glass jars) may explode and should not be heated in this oven.
16.To reduce the risk of fire in the oven cavity:
(a)Do not overcook food. Carefully attend appliance if paper, plastic, or other combustible materials are placed inside the oven to facilitate cooking.
(b)Remove wire twist-ties from paper or plastic bags before placing bag in oven.
(c)If materials inside the oven should ignite, keep oven door closed, turn oven off, and disconnect the power cord, or shut off power at the fuse or circuit breaker panel.
(d)Do not use the cavity for storage purposes.
Do not leave paper products, cooking utensils, or food in the cavity when not in use.
17.Liquids, such as water, coffee, or tea are able to be overheated beyond the boiling point without appearing to be boiling due to surface tension of the liquid. Visible bubbling or boiling when the container is removed from the microwave oven is not always present. THIS COULD RESULT IN VERY HOT LIQUIDS SUDDENLY BOILING OVER WHEN A SPOON OR OTHER UTENSIL IS INSERTED INTO THE LIQUID. To reduce the risk of injury to persons:
(a)Do not overheat the liquid.
(b)Stir the liquid both before and halfway through heating it.
(c)Do not use straight-sided containers with narrow necks.
(d)After heating, allow the container to stand in the microwave oven for a short time before removing the container.
(e)Use extreme care when inserting a spoon or other utensil into the container.
SAVE THESE INSTRUCTIONS
For proper use of your oven read remaining safety cautions and operating instructions.
- 3 -
Installation and GROUNDING INSTRUCTIONS
Placement of the Oven
Locate the oven on a smooth, flat and stable surface. There should be no gap between the table surface and the bottom of the oven. Do not place the oven in a hot or damp area, ie. near a stove, sink or directly above heat lamps on a serving line. Free airflow around the oven is important. There is a possibility of a small amount of interference with weak broadcast signals if the microwave oven is too close to a radio or TV.
Grounding Instructions
This oven must be grounded electrically. In the event of an electrical short circuit, grounding reduces the risk of electric shock by providing an escape wire for the electric current. The appliance is equipped with a cord having a grounding wire with a grounding plug. The plug must be plugged into an outlet that is properly installed and grounded.
WARNING — improper use of the grounding plug can result in a risk of electric shock.
Consult a qualified electrician or service person if the grounding instructions are not completely understood, or if doubt exists as to whether the appliance is properly connected.
If it is necessary to use an extension cord, use only a three wire extension cord that has a three blade grounding plug, and a three slot receptacle that will accept the plug on the appliance. The marked rating of the extension cord should be equal to or greater than the electical rating of the oven.
Removal of Protective Film
A blue protective film is used to prevent scratching of the outer case during transportation. Peel the film from the exterior of the oven before installation or use.
Wiring Requirements
No other appliance should share the circuit with the microwave oven. If it does, the branch circuit fuse may overload and either cause the oven to heat slower than
expected or blow the fuse.
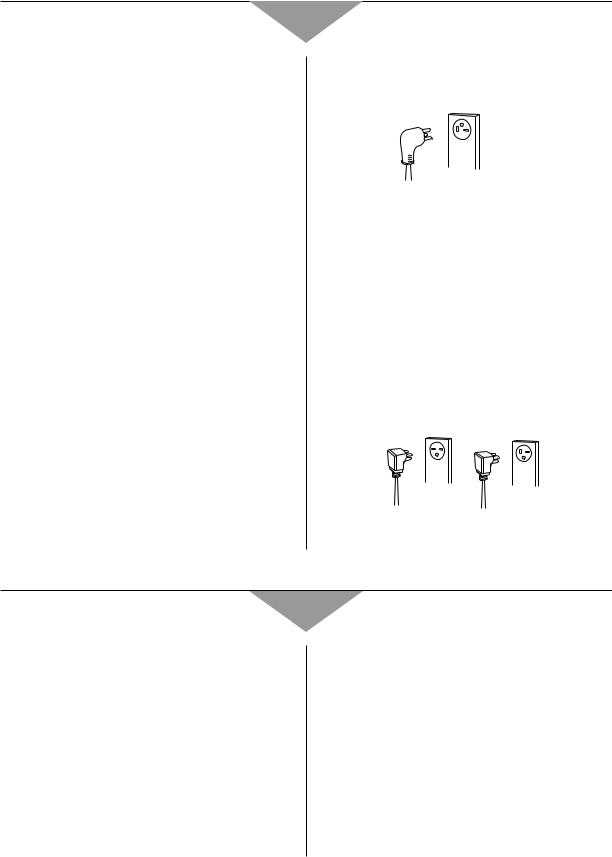
A.For Model NE-1257/NE-1258
The oven must be on a SEPARATE, 20 amp, 60 Hz-120 V GROUNDED CIRCUIT.
|
120 V |
NEMA# |
Grounded |
5-20P |
Outlet |
|
NEMA# 5-20R |
B.For Models NE-1757/NE-2157
1.This oven must be on a separate, 60 Hz GROUNDED CIRCUIT - minimum 15 amps for NE-1757; minimum 20 amps for NE-2157.
2.The microwave ovens are built to operate on 2 different voltages (230-240 V or 208 V). Be sure that the voltage selector connector (on the back of the oven) is set for your power supply (see
page 5). Using a higher voltage setting is dangerous and may result in overheating of the electrical components thus shortening their life expectancy or possibly causing a fire or other accident. Using a lower voltage will lower the power output of the oven, resulting in slower heating of the food. Panasonic is NOT responsible for damage resulting from the use of the oven with other than the specified voltage.
NE-1757 |
NE-2157 |
NEMA# |
NEMA# |
6-15P |
6-20P |
208 V/230-240 V |
208 V/230-240 V |
Grounded Outlet |
Grounded Outlet |
NEMA# 6-15R or 6-20R |
NEMA# 6-20R |
Caution
1. Do not attempt to tamper with or make any adjustments or repairs to the door, control panel housing, safety interlock switches or any other part of the oven. Do NOT remove the outer panel of the oven. Repairs should only be done by a qualified service person.
2. Do NOT operate the oven empty. The microwave energy will reflect continuously throughout the oven if no food or water is present to absorb energy.
3. If a fire occurs in the oven, press the Stop/Reset Pad and LEAVE THE DOOR CLOSED. Disconnect the power cord, or shut off the power at the fuse or circuit breaker panel.
4. Do NOT attempt to dry clothes, newspapers or other materials in the oven, as they may catch on fire.
5. Do NOT use recycled paper products, as they may contain impurities which may cause sparks and/or fires.
6. Do NOT use newspapers or paper bags for cooking.
7. Do NOT hit or strike the control panel. Damage to controls may occur.
8. POT HOLDERS may be needed when removing food from the oven. Heat is transferred from the hot food to the container.
9. Do NOT store flammable materials next to, on top of, or in the oven. It could be a fire hazard.
10.Do NOT operate the oven without the spatter shields (located in the top of inner cavity) in place.
- 4 -
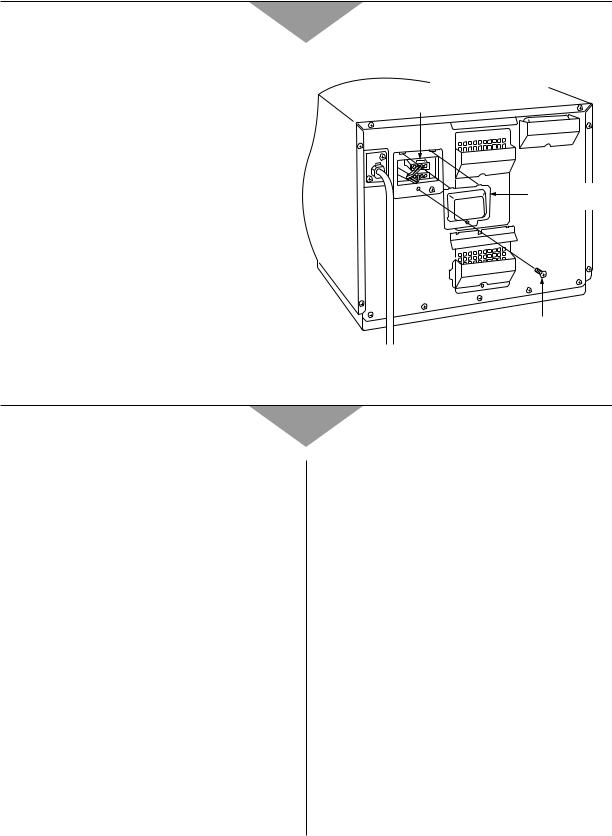
Power Source Voltage Adjustment
The microwave oven Models NE-1757 and NE-2157 are factory set for 208 V operation. For 230 V - 240 V operation, the following adjustment MUST be made.
(Step 1) Make sure that the power cord is unplugged before removing the voltage adjustment panel cover.
(Step 2) Unscrew the voltage adjustment panel cover which is located on the back of the oven. Do not remove any other parts from the oven.
(Step 3) Remove the white connector and plug the black connector into the socket.
(Step 4) Store the unused white connector in the rectangular opening.
(Step 5) Reattach the voltage adjustment panel cover to the cabinet.
For 230 V - 240 V – Use black connector plug.
For 208 V – Use white connector plug.
To go from 230 V - 240 V to 208 V circuit follow steps 1-5 above, except at step 3, plug the white connector plug into the socket and store the black plug in the rectangular opening.
VOLTAGE ADJUSTMENT
CONNECTOR
VOLTAGE
ADJUSTMENT
PANEL
COVER
SCREW
How Does The Microwave Work?
Microwaves are a form of high frequency radio waves similar to those used by a radio including AM, FM, and CB. They are, however, much shorter than radio waves; approximately five inches long. Electricity is converted into microwave energy by the magnetron tube. From the magnetron tube, microwave energy is transmitted to the oven cavity where it is: reflected, transmitted and absorbed.
Reflection
Microwave are reflected by metal just as a ball is bounced off a wall. A combination of stationary (interior walls) and rotating antenna, located underneath the bottom shelf and above the ceiling cover assure that the microwaves are well distributed within the oven cavity to produce even heating or cooking of foods.
Transmission
Microwave pass through some materials such as paper, glass and plastic much like sunlight shining through a window. Because these substances do not absorb or reflect the microwave energy, they are ideal materials for microwave oven heating containers when covered.
Absorption
During heating, microwaves will be absorbed by food. They penetrate to a depth of about 3⁄4 to 11⁄2 inches. Microwave energy excites the molecules in the food (especially water, fat and sugar molecules), and causes them to vibrate at a rate of 2,450,000,000 times per second. This vibration causes friction, and heat is produced just as you will feel heat produced if you vigorously rub your hands together. The internal heating of larger foods is done by conduction. The heat which is produced by friction is conducted to the center of the food. Foods also continue to heat by conduction during standing time. (“carry-over” cooking)
Because microwave dissipate, much like sunlight as it reaches the Earth’s surface, they are not stored in food.
Radio Inference
1.Operation of the microwave oven may cause interference to your radio, TV or similar equipment.
2.When there is interference, it may be reduced or eliminated by taking the following measures:
a.Clean door and sealing surfaces of the oven. (See Care of Your Microwave Oven found on page 16.)
b.Place the radio, TV, etc. away from the microwave oven as far as possible.
c.Use a properly installed antenna, to obtain stronger signal reception.
- 5 -
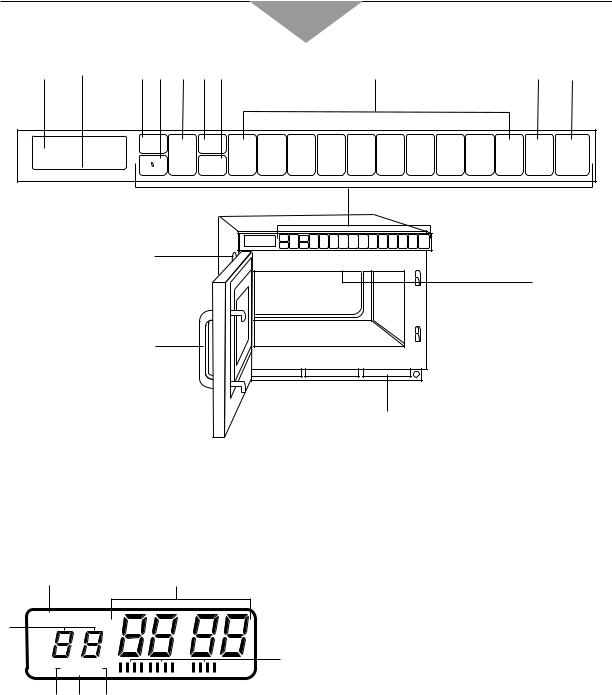
Outline Diagram
(1) |
(2) |
(3)(4) (5) (6)(7) |
(8) |
(9) |
(10) |
PROG POWER |
x 2 |
1 2 |
3 4 5 6 7 8 9 0 |
STOP/ |
|
A B |
LEVEL |
x 3 |
RESET START |
||
HI MED DEF
(11)
(14)
(12)
(13)
(1) |
Digital Display Window (see below) |
(8) |
Number/Memory pads |
(2) |
Power Level Indicator Display |
(9) |
Stop/Reset pad |
(3) |
Program pad |
(10) |
Start pad |
(4) |
Shift (A/B) pad |
(11) |
Oven Lamp Cover |
(5) |
Power Level Selector pad |
(12) |
Door Handle |
(6) |
Double Quantity pad |
(13) |
Air Filter |
(7) |
Triple Quantity pad |
(14) |
Splatter Shield (top of inner cavity) |
|
A |
B |
A –– Program Display |
|
|
|
B –– Heating Time Display (min. sec.) |
|
PROG |
|
C –– Memory Pad Number Display |
C |
|
D –– 1st Stage Heating Indicator |
|
|
|
E –– 2nd Stage Heating Indicator |
|
|
|
|
|
|
|
G |
F –– 3rd Stage Heating Indicator |
|
1 2 3 |
G –– Power Level Indicator |
|
|
MED DEF |
|
|
|
HI |
|
|
|
D E F |
|
|
This oven is preset at the factory as follows:
XX Manual operation
XX Number/Memory pads preset HIGH power at the indicated heating times for single stage heating
1 |
= 10 sec. |
2 |
= 20 sec. |
3 |
= 30 sec. |
4 |
= 40 sec. |
5 |
= 50 sec. |
6 |
= 1 min. |
7 |
= 1 min. 15 sec. |
8 |
= 1 min. 30 sec. |
9 |
= 1 min. 45 sec. |
0 |
= 2 min. |
(There are two sides, A and B. Only A-side is preset.) XX Program Unlocked
XX Cycle Counter set to “0” on all pads
If you wish to change these settings, please consult the operating instructions for programming procedure.
- 6 -
How to Operate
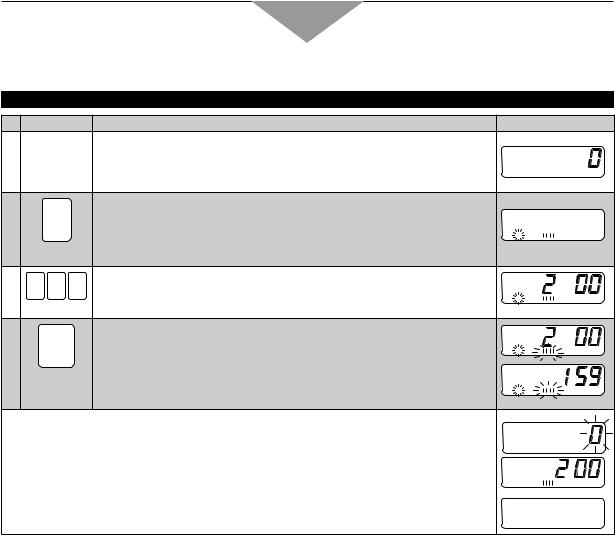
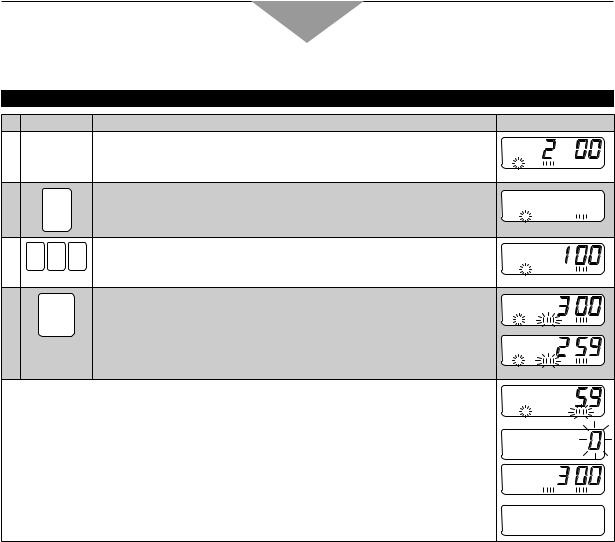
A. MANUAL HEATING –– single stage heating ––
Example: To cook food at HIGH power for 2 minutes
|
|
PAD |
|
INSTRUCTION |
DIGITAL DISPLAY WINDOW |
1 |
|
|
|
Open the door and put the food in the oven. |
|
|
|
|
|
\The oven lamp will turn on and “0” will appear. |
|
|
|
|
|
Note: While “0” appears, operation is available. One minute after the door |
|
|
|
|
|
is closed, “0” will disappear. |
|
2 |
|
|
|
Press Power Level Selector pad once. |
|
|
|
POWER |
|
\The selected power level will be indicated and 1st Stage Heating |
|
|
|
LEVEL |
|
Indicator “1” will start to blink. |
|
|
|
|
|
1 |
|
|
|
|
|
Note: To select HIGH power, press once. To select MEDIUM power, press |
|
|
|
|
|
HI |
|
|
|
|
|
twice. To select DEFROST power, press three times. |
|
3 |
2 |
0 |
0 |
Press Number/Memory pads “2”, “0” and “0”. |
|
\The set heating time will appear. |
|
||||
|
|
|
|
1 |
|
|
|
|
|
Note: up to 15 min. on HIGH or MEDIUM power, 30 min. on DEFROST |
|
|
|
|
|
HI |
|
4 |
|
|
|
Press Start pad. |
|
|
|
START |
|
\The oven lamp will turn on and heating will start. Power Level Indicator |
1 |
|
|
|
|
will start to blink, and heating time will count down. |
|
|
|
|
|
HI |
|
|
|
|
|
|
1 |
|
|
|
|
|
HI |
• When all time expires, beep tone will sound and heating will stop.The oven lamp will turn |
|
||||
|
off. “0” will blink until the door is opened. One minute later, cooling fan will stop. |
|
|||
• Open the door and take the food out.The oven lamp will turn on. Digital Display Window |
|
||||
|
will show the originally selected time and power. |
|
|||
• |
Close the door.The oven lamp will turn off. One minute later, Digital Display Window will |
1 |
|||
|
go blank. |
|
|
||
|
|
|
HI |
||
- 7 -
How to Operate
A. MANUAL HEATING –– 2 or 3 stage heating ––
Example: To cook food at HIGH power for 2 minutes and at DEFROST power for 1 minute
|
|
PAD |
|
INSTRUCTION |
DIGITAL DISPLAY WINDOW |
|
|
|
|
|
Follow steps 1 to 3 on page 7. |
|
|
|
|
|
|
|
1 |
|
|
|
|
|
|
HI |
|
4 |
|
|
|
Press Power Level Selector pad three times. |
|
|
|
|
POWER |
|
\The selected power level will be indicated and 2nd Stage Heating |
|
|
|
|
LEVEL |
|
Indicator “2” will start to blink. |
1 2 |
|
|
|
|
|
DEF |
||
|
|
|
|
|
||
|
|
|
|
|
|
|
5 |
1 |
0 |
0 |
Press Number/Memory pads “1”, “0” and “0”. |
|
|
\The set heating time will appear. |
|
|
||||
|
|
|
|
1 2 |
|
|
|
|
|
|
Note: up to 15 min. on HIGH or MEDIUM power, 30 min. on DEFROST |
|
|
|
|
|
|
|
DEF |
|
6 |
|
|
|
Press Start pad. |
|
|
|
|
START |
|
\The oven lamp will turn on. The total time for both stages will appear |
1 2 |
|
|
|
|
|
and start to count down. 1st Stage Heating Indicator “1” and Power |
|
|
|
|
|
|
HI |
DEF |
|
|
|
|
|
Level Indicator for the first stage heating will start to blink. |
|
|
|
|
|
|
|
1 2 |
DEF |
|
|
|
|
|
HI |
|
• After the first stage heating, beep tone will sound. 2nd Heating Stage Indicator “2” and |
|
|
||||
|
Power Level Indicator for the second stage heating will start to blink and the remaining |
2 |
|
|||
|
heating time will count down. |
|
||||
|
|
DEF |
||||
• When all time expires, beep tone will sound and heating will stop.The oven lamp will turn |
|
|
||||
|
off. “0” will blink until the door is opened. One minute later, cooling fan will stop. |
|
|
|||
• Open the door and take the food out.The oven lamp will turn on. Digital Display Window |
|
|
||||
|
will show the originally set time and power. |
|
|
|||
• |
Close the door.The oven lamp will turn off. One minute later, Digital Display Window will |
1 2 |
|
|||
|
go blank. |
|
|
|
||
|
|
|
HI |
DEF |
||
Note: For 3 stage heating, select a power level once again after step 5 and set a heating time.
SPECIAL NOTE: For both single and 2 stage heating
1.While heating, one touch on Stop/Reset pad stops the operation. You can restart it by pressing Start pad or a second touch on Stop/Reset pad will cancel the selected program.
2.While not heating, one touch on Stop/Reset pad cancels the selected program.
3.You can repeat exactly the same manually selected heating time by pressing only Start pad you use the oven again within one minute.
4.One minute later of non-use with door closed, the repeat feature will be cancelled.
- 8 -
How to Operate
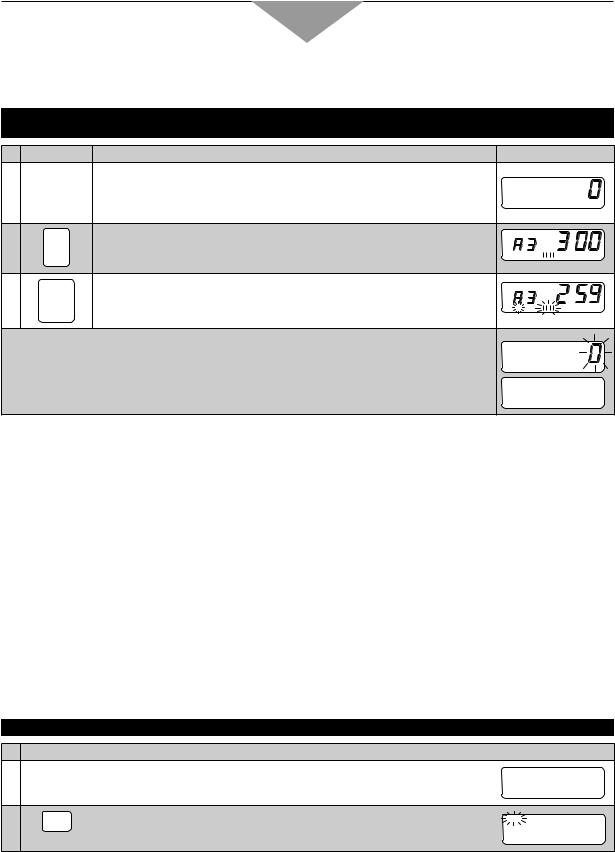
B. PROGRAMMED HEATING
XXIn Program Unlock Mode:
Example: To select Number/Memory pad “3” at A side in which your desired heating program (at HIGH power for 3 min., single stage heating) is set
|
PAD |
INSTRUCTION |
DIGITAL DISPLAY WINDOW |
1 |
|
Open the door and put the food in the oven. |
|
|
|
\The oven lamp will turn on and “0” will appear. |
|
|
|
Note: While “0” appears, operation is available. One minute after the door |
|
2 |
|
is closed, “0” will disappear. |
|
3 |
Press the desired Number/Memory pad “3”. |
PROG |
|
|
|
||
|
\The currently programmed information will be indicated. |
1 |
|
|
|
|
|
|
|
|
HI |
3 |
|
Press Start pad. |
PROG |
|
START |
\The oven lamp will turn on and heating will start. The heating time will |
1 |
|
|
count down. |
|
|
|
HI |
• When all time expires, beep tone will sound and heating will stop.The oven lamp will turn off. “0” will blink until the door is opened. One minute later, cooling fan will stop.
• Open the door and take the food out.The oven lamp will turn on.
•Close the door.The oven lamp will turn off. One minute later, Digital Display Window will go blank.
Note:
•When you want to select the number at B side, press Shift (A/B) pad before pressing the desired
Number/Memory pad.
XXIn Program Lock Mode:
Just press the desired Number/Memory pad. Heating will automatically start without pressing Start pad.
For Double (or Triple) Quantity heating:
Press Double (or Triple) Quantity pad before pressing the desired Number/Memory pad.
C. PROGRAMMING NUMBER/MEMORY PADS –– single stage heating ––
The oven can not be programmed when Program Lock is activated! (see page 11-12) DO NOT OPEN THE DOOR WHILE PROGRAMMING!
Example: To program cooking at DEFROST power for 1 minute into Number/Memory pad “5”
1
2
PAD |
INSTRUCTION |
DIGITAL DISPLAY WINDOW |
|
Keep the door closed. |
|
|
\Digital Display Window must be blank. |
|
PROG |
Press Program pad. |
PROG |
\“PROG” will start to blink. |
|
|
|
|
|
|
|
|
- 9 -

How to Operate
3 |
|
5 |
|
Press Number/Memory pad “5”. |
PROG |
|
|
|
\The selected pad number will appear and currently programmed |
1 |
|
|
|
|
|
information will be indicated. |
|
|
|
|
|
|
HI |
4 |
|
|
|
Press Power Level Selector pad three times. |
PROG |
|
|
POWER |
|
\The selected power level will be indicated, 1st Stage Heating Indicator |
|
|
|
LEVEL |
|
“1” will start to blink, and Heating Time Display will go blank. |
1 |
|
|
|
|
||
|
|
|
|
|
DEF |
5 |
1 |
0 |
0 |
Press Number/Memory pads “1”, “0” and “0”. |
PROG |
\The set heating time will appear. |
|
||||
|
|
|
|
1 |
|
|
|
|
|
Note: up to 15 min. on HIGH or MEDIUM power, 30 min. on DEFROST |
|
6 |
|
|
|
|
DEF |
|
PROG |
|
Press Program pad. |
PROG |
|
|
|
|
|
\“PROG” and 1st Stage Heating Indicator “1” will stop blinking. |
1 |
|
|
|
|
This means that you have completed programming. |
|
|
|
|
|
DEF |
• Three seconds later, Digital Display Window will go blank.
Note:
•Program the remaining Number/Memory pads as desired by repeating steps 1-6 above.
•When “PROG” is blinking in Digital Display Window, the program can be cancelled and/or one touch on
Stop/Reset pad erases the programmed Number/Memory pad number.
•When you want to program the B side, press Shift (A/B) pad before selecting the desired Number/Memory pad.
C. PROGRAMMING NUMBER/MEMORY PADS –– 2 or 3 stage heating ––
The oven can not be programmed when Program Lock is activated! (see page 11-12) DO NOT OPEN THE DOOR WHILE PROGRAMMING!
Example: To program cooking at DEFROST power for 1 minute and at HIGH power for 2 minutes into Number/Memory pad “5”
|
|
PAD |
|
INSTRUCTION |
DIGITAL DISPLAY WINDOW |
|
|
|
|
|
Follow steps 1 to 5 above. |
PROG |
|
|
|
|
|
|
1 |
|
|
|
|
|
|
|
DEF |
6 |
|
|
|
Press Power Level Selector pad once. |
PROG |
|
|
|
POWER |
|
\The power level for 2nd stage will be indicated, 2nd Stage Heating |
|
|
|
|
LEVEL |
|
Indicator “2” will start to blink, and Heating Time Display will go blank. |
1 2 |
|
|
|
|
|
|
||
|
|
|
|
|
HI |
|
7 |
2 |
0 |
0 |
Press Number/Memory pads “2”, “0” and “0”. |
PROG |
|
\The set heating time will appear. |
|
|
||||
|
|
|
|
1 2 |
|
|
|
|
|
|
Note: up to 15 min. on HIGH or MEDIUM power, 30 min. on DEFROST |
|
|
|
|
|
|
|
HI |
|
8 |
|
PROG |
|
Press Prog pad. |
PROG |
|
|
|
|
|
\“PROG” and 2nd Stage Heating Indicator “2” will stop blinking. The total |
|
|
|
|
|
|
time for both stages will appear. This means that you have completed |
1 2 |
|
|
|
|
|
programming. |
HI |
DEF |
|
|
|
|
|
|
|
• Three seconds later, Digital Display Window will go blank.
Note:
•Program the remaining Number/Memory pads as desired by repeating steps above.
•When “PROG” is blinking in Digital Display Window, the program can be cancelled and/or one touch on
Stop/Reset pad erases the programmed Number/Memory pad number.
•When you want to program the B side, press Shift (A/B) pad before pressing Number/Memory pad.
•For 3 stage heating, select a power level once again after step 7 and enter the time desired.
-10 -
Loading...