


SD Multi Camera
Operating Instructions
Model No. SV-AS10
Before use, please read these instructions completely.
EG EB GC GN |
VQT0F03 |

Contents
Preparation
Standard Accessories . . . . . . . . . . . . . . . . . . . . 4 Information for Your Safety . . . . . . . . . . . . . . . . . 6 Components . . . . . . . . . . . . . . . . . . . . . . . . . . . . 8 Insert the Battery . . . . . . . . . . . . . . . . . . . . . . . 10 Remove the Battery . . . . . . . . . . . . . . . . . . . . . 11 Charging the Battery . . . . . . . . . . . . . . . . . . . . 12 About Charging . . . . . . . . . . . . . . . . . . . . . . . . 13 Insert the Card . . . . . . . . . . . . . . . . . . . . . . . . . 14 Remove the Card . . . . . . . . . . . . . . . . . . . . . . . 15 About Cards . . . . . . . . . . . . . . . . . . . . . . . . . . . 16 Basic Menu Operation . . . . . . . . . . . . . . . . . . . 17 About the Setup Menu . . . . . . . . . . . . . . . . . . . 18 Setting the Date/Time . . . . . . . . . . . . . . . . . . . 19
Basic (Recording)
Taking a Picture (Still Picture) . . . . . . . . . . . . . 20 Recording Still Picture with Audio . . . . . . . . . . 23 Taking Pictures in Burst Mode . . . . . . . . . . . . . 24 Recording Motion Images . . . . . . . . . . . . . . . . 25 Recording Voice . . . . . . . . . . . . . . . . . . . . . . . . 26
Basic (Play back)
Playing Back Still Pictures . . . . . . . . . . . . . . . . 27 Playing Back Still Picture with Audio . . . . . . . . 28 Playing Back Motion Images . . . . . . . . . . . . . . 29 Playing Back Voice . . . . . . . . . . . . . . . . . . . . . . 30 Playing Back Music . . . . . . . . . . . . . . . . . . . . . 31 Multi File Playback (Thumbnail display) . . . . . . 35 Erasing Files . . . . . . . . . . . . . . . . . . . . . . . . . . 36
2

Advanced (Recording) |
|
Others |
|
|
|
|
|
|
Setting Flash . . . . . . . . . . . . . . . . . . . . . . . . . . 37 Changing the Quality and Size of Picture . . . . . 39 Taking Pictures with the Self Timer . . . . . . . . . 40 Setting the White Balance . . . . . . . . . . . . . . . . 41 Setting the White Balance (Manual) . . . . . . . . . 42 Setting the Application Menu . . . . . . . . . . . . . . 43
Advanced (Play back)
Using the Playback Zoom . . . . . . . . . . . . . . . . . 45 Marking the Picture as a “Favorite” . . . . . . . . . 46 Playing back Still Pictures on the Slide Show . . . 47 Setting the Still Pictures to be Printed
(DPOF print) . . . . . . . . . . . . . . . . . . . . . . . . . 48 Preventing Accidental Erasure of Files
(Lock setting) . . . . . . . . . . . . . . . . . . . . . . . . . 50 Adding Audio to the Still Picture
(Audio dubbing) . . . . . . . . . . . . . . . . . . . . . . . 51 Resizing the Still Picture . . . . . . . . . . . . . . . . . . 52 Altering the Colour of the Still Picture
(Colour Creator) . . . . . . . . . . . . . . . . . . . . . . 53 Connecting to PC . . . . . . . . . . . . . . . . . . . . . . . 54
LCD Monitor Display . . . . . . . . . . . . . . . . . . . . 64 Menu Screen Display . . . . . . . . . . . . . . . . . . . . 65 Cautions for Use . . . . . . . . . . . . . . . . . . . . . . . 68 Messages . . . . . . . . . . . . . . . . . . . . . . . . . . . . . 74 Trouble Shooting . . . . . . . . . . . . . . . . . . . . . . . 76 Specifications . . . . . . . . . . . . . . . . . . . . . . . . . . 78 End User License Agreement . . . . . . . . . . . . . 83
3
Standard Accessories
Sales and Support Information
Customer Care Centre
•For UK customers: 08705 357357
•For Republic of Ireland customers: 01 289 8333
•Visit our website for product information
•E-mail: customer.care@panasonic.co.uk
Technical Support for AV Software
•For callers in UK: 08701 505610
•For callers in ROI: 0044 8701 505610
Direct Sales at Panasonic UK
•Order accessory and consumable items for your product with ease and confidence by phoning our Customer Care Centre Monday–Friday 9:00am– 5:30pm. (Excluding public holidays).
•Or go on line through our Internet Accessory ordering application at www.panasonic.co.uk.
•Most major credit and debit cards accepted.
•All enquiries transactions and distribution facilities are provided directly by Panasonic UK Ltd.
•It couldn’t be simpler!
•Also available through our Internet is direct shopping for a wide range of finished products, take a browse on our website for further details.
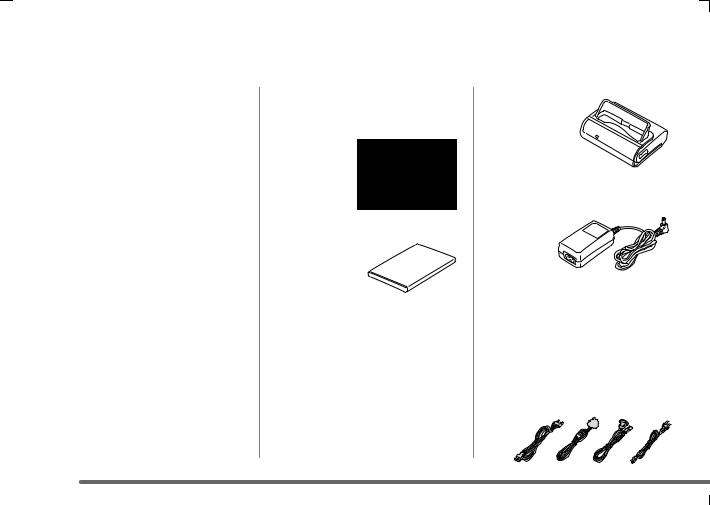
Before using your camera, check the contents.
_SD Memory Card (8MB) RP-SD008BVE0
_Battery Pack
The optional battery pack (CGA-S003E/1B) is also available.
_ .USB Cradle
VSK0643
_AC Adaptor VSK0621 (EG/EB) VSK0646 (GC/GN)
_AC Mains Lead A:SV-AS10EG/GC (K2CR2DA00004) B:SV-AS10EB (For UK) only (K2CT3DA00003) C:SV-AS10GN only (K2CJ2DA00002) D:SV-AS10GC only
(K2CA2CA00020)
A B  C
C  D
D
4
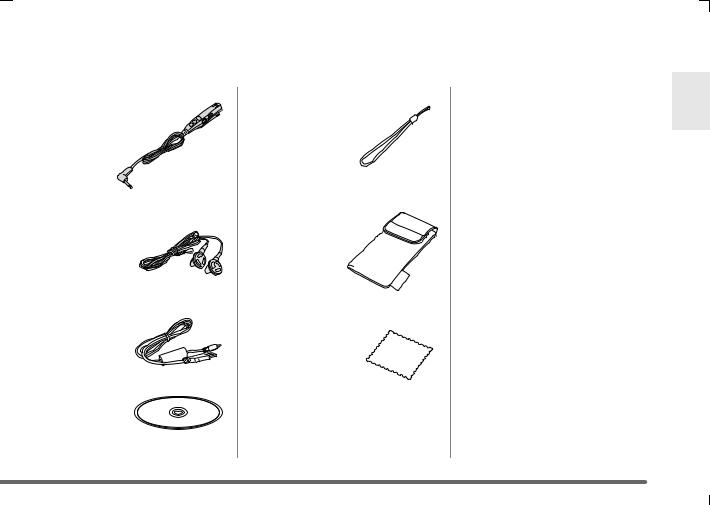
_Remote Controller VYC0902
_Stereo Earphones L0BAB0000173
_USB Cable K1HA09BD0001
_ CD-ROM
_Hand Strap VFC4012
_Carrying Case VFC4013
_Cleaning Cloth VFC1792
5

Information for Your Safety
Dear Customer,
We would like to take this opportunity to thank you for purchasing this Panasonic SD Multi Camera. Please read these Operating Instructions carefully and keep them handy for future reference.
WARNING
TO REDUCE THE RISK OF FIRE OR SHOCK HAZARD AND ANNOYING INTERFERENCE, USE ONLY THE RECOMMENDED ACCESSORIES AND DO NOT EXPOSE THIS EQUIPMENT TO RAIN OR MOISTURE. DO NOT REMOVE THE COVER (OR BACK); THERE ARE NO USER SERVICEABLE PARTS INSIDE. REFER SERVICING TO QUALIFIED SERVICE PERSONNEL.
Carefully observe copyright laws. Recording of pre-recorded tapes or discs or other published or broadcast material for purposes other than your own private use may infringe copyright laws. Even for the purpose of private use, recording of certain material may be restricted.
•Please note that the actual controls and components, menu items, etc. of your SD Multi Camera may look somewhat different from those shown in the illustrations in these Operating Instructions.
6
(For UK only)
Caution for AC mains lead
For your safety, please read the following text carefully.
This appliance is supplied with a moulded three-pin mains plug for your safety and convenience. A 5-ampere fuse is fitted in this plug.
Should the fuse need to be replaced, please ensure that the replacement fuse has a rating of 5-amperes and it is approved by ASTA or BSI to BS1362. Check for the ASTA mark Ï or the BSI mark Ì on the body of the fuse.
If the plug contains a removable fuse cover you must ensure that it is refitted when the fuse is replaced. If you lose the fuse cover, the plug must not be used until a replacement cover is obtained. A replacement fuse cover can be purchased from your local Panasonic Dealer.
IF THE FITTED MOULDED PLUG IS UNSUITABLE FOR THE SOCKET OUTLET IN YOUR HOME THEN THE FUSE SHOULD BE REMOVED AND THE PLUG CUT OFF AND DISPOSED OF SAFELY.
THERE IS A DANGER OF SEVERE ELECTRICAL SHOCK IF THE CUT OFF PLUG IS INSERTED INTO ANY 13-AMPERE SOCKET.
If a new plug is to be fitted, please observe the wiring code as shown below. If in any doubt, please consult a qualified electrician.
_ IMPORTANT
The wires in this mains lead are coloured in accordance with the following code: Blue: Neutral
Brown: Live
As the colours of the wires in the mains lead of this appliance may not correspond with the coloured markings identifying the terminals in your plug, proceed as follows:
The wire which is coloured BLUE must be connected to the terminal in the plug which is marked with the letter N or coloured BLACK.
The wire which is coloured BROWN must be connected to the terminal in the plug which is marked with the letter L or coloured RED.
Under no circumstances should either of these wires be connected to the earth terminal of the three-pin plug, marked with the letter E or the Earth Symbol Ó.
Before Use
Remove the Connector Cover as follows.
Connector
Cover
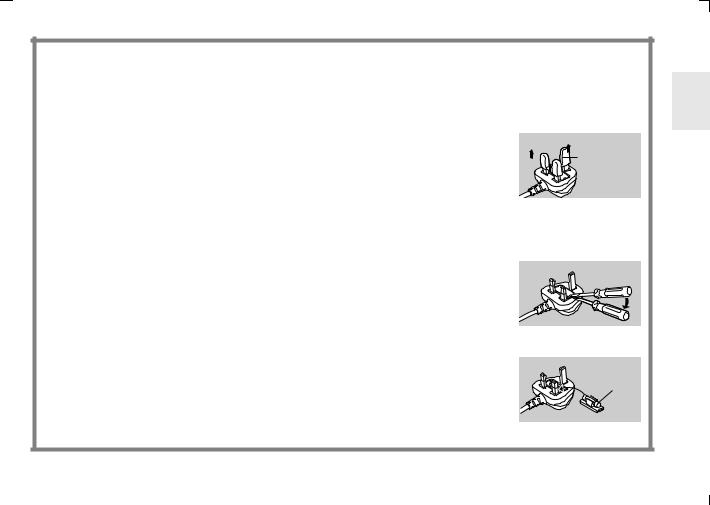
_ How to replace the Fuse
1Remove the Fuse Cover with a screwdriver.
Fuse
 Cover
Cover
2Replace the fuse and attach the Fuse Cover.
Fuse
 7
7
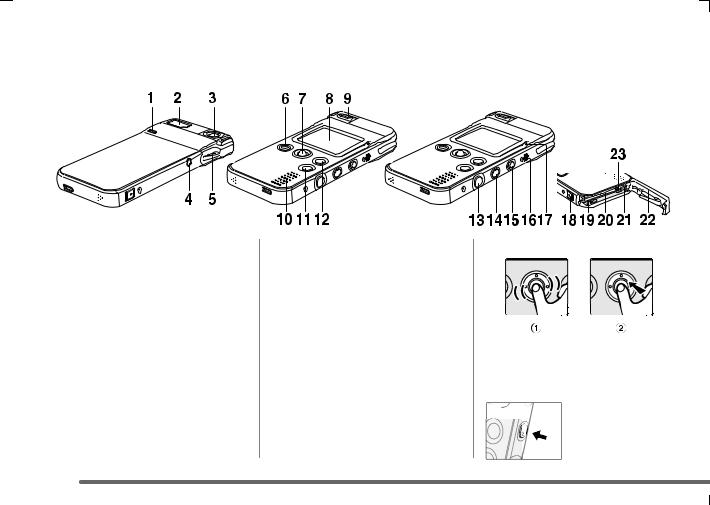
Components
_ Body
1Self timer Lamp
2Flash
3Lens
4Terminal (Headphone/Remote Controller) [  ]
]
5Strap Attachment
6Shutter Button [[]
7Jog Ball
8LCD Monitor
9Macro Switch [ 

 ]
]
10Speaker
•For confirming voice and music.
11Screen Reversal Button/HOLD Button (when playing music) [REV]
12MENU Button [MENU]
13Shutter Button [[]
14Power Button [ ]
]
15Record/Playback mode Switch [  /
/  ]
]
16Microphone
17Power/Card Access Lamp
18Lock Release Lever
19Battery Slot
20Card Slot
21Connector for USB Cradle
22Card/Battery Door
23Battery Lock
_ Operating Jog Ball
Roll the ball to select items. 1 Press to select items. 2
_ Operating Power Button
Hold for about 1 second to turn the power on.
Hold for about 2 seconds to turn the power off.
8
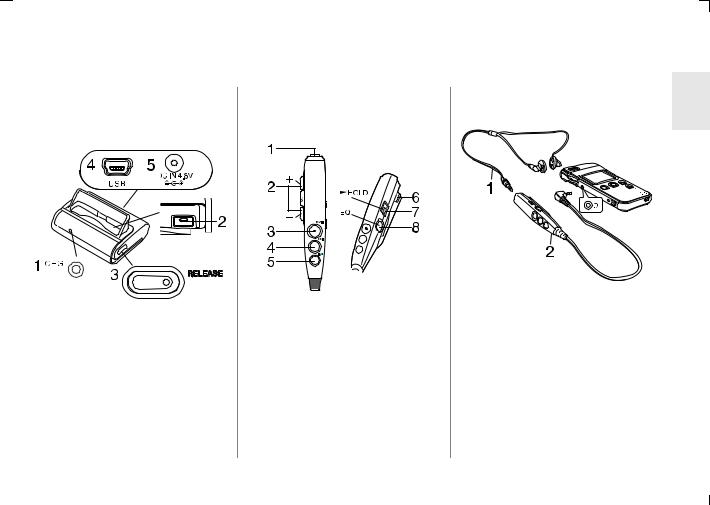
_ USB Cradle
Use this to charge the battery installed in this unit. When connecting an USB cable (supplied) to a socket, you can playback the pictures or voice and edit music on your PC.
1Charge Lamp [CHG]
2Connector
3Release Button [RELEASE]
4USB Socket [USB]
5DC Input Socket [DC IN 4.8V]
_ Remote Controller
You can play back pictures, sounds and music, and control the volume of the sound and music. You can also take pictures by using this remote controller.
1Stereo Earphone Socket
2Volume Button [j VOL i]
3Playback/Stop/Shutter Button [1/∫/µ]
4Fast-forward Button [9]
5Fast-rewind Button [:]
6Clip
7Hold Switch [HOLD]
•The buttons on the main unit cannot be locked.
8 Equalizer Button [EQ]
_ Stereo Earphones
When using earphones, be sure to connect to the supplied remote controller.
1Stereo Earphones
2Remote Controller
•If you use earphones other than the ones supplied, use 3 m or less length of earphones (including the remote controller).
 9
9

Insert the Battery
1 |
2 |
3 |
Slide the door while releasing the |
Insert the battery all the way. |
Close the door. 1 |
lock. 1 |
• Confirm the direction of the battery. |
Lock the door while sliding it. 2 |
Open the door. 2 |
|
|
10 
Remove the Battery
Be sure to turn the power off when you remove the battery.
1
Slide the door while releasing the lock. 1
Open the door. 2
CAUTION
Danger of explosion if battery is incorrectly replaced. Replace only with the same or equivalent type recommended by the manufacturer. Dispose of used batteries according to the manufacturer’s instructions.
2
Tilting this unit with facing the battery slot to the bottom, remove the battery with lifting the Battery lock A.
•When you cannot remove the battery, pull out the projection part B to remove it.
3
Close the door. 1
Lock the door while sliding it. 2
•When you do not use the camera for a long time, remove the battery.
•Never open the Card/Battery door during the access. (P16) Otherwise, the data on the card may be damaged.
•The supplied battery is only for this camera. Do not use it for other devices.
 11
11
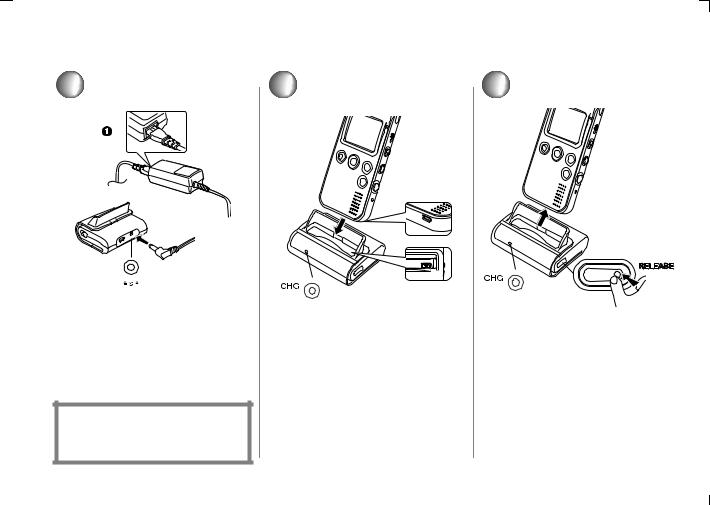
Charging the Battery
1
DC IN 4.8V
Connect the AC Mains Lead to the AC Adaptor and the AC mains socket.
•The AC Mains Lead does not fit entirely into the AC Adaptor socket. A gap will remain as shown 1.
And then connect the DC input lead to the USB cradle.
THE SOCKET OUTLET SHALL BE INSTALLED NEAR THE EQUIPMENT AND SHALL BE EASILY ACCESSIBLE.
2
Charge the battery.
•Align the connections.
•Be sure to turn the power off when charging the battery.
•Do not insert this unit in a wrong direction.
•The charge lamp blinks in about 3 seconds after connecting this unit with USB cradle.
3
When the charge lamp turns off, the battery is charged fully.
• It takes about 120 minutes.
Remove this unit from the cradle while pressing the RELEASE button.
12 

About Charging
•The battery is warmed during and after charging, and after use. The camera is also warmed during the operation, however, it is not malfunction.
•Use the supplied cradle or AC adaptor for this unit.
•Pull the plug out of the electrical outlet after completing the charge.
•Do not disassemble or alter the cradle or AC adaptor.
•Disconnect the USB cable from the USB cradle before charging.
_ Battery indicator
The remaining battery power is displayed on the LCD monitor in use.
The indication is changed as follows
 #
# #
# (blinking) according to the consumption of the battery.
When the indicator is shown as  (blinking), the battery will be
exhausted in a few minutes. Charge the battery.
_ Charging time and available recording time
(Recording condition)
•Shooting once every 30 seconds, flash every other shot
•Temperature 25°C/Humidity 60%
•Using the supplied battery and the SD Memory Card
Charging time |
Approx. 120 minutes |
Continuous |
Approx. 59 minutes |
recording time |
(Approx. 110 still |
(recordable |
pictures) |
number) |
|
|
|
Playback time |
Approx. 121 minutes |
(Still Picture) |
|
|
|
Continuous |
Approx. 10 hours |
music playback |
(When setting the |
time |
power save to ON |
|
and using supplied |
|
stereo earphones.) |
|
|
The times shown above may vary depending on the condition.
_ Charging environment and charging error
•Charge the battery in a place with the temperature 10 - 35°C. (The battery should also be the same temperature)
•The charge Lamp blinks while charging. (Blinks approx. every 2
seconds (lighting approx. 1 second, turning off approx. 1 second) when charging is normal.) When the charge Lamp blinks more quickly or slowly (or turns off), some abnormality may have occurred. The blinking speed suggests the following states.
Blinking approx. every 6 seconds (lighting approx. 3 seconds, turning off approx. 3 seconds):
•The ambient temperature or that of the battery itself is too high or too low. Charging proceeds, but will take
a longer time.
Blinking approx. every 0.5 seconds (lighting approx. 0.25 seconds, turning off approx. 0.25 seconds):
Refer to P70.
Turning off:
Charging is completed.
•If the charge Lamp turns off when charging is not completed, the AC Adaptor or the battery is probably defective. Contact your nearest Panasonic dealer.
•For details, refer to P69.
 13
13
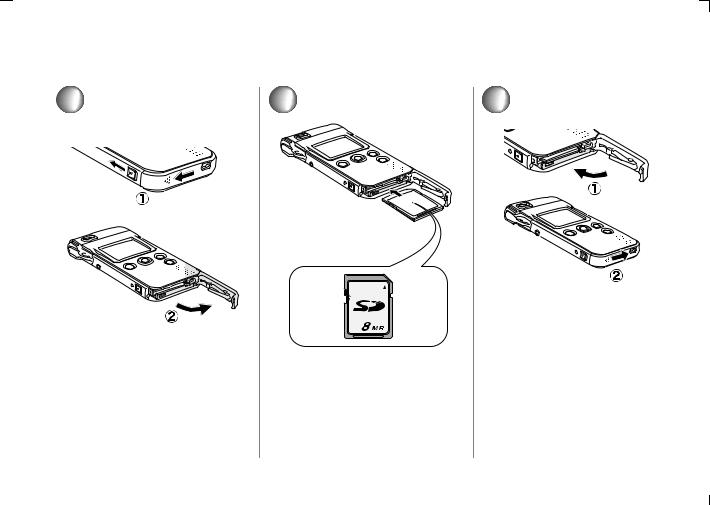
Insert the Card
Be sure to turn the power off when you insert the card.
1 |
2 |
Slide the door while releasing the lock. 1
Open the door. 2
Insert the card all the way in until it clicks.
•Check the direction of the card.
•Do not touch the connecting terminal on the rear of the card.
•If you do not insert the card all the way, it may be broken.
3
Close the door. 1
Lock the door while sliding it. 2
•If you cannot close the Card/Battery door completely, remove the card once, then insert it again.
•We recommend using the cards made by Panasonic. (Use genuine card only)
14 
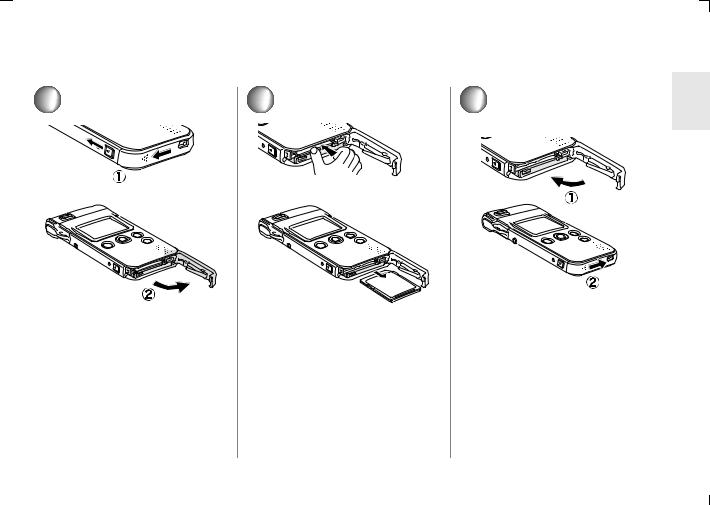
Remove the Card
Be sure to turn the power off when you remove the card.
1 |
2 |
3 |
Slide the door while releasing the |
Press the card until it clicks to |
Close the door. 1 |
lock. 1 |
release and pull out the card. |
Lock the door while sliding it. 2 |
Open the door. 2 |
|
|
 15
15

About Cards
_ Access to the card
When you access the card, (recognition/recording/reading/deleting) the Power/Card Access lamp blinks quickly.
When the Power/Card Access lamp is blinking, do not turn the power off or do not remove the battery and the card. Otherwise, the card or its contents may be damaged, or the camera may not work properly.
The data of the card may be damaged or lost because of the electrical noise, static or breakdown of the camera or the card. Save your precious data to your PC.
(P54)
_ SD Memory Card (supplied)
The SD Memory Card is a small, lightweight, removable external card. The SD Memory Card is equipped with a write-protect switch 1 that can inhibit writing and formatting. (When the switch is moved towards the LOCK side, it is not possible to write or delete data on the card and format it. When the switch is unlocked, these functions become available.)
•Keep the Memory Card out of reach of children to prevent swallowing.
16 

Basic Menu Operation
1 |
2 |
3 |
|
|||
|
|
|
|
|
|
|
Press the Power Button for 1 second to turn the power on. 1
Select the recording mode [ |
] or |
Press the MENU button to access |
Select the menu item as above. |
|
playback mode [ |
]. 2 |
|
the menu. |
|
|
|
|
||
4 |
|
|
5 |
• To stop the operation, Press the |
|
|
MENU button. |
||
|
|
|
|
|
|
|
|
|
• If the Jog Ball is left without any |
|
|
|
|
operation for about 30 seconds, the |
|
|
|
|
unit exits the menu automatically. |
|
|
|
|
• When you press the MENU button for |
|
|
|
|
about 1 second, the short cut menu |
|
|
|
|
appears. (P65, 66, 67) |
Select the desired item. |
Press the Jog Ball to set. |
 17
17
About the Setup Menu
Items |
|
|
Details of the setting |
||||||
Volume [ |
] |
|
• |
Beep ON: |
The operational sound turns on. |
||||
|
|
|
• |
Beep OFF: |
The operational sound turns off. |
||||
|
|
|
• |
Main volume: |
Adjust the volume of the speaker. |
||||
|
|
|
|
|
|
|
|
|
|
Format card [ |
|
] |
• |
You cannot recover all the data including the protected data once you format. Check the data |
|||||
|
|
|
|
before formatting. |
|
|
|
||
|
|
|
|
|
|
|
|
|
|
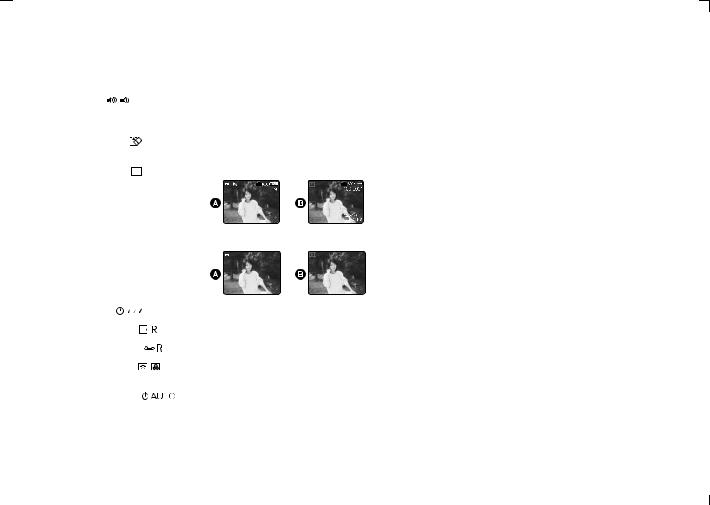
Icon display [ |
+ |
] |
• |
ON: |
Display the icon on the LCD monitor. |
||||
|
|
|
|
|
|
|
|
|
A: Recording mode B: Playback mode |
|
|
|
|
|
|
|
|
|
|
|
|
|
|
|
|
|
|
|
|
|
|
|
• |
OFF: |
Does not display the icon on the LCD monitor. |
||||
|
|
|
|
|
|
|
|
|
A: Recording mode B: Playback mode |
|
|
|
|
|
|
|
|
|
|
|
|
|
|
|
|
|
|
|
|
|
|
|
|
|
|
|
|
|
|
Clock set [ |
|
] |
• |
Change the date and display style. (P19) |
|||||
|
|
|
|
|
|
|
|
|
|
Reset file No. [ |
|
] |
• |
The number of the file to be recorded in the next time starts from 0001. |
|||||
|
|
|
|
|
|
|
|
||
Reset settings [ |
] |
• |
Reset to the initial setting of recording and setup menu. The clock setting does not change. |
||||||
|
|
|
|
|
|
|
|
|
|
Display setup [ |
] |
• |
Brightness: |
Adjust the brightness of the LCD monitor. |
|||||
|
|
|
• |
Colour: |
Adjust the saturation of the LCD monitor. |
||||
|
|
|
|
|
|
|
|
|
|
Auto power off [ |
] |
• |
5 min: |
No operation for about 5 minutes leads to power off. |
|||||
|
|
|
• |
Cancel: |
Not lead to power off until the battery is exhausted. |
||||
|
|
|
|
• This function does not work when connecting to PC, recording/playing back the motion |
|||||
|
|
|
|
|
|
image, playing the slideshow or music, or recording/playing back the voice memo. |
|||
|
|
|
|
|
|
|
|
|
|
18 

Setting the Date/Time
1
Access the menu. (P17) Select Clock set from Clock set
[ 
 ] on the Setup menu.
2
Set the year, month, day and time.
•When pressing the jog ball, year, month, day and time is set. When rolling it up and down, the number is set.
•Press the MENU button to exit from the menu.
_ After purchase
The clock is not set when shipping. When you turn the power on, the clock setting screen appears. Adjust the time here.
•If you do not set the clock here, the clock is automatically set to “January 1st, 2000 0:00”.
•You can set the year from 2000 to 2099.
•When you select Display style from Clock set in step 1, you can choose the indication style from the following. (e.g. September 1st, 2003 PM12:00)
•[Y/M/D]:2003/9/1 12:00
•[D/M/Y]:1/9/2003 12:00
•[M/D/Y]:Sep/1/2003 12:00PM
•When the fully charged battery is inserted in the camera for 1 hour or more, the clock setting is stored in the camera for about 10 hours even after the battery is removed. (It is stored for about a maximum of 3 months according to the time when the battery is inserted. If a battery which is not fully charged is inserted, time may become shorter.)
However, the clock setting is cancelled if more time has passed without the battery inserted. In this case, please set the date/time again.
 19
19
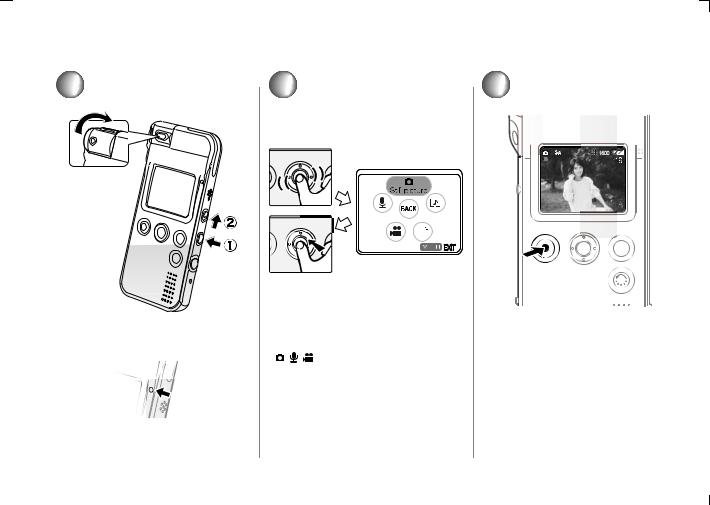
Taking a Picture
1
Turn the power on. 1
•The power/card access lamp is lit in red.
(Still Picture) |
|
2 |
3 |
Access the menu. (P17) |
Press the shutter button to take a |
|
Select Still picture from REC mode |
picture. |
|
[ |
]. |
|
Switch to the recording mode [  ].
].
2
20 
_ Self-Recording
1
Turn the lens.
• Do not touch the lens.
2
Press the screen reversal button to reverse a picture.
• If you take a picture without pressing the button, the picture is displayed upside down.
3
Take a picture.
• The recorded picture is horizontally reversed.
• You can take reverse the picture only in still picture mode.
• The flash setting is fixed to Flash off.
_ Digital zoom
You can record the picture enlarging it up to 4 times.
1
Press the jog ball.
2
Roll the jog ball up and down to set the zoom magnification.
•Press the jog ball again to cancel the digital zoom.
•The more the picture is enlarged, the more the picture quality is deteriorated.
•You can zoom only in still picture mode.
 21
21
Taking a Picture (Still Picture) (Continued)
_ Macro |
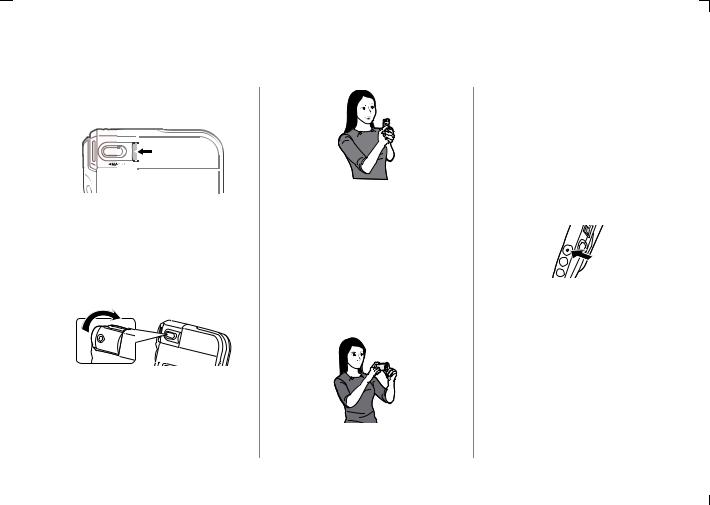
_ How to hold the camera |
Slide the Macro switch to left side to take pictures of the subjects at a distance of about 10 cm.
•If you slide the Macro switch to the left but the subject is further away than 10 cm, you cannot focus on the subject sharply.
_ When the lens is facing down
Rotate the lens to prepare for taking pictures.
• At purchase, the lens is facing down.
•Put your arm on the side of your body.
•Fix the camera with your right hand and put your left hand on the camera.
•In this unit, the shutter speed is automatically adjusted according to the brightness of the subject. Press the shutter button not to shake the camera.
_ When taking a horizontal picture
It is convenient to use the shutter button on the side of the camera.
•Be careful not to touch the lens or flash when taking pictures using the shutter button on the side of the camera.
•Distances for optimum focus Normal: About 50 cm - ¶ Macro: About 10 cm
•The brightness of the LCD monitor may differ from that of the recorded pictures. In particular, when taking pictures in dark places with a long exposure time, darkness appears on the LCD monitor, but the recorded pictures are bright.
•When taking the picture from a distance, it is more convenient to use the shutter button on the remote controller.
•The LCD color and the brightness may be different under the fluorescent lamp.
•When taking pictures in very dark places, the shutter speed becomes slow. Be careful not to shake the camera. When taking pictures of the subjects in quick motion, the picture may be blurred or the image of the subject may persist.
22 
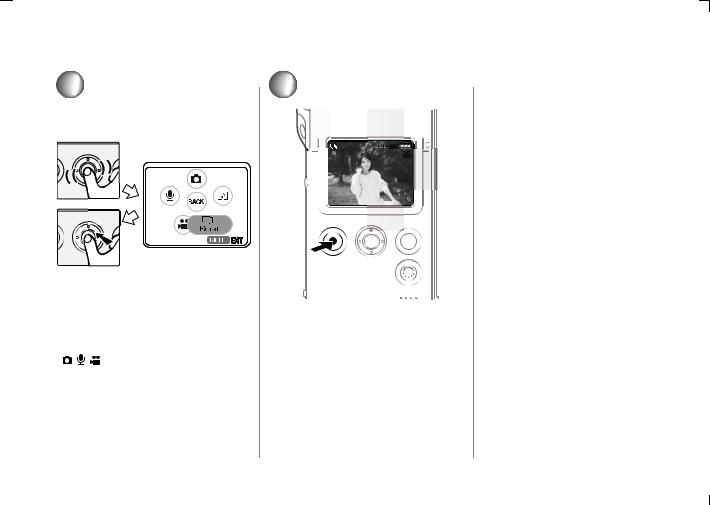
Recording Still Picture with Audio
1
Access the menu in the recording mode. (P17)
Select Still picture + Audio from REC mode [

 ].
].
2
Take a picture.
•You can record audio for about 10 seconds. (The recording is automatically stopped.)
•You can also stop recording of the audio by pressing the shutter button within 10 seconds. You cannot stop recording within 2 seconds after recording has started.
•You do not have to keep the shutter button pressed.
•The audio is recorded with the microphone on this unit. Do not cover it with your finger.
•Auto review (P44) does not work in this mode.
•Be careful not to touch the jog ball or any other buttons. The noise may be recorded.
 23
23
Taking Pictures in Burst Mode
1 |
2 |
Access the menu in the recording |
Take a picture. |
|
mode. (P17) |
|
|
Select Burst from REC mode |
|
|
[ |
]. |
|
Burst speed |
3 frames/sec. |
|
|
Burst number |
Max. 3 frames |
|
|
•Flash setting is fixed to Flash off.
•Self timer (P40) does not work in this mode.
•Auto review does not work in this mode.
24 
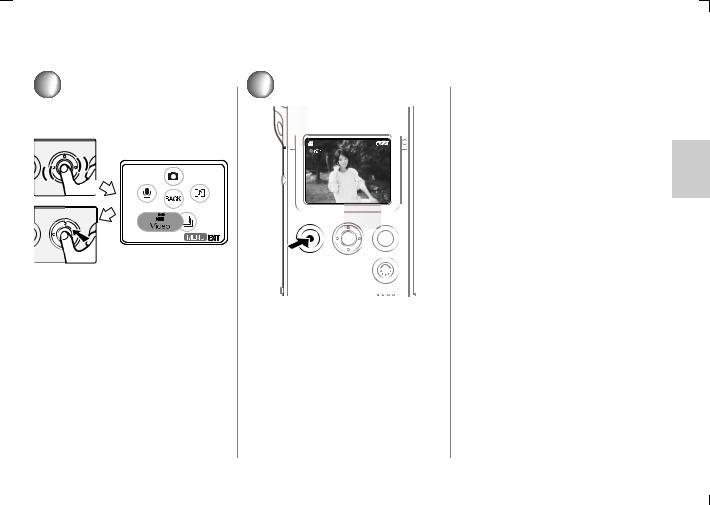
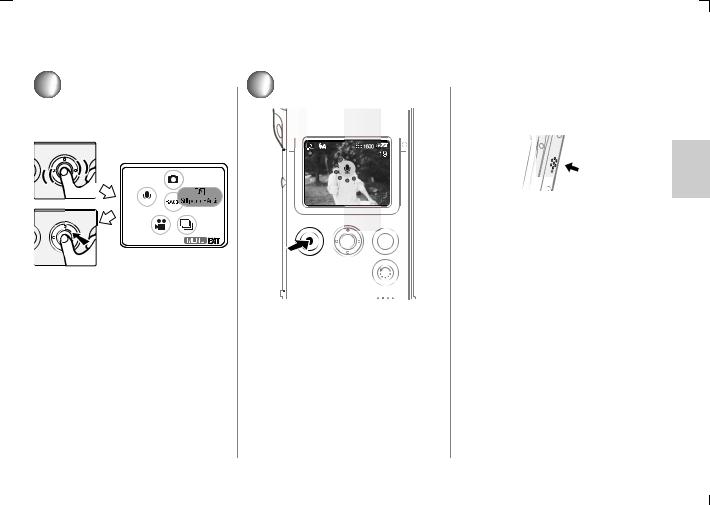
Recording Motion Images
1
Access the menu in the recording mode. (P17)
Select Video from REC mode
[ 

 ].
].
2
Start recording.
•µ this symbol is displayed.
•The audio recording starts simultaneously from the microphone. (The audio is recorded with the microphone on this unit.)
•You can record up to about 60 seconds.
Stop recording.
•- this symbol is displayed.
•If the memory of the card becomes full during the recording, the recording is stopped automatically.
•The remaining time displayed on the LCD monitor is an approximation.
•When the motion image recorded with this unit is played back on other equipment, the quality of pictures and sounds may be deteriorated or pictures may not be able to be played back.
•When setting REC mode to Video
•Flash setting is fixed to Flash off.
•Digital zoom does not work in this mode.
•Night mode (P44) does not work in this mode.
•Auto review does not work in this mode.
•The picture size is fixed to 320a240 pixels.
•You cannot use the Screen Reversal Button/HOLD Button.
•Be careful not to touch the jog ball or any other buttons. The noise may be recorded.
•When the remaining time is lower than 1 minute, R 0h00m is displayed in red.
•After recording motion images, it may take time to read the data. This is not a malfunction.
 25
25
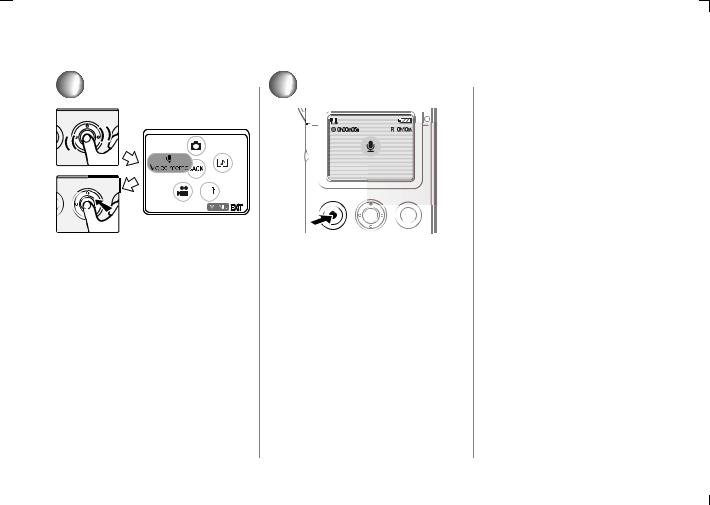
Recording Voice
1
Access the menu in the recording mode. (P17)
Select Voice memo from REC mode [ 

 ].
].
2
Start recording.
•µ this symbol is displayed.
•The audio is recorded from the microphone on this unit.
•The LCD monitor is turned off within about 5 seconds after recording has started. Roll the jog ball gently to turn it on.
Stop recording.
•The LCD monitor is turned on again.
•- this symbol is displayed.
•You cannot stop recording within 2 seconds after recording has started.
•If the memory of the card becomes full during the recording, the recording is stopped automatically.
•The remaining time displayed on the LCD monitor is an approximation.
•Recording could suddenly stop when recording voice depending on the brand of card.
•The audio recorded with this unit cannot be played back by other equipment.
•Be careful not to touch the jog ball or any other buttons. The noise may be recorded.
26 
 Loading...