


Users’ Guide
Mixing Automation Expansion Software
Model WR-RC/M
for Macintosh
The product name, RAMSA MAX is the property of Matsushita Communication Industrial Co., Ltd.. All other product names in this manual are the property of their respective holders.
Part number for this manual: YWA8QA5134AN

CONTENTS
LICENSE AGREEMENT . . . . . . . . . . . . . . . . . . . . . . . . . . . . . . . . . . . . . . . . . VI
READ THIS FIRST . . . . . . . . . . . . . . . . . . . . . . . . . . . . . . . . . . . . . . . . . . .VII
PANASONIC TECHNICAL SUPPORT . . . . . . . . . . . . . . . . . . . . . . . . . . . . . . . . .VIII
OVERVIEW . . . . . . . . . . . . . . . . . . . . . . . . . . . . . . . . . . . . . . . . . . . . . . . IX
FEATURES . . . . . . . . . . . . . . . . . . . . . . . . . . . . . . . . . . . . . . . . . . . . . . . .XIII
CHAPTER 1 GETTING STARTED . . . . . . . . . . . . . . . . . . . . . . . . . . . . . . . . . . 1
Computer Skills Required . . . . . . . . . . . . . . . . . . . . . . . . . . . . . 1
Computer Requirements . . . . . . . . . . . . . . . . . . . . . . . . . . . . . 1
Computer Setup . . . . . . . . . . . . . . . . . . . . . . . . . . . . . . . . . . . . 2
The Chooser and AppleTalk . . . . . . . . . . . . . . . . . . . . . . 2
Monitor . . . . . . . . . . . . . . . . . . . . . . . . . . . . . . . . . . . . . . 2
Memory . . . . . . . . . . . . . . . . . . . . . . . . . . . . . . . . . . . . . . 2
Software Installation . . . . . . . . . . . . . . . . . . . . . . . . . . . . . . . . . 3
CHAPTER 2 CONNECTING THE SYSTEM . . . . . . . . . . . . . . . . . . . . . . . . . . . . . 5
Mixer and Computer Communication Hookup . . . . . . . . . . . . 5 Time-Code Sync Hookup . . . . . . . . . . . . . . . . . . . . . . . . . . . . . 6 MIDI Hookup . . . . . . . . . . . . . . . . . . . . . . . . . . . . . . . . . . . . . . 6 System Connection Examples . . . . . . . . . . . . . . . . . . . . . . . . . 7 Setting up the System . . . . . . . . . . . . . . . . . . . . . . . . . . . . . . . . 9
Mixer Setup . . . . . . . . . . . . . . . . . . . . . . . . . . . . . . . . . . . 9 Launching Software to Verify Connections . . . . . . . . . . . 9 Setting the Communication Speed . . . . . . . . . . . . . . . . . . . . . . 10 Required Setup for Two Mixers . . . . . . . . . . . . . . . . . . . . . . . . 10
CHAPTER 3 MAX CONTROL BAR . . . . . . . . . . . . . . . . . . . . . . . . . . . . . . . . . 11
CHAPTER 4 CUSTOM VIEWS . . . . . . . . . . . . . . . . . . . . . . . . . . . . . . . . . . . . 15
Editing the Custom Views . . . . . . . . . . . . . . . . . . . . . . . . . . . . . 18
About the Edit Custom Views Dialogue . . . . . . . . . . . . . . . . . . 20
Selection Pop-up Menu . . . . . . . . . . . . . . . . . . . . . . . . . . . . . . 21
Standard Fader Module Description . . . . . . . . . . . . . . . . . . . . 23
Getting Info About a Control . . . . . . . . . . . . . . . . . . . . . . . . . . 25
CHAPTER 5 INTRODUCTION TO AUTOMATED MIXING IN REAL TIME . . . . . . . . . . 27
Building a Mix in Many “Passes” . . . . . . . . . . . . . . . . . . . . . . . . 27 Preparing to Write an Automated Mix . . . . . . . . . . . . . . . . . . . 29 Setting Which Parameters are Write Enabled . . . . . . . . . . . . . . 30 Choosing the Edit Mode . . . . . . . . . . . . . . . . . . . . . . . . . . . . . . 30 Edit Modes (Write, Read, Trim, Manual) Defined . . . . . . . . . . 31 Selecting the Mixer Channels . . . . . . . . . . . . . . . . . . . . . . . . . . 33
CHAPTER 6 MAX REAL TIME OPERATION . . . . . . . . . . . . . . . . . . . . . . . . . . |
35 |
Overview of First Automation Pass . . . . . . . . . . . . . . . . . . . . . . |
35 |
First Automation Pass in Detail . . . . . . . . . . . . . . . . . . . . . . . . . |
36 |
Preparing to Mix . . . . . . . . . . . . . . . . . . . . . . . . . . . . . . . |
36 |
i

Selecting the channels that you wish to write . . . . . . . . . 39 Perform a Mix . . . . . . . . . . . . . . . . . . . . . . . . . . . . . . . . . 39 Writing Channel On/Offs . . . . . . . . . . . . . . . . . . . . . . . . . 39 Writing Faders . . . . . . . . . . . . . . . . . . . . . . . . . . . . . . . . . 40 Writing Additional Snapshots . . . . . . . . . . . . . . . . . . . . . 40 More About Snapshots . . . . . . . . . . . . . . . . . . . . . . . . . . 40 Writing Routing . . . . . . . . . . . . . . . . . . . . . . . . . . . . . . . . 40 Writing Aux Sends . . . . . . . . . . . . . . . . . . . . . . . . . . . . . . 41 Writing Pans . . . . . . . . . . . . . . . . . . . . . . . . . . . . . . . . . . . 41 Writing EQ . . . . . . . . . . . . . . . . . . . . . . . . . . . . . . . . . . . . 42 Writing Gain and Phase . . . . . . . . . . . . . . . . . . . . . . . . . . 43 Writing Delay . . . . . . . . . . . . . . . . . . . . . . . . . . . . . . . . . . 44 Writing Dynamics . . . . . . . . . . . . . . . . . . . . . . . . . . . . . . . 44
Fader Editing . . . . . . . . . . . . . . . . . . . . . . . . . . . . . . . . . . . . . . . 45 The Phantom Faders . . . . . . . . . . . . . . . . . . . . . . . . . . . . 46 What is a Null Point? . . . . . . . . . . . . . . . . . . . . . . . . . . . . 47 Manually Nulling a Fader . . . . . . . . . . . . . . . . . . . . . . . . . 47 Manually Punching In Fader Moves . . . . . . . . . . . . . . . . 48 Auto Punch In and Auto Punch Out . . . . . . . . . . . . . . . . 49 SoftTouch™ . . . . . . . . . . . . . . . . . . . . . . . . . . . . . . . . . . . 55 SoftTouch Time Out . . . . . . . . . . . . . . . . . . . . . . . . . . . . 55 SoftTouch In Read Mode . . . . . . . . . . . . . . . . . . . . . . . . . 55 Important Notes About SoftTouch . . . . . . . . . . . . . . . . . 56 Trimming Fader moves in Trim Mode . . . . . . . . . . . . . . 57 Trim Until End . . . . . . . . . . . . . . . . . . . . . . . . . . . . . . . . . 59 Trim Until End Preferences . . . . . . . . . . . . . . . . . . . . . . . 60 Auto Disable . . . . . . . . . . . . . . . . . . . . . . . . . . . . . . . . . . . 61
Channel On/Offs and Switch Editing . . . . . . . . . . . . . . . . . . . . 62 Pan, Aux Sends, EQ, Gain and Delay Editing . . . . . . . . . . . . . . 64 Undo a Pass and Aborting a Pass . . . . . . . . . . . . . . . . . . . . . . . 65 Snapback . . . . . . . . . . . . . . . . . . . . . . . . . . . . . . . . . . . . . . . . 66 Solo Mode . . . . . . . . . . . . . . . . . . . . . . . . . . . . . . . . . . . . . . . . 68 Capturing Markers In Real Time . . . . . . . . . . . . . . . . . . . . . . . . 70
CHAPTER 7 SOFTGROUPS™ . . . . . . . . . . . . . . . . . . . . . . . . . . . . . . . . . . . . 73
Example of a SoftGroup Assignment . . . . . . . . . . . . . . . . . . . . 74 Rearranging SoftGroup in the Custom View . . . . . . . . . . . . . . 75 Removing SoftGroup Assignment . . . . . . . . . . . . . . . . . . . . . . . 76 Important Notes About SoftGroups . . . . . . . . . . . . . . . . . . . . . 76
CHAPTER 8 SURROUND PANNER . . . . . . . . . . . . . . . . . . . . . . . . . . . . . . . . . 79
Surround Panning in Real Time . . . . . . . . . . . . . . . . . . . . . . . . 79
Stereo Link . . . . . . . . . . . . . . . . . . . . . . . . . . . . . . . . . . . . . . . . 80
Panning and SoftGroups . . . . . . . . . . . . . . . . . . . . . . . . . . . . . . 81
i i

CHAPTER 9 DISK AND FILE OPERATIONS . . . . . . . . . . . . . . . . . . . . . . . . . . . |
85 |
Auto-Backup . . . . . . . . . . . . . . . . . . . . . . . . . . . . . . . . . . . . . . . |
85 |
Auto Backup Numbering . . . . . . . . . . . . . . . . . . . . . . . . . |
85 |
Auto Backup Example . . . . . . . . . . . . . . . . . . . . . . . . . . . |
86 |
Mix Backup Trees . . . . . . . . . . . . . . . . . . . . . . . . . . . . . . . . . . . |
88 |
Mix Backup Tree Example . . . . . . . . . . . . . . . . . . . . . . . . |
89 |
Recent Mixes . . . . . . . . . . . . . . . . . . . . . . . . . . . . . . . . . . . . . . . |
90 |
Opening Mixes with Different Modules . . . . . . . . . . . . . . . . . |
91 |
CHAPTER 10 MAX GRAPHIC VIEW . . . . . . . . . . . . . . . . . . . . . . . . . . . . . . . 93
Description of the Graphic View . . . . . . . . . . . . . . . . . . . . . . . 95 Creating a Fader Move . . . . . . . . . . . . . . . . . . . . . . . . . . . . . . . 98 Creating a Channel On/Off . . . . . . . . . . . . . . . . . . . . . . . . . . . . 98 Creating a New Marker . . . . . . . . . . . . . . . . . . . . . . . . . . . . . . . 98 Moving a Snapshot or Marker . . . . . . . . . . . . . . . . . . . . . . . . . . 98 Show or Hide Marker and Snapshot Names . . . . . . . . . . . . . . . 99 Show or Hide Marker and Snapshot Lines . . . . . . . . . . . . . . . . 99 Snap to Marker . . . . . . . . . . . . . . . . . . . . . . . . . . . . . . . . . . . . . 99 Graphic Editing of Fader Moves . . . . . . . . . . . . . . . . . . . . . . . .100 Graphic Editing of a Channel On/Off . . . . . . . . . . . . . . . . . . . .103
CHAPTER 11 MAX OFF LINE OPERATION . . . . . . . . . . . . . . . . . . . . . . . . . . |
.105 |
Cue List Editing Introduction . . . . . . . . . . . . . . . . . . . . . . . . . . |
105 |
About the Off Line Menu . . . . . . . . . . . . . . . . . . . . . . . . . . . . . |
105 |
The Cue List and a Single Fader Move . . . . . . . . . . . . . . . . . . . |
106 |
Scrolling the Cue List . . . . . . . . . . . . . . . . . . . . . . . . . . . . . . . . |
107 |
Clipboard Editing . . . . . . . . . . . . . . . . . . . . . . . . . . . . . . . . . . . |
108 |
Selecting Events . . . . . . . . . . . . . . . . . . . . . . . . . . . . . . . . . . . . |
108 |
De-selecting Events . . . . . . . . . . . . . . . . . . . . . . . . . . . . . . . . . . |
108 |
Edit Bar . . . . . . . . . . . . . . . . . . . . . . . . . . . . . . . . . . . . . . . . |
111 |
Edit Fields . . . . . . . . . . . . . . . . . . . . . . . . . . . . . . . . . . . . . . . . |
112 |
Fader Tools . . . . . . . . . . . . . . . . . . . . . . . . . . . . . . . . . . . . . . . . |
114 |
Move . . . . . . . . . . . . . . . . . . . . . . . . . . . . . . . . . . . . . . . . |
114 |
Scale . . . . . . . . . . . . . . . . . . . . . . . . . . . . . . . . . . . . . . . . . |
115 |
Crop . . . . . . . . . . . . . . . . . . . . . . . . . . . . . . . . . . . . . . . . . |
115 |
Smooth . . . . . . . . . . . . . . . . . . . . . . . . . . . . . . . . . . . . . . |
115 |
Offset Buttons . . . . . . . . . . . . . . . . . . . . . . . . . . . . . . . . . . . . . . |
116 |
Example of Move with Offset Buttons . . . . . . . . . . . . . . . |
116 |
View “Document” Icon . . . . . . . . . . . . . . . . . . . . . . . . . . . . . . . |
117 |
View Events Dialogue . . . . . . . . . . . . . . . . . . . . . . . . . . . . . . . . |
117 |
Example of View Events . . . . . . . . . . . . . . . . . . . . . . . . . |
118 |
About the View Events Dialogue . . . . . . . . . . . . . |
121 |
Performing Cue List Edits with Edit Bar . . . . . . . . . . . . . . . . . . |
123 |
Outline View “Triangles” . . . . . . . . . . . . . . . . . . . . . . . . . . . . . |
124 |
Creating and Editing Markers Off Line . . . . . . . . . . . . . . . . . . . |
125 |
i i i

Finding Markers . . . . . . . . . . . . . . . . . . . . . . . . . . . . . . . . . . . .127 Creating Automation Events Off Line . . . . . . . . . . . . . . . . . . . .128 Create Fader Moves . . . . . . . . . . . . . . . . . . . . . . . . . . . . .129 Create Channel On/Off Events . . . . . . . . . . . . . . . . . . . .131 Create Surround Pan Events . . . . . . . . . . . . . . . . . . . . . .132 Create Parameter Change . . . . . . . . . . . . . . . . . . . . . . . .134 Create Switch Events . . . . . . . . . . . . . . . . . . . . . . . . . . . .136 Create Snapshots . . . . . . . . . . . . . . . . . . . . . . . . . . . . . . .138 Create Library Events (Dynamics, EQ, and Effects) . . . . .140 Create MIDI Events . . . . . . . . . . . . . . . . . . . . . . . . . . . . .141 Transition Between Snapshots . . . . . . . . . . . . . . . . . . . . . . . . .142 Merge Mix . . . . . . . . . . . . . . . . . . . . . . . . . . . . . . . . . . . . . . . . .143 Merge Mix Example . . . . . . . . . . . . . . . . . . . . . . . . . . . . .144 Channel Names and Labels Dialogue . . . . . . . . . . . . . . . . . . . .145 Printing the Cue List or Track List . . . . . . . . . . . . . . . . . . . . . .147
CHAPTER 12 MAX EDIT MODULE DIALOGUE . . . . . . . . . . . . . . . . . . . . . . . . |
149 |
About Modules . . . . . . . . . . . . . . . . . . . . . . . . . . . . . . . . . . . . . |
149 |
Automated Custom Modules . . . . . . . . . . . . . . . . . . . . . . |
150 |
Non-Automated Modules . . . . . . . . . . . . . . . . . . . . . . . . . |
150 |
Automated Virtual Modules . . . . . . . . . . . . . . . . . . . . . . . |
150 |
About the Edit Module Dialogue . . . . . . . . . . . . . . . . . . . . . . . |
151 |
Elements of the Edit Module Dialogue . . . . . . . . . . . . . . . . . . |
152 |
Procedure for Editing Modules . . . . . . . . . . . . . . . . . . . . . . . . |
153 |
To Place an Item . . . . . . . . . . . . . . . . . . . . . . . . . . . . . . . |
154 |
To Move an Item . . . . . . . . . . . . . . . . . . . . . . . . . . . . . . . |
155 |
To Erase an Item . . . . . . . . . . . . . . . . . . . . . . . . . . . . . . . |
155 |
To Connect an Item . . . . . . . . . . . . . . . . . . . . . . . . . . . . . |
155 |
Naming Module Controls . . . . . . . . . . . . . . . . . . . . . . . . |
156 |
Connecting Labels . . . . . . . . . . . . . . . . . . . . . . . . . . . . . . |
157 |
Calibration Lines and Calibration Labels . . . . . . . . . . . . |
158 |
Examples . . . . . . . . . . . . . . . . . . . . . . . . . . . . . . . . . . . . . |
160 |
CHAPTER 13 MAX’S AUXILIARY MIDI CONTROL . . . . . . . . . . . . . . . . . . . . . .165
Port Setup . . . . . . . . . . . . . . . . . . . . . . . . . . . . . . . . . . . . . . . .165
MIDI Machine Control . . . . . . . . . . . . . . . . . . . . . . . . . . . . . . .166
Real Time MIDI Automation . . . . . . . . . . . . . . . . . . . . . . . . . . .167
Creating MIDI Faders . . . . . . . . . . . . . . . . . . . . . . . . . . . . . . . .168
MIDI Faders Dialogue . . . . . . . . . . . . . . . . . . . . . . . . . . . . . . . .169
Writing and Editing MIDI Fader Moves . . . . . . . . . . . . . . . . . .170
Example . . . . . . . . . . . . . . . . . . . . . . . . . . . . . . . . . . . . . .171
Real Time MIDI Recording . . . . . . . . . . . . . . . . . . . . . . . . . . . .172
Creating MIDI Events Off Line . . . . . . . . . . . . . . . . . . . . . . . . .174
MIDI Names and Labels Dialogue . . . . . . . . . . . . . . . . . . . . . .177
MIDI Applications . . . . . . . . . . . . . . . . . . . . . . . . . . . . . . . . . . .178
i v

CHAPTER 14 MAX PREFERENCES (EDIT MENU) . . . . . . . . . . . . . . . . . . . . . . |
.179 |
General . . . . . . . . . . . . . . . . . . . . . . . . . . . . . . . . . . . . . . . |
.180 |
Time Code . . . . . . . . . . . . . . . . . . . . . . . . . . . . . . . . . . . . . . . . |
183 |
Faders . . . . . . . . . . . . . . . . . . . . . . . . . . . . . . . . . . . . . . . . . |
184 |
Real Time . . . . . . . . . . . . . . . . . . . . . . . . . . . . . . . . . . . . . . . . |
186 |
Backup . . . . . . . . . . . . . . . . . . . . . . . . . . . . . . . . . . . . . . . . |
187 |
Port Setup . . . . . . . . . . . . . . . . . . . . . . . . . . . . . . . . . . . . . . . . |
188 |
Machine Control . . . . . . . . . . . . . . . . . . . . . . . . . . . . . . . . . . . . |
189 |
CHAPTER 15 MAX SOFTWARE MENUS . . . . . . . . . . . . . . . . . . . . . . . . . . . . .191
Apple Menu . . . . . . . . . . . . . . . . . . . . . . . . . . . . . . . . . . . . . . . .191
File Menu . . . . . . . . . . . . . . . . . . . . . . . . . . . . . . . . . . . . . . . .191
Edit Menu . . . . . . . . . . . . . . . . . . . . . . . . . . . . . . . . . . . . . . . . .193
Off Line Menu . . . . . . . . . . . . . . . . . . . . . . . . . . . . . . . . . . . . . .195
Real Time Menu . . . . . . . . . . . . . . . . . . . . . . . . . . . . . . . . . . . .202
Graphic Editing Menu . . . . . . . . . . . . . . . . . . . . . . . . . . . . . . . .206
Windows Menu . . . . . . . . . . . . . . . . . . . . . . . . . . . . . . . . . . . . .206
CHAPTER 16 DA7 LIBRARIAN SOFTWARE . . . . . . . . . . . . . . . . . . . . . . . . . . |
207 |
Installation . . . . . . . . . . . . . . . . . . . . . . . . . . . . . . . . . . . . . . . . |
207 |
Launching Librarian Software . . . . . . . . . . . . . . . . . . . . . . . . . . |
207 |
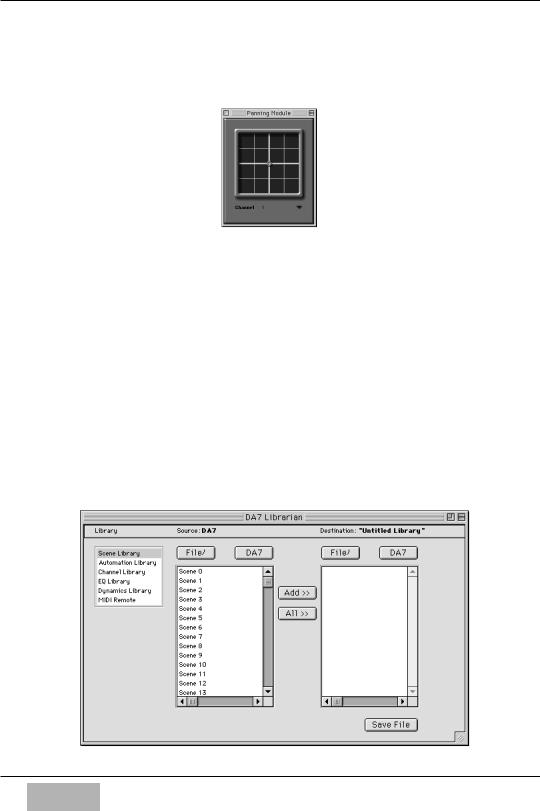
Librarian Window . . . . . . . . . . . . . . . . . . . . . . . . . . . . . . . . . . . |
208 |
Setting the Port and Communication Speed . . . . . . . . . . . . . . |
209 |
To Select and View a Library . . . . . . . . . . . . . . . . . . . . . . . . . . . |
210 |
To Edit and Save . . . . . . . . . . . . . . . . . . . . . . . . . . . . . . . . . . . . |
211 |
To Select Library Entries Prior to Editing or Saving . . . . . . . . . |
212 |
Clipboard Editing of "Destination" . . . . . . . . . . . . . . . . . . . . . . |
214 |
To Change the Name of a Library Entry . . . . . . . . . . . . . . . . . . |
214 |
Example of Procedure to Save DA7 Library Contents
to Disk . . . . . . . . . . . . . . . . . . . . . . . . . . . . . . . . . . . . . . . .215
Example of Procedure to Open A Previously Saved File
and Download It to The DA7 . . . . . . . . . . . . . . . . . . . . . . .215
APPENDIX MACINTOSH KEYBOARD SHORT CUTS . . . . . . . . . . . . . . . . . . . . .217
STUDIO VISION PRO . . . . . . . . . . . . . . . . . . . . . . . . . . . . . . . .220
v

LICENSE AGREEMENT
By opening this sealed disk package, you are agreeing to be bound by the terms of this Agreement.
This product is remote control software package, herein refer to as M.A.X. (“Product”) for use with a Digital Recording Mixer, Panasonic model WR-DA7(“Unit”). This Agreement constitutes the complete agreement between you and MATSUSHITA COMMUNICATION INDUSTRIAL CO., LTD. (“LICENSOR”) about this Product.
If you do not agree to the terms of this Agreement, do not open the disk package. Promptly return the unopened package and any other materials that are part of this Product together with your proof of payment within 10 days to the place where you obtained it for full refund.
1. License Grant
In consideration of payment of the license fee, which is part of the price you paid for this Product, LICENSOR grants to you, the LICENSEE, a non-exclusive right to use and display this copy of the Product only on a single computer which remotely controls a single Unit.
LICENSOR reserves all rights not expressly granted to the LICENSEE.
2. Ownership
As the LICENSEE, you own the magnetic media on which the Product is originally or subsequently recorded or fixed, but LICENSOR and JLCooper Electronics (“JLC”) who have licensed portions of the Product to LICENSEE retain title to and ownership in the software program of the Product. This License is not a sale of original software program of the Product, or any portion or copy of it.
3. Copy Registration
The Product and the accompanying materials are copyrighted and contain proprietary information and trade secrets of the LICENSOR and others. Unauthorized copying of the Product even if modified, merged, or included with other software, or of the written materials, is expressly forbidden. You may be held legally responsible for any infringement of intellectual property rights that is caused or encouraged by your failure to abide by the terms of this Agreement.
4. Permitted Users
The software, user’s manual and documentation are licensed to you only. You may not rent or lease the Product, but you may transfer the software and accompanying written materials on a permanent basis to a transferee of your Unit provided you retain no copies and recipient agrees to the terms of this Agreement.
You may not modify, adapt, translate, reverse engineer, decompile, disassemble, or create derivative works based on the Product. Written materials provided to you may not be modified, adapted, translated or used to create derivative works without the prior written consent of LICENSOR.
5. Termination
This Agreement is effective until terminated.
This Agreement will terminate automatically without notice from LICENSOR if you fail to comply with any provision contained herein. Upon termination, you shall destroy the written materials, the Product, and all copies of them, in part and in whole, including modified copies, if any.
6. Miscellaneous
This Agreement is governed by the laws of either Japan or the Commonwealth of Massachusetts. In the case of a conflict, the law applies that is more likely to uphold the enforceability of Agreement.
7. Disclaimer and Limited Warranty
LICENSOR warrants the disk on which the Product is furnished to be free from defects in materials and workmanship under normal use for a period of thirty (30) days from the date of delivery to you as evidenced by a copy of your receipt.
LICENSOR’s entire liability and your exclusive remedy as to the disk shall be replacement of the disk that does not meet LICENSOR’s Limited Warranty and which is returned to LICENSOR with a copy of receipt. If failure of any disk has resulted from accident, abuse, or misapplication, LICENSOR shall have no responsibility to replace the disk. Any replacement disk will be warranted for the remainder of the original warranty period.
EXCEPT AS EXPRESSLY PROVIDED ABOVE, THE PRODUCT, USER’S MANUAL AND DOCUMENTATION ARE PROVIDED “AS IS”. LICENSOR DOES NOT MARK ANY WARRANTY OF ANY KIND, EITHER EXPRESSED OR IMPLIED, INCLUDING BUT NOT LIMITED TO THE IMPLIED WARRANTIES OF MERCHANTABILITY AND FITNESS FOR A PARTICULAR PURPOSE.
The entire risk as to the quality and performance of the Product, user’s manual, and documentation is with you. LICENSOR does not warrant that the functions contained in the Product will meet your requirements or that the operation of the Product will be uninterrupted or error free.
LICENSOR SHALL NOT BE LIABLE FOR ANY DIRECT, INDIRECT, CONSEQUENTIAL, OR INCIDENTAL DAMAGES (INCLUDING DAMAGES FROM LOSS OF BUSINESS PROFITS, BUSINESS INTERRUPTION, LOSS OF BUSINESS INFORMATION, AND THE LIKE) ARISING OUT OF THE USE OF OR INABILITY TO USE THE PRODUCT EVEN IF LICENSOR HAS BEEN ADVISED OF THE POSSIBILITY OF SUCH DAMAGES.
v i

READ THIS FIRST!
The Panasonic WR-DA7 Mixer be “Version 1.10” or higher
to operate with MAX.
You can find out what version your DA7 is
by looking at the display screen on the mixer. When the DA7 is powered up, it displays the current version of software in the lower right-hand corner of the display. If you see a V 1.10 displayed, your software is compatible. If any version displayed is lower, such as V 1.01 or V1.02, you must upgrade your DA7 operating system in order for MAX to operate.
If your mixer is not Version 1.10 or higher, it will not work with MAX.
If you need assistance to upgrade the operating system in your DA7, please contact Panasonic Pro Audio Technical Support for information, or visit our web site at:
www.panasonic.com/proaudio.
v i i

PANASONIC TECHNICAL SUPPORT
(In the USA)
If you need to contact Technical Support for this or any other Pro Audio product,
please call 323 436-3620 Monday through Friday from 9am to 5pm Pacific time.
For other Panasonic Broadcast products, please call 800-524-1448 Monday through Friday
9am to 5pm Eastern time.
Panasonic Broadcast & Television Systems Company
Professional Audio Division
3330 Cahuenga Boulevard
Los Angeles CA, 90068
Telephone: 323-436-3500
v i i i

Overview
OVERVIEW
MAX is a sophisticated software package engineered to automate your Panasonic DA7 Digital Mixer in conjunction with a Macintosh computer.
MAX provides time code-synchronized record and playback of all automatable mixer features, including automated moving faders, surround panning, channel on/offs, aux send levels, EQ, dynamics on/offs, and routing.
Even though your DA7 already has automation, using MAX gives you easier and more precise mix editing. Mixes can be longer and can be saved to disk. You can even connect two mixers to a single Macintosh creating a larger digital console treated as a single, integrated automation system.
MAX features multiple user-designable “Custom Views”, a feature-packed Cue List, and easy to use Graphic Editing.
The Custom View shows the positions of the faders, knobs, and switches. You see and edit the mix as it happens by moving the mixer’s faders. You can edit by punching in and out of fader moves, or modify existing fader moves without replacing them.
i x
Overview
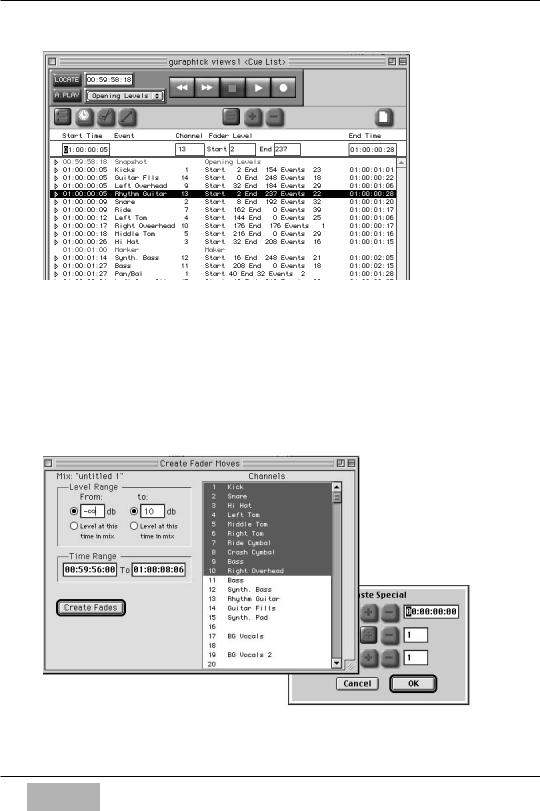
The Cue List shows each automation move as an event occurring at a specific SMPTE time. You see and edit the mix as a sequence of events.
Individual fader moves or whole sections of a mix can be copied, cut, pasted, and modified.
You can even create precision fade-outs by simply typing the start and end times into the computer.
x
Overview
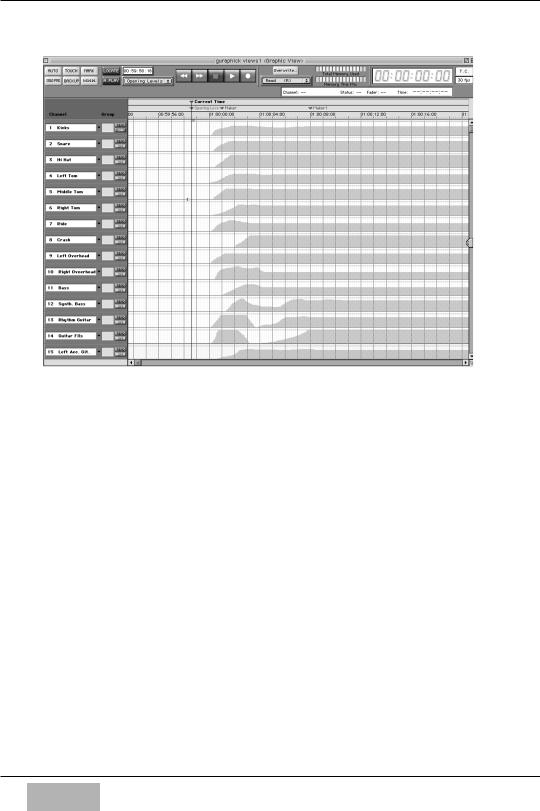
The Graphic Editing view displays the mix as curves on a time line. You can see multiple channels at the same time, and easily see what moves are coming up. You edit the mix by drawing fader curves.
What’s more, you can freely change the way you view the mix, with the Custom View, Cue List, or Graphic window, even while the mix is playing. And you can have multiple mixes open at the same time, allowing you to instantly compare two different mixes. You can even freely copy from one mix and paste into another mix!
A clear indication of channel names, edit modes, grouping, and channel on/off status, combined with a large, easy to read time code display make mixing fast and easy.
MAX software also adds to your mixer up to 15 groups called “SoftGroups”. Any fader on the mixer can be turned into a SoftGroup Master, in addition to the mixer’s groups and Stereo Master. When two mixer’s are connected, faders on one mixer can be a group master to faders on the other mixer.
Your mixer faders become a virtual Control Surface, to control and automate signal processors and digital audio workstations.
x i
Overview
MAX provides a clear graphic display of automated Surround Panning positions. It also allows panning of either individual channels or the grouped multiple channels.
Mixes reside in the Macintosh’s “RAM”. You can save the mixes to a disk, either manually or automatically using the Auto Backup feature.
MAX allows you to quickly create different mixes, listen to them, compare them, save them, retrieve and modify them.
MAX also allows you to customize the software to your personal style of mixing. You can label each fader, re-arrange the order of the faders, turn certain features on and off, etc. This customization is saved as part of a Preference file. Multiple Preferences files are supported, so different engineers can each have their own preferences.
This introduction has just scratched the surface of the power of MAX. The following list highlights many of MAX’s key features.
The DA7 Librarian Software allows you to edit and save multiple DA7 libraries to disk.
x i i

Features
FEATURES
MAX FOR PANASONIC DA7 KEY FEATURES
•Capture “Snapshots” in Real Time.
•Snapshots can be Individually Named
•Auto Transition Between Snapshots
•Dynamic Memory Meters Display Available Memory
•On-Screen Display of Time code Frame Rate
•Multiple Preference Files for Each Engineer or Project Type
•Single Key Access to Frequently Used Items
•OMS Compatible
•Mixer Faders Can Become MIDI Control Surface
•Real Time MIDI Recording
•Enhanced MMC
•Large Screen Support with 1024 x 768 resolution
•Automates Auxiliary MIDI Equipment like Signal Processors
•Supports MIDI Machine Control (MMC)
•Assignable Automated On-Screen Surround Panning
•Groups Control Surround Panning
MAX GRAPHIC EDITING FEATURES
•Freely Draw Fader Levels
•Simple Free Hand or Straight Line Editing
•Copy, Paste, Clear, Moves
•Movable Current Time Indicator
•Create/Edit Markers in the Time Line
•Fader Curves Smoothly Scroll in Real Time
•Graphic Indication of Channel On/Offs
•User can Reposition Markers and Snapshots in the Time Line
•Moved Regions Snap to Markers
x i i i

Features
MAX CUE LIST FEATURES
•Powerful Cue List EDL Style Editing for Precision Control
•Cut, Copy, and Paste Mix Editing
•Offset, Scale, Crop, and Smooth Fader Moves
•Interpolate Moves, During Scale - Stretch Editing Operations
•Triangles Expand to reveal Microscope View of Fader Moves
•View Filter Displays Channels, Range of Time, Type of Event
•Ability to Create Events Off-Line
•Undo and Redo on All Editing Operations
•Moving Time Line With Markers
•Revert Command
•Find Command
•Merge Mixes
•Real Time Scrolling Cue List with Time Code
•Convert Markers into Fader Moves, Channel Ons or Snapshots
•Off-Line Editing in dB or Fader Value
•Print Cue List, Markers or Track Sheet.
•Ability to Type “Comment” Text that is Saved with the Mix
•Ability to Create Fades by Typing the Start and End Times.
DA7 LIBRARIAN FEATURES
•Ability to upload the libraries stored in DA7 to Librarian software
•Editing Library names
•Download libraries to disk or DA7
x i v

Chapter 1
GETTING STARTED
COMPUTER SKILLS REQUIRED
This manual assumes that the user already possesses computer-operating skills, particularly a familiarity with the mouse (pointing, clicking, dragging), menus, dialogue boxes, the Desktop, the Finder, the Chooser, and other basic Macintosh concepts.
If you have just purchased your first Computer for the purposes of automating your mixer, we recommend that you first read the introductory manuals that came with your computer before starting to use the automation system.
COMPUTER REQUIREMENTS
MAX software runs on Power Macintosh computers with a 17” minimum color monitor.
The minimum Macintosh configuration required to install and run MAX is a PowerPC 7100 with at least 16 megabytes of RAM. MAX software does not run on a Powerbook, or any 68000 series Mac.
The software was developed on System 8.1. The minimum recommended Macintosh System version is 7.6.1 or higher.
To find out what version System you have, click on the Apple menu in the upper left hand corner of the screen. Drag down to select “About this Macintosh” and release. If you have an older version, contact your Apple dealer to obtain a compatible System software version for your Macintosh.
1

Getting Started
COMPUTER SETUP
The Chooser and AppleTalk
Your Macintosh may or may not be connected to printers via the “AppleTalk Network.” AppleTalk must be “Active” for printing. However, turning it on robs processing time from the computer, and may adversely affect the way that the MAX software responds to time code.
Therefore it is recommended that you turn AppleTalk off while mixing with MAX. Leave it turned off until you want to print.
To turn AppleTalk off, select the Chooser from the Apple menu. Then click on the AppleTalk Inactive button.
When making AppleTalk Active or Inactive, you will see a prompt reminding you to connect or disconnect the AppleTalk network, that is, the printer cable.
Note: Please make sure that unused serial ports are inactive by opening the Extensions Manager in the Control Panel on your computer.
Monitor
MAX operates only in 256 color mode, on a 17” minimum monitor with 1024 X 768 resolution. Select Control Panels from the Apple menu.
Select Monitors (or “Monitors and Sound”), then select 256 color.
When you launch the software, if the color mode is not set to 256, the software will prompt you. Click OK and MAX will set the color mode to 256 automatically.
Memory
Typical of Macintosh applications, the more RAM that you allocate to the application, the longer the mix you can do.
To allocate more memory to the application, from the Finder (with the application not running), click once only to select (highlight) the MAX icon. Select “Get Info” from the File menu, or type command I. Then increase the Preferred size, based on how much RAM is available in your Macintosh.
2
Getting Started
SOFTWARE INSTALLATION
For installation, follow the steps shown below. RAMSA MAX software and DA7 Librarian are contained in the provided disk labeled “Mixing Automation eXpansion Software". DA7 Librarian software will be discussed later in Chapter 16.
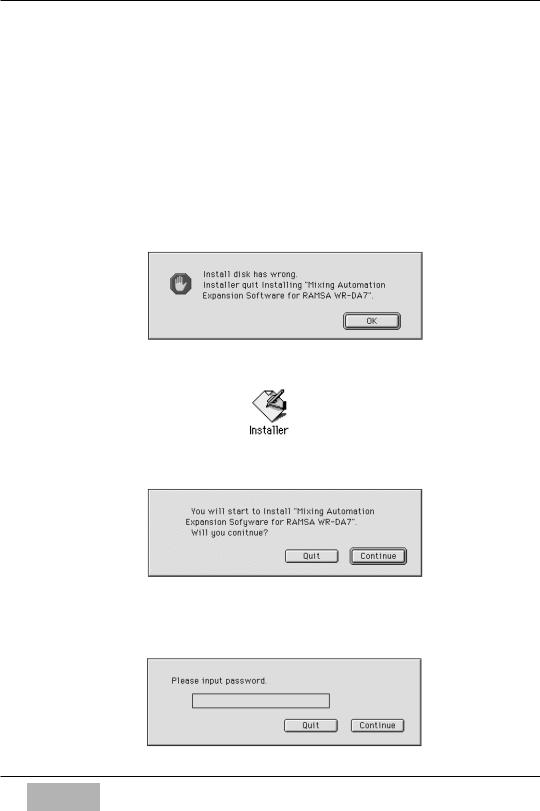
1Insert the MAX disk. Installer icon appears.
Double-click on MAX icon if the Installer icon is not displayed.
An error message will appear if a wrong disk other than “MAX disk” is inserted.
2 Double–click on the Installer icon to expand MAX.
3 A start-up dialogue box will |
Continue button and |
follow the on-screen directions |
|
4A Password dialogue box will appear.
Enter the password and click on the Continue button. Please find the password indicated in an attached label on the rear cover page. The password IS case sensitive, please type all text in capital letters.
3

Getting Started
If a wrong password is entered, a warning will appear. Clicking OK will let you attempt to enter the password again.
5An “Extract” dialogue box will appear.
Select the destination folder where you want to store MAX. Click the Extract button to begin the software installation.
6When the installation of MAX ends, a new “Extract” dialogue box will appear for the DA7 Librarian program.
Select the destination folder for the DA7 Librarian.
Click the Extract button to begin the installation of the Librarian program.
7An ending dialogue box will appear upon successful completion of the installation of the MAX and DA7 Librarian programs.
Click the Quit button.
4
Chapter 2
CONNECTING THE SYSTEM
MIXER AND COMPUTER COMMUNICATION HOOKUP
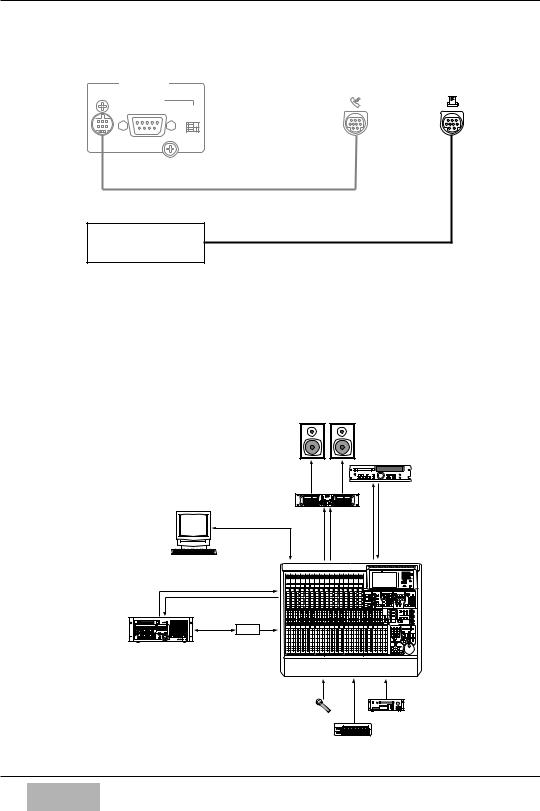
If you are connecting one DA7 to your Macintosh computer, you will need a cable (which is not provided) that connects the DA7's TO PC port connector to your Macintosh's Modem port.
WR-DA7 Rear Panel |
Macintosh |
SERIAL PORT |
MODEM Port |
TO PC |
|
RS422 / 485 |
|
110 |
|
OFF |
ON |
Printer Cable
2x Mini DIN 8 Male, Cross-type
If you are connecting two Panasonic DA7s, connect the first mixer as described above, and the second mixer's TO PC port to the Macintosh's Printer port.
WR-DA7 (Master) Rear Panel |
|
Macintosh |
SERIAL PORT |
MODEM Port |
Printer Port |
|
|
|
TO PC |
|
|
RS422 / 485 |
|
|
110 |
|
|
OFF ON |
|
|
Printer Cable
2x Mini DIN 8 Male, Cross-type
WR-DA7 (Slave) Rear Panel
SERIAL PORT
TO PC
RS422 / 485
110 OFF ON
Printer Cable
2x Mini DIN 8 Male, Cross-type
MAX Software communicates with the mixer at a very high data speed, (also referred to as Baud Rate) using MIDI protocol. Because Max uses this high MIDI rate, you cannot use standard MIDI at the same time on the DA7 mixer.
5

Connecting the System
TIME-CODE SYNC HOOKUP
The MAX System is SMPTE Time Code-driven. This means that it requires SMPTE time code in the form of a longitudinal time code source. If your system does not use SMPTE time code, or you would prefer to use MIDI time code (MTC), skip down to the section on Using MTC.
The DA7 has an optional SMPTE time code reader available. If you did not purchase this option with your mixer, contact your DA7 dealer.
The cable carrying the SMPTE time code signal from the device that you will syncing to will connect directly to the SMPTE Input on the optional SMPTE / V-SYNC card.
The SMPTE time code can come from one of several possible sources: One track of your tape source may be pre-striped with SMPTE.
Most modern modular digital multitrack tape machines and certain hard disk recorders can also generate SMPTE from a “sub code” track.
If two mixers are connected, send the time code into the mixer which is connected to the Macintosh’s Printer port.
Using MTC
If OMS is installed, MAX can also sync to MIDI Time Code (MTC.) This can be selected in the Port Setup Preferences.
MIDI HOOKUP
The MAX Software allows the mixer console to be a MIDI Controller.
MAX also features a built-in MIDI Machine Control locator.
To use this feature, connect a Macintosh MIDI Interface to the available serial port on the Macintosh.
For example, if the mixer is connected to the Macintosh Modem Port, then connect the MIDI Interface to the Macintosh’s Printer Port.
If you are connecting only one mixer, use the other available port for the MIDI interface.
Remember, you CANNOT use the DA7 MIDI port for this purpose because it is being utilized for MAX.
6
Connecting the System
WR-DA7 Rear Panel |
|
Macintosh |
SERIAL PORT |
MODEM Port |
Printer Port |
TO PC
RS422 / 485
110 
OFF ON
MIDI Interface
If you are connecting two mixers, see next page, System Connection Examples, for Tandem Operation.
SYSTEM CONNECTION EXAMPLES
For Single DA7
SP |
SP |
|
|
|
|
|
DAT |
Power |
AES/EBU |
|
|
Expansion |
AMP |
|
|
|
|
||
|
|
|
|
Software |
|
|
|
(Mac) |
|
|
|
MODEM Port |
|
|
|
|
|
REC |
|
|
|
OUT |
2TR |
To PC |
MONITOR |
||
A |
|
A IN |
|
|
|
|
MIDI IN |
MIDI |
MIDI |
|
MIDI OUT |
|
|
||
OUT |
IN |
TDIF-1 TDIF-1 |
|
WCK MASTER |
|
TDIF |
|
|
|
PW-88DL |
SLOT 1 |
DA-98 |
|
(17-24ch) |
|
WR-DA7
INPUT 1-16
Mic Sampler
Keyboard
7
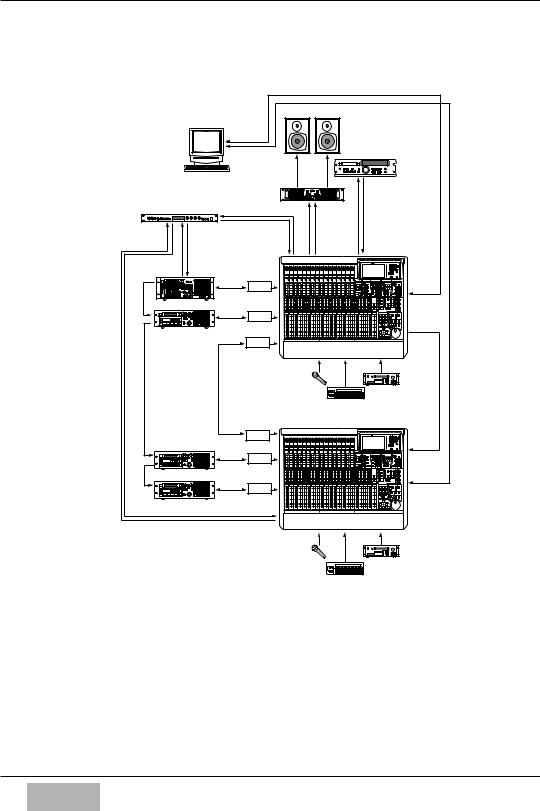
Connecting the System
For Tandem Operation |
|
|
|
|
|
|
|
|
|
|
|
Expansion |
|
SP |
SP |
|
|
|
|
|
Software |
|
|
|||
|
|
|
(Mac) |
|
|
|
|
|
|
|
|
|
Modem Port |
|
|
|
|
|
|
|
|
Printer Port |
|
DAT |
||
|
|
|
|
|
|
|
||
|
|
|
|
|
|
Power |
AES/EBU |
|
|
|
|
|
|
|
AMP |
||
|
|
|
|
|
|
|
||
|
MIDI |
|
|
|
|
|
|
|
|
Timepiece |
|
|
PORT 1 IN |
|
|
|
|
|
PORT 2 |
|
PORT 3 |
OUT |
|
|
REC |
|
|
|
|
|
|
|
|||
|
IN/OUT |
|
IN/OUT |
|
|
|
OUT |
2TR |
|
|
|
|
|
MIDI |
MIDI |
MONITOR |
|
|
|
|
|
|
A IN |
|||
|
|
|
|
|
IN |
OUT |
A |
|
|
|
|
|
|
|
|||
|
MIDI |
MIDI |
|
SLOT 1 |
|
|
|
|
|
SYNC OUT OUT |
IN |
|
|
|
|
||
|
|
(17-24ch) |
|
|
|
|||
|
|
|
|
TDIF-1 |
|
|
|
|
WCK MASTER |
|
|
|
TDIF |
|
|
To PC |
|
PW- |
|
|
PW-88DL |
|
|
|||
|
|
|
|
|
|
|
||
|
88S |
DA-98 |
|
|
|
|
|
|
|
IN |
TDIF-1 |
|
|
|
|
||
|
|
|
TDIF |
|
|
|
||
|
|
|
|
PW-88DL |
|
|
WORD CLOCK |
|
|
|
|
|
SLOT 2 |
|
|
||
|
|
DA-38 |
|
|
OUT (75Ω =ON) |
|||
|
|
|
|
|
||||
|
|
|
(25-32ch) |
|
|
|
||
|
SYNC OUT |
(MASTER) |
TANDM |
|
|
|
||
|
|
|
|
|
SLOT 3 |
|
|
|
|
|
|
|
|
WR-DA7 |
|
INPUT 1-16 |
|
|
|
|
|
|
(MASTER) |
|
||
|
PW-88S |
|
|
|
|
|
Mic |
Sampler |
|
|
|
|
|
|
|
Keyboard |
|
|
|
|
|
|
SLOT 3 |
|
|
WORD |
|
|
|
|
|
|
|
CLOCK |
|
|
|
|
|
(SLAVE) |
TANDM |
|
|
IN |
|
IN |
|
|
|
|
|
(75Ω =ON) |
|
|
|
|
TDIF-1 |
|
|
|
|
|
|
SYNC |
|
|
TDIF |
|
|
|
|
|
|
|
PW-88DL |
|
|
|
||
|
|
|
SLOT 1 |
|
|
|
||
|
OUT |
DA-38 |
|
|
|
|||
|
IN |
|
(17-24ch) |
|
|
To PC |
||
|
|
|
TDIF-1 |
|
|
|
||
|
|
|
|
TDIF |
|
|
|
|
|
PW-88S |
|
|
PW-88DL |
|
|
|
|
|
DA-38 |
SLOT 2 |
|
|
|
|||
|
|
MIDI IN |
(25-32ch) |
|
|
|
||
|
|
|
|
|
|
|
|
|
|
|
|
|
MIDI OUT |
|
|
|
|
|
|
|
|
|
WR-DA7 |
|
INPUT 1-16 |
|
|
|
|
|
|
(SLAVE) |
|
||
|
|
|
|
|
|
|
Mic |
Sampler |
|
|
|
|
|
|
|
Keyboard |
|
8
Connecting the System
SETTING UP THE SYSTEM
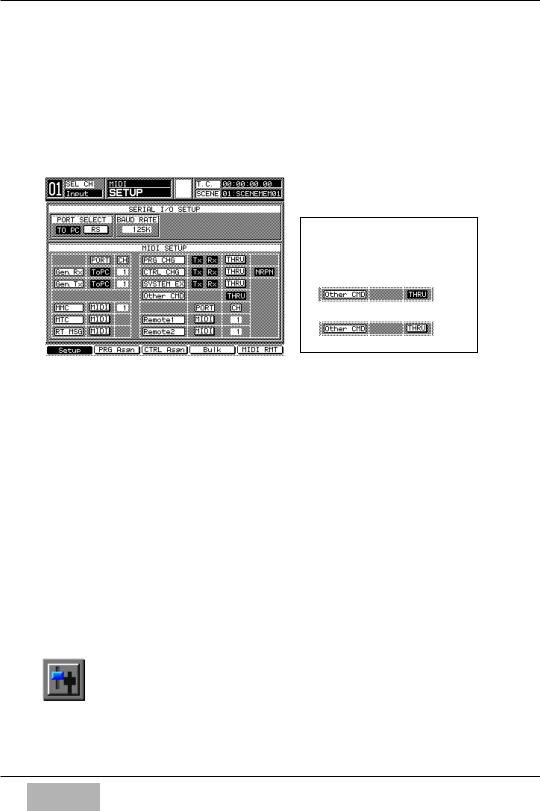
Mixer Setup
The DA7 communicates with MAX via the mixer’s “TO PC” port, using a special high-speed protocol. To enable this communication, it is essential that several things be setup correctly in the mixer’s MIDI Setup Screen.
For TANDEM Operation, set the
Other CMD fields as shown below.
FOR MASETER DA7
FOR SLAVE DA7
•Press the MIDI Button on mixer until the Setup Screen is displayed.
•Set Port Select to “TO PC”.
•Set Gen RX and Gen TX to “TO PC”.
•Enable TX and RX for PRG CHG, CTRL CHG, and SYSTEM EX.
•Set Other CMD to  for Single DA7. When used in TANDEM operation, set to
  for Master and to
  for Slave DA7.
•Enable NRPN.
•Set MTC to MIDI.
•Set the Mixer’s BAUD RATE to 125K.
•To receive time code at the mixer, connect a source of SMPTE (on the optional SMPTE / V-SYNC board) or MTC into the mixer's MIDI In.
•Go to the Automation Setup Screen and select SMPTE or MTC as the "time base."
Launching Software to Verify Connections
•Turn on the Macintosh first.
•Before launching the MAX software, be sure the mixer is turned on.
•Launch the software by double-clicking on the MAX icon.
•Moving a fader on the mixer should cause a fader to move on the computer monitor.
•Moving a fader with the mouse should cause a fader to move on the mixer.
9
Connecting the System
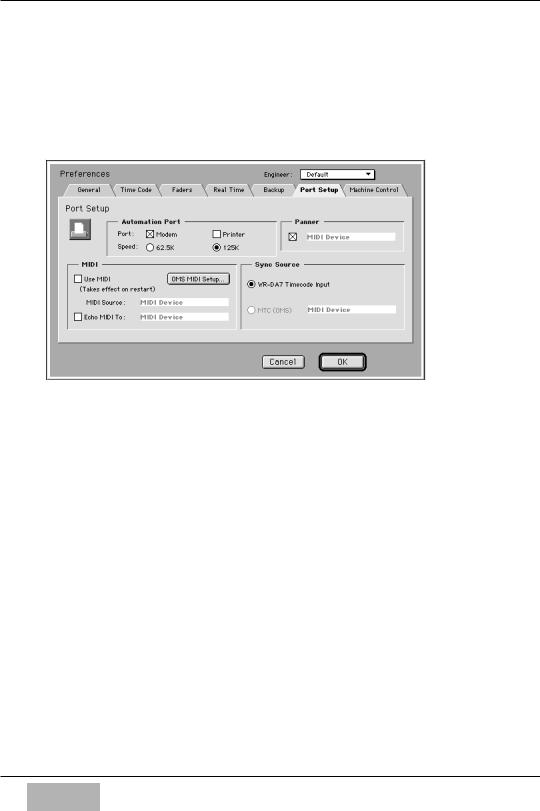
SETTING THE COMMUNICATION SPEED
The MAX software communicates with the Panasonic WR-DA7 Digital Mixer at one of two rates; 62.5K and 125K.
To change the communication speed, select Preferences from the Edit menu. Click on the Port Setup tab. This accesses the Communication Speed setting.
Notes:
•After changing the Communication Speed, you will need to close the MAX software once and then restart it for some types of computers.
•When connecting with the computer, the DA7 mixer will not perform one of functions, Auto Channel Selection assigned in the Utility Configuration Window.
REQUIRED SETUP FOR TWO MIXERS
If you are automating two Panasonic WR-DA7 Digital Mixers using MAX:
First connect the two mixers and install the software according to the instructions in the previous chapters.
After launching the software, select Preferences from the Edit menu. Under General Preferences, look at the setting
“Number of consoles”.
Check whether one or two mixers are connected to the Macintosh serial ports.
Be sure to check two when two mixers are connected.
1 0
Chapter 3
MAX CONTROL BAR
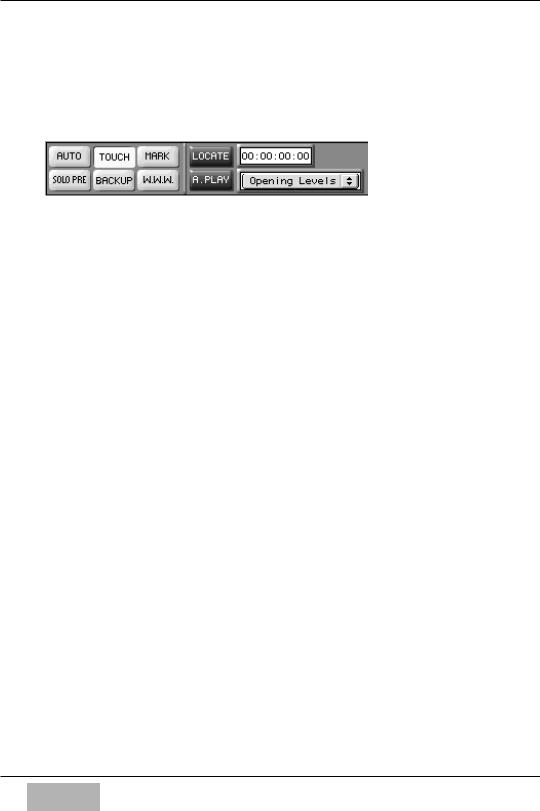
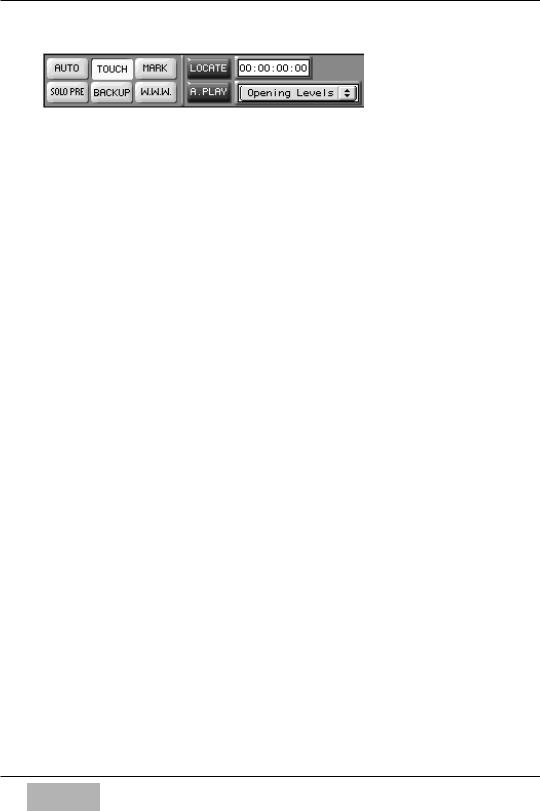
Common to all three main windows is the Control Bar.
It appears at the top of the Custom Views, the Cue List, and the Graphic View.
The Control Bar displays some frequently used buttons, controls and displays.
Auto
Turns on Auto Punch In.
Click to turn on, (the button is yellow when on).
Auto Punch in means that a selected fader in Write mode will not actually start writing new moves until you physically moves the fader knob (up or down) until the fader position matches the current level, called the Null point.
Touch
Turns on SoftTouch.
Click to turn on, (the button is yellow when on).
SoftTouch means that a fader will automatically become selected when you physically moves the fader knob. It is not necessary to press a Select button. When the fader is selected, it switches to the current Edit Mode. In other words, if the fader is currently in Read mode, and the Edit Mode menu is set to Write, moving a fader will automatically switch the fader from Read into Write mode.
Mark
Click to create a Marker.
If time code is running at the time, an untitled text Marker is inserted into the mix when you click. (It can be edited later, by renaming it, moving it, or turning it into another kind of automation event such as a snapshot.)
If time code is not running, the Create Marker dialogue appears, allowing you to create a marker and specify a name and a time. Markers can be viewed in the Cue List and Graphic Editing windows.
1 1
MAX Control Bar
Solo Pre
Lights to indicate a channel is soloed.
Click to select Solo PFL, AFL, or Solo In Place.
Back Up
Click to turn on automatic Back Up feature.
Back Up automatically saves the mix to disk every time that time code is stopped, (if a change has been made).
Mixes are automatically re-named with an upcounting extension number, for example, mix.1, mix.2, mix.3, etc.
WWW
This button is a shortcut to launch your web browser. The first time you click it a dialogue box opens to allow you to select your web browser. This is useful to go to our web page to check for updates, operating tips, contacting technical support and other helpful information.
Locate
Sends an MMC Locate command to machines that respond to MMC. The Locate Time is entered in the Locate Time field to the left of the Locate button.
Alternately, a Locate time can be selected from the Locate Snapshots and Markers Menu, which automatically lists all the snapshots and markers within the mix.
Locates can be automatically adjusted with a Pre Roll time specified by you in the Machine Control Preferences.
A. Play
When turned on, causes machines controlled by MIDI Machine Control to automatically go into play after they have arrived at a locate point.
(Important: For MMC autolocation to work correctly, both the MIDI In and the MIDI Out of the machine must be connected to your Macintosh MIDI interface. Remember, your DA7 MIDI interface is in use by MAX, so it is inoperative for this purpose.)
Locate Time Field
Enter a locate time here. It is sent via MIDI Machine Control the next time your click on Locate.
1 2

MAX Control Bar
Locate (Snapshots and Markers) Menu
Allows you to quickly locate and initiate playback from specific points within the mix. This pop up menu contains a list of all the snapshots and markers in the current mix.
Selecting a snapshot or marker from this menu causes its time to appear in the Locate Point field.
Click on the Locate button to send the locate.
Transports
MIDI Machine Control Rewind, Fast Forward, Stop, Play, and Record.
Click on the Transport Buttons send MMC to a connected MIDI interface.
Overwrite...
Opens the Overwrite dialogue box. This dialogue box is similar to the mixer’s Automation Setup Overwrite section. It allows you to select which parameters within the mixer can be edited in real time during the next automation pass.
When Trim has been selected in the Real Time Edit Mode menu (below), only Faders and Channel Ons can be selected in the Overwrite dialogue box. The other parameters are dimmed.
Real Time Edit Mode
Select the Edit Mode, either Write, Trim, Read, Manual.
An Edit Mode is chosen prior to selecting individual channels for editing.
Selected channels switch from their current mode (usually Read) into the Edit Mode.
Memory Meters
The top Memory Meter is called “Total Memory Used”. It shows how much of the application’s available memory is being used by the open mixes, undo buffers, and the clipboard.
The bottom Memory Meter is called “Memory This Mix”.
It shows how much of the available memory is being used by the currently active mix, the mix in the front most window.
1 3
MAX Control Bar
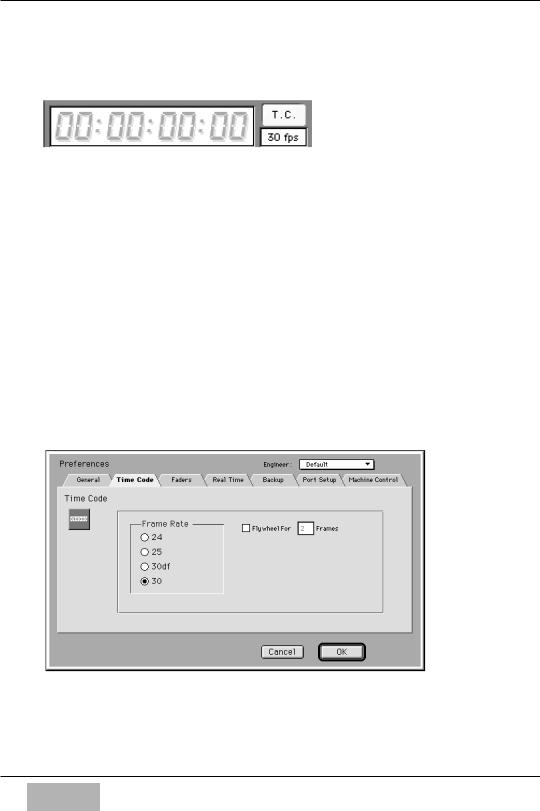
SMPTE Time Code Display
Displays currently received time code in hours, minutes, seconds, and frames.
When time code reception stops, the SMPTE Time Code display holds the value of the last time code received, in dim numbers.
T.C.
Click to turn on. Button is yellow when on.
Enables Time Code reception. Time code reception must be turned on for an automated mix to play back. Turn time code reception off when you do not want incoming time code to cause a mix to play back.
Frame Rate
Displays the frame rate of the currently received time code.
It is important to manually set the frame rate. Select Preferences in the Edit Menu to open the Preferences dialogue box. Click to select the Time Code tab. Click to select the frame rate that you are using for the current project.
If you select an incorrect time code (or one that doesn't match the incoming time code), MAX may not function properly. This could result in automated moves occurring at the wrong time, or even the loss of data. Please check this setting before each new mix.
1 4
 Loading...