


2700 |
I n s t r u c t i o n M a n u a l |
MIXMASTER® STAND MIXER
PLEASE READ ALL INSTRUCTIONS BEFORE USING THIS APPLIANCE
M a n u e l d ' I n s t r u c t i o n s
BATTEUR SUR PIED MIXMASTER®
LIRE TOUTES LES INSTRUCTIONS AVANT D'UTILISER CET APPAREIL
M a n u a l d e I n s t r u c c i o n e s
B A T I D O R A D E P E D E S T A L M I X M A S T E R ®
LEA TODAS LAS INSTRUCCIONES ANTES DE USAR ESTE APARATO
M a n u a l d e I n s t r u ç õ e s
B A T E D E I R A D E P E D E S T A L M I X M A S T E R ®
LEIA TODAS AS INSTRUÇÕES ANTES DE USAR ESTE APARELHO

IMPORTANT SAFEGUARDS
When using electrical appliances, basic safety precautions should always be followed to reduce the risk of fire, electric shock and/or injury to persons, including the following:
READ ALL INSTRUCTIONS BEFORE USING YOUR STAND MIXER.
•To protect against risk of electrical shock DO NOT immerse power cord or motor base in water or any other liquid
•Close supervision is required when any appliance is used by or near children
•Unplug your appliance from the outlet when not in use, before putting on or taking off parts, and before cleaning
•Avoid contacting moving parts
•DO NOT operate any appliance with a damaged cord or plug or after the appliance malfunctions, or is dropped or damaged in any manner. Return appliance to the nearest Oster® Authorized Service Center for examination, repair, or electrical/mechanical adjustment
•The use of attachments not recommended or sold by the manufacturer may cause fire, electric shock, or injury
•DO NOT use outdoors
•DO NOT let cord hang over edge of table or counter
•Never leave an appliance unattended while in use
•Keep hands and utensils away from the beaters or any other attachment that is in use. To reduce the risk of personal injury or damage to the mixer, a rubber spatula can be used only when the mixer is off
•Always use the Stand Mixer on a dry, level surface
•DO NOT place this appliance on or near a hot gas or electric burner, or where it could touch a heated oven
•DO NOT operate Stand Mixer continuously for more than 10 minutes when mixing regular batter. When using extremely heavy loads such as dough, the appliance should not be operated for more than 5 minutes
•Keep hands, hair, clothing, as well as spatulas and other utensils away from beaters during operation to reduce the risk of injury to persons, and/or damage to the mixer
1

•Remove beaters from Stand Mixer before washing. NEVER eject beaters or dough hooks when appliance is in operation
•Ensure fingers are kept well away from moving beaters and dough hooks
•Use only the supplied mixing bowl. DO NOT remove mixing bowl from the base while Stand Mixer is in use
THIS APPLIANCE IS FOR HOUSEHOLD USE ONLY.
SAVE THESE INSTRUCTIONS
(For 120 & 127 Volts Only)
To reduce the risk of electrical shock, this appliance has a polarized plug (one blade is wider than the other). This plug fits a polarized outlet only one way. This is a safety feature intended to help reduce the risk of electrical shock. If the plug does not fit fully into the outlet, reverse the plug. If it still does not fit, contact a qualified electrician. Do not attempt to defeat this safety feature.
If a longer detachable power-supply cord or extension cord is used, the marked electrical rating of the extension cord should be the same as that of your mixer. The extension cord should be arranged so that it will not drape over the countertop or tabletop where it can be pulled on by children or tripped over unintentionally.
2

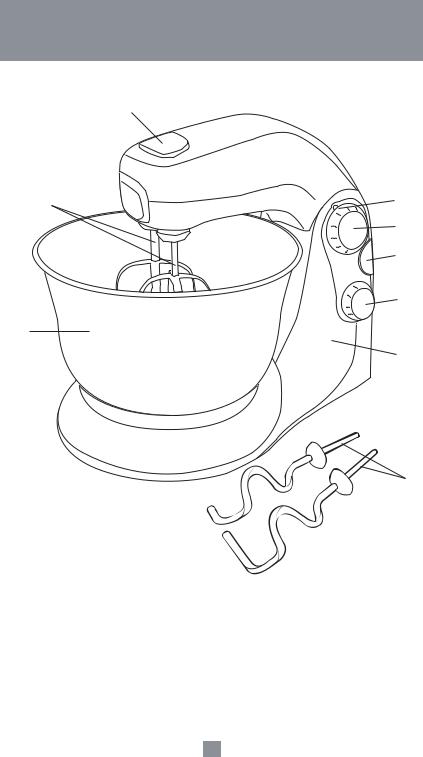
DESCRIPTION OF THE APPLIANCE
9
2 |
6 |
|
5 |
|
8 |
|
7 |
4
1
3
1.Stand/Motor Base
2.Beaters
3.Dough Hooks
4.4-liter Stainless Steel Mixing Bowl
5.12-speed Rotary Control Dial
6.Power Indicator Light
7.Bowl Speed Control Dial
8.Tilt Button
9.Eject Button
3
INSTRUCTIONS FOR USE
BEFORE USING YOUR OSTER® MIXMASTER® STAND MIXER
Before assembling your Oster® Mixmaster® Stand Mixer, be sure the power cord is unplugged from the power outlet and the speed control dial is in the “O” position.
Figure 1
Figure 2 |
Figure 3 |
|
|
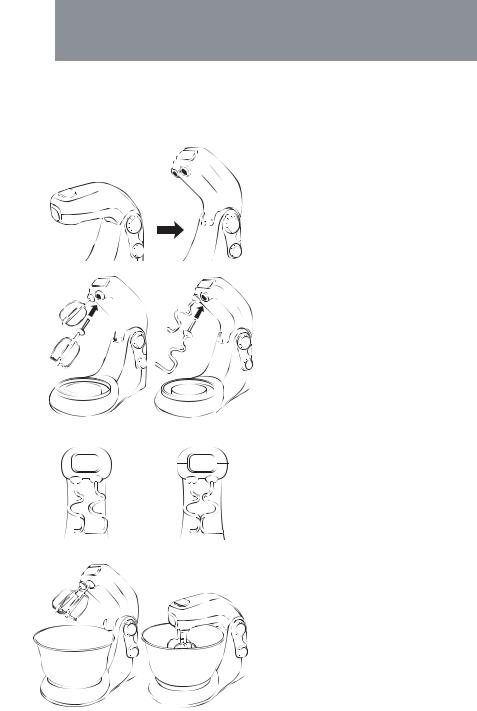
1.Press the tilt button located on the stand and swing the mixer head up. The mixer head will lock into this tilt position so you can insert the beaters or dough hooks and
the bowl (Figure 1).
2. Insert the beater with the round/oval shape
into the back socket and the beater with the flat bottom shape and plastic pieces into the front socket (the socket located on same side as the speed controls in the mixer) (Figure 2). To insert the dough hooks, place the one with the shorter hook into
the back socket and the one with the
longer hook into the front socket (the
socket located on same side as the speed controls in the mixer) (Figure 3).
Important: Please review Figure 4. The illustration on the left is how the dough hooks should look when correctly inserted.
However, should the dough hooks once inserted to be touching, as they do in the illustration on the right, then they have been inserted incorrectly.
Figure 4 |
|
|
Note: Be sure both beaters or dough |
|
|
|
|
hooks click firmly in place, you may need |
|
|
|
|
to twist the attachments slightly to engage |
|
CORRECT |
INCORRECT |
|
them in position prior to pushing them into |
|
|
|
|
place. |
|
|
|
3. Place the mixing bowl onto the plate |
||
|
|
|
located on the stand and lock it by turning |
|
|
|
|
it clockwise (Figure 5). |
|
|
|
4. Press tilt button to lower the head with the |
||
|
|
|
attachments already in place and into the |
|
|
|
|
bowl. Ensure mixer head locks into place |
|
|
|
|
(Figure 6). |
|
Figure 5 |
Figure 6 |
|
|
|
|
|
|
|
|
|
|
|
4 |
|
|
|
|
|
|
USING YOUR OSTER® MIXMASTER® STAND MIXER
The OSTER® Mixmaster® Stand Mixer has a DUAL MOTOR DESIGN where one motor located in the head of the mixer drives the beaters while an independent motor located in the neck of the mixer rotates the bowl for more powerful and optimum mixing. Please follow the instructions below to use your Oster® Mixmaster® Stand Mixer:
1.Turn the rotary speed control dial to the “O” position; plug the power cord into the power outlet.
NOTE: The power indicator light on the speed control dial should now be on.
2.Use the rotary speed dial to turn the mixer on and off and to control the mixing speeds.
Please refer to the “SPEED GUIDE FOR STAND MIXER” section of this manual for mixing instructions for several types of mixtures,
Tip: Start mixing at slow speeds and increase speed gradually to prevent ingredients from splashing out of the mixing bowl. When adding dry ingredients such as flour, chocolate powders and others, lower the speed temporarily until ingredients are combined.
Tip: For better results when kneading yeast dough, use speed 1.
SELECTING THE MIXING BOWL SPEED
1.The mixing bowl automatically turns on when one of the 12 speeds is selected in the speed control dial. For majority of mixing tasks the bowl speed should be set on the low speed setting “1”. For light mixes requiring maximum mixing performance such as cakes and meringue, set the bowl speed to the high setting “2” to ensure the whole mixture goes through the beaters many times. For thick mixes and large volumes the bowl speed should be set at the low position “1”.
2.When mixing is complete, turn the speed control dial to the “O” position and unplug the cord from the power outlet.
Note: The indicator light will stay on until power is disconnected from the mixer.
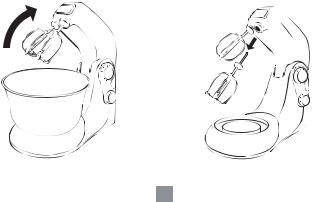
3.Push down the tilt button and move mixer head back until it is locked into position
(Figure 7).
4.To remove the attachments (either beaters or dough hooks), place fingers loosely around the attachments and hold down the “beater eject” button (Figure 8).
Figure 7 |
Figure 8 |
5

SPEED GUIDE FOR STAND MIXER
Please keep in mind that the various mixing tasks and related speeds listed in the table below may vary slightly from recipe to recipe.
SPEED SETTING |
MIXING TASK |
|
FOLDING & BLENDING |
1 |
Scones/Pastry |
2 |
Biscuit dough |
3 |
Tea Cakes |
|
|
|
LIGHT MIXING |
4 |
Sauces & Puddings |
5 |
Custard/Icing |
6 |
Packet Mixes |
|
|
|
CREAMING & BEATING |
7 |
Butter & Sugar |
8 |
Cream Cheese |
9 |
Heavy Batters |
|
|
|
WHIPPING & AERATING |
10 |
Cream |
11 |
Egg whites & meringue |
12 |
Marshmallow |
|
|
CARE AND CLEANING
•Before cleaning your mixer, ensure the power is turned off and then remove the plug
•Wipe over the outside area of the stand with a damp cloth and polish with a soft dry cloth
•Wipe any excess food particles from the power cord
•Wash the mixing bowl, beaters, and dough hooks in warm soapy water and wipe dry. The stainless steel mixing bowl, beaters and dough hooks can also be placed in the dishwasher (top rack only)
6

RECIPES
Fruit Cake
Ingredients
400 grams (14 oz.) butter or margarine (room temperature)
200 grams (7 oz.) brown sugar
200 grams (7 oz.) sugar
6 eggs
1 teaspoon vanilla essence
5 tablespoons rum
½kilogram (1 lb) all-purpose flour
½teaspoon baking soda
1 pinch ground clove
1 pinch nutmeg
1 pinch cinnamon powder ¼ teaspoon baking powder 150 grams (5 oz.) raisins
150 grams (5 oz.) golden raisins
1 tablespoon grated orange peel
150 grams (5 oz.) dried seedless prunes
100 grams (3.5 oz.) cherries maraschinos
100 grams (3.5 oz.) chopped dried apricots Powder sugar to decorate
Directions
In the Oster® Mixmaster® Stand Mixer, mix the butter or margarine with the sugar. Add eggs, one by one. Add vanilla and rum. Mix the dry ingredients separately, setting aside 5 tablespoons to powder the dried fruit. Add the dried ingredients to the mixture and mix in a folding motion. Chop the fruits and powder them with the flour you set aside and add them to the previous mixture. Pour the mixture into a greased pan lined with baking paper. Bake for 45 minutes at 180º C (350º F). Remove from pan and let cool. Decorate with powdered sugar.
7

Coconut Caramel Custard
Ingredients
5 eggs
1 ½ cups condensed milk
1 cup fresh milk
1 teaspoon vanilla
50 grams (2oz) grated coconut Caramelized mold
Sauce
½ cup fresh milk
100 grams (3.5oz) milk caramel
Directions
In the Oster® Mixmaster® Stand Mixer, mix the eggs with the fresh milk, the condensed milk and the vanilla. Add the grated coconut and keep mixing. Pour the mixture over a caramelized mold. Set mold over a broiling pan filled with water and let it cook for 20 minutes. Remove from pan and decorate with grated coconut and serve with sauce.
Sauce
Mix milk with milk caramel to obtain a consistent sauce.
8

Apricot Sponge Cake
Ingredients
1 cup white wine
200 grams (7oz) dried apricot
200 grams (7oz) brown sugar
150 grams (5oz) butter or margarine
3 egg yolks
3 egg whites
80 grams (3oz) toasted almonds
250 grams (9oz) all-purpose flour
2 teaspoons baking powder
To decorate
Apricot marmalade
Dried apricots
Almonds
Directions
Heat the wine, add the apricots and let them soak. Grind the apricots with an Oster® Blender until the mix becomes a puree. In your Oster® Mixmaster® Stand Mixer, mix the egg whites until light and fluffy, add the sugar and keep mixing. Add the apricot puree and mix with folding strokes. Melt the butter or margarine, allowing it to cool before adding the previously made mixture. Add the egg yolks one by one; add the chopped almonds in the Oster® Food Processor. Lastly, add the all-purpose flour mixed with the baking powder. Pour the batter into a greased bundt cake pan. Bake it for 35 minutes at 180º C (350º F). Let it cool and remove it from pan. Add a layer of apricot marmalade to the top of the cake and decorate with dried apricots and almonds.
9
Banana Bread
Ingredients
2 cups flour 3/4 cup sugar
1 teaspoon baking soda 1/2 teaspoon salt
1 cup mashed ripe banana 2/3 cup mayonnaise
1/4 cup water
1 1/2 teaspoons vanilla
1/2 cup each chopped nuts and chocolate chips, optional
Directions
In Oster® Mixmaster® Stand Mixer, stir together dry ingredients at a medium speed. Put in the remaining ingredients, adding chocolate chips and nuts last. Bake on 180 ºC (350 ºF) in 23 x 13 cm (9x5") pan or in a 12-cupcake tin for 30 to 40 minutes. Less time is needed for cupcakes. Cake is done when a toothpick poked into the center of the bread comes out clean. Mayonnaise is substituted for the egg and butter in this recipe so fat free mayonnaise will not be appropriate.
1 0

Scones
Ingredients
3 cups all purpose flour
1 tablespoon baking powder
1 cup butter or margarine
1 cup buttermilk
1 tablespoon lemon zest
Your choice of raisins; dried cranberries; or butterscotch, cinnamon, or chocolate chips
Cinnamon Spread
1 teaspoon cinnamon, 2 tablespoons sugar, 1/2 pound (230 grams) soft butter or margarine
Directions
Cut softened margarine or butter into the mixture of flour and baking powder (you may use the Oster® Mixmaster® Stand Mixer if you desire). When the mixture resembles coarse meal, add buttermilk and zest and mix until the dough is combined. On a lightly floured counter or board, mix in your choice of raisins, dried cranberries, or those wonderful commercial butterscotch, cinnamon, or chocolate chips. Divide batter into 2 balls and pat into a circle until it is about 1.27cm to 1.90cm (1/2 to 3/4 inch thick. Cut into triangles and bake on a non-stick cookie sheet at 205 ºC (400 ºF) degrees for about 35 to 40 minutes until golden brown. You may sprinkle the tops with about 2 tablespoons of sugar if desired before baking. Serve warm or at room temperature accompanied by cinnamon spread.
Cinnamon Spread
Mix 1 teaspoon cinnamon and 2 tablespoons sugar with ½ pound (230 grams) soft butter or margarine. Label and use as a topping for toast, muffins, or scones. Also great on pancakes and waffles. More cinnamon and a ¼ teaspoon of nutmeg may be added.
1 1

Honey-almond Biscotti
Ingredients
3½ cups all-purpose flour 2 tsp. anise seeds
2 tsp. ground cinnamon
2 tsp. baking powder
½tsp. baking soda
½tsp. salt
1 cup dried cranberries 3/4 cup slivered almonds
½ cup (1 stick) butter or margarine ¾ cup honey
2 large eggs
1 tsp. vanilla
Directions
Preheat oven to 180 ºC (350° F). Spray a large baking sheet with nonstick cooking spray; set aside. In the Oster® Mixmaster® Stand Mixer, stir together flour, anise seeds, cinnamon, baking powder, baking soda and salt; Stir in cranberries and almonds; set aside. Separately, at medium speed, beat butter until creamy. Beat in honey until smooth and light, and then beat in eggs one at a time. At low speed, stir in flour mixture until just mixed, then stir in vanilla. On prepared baking sheet, shape dough into two 25.4x33x2.54cm (10x13x1 inch) logs. Bake at 180 ºC (350°F) for 20 minutes or until light golden brown. Remove from oven to wire rack; cool 5 minutes. Reduce oven to 150 ºC (300°F). Using 2 metal spatulas in tandem, transfer logs to a cutting board. Cut each log into 1.27cm (1/2 inch) strips; arrange strips on baking sheet. Bake 20 minutes or until crisp. Remove from baking sheet to wire racks to cool completely.
1 2

Chocolate Crumb Bars
Ingredients
1 cup butter or margarine, softened
2 cups all-purpose flour ¼ tsp. salt
½ cup firmly packed brown sugar
1 pkg. 340 grams (12 oz.) semisweet chocolate pieces, divided 1 can sweetened condensed milk
1/3 cup seedless raspberry jam ½ cup chopped nuts, optional
Directions
Preheat oven to 180 ºC (350° F). Spray 33x23cm (13x9-inch) baking pan with nonstick cooking spray. In large bowl of your stand mixer, beat butter or margarine on medium speed until creamy. At low speed, beat in flour, sugar and salt until crumbly. Remove 1 cup. In a 2 liter (2-quart) microwave-safe bowl, place 1 cup chocolate morsels and the condensed milk. Cook on Medium (50% power) 3-5 minutes. Remove and stir until smooth. Spread over hot crust. Stir nuts into remaining crumb mixture. Sprinkle crumbs over chocolate filling. Drop teaspoonfuls of raspberry jam over crumb mixture. Sprinkle with remaining chocolate pieces. Bake 25-30 minutes or until center is set. Cool in pan on wire rack. Cut into squares when completely cool.
1 3

Lemon Pound Cake
Ingredients
1 lemon
3cups all-purpose flour 1-1/2 tsp. baking powder
1tsp. baking soda 1/4 tsp. salt
1cup (2 sticks) unsalted butter 1-1/2 cups granulated sugar
4large eggs
1 cup dairy sour cream 1/2 tsp. vanilla
Confectioners' sugar for decoration, optional
Directions
Preheat oven to 160 ºC (325°F). Butter and lightly flour a 25.4cm (10-inch) tube pan. Grate zest from lemon and squeeze juice; set both aside. On a piece of waxed paper, sift together flour, baking powder, salt and baking soda. Set aside. In the Oster® Mixmaster® Stand Mixer, at medium speeds, beat butter until smooth. Add sugar and beat until light and fluffy. Add eggs one at a time, beating well after each addition. Add vanilla. Using low speed, beat in flour mixture alternately. Pour into prepared pan. Bake about 1 hour or until wooden pick inserted near center of cake comes out clean. Cool cake in pan on wire rack 20 minutes, then remove from pan to wire rack to cool completely. Just before serving, sprinkle, if desired, with confectioners' sugar.
1 4

Pineapple Upside Down Cake
Ingredients
1¼ cups flour
2 teaspoons baking powder
¼teaspoon salt 1 cup sugar 3/4 cup milk
1 teaspoon vanilla
1 egg
4 pineapple slices or 1 cup crushed pineapple ½ cup margarine or butter
¼cup brown sugar
Directions
Melt ¼ cup margarine or butter in a 23 x 23 cm (9x9-inch) pan. Sprinkle brown sugar evenly over melted margarine. Drain 4 pineapple slices or 1 cup of crushed pineapple and arrange in pan. Mix flour, baking powder, and salt into a mixing bowl. Stir in sugar. Add ¼ cup margarine or butter and milk. Beat for 2 minutes at medium speed in a mixer, scraping sides of bowl frequently. Add vanilla and egg. Beat at medium speed for another minute and pour carefully over pineapple in pan. Bake for 50 to 60 minutes or until cake springs back when top is lightly touched with a finger. Remove from oven; turn upside down all at once. Leave pan in place for 1 to 2 minutes so topping will not stick to pan; remove pan. Serve warm or cold. Peaches may be substituted for pineapple.
1 5

1 – YEAR LIMITED WARRANTY
Sunbeam Products, Inc. ("Sunbeam") doing business as Jarden Consumer Solutions warrants that for a period of ONE year from the date of purchase, this product will be free from defects in material and workmanship. Sunbeam, at its option, will repair or replace this product or any component of the product found to be defective during the warranty period. Replacement will be made with a new or remanufactured product or component. If the product is no longer available, replacement may be made with a similar product of equal or greater value. This is your exclusive warranty.
This warranty is valid for the original retail purchaser from the date of initial retail purchase and is not transferable. Keep the original sales receipt. Proof of purchase is required to obtain warranty performance. OSTER® dealers, service centers, or retail stores selling OSTER® products do not have the right to alter, modify, or any way change the terms and conditions of this warranty.
This warranty does not cover normal wear of parts or damage resulting from any of the following: negligent use or misuse of the product, use on improper voltage or current, use contrary to the operating instructions, disassembly, repair or alteration by anyone other than an Oster® Authorized Service Center. Further, the warranty does not cover: Acts of God, such as fire, flood, hurricanes and tornadoes.
Sunbeam shall not be liable for any incidental or consequential damages caused by the breach of any express, implied or statutory warranty or condition. Except to the extent prohibited by applicable law, any implied warranty or condition of merchantability or fitness for a particular purpose is limited in duration to the duration of the above warranty.
How To Obtain Warranty Service:
Please see the country specific warranty insert or contact your local authorized distributor.
PLEASE DO NOT RETURN THIS PRODUCT TO THE PLACE OF PURCHASE.
16

IMPORTANTES MESURES DE SECURITE
L’utilisation d’appareils électriques nécessite certaines précautions élémentaires d’emploi afin de réduire les risques d’incendie, de choc électrique ou autres blessures, et notamment les suivantes :
LIRE SOIGNEUSEMENT TOUTES LES INSTRUCTIONS AVANT D’UTILISER LE MIXEUR
•Pour éviter tout risque d’électrocution, NE PAS plonger le cordon ou le socle-moteur dans l’eau ou tout autre liquide
•Ne pas laisser un enfant se servir ou s’approcher sans surveillance de l’appareil
•Débrancher après usage, avant de retirer ou d’ajouter des éléments et avant de nettoyer
•Eviter tout contact avec les éléments en mouvement
•Ne pas utiliser un appareil lorsque le cordon ou la fiche électrique est endommagé, ni lorsque cet appareil ne fonctionne pas normalement, qu’il est tombé ou qu’il a subi quelque dommage que ce soit. En cas de réparation, vérification ou mise au point, veuillez retourner l’appareil au centre de service agréé Oster® le plus proche de chez vous.
•L’usage d’accessoires non recommandés ou vendus par le fabricant présente des risques d’incendie, d’électrocution ou de blessure
•Ne pas utiliser à l’extérieur
•Ne pas laisser le cordon électrique pendre sur le bord d’une table ou d’un plan de travail.
•Pendant l’usage, ne jamais laisser l’appareil sans surveillance
•Garder les mains et les ustensiles de cuisine à l’écart des fouets ou de tout autre accessoire durant le fonctionnement afin de réduire les risques de blessure corporelle ou de dommage sur l’appareil. Une spatule en caoutchouc peut être utilisée uniquement lorsque l’appareil n’est pas en marche.
•Toujours utiliser le mixeur sur une surface sèche et plane.
•NE PAS mettre l’appareil au contact de surfaces chaudes, en particulier, cuisinière et four.
•Débrancher l’appareil après usage, avant de retirer ou d’ajouter des éléments et avant de le nettoyer
•Ne pas faire fonctionner le Mixeur de manière continue pendant plus de 10 minutes dans le cas d’une mixture standard. Ne pas faire fonctionner l’appareil pendant plus de 5 minutes dans le cas de mixtures très lourdes comme les pâtes à gâteaux.
•Garder les mains, cheveux ou vêtements, ainsi que toute spatule ou autre ustensile de cuisine à l’écart des fouets durant le fonctionnement afin de réduire les risque de blessure corporelle ou de dommage sur le Mixeur.
1 7

•Détacher les fouets du Mixeur avant de les laver. Ne jamais éjecter les fouets ou les crochets pétrisseurs pendant que l’appareil est en marche
•Maintenir les doigts bien à l’écart des fouets et des crochets pétrisseurs
•Utiliser uniquement le bol mélangeur pourvu avec l’appareil. NE PAS retirer le bol mélangeur de la base pendant l’usage
CET APPAREIL EST PREVU POUR USAGE MENAGER UNIQUEMENT
CONSERVER CES INSTRUCTIONS
(Uniquement pour 120 &127 volts)
Pour réduire le risque de choc électrique, cet appareil est muni d’une fiche électrique polarisée (l’une des broches est plus large que l’autre) Il n’y qu’une seule façon d’insérer cette fiche dans une prise de courant polarisée. C’est un dispositif de sécurité qui vise à réduire le risque de choc électrique. Si la fiche ne rentre pas parfaitement dans la prise, tournez-la dans l’autre sens. Si elle ne rentre toujours pas, faites appel à un électricien professionnel. Ne pas tenter de contourner ce dispositif de sécurité.
Si vous utiliser un câble d’alimentation détachable ou une rallonge, (1) le cordon doit avoir une puissance équivalente à celle du Mixeur. Ne pas laisser pendre le cordon sur le bord d’un plan de travail ou d’une table, un enfant pourrait tirer dessus ou s’y accrocher involontairement.
1 8
DESCRIPTION DE L’APPAREIL
9
2 |
6 |
|
5 |
|
8 |
|
7 |
4
1
3
1. Socle-moteur
2.Fouets
3.Crochets pétrisseurs
4.Bol mélangeur en acier inoxydable de 4 litres
5.Commande de vitesse de rotation (12 vitesses )
6.Indicateur lumineux de marche/arrêt
7.Commande de vitesse du bol mélangeur
8.Bouton de dégagement
9.Bouton d’éjection
1 9
 Loading...