


3157 |
I N S T R U C T I O N M A N U A L |
JUICE EXTRACTOR |
PLEASE READ ALL INSTRUCTIONS BEFORE USING THIS APPLIANCE
M A N U E L D ' I N S T R U C T I O N S
CENTRIFUGEUSE À JUS
LIRE TOUTES LES INSTRUCTIONS AVANT D'UTILIZER CET APPAREIL
M A N U A L D E I N S T R U C C I O N E S
E X T R A C TO R D E J U G O S
LEA TODAS LAS INSTRUCCIONES ANTES DE USAR ESTE APARATO
M A N U A L D E I N S T R U Ç Õ E S
C E N T R I F U G A
LEIA TODAS AS INSTRUÇÕES ANTES DE USAR ESTE APARELHO

IMPORTANT SAFEGUARDS
When using electrical appliances, basic safety precautions should always be followed including the following:
•Read all instructions before using your juice extractor
•To protect against risk of electrical shock, DO NOT put power cord or motor base in water or any other liquid
•Close supervision is necessary when any appliance is used by or near children
•Unplug from outlet when not in use, before putting on or taking off parts, and before cleaning
•Avoid contact moving parts. DO NOT touch the small cutting blades located at the base of the stainless steel filter
•DO NOT operate any appliance with a damaged cord or plug or after the appliance malfunctions, or is dropped or damaged in any manner. Return appliance to the nearest authorized service center for examination, repair or electrical or mechanical adjustment
•The use of attachments not recommended or sold by the manufacturer may cause fire, electric shock or injury
•DO NOT use outdoors
•DO NOT let cord hang over edge of table or counter
•DO NOT let cord touch hot surfaces, including the stove
•DO NOT operate this appliance continuously for more than 5 minutes
•Always make sure juicer lid/cover is clamped securely in place before motor is turned on. DO NOT unfasten clamps while juicer is in operation
•Be sure to turn switch to off position “O” after each use of your juicer. Make sure the motor stops completely before disassembling
•DO NOT PUT YOUR FINGERS OR OTHER OBJECTS INTO THE JUICER OPENING WHILE IT IS IN OPERATION. IF FOOD BECOMES LODGED IN THE OPENING, USE FOOD PUSHER OR ANOTHER PIECE OF FRUIT OR VEGETABLE TO PUSH IT DOWN. WHEN THIS METHOD IS NOT POSSIBLE TURN THE MOTOR OFF AND DISASSEMBLE JUICER TO REMOVE THE REMAINING FOOD
•DO NOT use the appliance if the rotating sieve/filter is damaged
•DO NOT push produce into the feed chute with your finger. Always use the food pusher provided
•DO NOT touch the small cutting blades in the base of the stainless steel filter basket
•Always make sure the juice extractor is properly and completely assembled before operating. The unit will not turn on unless properly assembled
•Always use the juice extractor on a dry, level surface
•Always turn the juice extractor off first before unplugging it from the outlet
1

•DO NOT place this appliance on or near a hot gas or electric burner or where it could touch a heated oven
•This appliance is not intended for use by persons (including children) with reduced physical, sensory or mental capabilities, or lack of experience and knowledge, unless they have been given supervision or instruction concerning use of the appliance by a person responsible for their safety.
•Children should be supervised to ensure that they do not play with the appliance.
THIS APPLIANCE IS FOR HOUSEHOLD USE ONLY.
SAVE THESE INSTRUCTIONS
(For 120 & 127 Volts Only)
To reduce the risk of electrical shock, this appliance has a polarized plug (one blade is wider than the other). This plug fits a polarized outlet only one way. This is a safety feature intended to help reduce the risk of electrical shock. If the plug does not fit fully into the outlet, reverse the plug. If it still does not fit, contact a qualified electrician. Do not attempt to defeat this safety feature.
If a longer detachable power-supply cord or extension cord is used, the marked electrical rating of the extension cord should be the same as that of your juicer. The extension cord should be arranged so that it will not drape over the countertop or tabletop where it can be pulled on by children or tripped over unintentionally.
2
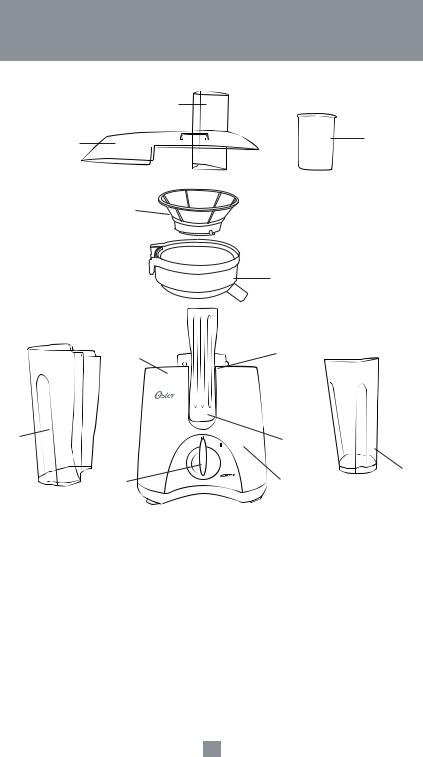
DESCRIPTION OF THE APPLIANCE
3
10 |
9 |
4
5
11  12
12
7 |
2 |
|
8 |
1 |
6 |
|
1.Powerful 400-watt Motor
2.Safety Locking Arms (both sides)
3.Food Chute
4.Stainless Steel Filter
5.Filter Basket
6.Large Capacity 600 mL (2.5-cup) Jar
7.Large Pulp Collector Container
8.ON/OFF Switch (I/O)
9.Food Pusher
10.Juice Extractor Lid/Cover
11.Motor Base Housing
12.Safety Switch (both sides)
3

INSTRUCTIONS FOR USE
BEFORE USING YOUR JUICE EXTRACTOR
Follow the assembling instructions listed below before using your Oster® Juice
Extractor:
Figure 1
Figure 2
•Before you start assembling your juice extractor, make sure it is unplugged and it is placed on a dry and
level surface
•Place filter basket on top of the motor base (Figure 1)
•Place the stainless steel filter on top of the filter basket pushing down and turning it until it fits into the grooves of the motor shaft (Figure 2)
•Place juicer cover/lid on top of the filter basket (Figure 3)
•Raise the safety locking arms, then lower them to securely fit into the grooves in the lid and then firmly press lower part of the locking arms into the unit ensuring they lock the lid into the unit (Figure 4)
•Place the pulp container into position by tilting it slightly (Figure 5)
Important: Make sure Pulp Container edge is underneath basket
•Place the 600 mL jar under the spout located on the right hand side of the juicer by tilting it slightly. Other jars or glasses can be used as well (Figure 6)
Figure 3 |
Figure 5 |
|
Figure 4 |
|
Figure 6 |
|
|
|
4

OPERATING INSTRUCTIONS
1.Prepare your fruits and vegetables by washing them thoroughly and peeling off those that need the skin removed.
2.Prepare the fruits and vegetables by cutting them into smaller pieces to ensure they will fit in the chute.
3.Make sure your juice extractor is properly assembled. Please follow the instructions from the section “Before Using Your Juice Extractor.”
4.Ensure the juice extractor and its accessories are clean by following the cleaning and maintenance section of this manual.
5.Place the jar or any other container/glass you may wish to use to collect the juice under the spout and make sure the pulp collector is in place prior to begin juicing. Do not allow the pulp collector container to overfill as this may cause the unit to stall.
6.Plug the power cord into an electrical outlet and turn the unit on “I.”
7.Once the juicer is on, place the fruits and vegetables on the food chute and use the food pusher slowly to drive them down. In order to extract the maximum amount of juice, it is important to push the food pusher slowly.
8.The juice extractor will separate the juice and the pulp in the jar and pulp collector while you are juicing.
NOTE: Both the pulp container as well as the jar can be emptied during juicing by turning the juice extractor off “O.” Make sure to place both containers back in place before you resume juicing.
NEVER USE HAND OR FINGERS TO PUSH FOOD DOWN THE FOOD CHUTE OR TO CLEAR THE FOOD CHUTE. ALWAYS USE THE FOOD PUSHER PROVIDED.
5

AFTER USING YOUR JUICE EXTRACTOR
Before cleaning and storing your juice extractor, follow the instructions below to disassemble the unit:
Figure 1
Figure 2
Figure 3
Figure 4
Figure 5
•Turn juice extractor off “O” and unplug it from the electrical outlet (Figure 1)
•Remove the jar and the pulp collector container by tilting it slightly (Figure 2)
•Unlock the safety locking arms to release the cover/lid (Figure 3)
•Lift the lid up and remove it from the juice extractor (Figure 4)
•In order to remove the filter basket and the filter, hold the filter basket with two hands and then lift it straight up (Figure 5)
WARNING: THE STAINLESS STEEL FILTER BASKET CONTAINS SMALL SHARP BLADES TO CUT AND PROCESS FRUITS AND VEGETABLES. DO NOT TOUCH BLADES WHEN HANDLING THE FILTER BASKET.
6

CLEANING
•After disassembling all removable parts of the juice extractor, wash them by hand with warm soapy water or in the dishwasher (top shelf only). If the pulp dries out in the pulp collector container, the filter or the filter basket, let it soak in water for approximately 10 minutes before washing it
•Wipe the motor base with a damp cloth
•It is very important to keep the filter very clean, free of residues blocking the holes in order to ensure optimal performance. Use a nylon brush to clean it thoroughly, if necessary. If the holes in the mesh remain blocked, soak the filter in hot water with a water solution with 10% lemon juice
NOTE: DO NOT IMMERSE THE MOTOR BASE IN WATER OR ANY OTHER LIQUID.
MAINTENANCE
•Some plastic parts might stain when in contact with some fruits and vegetables for too long. In order to avoid this from happening, all parts should be washed immediately after each use
7

PROBLEMS AND SOLUTIONS
PROBLEM |
SOLUTION |
|
|
|
|
Juice Extractor will not work |
• Safety locking arms may not be locked properly |
|
in its position |
||
after switching on “I” |
||
|
||
|
• Turn off and unplug unit and ensure all parts are |
|
|
assembled properly |
|
|
• Turn off and unplug unit and check if there are any |
|
|
residues blocking the unit |
|
|
|
|
Motor makes loud noise and |
• Turn off and unplug unit and ensure all parts are |
|
unit starts vibrating |
assembled properly |
|
|
• Juicing overripe fruits may produce too much pulp |
|
|
and clog the filter. Turn off and unplug unit and |
|
|
clean the filter thoroughly |
|
|
|
|
Motor appears to stall when |
• If pulp starts building up under the lid, slow down |
|
juicing |
the juicing process. Turn off and unplug unit and |
|
|
clean the filter basket, the stainless steel filter and |
|
|
the lid |
|
|
|
|
Too much pulp build up on |
• Follow the instructions to disassemble the unit |
|
stainless steel filter |
||
included in the “After Using Your Juice Extractor” |
||
|
||
|
section. Clean up pulp from the filter |
|
|
|
|
Pulp too wet and reduced |
• Try a slower juicing action. Remove stainless steel |
|
juice extraction |
mesh filter and thoroughly clean mesh with a nylon |
|
|
brush. Rinse the filter basket with hot water. If the |
|
|
fine mesh holes are blocked, soak the basket in a |
|
|
solution of hot water with 10% lemon juice to |
|
|
unblock the holes or wash in the dishwasher. This |
|
|
will remove excess fiber build up (from fruit or |
|
|
vegetables), which could be reducing the flow of |
|
|
juice |
|
|
|
|
Juice leaks between the rim |
• Try a slower juicing action by pushing the Food |
|
of the Juicer and Cover |
Pusher down slower |
|
the Filter. |
|
|
|
|
8

TIPS AND SUGGESTIONS
•Do not place any fruits or vegetables until you turn the unit on. Allow unit to run for at least 10 seconds before you start juicing
•Do not allow the pulp container to overfill as this may prevent correct operation or damage the unit
•Ensure to remove large pits from fruits such as peach, mango, etc as they can damage the unit
•You can use a plastic bag inside the pulp collector container to avoid having to clean it
•Do not use bananas or avocados as they do not contain juice and will clog the unit. You can use a blender to add them to the juice
•You can use the pulp of the juices you prepare in a variety of ways. The pulp from fruits and vegetables contains high amounts of fiber and cellulose, which are essential for a healthy and well balanced diet. You can use the pulp to thicken soups, bulk up rissoles and thicken casseroles or to enhance your desserts. Make sure to use the pulp the same day you juice to avoid loss vitamins
9
DRINK RECIPES
FRUIT POTPOURRI
Ingredients:
4 medium apricots
2 cups cubed melon
1 large apple
1 orange
Preparation:
Process the fruits in the Oster¨ Juice Extractor, mix well and add a few ice cubes. Serve immediately.
PINK CLOUD
Ingredients:
1 cup strawberries
1 cored orange
1 cup cubed pear
1 small carrot
Preparation:
Process the fruits in the Oster¨ Juice Extractor, mix thoroughly. Serve immediately. Add a few ice cubes.
MIRACLE EXTRACT
Ingredients:
1 cup pineapple cubes
1 apple cubes
2 small carrots
1 cored orange
2 celery stalks
1 lime with peal
Preparation:
Process the fruits with the Oster¨ Juice Extractor, mix well. Add a few ice cubes. Serve immediately.
ENERGY COCKTAIL
Ingredients:
2 cups carrot
½ cup cucumber
12 spinach leaves
1 lime with peel
1 cup celery
1apple
2tablespoons honey
1tomato
Preparation:
Process ingredients in the Oster¨ Juice Extractor, except the honey. Mix honey and juice well. Serve immediately, adding a few ice cubes as desired.
10

TOMATO COCKTAIL |
TEMPTATION |
Ingredients:
8 tomatoes
4 celery stalks
1 lime, peeled
1 carrot
½ teaspoon salt
1 tablespoon Worcestershire sauce
Procedure:
Wash vegetables thoroughly. Process the tomatoes, celery, lime and cucumbers. Mix the juices, add condiments, and stir well. Serve over ice in tall glasses. Garnish with a celery leaf. Yields 4 servings.
Ingredients:
6 apricots
2 cups melon
½ cup orange juice
Preparation:
Process the fruits with the Oster® Juice Extractor. Mix well the resulting extract. Add 6 ice-cubes. Serve immediately in medium glasses garnished with strawberries or a maraschino cherry and an orange slice.
SURPRISE PINEAPPLE CAKE |
|
Ingredients: |
Caramel: |
¾ cup pineapple extract |
¼ cup water |
10 tablespoons butter |
1 cup sugar |
1 tablespoon powdered sugar |
|
2 egg yolks |
Decoration: |
1 cup sweet condensed milk |
1 can sliced pineapple |
54 lady-finger biscuits |
6-10 maraschinocherries |
Preparation:
Use the Oster® Juice Extractor to obtain the pineapple extract. With an Oster® mixer, beat the butter until creamy. Slowly add the sugar, yolks and sweetened condensed milk. Continue beating until fluffy, and then add the pineapple extract. Grease a spring mold lightly with butter, and build the cake by covering bottom and slides of the pan with the lady-finger biscuits slightly moistened with the canned pineapple’s syrup. Then add a layer of cream. Followed by a layer of biscuits, and so on until finishing with a layer of cream. Cool cake in refrigerator for three hours and unmold. Make caramel by boiling sugar and water. Decorate the cake with pineapple slices, maraschino cherries and caramel threads. Using a spring mold will yield the best results.
11

1 – YEAR LIMITED WARRANTY
Sunbeam Products, Inc. doing business as Jarden Consumer Solutions “JCS” warrants that for a period of ONE year from the date of purchase, this product will be free from defects in material and workmanship. JCS, at its option, will repair or replace this product or any component of the product found to be defective during the warranty period. Replacement will be made with a new or remanufactured product or component. If the product is no longer available, replacement may be made with a similar product of equal or greater value. This is your exclusive warranty.
This warranty is valid for the original retail purchaser from the date of initial retail purchase and is not transferable. Keep the original sales receipt. Proof of purchase is required to obtain warranty performance. OSTER® dealers, service centers, or retail stores selling OSTER® products do not have the right to alter, modify or any way change the terms and conditions of this warranty.
This warranty does not cover normal wear of parts or damage resulting from any of the following: negligent use or misuse of the product, use on improper voltage or current, use contrary to the operating instructions, disassembly, repair or alteration by anyone other than an Oster® Authorized Service Center. Further, the warranty does not cover: Acts of God, such as fire, flood, hurricanes and tornadoes.
JCS shall not be liable for any incidental or consequential damages caused by the breach of any express, implied or statutory warranty or condition. Except to the extent prohibited by applicable law, any implied warranty or condition of merchantability or fitness for a particular purpose is limited in duration to the duration of the above warranty.
How To Obtain Warranty Service: Please see the country specific warranty insert or contact your local authorized distributor.
PLEASE DO NOT RETURN THIS PRODUCT TO THE PLACE OF PURCHASE.
12

IMPORTANTES MESURES DE SÉCURITÉ
L’utilisation d’appareils électriques nécessite certaines précautions élémentaires d’emploi et notamment les suivantes:
•Lire soigneusement toutes les instructions avant d’utiliser la Centrifugeuse
•Pour éviter tout risque d’électrocution, NE PAS plonger le cordon ou le socle-moteur dans l’eau ou tout autre liquide
•Ne pas laisser un enfant se servir ou s’approcher sans surveillance de l’appareil
•Débrancher après usage, avant de retirer ou d’ajouter des éléments et avant de nettoyer
•Eviter tout contact avec les éléments en mouvement. NE PAS toucher les petites lames coupantes qui se trouvent à la base du filtre en acier inoxydable
•Ne pas utiliser un appareil lorsque le cordon ou la fiche électrique est endommagé, ni lorsque cet appareil ne fonctionne pas normalement, qu’il est tombé ou qu’il a subi quelque dommage que ce soit. En cas de réparation, vérification ou mise au point technique ou mécanique, veuillez retourner l’appareil au centre de service agréé le plus proche de chez vous
•L’usage d’accessoires non recommandés ou vendus par le fabricant peut provoquer un incendie ou une électrocution et peut entraîner des blessures
•Ne pas utiliser à l’extérieur
•Ne pas laisser le cordon électrique pendre sur le bord d’une table ou d’un comptoir
•Ne pas mettre le cordon électrique en contact avec des surfaces chaudes, four inclus
•Ne pas se servir de cet appareil de manière continue pour plus de 5 minutes
•Assurez-vous que le couvercle de la Centrifugeuse est bien verrouillé avant de mettre le moteur en route. NE PAS déverrouiller le couvercle pendant que la Centrifugeuse est en marche
•Assurez-vous que le bouton est bien sur arrêt « OFF » après vous être servi de la Centrifugeuse. Assurez-vous que le moteur est bien arrêté avant de démonter les éléments
•NE PAS METTRE LES DOIGTS NI AUCUN OBJET DANS L’ORIFICE D’ÉCOULEMENT PENDANT QUE L’APPAREIL EST EN MARCHE. SI LES ALIMENTS SE COINCENT DANS L’ORIFICE, UTILISER LE PILON OU AUTRE MORCEAU DE FRUIT OU LÉGUME POUR POUSSER. SI CELA N’EST PAS POSSIBLE, ÉTEINDRE LE MOTEUR ET DÉMONTER LES ÉLÉMENTS DE LA CENTRIFUGEUSE POUR RETIRER LES ALIMENTS RESTANTS
•NE PAS se servir de l’appareil si le panier perforé est endommagé
•NE PAS pousser les aliments avec les doigts. Utiliser toujours le pilon pourvu avec l’appareil
•NE PAS toucher les petites lames coupantes qui se trouvent à la base du filtre en acier inoxydable
1 3

•Toujours vous assurer que tous les éléments de la centrifugeuse sont bien en place avant de mettre en marche. L’appareil ne démarrera pas si tout n’est pas parfaitement assemblé
•Toujours utiliser la Centrifugeuse sur une surface sèche et plane.
•Toujours mettre l’interrupteur sur la position d’arrêt avant de débrancher la prise
•NE PAS mettre l’appareil sur ou à côté d’une gazinière ou plaque électrique en fonctionnement ou sur une surface qui soit en contact avec un four chauffé.
•Cet appareil n’est pas fait pour être utilisé par des personnes (ou des enfants) handicapés moteurs, sensoriels ou mentaux, ou par des personnes avec peu d’expérience et connaissance, à moins d’être sous supervision ou d’avoir reçu des instructions concernant son usage, par une personne responsable de leur sécurité.
•Les enfants devraient être sous surveillance pour s’assurer qu’ils ne jouent pas avec l’appareil.
POUR USAGE DOMESTIQUE SEULEMENT
CONSERVER CES INSTRUCTIONS
(Pour 120/127 volts seulement)
A fin de réduire le risque de choc électrique, cet appareil est muni d’une fiche électrique polarisée (l’une des lames est plus large que l’autre)
Ce type de fiche ne peut s’insérer dans une prise murale polarisée que dans un seul sens. C’est un dispositif de sécurité qui vise à réduire le risque de choc électrique. Si la fiche ne rentre pas parfaitement dans la prise, tournez-la dans l’autre sens.
Si elle ne rentre toujours pas, faites appel à un électricien professionnel. Ne pas tenter de contourner ce dispositif de sécurité.
Si vous utiliser un câble d’alimentation détachable ou une rallonge, le cordon doit avoir une puissance équivalente à celle de la Centrifugeuse. Ne pas laisser pendre le cordon sur le bord d’un comptoir ou d’une table, un enfant pourrait tirer dessus ou s’y accrocher involontairement.
1 4

DESCRIPTION DE L’APPAREIL
3
10 |
9 |
4
5
11  12
12
7 |
2 |
|
8 |
1 |
6 |
|
1.Puissant moteur de 400 Watts
2.Etrier de fermeture (les deux côtés_
3.Tube d’alimentation
4.Filtre en acier inoxydable
5.Panier à filtre
6.Récipient à jus d’un litre
7.Récipient à pulpe d’une grande capacité
8.Interrupteur de marche/arrêt
9.Pilon
10.Couvercle de la Centrifugeuse
11.Socle-moteur
12.Interrupteur de sécurité (les deux côtés)
1 5
 Loading...