


Easy Thermo Projection Clock |
|
Model: RM622P / RM622PU |
|
User Manual |
|
CONTENTS |
|
Contents ................................................................. |
1 |
Introduction ............................................................. |
2 |
Product Overview ................................................... |
3 |
Front View ......................................................... |
3 |
Back View ......................................................... |
4 |
LCD Display ...................................................... |
5 |
Getting Started ........................................................ |
5 |
Batteries ............................................................ |
5 |
AC Adaptor ....................................................... |
6 |
Clock ........................................................................ |
6 |
Turn Clock ON / OFF ........................................ |
6 |
Setting the Clock Manually .................................... |
7 |
Clock Mode ....................................................... |
7 |
Clock Setting Mode ........................................... |
7 |
The Alarm Function ................................................ |
7 |
Basic Functions ................................................. |
7 |
Displaying the Alarm Time ................................ |
7 |
Setting the Alarm Time ..................................... |
7 |
Activating / Deactivating the Alarm ................... |
8 |
The Snooze Function .............................................. |
8 |
The Projector Function ........................................... |
8 |
Activating the Projector ..................................... |
8 |
The Backlight .......................................................... |
9 |
Indoor Temperature ................................................ |
9 |
Maximum and Minimum Temperatures ............ |
9 |
Reset System .......................................................... |
9 |
Safety and Care ....................................................... |
9 |
Warnings .................................................................. |
9 |
Troubleshooting .................................................... |
10 |
Specifications ........................................................ |
10 |
About Oregon Scientific ....................................... |
11 |
EC-Declaration of Conformity .............................. |
11 |
EN
1

EN
INTRODUCTION
Thank you for selecting the Oregon ScientificTM Easy Thermo Projection Clock (RM622P / RM622PU). This device bundles precise time keeping, alarm, and temperature monitoring features into a single tool you can use from the convenience of your home.
In this box, you will find:
•RF projection clock
•Batteries (2 x UM-3 (AA) 1.5V)
•3.0V AC/DC adaptor with jack
Keep this manual handy as you use your new product. It contains practical step-by-step instructions, as well as technical specifications and warnings you should know.
2

PRODUCT OVERVIEW
FRONT VIEW
1
6
2 |
7 |
|
3
4
5
The Easy Thermo Projection Clock features:
1.SNOOZE / LIGHT button
2. UP and
  DOWN keys
3.MODE button
4.MEM button
5. ALARM button
6.Projector feature
7.LCD display
EN
3
EN |
|
|
|
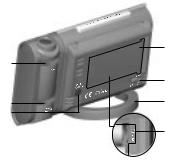
BACK VIEW |
|
|
|
|
|
|
|
|
4 |
1 |
|
|
5 |
2 |
6 |
|
|
3 |
|
|
7 |
From the back view, the Easy Thermo Projection Clock features:
1.FOCUS knob
2.IMAGE ROTATION knob
3.Power adaptor socket
4.Battery compartment
5.Projector on switch
6.Table stand
7.RESET hole
4
 Loading...