


C REV 06-53188
|
S I M P L Y |
A M A Z I N G ® |
|
|
|
|
|
|
USA: 1-800-989-3535
CANADA: 1-888-676-7325 COMMERCIAL: 1-800-242-1378
www.oreck.com
www.oreckcommercial.com
 VISIT ONE OF OUR OVER
  450 STORE LOCATIONS
USER’S GUIDE
ORBITER®
MULTI-FLOOR MACHINE
550 / 600 / 700 SERIES
•IMPORTANT•
SAVE THIS BOOKLET!
Includes:
•Safety Warnings
•Warranty
•Operating Instructions
•Trouble Diagnosis
•Accessories

E N G L I S H
BEFORE OPERATING CLEANER, READ ALL INSTRUCTIONS IN THIS MANUAL CAREFULLY.
Table of Contents
SAFETY & GENERAL INFORMATION . . . . . . 2
Important Safety Instructions . . . . . . . . . . . . . . . . 2
Grounding Information . . . . . . . . . . . . . . . . . . . . 3
Warranty . . . . . . . . . . . . . . . . . . . . . . . . . . . . . 3
Customer Service . . . . . . . . . . . . . . . . . . . . . . . . 4
INTRODUCTION . . . . . . . . . . . . . . . . . . . . . . . 4
GETTING STARTED . . . . . . . . . . . . . . . . . . . . . 4
Attaching Accessories . . . . . . . . . . . . . . . . . . . . 4
Removing Accessories . . . . . . . . . . . . . . . . . . . . 5
Turning Floor Machine On and Off . . . . . . . . . . . 5
To Guide the Floor Machine . . . . . . . . . . . . . . . . 5
CARPET & AREA RUG APPLICATIONS . . . . . 5
Dry Carpet Cleaning . . . . . . . . . . . . . . . . . . . . . 5
Bonnet Cleaning . . . . . . . . . . . . . . . . . . . . . . . . 5
LAMINATE, VINYL AND
LINOLEUM FLOOR APPLICATIONS . . . . . . . . 6
Surface Cleaning . . . . . . . . . . . . . . . . . . . . . . . . 6
Scrubbing . . . . . . . . . . . . . . . . . . . . . . . . . . . . . 6
Stripping . . . . . . . . . . . . . . . . . . . . . . . . . . . . . 6
Refinishing . . . . . . . . . . . . . . . . . . . . . . . . . . . . 7
SEALED HARDWOOD
FLOOR APPLICATIONS . . . . . . . . . . . . . . . . . 7
Surface Cleaning Sealed Floors . . . . . . . . . . . . . . 7
Sandscreening . . . . . . . . . . . . . . . . . . . . . . . . . . 8
WAXED HARDWOOD |
|
FLOOR APPLICATIONS . . . . . . . . . . . . . . . . . |
8 |
Surface Cleaning and Waxing Hard Wood Floors |
8 |
TILE FLOOR APPLICATIONS . . . . . . . . . . . . . . |
8 |
Deep Cleaning . . . . . . . . . . . . . . . . . . . . . . . . . |
8 |
Light Cleaning . . . . . . . . . . . . . . . . . . . . . . . . . . |
9 |
STONE FLOOR APPLICATIONS . . . . . . . . . . . |
9 |
Deep Cleaning . . . . . . . . . . . . . . . . . . . . . . . . . |
9 |
Marble Restoration . . . . . . . . . . . . . . . . . . . . . . . |
9 |
CONCRETE & ASPHALT APPLICATIONS . . . . 10 |
|
Removing Oil & Dirt . . . . . . . . . . . . . . . . . . . . . . |
10 |
ACCESSORIES . . . . . . . . . . . . . . . . . . . . . . . . . |
10 |
General . . . . . . . . . . . . . . . . . . . . . . . . . . . . . . |
10 |
Bonnets . . . . . . . . . . . . . . . . . . . . . . . . . . . . . . . |
10 |
Pads . . . . . . . . . . . . . . . . . . . . . . . . . . . . . . . . . |
10 |
Brushes . . . . . . . . . . . . . . . . . . . . . . . . . . . . . . . |
11 |
Sand Screens . . . . . . . . . . . . . . . . . . . . . . . . . . |
11 |
MAINTENANCE & TROUBLESHOOTING . . . . |
11 |
Care of your Oreck Floor Machine . . . . . . . . . . . |
11 |
User Maintenance . . . . . . . . . . . . . . . . . . . . . . . |
11 |
Troubleshooting Guide . . . . . . . . . . . . . . . . . . . . |
12 |
Safety &
General Information
IMPORTANT
SAFETY INSTRUCTIONS
When using an electrical appliance, basic precautions should always be followed, including the following:
READ ALL INSTRUCTIONS BEFORE USING THIS MULTI-FLOOR MACHINE
WARNING
To reduce the risk of fire, electric shock, or injury:
•Use indoors only.
•Risk of explosion - Floor sanding can result in an explosive mixture of fine dust and air. Use floor sanding machine only in well ventilated area.
•Do not allow to be used as a toy. Close attention is necessary when used by or near children.
•Do not leave appliance unattended when plugged in. Unplug from outlet when not in use and before servicing.
•Use only as described in this manual. Use only manufacturer’s recommended attachments.
•Do not use with a damaged cord or plug. If appliance is not working as it should, has been dropped, damaged, left outdoors, or dropped into water, return it to a service center or call customer service at:
US: 1-800-989-3535 Canada: 1-888-676-7325 Commercial: 1-800-242-1378
•Do not pull or carry by cord, use cord as a handle, close door on cord, or pull cord around sharp edges or corners. Keep cord away from heated surfaces.
•Do not run cleaner over cord.
•Do not use on stairs.
•Connect to a properly grounded outlet only. See grounding instructions.
•Unplug before installing or removing pads/cleaning brushes.
•Warning - To reduce the risk of fire, use only commercially available floor cleaners and waxes intended for machine application.
•Do not unplug by pulling on cord. To unplug, grasp the plug, not the cord.
•Do not handle plug or cleaner with wet hands.
•Do not put any object into openings. Do not use with any opening blocked; keep free of dust, lint, hair and anything that may reduce air flow.
•Keep hair, loose clothing, fingers and all parts of body away from openings and moving parts.
•Turn off all controls before unplugging.
•Do not use appliance in an enclosed space where flammable, explosive or toxic vapors are given off by oil base paint, paint thinner, some mothproofing substances, or in an area where flammable dust is present.
2
E N G L I S H
CAUTION
This appliance must be connected to a grounded metal, permanent wiring system; or an equipment-grounding conductor must be run with the circuit conductors and connected to the equipment-grounding terminal or lead on the appliance.
ALWAYS UNPLUG THE MACHINE BEFORE INSTALLING OR REMOVING ACCESSORIES.
ALWAYS WEAR SHOES WHEN USING
ELECTRICAL EQUIPMENT.
SAVE THESE INSTRUCTIONS
Grounding Information
▲ CAUTION ▲
This appliance must be grounded. If it should malfunction or break down, grounding provides a path of least resistance for electrical current to reduce the risk of electric shock. This appliance is equipped with a cord having an equipment-grounding conductor and grounding plug. The plug must be inserted into an appropriate outlet that is properly installed and grounded in accordance with all local codes and ordinances.
▲ WARNING ▲
Improper connection of the equipment-grounding conductor can result in a risk of electric shock. Check with a qualified electrician or service person if you are in doubt as to whether the outlet is properly grounded. Do not modify the plug provided with the appliance - if it will not fit the outlet, have a proper outlet installed by a qualified electrician.
This appliance is for use on a nominal 120-volt
circuit, and has a grounded plug that looks like the plug illustrated in Sketch A (see next column). A temporary adapter that looks like the adapter illustrated in Sketch B (see next column) may be used to connect this plug to a 2-pole receptacle, if a properly grounded outlet is not available. The temporary adapter should be used only until a properly grounded outlet can be installed by a qualified electrician. The green colored rigid ear, lug, or the like extending from the adapter must be connected to a permanent ground such as a properly grounded outlet box cover. Whenever the adapter is used, it must be held in place by a metal screw.
NOTE: In Canada, the use of a temporary adapter is not permitted by the Canadian Electrical Code.
Grounding Methods
GROUNDED
OUTLET BOX
ADAPTER
GROUNDED
OUTLET
GROUNDING |
METAL |
PIN |
SCREW |
Sketch A |
Sketch B |
Orbiter® Model 700 is intended for Household Use.
Orbiter® Model 600 is intended for Household Use.
Orbiter® Model 550 is intended for Commercial Use.
Warranty
Oreck Corporation (Oreck) gives you the following limited warranty for this product only if it was originally purchased for use, not resale, from Oreck or an ORECK AUTHORIZED Dealer.
Orbiter® 700 Series
(black unit with chrome highlights)
Oreck will repair or replace, free of charge, to the original purchaser, any part, which is found to be defective in material or workmanship within ten (10) years of the date of purchase for all models. Not intended for commercial use; any commercial use voids the warranty. This limited warranty applies to normal model specific intended use.
Orbiter® 600 Series
(cremé unit with blue highlights)
Oreck will repair or replace, free of charge, to the original purchaser, any part, which is found to be defective in material or workmanship within one (1) year of the date of purchase for all models and a five (5) year limited motor warranty for 600 series residential models. Not intended for commercial use; any commercial use voids the warranty. This limited warranty applies to normal model specific intended use.
Orbiter® 550 Series (metallic finish unit)
Oreck will repair or replace, free of charge, to the original purchaser, any part, which is found to be defective in material or workmanship within one (1) year of the date of purchase for all models. The 550 series Orbiter® Multi-Floor Machine is intended for commercial use.
Additional Warranty Information for all Orbiter® models:
Components returned prepaid to an Oreck Factory Authorized Service Center or to Oreck will be repaired or replaced free of cost at the option of Oreck and/or its service center when upon examination by either of them, such components are found to be defective.
3

E N G L I S H
Brushes, pads, drive blocks and other parts are subject to normal wear and are not covered by this limited warranty. This limited warranty does not apply to any part subjected to accident, abuse, alteration, misuse, damage caused by fire or act of God, the use of voltages other than indicated on the serial number plate of this product, or service of this product by other than Oreck or an Oreck Factory Authorized Service Center.
Oreck does not authorize any person or representative to assume or grant any other warranty obligation in connection with the sale of this product.
Oreck's limited warranty is valid only if you retain proof of purchase from Oreck or an Oreck authorized retail dealer of this product. If you purchase this product from any other source, your purchase is “AS IS”, which means that Oreck grants to you no warranty and that you, not Oreck, assume the entire risk of the quality and performance of this product, including the entire cost of any necessary servicing or repairs of any defects.
Oreck's liability for damages to you for any cost whatsoever, arising out of this statement of limited warranty shall be limited to the amount paid for this product at the time of original purchase, and Oreck shall not be liable for any direct, indirect, consequential or incidental damages arising out of the use or inability to use this product.
Some jurisdictions do not allow the exclusion or limitation of incidental or consequential damages, so the above limitation or exclusion may not apply to you.
ALL EXPRESS AND IMPLIED WARRANTIES FOR THIS PRODUCT, INCLUDING IMPLIED WARRANTIES OF MERCHANTABILITY AND FITNESS FOR A PARTICULAR PURPOSE, ARE LIMITED IN DURATION TO THE WARRANTY PERIOD, AND NO WARRANTIES, WHETHER EXPRESS OR IMPLIED, WILL APPLY AFTER THIS PERIOD.
Some jurisdictions do not allow limitations on the duration of implied warranties so the above limitation may not apply to you.
This warranty gives you specific legal rights and you may have other rights which vary from jurisdiction to jurisdiction.
Customer Service
Your ORECK floor cleaner is a product of precise engineering. If you require additional information or have problems with your ORECK appliance, you may call ORECK customer service at:
USA: 1-800-989-3535
Canada: 1-888-676-7325
Commercial: 1-800-242-1378
Please specify the model number and serial/code number which can be found on the data plate on the side of the Orbiter® Multi-Floor Machine.
Save your sales or purchase slip. Should your ORECK appliance require warranty service in the U.S.A., present
this slip to the Authorized Service Center as your proof of purchase date or, in Canada, call customer service.
Introduction
The Orbiter® Multi-Floor Machine is the most advanced, easiest to use machine of its kind. With proper care and use, your Orbiter® Multi-Floor Machine will last a lifetime. This booklet will tell you how to care for the Orbiter® Multi-Floor Machine and all about its features, accessories and their uses.
CAUTION: NEVER SERVICE THE MACHINE WHILE IT IS PLUGGED IN - ALWAYS DISCONNECT it from the electrical outlet. When leaving machine unattended, be sure to disconnect it. For more information see the
“Maintenance and Troubleshooting” section.
Getting Started
Your Orbiter® Multi-Floor Machine comes completely assembled and ready to operate once the proper accessories are attached. The off/on switch has international symbols (O) OFF and ( l ) ON.
Attaching Accessories
The Orbiter® Multi-Floor Machine can be used on almost any surface with the right accessories. A complete list and description of the available accessories is included on page 10 under “Accessories”.
To attach a pad, bonnet, or sand screen:
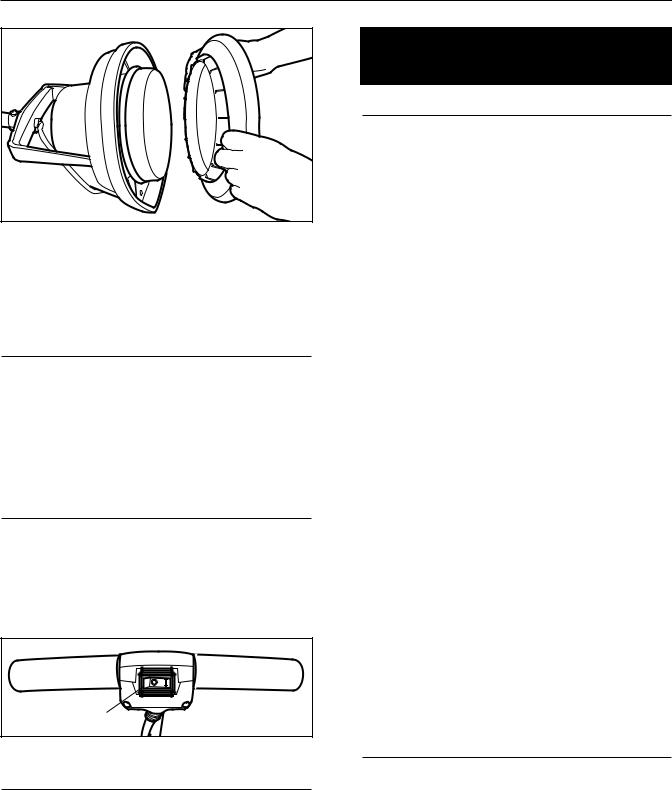
1.Lay the Orbiter® Multi-Floor Machine on its back with the handle lying on the floor.
2.Attach the pad or bonnet to the black drive pad holder using the teeth of the black drive pad holder. If attaching a sand screen, first attach the pad to the black drive pad holder. Then place the sand screen on the floor-side of the pad.
3.Place the black drive pad holder on the beige holder pan found on the bottom of the Orbiter® Multi-Floor Machine (See Figure 1, next page).
4.Set the Orbiter® Multi-Floor Machine upright with the pad, bonnet, or sand screen sitting on the floor.
To attach a brush:
1.Lay the Orbiter® Multi-Floor Machine on its back with the handle lying on the floor.
2.With the bristles pointed away from the unit, place the brush on the beige holder pan found on the bottom of the Orbiter® Multi-Floor Machine
(See Figure 1, next page).
3.Set the Orbiter® Multi-Floor Machine upright with the brush sitting on the floor.
CAUTION: NEVER put the brush or black drive pad holder on the machine by placing it on the floor and moving the running machine over it, or by placing the machine over the brush or black drive pad holder and then starting the motor.
4
E N G L I S H
Figure 1. Attaching Black Drive Pad Holder or Brush
CAUTION: Oreck recommends removing brushes and pads when storing the Orbiter® Multi-Floor Machine. Accessories (especially brushes) can become deformed if stored on the machine.
Removing Accessories
Lay the Orbiter® Multi-Floor Machine on its back and pull the brush or the black drive pad holder off the beige holder pan.
CAUTION: Oreck recommends removing brushes and pads when storing the Orbiter® Multi-Floor Machine. Accessories (especially brushes) can become deformed if stored on the machine.
Turning Floor Machine On and Off
The on-off switch is located on the handle. It has been designed to be conveniently activated. On (I) - Off(O) is printed on the switch. (See Figure 2.) BE CAREFUL that the switch is in the OFF (O) position before you plug the electrical cord into the outlet. Before turning the machine on, be sure there is a bonnet pad or brush in place on the machine.
ON/OFF
Switch
Figure 2. Orbiter® Multi-Floor Machine On/Off switch
To Guide the Floor Machine
Grasp the unique “T” handle and glide the machine across the floor in a side to side motion. The patented “T” handle feature gives you complete control. The Orbiter's perfectly balanced counter-weight system gives smooth and easy action with fingertip control.
CAUTION: IMPORTANT - Always wear shoes when using your Orbiter® Multi-Floor Machine. Before completing any of the following procedures for the first time, test a small hidden area to ensure color-fastness of the material and that the accessory used is not too aggressive for the surface.
Carpet and Area Rug
Applications
Dry Carpet Cleaning
(For deep cleaning carpet and rugs)
The Oreck Dry Carpet Cleaning System® is the easiest and most effective way to keep your carpet and rugs looking clean and beautiful. It effectively removes dirt and grime that vacuums cannot. Unlike many carpet extractors, steam cleaners or steam cleaning services, it will not leave a soapy or sticky residue on your carpet that will attract dirt and cause rapid resoiling. It is safe for use in homes with children and pets.
Equipment and Material Required:
•Orbiter® Multi-Floor Machine
•Black Drive Pad Holder
•White Terrycloth Bonnet (for berber or low-pile carpets) or Black Carpet Brush (for mediumor highpile carpets)
•Oreck Premist® Soil Release Pre-Spray
•Oreck Dry Carpet Cleaner
Procedure:
1. Spray Premist® Soil Release Pre-Spray on the carpet in a 6 ft by 6 ft area.
2.Sprinkle Dry Carpet Cleaner over the treated area (do not over use).
3.Work the Dry Carpet Cleaner into the carpet with the Orbiter® Multi-Floor Machine and the white terrycloth bonnet (for berber or low-pile carpets) or black carpet brush (for mediumor high-pile carpets).
4.Repeat steps 1 through 3 until the whole carpet has been treated. The carpet can be walked on during or immediately after the treatment with no ill effects.
5.When the white terrycloth bonnet becomes soiled, turn it over. When the job is complete, clean the white terrycloth bonnet in the washing machine using cold water or hose off and allow to air dry.
6.After waiting at least 30 minutes, vacuum the treated areas with an Oreck vacuum cleaner.
See Dry Carpet Cleaner packaging for complete instructions.
Bonnet Cleaning
(For surface cleaning carpet and rugs)
This procedure can be used on most types of carpets (follow manufacturer’s recommendations for handmade, silk and oriental rugs or carpets).
Equipment and Material Required:
•Orbiter® Multi-Floor Machine
•Black Drive Pad Holder
•White Terrycloth Bonnet
•Oreck Premist® Soil Release Pre-Spray
5

E N G L I S H
Procedure:
1.Lightly spray Premist® Soil Release Pre-Spray over the soiled area in the carpet or high traffic area.
2.Use the Orbiter® Multi-Floor Machine and the white terrycloth bonnet to lift dirt from the treated area. Work terrycloth bonnet over the treated area.
3.Turn terrycloth bonnet over when soiled and continue to clean carpet.
4.When the job is complete, clean the white terrycloth bonnet in the washing machine using cold water or hose off and allow to air dry.
Laminate, Vinyl and
Linoleum Floor Applications
Surface Cleaning
Timberworks® Floor Cleaner restores the natural beauty of all your hard flooring (not for use on stone, tile, or waxed floors). It safely and effectively removes the dirt, scuffs and grime from your floors to reveal their original and beautiful luster.
Equipment and Material Required:
•Orbiter® Multi-Floor Machine
•Black Drive Pad Holder
•White Terrycloth Bonnet
•Timberworks® Floor Cleaner
•White Polish Pad (optional)
Procedure:
To clean hard flooring, including polyurethane-coated wood, laminate, vinyl and linoleum floors, use the Timberworks® Floor Cleaner and the Orbiter® Multi-Floor Machine with the white terrycloth bonnet.
1.Lightly mist a 6 ft by 6 ft area with Timberworks® Floor Cleaner (a little goes a long way).
2.Clean the treated area with the Orbiter® Multi-Floor Machine and the white terrycloth bonnet.
3.Floors should shine with a beautiful luster. Timberworks® Floor Cleaner will not leave a residue; any streaking or clouding may be the result of a build-up of other floor cleaners. If necessary, repeat procedure until floor shines.
4.If desired, vinyl and laminate flooring can be polished to a higher luster using the white polish pad after cleaning.
See Timberworks® bottle for complete instructions.
Scrubbing
This procedure can be used on hard floor surfaces, EXCEPT WOOD FLOORS.
Equipment and Material Required:
•Orbiter® Multi-Floor Machine
•Black Drive Pad Holder
•Brown Strip Pad or Blue Scrub Pad depending on floor surface
•Orange Scrub Brush
•Vacuum, Broom or Dust Mop
•Cleaning Solution
•Interior Circle (Donut Hole) from Brown Strip Pad or Blue Scrub Pad
•Mops - 2 (1 to apply/pick up Cleaning Solution and 1 to rinse floor)
•Bucket and wringer
•Wet-Dry Vacuum (optional)
Procedure:
1.Vacuum or sweep floor area to be cleaned with broom or dust mop.
2.Mix cleaning solution according to manufacturer’s instructions on container label.
3.Apply cleaning solution in a 6 ft by 6 ft area.
4.Let solution stand for 5 minutes, scrub floor with Orbiter® Multi-Floor Machine and brown strip pad or blue scrub pad.
5.Use orange scrub brush on floors with cracks, crevices, and grout.
6.Use interior circle (donut hole) from the brown strip pad or blue scrub pad to clean in corners and around door jambs by hand.
7.Pick up dirty solution with mop or wet-dry vacuum.
DO NOT ALLOW CLEANING SOLUTION TO DRY ON FLOOR.
8.Repeat Steps 3-6 until all floor area is cleaned.
9.Mop or use Orbiter® Multi-Floor Machine with the white terrycloth bonnet and clean water to rinse the floor area.
Precautions:
1.Do not flood the floor area with cleaning solution or allow solution to dry before pick-up.
2.Use clean mop for final rinse.
3.Change rinse water frequently.
4.Use damp cloth to wipe off any splashes on walls or furniture.
Stripping
This procedure can be used on most types of hard floor surfaces, EXCEPT WOOD & STONE FLOORS, to remove buffable floor wax or coatings.
Equipment and Material Required:
•Orbiter® Multi-Floor Machine
•Black Drive Pad Holder
•Brown Strip Pad
•Vacuum, Broom or Dust Mop
•Wax Remover or Stripping Solution
•Interior Circle (Donut Hole) from Brown Strip Pad
•Mops - 2 (1 to apply/pick up Cleaning Solution and 1 to rinse floor)
•Bucket and Wringer
•Wet-Dry Vacuum for dirty and rinse water pick-up (optional)
Procedure:
1.Vacuum or sweep floor area to be stripped with broom or dust mop.
2.Mix stripping solution according to manufacturer’s
6 |
instructions on container label. |
|

E N G L I S H
3.Dip mop in stripping solution and apply to floor in a 6 ft by 6 ft area. Apply along baseboard edges first or where there is a wax or dirt build-up.
4.Let solution stand for 5 minutes, scrub floor with Orbiter® Multi-Floor Machine and the brown strip pad. Use interior circle (donut hole) from the brown strip pad to reach in corners and around door jambs.
5.To pick up dirty solution, use a mop or wet-dry vacuum. DO NOT ALLOW STRIPPING SOLUTION TO DRY ON FLOOR.
6.Repeat steps 3-5 until the entire floor is completely stripped.
7.Rinse area TWICE with clean water and clean mop. Pick up water with mop or wet-dry vacuum.
8.Allow floor to dry before applying new floor finish.
Precautions:
1.Do not flood the floor with stripping solution or allow solution to dry before pick-up.
2.Use clean mop for final rinse.
3.Change rinse water frequently.
4.Use damp cloth to wipe off any splashes on walls or furniture.
Refinishing
This procedure can be used on most types of hard floor surfaces, EXCEPT WOOD & STONE FLOORS.
Equipment and Material Required:
•Orbiter® Multi-Floor Machine
•Black Drive Pad Holder
•White Polish Pad or Lamb’s Wool Bonnet
•Floor finish liquid
•Clean string mop, 16-20 oz. size
•Bucket and wringer
•Disposable plastic bag
Procedure:
1.Place disposable bag inside of bucket with wringer. This will protect floor finish from being contaminated and chemical residue remaining in bucket.
2.Pour quart size container of floor finish into the disposable bag. Amount of floor finish depends on size of floor area to be covered and number of coats to be applied.
3.ONLY dip the mop tip into the floor finish and wring out lightly. Avoid dripping floor finish or splashing on walls.
4.Apply floor finish in thin even coats. Apply FIRST COAT of floor finish along baseboard edges and cover remaining floor area in an left-right direction.
HINT: Only the first coat of floor finish needs to be applied to baseboard edges.
5.Allow floor finish to dry for 20 minutes before applying a second coat.
6.Apply the second coat of floor finish 1 tile width from baseboard. Application should be in a crossing direction to the preceding coat.
7.Additional coats (3 and 4) of floor finish should be applied to achieve the level of appearance desired. Four coats of floor finish will provide extra protection to the floor surface.
8.Allow 24 hours for floor finish to harden before buffing.
9.Buff floor to higher shine using Orbiter® Multi-Floor Machine and white polish pad or lamb’s wool bonnet.
Precautions:
1.When using NEW mops to apply floor finish, make sure to rinse mop first. Foreign chemicals will affect the floor finish.
2.Completely submerging mop head into the floor finish is a waste of product.
3.Turn mop over frequently for even distribution of floor finish.
4.Do not allow mop to become dry; this will cause streaking.
5.Apply floor finish in thin even coats.
6.Do NOT pour floor finish directly on the floor and attempt to spread evenly. This will cause dark spots and delay drying time.
Sealed Hard Wood Floor
Applications
Surface Cleaning Sealed Floors
This procedure is for polyurethane-sealed hard wood floors, not waxed hard wood floors.
Timberworks® Floor Cleaner restores the natural beauty of all your hard flooring (not for use on stone, tile, or waxed floors). It safely and effectively removes the dirt, scuffs and grime from your floors to reveal their original and beautiful luster.
Equipment and Material Required:
•Orbiter® Multi-Floor Machine
•Black Drive Pad Holder
•White Terrycloth Bonnet
•Timberworks® Floor Cleaner
•White Polish Pad (optional)
Procedure:
To clean hard flooring, including polyurethane-coated wood, laminate, vinyl and linoleum floors, use the Timberworks® Floor Cleaner and the Orbiter® Multi-Floor Machine with the white terrycloth bonnet. Vinyl and laminate flooring can be polished to a higher luster using the white polish pad after cleaning.
1.Lightly mist a 6 ft by 6 ft area with Timberworks® Floor Cleaner (a little goes a long way).
2.Clean the treated area with the Orbiter® Multi-Floor Machine and the white terrycloth bonnet.
3.Floors should shine with a beautiful luster. Timberworks® Floor Cleaner will not leave a residue; any streaking or clouding may be the result of a
7

E N G L I S H
build-up of other floor cleaners. If necessary, repeat procedure until floor shines.
See Timberworks® bottle for complete instructions.
Sandscreening
(Wood Floors)
Sandscreening is ideal for refinishing the polyurethane coating on hard wood floors. The procedure is not designed to totally remove the old polyurethane, but smooth out imperfections and prime the floor for a new fresh coating. However, polyurethane coatings are generally very durable and look good for a long time - try a thorough cleaning before refinishing the polyurethane coating to see if the luster can be restored.
Equipment and Material Required:
•Orbiter® Multi-Floor Machine
•Black Drive Pad Holder
•Brown Strip Pad
•Sand Screen 60 grit
•Sand Screen 80 grit
•Sand Screen 100 grit
•Broom or Dust Mop
•Vacuum Cleaner
•Tack Rags
Procedure:
1.Use Orbiter® Multi-Floor Machine and the brown strip pad.
2.Place #60 grit sand screen disc under brown strip pad. Sand the floor. Remove residue by vacuuming or sweeping the floor in the same direction as the boards.
3.Place a #80 sand screen disc under the brown strip pad. Sand the floor.
4.Sweep and vacuum the floor, then tack rag THOROUGHLY.
5.Apply finish according to manufacturer’s recommendations.
6.Burnish between coats with #100 grit sand screen disc and tack rag.
Surface Cleaning and Waxing
Waxed Hard Wood Floors
Waxed Hard Wood Floor
Applications
This procedure should be used on WAX FINISH floors only.
Equipment and Material Required:
•Orbiter® Multi-Floor Machine
•Black Drive Pad Holder
•Lamb’s Wool Bonnet
•Tan Polish Brush (Union Mix)
•White Polish Pad (optional)
•Paste Wax, 1 lb.
•Indian Sand Paste Wax
•Dust Mop
•Buffable Wax
Procedure:
1.Completely dust mop floor.
2.Wipe up spills with a dry cloth or paper towel. Use a slightly damp cloth for sticky spills. Hint: Buff with white polish pad to restore luster.
3.To apply paste wax: Attach black drive pad holder to Orbiter® Multi-Floor Machine. Apply a tablespoon
of paste wax on 4 sections of white polish pad. Place white polish pad on floor and center black drive pad holder onto pad. Work Orbiter® Multi-Floor Machine in a forward/back motion and spread out the paste wax to a thin coat. Allow paste wax to dry for
5 minutes. Turn white polish pad over to clean side and buff. Use tan polish brush or lamb’s wool bonnet to obtain a higher luster.
Helpful Hints:
1.When floor looks dull, try buffing first to see if that will restore the luster before re-waxing.
2.When areas of heavy use no longer respond to buffing, wax only those areas and buff all of the floor to an even luster.
3.Use clear paste wax to retain the floor’s natural color. Use Indian Sand Paste Wax to add a little color and help blend in blemishes on old floors.
Tile Floor Applications
Deep Cleaning
Equipment and Material Required:
•Orbiter® Multi-Floor Machine
•Black Drive Pad Holder
•Orange Scrub Brush or Black Carpet Brush
•White Terrycloth Bonnet
•Grunge Attack® Tile Floor Cleaner
Procedure:
Grunge Attack® Tile Floor Cleaner lifts dirt, grime and grease from tile floors and grout, leaving sparkling results.
1.Dilute Grunge Attack® Tile Floor Cleaner into a separate spray bottle according to the instructions on the bottle.
2.Lightly spray a 6 ft by 6 ft area with diluted Grunge Attack® Tile Floor Cleaner.
3.Clean with the Orbiter® Multi-Floor Machine and an orange scrub brush for ceramic tile floors or concrete. Use Orbiter® Multi-Floor Machine and the black carpet brush for delicate or glazed ceramic or porcelain tile floors.
4.Repeat steps 1 through 3 until the whole floor has been cleaned.
5.Go back over the cleaned floor with the Orbiter® Multi-Floor Machine and white terrycloth bonnet to remove all dirt lifted by the orange scrub brush. Wet floor as necessary with water or diluted Grunge Attack® Tile Floor Cleaner.
See Grunge Attack® Tile Floor Cleaner bottle for complete
instructions.
8

E N G L I S H
Light Cleaning
Equipment and Material Required:
•Orbiter® Multi-Floor Machine
•White Terrycloth Bonnet
•Grunge Attack® Tile Floor Cleaner
Procedure:
Grunge Attack® Tile Floor Cleaner lifts dirt, grime and grease from tile floors and grout, leaving sparkling results.
1.Dilute Grunge Attack® Tile Floor Cleaner according to the instructions on the bottle.
2.Lightly spray a 6 ft by 6 ft area with Grunge Attack® Tile Floor Cleaner.
3.Clean with the Orbiter® Multi-Floor Machine and white terrycloth bonnet. This bonnet is designed to lift and remove dirt from hard surfaces.
See Grunge Attack® Cleaner bottle for complete instructions.
Stone Floor Applications
Deep Cleaning
For cleaning all types of stone floors, including marble, granite, slate and other stone floors.
Equipment and Material Required:
•Orbiter® Multi-Floor Machine
•Tan Polish Brush (Union Mix)
•Stone Clear Bottom® Stone Floor Cleaner
•Vacuum, Broom or Dust Mop
•Mop and Bucket
Procedure:
Stone Clear Bottom® Stone Floor Cleaner is a pH neutral balanced daily cleaner designed to safely clean all stone surfaces without damaging the stone’s natural crystalline surface.
1.Clean the floor with vacuum, broom or dust mop to ensure that all grit is removed.
2.Dilute Stone Clear Bottom® Stone Floor Cleaner according to the instructions on the bottle.
3.To clean stone floors and grout, use the Orbiter® Multi-Floor Machine and the tan polish brush (union mix).
4.To remove dirt and grime lifted by the brush, mop floors with clean water or with Stone Clear Bottom® Cleaning Solution.
See Stone Clear Bottom® bottle for complete instructions.
Marble Restoration
Michaelangelo’s Marble Restorer® polishing cream is a unique blend of microabrasives that safely restores the stone’s natural crystalline structure to rejuvenate the shine the marble once had. It will safely and effectively revive dull marble surfaces, light surface scratches, abrasions, etch marks, shower wall streaks, water marks, and glass rings.
Equipment and Material Required:
•Orbiter® Multi-Floor Machine
•Black Drive Pad Holder
•Beige Marble Pad
•White Poilsh Pad
•Stone Clear Bottom® Stone Floor Cleaner
•Lamb’s Wool Bonnet (optional)
•Michaelangelo’s Marble Restorer® Polishing Cream
•Vacuum, Dust Mop or Broom
•Mop & Bucket
•Squeegee
Procedure:
1.Clean the floor with vacuum, broom or dust mop to ensure that all grit has been removed. All topical coatings need to be removed.
2.Spray water on the floor and then apply a dab (2 in diameter) per 16 sq ft of surface of
Michaelangelo’s Marble Restorer® polishing cream. Using Orbiter® Multi-Floor Machine and beige marble pad, begin buffing the area. Buff for five or more passes, keeping the product in a wet slurry. Do not let the product dry on the floor, and spray additional water if necessary.
3.Check results by moving the slurry with a squeegee. Reapply or continue to buff if necessary. Remove slurry with squeegee, wet/dry vacuum or clean mop.
4.Immediately mop the floor with a mix of 2 oz of Stone Clear Bottom® Stone Floor Cleaner and
1 gallon of water, making sure all of the Michaelangelo’s Marble Restorer® has been removed from the floor.
5.Let the floor dry completely. Buff the floor with an Orbiter® Multi-Floor Machine and a white polish pad.
See Michaelangelo’s Marble Restorer® bottle for complete instructions.
9
E N G L I S H
Concrete and Asphalt
Applications
Removing Oil and Dirt
Greaselock® Absorbent Powder effectively and safely cleans concrete and asphalt without solvents. Greaselock® application is a natural mineral that absorbs and captures oil and dirt so it can be safely discarded or rinsed away.
Equipment and Material Required:
•Orbiter® Multi-Floor Machine
•Black Drive Pad Holder
•Greaselock® Absorbent Powder
•Brown Strip Pad
•Orange Scrub Brush
Procedure:
To clean oil, dirt, mold and mildew from smooth concrete, use the Greaselock® Absorbent Powder and the brown strip pad. To clean rough or uneven concrete or asphalt, use Greaselock® Absorbent Powder and the orange scrub brush.
1.For fresh stains or spills that have not dried, use the Greaselock® Absorbent Powder as a dry powder. For dry stains, add a little water during mixing or scrubbing stage.
2.Liberally apply Greaselock® Absorbent Powder to spill or area to clean, completely covering it. Allow five to ten minutes to absorb for fresh stains, overnight for dried stains.
3.Use the Orbiter® Multi-Floor Machine and brown strip pad or orange scrub brush to agitate the powder on the floor. Mop or hose off floor if necessary.
See Greaselock® Absorbent Powder packaging for complete instructions.
Accessories
Oreck offers a full line of accessories to give you the tools you need for the job!
Depending on the unit purchased, some of the accessories below may be included with your Orbiter® Multi-Floor Machine. All of these accessories are available at one of our over 450 Oreck retail Stores or on our website, www.oreck.com.
When choosing different pads and brushes for the Orbiter®, there is no exact science to selecting an accessory for a particular floor. Bonnets are good for surface cleaning most floor types. Pads are good for scrubbing and polishing flat surfaces. Brushes work well for getting into recesses in non-flat surfaces, like tile, where the bristles can get into grout lines. When you choose an accessory, remember you want one aggressive enough to do the job but gentle enough not to damage the floor. Use common sense. For example, do not use a brown strip pad (aggressive) on a wood floor (soft floor). Start with what is safe and move to a more aggressive accessory, if needed.
Note: Oreck recommends removing brushes and pads when storing the Orbiter® Multi-Floor Machine. Accessories can become deformed if stored on the machine.
General
Black Drive Pad Holder 53178-51-0327
(Black plastic with teeth)
• Holds pads and bonnets in place
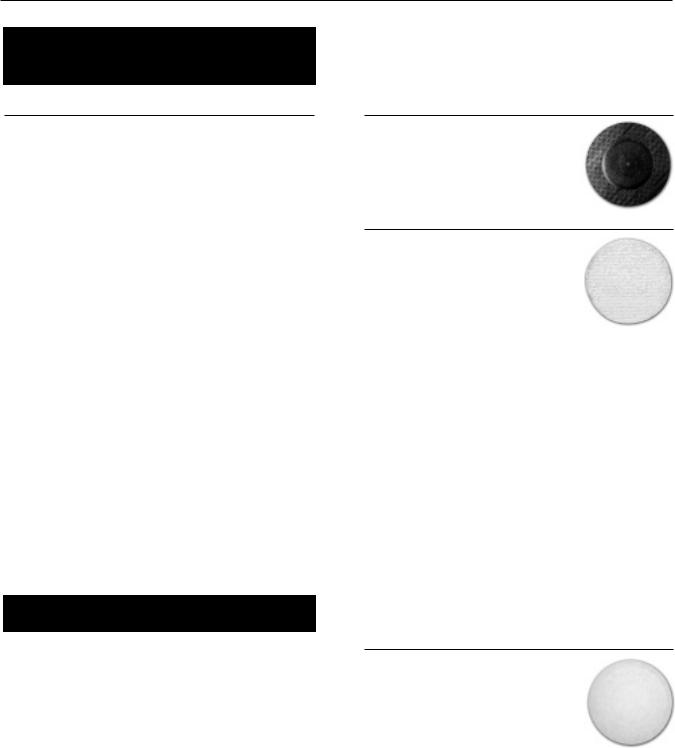
Bonnets
Bonnets are designed to surface clean most surfaces. They are washable and can be reused.
White Terrycloth Bonnet 437053
•This bonnet cleans the traffic lane
and spots in the carpet without wetting the entire carpet.
•Use with Oreck Premist® Soil Release Pre-Spray and Dry Carpet Cleaner.
•When one side of bonnet is dirty, flip it over and use the other side.
•When job is complete, clean terrycloth bonnet in washing machine using cold water or hose off and allow to air dry.
Lamb’s Wool Bonnet |
437054 |
•Designed to provide the best possible shine on wood, tile and vinyl floors.
•Use the bonnet for everyday buffing to remove scuff marks.
•When job is complete, clean lambs wool bonnet in washing machine using cold water or hose off and allow to air dry.
To use a bonnet, see “Attaching Accessories” on page 4 and “Removing Accessories” on page 5
Pads
Pads are designed to be porous and open-weave (except the beige pad) so that when it loosens dirt it can pick it up. The dirt goes inside the pad (i.e. off the floor). All pads can be turned over and the other side used before cleaning or disposing. Pads may be hosed off in some instances and re-used.
The pads are color coded depending on how aggressive they are (except for the beige marble pad): White is the softest, followed by blue medium aggressive, and brown being the most aggressive.
White Polish Pad |
437051 |
(least aggressive) |
|
•Apply paste wax.
•Clean and polish wood (coated & uncoated),linoleum, and laminate.
•Cleans all surfaces except stone.
10
E N G L I S H
Blue Scrub Pad |
437057 |
|
(medium aggressive) |
|
|
• |
Used for scrubbing. |
|
• |
Cleans tile and concrete. |
|
Brown Strip Pad |
437049 |
|
(most aggressive) |
|
|
•Strips linoleum, vinyl, laminate and tile floors.
•Cleans and scrubs tile and grout.
•Can be used on commercial vinyl.
•Use on smooth concrete.
•Use with Sand Screens.
•Scrubs and cleans wood decks.
Beige Marble Pad |
437058 |
(marble only)
• For restoring and cleaning marble floors.
To use a floor pad, see “Attaching Accessories” on page 4 and “Removing Accessories” on page 5.
Brushes
Brushes are designed to get into grooves and recesses on non-flat surfaces. Brushes lift and remove ground-in dirt and grime.
Brushes are coded depending on how aggressive they are with the black carpet brush being the least
aggressive, followed by the tan polish brush (union mix) and the orange scrub brush the most aggressive.
Black Carpet Brush |
237049 |
(least aggressive) |
|
•Use with Oreck Dry Shampoo.
•Safe, soft action needed for carpet cleaning.
•Use on textured linoleum.
•Use for cleaning delicate or glazed ceramic or porcelain tile.
Tan Polish Brush (Union Mix) |
237048 |
(medium aggressive) |
|
•Use to polish wood floors.
•Will “blend” in excess floor wax, maintain an even coat of wax and eliminate wax build-up.
•Use for getting inside cracks of a wood floor.
•Use to polish waxed wood floors.
•Use for marble, stone, and delicate tile floors
Orange Scrub Brush |
237047 |
(most aggressive) |
|
•Used to clean ceramic tile or concrete and many tough stains.
To use a brush, see “Attaching Accessories” on page 4 and “Removing Accessories” on page 5.
Sand Screens
Sand screens offer the very best in floor sanding. For all sand screens, place the black drive pad holder on Orbiter® Multi-Floor Machine. Then place the sand screen under any floor pad on floor and center Orbiter® MultiFloor Machine onto the pad.
60 grit |
SS12060 |
80 grit |
SS12080 |
100 grit |
SS12100 |
For Questions or Information about Oreck’s Line of Cleaning Products, Please Call or Visit Your Local Oreck Dealer.
RESIDENTIAL
USA: 1-800-989-3535
Canada: 1-888-676-7325
www.oreck.com
COMMERCIAL
Commercial: 1-800-242-1378
www.oreckcommercial.com
Maintenance &
Troubleshooting
Care of Your Oreck®
Multi-Floor Machine
This is a precision machine. Dropping, unreasonable bumping or rough handling may result in damage to the balanced counter-weight system. Wrap your cord loosely around the two hooks on the handle. Remove brushes after use. The bristles may be damaged due to the weight of the machine. Store your machine in the upright position. After each use, remove wax or cleaning solutions from the unit. After sanding, blow sawdust off motor. Clean housing and bumper with damp cloth after each use. A little care will keep your Orbiter® looking like new.
User Maintenance
The Orbiter® motor bearings are factory lubricated and sealed. All other servicing should be performed by an authorized service center. There are no user serviceable parts inside.
11
 Loading...