


Instruction manual
U22
• English
• Deutsch
• Nederlands
1

Table of contents |
|
Safety precautions . . . . . . . . . . . . . . . . . . . . . . . . . . . . . . . . |
.3 |
Features of the MicroAIR U22 . . . . . . . . . . . . . . . . . . . . . . . |
.4 |
Contents of the MicroAIR U22 package . . . . . . . . . . . . . . . . |
.5 |
Names & functions of the parts . . . . . . . . . . . . . . . . . . . . . . |
.6 |
How to insert or replace the batteries . . . . . . . . . . . . . . . . . . |
.8 |
How to use the AC adapter . . . . . . . . . . . . . . . . . . . . . . . . . |
.9 |
How to assemble the unit and fill the medication container . . |
10 |
How to select the nebulisation mode . . . . . . . . . . . . . . . . . . |
13 |
How to inhale with the MicroAIR U22 . . . . . . . . . . . . . . . . . . |
14 |
How to clean the unit after each inhalation . . . . . . . . . . . . . . |
15 |
How to disinfect the unit each day . . . . . . . . . . . . . . . . . . . . |
17 |
How to replace the mesh cap . . . . . . . . . . . . . . . . . . . . . . . . |
18 |
Troubleshooting . . . . . . . . . . . . . . . . . . . . . . . . . . . . . . . . . . |
19 |
Specifications . . . . . . . . . . . . . . . . . . . . . . . . . . . . . . . . . . . . |
21 |
Dear customer,
Thank you for purchasing the OMRON MicroAIR U22 Nebuliser.
By buying the MicroAIR U22 nebuliser, you have chosen a high-quality, innovative device.
During its development, particular attention was given to reliability, easy and convenient handling. Before using the nebuliser for the first time, please read through this manual carefully.
If you still have any questions regarding its use, contact OMRON customer service at the address shown on the packaging or in this instruction manual. They will be pleased to assist you.
OMRON Healthcare Europe.
Safety precautions
•This nebuliser is a medical device. Only use medications as prescribed and instructed by your doctor.
•Disinfect the nebuliser before first use and at least once per day when in use. See page 17 for disinfection instructions.
•Clean the nebuliser after each inhalation. See page 15 for cleaning instructions.
•Only use the nebuliser for its intended purpose; for inhalation therapy. Any other form of use constitutes an improper use and is therefore dangerous. The manufacturer cannot be held liable for any damage caused by improper or incorrect use.
•Do not leave the nebuliser and AC adapter* unattended with people who require supervision (e.g. people with infirmities or children).
•The nebuliser does not contain user serviceable parts. Never open the main unit. In case of problems, stop using the nebuliser and contact your OMRON dealer.
•Do not wash the main unit and AC adapter* with water; do not immerse them in water.
•Do not drop medication on the main unit or on the AC adapter*. If you drop medication, immediately wipe it off.
•Do not apply strong shocks to the nebuliser or AC adapter*.
•Although this device complies with the provisions of the EMC (Electromagnetic Compatibility) directive, operating the device should be avoided in direct vicinity of other electronic devices.
•Make sure that the electrical rating shown on the bottom of the AC adapter* corresponds to your mains voltage and frequency.
•Always disconnect the mains cable of the AC adapter* before you start cleaning the nebuliser or when you do not use the nebuliser.
•Do not plug in or unplug the AC adapter* powerplug from the electrical outlet with wet hands.
•Keep the mains cable of the AC adapter* away from heated or hot surfaces.
•The AC adapter* does not contain user serviceable parts. Never open it. In case of problems, stop using it and contact your OMRON dealer.
•Keep this manual for future reference
* Optional
2 |
3 |
Features and benefits
In the MicroAIR U22, aerosol is generated by pushing liquid medication through fine holes in the newly developed metal alloy mesh. This is realised by a titanium vibrator, oscillating at high frequency. This unique technology offers the following features and benefits:
True portable, pocket size
The device will fit in any handbag or briefcase. Running up to 4 hours on just two penlite batteries, your medication is always within reach wherever you go, whatever you do.
Inhalation is possible at various angles
The device enables inhalation at various angles with stable nebulisation. Therefore the device can be used even while in bed or can be used for a baby/child, laying in the arms of the care-taker.
Soundless operation
The soundless operation of the device enables discrete use.
No loud frightening noises, meaning calm treatment even while using it on a sleeping child.
Simple one-button operation
Wide medication compliance
Low medication waste and residue
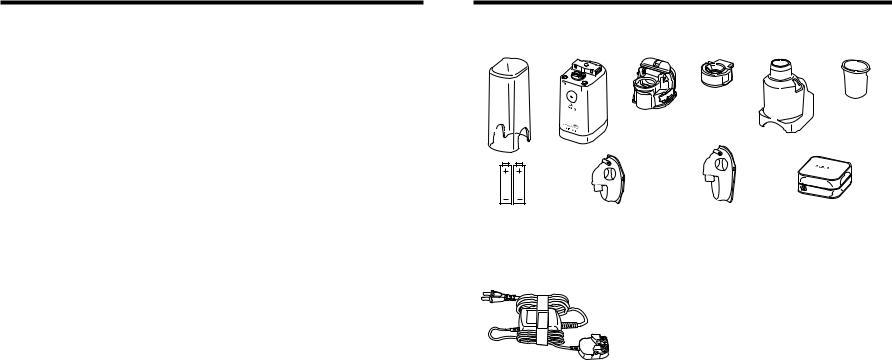
Contents of the OMRON MicroAIR U22 package
The following items are contained in the package:
Main unit Cover |
|
Medication |
Mesh Cap |
|
Main Unit |
Container |
(with Mesh) Mask Adapter |
Mouthpiece |
Batteries |
Child mask |
Adult mask |
Soft pouch |
•batteries (2x AA/LR6)
•instruction manual
•warranty card
Optional item (not included), contact your OMRON dealer.
AC adapter
4 |
5 |
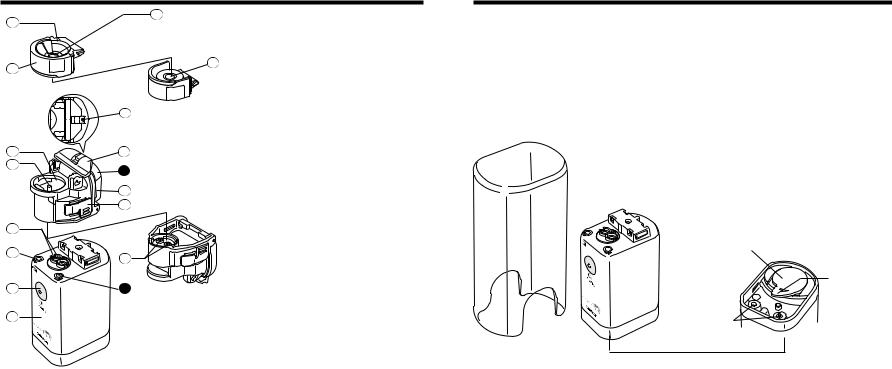
Names and functions of the parts
2
1
Mesh cap viewed from the bottom
4
3
Figure viewed from the above
|
5 |
6 |
8 |
7
9
10
11
12
13
14
Viewed from the bottom
17
Contains metal alloy mesh for nebulisation.
2.Nebulisation port
Nebulised medication exits here.
3.Mesh Cap Cover
Protects the mesh.
4.Mesh
Efficient nebulisation is realized through the use of minute pores.
Do not touch this fragile part with your fingers!
Do not attempt to clean with a cotton swab or a pin!
5.Air port
Stabilizes nebulisation.
6.Medication Port
Medication can be filled here by opening the mesh cap.
7.Vibrator
The tip of this vibrator oscillates at high frequency and pushes the medication through the pores of the mesh.
8.Medication container cap locking lever
Opens the medication container cap.
9.Medication container cap
To be opened for cleaning the medication container.
6
Names and functions of the parts
10. Container
Contains the medication (7 ml max.) 11. Medication container release button
Medication container can be removed when the buttons on both sides are pushed.
12. Electrodes
Connects the main unit with the vibrator. 13. Battery Low Indicator
An orange light blinks when the batteries are low.
14. ON/OFF button
15. Electrodes
Connects the vibrator with the main unit. 16. Power indicator
A green light turns on when the power is on. 17. Main unit
Battery Cover |
|
|
Battery cover |
|
removal lever |
Connections |
|
for AC-adapter |
Viewed from the |
|
|
|
bottom |
Main unit cover
Protects the main unit.
7
How to insert or replace the batteries
Inserting batteries
1. Remove the battery cover by slightly rotating the disengaging lever in the direction of the arrow (1).
2. Insert the batteries according to the battery polarity indicated inside the battery compartment.
3. Replace battery cover by aligning tabs and, with your thumbs, push into place until it clicks.
Battery life and battery replacement
The unit can operate with alkaline batteries or with nickel-metal-hydride (NiMH) rechargeable batteries. Depending on the capacity and condition of the batteries, the unit can operate upto 8 days on a set of batteries based on usage of 30 minutes a day.
Notes: • When the battery low indicator (orange) flashes, the batteries should be replaced. Replace both batteries with new ones.
• The (optional) AC adapter does not function as a battery charger; rechargeable batteries must be charged in an external battery charger.
• Remove batteries if the unit is not in use for long periods. Failure to do so could result in damage due to battery leakage.
• Batteries should be treated as chemical waste; disposal should be done at your retail store or at appropiate collection locations.
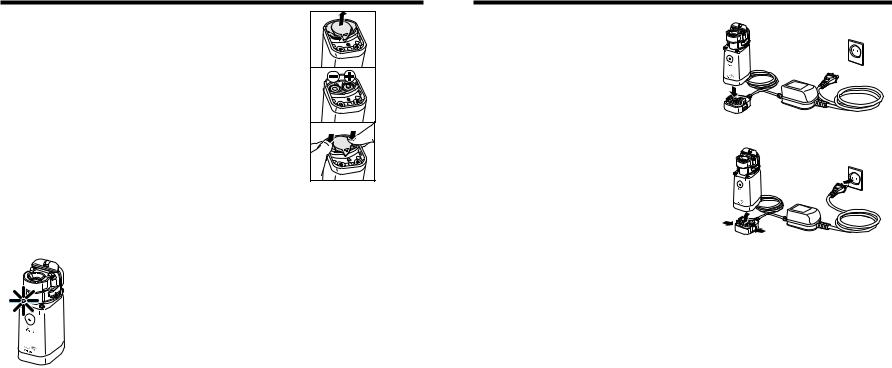
How to use the AC adapter
Using the AC adapter
The AC adapter is an optional accessory.
Place the main unit on the AC adapter connector. Press firmly untill it clicks.
Plug in the power plug of the AC adapter to the electrical outlet.
To remove the AC adapter connector from the main unit, remove the power plug from the electrical outlet and unlock the AC adapter connector by pushing the buttons on both sides.
8 |
9 |

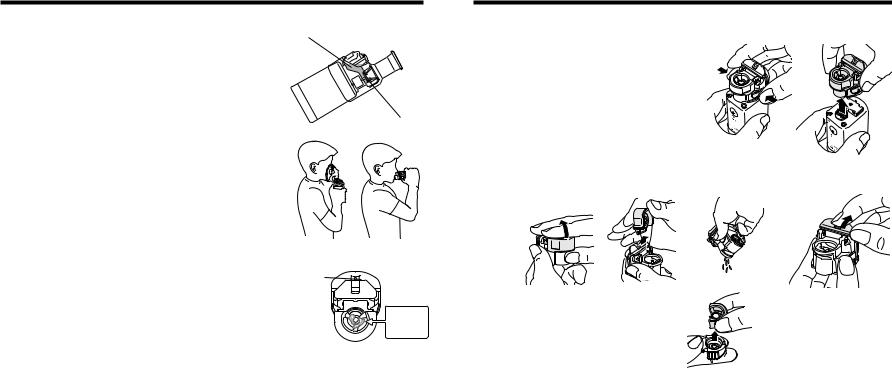
How to assemble the unit and fill the medication container
When using the unit for the first time or after not using it for a long period of time, clean and disinfect the medication container, mesh, mask adapter, mouthpiece and mask. Refer to page 15 for instructions.
1. Insert batteries or use the (optional) AC adapter, see page 8 and 9.
2. Remove the medication container from the main unit. To do so, push on the release buttons on both sides. This will disengage the latch mechanism.
3.Remove the mesh cap by placing your thumb under the rim, gently pushing up, tilt the
cap back until perpendicular and lift straight up.
Hold the medication bottle as illustrated.
Do not touch the mesh!
Medication container release Buttons
Lift up the Mesh Cap by placing your thumb under the rim.
How to assemble the unit and fill the medication
4. Fill the medication container as illustrated. The maximum capacity is 7 ml.
5. Install the mesh cap
Do not touch the mesh!
The mesh cap seals the medication bottle. Confirm if the cap is securely installed.
6. Install the medication container on the main unit
Clicks.
10 |
11 |
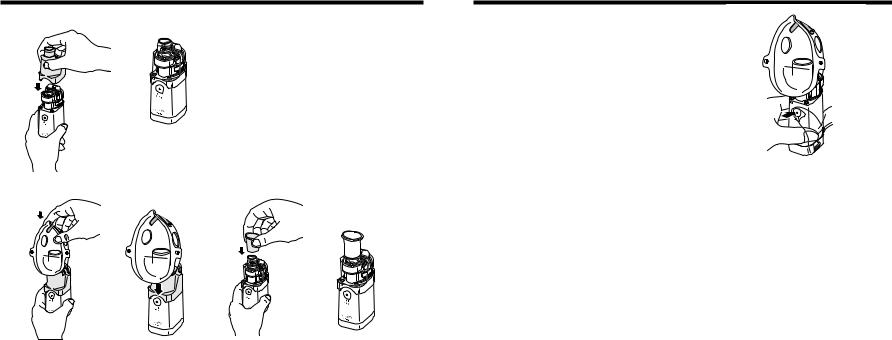
How to assemble the unit and fill the medication
7. Install the mask adapter on the main unit
8. Install the mask or mouthpiece on the mask adapter
The device is now ready for use.
Refer to the next section on how to select the nebulisation mode and how to inhale.
12
How to select the nebulisation mode
Continuous nebulisation mode
If you push the ON/OFF (O/ I) button and release within approximately 1 second, the unit nebulises in continuous mode.
If you push the O/ I button again, the unit stops nebulisation.
The green power indicator lights up during nebulisation.
Manual nebulisation mode
If you hold the ON/OFF (O/ I) button
for approx. 2 seconds or more, the unit nebulises in the manual nebulisation mode.
The unit only nebulises while you keep on pressing the O/ I button and stops nebulisation when you remove your finger from the button.
In this mode, nebulisation may be synchronised with your Inhalation/exhalation cycle and medication waste is minimized.
The green power indicator lights up during nebulisation.
13
How to inhale with the OMRON MicroAIR U22
!Caution: Only use type and amount of medications as prescribed |
|
|
and instructed by your doctor. |
Medication |
|
1. Slightly tilt the unit as illustrated in the figure. |
||
|
||
In this position, the vibrator is immursed in the |
|
|
medication and nebulisation will start after power on. |
|
|
After the vibrator has been immursed in the medication, |
|
|
the unit can be used under any angle. |
|
|
!Caution: In some positions (e.g. upright), nebulisation may |
|
|
stop after a short while. In that case, briefly tilt the unit again |
Vibrator |
|
in order to re-immerse the vibrator in the medication. |
||
|
2. Place the mouthpiece in your mouth or place the mask over mouth and nose.
Always be calm and relaxed when you inhale. Breathe in slowly and deeply so that the medication can reach deep in to the bronchial tubes. Hold your breath briefly, then breathe out slowly while removing the mouthpiece from your mouth. Do not breathe too quickly. Pause when you feel like having a rest.
You may synchronise the nebulisation with your inhalation/exhalation cycles by using the unit in ‘manual nebulisation mode’. Refer to page 13.
Note:
If high-viscosity medication is used, nebulisation may be reduced. Air Port
If excessive medication collects on the mesh, nebulisation may |
|
|
stop. In that case, turn off the power and remove the mask adapter. |
|
|
Absorb the medication by means of a lint-free cloth. |
Absorb the |
|
!Caution: Do not poke the mesh with a cotton swap or a pin; |
||
medication. |
||
the mesh may be permanently damaged. |
|
After inhalation always switch off the nebuliser by pressing the O/ I button. When an AC adapter was used, disconnect the AC from the electrical outlet. 14
How to clean the unit after each inhalation
Note: if the device is not cleaned and disinfected correctly and frequently, micro-organisms may remain in the unit, causing risk of infection.
The following items should be cleaned after each use: Medication container, mesh cap, mask adapter, mouthpiece and mask.
1. Remove the mask adapter from the main unit.
2. Remove the medication container from the main unit:
3.Remove the mesh cap from the medication container, discard the medication and open the medication container cap. It is recommended to nebulize clean water to remove medication left in the mesh holes after discarding the medication.
4. Remove the mesh cover from the mesh cap.
!Caution: Do not touch the mesh.
15

How to clean the unit after each inhalation
5. Wash the parts (not the main unit!) in a warm soapy solution. Rinse the parts in warm tap water to remove the soap residue.
Some types of medications can easily remain on the mesh, therefore pay close attention during washing.
Do not touch the mesh with a cotton swab, or with a pin.
6. Shake off excessive water from the parts and let them air dry on a clean, lint free (paper) towel.
7.Clean the main unit and it’s electrodes by wiping it off with a (moistened) gauze. Use a dry gauze to wipe the main unit dry.
Do not use volatile agents, such as benzene or thinner.
8.Assemble the unit, refer to page 10.
9.Store the unit in a dry, clean place.
16
How to disinfect the unit each day
Note: if the device is not cleaned and disinfected correctly and as frequently as indicated, microorganisms may remain in the unit, causing risk of infection.
The medication container, mesh cap, mouthpiece, mask and mask adapter should be disinfected
•before using the unit for the first time,
•after the unit has not been used for a long period of time, or
•daily during normal use.
Before disinfection, always first clean the parts as described in the section “How to clean the unit after each use” on the previous page.
Disinfection of the individual parts can be done, using one of the following methods:
1.Disinfection by boiling.
Note: Main unit, medication container and flexible mask can NOT be boiled. For these parts, use other methods, as described below.
Mesh-cap, mouthpiece and mask-adapter can be disinfected by boiling in distilled water. After 10 to 30 minutes of boiling, shake off excessive water from the parts and let them air dry on a clean, lint free (paper) towel.
2.Disinfection by using alcohol.
All parts can be disinfected by using alcohol.
Note: Alcohol is highly flammable; do not use alcohol in close vicinity of open fire; do not smoke. Soak the parts (NOT the main unit) in 70% ethyl alcohol for approx. 1 minute. Shake off exces sive alcohol from the parts and let them air dry on a clean, lint free (paper) towel.
Alternatively, disinfect all parts by wiping them off with a lint-free cloth, soaked in alcohol.
3.Disinfection by commercially available disinfectant. Note: Do NOT soak the main unit in any disinfectant.
Do not use disinfectant containing Sodium (Natrium) Hypochlorite; this may affect the metal parts. For disinfection of the parts, refer to the instructions as supplied by the manufacturer of the disinfectant. After disinfection, thoroughly rinse the parts with warm tap water. Shake off excessive water from the parts and let them air dry on a clean, lint free (paper) towel.
17

How to replace the mesh cap
The mesh cap is a consumeable part.
Omron recommends to exchange the mesh cap after approximately 1 year.
In case the unit nebulises poorly even after boiling in water (refer to “Disinfection by boiling”), replace the mesh cap.
Remove the mesh cap and install a new one as described on page 10 (section “How to assemble the unit and fill the medication container”).
Troubleshooting
|
Trouble |
|
Possible cause |
|
Corrective action |
|
|
|
|
Batteries are low (the orange |
|
Replace the batteries with new |
|
|
|
|||||
|
The nebulisation rate |
|
battery low indicator flashes). |
|
ones. Refer to page 8. |
|
|
|
|
|
|
|
|
|
|
The mesh is stained or clogged. |
|
1. Clean the mesh by boiling. Refer |
||
|
is extremely low |
|
|
|||
|
|
|
|
to page 15. |
||
|
|
|
|
|
||
|
|
|
|
|
2. Replace the mesh cap with a new |
|
|
|
|
|
|
one. Refer to page 10. |
|
|
|
|
|
|
|
|
|
|
|
The batteries are low. |
|
Replace the batteries with new |
|
|
|
|
|
|
ones. Refer to page 8. |
|
|
|
|
|
|
|
|
|
The green power indi- |
|
The capacity of rechargeable |
|
Charge the batteries with a com- |
|
|
|
batteries is low. |
|
mercially available recharger. |
||
|
cator does not turn on |
|
|
|||
|
|
|
|
|
|
|
|
and the unit does not |
|
The batteries are inserted in the |
|
Re-insert the batteries in the correct |
|
|
nebulise. |
|
wrong direction. |
|
direction. Refer to page 8. |
|
|
|
|
|
|
|
|
|
|
|
The AC adapter is not correctly |
|
Remove the AC adapter from the |
|
|
|
|
connected to the main unit. |
|
main unit and connect it correctly. |
|
|
|
|
|
|
|
|
|
|
|
The medication container is not |
|
Remove the medication container |
|
|
|
|
installed correctly to the main unit. |
|
from the main unit and install cor- |
|
|
|
|
|
|
rectly. Refer to page 11. |
|
|
|
|
|
|
|
|
|
|
|
The vibrator is not immursed in the |
|
Tilt the main unit in order to |
|
|
The green power |
|
medication. |
|
immerse the vibrator in the medica- |
|
|
indicator turns on but |
|
|
|
tion. |
|
|
the unit does not |
|
|
|
|
|
|
|
The medication container is not |
|
Fill with medication. Refer to page 11 |
||
|
nebulise. |
|
|
|||
|
|
filled with medication. |
|
|
|
|
|
|
|
|
|
|
|
|
|
|
The mesh is broken. |
|
Replace with a new one. Refer to |
|
|
|
|
|
|
page 10. |
|
|
|
|
|
|
|
|
18 |
19 |
 Loading...