


SpotArm™ Type Blood Pressure Monitor
Model i-Q142
•Instruction Manual
•Mode d’emploi
•Gebrauchsanweisung
•Manuale di istruzioni
•Manual de instrucciones
•Gebruiksaanwijzing
EN |
FR |
DE |
IT |
ES |
NL |
RU |
AR |
IM-HEM-1040-E-06-05/2012 1665009-3F

Contents
Before using the unit |
|
||
Introduction ................................................................................. |
3 |
||
Important Safety Information..................................................... |
4 |
||
1. |
Overview ................................................................................ |
7 |
|
2. |
Preparation .......................................................................... |
10 |
|
|
2.1 |
Connecting the AC Adapter........................................................ |
10 |
|
2.2 |
Setting the Date and Time.......................................................... |
11 |
Operating instructions |
|
||
3. |
Using the Unit...................................................................... |
16 |
|
|
3.1 |
How to Sit Correctly When Taking a Measurement.................... |
16 |
|
3.2 |
Place Your Arm Through the Arm Cuff....................................... |
18 |
|
3.3 |
Taking a Reading........................................................................ |
20 |
|
3.4 |
Instructions for Special Conditions ............................................. |
28 |
|
3.5 |
Using the Memory Function........................................................ |
29 |
Care and maintenance |
|
||
4. |
Handling Errors and Problems .......................................... |
36 |
|
|
4.1 |
Error Messages .......................................................................... |
36 |
|
4.2 |
Troubleshooting.......................................................................... |
37 |
5. |
Maintenance and Storage .................................................. |
39 |
|
6. |
Optional Parts ..................................................................... |
41 |
|
7. |
Technical Data..................................................................... |
44 |
|
8. |
Some Useful Information about Blood Pressure ............. |
46 |
|
2

Before using the unit
Introduction
Introduction
Thank you for purchasing the OMRON i-Q142 Intellisense SpotArm™ Type Upper Arm Blood Pressure Monitor.
The OMRON i-Q142 Intellisense is a fully automatic blood pressure monitor, operating on the oscillometric principle. It measures your blood pressure and pulse rate simply and quickly. For comfortable controlled inflation without the need for pressure pre-setting or reinflation the device uses its advanced “Intellisense” technology.
The adjustable cuff angle corrects the body posture which tends to be stooped. The elbow rest stabilizes the position and keeps the arm at the most appropriate angle.
By simply placing the arm through the cuff, it automatically wraps around your arm to the appropriate size and starts to measure your blood pressure and pulse rate.
The monitor stores measurement results for two people and features
morning and evening averages.
EN
Omron's blood pressure management software and printer are optional. The software allows you to view, manage and print data about blood pressure measured by the OMRON i-Q142 Intellisense. Software is in English only.
 Please read this instruction manual thoroughly before using the unit. For specific information about your own blood pressure, CONSULT YOUR DOCTOR.
3

Important Safety Information
Important Safety Information
Consult your doctor during pregnancy, arrhythmia and arteriosclerosis. Please read this section carefully before using the unit.
 Warning:
Indicates a potentially hazardous situation which, if not avoided, could result in death or serious injury.
(General Usage)
•Always consult your doctor. Self-diagnosis of measurement results and self-treatment are dangerous.
•People with severe blood flow problems, or blood disorders, should consult a doctor before using the unit. Cuff inflation can cause internal bleeding.
•Stop using the unit immediately, if medication spills on the cuff lining or it otherwise becomes contaminated. Continued use could pose a risk of infection. Contact your OMRON distributor or customer services in case you want to have the cuff lining replaced.
•Do not take measurements if there is a wound on your arm, such as cuts or scratches. This could cause the wound to deteriorate, or cause an infection through contamination of the cuff lining.
(AC Adapter Usage)
•Never plug in or unplug the power cord from the electric outlet with wet hands.
 Caution:
Indicates a potentially hazardous situation which, if not avoided, may result in minor or moderate injury to the user or patient or damage to the equipment or other property.
4

Important Safety Information
(General Usage)
•Do not leave the unit unattended with infants or persons who cannot express their consent.
•Do not use the unit for any purpose other than measuring blood pressure.
•Do not disassemble the unit.
•Do not inflate the arm cuff over 299 mmHg.
•If the cuff does not stop inflating, or some other abnormality occurs, press the Emergency Deflation Switch immediately to prevent from internal bleeding or damage to peripheral nerves.
•To inflate the cuff manually, refer to Chapter 3.4. If the cuff is over inflated, it can cause internal bleeding.
•Be sure to remove watches and other jewelry (rings, bracelets) etc that could damage the cuff lining during application.
•Do not take readings if the cuff lining is damaged. This could cause injury.
•Do not use a mobile phone near the unit. This could cause a malfunction.
•Do not allow objects to come into contact with the PC/printer port of the unit when taking measurements.
(AC Adapter Usage) |
EN |
•Use only the original AC adapter designed for this unit. Use of unsupported adapters may damage and/or may be hazardous to the unit.
•Plug the AC adapter into the appropriate voltage outlet.
•Do not use the AC adapter if the unit or the power cord is damaged. Turn off the power and unplug the power cord immediately.
General Precautions
•Do not apply strong shocks and vibrations to or drop the unit.
•Do not take measurements after bathing, drinking alcohol, smoking, exercising or eating.
5
Important Safety Information
•Read and follow the “Important information regarding Electro Magnetic Compatibility (EMC)” in the Technical Data Section.
•Read and follow the “Correct Disposal of This Product” in the Technical Data Section when disposing of the device and any used accessories or optional parts.
•When the unit is not in use, or if it is moved etc., do not place objects (writing implements, note books, the AC adapter etc.) in the arm cuff. This could cause damage to the cuff lining or the unit and prevent the unit from taking correct readings.
•Do not inflate the arm cuff if your arm is not in place.
•Do not take readings if your arm is placed incorrectly (upside down or from the opposite side of the unit).
•Do not move the unit unless the arm cuff has been secured.
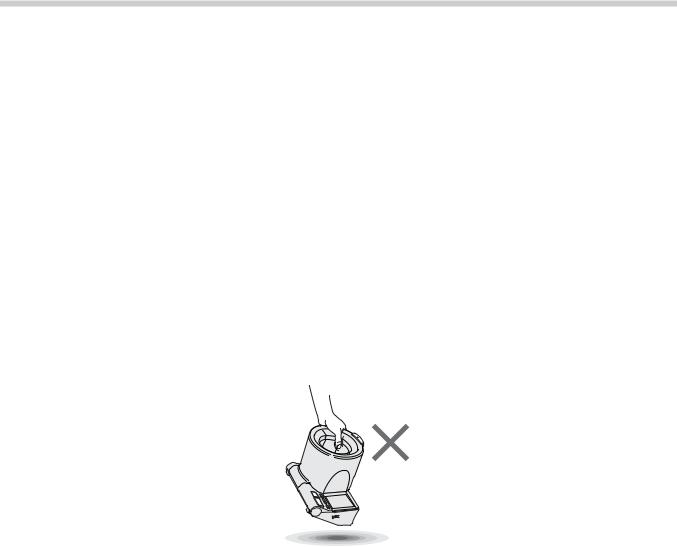
•Do not hold the unit by the Arm cuff.
6
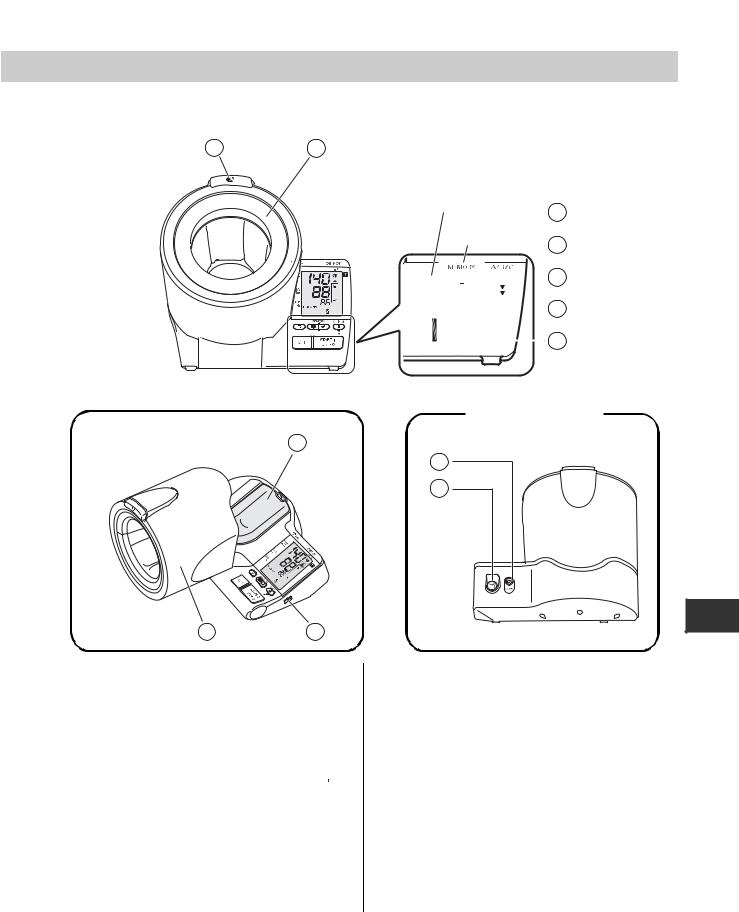
1. Overview
1. Overview
Main Unit
AB
C
D


 E
E

 F
F
G
When the arm cuff is open |
Rear view |
I
K
L
DC6V
JH
EN |
A. Arm cuff release button 
Press this to open as shown above.
B.Cuff lining
C.Memory button 
D.Weekly average (Morning  / Evening
  ) button
E.User ID selection button 
F.START/STOP button
G.O/I button (Power switch)
H.PC/printer port
I.Elbow rest
J.Arm cuff
K.AC adapter jack
L.Emergency deflation switch
Press this to stop measurement in an emergency.
7
1. Overview
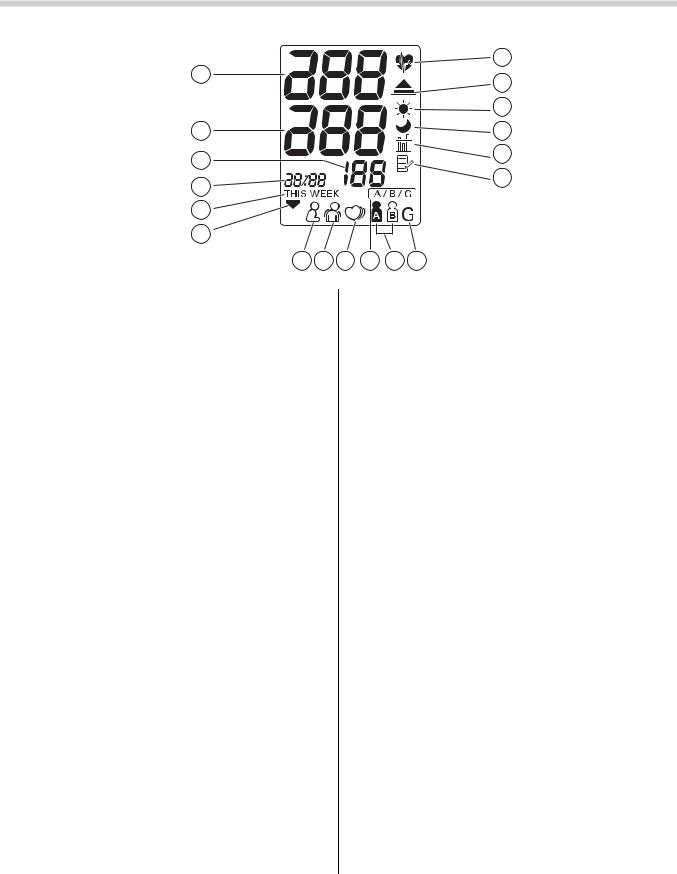
Display
M |
Y |
|
Z |
||
|
||
|
AA |
|
N |
AB |
|
O |
AC |
|
AD |
||
P |
||
|
||
Q |
|
|
R |
|
|
S T U |
V W X |
M.Systolic blood pressure
N.Diastolic blood pressure
O.Pulse display
P.Date/Time display
Q.Week display
R.Deflation symbol
S.Posture symbol
Displayed when sitting incorrectly.
T. Movement symbol
Displayed if you move your body during the measurement.
U.Irregular heartbeat symbol
V.User select symbol
Indicates to select the user I.D. or guest.
W. User ID symbol (A or B)
Indicates user A or user B as selected by the user to take a measurement or when using the memory function.
X.Guest symbol
Y.Heartbeat symbol
1.Flashes during measurement.
2.If flashing after measurement completed, or when viewing results stored in the memory, indicates blood pressure out of recommended range*.
Z.Morning hypertension symbol
Indicates blood pressure out of recommended range*.
AA. Morning average symbol
Displayed when viewing morning averages using the memory function.
AB. Evening average symbol
Displayed when viewing evening averages using the memory function.
AC. Average value symbol
Displayed when viewing value for the last three measurements.
AD. Memory symbol
Displayed when viewing values stored in the memory.
* Note: If your systolic or diastolic pressure is outside the standard range (above 135/85 mmHg), the Heartbeat symbol (  ) as well as the Morning hypertension symbol (
  ) will blink. Please refer to Chapter 3.3 “Taking a Reading - Symbol Information”.
8
1. Overview
Package Contents
AE
AE. AC adapter |
• Instruction manual |
|
• Quick guide |
|
• Guarantee card |
|
• Blood pressure pass |
|
• Instruction Manual for Optional |
|
Printer |
|
* Note: The printer is optional. |
|
This unit does not include the |
|
printer. |
EN |
9

2. Preparation
2. Preparation
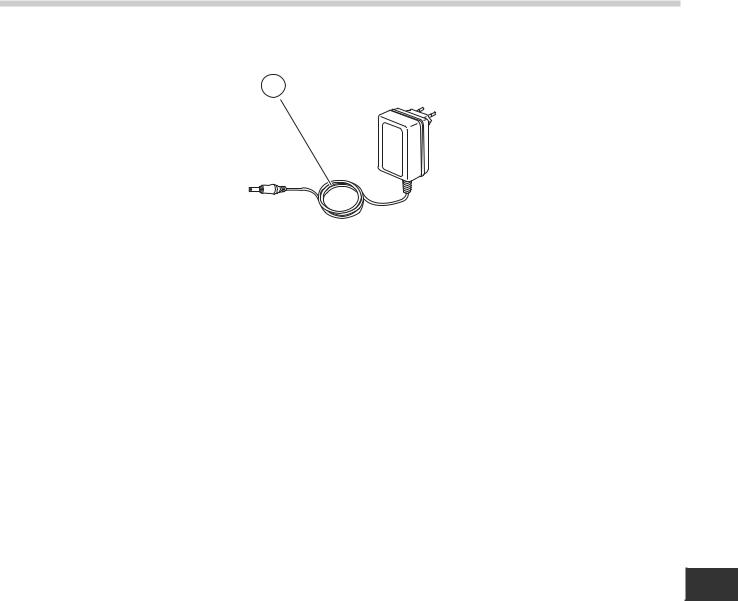
2.1Connecting the AC Adapter
 Caution:
Use only the AC adapter designed for this unit.
1.Insert the plug of the AC adapter into the AC adapter jack on the back of the unit.
2.Insert the power plug of the AC adapter into a power outlet.
Power plug
2


 1
1
DC6
AC adapter
AC adapter jack |
AC adapter plug |
|
10
2. Preparation
2.2Setting the Date and Time
Your blood pressure monitor automatically stores up to 84 individual measurement values with the date and time for each user.
To make use of the memory and average values functions:
•Set the unit to the correct date and time before taking a measurement for the first time.
Set the year, month, day, hours and minutes for the current date and time.
(For details on changing the date and time setting, refer to “Adjusting the Date and Time Setting”.)
The Weekly average buttons are used to set the date and time.
Use the buttons as described below to adjust the date and time setting.
Evening average button  : Press this button to increase the value for the date/time setting.
Morning average button  : Press this button to decrease the value for the date/time setting.
1. Press the O/I button to turn |
|
|
the power on. All items on the |
EN |
|
display will appear briefly, |
||
|
||
then the year digit will flash. |
|
Note: The illustration to the right shows the display when the unit is used for the first time.
11
2.Preparation
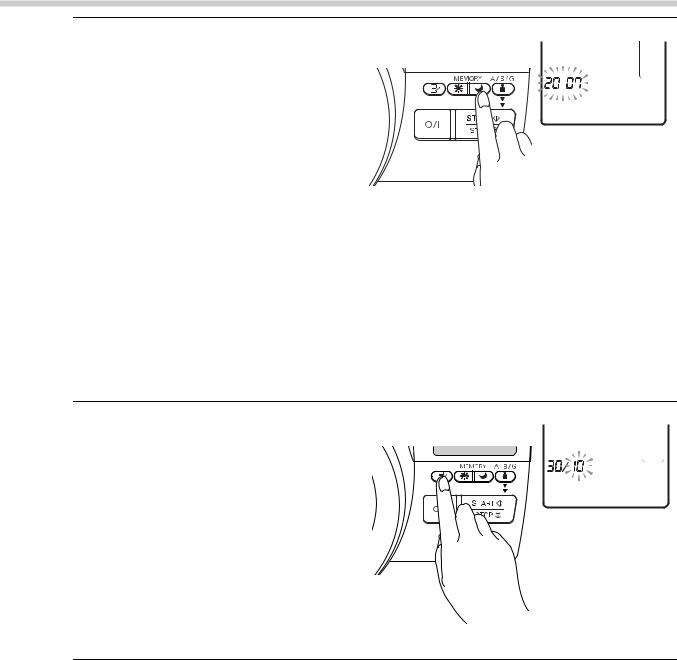
2.Press the Weekly average buttons to adjust the year
setting.
• Press the Evening average button  once to increase the setting by one year.
•Press the Morning average button  once to decrease the setting by one year.
•Hold the buttons down to increase (decrease) the digits rapidly.
Note: The range for the year setting is 2007 to 2030. If the year reaches 2030, it will return to 2007.
3.Press the Memory button
 to confirm the setting
when the desired number appears on the display.
The year is set and the month digits flash on the display.
4.Press the Weekly average buttons to adjust the month setting.
•Press the Evening average button  once to increase the setting by one month.
Press the Morning average button  once to decrease the setting by one month.
•Hold the buttons down to increase (decrease) the digits rapidly.
12

2. Preparation
5.Press the Memory button
 to confirm the setting
when the desired number appears on the display.
The month is set and the day digits flash on the display.
Example: when October has been set as the month.
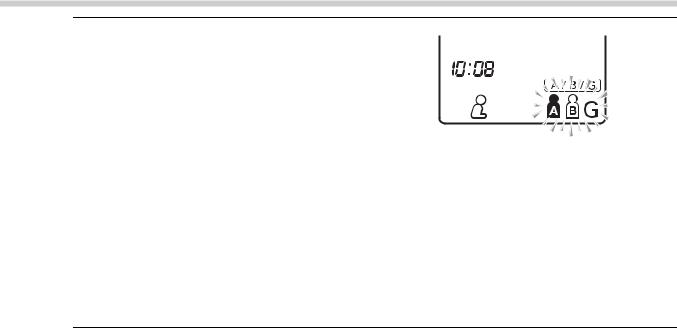
6.Press the Weekly average buttons to adjust the day setting.
•Press the Evening average button  once to increase the setting by one day.
Press the Morning average button  once to decrease the setting by one day.
•Hold the buttons down to increase (decrease) the digits rapidly.
7.Press the Memory button
 to confirm the setting when the desired number appears on the display.
The day is set and the hour
digits flash on the display.
EN
13
2.Preparation
8.Set the hour and minutes in
the same way as the date settings.
Press the Weekly average buttons to adjust the digits for the hour and minutes, then press the Memory button  to confirm the setting.
When the date and time settings have been set, the display changes to that shown to the above.
9.Press the O/I button to turn the power off.
Note: You can also start taking readings immediately, rather than turn the unit off.
14
2. Preparation
Adjusting the Date and Time Setting
Note: If you need to change the date and time for some reason, adjust the date and time between 10:00 and 18:59. This will avoid problems with morning and evening weekly averages stored in the memory.
1.Press the O/I button to turn the power off.
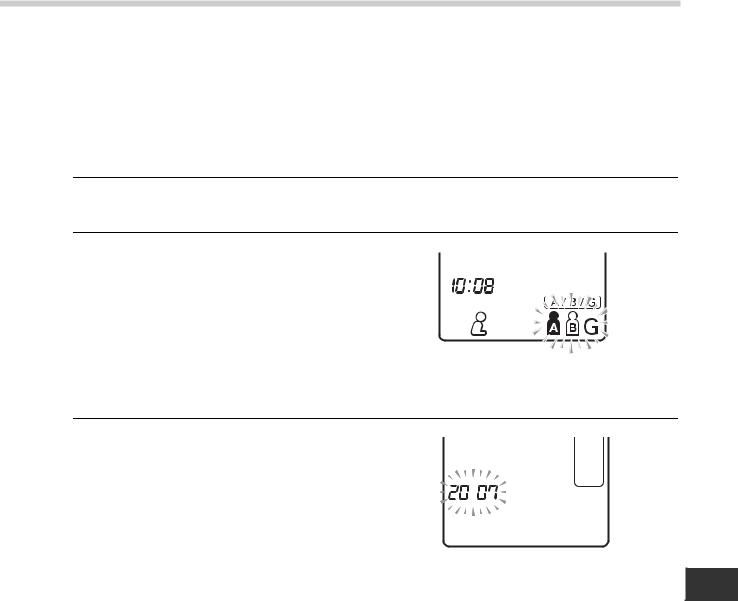
2.Turn the unit on then press
and hold the Memory button
 for three seconds or longer when the standby display (shown right) appears.
Standby display
(When the arm cuff is closed.)
3.The year setting flashes on the display.
Refer to Chapter 2.2 to adjust the settings for the date and time.
EN |
15
 Loading...