


DIGITAL VOICE
RECORDER
WS-331M
WS-321M
WS-311M
INSTRUCTIONS
 INSTRUCTIONS
Thank you for purchasing an Olympus Digital Voice Recorder.
Please read these instructions for information about using the product correctly and safely.
Keep the instructions handy for future reference.
To ensure successful recordings, we
recommend that you test the record function EN and volume before use.
Introduction
●The contents of this document may be changed in the future without advanced notice. Contact our Customer Support Center for the latest information relating to product names and model numbers.
●The utmost care has been taken to ensure the integrity of the contents of this document. In the unlikely event that a questionable item, error, or omission is found, please contact our Customer Support Center.
●Any liability for passive damages or damage of any kind occurred due to data loss incurred by a defect of the product, repair performed by the third party other than
Olympus or an Olympus authorized service station, or any other reasons is excluded from the Olympus’s liability.
Trademarks
IBM and PC/AT are the trademarks or registered trademarks of International Business Machines Corporation.
Microsoft, Windows and Windows Media are registered trademarks of Microsoft Corporation. WOW XT, SRS and symbol are trademarks of SRS Labs, Inc.
WOW XT technology is incorporated under license from SRS Labs, Inc.
MPEG Layer-3 audio coding technology licensed from Fraunhofer IIS and Thomson.
The product was developed based on noise-canceling technology under license from NEC Corporation.
Other product and brand names mentioned herein may be the trademarks or registered trademarks of their respective owners.
2
INDEX
Table of Contents |
P.4 |
|
Safe and Proper Usage |
P.6 |
|
Getting Started |
P.8 |
|
When Using the Recorder as a Voice Recorder |
P.19 |
|
Using the Recorder on Your PC |
P.44 |
|
Using the Recorder as a Music Player |
P.48 |
|
Feature Common to the Voice Recorder |
P.72 |
|
and Music Player |
||
|
||
Other Practical Use Methods |
P.94 |
|
Other Information |
P.95 |
1
2
3
4
5
6
7
3

Table of Contents
Introduction .............................................. |
2 |
INDEX ...................................................... |
3 |
Table of Contents .................................... |
4 |
Safe and Proper Usage ........................... |
6 |
General Precautions ................................ |
6 |
1 Getting Started |
|
Main Features .......................................... |
8 |
Identification of Parts ............................. |
10 |
Inserting Battery .................................... |
12 |
Power Supply ........................................ |
13 |
VOICE Mode and MUSIC Mode ........... |
14 |
Setting Time/Date (Time & Date) .......... |
17 |
2When Using the Recorder as a Voice Recorder
Recording .............................................. |
19 |
Using the Variable Control |
|
Voice Actuator (VCVA) .................... |
22 |
Recording Modes (Rec Mode) .............. |
24 |
Microphone Sensitivity (Mic Sense) ...... |
25 |
Set the Low Cut Filter (Low Cut Filter) .... |
26 |
Recording from External Microphone |
|
or Other Devices ............................. |
28 |
Playing ................................................... |
30 |
Noise Cancel Function (Noise Cancel) ... |
34 |
Set the Voice Filter (Voice Filter) .......... |
36 |
Continuous Playback (All Play) ............. |
38 |
Locking Files (Lock) .............................. |
40 |
Menu List (VOICE Mode) ...................... |
42 |
3 Using the Recorder onYour PC |
|
Saving Files in Your PC ......................... |
44 |
Operating Environment ......................... |
45 |
Connecting to Your PC .......................... |
46 |
4 Using the Recorder as a |
|
Music Player |
|
Using the Recorder as a Music Player .... |
48 |
Using Windows Media Player ............... |
48 |
Importing Content for Listening on the |
|
Recorder .......................................... |
49 |
Window Names ..................................... |
50 |
Copying Music from CD ........................ |
51 |
4

Table of Contents
Transferring Music File to the Recorder ...... |
52 |
Music Playback ...................................... |
55 |
Select Play Mode (Play Mode) .............. |
59 |
Random Playback (Random) ................ |
61 |
Increasing the WOW Effect (WOW) ...... |
63 |
Selecting Equalizer (EQ) ....................... |
66 |
Moving the Tracks (Move) ..................... |
68 |
Menu List (MUSIC Mode) ...................... |
70 |
5Feature Common to the Voice Recorder and Music Player
Erasing ................................................... |
72 |
Hold ........................................................ |
75 |
Index Marks and Temp Marks ............... |
76 |
How to Begin Segment Repeat Playback ... |
78 |
Menu Setting Method ............................ |
80 |
Auto Backspace Review (Back Space) ... |
82 |
Changing the Playback Speed |
|
(Play Speed) ................................... |
84 |
System Sounds (Beep) ......................... |
87 |
Backlight (Backlight) .............................. |
88 |
LCD Contrast Adjustment (Contrast) .... |
89 |
LED (LED) ............................................. |
90 |
Formatting the Recorder (Format) |
........ 91 |
Viewing System Information |
|
(System Info.) .................................. |
93 |
6 Other Practical Use Methods |
|
Using as External Memory |
|
of the Computer ............................. |
94 |
7 Other Information |
|
Alarm Message List ............................... |
95 |
Troubleshooting ..................................... |
96 |
Accessories (Optional) .......................... |
97 |
Specifications ........................................ |
98 |
Technical Assistance and Support ...... |
100 |
5

Safe and Proper
Usage
Before using your new recorder, read this manual carefully to ensure that you know how to operate it safely and correctly. Keep this manual in an easily accessible location for future reference.
•The warning symbols indicate important safety related information. To protect yourself and others from personal injury or damage to property, it is essential that you always read the warnings and information provided.
General Precautions
●Do not leave the recorder in hot, humid locations such as inside a closed automobile under direct sunlight or on the beach in the summer.
●Do not store the recorder in places exposed to excessive moisture or dust.
●Do not use organic solvents such as alcohol and lacquer thinner to clean the unit.
●Do not place the recorder on top of or near electric appliances such as TVs or refrigerators.
●Avoid recording or playing back near cellular phones or other wireless equipment, as they may cause interference and noise. If you experience noise, move to another place, or move the recorder further away from such equipment.
●Avoid sand or dirt. These can cause irreparable damage.
●Avoid strong vibrations or shocks.
●Do not disassemble, repair or modify the unit yourself.
6

General Precautions
●Do not operate the unit while operating a vehicle (such as a bicycle, motorcycle, or go-cart).
●Keep the unit out of the reach of children.
<Warning regarding data loss>
Recorded content in memory may be destroyed or erased by operating mistakes, unit malfunction, or during repair work.
It is recommended to back up and save important content to other media such as a computer hard disk.
Any liability for passive damages or damage of any kind occurred due to data loss incurred by a defect of the product, repair performed by the third party other than Olympus or an Olympus authorized service station, or any other reasons is excluded from the Olympus’s liability.
Batteries
 Warning
•Batteries should never be exposed to flame, heated, short-circuited or disassembled.
•Do not attempt to recharge alkaline, lithium or any other non-rechargeable batteries.
•Never use any battery with a torn or cracked outer cover.
•Keep batteries out of the reach of children.
•If you notice anything unusual when using this product such as abnormal noise, heat, smoke, or a burning odor:
1remove the batteries immediately while being careful not to burn yourself, and;
2call your dealer or local Olympus representative for service.
7
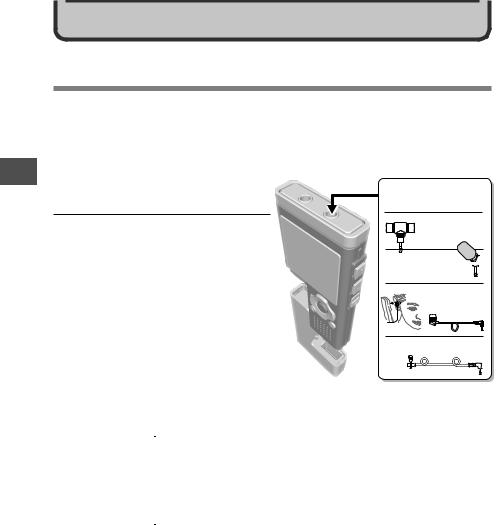
1
Features Main
Getting Started
Main Features
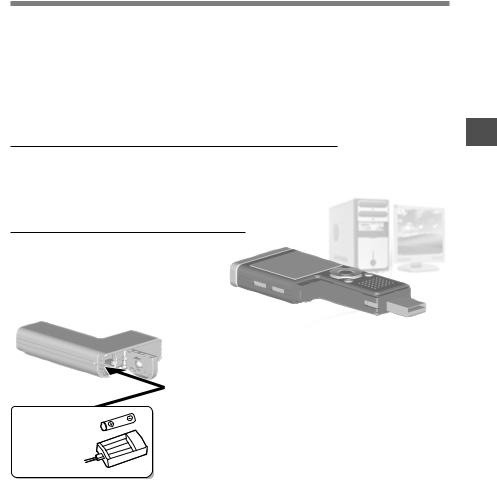
This product can be used to record meetings or notes, for use in conferences and other business settings, and for language studies. It can also be used as a digital music player. This recorder features a two-part design. The battery compartment separates from the main unit to expose a USB terminal, for direct connection to your PC.
Main Features of the Digital
Voice Recorder
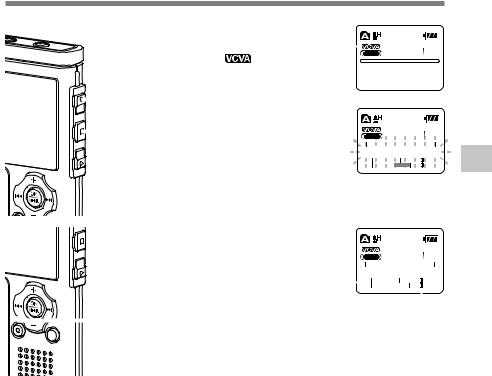
The recorder stores highly compressed WMA (Windows Media Audio) format voice messages in integrated flash memory. ( P. 19)
It can also play back WMA and MP3 (MPEG-1/MPEG-2 Audio Layer-3) format files. ( P. 30)
It has a built-in Variable Control Voice Actuator (VCVA) function. ( P. 22)
External Microphone
(optional) P. 97
Stereo microphone
Noise-Cancellation  monaural microphone
Telephone pickup
The Low Cut Filter minimizes air conditioner |
Tie clip microphone |
noise and other similar noises while recording. |
|
( P. 26) |
|
A Noise Cancel function ( P. 34) and a Voice Filter
function ( P. 36) cut noise and enable clear audio playback.
You can choose one of three stereo or three monaural recording modes. ( P. 24)
Recording time:
Recording modes |
WS-331M (2GB) |
WS-321M (1GB) |
WS-311M (512MB) |
|
|
|
|
ST XQ |
35 hours 30 minutes |
17 hours 40 minutes |
8 hours 45 minutes |
ST HQ |
71 hours 00 minutes |
35 hours 25 minutes |
17 hours 40 minutes |
ST SP |
142 hours 05 minutes |
70 hours 55 minutes |
35 hours 25 minutes |
HQ |
142 hours 05 minutes |
70 hours 55 minutes |
35 hours 25 minutes |
SP |
279 hours 35 minutes |
139 hours 40 minutes |
69 hours 40 minutes |
LP |
555 hours 45 minutes |
277 hours 35 minutes |
138 hours 30 minutes |
Available recording time may be shorter if many short recordings are made. (The displayed available recording time 8 and recorded time are approximate indications.)
Main Features
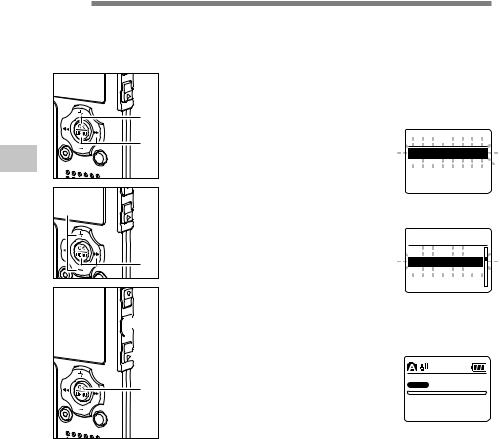
It has a backlight full-dot display (LCD display screen). ( P. 11)
It features various repeat functions. ( P. 59, P. 78)
Index mark and temp mark features allow you to quickly find desired locations. ( P. 76)
The playback speed can be controlled as preferred. ( P. 84)
Main Features of the Digital Music Player
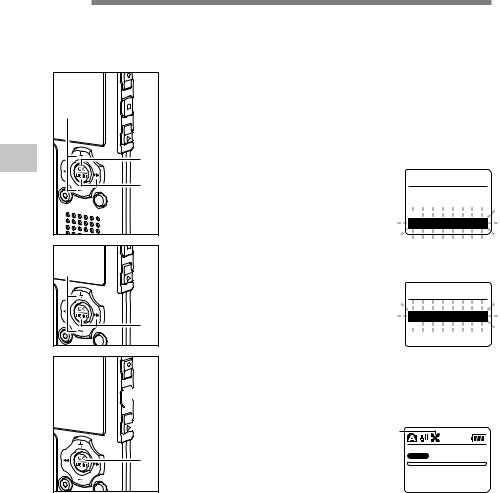
You can play back music files in WMA and MP3 format. ( P. 55)
•The WS-331M can hold about 500 songs; the WS-321M about 250, and the WS-311M about 125. (at 128 kbps, 4 minutes per song)
It has built-in WOW XT. ( P. 63)
You can change the playback equalizer settings. ( P. 66)
Ni-MH rechargeable  battery and charger
set (optional)
P. 97
Connecting this recorder directly to the USB port links up with your PC. The data can be transferred or saved without USB cable or driver software. ( P. 46)
•This recorder is compatible with USB 2.0, enabling fast data transfer to a computer.
This USB storage class support recorder can be utilized as external memory to read and save the data. ( P. 94)
•By connecting the computer with the USB, pictures, text data, etc. can be saved, and utilized to carry data.
1
Features Main
9
1
of Identification
artsP
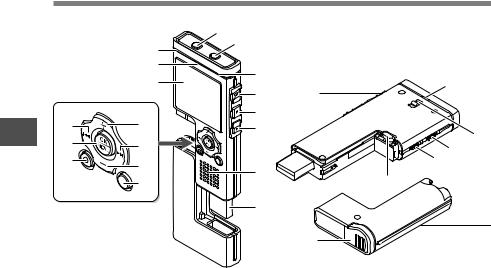
Identification of Parts
1
|
* |
2 |
|
|
|
|
|
|
& |
|
|
|
^ |
3 |
( |
|
Main unit |
||
|
|
4 |
|
|
|
5 |
|
% |
9 |
6 |
) |
$ |
0 |
|
|
|
- |
||
|
|
|
|
# |
! |
|
= |
|
7 |
|
|
|
|
q |
|
|
@ |
|
|
|
|
8 |
|
w |
Battery |
|
compartment |
||
|
1 EAR (Earphone) jack |
# ERASE button |
2 MIC (Microphone) jack |
$ OK/MENU button |
3 Built-in stereo microphone (R) |
% 0button |
4 REC (Record) button |
^ Display (LCD panel) |
5 STOP button |
& Record/Play indicator light |
6 PLAY button |
* Built-in stereo microphone (L) |
7 Built-in speaker |
( USB access indicator light |
8 USB terminal |
) Strap hole |
9 VOL (+) button |
- HOLD switch |
0 9button |
= Mode (VOICE/MUSIC) switch |
! VOL (–) button |
q RELEASE (Release) button |
10 @ FOLDER/INDEX button |
w Battery cover |
Identification of Parts
Display (LCD Panel)
|
|
VOICE mode display |
|
|
|
|
|
|
MUSIC mode display |
||||||||||||||||||||||||||||||||||||||||||||||||
|
|
567 8 |
|
|
|
|
|
|
|
|
|
|
|
|
|
|
|
|
|
|
1 |
|
|
|
|
|
|
|
|
|
|
|
|
|
|
0 ! |
|
|
|||||||||||||||||||
1 |
|
|
|
|
|
|
|
|
|
|
|
|
|
|
|
S |
9 |
|
|
|
Music |
01 /36 |
|
|
|||||||||||||||||||||||||||||||||
|
|
|
|
|
|
|
|
|
|
|
|
|
|
|
|
|
|
|
|
|
|
|
|
|
|
|
|
|
|
0 |
|
|
|
|
|
|
|
|
|
|
|
|
|
|
|
|
|
|
|
|
|
|
|
|
|
|
|
|
|
|
|
|
|
|
|
|
|
|
|
|
|
|
|
|
|
|
|
|
|
|
|
|
|
|
|
|
|
|
|
|
|
|
|
|
|
|
|
|
|
|
|
|
|
|
|
|
|
|
|
|
|
|
|
||
|
|
|
|
|
|
|
|
|
|
|
|
|
|
|
|
|
|
|
|
|
|
|
|
|
|
|
|
|
|
|
|
|
|
|
|
|
|
|
|
|
|
|
|
|
|
|
|
|
|
|
|
|
|
|
|
||
2 |
|
|
|
|
|
|
|
|
|
|
|
|
|
|
|
|
|
|
|
|
|
|
|
|
|
|
|
|
|
|
|
|
|
|
|
|
|
|
|
|
|
|
|
|
|
|
|
|
|
|
|
|
|
|
|
|
|
|
|
|
|
|
|
|
|
|
|
|
|
|
|
|
|
|
|
|
|
|
|
|
|
|
|
|
|
|
|
|
|
|
|
|
|
|
|
|
|
|
|
|
|
|
|
|
|
|
|
|
|
|
|
|
|||
|
|
|
|
|
|
120 120 |
|
# |
|
|
SONG A/Artist |
||||||||||||||||||||||||||||||||||||||||||||||
|
|
|
|
|
|
|
|
|
|||||||||||||||||||||||||||||||||||||||||||||||||
3 |
|
HQ |
|
|
! |
|
|
||||||||||||||||||||||||||||||||||||||||||||||||||
|
E |
|
|
|
|
|
|
|
|
|
|
|
|
|
|
|
|
|
|
|
|
|
|
|
|
|
F |
|
|
@ |
|
|
|
|
|
|
|
|
|
|
|
|
|
|
|
|
|
|
|
|
$ |
||||||
4 |
|
|
|
|
|
|
|
|
|
|
|
|
|
|
|
|
|
|
|
|
|
|
|
|
|
|
|
|
|
|
|
|
|
|
|
|
|
|
|
|
|
|
|
|
|
|
|
|
|
|
|
|
|
|
|
|
4 |
|
|
|
|
|
|
|
|
|
|
|
|
|
|
|
|
|
|
|
|
|
|
|
|
|
|
|
|
|
|
|
|
|
|
|
|
|
|
|
|
|
|
|
|
|
|
|
|
|
|
|
|
|
|
|
|
||
|
|
|
|
|
|
|
|
|
|
|
|
|
|
|
|
|
|
|
|
|
|
|
|
|
|
|
|
|
|
|
|
|
|
|
|
|
|
|
|
|
|
|
|
|
|
|
|
|
|
|
|
|
|
|
|
||
|
|
|
|
|
|
|
|
|
|
|
|
|
|
|
|
|
|
|
|
|
|
|
|
|
|
|
|
|
|
|
|
8 |
|
|
A S |
|
|
|
9 |
||||||||||||||||||
|
|
|
|
|
|
|
|
|
|
|
|
|
|
|
|
|
|
|
|
|
|
|
|
|
|
|
|
|
|
|
|
|
|
|
|
|
|
|
|
|
|
||||||||||||||||
|
|
|
|
|
|
|
|
|
|
|
|
|
|
|
|
|
|
|
|
|
|
|
|
|
|
|
|
|
|
|
|
|
|
|
|
|
|
|
|
|
|
|
|
|
|
|
|
|
|
|
|
|
|
|
|
|
|
1
of Identification
artsP
1 Folder indicator
2 VCVA (Variable Control Voice
Actuator) indicator
3 Record mode indicator
4 Character information display
5 Microphone sensitivity indicator
6 Erase lock indicator
7 Low Cut Filter indicator
8 Playback effect indicator
9 Battery indicator
0 Current file number
!Total number of recorded files in the folder
@Memory remaining indicator (E/ F bar)
# Title and artist name indicator $ Play position bar indicator
11
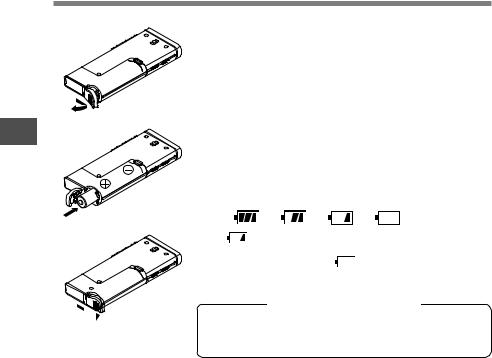
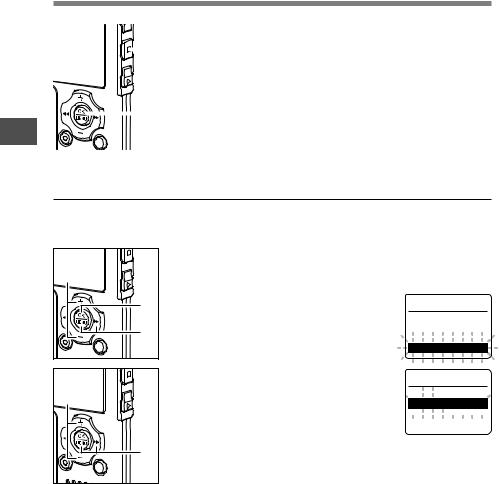
Inserting Battery
1
1 2
Battery Inserting
3
B


A
1Lightly press down on the arrow and slide the battery cover open.
2Insert size-AAA alkaline battery, observing the correct polarity.
3Close the battery cover completely by pressing to the direction A, then sliding to the direction B.
If the “hour” indicator flashes in the display, see “Setting Time/ Date (Time & Date)” ( P. 17).
Replacing the Battery
The battery indicator on the display changes as the battery loses power.
|
|
|
|
When |
appears on the display, replace the battery as soon |
||
as possible. |
|
|
|
When the battery is too weak, |
“Battery Low” appears on the |
||
display and the recorder shuts down. When changing battery, AAA alkaline battery or Olympus Ni-MH battery is recommended.
Ni-MH Rechargeable Battery
Optional Ni-MH rechargeable batteries from Olympus can be used for the recorder. Use them with the BU-400 Olympus NiMH Rechargeable Battery Charger (Europe only) ( P. 97).
..................................................................................................................................................
Notes
•Manganese battery may not be used in this recorder.
•Be sure to stop the recorder before replacing the battery. Unloading the battery while the recorder is in use may corrupt the file. If you are recording into a file and the battery runs out, you will lose your currently recorded file because the file header will not be able to close. It is crucial to change the battery once you see only one hash mark in the battery indicator.
•If it takes longer than 15 minutes to replace the dead battery or if you take the battery in and out repeatedly at short intervals, you may have to reset the time when you have loaded a fresh battery.
•Remove the battery if you are not going to use the recorder for an extended period of time.
•When playing a voice/music file, the recorder may be reset due to the reduction of the voltage output of
the battery depending on the volume level even if  is displayed in the battery indicator. In this case, 12 lower the volume of the recorder.
Power Supply
When the recorder is not being used, turn the power off to reduce battery consumption to a minimum. Even if the power is turned off, existing data, mode settings, and clock settings will be maintained.
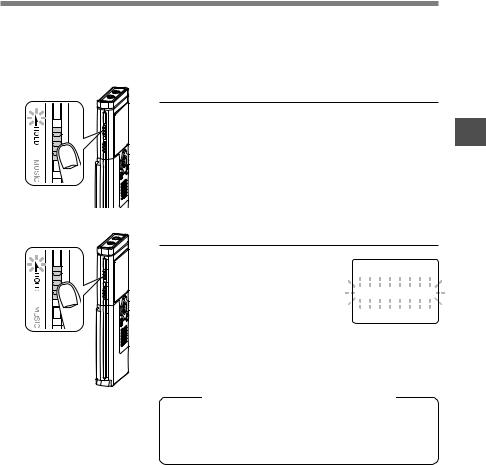
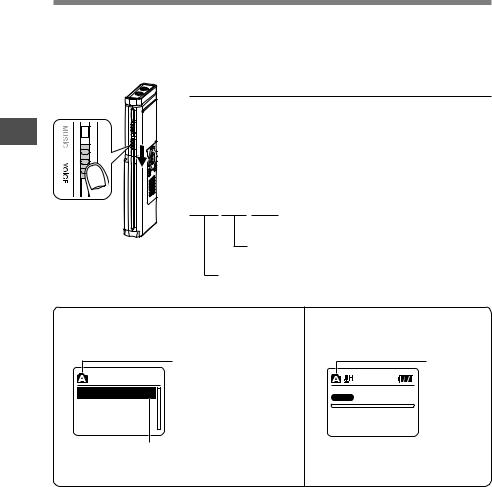
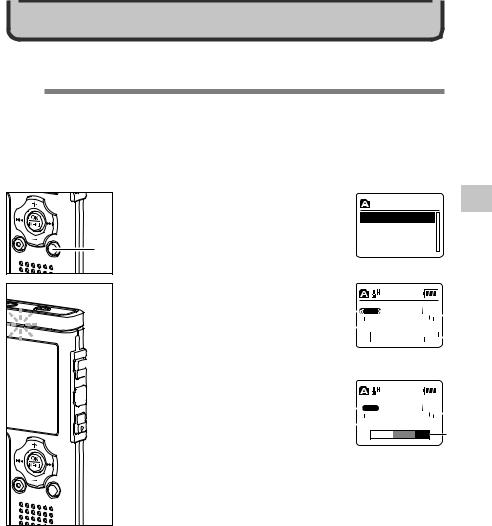
Turning On the Power
Slide the HOLD switch in the direction opposite that indicated by the arrow.
The display will turn on and the power will be turned on. The resume function will bring the recorder back to the stop position in memory before power was turned off.
Turning Off the Power
Slide the HOLD switch in the direction indicated by the
arrow while the recorder is not |
H o l d |
in operation.
The display shuts off and the power will be turned off.
The resume function remembers the stop position before the power is turned off.
Standby Mode and Display Shut Off
If the recorder is stopped/not used for over 5 minutes after it is turned on, it goes into standby (power-save) mode, and the display shuts off. To exit standby mode and turn on the display, press any button.
1
werPo
Supply
13
1
OICEV
and Mode
Mode MUSIC
VOICE Mode and MUSIC Mode
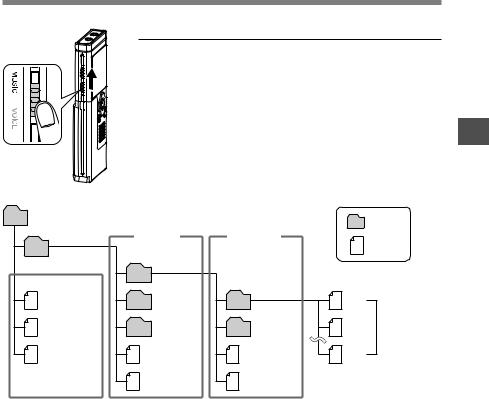
This device can be used as a voice recorder or as a music player. For recording and playing back voice recordings, set the mode switch to VOICE. For listening to music, set the mode switch to MUSIC.
VOICE Mode
Slide the mode switch to the VOICE position.
The recorder provides five folders, named A through E, for storing audio data. The files like recorded audio or language files transferred from a PC, are stored in these folders as individual files. Up to 200 files can be saved in each folder.
File names will be automatically created for files recorded by this recorder.
WS330001.WMA
 Extension
File number: A serial number automatically assigned by a Digital Voice Recorder.
User ID: The name that has been set on the Digital Voice
Recorder.
List display
Current folder and files recorded in this folder are displayed.
01/120
01.WMA/ 5M 24D AM WS330002.WMA WS330003.WMA WS330004.WMA
Current folder
Scroll bar (appears when the whole contents cannot be displayed.)
File being selected (The file name will be highlighted, and the file name, and date and time the file was recorded, will scroll across the screen once.)
File display
Information of the selected file is displayed.
Current folder
 HQ
HQ 01
01 120
120
0 0 M 0 0 S
18M05S File length
14
VOICE Mode and MUSIC Mode
MUSIC Mode
Slide the mode switch to the MUSIC position.
This recorder can save the music files (WMA, MP3 files) transferred from the PC in the 2 music folders, the original “Root” folder and its subsidiary “Music” folder.
Also, this recorder can create the folders in up to 2 layers within the “Music” folder. It is convenient to manage the multiple albums with the same artist name. Up to 200 files can be saved in each folder.
Root |
|
|
|
Folder |
|
|
|
|
|
||
|
First layer |
Second layer |
|
File |
|
Music |
|
|
|
||
|
Artist A |
|
|
|
|
Music File A |
Artist B |
Album 1 |
001 |
|
|
Music File B |
Artist C |
Album 2 |
002 |
Save up to 200 |
|
files. |
|||||
|
|
|
|
||
Music File C |
Music File D |
Music File F |
200 |
|
|
A |
Music File E |
Music File G |
|
|
..................................................................................................................................................
Notes
•Up to 128 folders including “Root” and “Music” folders can be operated on this recorder.
•When using Windows Media Player 10, click [Start Sync] instead of setting the synchronization options. All the files will be transferred to the part A above ( P. 52).
1
OICEV
and Mode
Mode MUSIC
15

1
OICEV
and Mode
Mode MUSIC
VOICE Mode and MUSIC Mode
How to Select a File
|
|
|
Current folder |
|
|
|
Folder being selected |
|
|
|
|
File being selected |
|||||||||||
|
|
|
|
|
|
|
|
|
|
||||||||||||||
|
|
|
|
|
|
|
|
|
|
Artist A |
|
|
|
|
|
|
|
|
|
|
01 /11 |
|
|
Root |
|
|
|
Music |
|
|
|
|
|
Album1 |
|
|
|
|
Album1 |
|
|||||||
|
|
|
|
|
|
|
|
|
|
|
|
|
|
|
|
|
|
|
|
|
|
||
Music |
|
|
|
Artist A |
|
|
|
|
Album1 |
|
SONG G.wma |
|
|
|
|
|
SONG G / Artist A |
||||||
SONG A.wma |
|
|
|
Artist B |
|
|
|
Album2 |
|
SONG H.wma |
|
|
|
00 00 |
|
05 32 |
|||||||
SONG B.wma |
|
|
|
Artist C |
|
|
|
SONG E.wma |
SONG I .wma |
|
|
|
|
||||||||||
SONG C.wma |
|
|
|
SONG D.wma |
|
|
|
SONG F.wma |
SONG J.wma |
|
|
|
|
|
Fld |
|
|
|
|||||
|
|
|
|
|
|
|
|
|
|
|
|
Title (name of the file)/Artist |
|
|
01 /16 |
|
|||||||
|
|
|
|
|
|
|
|
|
|
|
|
|
|
|
|||||||||
Root |
|
|
|
Music |
|
|
|
Artist B |
|
Best |
|
|
|
|
Best |
|
|||||||
|
|
|
|
|
|
|
|
|
|
|
|
|
|
|
|
|
|
|
|
|
|
||
Music |
|
|
|
Artist A |
|
|
|
Best |
|
SONG N.wma |
|
|
|
|
SONG N / Artist B |
||||||||
SONG A.wma |
|
|
|
Artist B |
|
|
|
SONG K.wma |
|
SONG O.wma |
|
|
|
00 00 |
|
04 35 |
|||||||
SONG B.wma |
|
|
|
Artist C |
|
|
|
SONG L.wma |
|
SONG P.wma |
|
|
|
|
|||||||||
SONG C.wma |
|
|
|
SONG D.wma |
|
|
|
SONG M.wma |
|
SONG Q.wma |
|
|
|
|
|
Fld |
|
|
|||||
Root |
|
|
|
Root |
01/06 |
|
Music |
|
|
SONG B |
|
|
|
|
|
|
|
|
||
SONG A.wma |
|
|
00 00 |
03 48 |
||
SONG B.wma |
|
|
||||
SONG C.wma |
|
|
|
Fld |
|
|
Pressing the OK button will play the selected file.
Current file number/Total number of recorded files in the folder
+ or – button: Moves the cursor up and down.
9or OK button: Opens the selected folder/file.
FOLDER button: Returns to the folder in the higher level and shows the list display.
Meaning of Icons in this Manual
Set the mode switch to VOICE before operating the recorder.
Set the mode switch to MUSIC before operating the recorder.
Convenient features that can be used with both the Voice Recorder and Music Player.
16

 Setting Time/Date (Time & Date)
If you set the date and time beforehand, the information when the file is recorded is automatically stored for each file. Setting the date and time beforehand enables easier file management.
The hour indicator will flash automatically when you load a battery |
S e t |
|
before using the recorder for the first time, or after the recorder hasn’t |
||
T i m e & M |
||
been used for a long time. Proceed from step 1. |
D a t e |
|
|


 1
1


 2
2
1Press the 9 or 0 button to select the item to set.
Select the item from “hour”, “minute”, “year” “month” and “day” with a flashing point.
2Press the + or – button to set.
Follow the same steps by pressing the 9or 0button to select the next item, and press the + or – button to set.
Time & Date
1M 7D 2007Y

 4 :
4 : 3 8 PM
Time & Date
1M 7D 2007Y
 1 0 : 3 8 PM
•You can choose between 12 and 24 hour display by pressing the FOLDER button while setting the hour and minute.
Example: 10:38 P.M.
10:38 PM ←→ 22:38 (Initial setting)
•You can choose the order of the year, month, day by pressing the FOLDER button while setting them.
Example: January 7, 2007
1M 7D 2007Y |
7D 1M 2007Y |
2007Y 1M 7D |
(Initial setting)
1
Time/Date Setting & (Time
Date)
17
1
Time/Date Setting & (Time
Date)
Setting Time/Date (Time & Date)
|
|
|
|
Press the OK button to complete the setup screen. |
|
|
|
|
The clock will start from the set date and time. Press the OK button |
|
|
4 |
3according to the time signal. |
|
|
||||
|
|
|
3 |
4Press the STOP button to close the menu. |
|
|
|
......................................................................................................... |
|
|
|
|
Note |
|
|
|
|
|
• If you press the OK button during the setup operation, the recorder will save |
|
|
|
|
the items that were set to that point. |
Changing the Time/Date
Press and hold the STOP button while this recorder is in stop mode to display the “Time & Date”. If the “Time & Date” is not correct, set it using the procedure below.
2 |
|
While the recorder is stopped, press the MENU button |
|
|
for 1 second or longer. |
|
|
1The “Menu” screen opens ( P. 42). |
|
||
1 |
2 |
Press the + or – button to choose |
M e n u |
“Sub Menu”. |
Rec Menu |
||
3 |
3 |
Press the OK or 9button. |
Play Menu |
Beep & Display |
|||
|
|
|
Sub Menu |
4 |
5 |
4Press the + or – button to choose “Time & Date”.
5Press the OK or 9button.
The hour indicator flashes, indicating the start of the Time/Date setup process.
The following steps are the same as Step 1 through Step 4 of “Setting Time/Date (Time & Date)” ( P. 17).
S u b M e n u

 Lock
Lock 


 Time & Date

 Format


System
18
When Using the Recorder as a Voice Recorder
 Recording
Before starting recording, select a folder between Folder A to Folder E.These five folders can be selectively used to distinguish the kind of recording; for example, Folder Amight be used to store private information, while Folder B might be dedicated to holding business information.
Newly recorded audio will be saved as the last file in the selected folder.
|
Press the FOLDER button to |
|
1choose a folder in which to make |
1 |
a recording. |
Every time the FOLDER button is pressed, |
|
folders will switch. |
|
|
a Current folder |
a 01/119
WS330001.WMA/ 5 
WS330002.WMA
WS330003.WMA
WS330004.WMA
 2
2  3
3
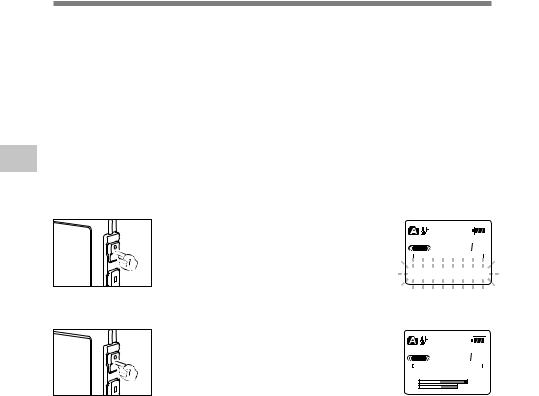
2Press the REC button to start recording.
The record/play indicator light glows red. Turn the built-in stereo microphone in the direction to be recorded.
The display changes depending on the recording mode ( P. 24).
b Current recording mode c Recording elapsed time
d Memory remaining indicator (E/F bar)
(the bar indicates remaining memory)
eLevel meter (varies according to the sound volume being recorded)
Every time the OK button is pressed while recording, “Recording elapsed time” and “Remaining recording time” cycles in the location indicated by c.
3Press the STOP button to stop recording.
b |
HQ |
120 120 |
d |
||||||||||
|
|
|
|
|
|
|
|
|
|
|
|
||
|
E |
|
|
|
|
|
|
|
|
|
|||
|
|
|
|
|
|
|
|
|
F |
|
|||
c |
|
|
|
|
3 5 M 1 2 S |
|
|||||||
|
|
L |
|
e |
|||||||||
|
|
|
R |
|
|
|
|
|
|
|
|
|
|
|
Display in the stereo |
|
|||||||||||
|
recording mode |
|
|||||||||||
|
|
|
|
|
|
|
|
||||||
b |
HQ |
120 120 |
d |
||||||||||
|
|
|
|
|
|
|
|
|
|
|
|
||
|
E |
|
|
|
|
|
|
|
|
|
|||
|
|
|
|
|
|
|
|
|
F |
|
|||
c |
|
|
|
3 5 M 1 2 S |
|
||||||||
|
|
|
|
||||||||||
e
Display in the monaural recording mode
2
Recording
19
2
Recording
Recording
Notes
•To ensure recording from the beginning, start speaking after you see the red record/play indicator light on.
•A beep will sound when remaining recording time reaches 60 seconds, 30 seconds, and 10 seconds while recording.
•When remaining recording time is less than 60 seconds, the record/play indicator light starts flashing in red. When the recording time is decreasing to 30 or 10 seconds, the light flashes faster.
•“Memory Full” or “Folder Full” will be displayed when the memory or folder capacity is full. Delete any unnecessary files before recording any further ( P. 72).
•If the REC button is pressed while the mode switch is set to MUSIC, “Music Mode” will flash on the screen. Set the mode switch to VOICE before recording ( P. 14).
Pause |
|
|
|
|
|
|
|
Press the REC button while recording. |
|
|
|
|
|
|
|
“Rec Pause” will flash on the display. |
|
|
|
|
|
|
|
|
HQ |
120 120 |
|||||
• The recorder will time out after 1 hour when |
|
||||||
E |
|
|
|
F |
|||
left in “Rec Pause”. |
|
|
|
3 5 M 1 2 S |
|||
|
|
|
Rec Pause |
|
|||
|
|
|
|
|
|
|
|
Resume Recording |
|
|
|
|
|
|
|
Press the REC button again. |
|
|
|
|
|
|
|
Recording will resume at the point of |
|
|
|
|
|
|
|
|
|
|
120 120 |
|
|||
interruption. |
HQ |
|
|||||
|
E |
|
|
|
F |
||
|
|
|
|
3 5 M 1 3 S |
|||
L
R
20
Recording
To EAR (earphone) jack
Listening While Audio is Recorded
If you start recording after inserting the earphone into the EAR jack on the recorder, you can hear the sound being recorded. The sound volume on the recording monitor can be adjusted by pressing the VOL (+) or VOL (–) button.
Connect the earphone to the EAR jack on the recorder.
After recording has started, you can hear the sound being recorded through the earphone. If the earphone is connected, no sound will come from the speaker.
............................................................................................................
Notes
•Recording level cannot be controlled using the volume button.
•When using the earphones, do NOT set the volume too high. Listening at very high volume may lead to hearing loss.
•Do not place earphones near a microphone as this may cause feedback.
2
Recording
21

2
the Using
Control Variable
Actuator Voice
A)(VCV
Using the Variable Control Voice
Actuator (VCVA)
When the microphone senses that sounds have reached a preset threshold volume level, the built-in Variable Control Voice Actuator (VCVA) starts recording automatically, and stops when the volume drops below the threshold level.
The VCVA feature extends recording time and conserves memory by stopping recording during silent periods, which helps the playback to be more efficient.
1
2
3
4
5 |
6 |
1While the recorder is stopped, press the MENU button for 1 second or longer.
The “Menu” screen opens ( P. 42).
2Press the OK or 9button.
The “Rec Menu” screen opens.
3Press the + or – button to choose “VCVA”.
4Press the OK or 9button.
The VCVA setup process begins.
5Press the + or – button to choose between “On” and “Off”.
On: Will start recording in VCVA mode. Off: Will resume recording in normal mode.
6Press the OK button to complete the setup screen.
If the 0button is pressed, the setting will be canceled and it will return to the “Rec Menu” screen.
 M e n u


Rec Menu

 Play Menu
Beep & Display
Sub Menu
R e c M e n u
Rec Mode
 Mic
Mic Sense
Sense
VCVA
 Low Cut Filter
V C V A
 O n
O n 

 O f f
O f f 


22
Using the Variable Control Voice Actuator (VCVA)
|
|
|
|
|
Press the STOP button to close the |
|
|
|
|
|
|
|
|
|
|
|
|
|
|
|
|
|
|
|
|
|
|
|
|
|
menu. |
|
a |
|
|
|
|
|
|
|
|
|
|
|
|
|
|
|
|
|
|
|
|
|
|
|
|
|
|
|
|
|
|
|
|
|
120 120 |
|
|||||||||
|
|
|
|
|
|
|
|
|
|
|
|
|
|
|
|
||||||||||
|
|
|
|
|
7If it is set to “On”, |
will appear on the |
|
|
|
|
HQ |
|
|||||||||||||
|
|
|
|
|
display. |
|
|
|
|
|
|
|
|
|
|
|
0 0 M 0 0 S |
||||||||
8 |
a VCVA (Variable Control Voice Actuator) |
|
|
|
|
|
|
|
|
|
|
|
1H 27M53S |
||||||||||||
|
|
|
|
|
|
|
|
|
|
|
|
|
|
|
|
|
|
|
|||||||
indicator |
|
|
|
|
|
|
|
|
|
|
|
|
|
|
|
|
|
|
|
|
|||||
|
|
|
|
|
Press the REC button to start |
|
|
|
|
|
|
|
|
|
|
|
|
|
|
|
|
|
|
|
|
|
|
|
|
|
8recording. |
|
|
|
|
|
|
|
|
|
|
|
|
|
|
|
|
|
|
|
|
|
|
|
|
|
|
|
|
|
|
|
|
|
121 121 |
||||||||||||
7 |
|
|
|
|
|
|
|
HQ |
|
||||||||||||||||
When the sound volume is lower than the |
|
|
|
|
E |
|
|
|
|
|
|
|
|
F |
|||||||||||
|
|
|
|
|
|
|
|
|
|
|
|
|
|
|
|
|
|
||||||||
|
|
|
|
|
preset threshold sound level, recording |
|
|
|
|
|
|
|
|
|
S t a n d b y |
|
|||||||||
|
|
|
|
|
automatically stops after 1 sec approximately, |
|
|
|
|
|
|
|
L |
|
|
|
|
|
|
|
|
|
|
||
|
|
|
|
|
|
|
|
|
|
|
|
R |
|
|
|
|
|
|
|
|
|
|
|||
|
|
|
|
|
|
|
|
|
|
|
|
|
|
|
|
|
|
|
|||||||
|
|
|
|
|
|
|
|
|
|
|
|
|
|
|
|
|
|
|
|||||||
|
|
|
|
|
and “Standby” flashes on the display. The |
|
|
|
|
|
|
|
|
|
|
|
|
|
|
|
|
|
|
|
|
|
|
|
|
|
record/play indicator light glows red when |
|
|
|
|
|
|
|
|
|
|
|
|
|
|
|
|
|
|
|
|
|
|
|
|
|
recording starts and flashes when recording |
|
|
|
|
|
|
|
|
|
|
|
|
|
|
|
|
|
|
|
|
|
|
|
|
|
pauses. |
|
|
|
|
|
|
|
|
|
|
|
|
|
|
|
|
|
|
|
|
|
|
|
|
|
Press the 9or 0button adjust |
|
|
|
|
|
|
|
|
|
|
|
|
|
|
|
|
|
|
|
|
|
|
|
|
|
|
|
|
|
|
|
|
|
|
|
|
|
|
|
|
|
|
|
|
||
|
|
|
|
|
9the pause sound level. |
|
|
|
|
|
|
|
|
|
|
|
|
|
|
|
|
|
|||
|
|
|
|
|
|
|
|
|
HQ |
121 121 |
|
||||||||||||||
|
|
|
|
|
The VCVA level can be set to any of 15 |
|
|
|
E |
|
|
|
|
|
|
|
|
F |
|||||||
|
|
|
|
|
|
|
|
|
|
|
|
|
|
|
|
|
|
|
|||||||
|
|
|
|
|
different values. The higher the value, the |
|
|
|
|
VCVA Level 0 2 |
|
||||||||||||||
|
|
|
|
|
more sensitive the recorder to sounds. At |
b |
|
|
|
|
|
L |
|
|
|
|
|
|
|
|
|
|
|
||
|
|
|
|
|
|
|
|
|
|
|
R |
|
|
|
|
|
|
|
|
|
|
|
|||
|
|
|
|
|
the highest value, even the faintest sound |
c |
|
|
|
|
|
|
|
|
|
|
|
|
|
|
|
|
|
|
|
|
|
|
|
|
|
|
|
|
|
|
|
|
|
|
|
|
|
|
|
|
|
|
|||
|
|
9 |
will activate recording. |
|
|
|
|
|
|
|
|
|
|
|
|
|
|
|
|
|
|
|
|
||
|
|
|
|
|
|
|
|
|
|
|
|
|
|
|
|
|
|
|
|
|
|
||||
|
|
The VCVA pause sound level can be |
|
|
|
|
|
|
|
|
|
|
|
|
|
|
|
|
|
|
|
||||
|
|
|
|
|
|
|
|
|
|
|
|
|
|
|
|
|
|
|
|
|
|
|
|
||
|
|
|
|
|
adjusted according to the ambient |
|
|
|
|
|
|
|
|
|
|
|
|
|
|
|
|
|
|
|
|
|
|
|
|
|
(background) noise. |
|
|
|
|
|
|
|
|
|
|
|
|
|
|
|
|
|
|
|
|
|
|
|
|
|
b Level meter (varies according to the sound volume being recorded) |
||||||||||||||||||||
|
|
|
|
|
c Start level (moves to the right/left according to the set level) |
||||||||||||||||||||
..................................................................................................................................................
Notes
•The start/stop actuation level also varies depending on the selected microphone sensitivity mode ( P. 25).
•If the starting level is not adjusted within 2 seconds, the display will return to the previous.
•If the surrounding noise is loud, the starting sensitivity of the VCVA can be adjusted according to the recording situation.
•To ensure successful recordings, prior testing and adjustment of the start/stop actuation level is recommended.
2
the Using
Control Variable
Actuator Voice
A)(VCV
23
2
Modes Recording Mode) (Rec
 Recording Modes (Rec Mode)
The recording mode can be chosen from ST XQ (stereo extra high quality sound recording), ST HQ (stereo high quality sound recording), ST SP (stereo standard recording), HQ (high quality sound recording), SP (standard recording), and LP (long-term recording).
1
2
4
3
 6
6
5
1While the recorder is stopped, press the MENU button for 1 second or longer.
The “Menu” screen opens ( P. 42).
2Press the OK or 9button.
The “Rec Menu” screen opens.
3Press the OK or 9button.
The recording mode setup process begins.
4Press the + or – button to select the recording mode.
5Press the OK button to complete the setup screen.
If the 0button is pressed, the setting will be canceled and it will return to the “Rec Menu” screen.
6Press the STOP button to close the menu.
a Record mode indicator
Press and hold the STOP button while the recorder is stopped to check “Remaining
Memory” and “Remaining Recording Time” in the selected recording mode.
 R e c
R e c  M e n u
Rec Mode

 Mic
Mic Sense
Sense
VCVA
Low Cut Filter
R e c M o d e

 S T
S T  X Q
X Q 


S T H Q

 S T
S T  S P
S P 

 H Q
H Q
a
 HQ
HQ 120
120 120
120
0 0 M 0 0 S
1H 27M53S
..................................................................................................................................................
Notes
•When a meeting and lecture is to be recorded clearly, set other than LP mode to record.
•When an external monaural microphone is used while the recorder is set to ST XQ, ST HQ, or ST SP
24 |
mode, audio will be recorded to the L channel only. |
|

 Microphone Sensitivity (Mic Sense)
Microphone sensitivity is adjustable to meet recording needs.
3
1
2
5 |
4 |
1While the recorder is stopped, press the MENU button for 1 second or longer.
The “Menu” screen opens ( P. 42).
2Press the OK or 9button.
The “Rec Menu” screen opens.
3Press the + or – button to choose “Mic Sense”.
4Press the OK or 9button.
The microphone sensitivity setup process begins.
5Press the + or – button to choose between “Conf” and “Dict”.
Conf: High-sensitivity mode that records sounds in all directions.
Dict: Low-sensitivity mode suited for dictation.
R e c M e n u

 Rec Mode
Mic Sense

 VCVA
VCVA
Low Cut Filter
Mic Sense
C o n f

 D i c t
|
|
|
|
Press the OK button to complete |
|
|
|
|
|
|
|
the setup screen. |
|
|
|
|
|
7 |
6If the 0button is pressed, the setting |
|
|
||
|
|
|
|||||
|
|
|
|
will be canceled and it will return to the |
|
|
|
|
|
|
|
“Rec Menu” screen. |
|
|
|
|
|
|
|
Press the STOP button to close the a |
|
|
|
|
|
|
|
|
|
|
|
|
|
|
|
menu. |
|
|
|
|
|
|
|
|
|
||
|
|
|
6 |
7a Microphone sensitivity indicator |
HQ 120 120 |
||
|
|
||||||
|
|
|
|
|
|
|
0 0 M 0 0 S |
|
|
|
|
|
|
|
1H 27M53S |
..................................................................................................................................................
Note
2
Sensitivity Microphone Sense) (Mic
• When the speaker’s voice is to be recorded clearly, set to Dict (dictation) mode and move the built-in |
25 |
stereo microphone close to the speaker’s mouth (5 to 10 cm / 2 to 4 inches) and record. |
2
the Set Cut Low (Lo Filter
Cut w Filter)
 Set the Low Cut Filter (Low Cut Filter)
The recorder has a Low Cut Filter function to minimize low-frequency sounds and record voices more clearly. This function can reduce noise from air conditioners, projectors and other similar noises.
3
1
2
1While the recorder is stopped, press the MENU button for 1 second or longer.
The “Menu” screen opens ( P. 42).
2
3Press the + or – button to choose “Low Cut Filter”.
R e c M e n u
Rec Mode
Mic Sense

 VCVA
VCVA
Low Cut Filter
5
4
 7
7
6
4Press the OK or 9button.
The Low Cut Filter setup process begins.
5Press the + or – button to choose between “On” and “Off”.
On: Low Cut Filter will be turned on. Off: Low Cut Filter will be canceled.
6Press the OK button to complete the setup screen.
If the 0button is pressed, the setting will be canceled and it will return to the “Rec Menu” screen.
7Press the STOP button to close the menu.
If it is set to “On”,  will appear on the display.
a Low Cut Filter indicator
Low Cut Filter
O n

 O f f
O f f
a
 HQ
HQ 120
120 120
120
0 0 M 0 0 S
1H 27M53S
26

Set the Low Cut Filter (Low Cut Filter)
Recommended Settings by Recording Condition
|
|
Recommended settings |
|
||
Recording condition |
|
|
|
|
|
|
Recording Mode |
Microphone |
|
Low Cut |
|
|
|
Sensitivity |
|
Filter |
|
|
|
|
|
||
|
|
|
|
|
|
Conferences with large crowds and |
|
ST XQ |
|
|
|
lectures in large rooms. |
|
|
|
|
|
|
|
Conf |
|
|
|
|
|
|
|
|
|
Meetings and business negotiations with |
|
ST XQ, ST HQ, ST SP |
|
On |
|
|
|
|
|||
a small number of people. |
|
|
|
||
|
|
|
|
|
|
|
|
|
|
|
|
Dictation with a lot of background noise. |
|
ST XQ, ST HQ, HQ |
Dict |
|
|
|
|
|
|
|
|
Music playing, wild birds singing, and |
|
ST XQ |
Microphone |
|
Off |
railway sounds. |
|
Sensitivity |
|
||
Dictation in a quiet environment. |
|
There is no particular recommendation. Choose a setting |
|||
|
for recording. |
|
|
|
|
|
|
|
|
|
|
|
|
|
|
|
|
Set the microphone sensitivity according to the volume being recorded. |
|||||
2
the Set
Cut Low
(Low Filter
Filter) Cut
27

2
from Recording
Micr External or ophone
De Other vices
Recording from External Microphone or Other Devices
To MIC (microphone) jack
Recording with External Microphone
Connect the external microphone to the microphone jack of the recorder.
When the external microphone is connected to the microphone jack of the recorder, the built-in microphone will not operate.
Applicable External Microphones (optional)
●Stereo microphone: ME51S
The built-in large-diameter microphone enables sensitive stereo recording. Stereo recording is available only in ST XQ, ST HQ or ST SP modes.
●Highly sensitive noise-cancellation monaural microphone: ME52
This microphone is used to record sound at a distance while minimizing surrounding noise.
●Noise-Cancellation monaural microphone: ME12 (Dictation microphone)
Used to get clear recordings of your own voice by reducing the effects of ambient noise.
●Tie clip microphone: ME15 (Monaural)
Small concealing microphone with a tie-clip.
●Telephone pickup: TP7 (Monaural)
Earphone type microphone can be plugged into your ear while phoning. The voice or conversation over the phone can be clearly recorded.
28
Recording from External Microphone or Other Devices
To MIC (microphone) jack
To EAR (earphone) jack
E |
EAR |
 EAR
EAR
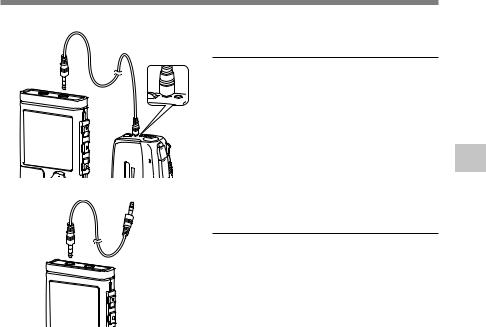
Recording the Sound of Other Devices with this Recorder
The sound can be recorded when connecting to the audio output terminal (earphone jack) of the other device, and the microphone jack of the recorder with the connecting cord (optional
KA333) ( P. 97) for dubbing.
To audio output terminal of other devices
To audio input terminal of other devices
Recording the Sound of this Recorder with Other Devices
The sound of this recorder can be recorded to other devices when connected to the audio input terminal (microphone jack) of other devices and the earphone jack of this recorder, with the connecting cord (optional KA333) for dubbing.
..................................................................................................................................................
Notes
•Use the connecting cord sold separately for dubbing (KA333) to connect the recorder with other devices.
•The detailed input levels cannot be adjusted with this recorder. When you connect the recorder to an external device, execute a test recording and adjust the output level of the external device.
•A microphone with plug-in power, which receives the power supply from this recorder, can be used.
•When the external stereo microphone is inserted while set in HQ, SP, and LP modes, it enables recording only with the L channel microphone.
•When an external monaural microphone is used while the recorder is set to ST XQ, ST HQ, or ST SP mode, audio will be recorded to the L channel only.
2
from Recording
Micr External or ophone
De Other vices
29

 Playing
|
|
Press the FOLDER button to |
|
|
choose a folder. |
|
1 |
1Every time the FOLDER button is pressed, |
|
folders will switch. |
|
|
|
Press the + or – button to choose |
|
|
the file that you want to play. |
|
|
2In the list display, use the + and – buttons |
2 |
|
to place the cursor on the desired file. |
|
Press the 9button in the list display to |
|
|
2 |
change the screen to the file display. |
Playing |
In the file display, press the 9or 0 |
|
button to select a file. |
||
|
If you want to return from the file display |
|
|
|
to the list display, press the FOLDER |
|
|
button. |
01/120
WS330001.WMA/ 5  WS330002.WMA WS330003.WMA WS330004.WMA
03/120
WS330001.WMA  WS330002.WMA WS330003.WMA/ 5
WS330004.WMA
List display
 HQ
HQ 03
03 120
120
00 M 0 0 S
22M41S
File display
|
Press the PLAY or OK button to |
|
start playback. |
|
3The record/play indicator light glows |
|
green. |
|
a Play position bar indicator |
4 |
b Current playback time |
c File length |
|
You can change the playing speed by |
|
|
pressing the PLAY button while the |
3 |
recorder is playing back ( P. 84). |
Press the + or – button to select |
|
|
the proper sound volume. |
|
4The display shows the volume level. You |
|
can choose between 0 and 30. |
|
d Volume level meter |
a |
|
|
HQ |
03 120 |
|
|
|
|
0 5 M 1 0 S |
||
b |
|
||||
|
|||||
c |
|
|
22M41S |
||
|
|
||||
 HQ
HQ 03
03 120
120
Volume Level 1 5
d

30
 Loading...