Olympus TG-5 Instruction Manual

DIGITAL CAMERA
TG-5
Instruction Manual
Model No. : IM005
 Thank you for purchasing an Olympus digital camera. Before you start to use your new camera, please read these instructions carefully to enjoy optimum performance and a longer service life. Keep this manual in a safe place for future reference.
 We recommend that you take test shots to get accustomed to your camera before taking important photographs.
 The screen and camera illustrations shown in this manual were produced during the development stages and may differ from the actual product.
 If there are additions and/or modifications of functions due to firmware update for the camera, the contents will differ. For the latest information, please visit the Olympus website or contact your Olympus Consumer Support Team in your region.
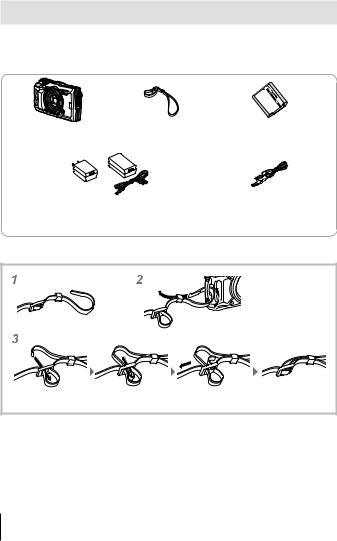
Unpack the box contents
The following items are included with the camera.
If anything is missing or damaged, contact the dealer from whom you purchased the camera.
Digital camera |
Strap |
Lithium Ion Battery |
|
(LI-92B) |
|||
|
|
||
|
or |
|
|
USB-AC adapter (F-5AC) |
USB cable (CB-USB12) |
||
Other accessories not shown: Warranty card
Contents may vary depending on purchase location.
Attaching the camera strap
• Pull the strap tight so that it does not come loose.
2 EN
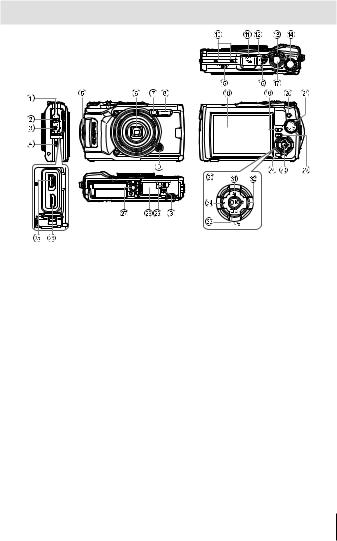
Names of parts
1Connector cover
2Connector cover lock
3LOCK knob
4Speaker
5Strap eyelet
6Lens
7Self-timer lamp/LED Illuminator/ AF illuminator
8Flash
9Lens ring release button
0 Stereo microphone
aGPS antenna
bnbutton
cZoom lever
dControl dial
eLOG switch
fIndicator lamp
gShutter button
hMonitor
iINFO (Information display) button
jR(Movie)/select button
kMode dial
lq(Playback) button
mA button
n/Wi-Fi button
oHDMI micro connector
pMicro-USB connector
qTripod socket
rBattery/card compartment cover
sBattery/card compartment cover lock
tArrow pad
uF(Up) / F (Exposure compensation) button
vI(Right) /#(Flash) button
wG(Down) /
jY(Sequential shooting/ Self-timer) / (Erase) button
xH(Left)/mode function button
• FGHIinstruct to press the up/down/left/right arrow pad.
EN 3
Preparations for shooting
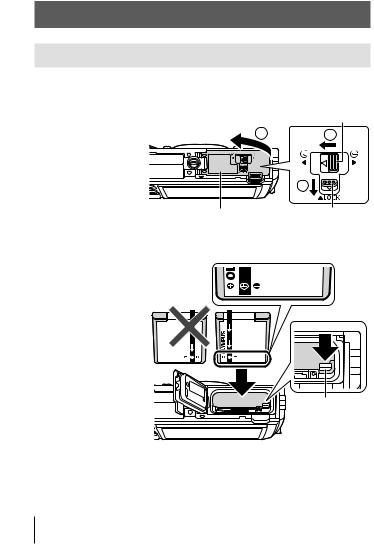
Inserting and removing the battery and card
1 Follow Steps 1, 2 and 3 to open the battery/card compartment cover.
• Turn off the |
Battery/card compartment cover lock |
|
camera before |
3 |
2 |
opening the |
||
battery/card |
|
|
compartment |
|
|
cover. |
|
|
|
|
1 |
|
Battery/card compartment cover |
LOCK knob |
2 Insert the battery while sliding the battery lock knob in the direction of the arrow.
•Insert the battery as illustrated with the Cmark
toward the battery lock knob.
•If you insert the battery in the wrong direction, the camera is not turned on. Be sure to insert it in the correct direction.
•Slide the battery lock knob in the direction of the arrow to unlock, and then remove the battery.
Battery lock knob
4 EN
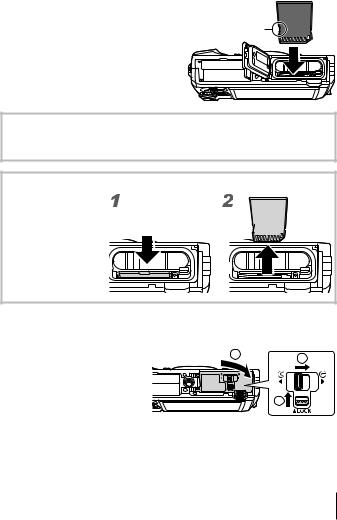
3 Insert the card straight until it clicks into place.
• Do not touch the metallic parts of |
|
|
the card directly. |
Write-protect |
|
• Always use the specified cards |
||
switch |
||
with this camera. Do not insert |
|
|
other types of memory cards. |
|
Cards compatible with this camera
SD/SDHC/SDXC/Eye-Fi (with Wireless LAN function) card (commercially available) (for compatibility card details, visit the Olympus website.)
To remove the card
Press the card in until it clicks and comes out slightly, then remove the card.
4 Follow Steps 1, 2 and 3 to close battery/card compartment cover.
• When using the camera, |
1 |
|
|
be sure to close the |
2 |
||
|
|||
battery/card compartment |
|
|
|
cover. |
|
|
|
|
|
3 |
EN 5
Charging the battery
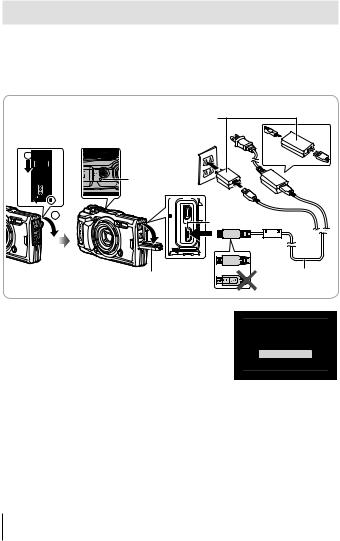
1 Check that the battery is in the camera, and connect the USB cable and USB-AC adapter.
•The battery is not fully charged at shipment. Before use, be sure to charge the battery until the indicator lamp turns off (up to 3 hours).
Connecting the camera |
USB-AC adapter |
|
|
|
|
|
AC outlet |
|
2 |
|
|
|
Indicator lamp |
|
|
On: Charging |
or |
|
Off: Charged |
|
1 |
|
|
3 |
Micro-USB connector |
|
|
||
Connector cover
2 A menu will be displayed; highlight [Charge] and press the A button.
USB cable (supplied)
USB
Storage
MTP
Charge
Exit
Set
For charging the battery abroad, see “Using your charger and USB-AC adapter abroad” (P. 100).
•Never use any cable other than supplied or Olympus-designated USB cable. This may cause smoking or burning.
•The included F-5AC USB-AC adapter (hereafter referred to as USB-AC adapter) differs depending on the region where you purchased the camera. If you received a plug-in type USB-AC adapter, plug it directly into AC outlet.
•Be sure to unplug the power plug of the USB-AC adapter from the wall outlet when the charging is complete.
6 EN

•For details on the battery, see “SAFETY PRECAUTIONS” (P. 120). For details on the USB-AC adapter, see “SAFETY PRECAUTIONS” (P. 120).
•If the indicator lamp does not light, reconnect the USB cable and USB-AC adapter to the camera.
•If the message “No Connection” is displayed in the monitor, disconnect and reconnect the cable.
When to charge the batteries
Charge the battery when |
Flashes in red |
Error message |
|||
the error message shown |
|
|
|
|
|
|
|
|
|
|
|
on the right appears. |
|
|
|
|
|
|
|
|
|
|
Battery Empty |
|
|
|
|
|
|
|
|
|
|
|
|
EN 7
Turning on the camera and making the initial
settings
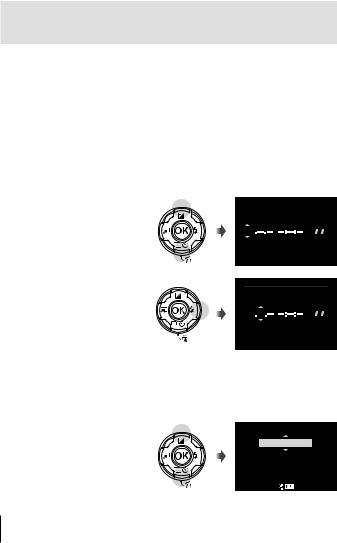
When you turn on the camera for the first time, a screen appears enabling to set the language for the menus and messages displayed in the monitor, and the date and time.
To change the selected date and time, see “Setting the clock manually, choosing a time zone, and using GPS to set the clock d [XSettings]” (P. 70)
1 Press the nbutton to turn the camera on, highlight your language using FGHI(arrow pad) or the control dial, and press the A button.
•In the case that the power is not turned on when you press the n button, check the direction of the battery. g“Inserting and removing the battery and card” (P. 4)
2 Use FG(arrow pad) or the control dial to select the year ([Y]).
X
Y M D Time
2017 |
|
|
|
|
|
|
|
|
|
|
|
Y/M/D |
Cancel

3 Press I(arrow pad) to save the setting for [Y].
X
Y M D Time
2017 |
|
|
|
|
|
|
|
|
|
|
|
Y/M/D |
Cancel

4 Select the month ([M]), day ([D]), hour and minute ([Time]), and the date display order ([Y/M/D]) using FGHI(arrow pad) as described in Steps 2 and 3, and then press the A button.
5 Use FG(arrow pad) to select the time zone and then press the A button.
•Daylight saving time can be turned on or off using the INFO button.
Time Zone
UTC+09:00 (12:30)
Seoul
Tokyo
Set 
8 EN
Using basic functions
Taking photographs (Pmode)
1 |
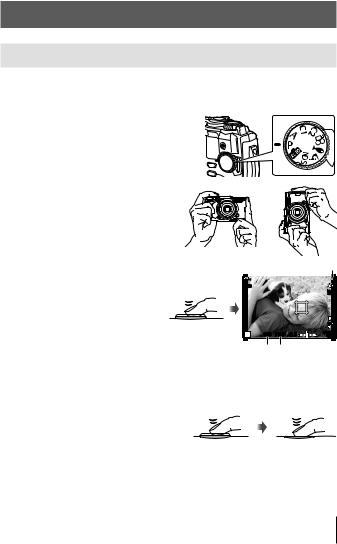
Press the nbutton to turn on the camera. |
|
When the camera is turned on, the monitor will turn on. |
2 |
Set the mode dial to P. |
|
In mode P, the camera automatically |
|
adjusts shutter speed and aperture in |
|
response to subject brightness. |
3 Frame the shot.
• When holding the camera, take care not to cover the flash, microphone or other important parts with your fingers, etc.
4 Press the shutter button |
|
halfway down to focus. |
Press halfway |
The focus indicator will blink to |
|
show that the camera is not in |
|
focus. Focus again. |
|
• The shutter speed and |
|
aperture displays will blink |
|
to show that the camera is |
|
unable to achieve optimal |
|
exposure. |
|
5 To take the picture, gently |
Press |
halfway |
|
press the shutter button all the |
|
way down while being careful |
|
not to shake the camera. |
|
Focus indicator
S-IS ON
ISO-A
200
|
|
|
L N |
|
|
|
FHD F |
|
|
|
30p |
P |
125 |
F5.6 ±0.0 |
01:02:03 |
1023 |
|||
Shutter |
Aperture |
|
|
speed value |
|
||
Press the rest of the way down
EN 9
Viewing photographs (Playing back images)
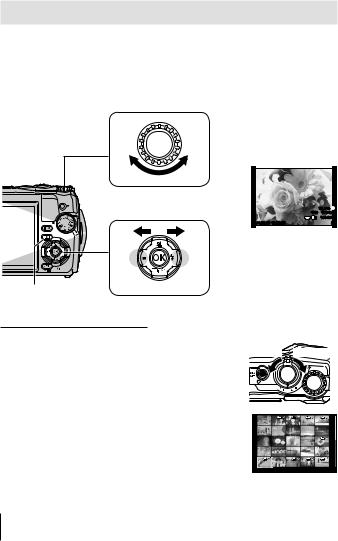
Turn on the camera.
Press the qbutton.
•Your most recent photograph is displayed.
•Press HI(arrow pad) or rotate the control dial to view other pictures.
Control dial
Displays the |
Displays the |
previous frame |
next frame |
qbutton  Arrow pad
Index display/Calendar display
•To switch from single-frame to index playback, rotate the zoom lever counterclockwise. Repeating the process will increase the number of images displayed, ending in a calendar display.
g[G Settings] (P. 62)
•Use FGHI(arrow pad) or the control dial to move the cursor.
•Rotate the zoom lever clockwise to proceed in turn from calendar to index to single-frame playback.
20.5°C  10m 1012hPa
4:3 L N |
100-0020 |
2017.02.26 12:30:00 |
20 |
Still image
Counter-
clockwise Clockwise
2017.02.26 12:30:00 |
21 |
10 EN

Close-up playback
• In single-frame playback, you can zoom in or out using the zoom lever: rotate the lever clockwise to zoom
in from 2× to 14× and counterclockwise to zoom out. Press the A button to return to single-frame playback.
• Press FGHI(arrow pad) to scroll an image to the |
2x |
direction of the button you pressed. |
|
•To view other images at the same zoom ratio, press the INFO button and then press HI(arrow pad). Press the INFO button again to re-enable scrolling. You can also view other images using the control dial.
Selecting Multiple Images
You can select multiple images for [R] (P. 13), [Erase Selected] (P. 16), and [Share Order Selected] (P. 13) operations. Press the R(movie) button to select the image currently displayed during playback or highlighted in the index display (P. 10). Selected images are indicated by a vicon. Press the button again to deselect the image.
EN 11

Using the Playback Menu
The playback menu can be displayed by pressing the A button during playback. Highlight the desired option and select it by pressing the A button. The options displayed vary with the type of image selected.
Available Options
|
RAW |
JPEG |
RAW+JPEG |
Movies |
Play H |
R |
R |
R |
― |
RAW Data Edit |
R |
― |
R |
― |
JPEG Edit |
― |
R |
R |
― |
Play Movie |
― |
― |
― |
R |
Movie Edit |
― |
― |
― |
R |
|
|
|
|
|
Share Order |
― |
R |
R |
R |
|
|
|
|
|
R |
R |
R |
R |
R |
|
|
|
|
|
R |
R |
R |
R |
― |
|
|
|
|
|
Rotate |
R |
R |
R |
― |
|
|
|
|
|
L |
R |
R |
R |
R |
|
|
|
|
|
Image Overlay |
R |
― |
R |
― |
< |
― |
R |
R |
― |
Erase |
R |
R |
R |
R |
Play H
Voice memos (P. 13) are played back when the associated image is displayed. Volume can be adjusted using FG(arrow pad). Press or A to end voice memo playback.
RAW Data Edit
Creates a JPEG copy of a RAW image according to the selected settings. g[RAW Data Edit] (P. 57)
JPEG Edit
Edit JPEG images. g[JPEG Edit] (P. 57)
Play Movie
View the current movie. g“Movie playback” (P. 15)
12 EN

Movie Edit
Edit movies. g[In-Movie Image Capture (Movie Edit)] (P. 59), [Movie Trimming (Movie Edit)] (P. 59)
Share Order
Select images for later transfer to a smartphone. You can also view the images currently selected for transfer. Press FG(arrow pad) to select images for transfer. Selected images are indicated by a hicon; to deselect, press FG(arrow pad) again. You can also select multiple images and then mark them all for transfer simultaneously. g“Selecting Multiple Images” (P. 11), “Transferring images to a smartphone” (P. 74)
R
Protect images from accidental deletion. Pressing FG(arrow pad) marks images with a 0(protect) icon. Press FG(arrow pad) again to remove protection. You can also select multiple images and then protect them simultaneously. g“Selecting Multiple Images” (P. 11)
R
Audio can be added to still images (up to 30 sec. long). g[R] (P. 59)
Rotate
Rotate the current image. The image rotates each time you press FG (arrow pad); press the A button to complete the operation.
•The rotated image is saved in its current orientation.
•Movies and protected images cannot be rotated.
L
This function displays images stored on the card one after another. g[L] (P. 56)
Image Overlay
Up to 3 frames of RAW images taken with the camera can be overlaid and saved as a separate image. g[Image overlay] (P. 60)
<
Choose print options (the number of copies and date imprinting) for the images on the memory card. g“Print reservation (DPOF)” (P. 86)
Erase
Delete the current image. g“Erasing images during playback” (P. 16)
EN 13

Recording movies
1 Press the R(movie) button to start recording.
•The movie is shot in the set shooting mode. Note that the shooting mode effects may not be obtained for some shooting modes.
L
R
|
ISO |
|
AUTO |
|
AF |
|
FHD F |
|
30p |
0.0 |
REC 00:01 |
0:07:48 |
• |
Sound is also recorded. |
Recording time |
REC 00:01 |
• |
When using a camera with a |
Recording length |
0:07:48 |
CMOS image sensor, moving objects may appear distorted
due to the rolling shutter phenomenon. This is a physical phenomenon whereby distortion occurs in the filmed image when shooting a fastmoving subject or due to camera shaking. In particular, this phenomenon becomes more noticeable when using a long focal length.
2 Press the R(movie) button again to stop recording.
•When recording movies, use an SD card that supports an SD speed class of 10 or higher.
•Use a UHS-I card with a UHS speed class of 3 or better if:
[4K] or [High-speed] is selected for A (movie mode)/[Super Fine] is selected for bit rate
•When the mode dial is rotated to A, you can choose sub modes for recording 4K or high-speed movies. g“A (movie mode)” (P. 25)
14 EN

Movie playback
Pressing the A button when a movie is selected in single-frame playback displays the playback menu. Highlight [Play Movie] and press the A button to start movie playback.


 Movie
Movie 


Play Movie
Movie Edit
Share Order
0 y
Erase
Back


 Set
Set
Operations During Playback
Pause |
Press the A button to pause playback. To resume |
|
playback, press the A button again. |
||
|
||
|
|
|
Fast forward |
Press I(arrow pad) to fast forward. Press I |
|
(arrow pad) again to increase the fast forward |
||
|
speed. |
|
Rewind |
Press H(arrow pad) to rewind. Press H(arrow |
|
pad) again to increase the rewind speed. |
||
|
||
Adjusting the volume |
Use FG(arrow pad) to adjust the volume. |
|
|
|
Operations while playback is paused
Cueing |
Use F(arrow pad) to display the first frame and |
|
press Gto display the last frame. |
||
|
||
Advancing and |
Use HI(arrow pad) or the control dial to advance |
|
rewinding one frame at |
or rewind one frame at a time. Keep HI(arrow |
|
a time |
pad) pressed for continuous advance or rewind. |
|
Resuming playback |
Press the A button to resume playback. |
To stop movie playback
Press the button.
•We recommend using OLYMPUS Viewer 3 (P. 90) to view movies on a computer. Be sure to use the latest version. Connect the camera to the computer before launching OLYMPUS Viewer 3 for the first time.
EN 15
Erasing images during playback
1 Display the image you want to erase and press .
• To erase a movie, select the movie to erase and press .
Erase
Yes
No
Back
 Set
Set 
2 Press FG(arrow pad) to select [Yes], and press the A button.
•Grouped images are erased as a group (P. 11).
•Multiple images or all images can be erased at a time (P. 70).
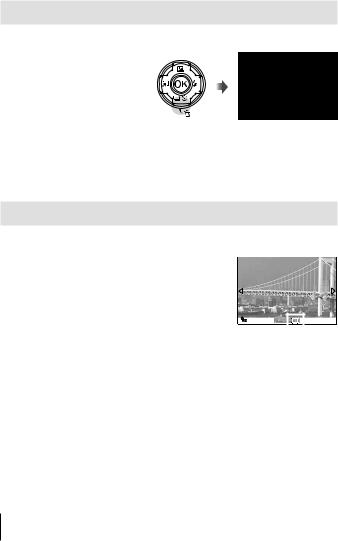
Scrolling Panoramas
Panoramas made up of multiple images joined together can be viewed in a scrolling display.
1 Select a panorama in single-frame playback.
2 Rotate the zoom lever clockwise.
• Press FGHI(arrow pad) to scroll the image in |
|
|
|
|
1x |
|
|
||
the direction of the pressed button. |
|
|
|
|
|
|
|
|
|
|
|
|
|
|
• During playback, you can rotate the zoom lever clockwise to zoom in from 2× to 14× or
counterclockwise to zoom out. Press the A button to return to single-frame playback.
•To view other images at the same zoom ratio, press the INFO button and then press HI(arrow pad). Press the INFO button again to re-enable scrolling. You can also view other images using the control dial.
16 EN
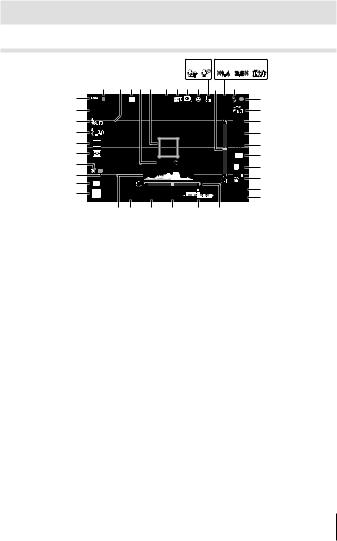
Monitor display |
|
|
|
|
|
|
|||
Shooting screen displays |
|
|
|
|
|
||||
|
|
|
|
|
0 a |
c |
d |
||
|
|
|
|
|
|
x1.4 |
2.0 x |
|
|
|
1 2 345 6 78 9 b |
e |
|
||||||
E |
|
BKT |
|
FD-1 |
2 |
x1.4 |
|
f |
|
D |
S-ISON |
|
|
|
|
|
|
g |
|
C |
|
|
|
|
|
|
ISO-A |
h |
|
B |
|
|
|
|
|
|
200 |
i |
|
|
|
|
|
|
|
AUTO |
|||
|
|
|
|
|
|
|
WB |
|
|
A |
|
|
|
|
|
|
AF |
j |
|
z |
|
|
|
|
|
|
4:3 |
k |
|
|
|
|
Focus |
|
|
||||
y |
LOG |
|
|
|
L N |
l |
|||
x |
|
|
|
|
|
||||
|
|
|
|
|
FHD F |
|
|||
|
|
|
|
|
|
m |
|||
w |
C1 |
|
|
|
|
|
30p |
||
|
|
|
|
01:02:03 |
n |
||||
v |
P |
125 |
F5.6 |
+2.0 |
|||||
|
1023 |
o |
|||||||
|
|
u t |
s |
r |
q |
p |
|
|
|
No. |
Name |
1 |
Card write indicator |
2 |
Grid Guide |
3 |
Bracketing icon |
4 |
AF fine-tuning guide |
5 |
AF target mark |
6 |
Accessory |
7 |
Digital zoom ratio*1 |
8 |
Time lapse shooting |
9 |
Face priority |
0 |
Movie sound |
a |
Wind noise reduction |
b |
Attitude indicator (pitch) |
c |
Optical zoom ratio/ |
magnification*1 |
|
d |
Internal temperature warning |
e |
Flash (blinks: charging in progress, |
lights up: charging completed) |
|
f |
Focus indicator |
No. |
Name |
g |
Picture Mode |
h |
ISO sensitivity |
i |
White balance |
j |
AF mode |
k |
Aspect |
l |
Image quality (still images) |
m |
Record mode (movies) |
n |
Movie recording length |
o |
Number of storable still pictures |
p |
Attitude indicator (roll) |
q |
Top: Flash intensity control |
Bottom: Exposure compensation |
|
r |
Exposure compensation |
s |
Aperture value |
t |
Shutter speed |
u |
Histogram |
v |
Shooting mode |
*1 Displayed at all times if [nMicroscope Control] (P. 27) is in use.
EN 17

No. Name
wCustom mode
xLOG icon/warning
yGPS icon
zMetering
Ao/Y/Pro Capture shooting
BFlash Compensation
CFlash mode
DImage stabilization
EBattery check
Reading a histogram
If the peak fills too much of the frame, the image will appear mostly black.
If the peak fills too much of the frame, the image will appear mostly white.
The green section shows luminance distribution within the screen’s center.
Switching the displays
Press the INFO button to cycle through the displays as follows: Basic Information*1, Image Only, Histogram Display (Custom1), Attitude Indicator (Custom2).
•You can change Custom1 and Custom2 settings. g[G/Info Settings] > [LV-INFO] (P. 62)
•Hold the INFO button and rotate the control dial to rotate the shooting information display.
*1 Not displayed in A mode (movie mode) unless recording is in progress.
The Attitude Indicator
The attitude indicator shows the amount of camera tilt. The vertical bar shows pitch, and the horizontal bar shows roll.
•The indicator is intended as a guide only.
•Error in the display can be corrected via calibration (P. 69).
18 EN
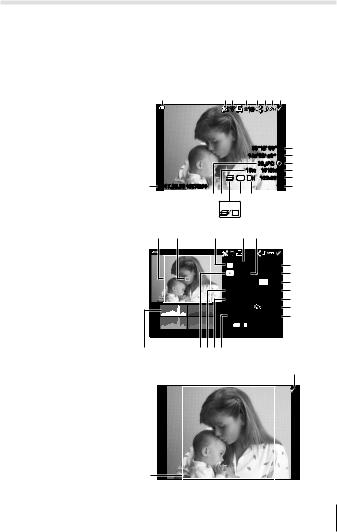
Playback mode display
Switching the displays
Press the INFO button to cycle through the displays as follows: Simplified, Overall, Image Only.
•Histogram and highlight/shadow displays can be added to the playback information display. g[G/Info Settings] > [qInfo] (P. 62)
Simplified display
Overall display
Image only
1 |
23 4 5678 |
|
||
|
|
×10 |
|
|
|
|
39°12’ 30” N |
9 |
|
|
|
145°23’ 59” W |
0 |
|
|
|
|
20.5°C |
a |
|
|
10m |
1012hPa |
b |
|
|
4:3 L N |
100-0015 |
c |
j 2017.02.26 12:30:00 |
|
|
15 |
d |
|
ih |
f e |
|
|
|
|
g |
|
|
|
|
HDR1 |
|
|
k l |
m |
n o |
|
|
|
×10 |
|
|
P |
125 |
F5.6 |
p |
|
+2.0 |
25mm |
q |
|
|
+1.0 |
r |
WB |
A+4 |
G+4 |
s |
AUTO |
|||
ISO 400 |
sRGB |
t |
|
|
|
Natural |
u |
4000×3000 |
1/8 |
v |
|
|
4:3 L N |
100-0015 |
|
2017.02.26 12:30:00 |
|
15 |
|
A zyxw
8
k
EN 19

No. |
Name |
*1 |
*2 |
*3 |
|
1 |
Battery check |
R |
R |
– |
|
2 |
Including GPS |
R |
R |
– |
|
|
information |
|
|
|
|
3 |
Eye-Fi transfer |
R |
R |
– |
|
data/Wi-Fi |
|||||
4 |
Print reservation/ |
R |
R |
– |
|
number of prints |
|||||
5 |
Share order |
R |
R |
– |
|
6 |
Adding sound |
R |
R |
– |
|
7 |
Protect |
R |
R |
– |
|
8 |
Image selected |
|
R |
R |
R |
9 |
Latitude |
|
R |
– |
– |
0 |
Longitude |
R |
– |
– |
|
a |
Direction |
R |
– |
– |
|
|
information |
|
|
|
|
b |
Atmospheric |
R |
– |
– |
|
c |
File number |
R |
R |
– |
|
d |
Frame number |
R |
R |
– |
|
e |
Image quality |
R |
R |
– |
|
f |
Aspect ratio |
R |
R |
– |
|
g |
Focus Stacking/ |
R |
R |
– |
|
|
HDR image |
|
|
|
|
h |
Altitude/Water |
R |
– |
– |
|
depth |
|||||
i |
Temperature |
R |
– |
– |
|
|
(water temperature) |
|
|
|
|
No. |
Name |
*1 |
*2 |
*3 |
j |
Recording date |
R |
R |
– |
|
and time |
|
|
|
k |
Aspect border*4 |
R |
R |
R |
l |
AF area pointer |
– |
R |
– |
m |
Shooting mode |
– |
R |
– |
n |
Shutter speed |
– |
R |
– |
o |
Exposure |
– |
R |
– |
compensation |
||||
p |
Aperture value |
– |
R |
– |
q |
Focal length |
– |
R |
– |
r |
Flash intensity |
– |
R |
– |
control |
||||
s |
White balance |
– |
R |
– |
compensation |
||||
t |
Color space |
– |
R |
– |
u |
Picture mode |
– |
R |
– |
v |
Compression rate |
– |
R |
– |
w |
Image size |
– |
R |
– |
x |
ISO sensitivity |
– |
R |
– |
y |
White balance |
– |
R |
– |
z |
Metering mode |
– |
R |
– |
A |
Histogram |
– |
R |
– |
*1 Simplified display
*2 Overall display
*3 Image only
*4 Displayed only if an aspect ratio other than 4:3 is selected with a RAW image quality option.
20 EN

Shooting using basic functions
Using the shooting modes
Selecting shooting mode
Turn the mode dial to set the shooting mode to the indicator.
• After selecting O, A, ^, or k, select the sub mode.
List of shooting mode
B (iAUTO mode)........................ |
P. 21 |
O (Scene Mode) ...................... |
P. 22 |
P (Program mode) ........................ |
P. 9 |
A (movie mode) ......................... |
P. 25 |
A (A mode) ................................. |
P. 22 |
^(Underwater mode) .............. |
P. 26 |
C1 (Custom mode 1)................... |
P. 22 |
k(Microscope mode).................. |
P. 27 |
C2 (Custom mode 2)................... |
P. 22 |
|
|
•Some features may be unavailable depending on the shooting mode and camera settings. g“List of settings available in each shooting
mode” (P. 111), “List of Asettings” (P. 112), “List of O settings” (P. 114), “List of ^settings” (P. 113)
•In certain shooting modes, the camera may take a few moments for image processing after taking a picture.
B (iAUTO mode)
A full auto mode in which the camera automatically optimizes settings for the current scene. The camera does all the work, which is convenient for beginners.
1
2
Rotate the mode dial to B.
Press the shutter button halfway down to focus.
The focus indicator will blink to show that the camera is not in focus. Focus again.
3 Press the shutter button all the way down to shoot.
EN 21

A (A mode)
When an aperture value is set, the camera automatically sets an appropriate shutter speed. You can change the aperture by rotating the control dial or by pressing Fand then FG(arrow pad).
C1/C2 (Custom mode)
If you store shooting settings in [Reset/Assign Custom Modes] (P. 52), you can call up and shoot using the stored shooting settings.
• You can register different settings in C1 and C2.
O (scene mode)
Only by selecting a sub mode according to the subject or the scene, you can shoot with an proper setting.
Sub mode 1 |
Sub mode 2 |
Application |
|
|
|
|
B Portrait |
Suitable for portrait shooting. |
|
|
|
|
|
Smoothes out skin tones and |
|
e e-Portrait |
texture. This mode is suitable when |
|
viewing images on a high-definition |
|
|
|
|
|
|
TV. |
People |
Portrait + |
Suitable for portraits featuring a |
|
D Landscape |
landscape in the background. |
|
Portrait + |
Suitable for portrait shooting against |
|
U Nightscape |
a background of night view. |
|
G Children |
Suitable for photographs of children |
|
and other active subjects. |
|
|
|
|
|
G Nightscape |
Suitable for tripod shooting of night |
|
scenes. |
|
|
|
|
|
Portrait + |
Suitable for portrait shooting against |
|
U Nightscape |
a background of night view. |
Nightscapes |
|
Suitable for shooting night scenes |
|
H Handheld Starlight |
without a tripod. |
|
|
Reduces blur when shooting low |
|
|
light/illuminated scenes. |
|
X Fireworks |
Suitable for shooting fireworks at |
|
night. |
|
|
|
22 EN

Sub mode 1 |
Sub mode 2 |
Application |
|
|
|
The camera automatically shoots |
|
|
|
multiple images, takes newly bright |
|
|
|
areas only, and composites them |
|
|
|
into a single image. |
|
Nightscapes |
d Live Composite |
With normal long exposure, an |
|
image of light trace such as star |
|||
|
|
||
|
|
trails with bright buildings tends |
|
|
|
to get too bright. You can capture |
|
|
|
them without over exposure while |
|
|
|
checking the progress. |
|
|
C Sport |
Suitable for fast action shooting. |
|
Motion |
|
|
|
G Children |
Suitable for photographs of children |
||
|
and other active subjects. |
||
|
|
||
|
F Landscape |
Suitable for landscape shooting. |
|
|
` Sunset |
Suitable for shooting the sunset. |
|
|
|
Suitable for shooting at snow- |
|
|
g Beach & Snow |
capped mountains, seascapes in the |
|
|
|
sun, and other whitish scenes. |
|
Scenery |
|
You can shoot and combine multiple |
|
s Panorama |
images to create an image with |
||
|
|||
|
a wide angle of view (panoramic |
||
|
|
||
|
|
image). |
|
|
|
Suitable for contrasting scenes. |
|
|
E Backlight HDR |
This mode captures multiple images |
|
|
and merges them into one, properly |
||
|
|
||
|
|
exposed image. |
|
|
W Candlelight |
Suitable for shots of candlelit |
|
|
scenes. Warm colors are preserved. |
||
|
|
||
|
B Portrait |
Suitable for portrait shooting. |
|
|
|
Smoothes out skin tones and texture. |
|
|
e e-Portrait |
This mode is suitable when viewing |
|
Indoors |
|
images on a high-definition TV. |
|
G Children |
Suitable for photographs of children |
||
|
|||
|
and other active subjects. |
||
|
|
||
|
|
Suitable for contrasting scenes. |
|
|
E Backlight HDR |
This mode captures multiple images |
|
|
and merges them into one, properly |
||
|
|
||
|
|
exposed image. |
EN 23

1 Rotate the mode dial to O.
2 Use FGHI(arrow pad) or the control dial to highlight an option for sub mode 1 and press the A button to select.
Sub mode 1
People Nightscapes
Motion |
Scenery |
Indoors
3 |
Use HI(arrow pad) or the control dial |
Sub mode 2 |
|
to highlight an option for sub mode 2 and |
Portrait |
press the A button to select. |
|
•Press the button to return to the sub mode 1 display.
•When the mode dial is rotated to O, the sub mode 1 display can be viewed by pressing H(arrow pad).
•The live control (P. 34) can also be used to select sub mode 2.
d Live Composite
1Press the shutter button halfway down to focus.
•Mount the camera securely on a tripod to reduce blur caused by camera shake.
•If the focus indicator blinks, the camera is not in focus. When the focus indicator is flashing, you can focus at infinity by pressing the A button while the shutter button is pressed halfway.
2To take the picture, gently press the shutter button all the way down while being careful not to shake the camera.
•The camera configures the proper settings automatically and starts shooting.
•After pressing the shutter button, there is a time lag until shooting starts.
•A combined panorama image is displayed per certain period of time.
3Press the shutter button again to stop shooting.
•The recording length in one shooting is up to three hours.
24 EN

sPanorama
1 Press the shutter button to take the first frame.
2Pan the camera slowly to frame the second shot.
•A target mark will be displayed.
3Move the camera slowly so that the pointer and the target mark overlap. The camera releases the shutter automatically when the pointer and the target overlap.
•To combine only two frames, press the A button.
Target mark 

Pointer
Cancel |
|
Save |
|
Screen when combining images from left to right
4Repeat step 3 to take a third frame. The camera automatically combines the frames into a single panorama image.
• To cancel the panorama function, press the button.
A (movie mode)
In addition to normal footage, you can record high-resolution 4K movies or shoot high-speed movies that play back in slow motion.
|
Sub mode |
Application |
|
|
|
A Standard |
Record normal movies. |
|
C |
4K |
Record high-definition 4K movies. |
D |
High-speed |
Record fast-moving subjects for slow-motion playback. |
|
|
|
1 |
Rotate the mode dial to A. |
2 |
Use HI(arrow pad) or the control dial |
|
to highlight a sub mode and press the A |
button to select.
Standard
4K HS
3 Press the R(movie) button to start recording.
•To end recording, press the R(movie) button again.
•When the mode dial is rotated to A, the sub mode display can be viewed by pressing H(arrow pad).
EN 25

Image Quality
You can adjust image quality using live controls. g“Record mode (movies)” (P. 39)
^(Underwater mode)
Only by selecting a sub mode according to the subject or the scene, you can shoot underwater photographs with a proper setting.
Sub mode |
Application |
|
|
Underwater |
Optimized for underwater photography that uses |
] Snapshot |
natural light. |
E Underwater Wide |
Suitable for shooting underwater. |
|
|
w Underwater Macro |
Suitable for shooting close-up view underwater. |
|
Suitable for contrasting underwater scenes. |
|
This mode captures multiple images and merges them |
_ Underwater HDR |
into one, properly exposed image. |
|
This mode may not function well for shooting a fast- |
|
moving subject. |
1
2
Rotate the mode dial to ^.
Use HI(arrow pad) or the control dial to highlight a sub mode and press the A button to select.
Underwater Snapshot
3 Press the shutter button all the way down to take the picture.
•To take a series of shots at the same focus distance, use AFL (P. 32) or MF (P. 37).
•When the mode dial is rotated to ^, the sub mode display can be viewed by pressing H(arrow pad).
26 EN

k(Microscope mode)
Images can be taken from up to 1 cm away from the subject. In this mode you can shoot images with a large depth of field, and perform focus bracket shooting of a set number of images.
1 |
Rotate the mode dial to k. |
2 |
Use HI(arrow pad) or the control dial |
|
to highlight a sub mode and press the A |
button to select.
Microscope
|
|
|
|
|
|
|
|
|
|
Sub mode |
Application |
|||
m Microscope |
Images can be taken from up to 1 cm away from the subject. |
|||
|
The camera shoots a number of images, automatically |
|||
Focus |
shifting the focus in each image. These can then be |
|||
combined into a composite image with a large depth of field. |
||||
o Stacking*1 |
||||
|
Two images are recorded, the first frame and the composite |
|||
|
image. |
|||
p Focus |
In this mode, the camera shoots a number of images, |
|||
automatically shifting the focus in each image. The number of |
||||
Bracketing |
images and shooting steps are set in [Focus BKT] (P. 55). |
|||
|
||||
|
Optimized for close-ups with the subject magnified in the |
|||
n Microscope |
monitor.The magnification level when the shooting distance |
|||
is 1 cm is displayed on the monitor. Pressing I(arrow pad) |
||||
Control |
can change the magnification level. At high magnification |
|||
|
||||
|
levels, the image may be grainy. |
|||
*1 There may be situations in which it is not possible to create composite image due to camera shake.
3 Press the shutter button all the way down to shoot.
•To take a series of shots at the same focus distance, use AFL (P. 32) or MF (P. 37).
•When the mode dial is rotated to k, the sub mode display can be viewed by pressing H(arrow pad).
EN 27

Using the zoom
Zoom in to photograph distant objects or zoom out to increase the area visible in the frame. Zoom can be adjusted using the zoom lever.
W side |
T side |
Using shooting options (Set by direct button)
Frequently used functions are assigned to IFG(arrow pad). Just by pressing the button, you can select the assigned function directly.
Some features may be unavailable depending on the shooting mode and camera settings. g“List of settings available in each shooting mode” (P. 111)
Flash
You can use a flash when shooting.
1
2
Press the #button to display options.
Use HI(arrow pad) or the control dial to highlight a flash mode and press the A button to select.
#AUTO |
Flash Auto |
The flash fires automatically in low light or |
|
backlight conditions. |
|||
|
|
||
|
|
|
|
# |
Fill In |
The flash fires regardless of the light |
|
conditions. |
|||
|
|
||
|
Redeye |
This function allows you to reduce the red- |
|
|
eye phenomenon. |
||
|
|
||
$ |
Flash Off |
The flash does not fire. |
|
|
|
|
|
|
Red-Eye Slow |
Combines slow sync with red-eye |
|
|
reduction. |
||
|
|
||
#SLOW |
SLOW |
Slow shutter speeds are used to brighten |
|
dimly-lit backgrounds. |
|||
|
|
28 EN
|
|
Control flash output manually. If you |
|
|
|
highlight “Manual” and press the INFO |
|
|
Manual |
button before pressing the A button, you |
|
|
|
can adjust flash output using FGHI |
|
|
|
(arrow pad) or the control dial. |
|
|
|
The dedicated underwater strobe or the |
|
|
|
Olympus wireless RC flash is used to take |
|
#RC |
Remote Control |
pictures. For details, see “Taking pictures |
|
|
|
with the Olympus Wireless RC Flash |
|
|
|
System” (P. 105). |
|
q |
LED On |
The LED turns on when a picture is taken. |
|
This is effective for taking close up pictures. |
|||
|
|
•In [ ], after the pre-flashes, it takes about 1 second before the shutter is released. Do not move the camera until shooting is complete.
•[ ] may not work effectively under some shooting conditions.
•The shutter speed becomes slower in [#SLOW]. Use a tripod and secure the camera.
•Some features may be unavailable depending on the shooting mode and camera settings.
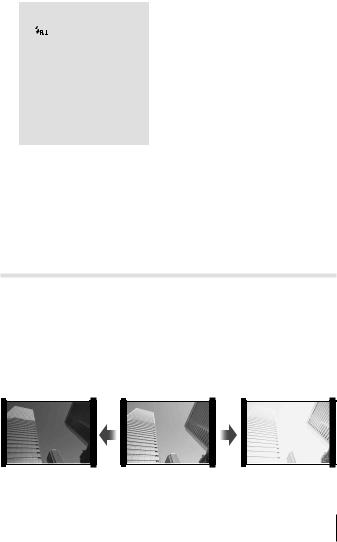
Exposure compensation
Compensates the brightness (appropriate exposure) adjusted by the camera.
1 Rotate the control dial, or press the F button and use HI (arrow pad).
•Depending on the shooting mode and camera settings, you may not be able to adjust exposure compensation using the control dial.
•Choose positive (“+”) values to make pictures brighter, negative (“–”) values to make pictures darker.
Negative (–) |
No compensation (0) |
Positive (+) |
EN 29

Single/Sequential
Hold the shutter-release button all the way down to take a series of photographs.
1
2
Press the jY button to display the direct menu.
Press HI(arrow pad) or rotate the control dial to highlight an option and then press the A button.
o Single |
Shoots 1 frame at a time when the shutter button |
||
is pressed (normal shooting mode). |
|||
|
|
||
|
|
Hold the shutter-release button all the way down |
|
|
|
to take a series of photographs. |
|
|
|
• To choose a frame advance rate, highlight |
|
|
Sequential |
[Sequential High] and press the INFO button |
|
T |
before you press the A button. Choose from |
||
High |
frame advance rates of approximately 10 |
||
|
|
frames per second (10 fps) or 20 frames per |
|
|
|
second (20 fps). Use FGHI(arrow pad) |
|
|
|
or the control dial to highlight a frame advance |
|
|
|
rate and press the A button to select. |
|
S |
Sequential |
Pictures will be taken at about 5 fps while the |
|
Low |
shutter button is pressed all the way down. |
||
|
|
Sequential shooting begins when you press the |
|
|
|
shutter button halfway. Press the shutter button all |
|
J |
Pro Capture |
the way down to begin recording captured images |
|
|
|
to the card, including those for a halfway press. |
|
|
|
g“Pro Capture” (P. 31) |
|
•During sequential and Pro Capture shooting, focus, exposure, and white balance are fixed at the values for the first shot.
•During sequential shooting, if the battery check blinks due to low battery, the camera stops shooting and starts saving the pictures you have taken on the card. The camera may not save all of the pictures depending on how much battery power remains.
30 EN
 Loading...