


 Loading...
DIGITAL CAMERA
TG-4
Instruction Manual
 Thank you for purchasing an Olympus digital camera. Before you start to use your new camera, please read these instructions carefully to enjoy optimum performance and a longer service life. Keep this manual in a safe place for future reference.
 We recommend that you take test shots to get accustomed to your camera before taking important photographs.
 The screen and camera illustrations shown in this manual were produced during the development stages and may differ from the actual product.
Unpack the box contents
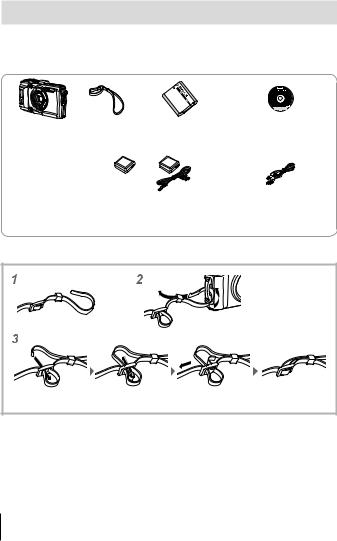
The following items are included with the camera.
If anything is missing or damaged, contact the dealer from whom you purchased the camera.
Digital camera |
Strap |
Lithium Ion Battery |
OLYMPUS Setup |
|
(LI-92B) |
CD-ROM |
|||
|
|
|||
|
|
or |
|
|
|
USB-AC adapter (F-2AC) |
USB cable (CB-USB8) |
||
Other accessories not shown: Warranty card
Contents may vary depending on purchase location.
Attaching the camera strap
• Pull the strap tight so that it does not come loose.
2 EN

Names of parts
1Connector cover
2Connector cover lock
3LOCK knob
4Speaker
5Strap eyelet
6Lens
7Self-timer lamp/LED Illuminator/ AF illuminator
8Flash
9Stereo microphone
0 GPS antenna
anbutton
bIndicator lamp
cShutter button
dZoom lever
eMonitor
fINFO (Information display) button
gR(Movie) button
hMode dial
iq(Playback) button
jA button
k/Wi-Fi button
lMulti-connector
mHDMI micro connector
nTripod socket
oBattery/card compartment cover
pBattery/card compartment cover lock
qArrow pad
rF(Up) / F (Exposure compensation) button
sI(Right) /#(Flash) button
tG(Down) /
jY(Sequential shooting/Selftimer) / (Erase) button
uH(Left) button
• FGHIinstruct to press the up/down/left/right arrow pad.
EN 3
Preparations for shooting
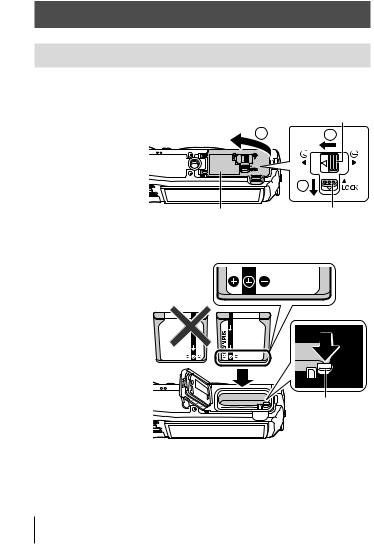
Inserting and removing the battery and card
1 Follow Steps 1, 2 and 3 to open the battery/card compartment cover.
• Turn off the |
Battery/card compartment cover lock |
|
camera before |
3 |
2 |
opening the |
||
battery/card |
|
|
compartment |
|
|
cover. |
|
|
|
|
1 |
|
Battery/card compartment cover |
LOCK knob |
2 Insert the battery while sliding the battery lock knob in the direction of the arrow.
•Insert the battery as illustrated with the C mark
toward the battery lock knob.
•If you insert the battery in the wrong direction, the camera is not turned on. Be sure to insert it in the correct direction.
•Slide the battery lock knob in the direction of the arrow to unlock, and then remove the battery.
Battery lock knob
4 EN
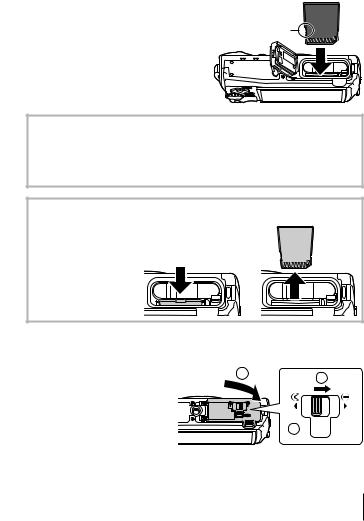
3 Insert the card straight until it clicks into place.
• Do not touch the metallic parts of |
|
|
the card directly. |
Write-protect |
|
• Always use the specified cards |
||
switch |
||
with this camera. Do not insert |
|
|
other types of memory cards. |
|
Cards compatible with this camera
SD/SDHC/SDXC/Eye-Fi (with Wireless LAN function) card (commercially available) (for compatibility card details, visit the Olympus website.)
•This camera can be used without a card by storing images in its internal memory. g“Checking the image saving location” (P. 96)
To remove the card
Press the card in until
it clicks and comes out 1 2 slightly, then remove
the card.
4 Follow Steps 1, 2 and 3 to close battery/card compartment cover.
• When using the camera, |
1 |
|
|
be sure to close the |
2 |
||
|
battery/card compartment cover.
3 


EN 5
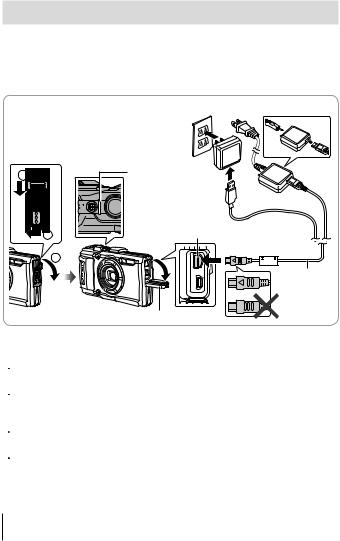
Charging the battery
1 Check that the battery is in the camera, and connect the USB cable and USB-AC adapter.
•The battery is not fully charged at shipment. Before use, be sure to charge the battery until the indicator lamp turns off (up to 5 hours).
Connecting the camera
|
AC outlet |
2 |
Indicator lamp |
|
On: Charging |
|
Off: Charged |
1 |
Multi-connector |
|
3 |
or
USB cable (supplied)
Connector cover
For charging the battery abroad, see “Using your charger and USB-AC adapter abroad” (P. 95).
 Never use any cable other than supplied or Olympus-designated USB cable. This may cause smoking or burning.
 The included F-2AC USB-AC adapter (hereafter referred to as USB-AC adapter) differs depending on the region where you purchased the camera. If you received a plug-in type USB-AC adapter, plug it directly into AC outlet.
 Be sure to unplug the power plug of the USB-AC adapter from the wall outlet when the charging is complete or the playback ends.
 For details on the battery, see “Handling the Battery” (P. 107). For details on the USB-AC adapter, see “USB-AC adapter” (P. 110).
6 EN

•If the indicator lamp does not light, reconnect the USB cable and USB-AC adapter to the camera.
•If “No Connection” is displayed on the back monitor, disconnect the USB cable and set [Storage] in [USB Connection] (P. 58) before connecting the cable again.
When to charge the batteries
Charge the battery when the error message shown on the right appears.
Flashes in red 
Error message
Battery Empty
EN 7
Turning on the camera and making the initial settings
When you turn on the camera for the first time, a screen appears enabling to set the language for the menus and messages displayed in the monitor, and the date and time.
To change the selected date and time, see “Setting the date and time d [X]” (P. 60).
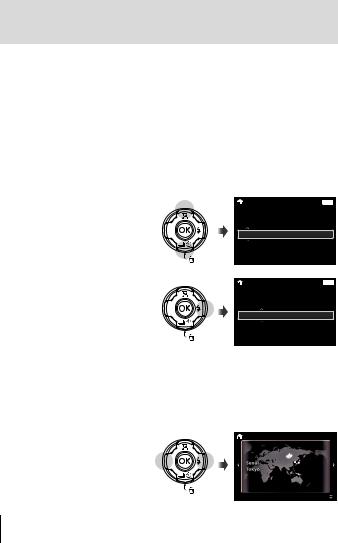
1 Press the nbutton to turn on the camera, press FGHIof the arrow pad to select your language and press the A button.
•In the case that the power is not turned on when you press the n button, check the direction of the battery. g“Inserting and removing the battery and card” (P. 4)
2 Press FGof the arrow pad to select the year for [Y].
3 Press Iof the arrow pad to save the setting for [Y].
|
X |
|
|
|
|
Back MENU |
|
Y |
|
M |
D |
Time |
|
|
|
. -- . -- |
-- : -- |
|
||
2015 |
Y/M/D |
|||||
|
|
|
|
|
|
|
|
|
|
|
|
|
|
|
X |
|
|
|
|
Back MENU |
|
Y |
|
M |
D |
Time |
|
2015 . |
|
. -- |
-- : -- |
|
||
-- |
Y/M/D |
|||||
|
|
|
|
|
|
|
|
|
|
|
|
|
|
4 As in Steps 2 and 3, press FGHIof the arrow pad to set [M] (month), [D] (day), [Time] (hours and minutes), and [Y/M/D] (date order), and then press the A button.
•For precise time setting, press the A button as the time signal strikes 00 seconds.
5 Use HI(arrow pad) to select the time zone and then press the A button.
• Use FG(arrow pad) to turn daylight saving time ([Summer]) on or off.
8 EN
Using basic functions
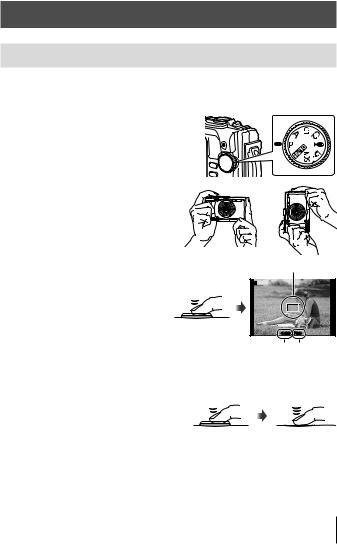
Taking photographs (Pmode)
1 |
Press the nbutton to turn on the camera. |
|
When the camera is turned on, the monitor will turn on. |
2 |
Set the mode dial to P. |
|
In mode P, the camera automatically |
|
adjusts shutter speed and aperture in |
|
response to subject brightness. |
3 Frame the shot.
•When holding the camera, take care not to cover the flash, microphone or other important parts with your fingers, etc.
4 Press the shutter button halfway down to focus.
The camera was unable to focus if the AF target mark flashes red. Try focusing again.
•The shutter speed and aperture value are displayed in red if the camera is unable to achieve optimal exposure.
5 To take the picture, gently press the shutter button all the way down while being careful not to shake the camera.
Press halfway
Press halfway
AF target
P
1/400 F6.9
Shutter Aperture
speed value
Press the rest of the way down
EN 9
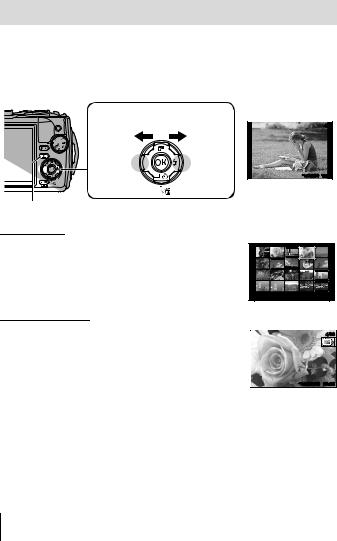
Viewing photographs (Playing back images)
Turn on the camera.
Press the qbutton.
•Your most recent photograph is displayed.
•Press HI(arrow pad) to select an image.
Displays the |
Displays the |
previous frame |
next frame |
qbutton |
Arrow pad |
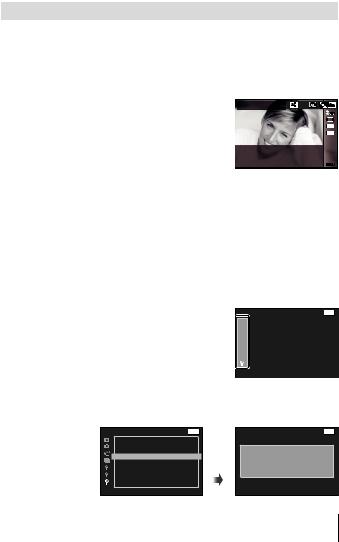
Index display
•In single-frame playback, press the zoom lever to the W side for Index playback.
•Use FGHI(arrow pad) to move the cursor.
•Press the zoom lever to the T side, or press the A button for single-frame playback.
Close-up playback
•In single-frame playback, press the zoom lever to the T side to zoom in up to 10×; press the W side to zoom out. Press the A button to return to single-frame playback.
•Press FGHI(arrow pad) to scroll an image to the direction of the button you pressed.
 4/30
4/30
’15/02/26 12:30
Still image
’15/02/26 12:30
 4/30
4/30
’15/02/26 12:30
10 EN
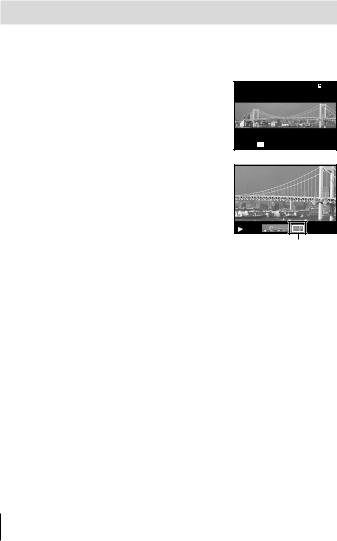
Recording movies
1 Press the R(movie) button to start recording.
•The movie is shot in the set shooting mode. Note that the shooting mode effects may not be obtained for some shooting modes.
•Sound is also recorded.
•When using a camera with a CMOS image sensor, moving objects may appear distorted due to the rolling shutter phenomenon. This is a physical phenomenon whereby distortion occurs in the filmed image when shooting a fast-moving subject or due to camera shaking. In particular, this phenomenon becomes more noticeable when using a long focal length.
|
REC 0:00 |
0:34 |
Lights up |
REC 0:00 |
0:34 |
red when |
|
|
recording |
Recording time |
|
|
|
|
|
Recording length |
|
|
|
(P. 97) |
2 Press the R(movie) button again to stop recording.
EN 11
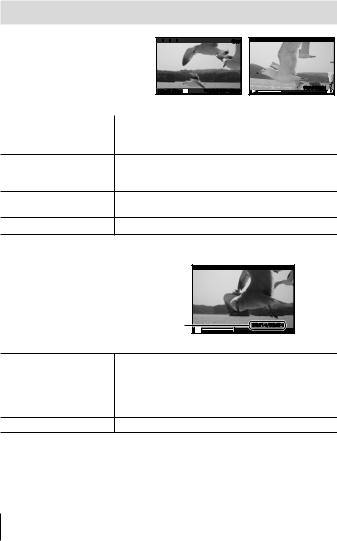
Movie playback
Select a movie in the Playback mode, and press the A button.


 4/30
4/30
Movie Play OK 
 ’15/02/26 12:30
00:12/00:34 |
|
Movie |
During playback |
|
|
|
Pausing and restarting |
Press the A button to pause playback. During |
|
playback |
pause, fast forward or reverse, press the A button |
|
to restart playback. |
|
|
|
|
|
Press I(arrow pad) to fast forward. Press I Fast forward (arrow pad) again to increase the fast forward
speed.
Rewind |
Press H(arrow pad) to rewind. Press H(arrow |
|
pad) again to increase the rewind speed. |
||
|
Adjusting the volume Use FG(arrow pad) to adjust the volume.
Operations while playback is paused
Elapsed time/Total shooting time |
00:14/00:34 |
|
During pause |
Cueing |
Use F(arrow pad) to display the first frame and |
|
press Gto display the last frame. |
||
|
||
Advancing and |
Press Ior H(arrow pad) to advance or rewind |
|
rewinding one frame at one frame at a time. Hold Ior H(arrow pad) |
||
a time |
pressed for continuous advance or rewind. |
|
Resuming playback Press the A button to resume playback.
To stop movie playback
Press the button.
•To play back movies on the computer, the supplied PC software is recommended. For the first use of the PC software, connect the camera to the computer, then launch the software.
12 EN

Erasing images during playback
1 |
Display the image you want to erase and press . |
|
|
|
• To erase a movie, select |
Erase |
Back MENU |
|
the movie to erase and |
|
4/30 |
|
press . |
|
|
|
|
|
Erase |
|
|
|
Cancel |
|
|
|
100-0004 |
2 |
Press FG(arrow pad) to select [Erase], and press the A |
||
|
button. |
|
|
•Grouped images are erased as a group (P. 54).
•Multiple images or all images can be erased at a time (P. 54).
EN 13
Playing back panorama and grouped images
Playing back panorama images
Panorama images that were combined together using [Auto] or [Manual] can be scrolled for viewing.
1 Select a panorama image during |
|
4/30 |
|
|
|
||
playback. |
|
|
|
2 Press the A button. |
|
|
|
|
Replay OK |
’15/02/26 12:30 |
|
To control panorama image playback |
|
|
|
Stop playback: Press the button. |
|
|
|
Pause: Press the A button. |
|
|
|
Control while paused |
|
|
|
Press FGHI(arrow pad) to scroll the image |
|
|
|
in the direction of the pressed button. |
|
|
|
Press the zoom lever to enlarge/shrink the |
Viewing area |
||
image. |
|||
|
|
||
Press the A button to restart scrolling. |
|
|
|
14 EN

Playing back grouped images
With sequential shooting (j/c/d) (P. 32) and [pFocus BKT] (P. 23) in k(Microscope mode), the taken images are displayed as a group during playback.
Expands.
• Expand to view the frames of a T side group in index view.
• If you want to delete images from the grouped images, you can expand the group and delete the images individually.
|
|
|
|
4/30 |
Expand |
|
|
|
|
T |
|
|||
Play |
OK |
|
|
’15/02/26 12:30 |
Sequential images frame
•Select the image and press the A button to display the images respectively.
•Use HI(arrow pad) to view the previous/next frame.
A button |
|
Plays back the grouped images in sequence automatically or |
|
||
|
pauses playback. |
|
|
|
|
button |
|
Stops playback. |
EN 15
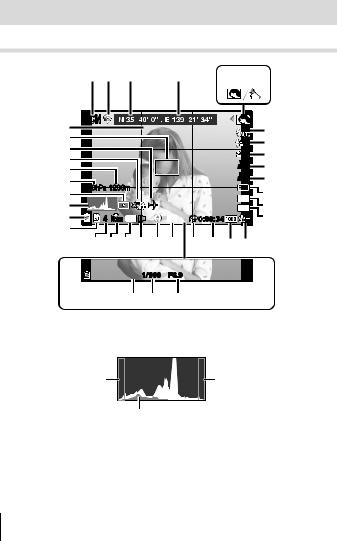
Monitor display
Shooting screen displays
1 |
2 |
3 |
4 |
5 |
6 |
||
|
|
|
|
|
|
|
|
34 |
SCN |
|
|
7 |
33 |
|
|
0.0 |
8 |
32 |
|
|
0.0 |
9 |
31 |
|
|
WB |
|
|
|
AUTO |
10 |
|
30 |
|
|
ISO |
|
880hPa 1200m |
|
AUTO |
12 |
|
28 |
|
16M |
||
29 |
|
|
11 |
|
27 |
|
z |
4:3 |
13 |
26 |
4 NORM Date n |
G |
0:00:34 |
14 |
25 |
242322212019 18 17 1615 |
|
||
|
|
|||

 1/100 F6.9
37 36 35
When the shutter button is pressed halfway down
Reading a histogram
If the peak fills too much of the frame, the image will appear mostly black.
If the peak fills too much of the frame, the image will appear mostly white.
The green section shows luminance distribution within the screen’s center.
Switching the displays
The displays change in the order of Normal → Detailed → No info. → Measurement position information each time the INFO button is pressed. g[GPS Settings] (P. 64)
16 EN

No. |
Name |
Normal |
Detailed |
No info. |
1 |
Shooting mode |
R |
R |
– |
2 |
Connection to Smartphone |
R |
R |
R |
3 |
Latitude |
R |
R |
– |
4 |
Longitude |
R |
R |
– |
5 |
Sub mode |
R |
R |
– |
6 |
Picture Mode |
R |
R |
– |
7 |
Flash |
R |
R |
– |
8 |
Flash Compensation |
R |
R |
– |
9 |
Exposure compensation |
R |
R |
– |
10 |
White balance |
R |
R |
– |
11 |
ISO sensitivity |
R |
R |
– |
12 |
o/Y |
R |
R |
R |
13 |
Image size (still images) |
R |
R |
– |
14 |
Aspect |
R |
R |
– |
15 |
Recording with sound/wind noise reduction |
R |
R |
– |
16 |
Image size (movies) |
R |
R |
– |
17 |
Movie recording length |
R |
R |
– |
18 |
Movie recording icon |
R |
R |
– |
19 |
GPS icon |
R |
R |
– |
20 |
Direction information |
R |
R |
– |
21 |
Conversion Lens |
R |
R |
– |
22 |
Date stamp |
R |
R |
– |
23 |
Compression |
R |
R |
– |
24 |
Number of storable still pictures |
R |
R |
– |
25 |
Current memory |
R |
R |
– |
26 |
Battery check |
R |
R |
– |
27 |
Histogram |
– |
R |
– |
28 |
Metering |
– |
R |
– |
29 |
Atmospheric/Hydraulic pressure |
– |
R |
– |
30 |
Altitude/Water depth |
– |
R |
– |
31 |
Image stabilization |
– |
R |
– |
32 |
World time |
– |
R |
– |
33 |
AF target mark |
R |
R |
R |
34 |
Grid Guide |
– |
R |
– |
35 |
Aperture value |
R |
R |
R |
36 |
Shutter speed |
R |
R |
R |
37 |
Camera shake warning |
R |
R |
R |
EN 17
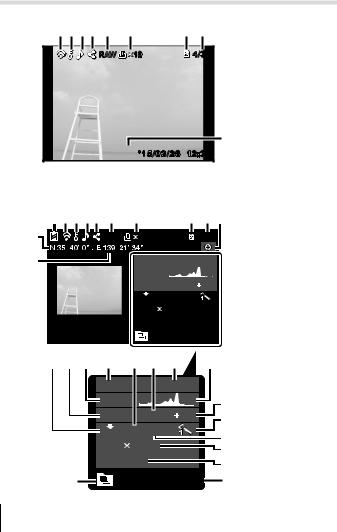
Playback mode display
• Normal
2 3 4 5 |
6 |
7 |
8 |
9 |
|
RAW |
10 |
|
4/30 |
27
 ’15/02/26 12:30
  26
26
Still image
• Detailed |
1 2 3 45 6 |
7 |
8 |
9 10 |
|
||||
12 |
RAW |
10 |
|
4/30 |
11 |
|
880hpa |
1200m |
|
|
|
P |
|
|
|
|
1/1000 |
F3.9 |
2.0 |
|
|
|
NORM |
ISO |
WB |
|
|
|
|
|
|
100 |
AUTO |
|
|
||
|
|
|
4608 |
3456 |
|
|
||
|
|
|
100-0004 |
|
|
|
||
|
|
|
|
’15/02/26 12:30 |
||||
|
|
|
|
|||||
131415 |
16 |
17 18 19 |
20 |
|||||
|
880hpa |
1200m |
|
||
|
P |
|
F3.9 |
2.0 |
21 |
|
1/1000 |
22 |
|||
|
NORM |
ISO |
WB |
|
|
|
100 |
AUTO |
|
23 |
|
|
|
|
|||
|
4608 |
3456 |
|
24 |
|
27 |
100-0004 |
|
25 |
||
’15/02/26 12:30 |
26 |
||||
18 EN

• No information |
|
Switching the |
|
||||
|
|
|
|
displays |
|
||
|
|
|
|
The displays change |
|||
|
|
|
|
in the order of Normal |
|||
|
|
|
|
→ Detailed → No info. |
|||
|
|
|
|
each time the INFO |
|||
|
|
|
|
button is pressed. |
|||
|
|
|
|
27 |
|
|
|
|
|
|
|
|
|
|
|
|
|
|
|
|
|
|
|
|
|
|
|
|
|
|
|
No. |
|
Name |
Normal |
Detailed |
|
No info. |
|
1 |
Battery check |
|
– |
R |
|
– |
|
2 |
Eye-Fi transfer data/Wi-Fi |
|
R |
R |
|
– |
|
3 |
Protect |
|
R |
R |
|
– |
|
4 |
Adding sound |
|
R |
R |
|
– |
|
5 |
Share order |
|
R |
R |
|
– |
|
6 |
RAW file |
|
R |
R |
|
– |
|
7 |
Print reservation/number of prints |
|
R |
R |
|
– |
|
8 |
Current memory |
|
R |
R |
|
– |
|
9 |
Frame number/total number of images |
|
R |
R |
|
– |
|
10 |
Direction information |
|
– |
R |
|
– |
|
11 |
Longitude |
|
– |
R |
|
– |
|
12 |
Latitude |
|
– |
R |
|
– |
|
13 |
Compression/Image size (movies) |
|
– |
R |
|
– |
|
14 |
Shutter speed |
|
– |
R |
|
– |
|
15 |
Shooting mode |
|
– |
R |
|
– |
|
16 |
Atmospheric/Hydraulic pressure |
|
– |
R |
|
– |
|
17 |
ISO sensitivity |
|
– |
R |
|
– |
|
18 |
Aperture value |
|
– |
R |
|
– |
|
19 |
Altitude/Water depth |
|
– |
R |
|
– |
|
20 |
Histogram |
|
– |
R |
|
– |
|
21 |
Exposure compensation |
|
– |
R |
|
– |
|
22 |
Picture mode |
|
– |
R |
|
– |
|
23 |
White balance |
|
– |
R |
|
– |
|
24 |
Image size (still images) |
|
– |
R |
|
– |
|
25 |
File name |
|
– |
R |
|
– |
|
26 |
Recording date and time |
|
R |
R |
|
– |
|
27 |
Grouped images |
|
R |
R |
|
R |
|
EN 19

Shooting using basic functions
Using the shooting modes
Selecting shooting mode
Turn the mode dial to set the shooting mode to the indicator.
• After selecting ^, O, or k, select the sub mode.
List of shooting mode
• The default settings of the function are highlighted in  .
.
Shooting mode |
|
|
|
|
|
|
Sub mode |
|
|
A (iAUTO mode) |
|
|
|
|
|
|
– |
P. 21 |
|
P (Program mode) |
|
|
|
|
|
|
– |
P. 9 |
|
A (A mode) |
|
|
|
|
|
|
– |
P. 21 |
|
C1 (Custom mode 1) |
|
|
|
|
|
|
– |
P. 21 |
|
|
|
|
|
|
|
|
|
|
|
C2 (Custom mode 2) |
|
|
|
|
|
|
– |
P. 21 |
|
^ |
] |
|
|
|
|
|
\ZWide1/[ZWide2/ |
|
|
ZSnapshot/ |
P. 22 |
||||||||
(Underwater mode) |
wZMacro/_ZHDR |
||||||||
|
|||||||||
|
m |
|
|
|
oFocus Stacking/ |
|
|||
k(Microscope mode) |
Microscope/ |
P. 23 |
|||||||
|
|
|
|||||||
|
pFocus BKT/nMicroscope Control |
|
|||||||
|
B |
|
ee-Portrait/FLandscape/ |
|
|||||
|
Portrait/ |
|
|||||||
|
1 |
Interval |
Shooting/#Live Composite/ |
|
|||||
O (Scene Mode) |
HHand-Held Starlight/GNight Scene/ |
P. 24 |
|||||||
UNight+Portrait/CSport/2Indoor/ |
|||||||||
|
3Self Portrait/`Sunset/XFireworks/ |
|
|||||||
|
_Cuisine/^Documents/gBeach & Snow/ |
|
|||||||
|
sSnow/sPanorama/EBacklight HDR |
|
|||||||
•“List of settings available in each shooting mode” (P. 103), “List of ^ settings” (P. 104), “List of O settings” (P. 105)
•In certain shooting modes, the camera may take a few moments for image processing after taking a picture.
20 EN
A (iAUTO mode)
A full auto mode in which the camera automatically optimizes settings for the current scene. The camera does all the work, which is convenient for beginners.
1
2
Rotate the mode dial to A.
Press the shutter button halfway down to focus.
The camera was unable to focus if the AF target mark flashes red. Try focusing again.
3 Press the shutter button all the way down to shoot.
A (A mode)
When an aperture value is set, the camera automatically sets an appropriate shutter speed. After pressing H(arrow pad), you can change the aperture value using FG.
C1/C2 (Custom mode)
If you store shooting settings in [Custom Mode Setup] (P. 57), you can call up and shoot using the stored shooting settings.
• You can register different settings in C1 and C2.
EN 21

^(Underwater mode)
Only by selecting a sub mode according to the subject or the scene, you can shoot underwater photographs with a proper setting.
Sub mode |
Application |
|
|
|
|
] ZSnapshot |
Suitable for shooting seaside and pool portraits. |
|
\ ZWide1 |
Suitable for shooting underwater. |
|
[ ZWide2 |
Suitable for shooting underwater. |
|
The focus distance is fixed to approximately 5 m. |
||
|
||
w ZMacro |
Suitable for shooting close-up view underwater. |
|
|
Suitable for contrasting underwater scenes. |
|
|
This mode captures multiple images and merges them |
|
_ ZHDR |
into one, properly exposed image. |
|
|
This mode may not function well for shooting a fast- |
|
|
moving subject. |
1
2
Rotate the mode dial to ^.
Use HI(arrow pad) to select a sub mode and press the A button at the end.
•Press H(arrow pad) once again to display the sub mode selection screen.
• You can shoot with a fixed focus position. gAFL (P. 34)
Flash Compensation
In []], [\], [[], and [w], you can adjust the flash brightness. g“Flash Compensation” (P. 38)
22 EN

k(Microscope mode)
Images can be taken from up to 1 cm away from the subject. In this mode you can shoot images with a large depth of field, and perform focus bracket shooting of a set number of images.
1
2
Rotate the mode dial to k.
Use HI(arrow pad) to select a sub mode and press the A button at the end.
Sub mode |
Application |
|
|
|
|
m Microscope |
Images can be taken from up to 1 cm away from the subject. |
|
|
The camera shoots a number of images, automatically |
|
Focus |
shifting the focus in each image. These can then be |
|
combined into a composite image with a large depth of field. |
||
o Stacking*1 |
||
|
Two images are recorded, the first frame and the composite |
|
|
image. |
|
|
In this mode, the camera shoots a number of images, |
|
p Focus BKT |
automatically shifting the focus in each image. The number |
|
of images and shooting steps are set in [Focus BKT settings] |
||
|
||
|
(P. 65). |
|
|
Changes the magnification level of the subject on the monitor. |
|
n Microscope |
The magnification level when the shooting distance is 1 cm |
|
is displayed on the monitor. Pressing I(arrow pad) can |
||
Control |
change the magnification level.*2 At high magnification levels, |
|
|
the image may be grainy. |
*1 There may be situations in which it is not possible to create composite image due to camera shake.
*2 Available only when Picture mode is [Vivid], [Natural] or [Muted].
3 Press the shutter button all the way down to shoot.
•You can shoot with a fixed focus position. gAFL (P. 34)
•In “AF Mode” (P. 44), only [Spot] or [Area] is available.
•You can select [#SLOW] in the flash mode for shooting. g“Flash” (P. 30)
EN 23

O (scene mode)
Only by selecting a sub mode according to the subject or the scene, you can shoot with an proper setting.
Sub mode |
Application |
|
|
|
|
B Portrait |
Suitable for portrait shooting. |
|
|
|
|
e e-Portrait |
Smoothes out skin tones and texture. This mode is |
|
suitable when viewing images on a high-definition TV. |
||
|
||
F Landscape |
Suitable for landscape shooting. |
|
|
|
|
|
Automatically shoot successive images according to |
|
1 Interval Shooting |
set [Start Waiting Time], [Frame], and [Interval Time]. |
|
The shot frames can also be recorded as into a single |
||
|
||
|
movie. |
|
|
The camera secured with a tripod automatically shoots |
|
|
multiple images, takes newly bright areas only, and |
|
# Live Composite |
composites them into a single image. |
|
With normal long exposure, an image of light trace |
||
|
such as star trails with bright buildings tends to get too |
|
|
bright. You can capture them without over exposure |
|
|
while checking the progress. |
|
Hand-Held |
Suitable for shooting night scenes without a tripod. |
|
Reduces blur when shooting low light/ illuminated |
||
H Starlight |
||
|
scenes. |
|
G Night Scene |
Suitable for tripod shooting of night scenes. |
|
|
|
|
U Night+Portrait |
Suitable for portrait shooting against a background of |
|
night view. |
||
|
||
C Sport |
Suitable for fast action shooting. |
|
2 Indoor |
Suitable for shooting portraits indoors like party scene. |
|
3 Self Portrait |
Suitable for shooting yourself with holding the camera. |
|
` Sunset |
Suitable for shooting the sunset. |
|
X Fireworks |
Suitable for shooting fireworks at night. |
|
|
|
|
_ Cuisine |
Suitable for shooting cuisine. |
|
^ Documents |
Suitable for shooting paper documents or time tables. |
|
g Beach & Snow |
Suitable for shooting at snow-capped mountains, |
|
seascapes in the sun, and other whitish scenes. |
||
|
||
s Snow |
Suitable for shooting snow scenes. This mode allows |
|
shooting using tap control (p. 62). |
||
|
24 EN
Sub mode |
Application |
|
s Panorama |
You can shoot and combine multiple images to create |
|
an image with a wide angle of view (panoramic image). |
||
|
||
E Backlight HDR |
Suitable for contrasting scenes. This mode captures |
|
multiple images and merges them into one, properly |
||
|
exposed image. |
1
2
Rotate the mode dial to O.
Use HI(arrow pad) to select a sub mode and press the A button at the end.
•Press the A button once again to display the sub mode selection screen.
•In [e-Portrait] mode, two images are recorded: an unmodified image and a second image to which [e-Portrait] effects have been applied.
1Interval Shooting
Adjusts interval settings in the setting menu before selecting Interval Shooting in O (Scene Mode) to shoot.
Customizing the setting
1 Press the button to display the menus.
2 Use H(arrow pad) to move to the page tab, and use FGto select Setting menu 3 and then press A.
Tab
|
Settings Menu 3 |
Back MENU |
GPS Settings
Wi-Fi Settings
Interval Settings
Focus BKT Setting
Certification
3 |
Use FG(arrow pad) to select [Interval Settings] and press |
|||
|
A. Then press FG(arrow pad) to select an item and press |
|||
|
A. |
|
|
|
|
Settings Menu 3 |
Back MENU |
Interval Settings |
Back MENU |
|
GPS Settings |
|
|
|
Wi-Fi Settings
Interval Settings
Focus BKT Setting
Certification
A |
Frame |
99 |
Start Waiting Time |
00:05:00 |
|
Interval Time |
00:00:30 |
|
|
Time Lapse Movie |
Off |
EN 25

4 Use FG(arrow pad) to highlight an option and press A to select.
Frame |
Sets the number of frames to be shot between 1 and |
|
99 frames. |
||
|
||
Start Waiting Time |
Sets the time from pressing the shutter button until |
|
the picture is taken between 00:00:00 and 24:00:00. |
||
Interval Time |
Sets the shooting interval for the second and |
|
subsequent frames between 00:00:01 and 24:00:00. |
||
|
||
|
Select [On] to record, besides the still pictures |
|
Time Lapse Movie |
recorded for each frame, a movie generated from |
|
|
the sequence of frames. |
•Press the button repeatedly to exit the menu.
•The interval may be longer than the set interval such as when the camera takes a few moments for image processing.
•If shooting a time lapse movie over a long period, use the USB-AC adapter F-3AC (sold separately).
•For the free space on a card, you cannot shoot the set number of frames.
•During interval shooting the power may turn off, but the shooting is still performed according to the setting.
To cancel the interval shooting
Press the button.
#Live Composite
1Press the shutter button halfway down to focus.
•The camera was unable to focus if the AF target mark flashes red. While the AF target mark is flashing, press the shutter button halfway, and without releasing this button, then press the A button. The camera focuses at infinity.
2To take the picture, gently press the shutter button all the way down while being careful not to shake the camera.
•The camera configures the proper settings automatically and starts shooting.
•After pressing the shutter button, there is a time lag until shooting starts.
•A combined panorama image is displayed per certain period of time.
3Press the shutter button again to stop shooting.
•The recording length in one shooting is up to three hours.
26 EN
sPanorama
When shooting a panorama, you can select the method of combining images using the submenu.
1Select [sPanorama].
2Press G(arrow pad) to go to the submenu.
3Use HI(arrow pad) to select a submenu, and press the A button to set.
|
Submenu |
Application |
||
|
|
|
Panorama images are automatically combined just by |
|
|
Auto |
|
||
|
|
swinging the camera in the shooting direction. |
||
|
|
|
||
|
|
|
Three frames are taken and combined by the camera. |
|
Manual |
The user composes the shots using the guide frame |
|||
|
|
|
and manually releases the shutter. |
|
PC |
The frames that were taken are combined into a |
|||
panorama image using the PC software. |
||||
|
|
|
||
•Move the camera as if rotating it around a vertical axis through the center of the lens to take better panorama images.
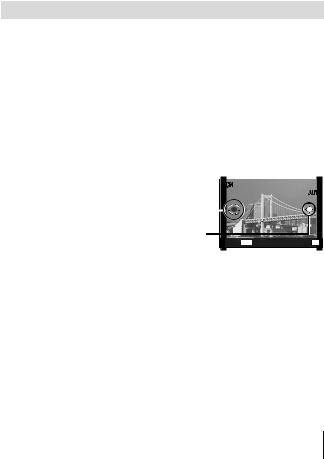
Taking pictures with [Auto]
1 Press the shutter button to take the first frame.
2Move the camera slightly in the direction of the second frame.
3Move the camera slowly so that the pointer and the target mark overlap. The camera releases the shutter automatically when the pointer and the target overlap.
•To combine only two frames, press the A button.
|
|
SCN |
|
|
|
||||
|
|
s |
|||||||
|
|
|
|
|
|
|
AUTO |
||
Target mark |
|
|
|
|
|
|
|
|
|
|
|
|
|
|
|
|
|
|
|
|
|
|
|
|
|
|
|
|
|
Pointer |
|
|
|
|
|
|
|
|
|
|
|
Cancel MENU |
Save OK |
||||||
Screen when combining images from left to right
4Repeat step 3 to take a third frame. The camera automatically combines the frames into a single panorama image.
•To cancel the panorama function, press the button.
•If the shutter does not automatically release, try [Manual] or [PC].
EN 27

Taking pictures with [Manual] |
|
|
1 Use FGHI(arrow pad) to |
Direction for combining frames |
|
specify at which edge the next |
|
|
picture is to be connected, and then |
SCN |
s |
press the A button. |
|
MANUAL |
|
|
|
2 Press the shutter button to take |
|
|
the first frame.The edge of the first |
|
|
frame is displayed faintly on the |
|
|
screen. |
|
|
3Compose the next shot so that the edge of the first frame displayed faintly on the screen overlaps the subject of the second frame, and press the shutter button.
•To combine only two frames, press the A button.
4Repeat step 3 to take a third frame. The camera automatically combines the frames into a single panorama image.
Taking pictures with [PC]
1Use FGHI(arrow pad) to specify at which edge the next picture is to be connected, and then press the A button.
2Press the shutter button to take the first frame. The edge of the first frame is displayed faintly on the screen.
3Compose the next shot so that the edge of the first frame displayed faintly on the screen overlaps the subject of the second frame, and press the shutter button.
4Repeat step 3 until the desired number of frames are taken, and then press the A button or button when finished.
•Panorama shooting is possible for up to 10 frames.
•The shot images are combined into a single panorama image by the PC software.
•For details on installing the PC software, refer to P. 85. In addition, refer to the PC software help guide for details on how to make panorama images.
28 EN
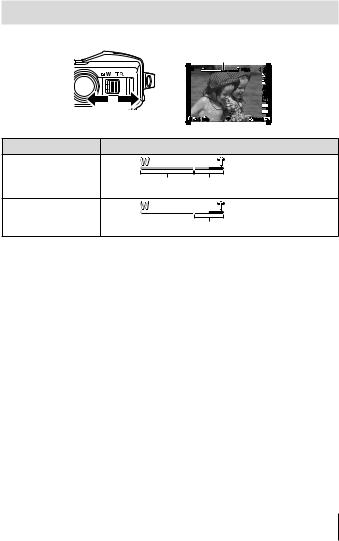
Using the zoom
Pressing the zoom lever adjusts the shooting range.
|
|
Zoom bar |
|
|
|
|
P |
3.4 |
|
|
|
|
||
|
|
|
0.0 |
|
|
|
|
WB |
|
|
|
|
AUTO |
|
|
|
|
ISO |
|
|
|
|
AUTO |
|
|
|
|
16M |
|
W side |
T side |
|
4:3 |
|
4 NORM |
00:34 |
|||
|
|
|||
Image size |
|
Zoom bar |
|
16M
Optical zoom Super-resolution zoom*1
Other
*2
*1 For the super resolution zoom and the details, refer to P. 49.
*2 Due to increased processing of the pixel counts, the image quality will not degrade. The magnification ratio changes depending on the image size setting.
EN 29

Using shooting options (Set by direct button)
Frequently used functions are assigned to IFG(arrow pad). Just by pressing the button, you can select the assigned function directly.
Some items are not available in some shooting modes. g“List of settings available in each shooting mode” (P. 103)
Flash
You can use a flash when shooting.
1
2
Press the #button to display options.
Use HI(arrow pad) to choose a flash mode and press A.
#AUTO |
Auto flash |
The flash fires automatically in low light or |
|
backlight conditions. |
|||
|
|
||
! |
Red-eye |
This function allows you to reduce the red- |
|
reduction flash |
eye phenomenon. |
||
# |
Fill-in flash |
The flash fires regardless of the light |
|
conditions. |
|||
|
|
||
$ |
Flash off |
The flash does not fire. |
|
|
|
|
|
|
|
The dedicated underwater strobe or the |
|
|
|
Olympus wireless RC flash is used to take |
|
#RC |
Remote Control |
pictures. For details, see “Taking pictures |
|
|
|
with the Olympus Wireless RC Flash |
|
|
|
System” (P. 98). |
|
|
|
The commercially-available slave flash that |
|
#SLV |
Slave |
is synchronized with the camera flash is |
|
used for taking pictures. The flash intensity |
|||
|
|
||
|
|
setting can be adjusted. |
|
#SLOW |
Slow |
Slow shutter speeds are used to brighten |
|
dimly-lit backgrounds. |
|||
|
synchronization |
Available only in k(Microscope). |
|
|
|
||
q |
LED On |
The LED turns on when a picture is taken. |
|
This is effective for taking close up pictures. |
|||
|
|
•In [!] (Red-eye reduction flash), after the pre-flashes, it takes about 1 second before the shutter is released. Do not move the camera until shooting is complete.
•[!] (Red-eye reduction flash) may not work effectively under some shooting conditions.
30 EN
Loading...