


 INSTRUCTIONS
Thank you for purchasing the Olympus AZ-4 Zoom. The AZ-4 Zoom is a totally new handgrip type single lens reflex camera in the full-size 35mm format. It is equipped with a 35 ~ 135mm zoom lens and, of course, focus is fully automated. Furthermore, the camera is extremely compact and easy-to-use, with features that give added flexibility including spot metering, fill-in flash, program shift, exposure compensation, double exposure, and a continuous shooting mode. With the AZ-4 Zoom, everyone can enjoy photography, from snapshots and portraiture to advanced techniques.
Before using the camera, please study this instruction manual carefully with the AZ-4 Zoom in front of you, to get the very best performance and longest service life from your new camera.
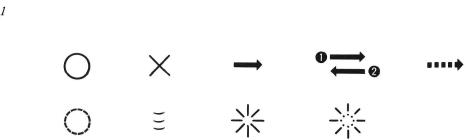
Symbols used in this manual
Correct |
Incorrect |
Operation |
Operation order |
Automatic operation |
Attention |
Presslightly |
Lamp on |
Lampblinking |

Preparations before taking pictures
Loading batteries Checking the batteries
Taking photographs I
Loading the film Taking photographs Unloading the film
Taking photographs II
Using the focus lock
Taking a continuous series of shots ....
Using the self-timer
How to use the manual focus Macro photography Exposure compensation
Spot metering Program shift
Double-exposure photography Using the RESET button
TakingphotographsIII
Flash auto photography Using fill-in flash
Using an exterior flash attachment Attaching a shoulder strap
In order to take even better photographs
Auto focus (AF) Exposure Viewfinder displays
LCD panel and mode buttons
For long-lasting enjoyment of your AZ-4 Zoom
Care and storage Questions and answers Description of controls Specifications
Accessories sold separately

Preparations before Taking Pictures
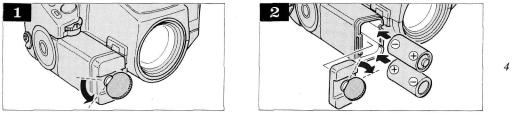
Loading Batteries
Do not use incorrect batteries or mix new and old batteries at the same time. Before replacing batteries, set the power switch to OFF.
Please remove the batteries from your camera during long periods in which the camera is not in use.
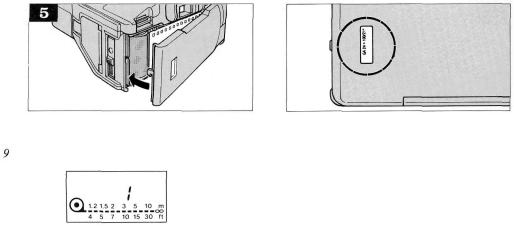
Turn the lock screw on the bottom of the grip with a coin as shown to remove the battery case lid.
Insert the batteries correctly as shown and replace the lid using a coin to turn the screw. Use two 3V Lithium batteries (Panasonic CR-123A or Duracell DL-123A batteries.)
* Try to avoid changing batteries while the film is still in the camera. (With the batteries removed the film counter indicator will remain active for approximately 30 minutes.)
Checking the Batteries
Slide the power switch ON.
* In order to conserve power, the LCD panel and the finder indicator will shut off automatically after approximately 15 sec. Lightly pressing the shutter release button will reactivate the panel and indicator.
The charge remaining in the batteries will be displayed on the LCD panel.
When  is displayed for 2 sec., the batteries are OK.
When  blinks, excess battery consumption is occurring. The batteries should be replaced as soon as possible. When the outer frame
  is blinking, the flash cannot be used.
* When is indicated, the batteries have reached their expected life span and should be replaced immediately.

Taking Photographs I
With the AZ-4 Zoom, anyone can take photographs easily using a variety of techniques. This section explains the basics of photography.
Loading the Film
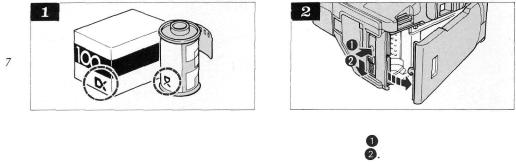
Film-loading and film-speed selection (ISO) for DX film is automatic in this camera.
Use a DX type film. Your camera will automatically set itself for DX-coded film speeds ranging from ISO 25 to 5000.
* In case of non-DX film, film speed is automatically set at ISO 100.
Depress the film compartment cover lock releasebutton and slide the cover latch down to open

Insert the film cartridge. Always avoid direct sunlight when loading the film.
Align the film leader with the green mark.
Close the camera back.
The film is automatically wound until the exposure counter reads 1.
* If the film is wound incorrectly, the will blink and the shutter release will not operate. In this case, open the film compartment cover and load the film again.
Film type confirmation: This is possible through the window in the camera back.
* When using a non-DX film, if the film is not wound correctly, the number indicator in the LCD panel will stop on 0. The  indication will not appear
in the LCD and the shutter release may not lock.
Taking Photographs
Preparations
10
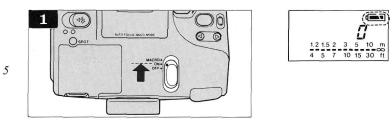
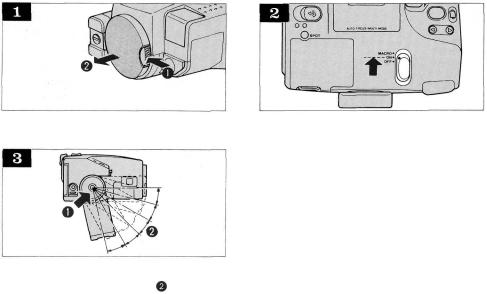
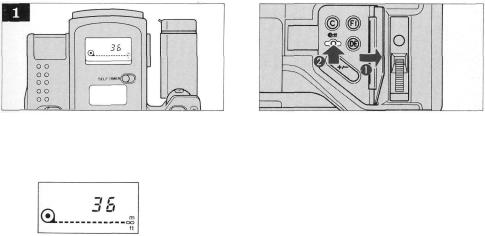
Under normal operation conditions, set the switch to A for autofocus. When you wish to set the focus manually, set the switch to M. (See p. 23)
When this camera is in focus, and when the last frame of film has been exposed, you will hear a "beep-beep" sound signaling these conditions. In order to turn off this sound, slide the sound switch to the down position.
Remove the lens cap.
11
Adjust the grip angle.
* The grip angle can be adjusted by moving the grip as you push the grip lock release button 
The grip adjusts to 6 different angles at 15° increments.
Slide the power switch to ON and the lens will extend from the camera body.
*Use the MACRO position for taking photos of objects nearby. (See p. 24)
*With the switch in the OFF position, the Viewfinder will become dark.
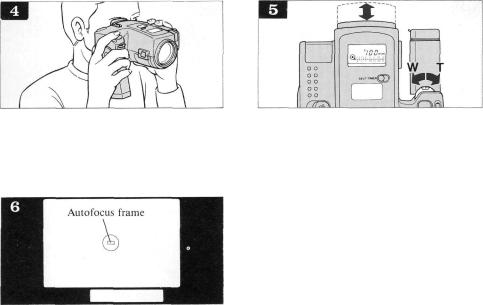
While looking through the Viewfinder, aim the camera at the subject you want to shoot.
*When the shutter speed indicator blinks in the Viewfinder, change to the flash AUTO photography mode. (See p. 34)
Adjust the zoom lever to the correct angle for |
|
the photo you wish to take. |
|
* Be careful not to touch the lens surface with |
12 |
your finger.
Tele: long angle Wide: wide angle
* The LCD panel will indicate the lens focal length for two seconds after you stop zooming.
Move the camera so the subject is in the center of the autofocus frame.
* Be sure to keep the subject within the frame.
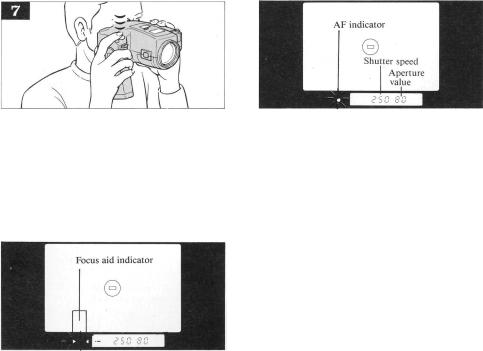
Press the shutter release button halfway to focus.
13* The button can be pressed in two steps; autofocus operates when the button is pressed to the first of these steps.
*When the camera is in focus, the green focus lamp comes on in the Viewfinder and you will hear the "beep-beep" sound.
*The shutter speed and the aperture will be indicated in the Viewfinder. (See p. 46)
*When the shutter speed indicator is
blinking, change to the flash mode. (See p. 34) If you do not use the flash in this case, the shutter speed may be too
slow and it is recommended that you use a tripod to avoid the effects of camera shake.
*If the camera is not in focus, the red focus-aid lamp will blink. In this case, push the shutter release button again.
*The shutter cannot be released while the focus-aid indicator is blinking.
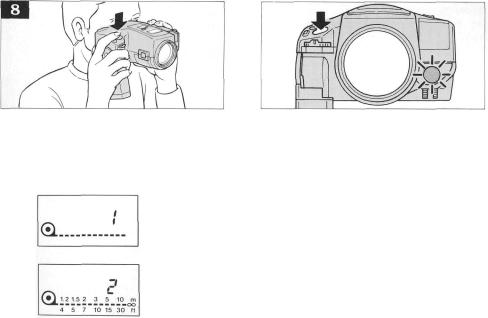
Press the shutter release button fully.
*Immediately after the shutter is released, the film is automatically wound by one frame, and the exposure counter advances by one.
In dark places:
A red-colored light emerging from the AF illuminator aimed at your subject will 14 provide extra illumination and allow for
precise focus. (illumination distance: approx. 5.5m (18 ft))
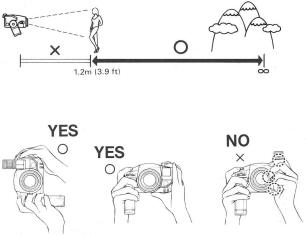
Shooting range: Photos can be taken from a range of 1.2m (3.9 ft.) to infinity. When
the  is blinking in the Viewfinder, the camera is too close to the subject. Switch to the MACRO mode.
15 Aim correctly: Be careful not to touch the lens, flash or AF Illuminator.
As the focal distance increases, the possibilities of the camera shake also increase. Grip the camera tightly with your right hand as you aim in order to avoid any shaking. If you use the shoulder strap, make sure that it doesn't interfere with the flash or the lens.
Unloading the Film
When you reach the end of the film, it will rewind automatically. You will hear the "beep-beep" sound indicating that the film has been rewound fully.
16
If you want to rewind the film in the middle of a roll, open the mode cover and press the rewind button.
* The final reading of the exposure counter prior to rewinding may be more than the number of exposures specified for the film.

* You will hear the "beep-beep" sound
17indicating that the film has been completely rewound and the exposure indicator will return to 0.
*After the film has been rewound, the shutter cannot be released until the film has been removed.
Open the camera back, and remove the film.
* In order to protect the shutter, the film is entirely rewound into the film canister.
 Loading...