


Fax-Lab 200/Fax-Lab 200P Fax-Lab 250/Fax-Lab 250P
INSTRUCTIONS
cover ENG.p65 |
2 |
11/09/01, 15.48 |

PUBLISHED BY: |
Editors: |
Olivetti I- Jet S.p.A. |
Olivetti Tecnost, S.p.A. |
Località Le Vieux |
Direzione @ Home/Office |
11020 ARNAD (Italy) |
Via Jervis, 77 - 10015 IVREA (Italy) |
Copyright © 2001, Olivetti
All rights reserved
The manufacturer reserves the right to make any changes to the machine described in this manual, at any time, and without prior warning.
This machine has been approved, under the terms of Council Decision 98/482/EC, for Europe-wide connection as a single terminal to an analogue Public Switched Telephone System (PSTN) system. However, due to differences between individual PSTNs in the various countries, the approval does not unconditionally guarantee success operation of every PSTN termination point.
If you encounter any problems, you should contact your supplier immediately.
The manufacturers declare under their own responsibility that this product complies with provisions laid down by the directive 1999/05/CE. Conformance is certified by the application of the  mark to the product.
Network compatibility declaration
This product has been designed and developed to operate in the networks of all European Community countries, and in those of Switzerland and Norway.
Full compatibility with the networks of individual countries will depend on specific national software parameters which can be set in the product. If you encounter problems with non EC PSTN networks, contact your national technical support service.
Your attention is drawn to the following conditions that could compromise the conformity attested above as well as the machine’s characteristics:
•incorrect electrical supply;
•incorrect installation, erroneous or improper use, or any use that differs from what is indicated in the User Manual supplied with the machine;
•replacement of components or original parts using other types, not approved by the manufacturer, or where carried out by unauthorized persons.
The electrical socket must be near to hand and easily accessible. To disconnect the machine from the electrical power supply, unplug it from the supply socket.
QUICK GUIDE
This chapter contains a simplified description of the installation, transmission, reception and copying procedures. For more detailed instructions, see the relevant sections.
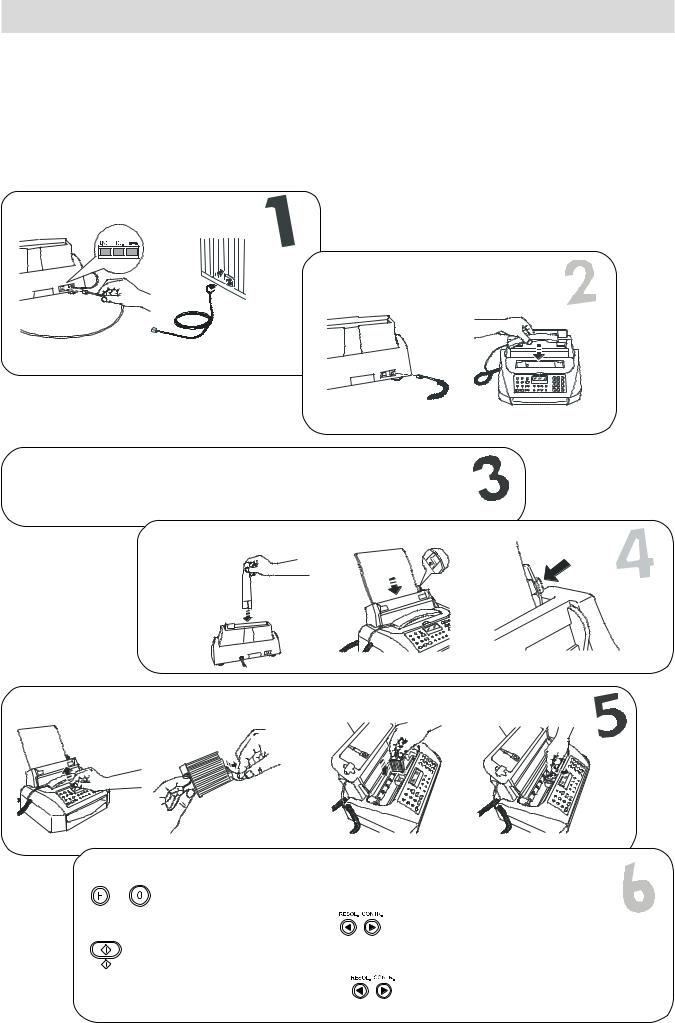
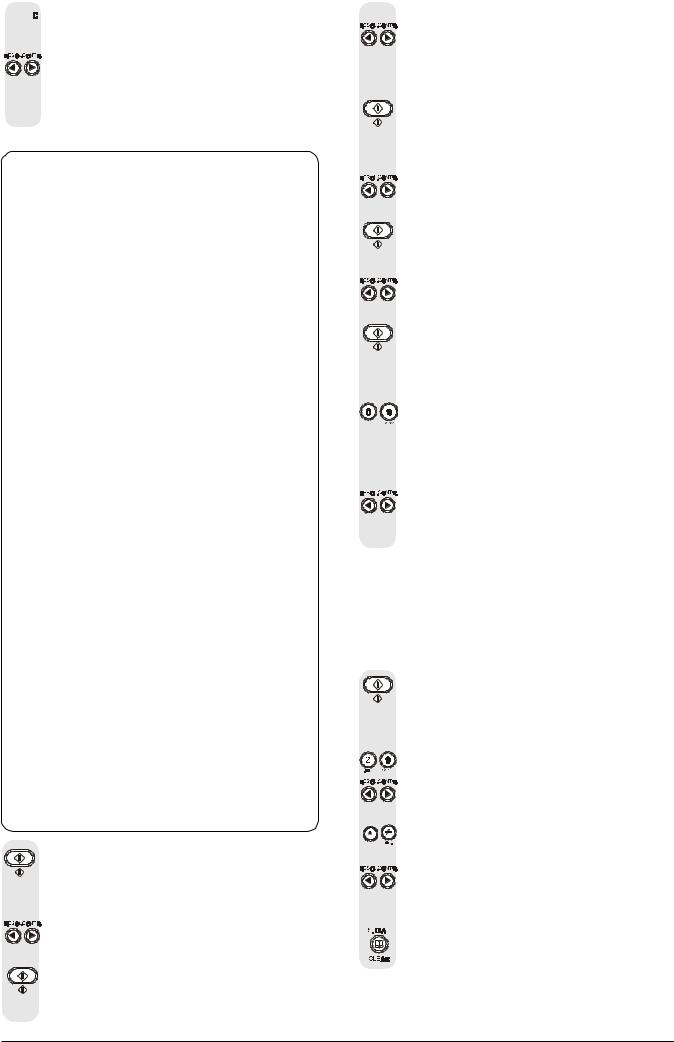
INSTALLATION
For further details, see the "Preliminary operations" chapter.
234567890123456789012345678901212345678901234567890123456789012123456789
234567890123456789012345678901212345678901234567890123456789012123456789
234567890123456789012345678901212345678901234567890123456789012123456789
234567890123456789012345678901212345678901234567890123456789012123456789Connect the fax machine to the telephone line
234567890123456789012345678901212345678901234567890123456789012123456789
234567890123456789012345678901212345678901234567890123456789012123456789
234567890123456789012345678901212345678901234567890123456789012123456789
234567890123456789012345678901212345678901234567890123456789012123456789
234567890123456789012345678901212345678901234567890123456789012123456789
234567890123456789012345678901212345678901234567890123456789012123456789
234567890123456789012345678901212345678901234567890123456789012123456789
234567890123456789012345678901212345678901234567890123456789012123456789
234567890123456789012345678901212345678901234567890123456789012123456789
234567890123456789012345678901212345678901234567890123456789012123456789
234567890123456789012345678901212345678901234567890123456789012123456789 12345678901234567890123456789012123456789012345678901234567890121234567
234567890123456789012345678901212345678901234567890123456789012123456789 12345678901234567890123456789012123456789012345678901234567890121234567
+ 12345678901234567890123456789012123456789012345678901234567890121234567
234567890123456789012345678901212345678901234567890123456789012123456789 1234567890123456789012345678901212345678901234567890123456789012123456712345678901234567890123456789012123456789012345678901234567890121234567Connect the receiver
234567890123456789012345678901212345678901234567890123456789012123456789
234567890123456789012345678901212345678901234567890123456789012123456789 12345678901234567890123456789012123456789012345678901234567890121234567
234567890123456789012345678901212345678901234567890123456789012123456789 12345678901234567890123456789012123456789012345678901234567890121234567
234567890123456789012345678901212345678901234567890123456789012123456789 12345678901234567890123456789012123456789012345678901234567890121234567
234567890123456789012345678901212345678901234567890123456789012123456789 12345678901234567890123456789012123456789012345678901234567890121234567
234567890123456789012345678901212345678901234567890123456789012123456789 12345678901234567890123456789012123456789012345678901234567890121234567
234567890123456789012345678901212345678901234567890123456789012123456789 12345678901234567890123456789012123456789012345678901234567890121234567
234567890123456789012345678901212345678901234567890123456789012123456789 12345678901234567890123456789012123456789012345678901234567890121234567
234567890123456789012345678901212345678901234567890123456789012123456789 12345678901234567890123456789012123456789012345678901234567890121234567
234567890123456789012345678901212345678901234567890123456789012123456789 12345678901234567890123456789012123456789012345678901234567890121234567
234567890123456789012345678901212345678901234567890123456789012123456789 12345678901234567890123456789012123456789012345678901234567890121234567
234567890123456789012345678901212345678901234567890123456789012123456789 12345678901234567890123456789012123456789012345678901234567890121234567
234567890123456789012345678901212345678901234567890123456789012123456789 12345678901234567890123456789012123456789012345678901234567890121234567
234567890123456789012345678901212345678901234567890123456789012123456789 12345678901234567890123456789012123456789012345678901234567890121234567
234567890123456789012345678901212345678901234567890123456789012123456789 12345678901234567890123456789012123456789012345678901234567890121234567
234567890123456789012345678901212345678901234567890123456789012123456789 12345678901234567890123456789012123456789012345678901234567890121234567
234567890123456789012345678901212345678901234567890123456789012123456789Line 12345678901234567890123456789012123456789012345678901234567890121234567
234567890123456789012345678901212345678901234567890123456789012123456789 12345678901234567890123456789012123456789012345678901234567890121234567
234567890123456789012345678901212345678901234567890123456789012123456789 12345678901234567890123456789012123456789012345678901234567890121234567+
234567890123456789012345678901212345678901234567890123456789012123456789 12345678901234567890123456789012123456789012345678901234567890121234567
234567890123456789012345678901212345678901234567890123456789012123456789 12345678901234567890123456789012123456789012345678901234567890121234567
234567890123456789012345678901212345678901234567890123456789012123456789 12345678901234567890123456789012123456789012345678901234567890121234567
234567890123456789012345678901212345678901234567890123456789012123456789 12345678901234567890123456789012123456789012345678901234567890121234567
234567890123456789012345678901212345678901234567890123456789012123456789 12345678901234567890123456789012123456789012345678901234567890121234567
12345678901234567890123456789012123456789012345678901234567890121234567
12345678901234567890123456789012123456789012345678901234567890121234567
12345678901234567890123456789012123456789012345678901234567890121234567
12345678901234567890123456789012123456789012345678901234567890121234567
12345678901234567890123456789012123456789012345678901234567890121234567
12345678901234567890123456789012123456789012345678901234567890121234567
12345678901234567890123456789012123456789012345678901234567890121234567
12345678901234567890123456789012123456789012345678901234567890121234567
12345678901234567890123456789012123456789012345678901234567890121234567
12345678901234567890123456789012123456789012345678901234567890121234567
12345678901234567890123456789012123456789012345678901234567890121234567
12345678901234567890123456789012123456789012345678901234567890121234567
12345678901234567890123456789012123456789012345678901234567890121234567
12345678901234567890123456789012123456789012345678901234567890121234567
234567890123456789012345678901212345678901234567890123456789012123456789012345678901234567890121234567890123456789012
234567890123456789012345678901212345678901234567890123456789012123456789012345678901234567890121234567890123456789012
234567890123456789012345678901212345678901234567890123456789012123456789012345678901234567890121234567890123456789012
234567890123456789012345678901212345678901234567890123456789012123456789012345678901234567890121234567890123456789012Connect the fax machine to the mains socket
234567890123456789012345678901212345678901234567890123456789012123456789012345678901234567890121234567890123456789012
234567890123456789012345678901212345678901234567890123456789012123456789012345678901234567890121234567890123456789012
234567890123456789012345678901212345678901234567890123456789012123456789012345678901234567890121234567890123456789012 234567890123456789012345678901212345678901234567890123456789012123456789012345678901234567890121234567890123456789012Before connecting it, remove the clip securing the print carriage during transport 234567890123456789012345678901212345678901234567890123456789012123456789012345678901234567890121234567890123456789012 234567890123456789012345678901212345678901234567890123456789012123456789012345678901234567890121234567890123456789012 234567890123456789012345678901212345678901234567890123456789012123456789012345678901234567890121234567890123456789012(see print head compartment).
234567890123456789012345678901212345678901234567890123456789012123456789012345678901234567890121234567890123456789012
234567890123456789012345678901212345678901234567890123456789012123456789012345678901234567890121234567890123456789012 234567890123456789012345678901212345678901234567890123456789012123456789012345678901234567890121234567890123456789012Plug the power cable into the wall power supply socket. 234567890123456789012345678901212345678901234567890123456789012123456789012345678901234567890121234567890123456789012 234567890123456789012345678901212345678901234567890123456789012123456789012345678901234567890121234567890123456789012 23456789012345678901234567890121234567890123456789012345678901212345678901234567890123456789012123456789012345678901234
123456789012345678901234567890121234567890123456789012345678901212345678901234567890123456789012123456789012345678901234
123456789012345678901234567890121234567890123456789012345678901212345678901234567890123456789012123456789012345678901234
123456789012345678901234567890121234567890123456789012345678901212345678901234567890123456789012123456789012345678901234Add some printing paper
123456789012345678901234567890121234567890123456789012345678901212345678901234567890123456789012123456789012345678901234
123456789012345678901234567890121234567890123456789012345678901212345678901234567890123456789012123456789012345678901234
123456789012345678901234567890121234567890123456789012345678901212345678901234567890123456789012123456789012345678901234
123456789012345678901234567890121234567890123456789012345678901212345678901234567890123456789012123456789012345678901234
123456789012345678901234567890121234567890123456789012345678901212345678901234567890123456789012123456789012345678901234
123456789012345678901234567890121234567890123456789012345678901212345678901234567890123456789012123456789012345678901234
123456789012345678901234567890121234567890123456789012345678901212345678901234567890123456789012123456789012345678901234
123456789012345678901234567890121234567890123456789012345678901212345678901234567890123456789012123456789012345678901234
123456789012345678901234567890121234567890123456789012345678901212345678901234567890123456789012123456789012345678901234
123456789012345678901234567890121234567890123456789012345678901212345678901234567890123456789012123456789012345678901234
123456789012345678901234567890121234567890123456789012345678901212345678901234567890123456789012123456789012345678901234+
123456789012345678901234567890121234567890123456789012345678901212345678901234567890123456789012123456789012345678901234+
123456789012345678901234567890121234567890123456789012345678901212345678901234567890123456789012123456789012345678901234
123456789012345678901234567890121234567890123456789012345678901212345678901234567890123456789012123456789012345678901234
123456789012345678901234567890121234567890123456789012345678901212345678901234567890123456789012123456789012345678901234
123456789012345678901234567890121234567890123456789012345678901212345678901234567890123456789012123456789012345678901234
123456789012345678901234567890121234567890123456789012345678901212345678901234567890123456789012123456789012345678901234
123456789012345678901234567890121234567890123456789012345678901212345678901234567890123456789012123456789012345678901234
123456789012345678901234567890121234567890123456789012345678901212345678901234567890123456789012123456789012345678901234
123456789012345678901234567890121234567890123456789012345678901212345678901234567890123456789012123456789012345678901234
123456789012345678901234567890121234567890123456789012345678901212345678901234567890123456789012123456789012345678901234
123456789012345678901234567890121234567890123456789012345678901212345678901234567890123456789012123456789012345678901234
123456789012345678901234567890121234567890123456789012345678901212345678901234567890123456789012123456789012345678901234
123456789012345678901234567890121234567890123456789012345678901212345678901234567890123456789012123456789012345678901234
123456789012345678901234567890121234567890123456789012345678901212345678901234567890123456789012123456789012345678901234
123456789012345678901234567890121234567890123456789012345678901212345678901234567890123456789012123456789012345678901234
123456789012345678901234567890121234567890123456789012345678901212345678901234567890123456789012123456789012345678901234
123456789012345678901234567890121234567890123456789012345678901212345678901234567890123456789012123456789012345678901234
123456789012345678901234567890121234567890123456789012345678901212345678901234567890123456789012123456789012345678901234
123456789012345678901234567890121234567890123456789012345678901212345678901234567890123456789012123456789012345678901234
123456789012345678901234567890121234567890123456789012345678901212345678901234567890123456789012123456789012345678901234
234567890123456789012345678901212345678901234567890123456789012123456789012345678901234567890121234567890123456789012345678901 |
2123456789012345 |
|
|||
234567890123456789012345678901212345678901234567890123456789012123456789012345678901234567890121234567890123456789012345678901 |
2123456789012345 |
|
|||
234567890123456789012345678901212345678901234567890123456789012123456789012345678901234567890121234567890123456789012345678901234567890123456789012345678901212345678901234567890123456789012123456789012345678901234567890121234567890123456789012345678901 |
21234567890123452123456789012345 |
|
|||
234567890123456789012345678901212345678901234567890123456789012123456789012345678901234567890121234567890123456789012345678901Insert the print head |
2123456789012345 |
|
|||
234567890123456789012345678901212345678901234567890123456789012123456789012345678901234567890121234567890123456789012345678901 |
2123456789012345 |
|
|||
234567890123456789012345678901212345678901234567890123456789012123456789012345678901234567890121234567890123456789012345678901 |
2123456789012345 |
|
|||
234567890123456789012345678901212345678901234567890123456789012123456789012345678901234567890121234567890123456789012345678901 |
2123456789012345 |
|
|||
234567890123456789012345678901212345678901234567890123456789012123456789012345678901234567890121234567890123456789012345678901 |
2123456789012345 |
|
|||
234567890123456789012345678901212345678901234567890123456789012123456789012345678901234567890121234567890123456789012345678901 |
2123456789012345 |
|
|||
234567890123456789012345678901212345678901234567890123456789012123456789012345678901234567890121234567890123456789012345678901 |
2123456789012345 |
|
|||
234567890123456789012345678901212345678901234567890123456789012123456789012345678901234567890121234567890123456789012345678901 |
2123456789012345 |
|
|||
234567890123456789012345678901212345678901234567890123456789012123456789012345678901234567890121234567890123456789012345678901 |
2123456789012345 |
|
|||
+ |
+ |
|
+ |
|
|
234567890123456789012345678901212345678901234567890123456789012123456789012345678901234567890121234567890123456789012345678901 |
2123456789012345 |
|
|||
234567890123456789012345678901212345678901234567890123456789012123456789012345678901234567890121234567890123456789012345678901 |
2123456789012345 |
|
|||
234567890123456789012345678901212345678901234567890123456789012123456789012345678901234567890121234567890123456789012345678901 |
2123456789012345 |
|
|||
234567890123456789012345678901212345678901234567890123456789012123456789012345678901234567890121234567890123456789012345678901 |
2123456789012345 |
|
|||
234567890123456789012345678901212345678901234567890123456789012123456789012345678901234567890121234567890123456789012345678901 |
2123456789012345 |
|
|||
234567890123456789012345678901212345678901234567890123456789012123456789012345678901234567890121234567890123456789012345678901 |
2123456789012345 |
|
|||
234567890123456789012345678901212345678901234567890123456789012123456789012345678901234567890121234567890123456789012345678901 |
2123456789012345 |
|
|||
234567890123456789012345678901212345678901234567890123456789012123456789012345678901234567890121234567890123456789012345678901 |
2123456789012345 |
|
|||
234567890123456789012345678901212345678901234567890123456789012123456789012345678901234567890121234567890123456789012345678901 |
2123456789012345 |
|
|||
234567890123456789012345678901212345678901234567890123456789012123456789012345678901234567890121234567890123456789012345678901 |
2123456789012345 |
|
|||
234567890123456789012345678901212345678901234567890123456789012123456789012345678901234567890121234567890123456789012345678901 |
2123456789012345 |
|
|||
234567890123456789012345678901212345678901234567890123456789012123456789012345678901234567890121234567890123456789012345678901 |
2123456789012345 |
|
|||
234567890123456789012345678901212345678901234567890123456789012123456789012345678901234567890121234567890123456789012345678901 |
2123456789012345 |
|
|||
234567890123456789012345678901212345678901234567890123456789012123456789012345678901234567890121234567890123456789012345678901 |
2123456789012345 |
|
|||
234567890123456789012345678901212345678901234567890123456789012123456789012345678901234567890121234567890123456789012345678901 |
2123456789012345 |
|
|||
234567890123456789012345678901212345678901234567890123456789012123456789012345678901234567890121234567890123456789012345678901 |
2123456789012345 |
|
|||
234567890123456789012345678901212345678901234567890123456789012123456789012345678901234567890121234567890123456789012345678901 |
2123456789012345 |
|
|||
234567890123456789012345678901212345678901234567890123456789012123456789012345678901234567890121234567890123456789012345678901 |
2123456789012345 |
|
|||
234567890123456789012345678901212345678901234567890123456789012123456789012345678901234567890121234567890123456789012345678901 |
2123456789012345 |
|
|||
234567890123456789012345678901212345678901234567890123456789012123456789012345678901234567890121234567890123456789012345678901 |
2123456789012345 |
|
|||
234567890123456789012345678901212345678901234567890123456789012123456789012345678901234567890121234567890123456789012345678901 |
2123456789012345 |
|
|||
234567890123456789012345678901212345678901234567890123456789012123456789012345678901234567890121234567890123456789012345678901 |
2123456789012345 |
|
|||
234567890123456789012345678901212345678901234567890123456789012123456789012345678901234567890121234567890123456789012345678901 |
2123456789012345 |
|
|||
2345678901234567890123456789012123456789012345678901234567890121234567890123456789012345678901212345678901234567890123456789012123456789012345 |
21234567 |
||||
|
|
|
|
2123456789012345 |
21234567 |
234567890123456789012345678901212345678901234567890123456789012123456789012345678901234567890121234567890123456789012345678901 |
|||||
234567890123456789012345678901212345678901234567890123456789012123456789012345678901234567890121234567890123456789012345678901 |
21234567 |
||||
234567890123456789012345678901212345678901234567890123456789012123456789012345678901234567890121234567890123456789012345678901234567890123456789012345678901212345678901234567890123456789012123456789012345678901234567890121234567890123456789012345678901 |
|
||||
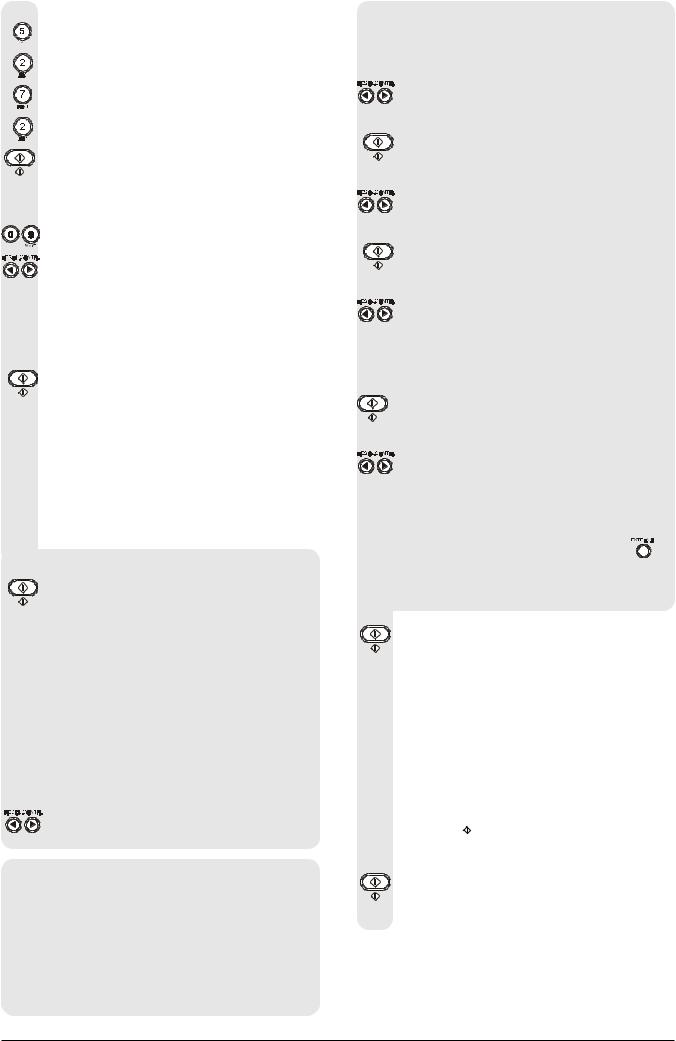
234567890123456789012345678901212345678901234567890123456789012123456789012345678901234567890121234567890123456789012345678901Make the fax machine’s country settings |
|
||||
234567890123456789012345678901212345678901234567890123456789012123456789012345678901234567890121234567890123456789012345678901 |
|
||||
234567890123456789012345678901212345678901234567890123456789012123456789012345678901234567890121234567890123456789012345678901 |
|
||||
234567890123456789012345678901212345678901234567890123456789012123456789012345678901234567890121234567890123456789012345678901 |
|
||||
234567890123456789012345678901212345678901234567890123456789012123456789012345678901234567890121234567890123456789012345678901 |
|
||||
234567890123456789012345678901212345678901234567890123456789012123456789012345678901234567890121234567890123456789012345678901+ The display shows the name of a country. |
|
||||
234567890123456789012345678901212345678901234567890123456789012123456789012345678901234567890121234567890123456789012345678901 |
|
||||
234567890123456789012345678901212345678901234567890123456789012123456789012345678901234567890121234567890123456789012345678901 |
|
||||
234567890123456789012345678901212345678901234567890123456789012123456789012345678901234567890121234567890123456789012345678901 |
|
||||
234567890123456789012345678901212345678901234567890123456789012123456789012345678901234567890121234567890123456789012345678901 |
|
||||
234567890123456789012345678901212345678901234567890123456789012123456789012345678901234567890121234567890123456789012345678901 |
21234567 |
||||
If the country displayed is not the desired one, press |
/ |
to change it. |
|
|
|
234567890123456789012345678901212345678901234567890123456789012123456789012345678901234567890121234567890123456789012345678901 |
21234567 |
||||
234567890123456789012345678901212345678901234567890123456789012123456789012345678901234567890121234567890123456789012345678901 |
21234567 |
||||
234567890123456789012345678901212345678901234567890123456789012123456789012345678901234567890121234567890123456789012345678901 |
21234567 |
||||
234567890123456789012345678901212345678901234567890123456789012123456789012345678901234567890121234567890123456789012345678901 |
21234567 |
||||
234567890123456789012345678901212345678901234567890123456789012123456789012345678901234567890121234567890123456789012345678901 |
21234567 |
||||
234567890123456789012345678901212345678901234567890123456789012123456789012345678901234567890121234567890123456789012345678901 |
21234567 |
||||
234567890123456789012345678901212345678901234567890123456789012123456789012345678901234567890121234567890123456789012345678901 |
21234567 |
||||
234567890123456789012345678901212345678901234567890123456789012123456789012345678901234567890121234567890123456789012345678901To confirm the setting. The display shows the language in which the messages will be displayed. |
21234567 |
||||
234567890123456789012345678901212345678901234567890123456789012123456789012345678901234567890121234567890123456789012345678901 |
21234567 |
||||
234567890123456789012345678901212345678901234567890123456789012123456789012345678901234567890121234567890123456789012345678901 |
21234567 |
||||
234567890123456789012345678901212345678901234567890123456789012123456789012345678901234567890121234567890123456789012345678901 |
21234567 |
||||
234567890123456789012345678901212345678901234567890123456789012123456789012345678901234567890121234567890123456789012345678901 |
21234567 |
||||
234567890123456789012345678901212345678901234567890123456789012123456789012345678901234567890121234567890123456789012345678901 |
21234567 |
||||
234567890123456789012345678901212345678901234567890123456789012123456789012345678901234567890121234567890123456789012345678901 |
21234567 |
||||
If the language displayed is not the desired one, press |
/ |
to change it. |
|
|
|
234567890123456789012345678901212345678901234567890123456789012123456789012345678901234567890121234567890123456789012345678901 |
21234567 |
||||
234567890123456789012345678901212345678901234567890123456789012123456789012345678901234567890121234567890123456789012345678901 |
21234567 |
||||
234567890123456789012345678901212345678901234567890123456789012123456789012345678901234567890121234567890123456789012345678901 |
21234567 |
||||
234567890123456789012345678901212345678901234567890123456789012123456789012345678901234567890121234567890123456789012345678901 |
21234567 |
||||
234567890123456789012345678901212345678901234567890123456789012123456789012345678901234567890121234567890123456789012345678901 |
21234567 |
||||
234567890123456789012345678901212345678901234567890123456789012123456789012345678901234567890121234567890123456789012345678901 |
21234567 |
||||
234567890123456789012345678901212345678901234567890123456789012123456789012345678901234567890121234567890123456789012345678901 |
21234567 |
||||
234567890123456789012345678901212345678901234567890123456789012123456789012345678901234567890121234567890123456789012345678901 |
21234567 |
||||
234567890123456789012345678901212345678901234567890123456789012123456789012345678901234567890121234567890123456789012345678901 |
21234567 |
||||

QUICK GUIDE
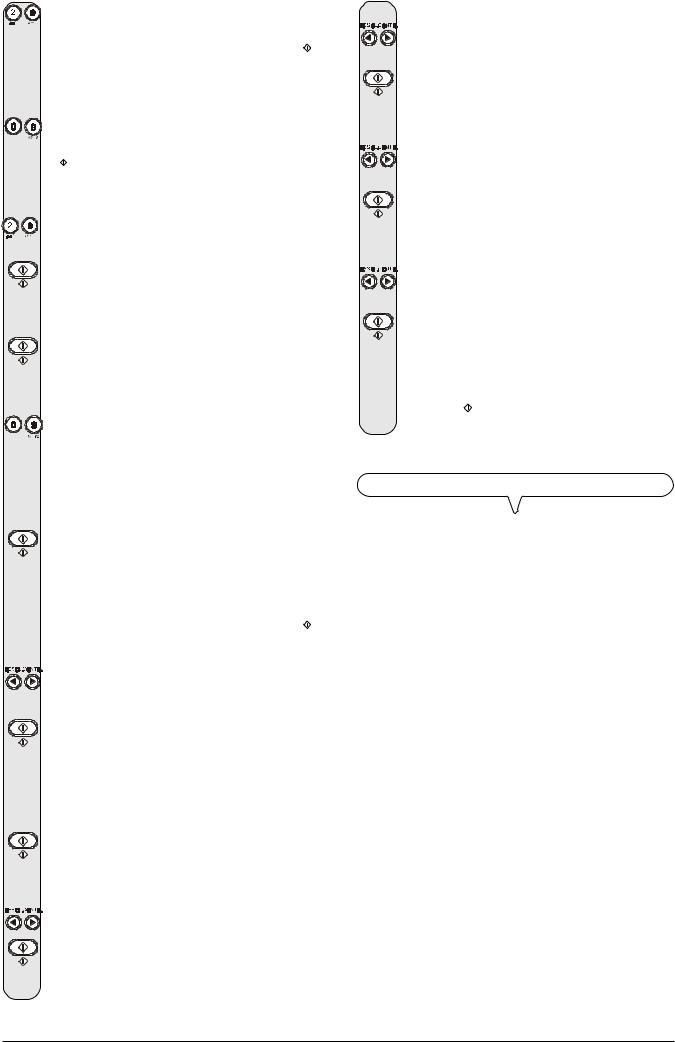
TRANSMISSION
For further details, see "To send a document" in the "Basic transmission and reception operations" chapter.
12345678901234567890123456789012123456789012345678901234567890121234
12345678901234567890123456789012123456789012345678901234567890121234 1234567890123456789012345678901212345678901234567890123456789012123412345678901234567890123456789012123456789012345678901234567890121234Place the original, without forcing, on the document 12345678901234567890123456789012123456789012345678901234567890121234 12345678901234567890123456789012123456789012345678901234567890121234 12345678901234567890123456789012123456789012345678901234567890121234tray with the side to be sent face down and then fit the 12345678901234567890123456789012123456789012345678901234567890121234
12345678901234567890123456789012123456789012345678901234567890121234 23456789012345678901234567890121234567890123456789012345678901212345678
12345678901234567890123456789012123456789012345678901234567890121234cheeks against either side of it. 23456789012345678901234567890121234567890123456789012345678901212345678
12345678901234567890123456789012123456789012345678901234567890121234 23456789012345678901234567890121234567890123456789012345678901212345678 12345678901234567890123456789012123456789012345678901234567890121234 23456789012345678901234567890121234567890123456789012345678901212345678Dial the correspondent’s number (max. 52 digits). 12345678901234567890123456789012123456789012345678901234567890121234 23456789012345678901234567890121234567890123456789012345678901212345678 12345678901234567890123456789012123456789012345678901234567890121234 23456789012345678901234567890121234567890123456789012345678901212345678 12345678901234567890123456789012123456789012345678901234567890121234 23456789012345678901234567890121234567890123456789012345678901212345678 12345678901234567890123456789012123456789012345678901234567890121234 23456789012345678901234567890121234567890123456789012345678901212345678 12345678901234567890123456789012123456789012345678901234567890121234 23456789012345678901234567890121234567890123456789012345678901212345678 12345678901234567890123456789012123456789012345678901234567890121234 23456789012345678901234567890121234567890123456789012345678901212345678 12345678901234567890123456789012123456789012345678901234567890121234 23456789012345678901234567890121234567890123456789012345678901212345678 12345678901234567890123456789012123456789012345678901234567890121234 23456789012345678901234567890121234567890123456789012345678901212345678 12345678901234567890123456789012123456789012345678901234567890121234 23456789012345678901234567890121234567890123456789012345678901212345678 12345678901234567890123456789012123456789012345678901234567890121234 23456789012345678901234567890121234567890123456789012345678901212345678+ + 12345678901234567890123456789012123456789012345678901234567890121234 23456789012345678901234567890121234567890123456789012345678901212345678 12345678901234567890123456789012123456789012345678901234567890121234 23456789012345678901234567890121234567890123456789012345678901212345678 12345678901234567890123456789012123456789012345678901234567890121234 23456789012345678901234567890121234567890123456789012345678901212345678 12345678901234567890123456789012123456789012345678901234567890121234 23456789012345678901234567890121234567890123456789012345678901212345678 12345678901234567890123456789012123456789012345678901234567890121234 23456789012345678901234567890121234567890123456789012345678901212345678 12345678901234567890123456789012123456789012345678901234567890121234 23456789012345678901234567890121234567890123456789012345678901212345678
23456789012345678901234567890121234567890123456789012345678901212345678
23456789012345678901234567890121234567890123456789012345678901212345678
23456789012345678901234567890121234567890123456789012345678901212345678
23456789012345678901234567890121234567890123456789012345678901212345678
23456789012345678901234567890121234567890123456789012345678901212345678
23456789012345678901234567890121234567890123456789012345678901212345678
RECEPTION
For further details, see "To receive a document" in the "Basic transmission and reception operations" chapter.
1234567890123456789012345678901212345678901234567890123456789012123456789012345678901234567890
1234567890123456789012345678901212345678901234567890123456789012123456789012345678901234567890
1234567890123456789012345678901212345678901234567890123456789012123456789012345678901234567890
1234567890123456789012345678901212345678901234567890123456789012123456789012345678901234567890 12345678901234567890123456789012123456789012345678901234567890121234567890123456789012345678901234567890123456789012345678901212345678901234567890123456789012123456789012345678901234567890Press the key until the message "MANUAL RX" appears on the
1234567890123456789012345678901212345678901234567890123456789012123456789012345678901234567890
1234567890123456789012345678901212345678901234567890123456789012123456789012345678901234567890
1234567890123456789012345678901212345678901234567890123456789012123456789012345678901234567890
1234567890123456789012345678901212345678901234567890123456789012123456789012345678901234567890display. 1234567890123456789012345678901212345678901234567890123456789012123456789012345678901234567890121234567812345678901234567890123456789012123456789012345678901234567890121234567890123456789012345678901212345678
1234567890123456789012345678901212345678901234567890123456789012123456789012345678901234567890
123456789012345678901234567890121234567890123456789012345678901212345678901234567890123456789012345678901234567890123456789012123456789012345678901234567890121234567890123456789012345678901212345678
123456789012345678901234567890121234567890123456789012345678901212345678901234567890123456789012345678901234567890123456789012123456789012345678901234567890121234567890123456789012345678901212345678
123456789012345678901234567890121234567890123456789012345678901212345678901234567890123456789012345678901234567890123456789012123456789012345678901234567890121234567890123456789012345678901212345678
12345678901234567890123456789012123456789012345678901234567890121234567890123456789012345678901212345678
12345678901234567890123456789012123456789012345678901234567890121234567890123456789012345678901212345678
12345678901234567890123456789012123456789012345678901234567890121234567890123456789012345678901212345678
12345678901234567890123456789012123456789012345678901234567890121234567890123456789012345678901212345678 12345678901234567890123456789012123456789012345678901234567890121234567890123456789012345678901212345678When the telephone rings, lift the to engage the line. 12345678901234567890123456789012123456789012345678901234567890121234567890123456789012345678901212345678 12345678901234567890123456789012123456789012345678901234567890121234567890123456789012345678901212345678 12345678901234567890123456789012123456789012345678901234567890121234567890123456789012345678901212345678 12345678901234567890123456789012123456789012345678901234567890121234567890123456789012345678901212345678 12345678901234567890123456789012123456789012345678901234567890121234567890123456789012345678901212345678 12345678901234567890123456789012123456789012345678901234567890121234567890123456789012345678901212345678 12345678901234567890123456789012123456789012345678901234567890121234567890123456789012345678901212345678
12345678901234567890123456789012123456789012345678901234567890121234567890123456789012345678901212345678
234567890123456789012345678901212345678901234567890123456789012123456789012
234567890123456789012345678901212345678901234567890123456789012123456789012
234567890123456789012345678901212345678901234567890123456789012123456789012
234567890123456789012345678901212345678901234567890123456789012123456789012 234567890123456789012345678901212345678901234567890123456789012123456789012234567890123456789012345678901212345678901234567890123456789012123456789012As soon as you hear the dialling tone, press . 234567890123456789012345678901212345678901234567890123456789012123456789012 234567890123456789012345678901212345678901234567890123456789012123456789012 234567890123456789012345678901212345678901234567890123456789012123456789012 234567890123456789012345678901212345678901234567890123456789012123456789012
234567890123456789012345678901212345678901234567890123456789012123456789012
COPYING
For further details, see the "To copy a document" chapter.
1234567890123456789012345678901212345678901234567890123456789012123 |
|
1234567890123456789012345678901212345678901234567890123456789012123 |
|
12345678901234567890123456789012123456789012345678901234567890121231234567890123456789012345678901212345678901234567890123456789012123 |
|
1234567890123456789012345678901212345678901234567890123456789012123Place the original on the document tray. The |
|
1234567890123456789012345678901212345678901234567890123456789012123 |
|
side to be copied must be face down. |
|
1234567890123456789012345678901212345678901234567890123456789012123 |
|
1234567890123456789012345678901212345678901234567890123456789012123 |
|
1234567890123456789012345678901212345678901234567890123456789012123 |
|
1234567890123456789012345678901212345678901234567890123456789012123 |
|
1234567890123456789012345678901212345678901234567890123456789012123 |
|
123456789012345678901234567890121234567890123456789012345678901212323456789012345678901234567890121234567890123456789012345678901212345678 |
|
123456789012345678901234567890121234567890123456789012345678901212323456789012345678901234567890121234567890123456789012345678901212345678 |
|
123456789012345678901234567890121234567890123456789012345678901212323456789012345678901234567890121234567890123456789012345678901212345678 |
|
123456789012345678901234567890121234567890123456789012345678901212323456789012345678901234567890121234567890123456789012345678901212345678 |
|
123456789012345678901234567890121234567890123456789012345678901212323456789012345678901234567890121234567890123456789012345678901212345678 |
|
123456789012345678901234567890121234567890123456789012345678901212323456789012345678901234567890121234567890123456789012345678901212345678 |
|
123456789012345678901234567890121234567890123456789012345678901212323456789012345678901234567890121234567890123456789012345678901212345678 |
|
123456789012345678901234567890121234567890123456789012345678901212323456789012345678901234567890121234567890123456789012345678901212345678Using the , and keys, select the contrast, |
|
123456789012345678901234567890121234567890123456789012345678901212323456789012345678901234567890121234567890123456789012345678901212345678 |
|
and then press |
|
123456789012345678901234567890121234567890123456789012345678901212323456789012345678901234567890121234567890123456789012345678901212345678 |
|
123456789012345678901234567890121234567890123456789012345678901212323456789012345678901234567890121234567890123456789012345678901212345678 |
|
123456789012345678901234567890121234567890123456789012345678901212323456789012345678901234567890121234567890123456789012345678901212345678 |
|
123456789012345678901234567890121234567890123456789012345678901212323456789012345678901234567890121234567890123456789012345678901212345678 |
|
resolution and reduction values, respectively. |
|
123456789012345678901234567890121234567890123456789012345678901212323456789012345678901234567890121234567890123456789012345678901212345678 |
|
123456789012345678901234567890121234567890123456789012345678901212323456789012345678901234567890121234567890123456789012345678901212345678 |
|
123456789012345678901234567890121234567890123456789012345678901212323456789012345678901234567890121234567890123456789012345678901212345678 |
|
123456789012345678901234567890121234567890123456789012345678901212323456789012345678901234567890121234567890123456789012345678901212345678 |
|
234567890123456789012345678901212345678901234567890123456789012123456789012345678901234567890121234567890123456789012345678901 |
212345678 |
234567890123456789012345678901212345678901234567890123456789012123456789012345678901234567890121234567890123456789012345678901 |
212345678 |
234567890123456789012345678901212345678901234567890123456789012123456789012345678901234567890121234567890123456789012345678901 |
212345678 |
234567890123456789012345678901212345678901234567890123456789012123456789012345678901234567890121234567890123456789012345678901 |
212345678 |
234567890123456789012345678901212345678901234567890123456789012123456789012345678901234567890121234567890123456789012345678901 |
212345678 |
234567890123456789012345678901212345678901234567890123456789012123456789012345678901234567890121234567890123456789012345678901 |
212345678 |
234567890123456789012345678901212345678901234567890123456789012123456789012345678901234567890121234567890123456789012345678901 |
212345678 |
234567890123456789012345678901212345678901234567890123456789012123456789012345678901234567890121234567890123456789012345678901 |
212345678 |
234567890123456789012345678901212345678901234567890123456789012123456789012345678901234567890121234567890123456789012345678901234567890123456789012345678901212345678901234567890123456789012123456789012345678901234567890121234567890123456789012345678901Press to make a single copy or type the desired number of copies (max 9) and then press |
212345678212345678 |
234567890123456789012345678901212345678901234567890123456789012123456789012345678901234567890121234567890123456789012345678901 |
212345678 |
234567890123456789012345678901212345678901234567890123456789012123456789012345678901234567890121234567890123456789012345678901 |
212345678 |
234567890123456789012345678901212345678901234567890123456789012123456789012345678901234567890121234567890123456789012345678901 |
212345678 |
234567890123456789012345678901212345678901234567890123456789012123456789012345678901234567890121234567890123456789012345678901 |
212345678 |
234567890123456789012345678901212345678901234567890123456789012123456789012345678901234567890121234567890123456789012345678901 |
212345678 |
234567890123456789012345678901212345678901234567890123456789012123456789012345678901234567890121234567890123456789012345678901 |
212345678 |
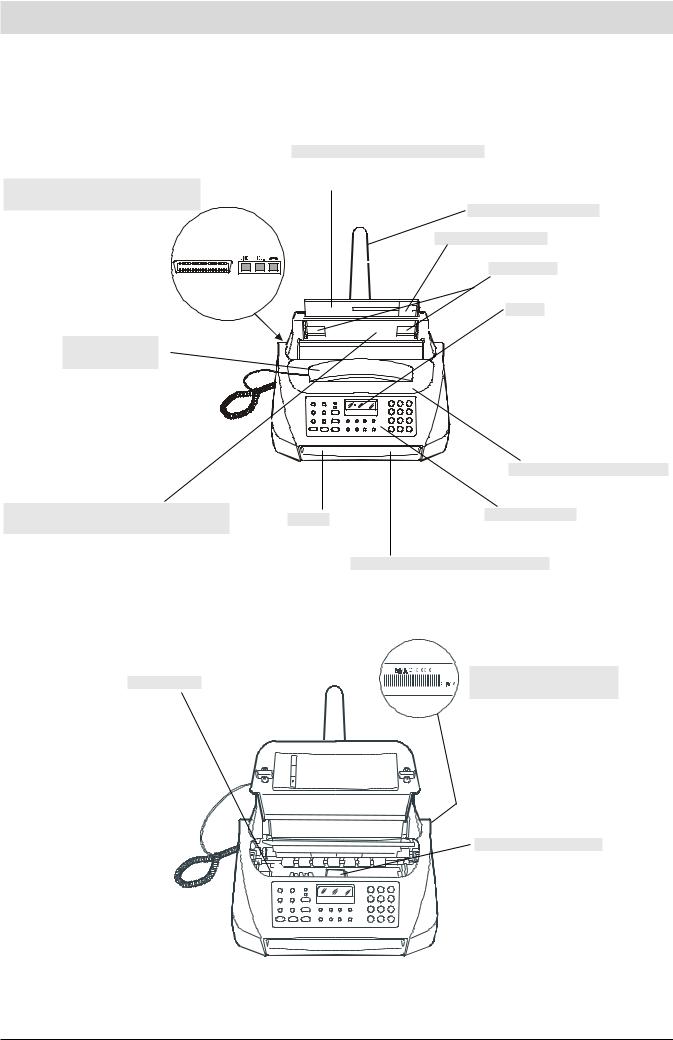
COMPONENTS
The figure shows the external and internal parts common to the four models of fax machine. The second row of keys shown on the lefthand side of the console is only present on models with a built-in telephone answering device. The parallel interface is only present on the multifunctional models.
Connection sockets and (only on the
multifunctional models) parallel port
Built-in telephone handset
Automatic feeder for original documents to
be sent and copied (ADF)
Maximum capacity: 5 sheets of A4, Letter and Legal 1 sheet of A5
Plain paper feed compartment (ASF)
Adjustable to the following paper sizes: A4, Letter and Legal.
Maximum capacity: 40 sheets (80gr/m2).
Paper support extension
Paper adjusting lever
Paper guides
Display
The display consists of two lines of 16 characters each. It shows the date and time, menu items, error messages, resolution and contrast values and, for the model with a built-in telephone answering device, the total number of messages received.
|
Print head compartment cover |
Speaker |
Operator console |
|
|
|
Received or copied document output |
Optical reader |
Machine serial number plate |
|
(see base) |
||
|
Print head compartment
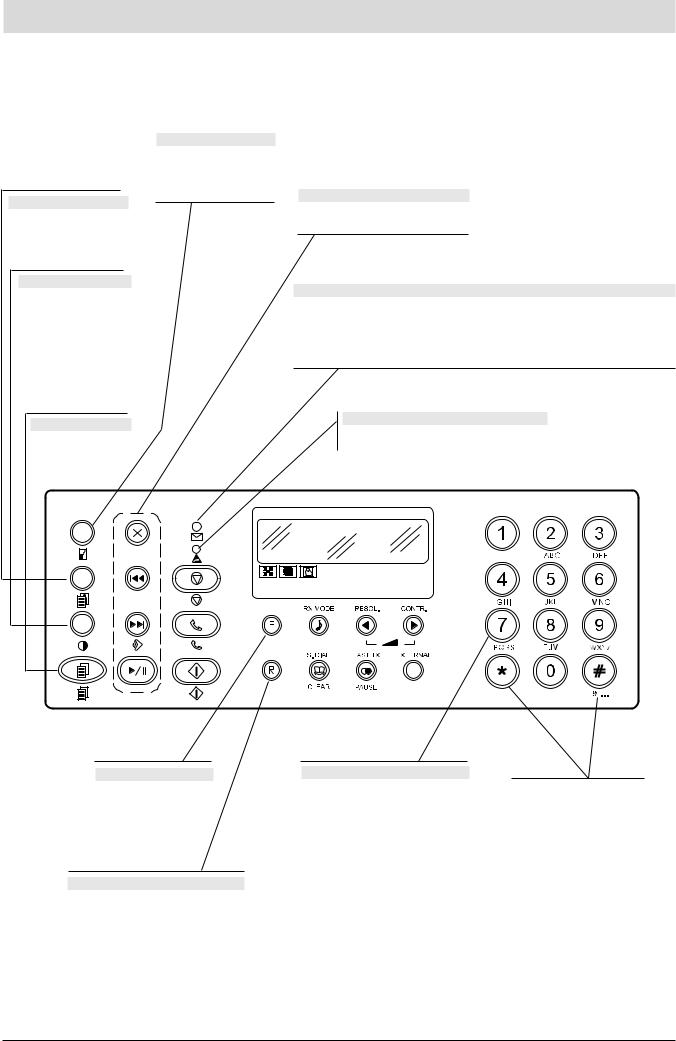
CONSOLE
The figure shows the operator console of the models with a built-in TAD. The keys on the second row on the left and the LED  concern the telephone answering device and are described in the relevant section.
REDUCTION KEY
Reduces or enlarges the documents to be copied (only with the document inserted in the
ADF).
RESOLUTION KEY
Adjusts the resolution of the documents to be copied (only with the document inserted in the ADF)
CONTRAST KEY
Adjusts the contrast of the documents to be copied (only with the document inserted in the ADF).
COPY KEY
Starts copying a document (only with the document already inserted in the ADF).
FUNCTION KEY
Gives access to programming mode.
Selects menus and submenus.
RECALL KEY
With the handset lifted, gives access to the special functions made available by the network manager and commonly known as REGISTER RECALL (R function).
TELEPHONE ANSWERING DEVICE KEYS
Models with a built-in TAD only
Described in the corresponding chapter.
ONLY MODELS WITH BUILT-IN TELEPHONE ANSWERING DEVICE
On, indicates that there are messages or memos in the memory that have already been played.
Blinking, indicates that the memory contains documents that have not been printed, messages or memos that have not been played.
Off, indicates that the memory is empty.
"ERROR" LED INDICATOR
Signals an operating fault during transmission or reception.
NUMERIC KEYS
Dial the fax or telephone number.
If pressed for more than a second, automatically dial (once set) the telephone or fax number assigned to them (one-touch dialling function).
Set any numeric data.
Select digits and alphanumeric characters during the entry of numbers and names.
With tone dialling, they send a tone down the line for special network services.
They scroll "backwards" and "forwards" through characters and special symbols during the entry of names.
 only: dials remote control
codes.
Before or after dialling the fax or telephone number, temporarily switches the dialling mode from pulse to tone.
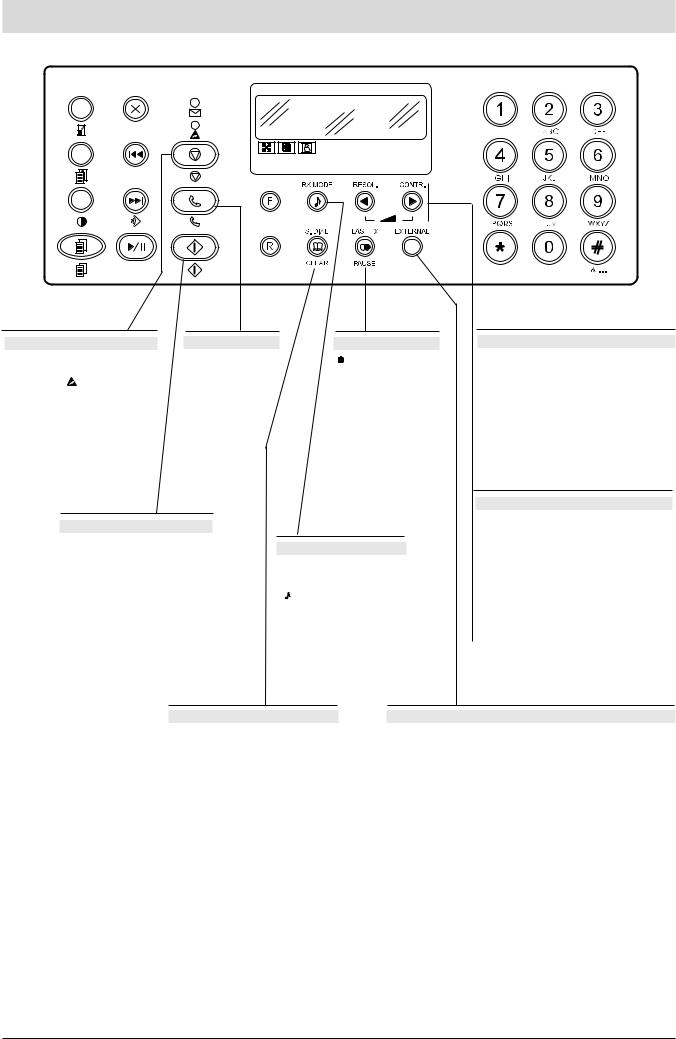
CONSOLE
STOP KEY
Unloads a document from the ADF. Turns off the " " LED indicator.
Returns the fax machine to the standby mode.
Stops the programming, transmission, reception or copying operation in progress.
HOOK KEY
Accesses the line: it is equivalent to lifting the receiver.
LAST TX /PAUSE KEY
 When pressed twice, redials the last fax number (only with document inserted in the ADF) or the last telephone number dialled.
Inserts a pause during the dialling of the telephone or fax number.
CONTRAST KEY
Adjusts the contrast of the documents to be sent (only with the document inserted in the ADF). Scrolls "forwards" through the settings of a parameter.
Moves the cursor to the "right" during the entry of numbers and names.
Increases the speaker volume after pressing the  key.
key.
RESOLUTION KEY
START KEY
Starts receiving a document.
After the fax number has been dialled, starts sending a document (only with the document already inserted in the ADF)
Confirms the selection of menus, submenus, parameters and their values and moves on to the next condition.
RX MODE/HOLD KEY
Selects the various reception methods.
 Puts a call on hold during a telephone conversation.
Adjusts the resolution of the documents to be sent (only with the document inserted in the ADF).
Scrolls "backwards" through the settings of a parameter.
Moves the cursor to the "left" during the entry of numbers and names.
Decreases the speaker volume after pressing the  key.
key.
SPEED DIAL/CLEAR KEY |
EXTERNAL KEY |
After two numeric keys (01-32) have been pressed, automatically dials (once set) the telephone or fax number associated with them.
Cancels incorrect settings.
With the fax machine connected to a private exchange:
When pressed before dialling the telephone or fax number gives access to the public line.

TABLE OF CONTENTS
INTRODUCTION |
1 |
PRELIMINARY OPERATIONS |
2 |
TO CONNECT IT TO THE TELEPHONE LINE ............................. |
2 |
TO CONNECT THE TELEPHONE HANDSET .............................. |
4 |
TO CONNECT IT TO THE POWER SUPPLY ................................ |
4 |
TO ADD PAPER ............................................................................ |
4 |
TO INSTALL THE PRINT HEAD.................................................... |
4 |
TO SET IT UP FOR THE FIRST TIME .......................................... |
5 |
BASIC TRANSMISSION AND RECEPTION |
|
OPERATIONS |
9 |
TO SEND A DOCUMENT .............................................................. |
9 |
TO RECEIVE ............................................................................... |
12 |
TO SET ONE-TOUCH AND SPEED DIALLING ........................... |
13 |
TO PRINT REPORTS AND LISTS .............................................. |
15 |
TO MAKE A CALL |
18 |
TO TELEPHONE WITH ONE-TOUCH DIALLING ........................ |
18 |
TO TELEPHONE WITH SPEED DIALLING .................................. |
18 |
TO TELEPHONE BY RUNNING A SEARCH IN |
|
THE PHONE BOOK ..................................................................... |
18 |
TO MAKE A COPY |
19 |
WHAT DOCUMENTS CAN BE COPIED ...................................... |
19 |
TO MAKE A COPY ...................................................................... |
19 |
TO GET COPIES OF AN EXCELLENT QUALITY ........................ |
19 |
THE TELEPHONE ANSWERING DEVICE |
20 |
THE TAD CONSOLE ................................................................... |
20 |
TO CHANGE OR DELETE THE TAD ACCESS CODE ................ |
20 |
OUTGOING MESSAGES ............................................................. |
21 |
TO SET THE LENGTH OF MEMOS AND INCOMING |
|
MESSAGES ................................................................................. |
22 |
TO LISTEN TO INCOMING MESSAGES AND MEMOS .............. |
22 |
TO DELETE MESSAGES AND MEMOS YOU HAVE ALREADY |
|
LISTENED TO ............................................................................. |
23 |
TO TRANSFER MESSAGES AND MEMOS TO A REMOTE |
|
TELEPHONE ............................................................................... |
23 |
TO OPERATE THE TELEPHONE ANSWERING DEVICE |
|
FROM A REMOTE LOCATION .................................................... |
24 |
SPECIAL FUNCTIONS OF THE TELEPHONE ANSWERING |
|
DEVICE ....................................................................................... |
24 |
TO PRINT THE TAD CONFIGURATION PARAMETERS ............ |
25 |
MORE SOPHISTICATED OPERATIONS |
26 |
OTHER USEFUL RECEPTION SETTINGS ................................. |
26 |
OTHER USEFUL TRANSMISSION SETTINGS .......................... |
27 |
TO CHANGE THE DATE AND TIME AND THE |
|
INSTALLATION PARAMETERS ................................................... |
28 |
SENDING/RECEIVING A DOCUMENT IN POLLING MODE ....... |
32 |
TROUBLESHOOTING GUIDE |
34 |
WHAT HAPPENS IF THERE IS A POWER FAILURE ................... |
34 |
WHAT HAPPENS IF THE PAPER OR INK HAS RUN OUT ......... |
34 |
IF THE TRANSMISSION IS UNSUCCESSFUL ........................... |
34 |
FOR MINOR PROBLEMS ............................................................ |
34 |
ERROR CODES .......................................................................... |
35 |
SIGNALS AND MESSAGES ........................................................ |
36 |
MAINTENANCE OPERATIONS |
38 |
TO REPLACE THE PRINT HEAD ............................................... |
38 |
CLEANING THE PRINT HEAD AND TESTING |
|
THE NOZZLES ............................................................................ |
38 |
TO CLEAN THE ELECTRICAL CONTACTS OF THE |
|
PRINT HEAD ............................................................................... |
39 |
TO CLEAN THE NOZZLES OF THE PRINT HEAD .................... |
39 |
TO CLEAN THE PRINT HEAD PAD ............................................ |
39 |
TO CLEAN THE OPTICAL READER ........................................... |
40 |
TO CLEAN THE CASING ............................................................ |
40 |
TO REMOVE JAMMED DOCUMENTS AND SHEETS OF |
|
PRINTING PAPER ....................................................................... |
40 |
TECHNICAL DATA |
41 |
TO USE IT AS A PRINTER |
42 |
SOFTWARE INSTALLATION REQUIREMENTS .......................... |
42 |
TO INSTALL THE "LINKFAX" SOFTWARE ................................. |
42 |
TO UNINSTALL THE "LINKFAX" SOFTWARE ............................ |
42 |
ACCESSING THE ON-LINE DOCUMENTATION ........................ |
43 |
NOTES ON HOW TO USE THE COMMUNICATION PORT ........ |
43 |
INDEX |
44 |
INTRODUCTION
CONSULTING THE MANUAL
This manual describes four models of fax machine: the base model, the model with a built-in telephone answering device, and then the multifunctional models (base model and model with builtin telephone answering device) which can be connected to a PC and use a colour print head (for the latter two models, see also the documentation provided inside the packaging). In the description that follows, whenever a distinction is to be made between models, the following indications will be given:
Models with a built-in TAD: refers to the "model with a built-in telephone answering device" and "multifunctional model with built-in telephone answering device".
Multifunctional models: refers to the "multifunctional base model" and "multifunctional model with a built-in telephone answering device".
Base model: refers to the "base model" only.
 OPERATING PRECAUTIONS
•Never attempt to repair the fax machine yourself. If you remove the outer casing, you could get an electric shock or suffer some other kind of injury. Repairs should be carried out by qualified technical staff only.
•If you are to leave the fax machine unused for a long period of time, you should disconnect it from the power supply: in this way, it will be protected against the risk of damage due to interference or power surges.
•During storms we recommend you unplug the device from both the power outlet and the telephone line so as to eliminate all risk of damage.
•In case of a voltage drop or power failure, it will not be possible to make or receive telephone calls as the keypad will be disabled. If it is essential that you make a call in this situation, you must use an emergency telephone approved by the telephone company and connected directly to the fax machine.
 INSTALLATION PRECAUTIONS
•Place the fax machine on a stable, flat surface free of vibrations, to prevent it from falling and getting damaged or causing injury to people.
•Keep the fax machine in a dust-free place away from sources of water, steam or excessive heat. Do not expose it to direct sunlight.
•Keep the fax machine away from other electrical or electronic appliances which may generate interference, e.g. radio, television, etc.
•Ensure that no books, documents, or other objects obstruct normal ventilation in any way. Ideally this fax machine should be operated in an environment with a temperature of between 5°C and 35°C and a relative humidity of between 15% and 85%.
•Leave enough room in front of the outlet for the unloading of originals and received/copied documents, so that they do not fall on the floor.
ABOUT THE INSTALLATION AND SETUP
PARAMETERS
As the country default values for each installation and setup parameter may change due to certification requirements or specific customers’ needs, these values do not always correspond to those indicated in the manual: it is therefore advisable to print them before changing them.
PACKAGE CONTENTS
In addition to the fax machine and this manual, you will find the following elements in the package:
•The cable for connecting the fax machine to the telephone line.
•The telephone plug (if applicable).
•The box containing the monochrome print head provided with the machine.
•The telephone handset.
•The paper support.
•The template for nationalizing the central part of the operator console.
•The guarantee.
•For multifunctional models only:
•The Linkfax software installation CD (to use the fax machine as a printer).
•The print head box.
1
PRELIMINARY OPERATIONS
TO CONNECT IT TO THE TELEPHONE LINE
As the connection to the telephone line of the fax machine, external answering machine, additional telephone or other devices is regulated by national standards that vary from one country to another, the diagrams that follow show some examples of connections. However, if the connection to the telephone line is different in your country from those shown in the diagrams, respect the regulations in force in your country.
CONNECTING THE FAX MACHINE
If you cannot connect the additional device directly into the "TEL" socket, use the relevant adapter (which varies from one country to another).
If the system to which the fax machine is connected is a system with several sockets in series, you must connect the fax machine to the primary socket.
(Case 2 connection)
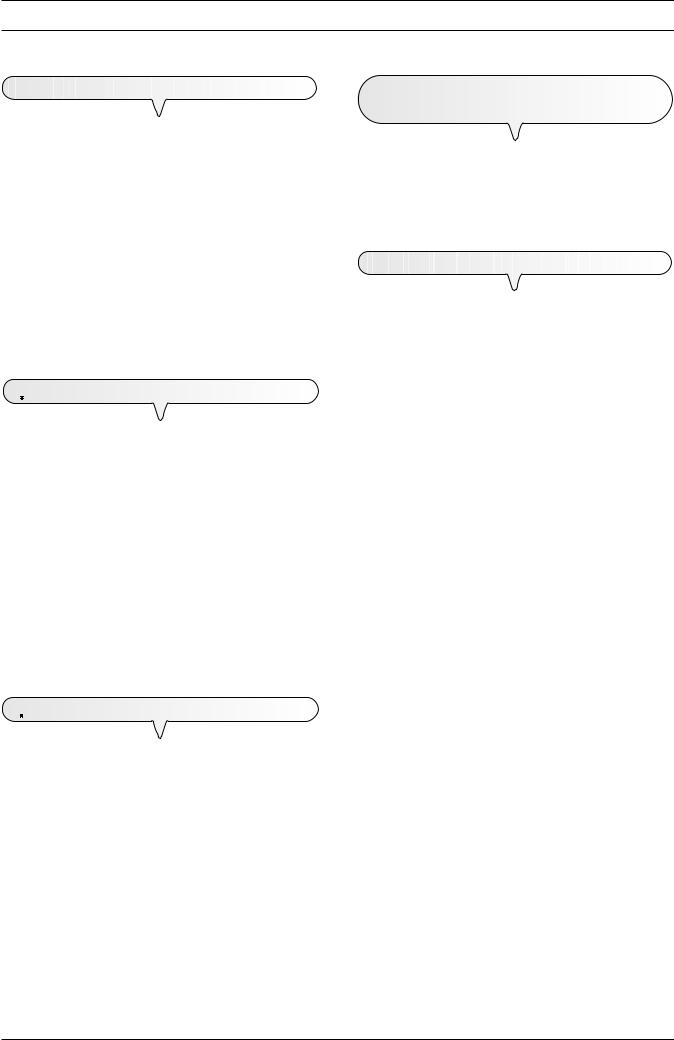
1.Insert the connector or plug (which varies from one country to another) of the additional device into the plug-socket (see diagram).
(Case 3 connection)
1.Insert the connector of the cable for connecting it to the telephone line into the "LINE" socket on the fax machine (see diagrams "case 1", "case 2" or "case 3").
2.Insert the connector or the plug (if applicable) at the other end of the cable into the wall telephone line socket (see diagrams "case 1", "case 2" or "case 3").
1.Insert the plug of the additional device into the wall telephone line socket (see diagram).
If you want, using the relevant adapter (as for the case 1 connection), you can connect another device to the "TEL" socket for connection to the telephone line on the fax machine.
CONNECTING OTHER DEVICES (ANSWERING MACHINE,
EMERGENCY TELEPHONE, ETC. )
(Case 1 connection)
1.Remove, if present, the cover of the "TEL" socket for connecting the machine to the telephone line on the fax machine, then insert the connector on the telephone cable of the addition device into this socket (see diagram).
CASE 1 CONNECTION |
|
|
|
CORD |
WALL SOCKETS FOR CONNECTION TO TELEPHONE LINE |
FAX |
|
|
|
|
B |
|
LINE |
|
Connection sockets |
|
B |
|
|
|
ADDITIONAL TELEPHONE OR |
TEL |
|
OTHER DEVICES |
|
|
2

CASE 2 CONNECTION |
CORD |
WALL SOCKETS FOR CONNECTION TO TELEPHONE LINE |
|
||
FAX |
|
C |
|
|
|
|
|
B |
Connection sockets |
|
|
|
LINE |
B |
|
|
|
ADDITIONAL TELEPHONE OR |
|
TEL |
OTHER DEVICES |
|
|
CASE 3 CONNECTION (GERMANY) |
CORD |
WALL SOCKETS FOR CONNECTION TO TELEPHONE LINE |
|
||
FAX |
|
B |
|
|
|
Connection sockets |
LINE |
|
|
|
|
ADDITIONAL TELEPHONE OR |
|
C |
|
B |
|
OTHER DEVICES |
|
C D |
|
|
OTHER DEVICES
D
CASE 3 CONNECTION (AUSTRIA) |
CORD |
|
WALL SOCKETS FOR CONNECTION TO TELEPHONE LINE |
|
|
||
FAX |
|
|
B |
|
|
|
|
Connection sockets |
|
|
|
|
LINE |
|
|
|
|
C |
B |
ADDITIONAL TELEPHONE OR |
|
|
|
|
|
CD |
|
OTHER DEVICES |
|
|
|
 D
D
OTHER DEVICES
3
TO CONNECT THE TELEPHONE HANDSET |
TO ADD PAPER |
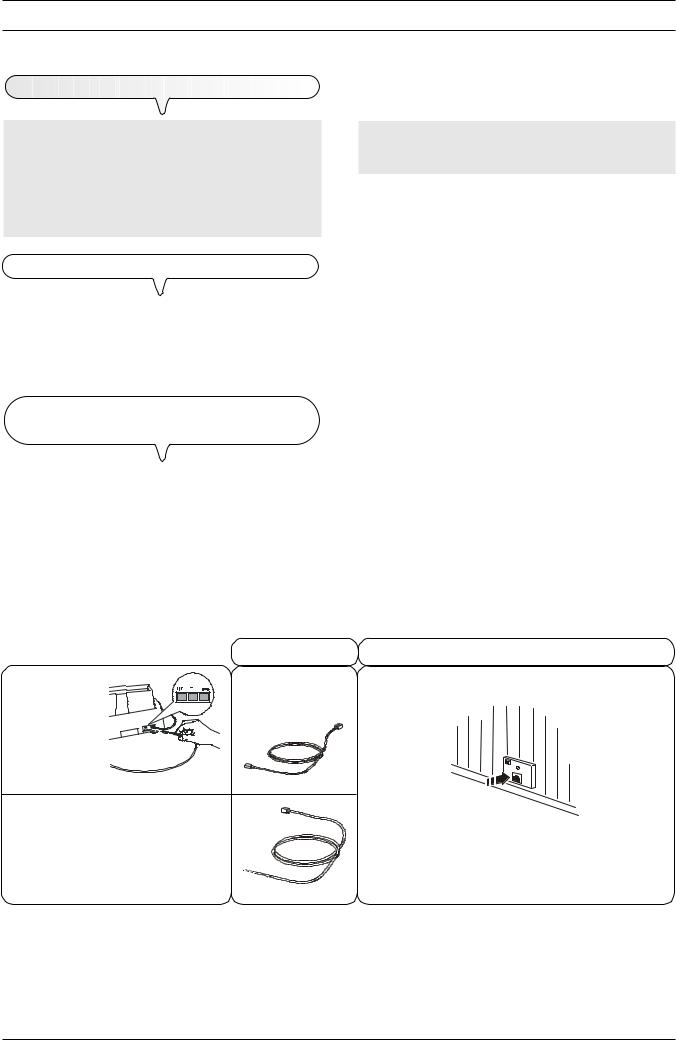
1.Insert the connector of the handset cable into the socket marked with the symbol  on the fax machine.
2.Place the handset in its seat.
TO CONNECT IT TO THE POWER SUPPLY
notE
Before connecting the fax machine to the mains, remove the clip securing the print carriage during transport
(see print head compartment).
1. Insert the plug of the power cable into the wall power socket.
The fax machine automatically runs a short test to check that its components are working and then the display shows:
AUTOMATIC RX
CHECK PRINT HEAD
For models with a built-in TAD, the display will also show the total number of messages received, in this case "00" beside the message "AUTOMATIC RX":
AUTOMATIC RX 00
CHECK PRINT HEAD
NOTE
The fax machine will remain permanently connected, ready to receive and send documents 24 hours a day.
If you want to turn it off, detach the plug of the power cable from the wall socket as the fax machine has no on/off switch.
notE
If the messages do not appear in the language spoken in your country, choose the "LANGUAGE" from those available by pressing the following keys in the order indicated:
 +
+  The display shows the country it is set for.
If the country displayed is not the desired one, press
 /
/  to change it.
 To confirm the setting. The display shows the lan-
guage in which the messages will be displayed.
If the language displayed is not the desired one, press
 /
/  to change it.
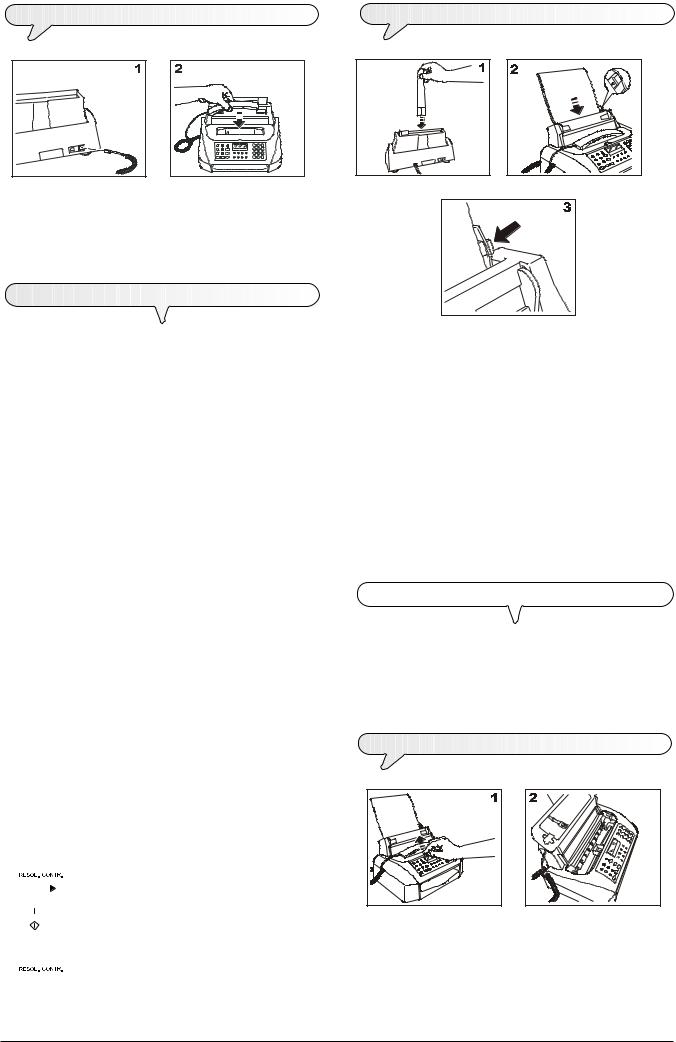
1.Insert the paper support extension in its slit until it clicks into place.
2.Holding the sheets by their upper edge, insert them by letting them "drop" into the ASF without folding or forcing them.
3.Push the sheets against the left side of the ASF using the adjusting lever.
notE
If you add sheets to the ASF, make sure you place them under and not on top of those already present.
notE
The fax machine has a memory that enables it to receive up to 21 pages even if you do not add any paper.
TO CHECK THE PRINT FORMAT SET ON THE FAX MACHINE
Once you have manually adjusted the automatic sheet feeder (ASF), to ensure that the fax machine works properly, check that the printing format set on the fax machine corresponds to the size of paper you intend to use. See "To set it up for the first time" later in this chapter.
TO INSTALL THE PRINT HEAD
4
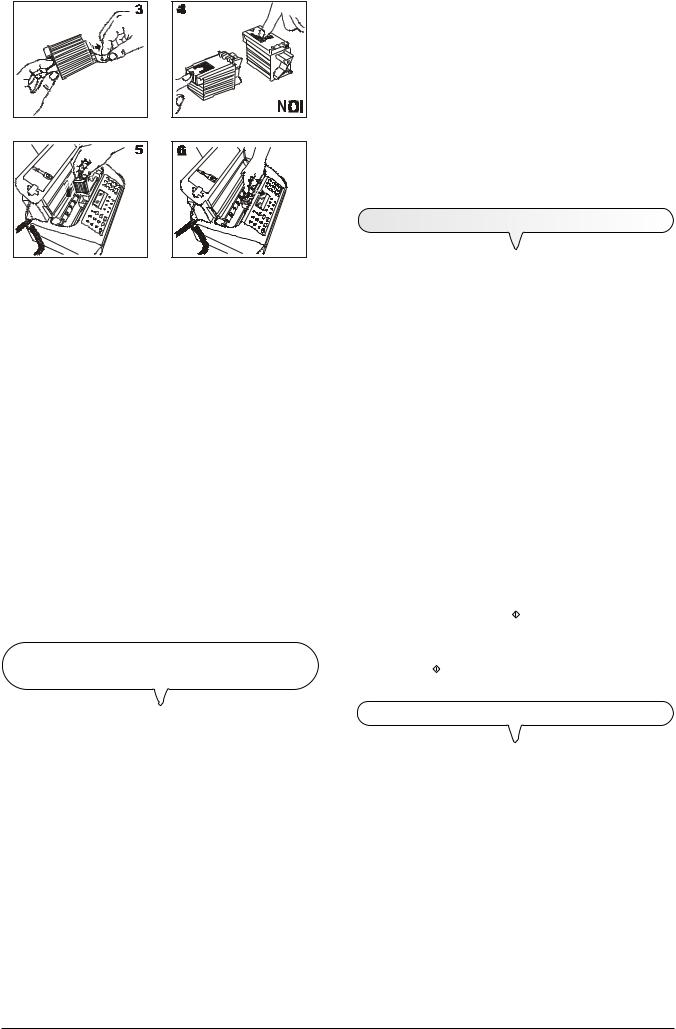
1-2 Lift the print head compartment cover by putting your finger in the notch at its centre, as shown in the figure.
3.Remove the print head from its package and, holding it by the grip, peel off the film covering the nozzles.
4.Avoid touching the nozzles and the electrical contacts with your fingers.
5.Place the print head in its seat with the electrical contacts facing towards the front of the fax machine.
6.Push the print head in the direction indicated by the arrow until it clicks into place and close the print head compartment cover.
notE
If, after the print head has been installed, the "CHECK PRINT HEAD" message appears again, try removing it and then reinserting it, pressing it more firmly into position. If the message remains on the display, remove the print head and clean the electrical contacts of the print head and the carriage, see "To clean the electrical contacts of the print head", section "Maintenance operations".
notE
To replace the print head, see the section "Maintenance operations".
AUTOMATIC PRINT HEAD NOZZLE CLEANING AND TESTING
PROCEDURE
Once the print head has been inserted, the fax machine starts the nozzle cleaning and checking procedure, which is completed by:
•the printing, on the sheet loaded automatically, of a diagnostic test sheet containing:
-a numbered scale, for checking the flow of ink and the electrical circuits of the print head nozzles.
-a group of graphics and text, so that the printing quality may be evaluated.
•the display shows the message: "CHECK PRINT OUT", "1=EXIT 0=REPEAT".
Examine the print test sheet as follows:
•Check that the numbered scale is not interrupted at any point, that the black areas do not present any horizontal white lines: if these conditions, which confirm that the print head has been inserted correctly and is working properly, are respected, set the value 1. The fax machine returns to its initial stand-by status and is ready for use.
The display shows the message:
AUTOMATIC RX 00
25-07-01 11:23
•On the other hand, if there are any interruptions or white lines present, set 0 to clean the nozzles again: if the new print test continues to be unsatisfactory, repeat the procedure another time. Then, if the printing quality does still not meet your expectations, clean the electrical contacts and the nozzles as indicated in "To clean the electrical contacts of the print head" and "To clean the nozzles of the print head", section "Maintenance operations".
TO SET IT UP FOR THE FIRST TIME
To get started on the fax machine, the only setup and installation parameters you have to set are the country, the language, the date and time, your name and your telephone number. The remaining parameters may be left unchanged (default values) or changed, to adapt the fax machine to your working requirements (see "Setting parameters").
notE
Once the parameters have been set for the first time, subsequent changes are to be made exclusively as indicated in the procedures described in "To set the date and time and the installation parameters", section "More sophisticated operations".
notE
As the country default settings for each installation parameter may be subject to changes due to certification requirements or specific users’ needs, these settings do not always correspond to those indicated in the manual: it is therefore advisable to print them before changing them: Having set the country and the language (see the procedure
described below), press the  key until the display shows:
PRINT OUT: 
Press the  key again to confirm.
SETTING PARAMETERS
notE
From here on, if you think you have made a mistake or wish to abort the procedure in progress during any phase of op-
eration, press the  key.
key.
If no data is entered for about two minutes, the fax machine will automatically return to its initial stand-by status.
notE
It is to be borne in mind that the stand-by status indicates that the fax machine is currently idle and is the status from which functions may be programmed.
5
 +
+ The display shows the country it was set up for. In this case:
U.K.
If the country displayed is not the desired one, press |/} to change it.
If your country is not present among those shown on the display, see the table below:
COUNTRY |
COUNTRY TO BE SELECTED |
Argentina |
AMERICA LATINA |
Australia |
NZL/AUSTRALIA |
Austria |
ÖSTERREICH |
Belgium |
BELGIUM |
Brazil |
BRASIL |
Chile |
AMERICA LATINA |
China |
CHINA |
Colombia |
AMERICA LATINA |
Denmark |
DANMARK |
Finland |
FINLAND |
France |
FRANCE |
Germany |
DEUTSCHLAND |
Greece |
INTERNATIONAL |
Holland |
HOLLAND |
Hong Kong |
SINGAPORE |
India |
INDIA |
Israel |
ISRAEL |
Italy |
ITALIA |
Luxembourg |
BELGIUM |
Mexico |
AMERICA LATINA |
New Zealand |
NZL/AUSTRALIA |
Norway |
NORGE |
Peru |
AMERICA LATINA |
Portugal |
PORTUGAL |
Rest of world |
INTERNATIONAL |
Singapore |
SINGAPORE |
South Africa |
S. AFRICA |
Spain |
ESPAÑA |
Sweden |
SVERIGE |
Switzerland |
SCHWEIZ |
Taiwan |
TAIWAN |
UK |
U.K. |
Uruguay |
AMERICA LATINA |
Venezuela |
AMERICA LATINA |
|
|
The display shows the language in which the messages will be shown on the display. In this case:
ENGLISH
If the language shown is not the desired one, press |/} to change it.
The display shows:
SIZE: A4
To select the print format
If the print format set on the fax machine does not corre-
spond to the print format you intend to use, press the |/} keys until the display shows the desired paper format "LETTER" or "LEGAL".
The display shows:
FORMAT: DD/MM/YY
To set the date and time
If you want to select a different format from the one dis-
played, press |/}.
The display shows:
FORMAT:24 H
If you want to select the other time format (12-hour), press
|/}.
The display shows:
DD/MM/YY HH:MM
25-07-01 11:23
Enter the new date and time (e.g. 26-07-01; 12:00). As
each digit is entered, the cursor will move to the next one.
DD/MM/YY HH:MM
26-07-01 12:00
If you only want to change a few digits, move the cursor to
them using the |/} keys and overwrite them with the correct digits.
note
If you have chosen the 12-hour time format, the display will show the letter "p" (post meridiem) or the letter "a" (ante meridiem). To switch from one letter to another, move the cursor to the letter to be changed, using the |/} keys, and
press the  key.
key.
The display shows:
TYPE YOUR NAME
To set your name
To select the characters of each key cyclically.
To move the cursor one place or to leave a space, press
|/}.
To include a variety of special symbols, e.g. &, in your name.
If there are any incorrect characters: position the cursor on
the incorrect character using the |/} keys and overwrite it with the correct character.
To delete the name completely.
6
For example, to enter the name "LARA":
Until you have selected the letter "L".
Until you have selected the letter "A".
Until you have selected the letter "R".
Until you have selected the letter "A".
To confirm the name. The display shows:
TYPE YOUR NUMBER
To set your fax number
Enter your fax number.
To enter a space, press |/}.
If you make any typing errors, correct them in the same way as for your name.
If you want to include the international code in your number, instead of the zeros, press the * key; the display will show the symbol +.
To confirm the fax number. The display shows:
PUBL.LINE (PSTN)
To set it up for the type of line
At this point, you can connect the fax machine to a public line or a private line:
follow either of the procedures described below and, having completed it, continue setting up the fax machine starting from the step at which the display shows: "OTHER CARR.:ON".
To connect it to a public line:
The display shows:
PSTN DIAL:TONE
The dialling mode is a characteristic parameter of the exchange that manages the line on which you have connected the fax machine:
•pulse dialling, also called decadic; each number dialled emits a corresponding number of pulses.
•tone dialling, also called multifrequency; each number dialled emits a sound with a specific tone different from that emitted by the other keys.
You must therefore set the correct parameter on the fax machine: if in doubt about the choice to be made, ask the telephone network manager.
Press |/} to display the other dialling mode: "PSTN DIAL: PULSE".
To connect it to a private line (PBX)
To connect the fax machine to a private line and be able to use it also on a public line, proceed as follows:
•Select the "PBX" parameter.
•Set the same dialling mode (tone or pulse) as the one used by the private telephone exchange that manages the line to which you have connected the fax machine. If in doubt about the choice to be made, ask the company that manages your private telephone network.
•Set the output mode (area code or flash) to access the public telephone network from the private telephone network.
•Set the same dialling mode (tone or pulse) as the one used by the public telephone exchange.
Press |/} to view the other available option:
PRIV.LINE (PBX)
The display shows:
PBX DIAL:TONE
Press |/} to view the other dialling mode:
PBX DIAL:PULSE
To confirm your choice.
EXT.LINE:PREFIX
Press | /} to view the other available option:
"EXT.LINE:FLASH".
If you confirmed the "EXT.LINE:PREFIX" mode, the fax machine prompts you to enter the number corresponding to the area code (max. 3 digits).
The display shows:
PSTN DIAL:TONE
Press |/} to view the other dialling mode:
PSTN DIAL:PULSE
note
Having confirmed the dialling mode to be used by the fax
machine to connect to the public line, simply press the
key, before dialling the correspondent’s fax or telephone number, to gain access to it. The display will show the letter "E" (external).
To confirm the connection to the public line or private line.
The display shows:
OTHER CARR.:ON
To automatically dial a frequently used code
This parameter enables you to store a frequently used code such as an area code or a code to access an alternative telephone operator which is to be dialled automatically by the fax machine.
If you do not want to enable this parameter, press |/} to display the alternative option: "OTHER CARR.:OFF" then
press the  key; then resume the procedure starting
from the point where the display shows: "REMOTE START:ON".
The display shows:
ENTER NAME:
7
Enter the name that identifies the area code or the name of
the alternative telephone operator and then press the 
key. The display shows:
TYPE PREFIX:
(0 - 9):
Type the new code (max. 6 digits) and then press the
 key. The display shows:
ENTER ACRONYM
(A - Z):
Type the letter that identifies the code on the display
(1 character).
The display shows:
REMOTE START:ON
To set the remote control code
The display shows:
TYPE CODE
COD.(0/9,*) **
Type the code, for example: “*8”.
You can only replace the second "asterisk" in this code using a digit from 0 to 9.
If you do not want to set any code, press |/} to display the alternative option: "REMOTE START:OFF" and move on to the next step.
To confirm your choice. The display shows:
DISTINC.RING:OFF
To recognize the ring frequency
If you do not want to enable this parameter, press the 
key and then resume the procedure from the point where the displays shows: "RX SILEN.:OFF".
Press |/} until the display shows:
CHANGE PATTERN
The display shows:
AUTODETECT. RING
Call the fax machine with the desired frequency so that it detects it. The display shows:
RING DETECTED
The display shows:
RX SILEN.:OFF
To enable/disable silent reception
Press |/} to display the alternative option: "RX SILEN.:ON".
To confirm your choice. The display shows:
RING COUNT: 02
To set the number of rings
Press |/} to view the other available values: "01", "02",
"04" and "08".
To confirm your choice. The display shows:
FAX/TEL TIMER:20
To set the time of the acoustic signal
Press |/} to view the other available values: "15", "30" or
"40".
To confirm your choice. The display shows:
SILENCE LAPSE: 6
To set the silence time
Press |/} to view the other available values: "3", "4", "8",
"10" and "OFF".
To confirm your choice. The display shows:
PRINT OUT: 
To print the parameters
Press the  key to start printing or the
  key to return the fax machine to its initial stand-by status.
HOW TO INTERPRET THE PARAMETERS
A more detailed explanation of the meaning of the parameters and their application is given in "To set the date and time and the installation parameters", section "More sophisticated operations".
8

BASIC TRANSMISSION AND RECEPTION OPERATIONS
Now that your fax machine has a name and number, you can use it to:
•send documents (also in broadcast mode, from the memory, or by polling)
•receive documents (also by polling)
•make telephone calls (see the section "To make a call")
•copy documents (see section "To make a copy").
TO SEND A DOCUMENT
WHAT DOCUMENTS MAY BE USED
Dimensions |
|
|
• |
Width |
min. 148 mm - max. 216 mm |
• |
Length |
min. 105 mm - max. 600 mm |
Thickness |
|
|
from: 60 - |
90 gr/m2 (max. 5 sheets) |
|
|
50 - 140 gr/m2 (1 sheet at a time) |
|
For documents of a different size from those specified, you can use a transparency with rear sheet.
NEVER USE
•curled paper
•excessively thin paper
•torn paper
•damp or set paper
•excessively small paper
•crumpled paper
•carbon paper
In addition, in order to avoid damaging your fax machine and invalidating your guarantee, make sure that the documents you are to use do not contain:
•staples
•paper clips
•adhesive tape
•correcting liquid or glue that has not yet dried.
For all these cases, photocopy the document and send the copy or use a transparency with a rear sheet.
TO PLACE THE DOCUMENT IN THE ADF
Place the document, without forcing, on the automatic document feeder (ADF) with the side to be sent face down and then fit the cheeks against either side of it.
The display shows:
DOCUMENT READY
27-07-01 15:45
TO ADJUST THE CONTRAST AND RESOLUTION
Before sending a document you can make some adjustments so as to optimize the printing quality.
To choose the contrast on the basis of the following crite-
ria:
•NORMAL, if the document is neither too light nor too dark. "NORMAL" appears on the bottom line of the display.
•LIGHT, if the document is dark. "LIGHT" appears on the bottom line of the display.
•DARK, if the document is light. "DARK" appears on the bottom line of the display.
To choose the resolution on the basis of the following
criteria:
•STD (STANDARD), if the document contains easily legible characters. An "arrow" appears on the bottom line of the display in line with the " 

 " symbol printed on the console.
•FINE, if the document contains very small characters or drawings. An "arrow" appears on the bottom line of the display in line with the " 

 " symbol printed on the console.
•HALF TONES, if the document contains shaded areas.
An "arrow" in line with the " " symbol and an arrow in line with the "

 " symbol printed on the console appear on the bottom line of the display.
TO SEND A DOCUMENT
Place the document in the ADF. The display shows the default contrast and resolution values: NORMAL and 


 (standard), respectively.
If you want, change the contrast and resolution values as described previously.
On the numeric keypad type the number of the correspond-
ent to whom you want to send the document (max. 52 digits).
To start sending the document.
If the document is sent correctly, once this operation has been completed, the display will show the message "TX COMPLETED" for a few seconds and then the initial standby status.
9
 Loading...