


 Loading...
Oki MC332DN, MPS2731MC, MC562DN, MC362DW, MC562DW User Manual
...
User’s Guide
 MC332dn, MC342dn, MC342dw, MC352dn,


MC362dn, MC362dw, MC562dn, MC562dw,
 ES3452 MFP, ES5462 MFP, MPS2731mc


PREFACE
Every effort has been made to ensure that the information in this document is complete, accurate, and up-to-date. The manufacturer assumes no responsibility for the results of errors beyond its control. The manufacturer also cannot guarantee that changes in software and equipment made by other manufacturers and referred to in this guide will not affect the applicability of the information in it. Mention of software products manufactured by other companies does not necessarily constitute endorsement by the manufacturer.
While all reasonable efforts have been made to make this document as accurate and helpful as possible, we make no warranty of any kind, expressed or implied, as to the accuracy or completeness of the information contained herein.
The most up-to-date drivers and manuals are available from: http://www.okiprintingsolutions.com
Copyright © 2012. Oki Data Corporation All rights reserved. OKI is a registered trademark of Oki Electric Industry Co., Ltd.
Energy Star is a trademark of the United States Environmental Protection Agency. Microsoft, MS-DOS and Windows are registered trademarks of Microsoft Corporation. Apple, Macintosh, Mac and Mac OS are trademarks of Apple Inc.
Other product names and brand names are registered trademarks or trademarks of their proprietors.
As an Energy Star Program Participant, the manufacturer has determined that this product meets the Energy Star guidelines for energy efficiency.
This product complies with the requirements of the Council Directives 2004/ 108/EC (EMC), 2006/95/EC (LVD), 1999/5/ EC (R&TTE) and 2009/125/EC (EuP), as amended where applicable on the approximation of the laws of the member states relating to electromagnetic compatibility, low voltage, radio & telecommunications terminal equipment, and energy using products.
The following cables were used to evaluate this product to achieve EMC directive 2004/108/EC compliance and configurations other than this may affect that compliance.
CABLE TYPE |
LENGTH |
CORE |
SHIELD |
|
(METRE) |
|
|
|
|
|
|
Power |
1.8 |
|
|
|
|
||
|
|
|
|
USB |
5.0 |
|
|
|
|
||
|
|
|
|
LAN |
7.0 |
|
|
|
|
||
|
|
|
|
Tel |
2.0 |
|
|
|
|
||
|
|
|
|
Modular |
7.0 |
|
|
|
|
||
|
|
|
|
Preface > 2

EMERGENCY FIRST AID
Take care with toner powder:
If swallowed, give small amounts of cold water and seek medical attention. DO NOT attempt to induce vomiting.
If inhaled, move the person to an open area for fresh air. Seek medical attention.
If it gets into the eyes, flush with large amounts of water for at least 15 minutes keeping eyelids open. Seek medical attention.
Spillages should be treated with cold water and soap to help reduce risk of staining skin or clothing.
MANUFACTURER
Oki Data Corporation, 4-11-22 Shibaura, Minato-ku, Tokyo 108-8551,
Japan
IMPORTER TO THE EU/AUTHORISED REPRESENTATIVE
Oki Europe Limited
Blays House
Wick Road Egham
Surrey, TW20 0HJ
United Kingdom
For all sales, support and general enquiries contact your local distributor.
ENVIRONMENTAL INFORMATION
Emergency first aid > 3
This product contains software developed by the Heimdal Project.
Copyright (c) 1995 - 2008 Kungliga Tekniska Högskolan (Royal Institute of Technology, Stockholm, Sweden). All rights reserved.
Redistribution and use in source and binary forms, with or without modification, are permitted provided that the following conditions are met:
1.Redistributions of source code must retain the above copyright notice, this list of conditions and the following disclaimer.
2.Redistributions in binary form must reproduce the above copyright notice, this list of conditions and the following disclaimer in the documentation and/or other materials provided with the distribution.
3.Neither the name of the Institute nor the names of its contributors may be used to endorse or promote products derived from this software without specific prior written permission.
THIS SOFTWARE IS PROVIDED BY THE INSTITUTE AND CONTRIBUTORS “AS IS” AND ANY EXPRESS OR IMPLIED WARRANTIES, INCLUDING, BUT NOT LIMITED TO, THE IMPLIED WARRANTIES OF MERCHANTABILITY AND FITNESS FOR A PARTICULAR PURPOSE ARE DISCLAIMED. IN NO EVENT SHALL THE INSTITUTE OR CONTRIBUTORS BE LIABLE FOR ANY DIRECT, INDIRECT, INCIDENTAL, SPECIAL, EXEMPLARY, OR CONSEQUENTIAL DAMAGES (INCLUDING, BUT NOT LIMITED TO, PROCUREMENT OF SUBSTITUTE GOODS OR SERVICES; LOSS OF USE, DATA, OR PROFITS; OR BUSINESS INTERRUPTION) HOWEVER CAUSED AND ON ANY THEORY OF LIABILITY, WHETHER IN CONTRACT, STRICT LIABILITY, OR TORT (INCLUDING NEGLIGENCE OR OTHERWISE) ARISING IN ANY WAY OUT OF THE USE OF THIS SOFTWARE, EVEN IF ADVISED OF THE POSSIBILITY OF SUCH DAMAGE.
Environmental information > 4
CONTENTS
Preface . . . . . . . . . . . . . . . . . . . . . . . . . . . . . . . . . . . . . . . . . . . . . . . . . . .2 Emergency first aid . . . . . . . . . . . . . . . . . . . . . . . . . . . . . . . . . . . . . . . . . .3 Manufacturer. . . . . . . . . . . . . . . . . . . . . . . . . . . . . . . . . . . . . . . . . . . . . . .3 Importer to the EU/authorised representative. . . . . . . . . . . . . . . . . . . . .3 Environmental information . . . . . . . . . . . . . . . . . . . . . . . . . . . . . . . . . . . .3 Contents . . . . . . . . . . . . . . . . . . . . . . . . . . . . . . . . . . . . . . . . . . . . . . . . . .5 Notes, cautions and warnings. . . . . . . . . . . . . . . . . . . . . . . . . . . . . . . . . .9
About this guide . . . . . . . . . . . . . . . . . . . . . . . . . . . . . . . . . . . . . . . . . . .10
Documentation suite . . . . . . . . . . . . . . . . . . . . . . . . . . . . . . . . . . . . . . .10 Purpose of this guide . . . . . . . . . . . . . . . . . . . . . . . . . . . . . . . . . . . . . . .10 On-line usage . . . . . . . . . . . . . . . . . . . . . . . . . . . . . . . . . . . . . . . . . . . .11 Printing pages. . . . . . . . . . . . . . . . . . . . . . . . . . . . . . . . . . . . . . . . . . . .11
Introduction . . . . . . . . . . . . . . . . . . . . . . . . . . . . . . . . . . . . . . . . . . . . . .12
Overview . . . . . . . . . . . . . . . . . . . . . . . . . . . . . . . . . . . . . . . . . . . . . . .14 Front view . . . . . . . . . . . . . . . . . . . . . . . . . . . . . . . . . . . . . . . . . . . .14 Rear view . . . . . . . . . . . . . . . . . . . . . . . . . . . . . . . . . . . . . . . . . . . . .15 Control panel . . . . . . . . . . . . . . . . . . . . . . . . . . . . . . . . . . . . . . . . . . . .16 Keypad - character switching . . . . . . . . . . . . . . . . . . . . . . . . . . . . . . . . .18 Qwerty keyboard (MC562dn, MC562dw, ES5462 MFP and MPS2731mc only) . . . 19 Changing the display language . . . . . . . . . . . . . . . . . . . . . . . . . . . . . . . .19
Getting started . . . . . . . . . . . . . . . . . . . . . . . . . . . . . . . . . . . . . . . . . . . .20
Turning on your machine . . . . . . . . . . . . . . . . . . . . . . . . . . . . . . . . . . . .20 Turning off your machine . . . . . . . . . . . . . . . . . . . . . . . . . . . . . . . . . . . .21 When the machine is not used for long time . . . . . . . . . . . . . . . . . . . . .21 Power saving mode . . . . . . . . . . . . . . . . . . . . . . . . . . . . . . . . . . . . . . . .22 Sleep mode . . . . . . . . . . . . . . . . . . . . . . . . . . . . . . . . . . . . . . . . . . . . .23 Auto power off . . . . . . . . . . . . . . . . . . . . . . . . . . . . . . . . . . . . . . . . . . .24 Installing drivers and utilities . . . . . . . . . . . . . . . . . . . . . . . . . . . . . . . . .25 Windows - scanner and printer drivers . . . . . . . . . . . . . . . . . . . . . . . . .26 Mac - printer driver . . . . . . . . . . . . . . . . . . . . . . . . . . . . . . . . . . . . . .27
Fax driver (MC342dn, MC342dw, MC362dn, MC362dw, MC562dn, MC562dw, ES5462 MFP and MPS2731mc) . . . . . . . . . . . . . . . . . . . . . .28 Configuration tool . . . . . . . . . . . . . . . . . . . . . . . . . . . . . . . . . . . . . . .29 ActKey utility . . . . . . . . . . . . . . . . . . . . . . . . . . . . . . . . . . . . . . . . . .30
Paper recommendations . . . . . . . . . . . . . . . . . . . . . . . . . . . . . . . . . . . . .32
Cassette trays. . . . . . . . . . . . . . . . . . . . . . . . . . . . . . . . . . . . . . . . . . . .33 Multi purpose tray . . . . . . . . . . . . . . . . . . . . . . . . . . . . . . . . . . . . . . . . .34 Face down stacker. . . . . . . . . . . . . . . . . . . . . . . . . . . . . . . . . . . . . . . . .34 Face up stacker. . . . . . . . . . . . . . . . . . . . . . . . . . . . . . . . . . . . . . . . . . .34 Duplex . . . . . . . . . . . . . . . . . . . . . . . . . . . . . . . . . . . . . . . . . . . . . . . . .34
Loading paper . . . . . . . . . . . . . . . . . . . . . . . . . . . . . . . . . . . . . . . . . . . . .35
Cassette trays. . . . . . . . . . . . . . . . . . . . . . . . . . . . . . . . . . . . . . . . . . . .35 Multi purpose tray . . . . . . . . . . . . . . . . . . . . . . . . . . . . . . . . . . . . . . . . .38 Configuring the tray settings . . . . . . . . . . . . . . . . . . . . . . . . . . . . . . . . .38 Registering custom sizes . . . . . . . . . . . . . . . . . . . . . . . . . . . . . . . . . . . .39
User authentication and access control . . . . . . . . . . . . . . . . . . . . . . . . .40
PIN authentication. . . . . . . . . . . . . . . . . . . . . . . . . . . . . . . . . . . . . . . . .40 Logging into the machine . . . . . . . . . . . . . . . . . . . . . . . . . . . . . . . . . .40 Logging out of the machine . . . . . . . . . . . . . . . . . . . . . . . . . . . . . . . .40 User name and password authentication . . . . . . . . . . . . . . . . . . . . . . . . .40 Logging into the machine . . . . . . . . . . . . . . . . . . . . . . . . . . . . . . . . . .40 Logging out of the machine . . . . . . . . . . . . . . . . . . . . . . . . . . . . . . . .40 Operation from the computer . . . . . . . . . . . . . . . . . . . . . . . . . . . . . . .41
Contents > 5
Operation . . . . . . . . . . . . . . . . . . . . . . . . . . . . . . . . . . . . . . . . . . . . . . . .43
Multi-tasking. . . . . . . . . . . . . . . . . . . . . . . . . . . . . . . . . . . . . . . . . . . . .44 Loading document(s) . . . . . . . . . . . . . . . . . . . . . . . . . . . . . . . . . . . . . . .45 Document requirements. . . . . . . . . . . . . . . . . . . . . . . . . . . . . . . . . . .45 Scannable area . . . . . . . . . . . . . . . . . . . . . . . . . . . . . . . . . . . . . . . . .45 Placing document(s) in the ADF . . . . . . . . . . . . . . . . . . . . . . . . . . . . .46 Placing document(s) on the glass . . . . . . . . . . . . . . . . . . . . . . . . . . . .47
Copying . . . . . . . . . . . . . . . . . . . . . . . . . . . . . . . . . . . . . . . . . . . . . . . . . .48
Basic operation . . . . . . . . . . . . . . . . . . . . . . . . . . . . . . . . . . . . . . . . . . .48 Increasing copy count . . . . . . . . . . . . . . . . . . . . . . . . . . . . . . . . . . . .48 Advanced operation. . . . . . . . . . . . . . . . . . . . . . . . . . . . . . . . . . . . . . . .49 Resetting copy settings . . . . . . . . . . . . . . . . . . . . . . . . . . . . . . . . . . . . .51 Auto reset . . . . . . . . . . . . . . . . . . . . . . . . . . . . . . . . . . . . . . . . . . . .51 Using the reset/logout button . . . . . . . . . . . . . . . . . . . . . . . . . . . . . . .51
Scanning . . . . . . . . . . . . . . . . . . . . . . . . . . . . . . . . . . . . . . . . . . . . . . . . .52
Installing scanner drivers (TWAIN/WIA/ICA driver) . . . . . . . . . . . . . . . . . .52 Installation procedure . . . . . . . . . . . . . . . . . . . . . . . . . . . . . . . . . . . .52 Using ActKey software . . . . . . . . . . . . . . . . . . . . . . . . . . . . . . . . . . . .57 Setup to use the WSD Scan . . . . . . . . . . . . . . . . . . . . . . . . . . . . . . . . . .58 Installation procedure . . . . . . . . . . . . . . . . . . . . . . . . . . . . . . . . . . . .58 Scanning methods. . . . . . . . . . . . . . . . . . . . . . . . . . . . . . . . . . . . . . . . .59 Scan to e-mail . . . . . . . . . . . . . . . . . . . . . . . . . . . . . . . . . . . . . . . . . . .61 Scan to network PC . . . . . . . . . . . . . . . . . . . . . . . . . . . . . . . . . . . . . . . .65 Scan to USB memory. . . . . . . . . . . . . . . . . . . . . . . . . . . . . . . . . . . . . . .68 Scan to Local PC . . . . . . . . . . . . . . . . . . . . . . . . . . . . . . . . . . . . . . . . . .70 Connecting VIA USB . . . . . . . . . . . . . . . . . . . . . . . . . . . . . . . . . . . . .71 Connecting VIA Network . . . . . . . . . . . . . . . . . . . . . . . . . . . . . . . . . .71 WSD Scan connection . . . . . . . . . . . . . . . . . . . . . . . . . . . . . . . . . . . .72 Scan to Remote PC . . . . . . . . . . . . . . . . . . . . . . . . . . . . . . . . . . . . . . . .73 Simple scan node . . . . . . . . . . . . . . . . . . . . . . . . . . . . . . . . . . . . . . .74 Secure scan mode (for network connection) . . . . . . . . . . . . . . . . . . . . .76 Secure scan mode (for USB connection). . . . . . . . . . . . . . . . . . . . . . . .79 WSD scan (for network connection). . . . . . . . . . . . . . . . . . . . . . . . . . .81 Managing profiles . . . . . . . . . . . . . . . . . . . . . . . . . . . . . . . . . . . . . . . . .82 Adding a new network profile . . . . . . . . . . . . . . . . . . . . . . . . . . . . . . .82 Deleting a network profile . . . . . . . . . . . . . . . . . . . . . . . . . . . . . . . . .83 Managing the address book . . . . . . . . . . . . . . . . . . . . . . . . . . . . . . . . . .84 Setting sender and reply to e-mail addresses (from/reply to) . . . . . . . . .84 Creating e-mail templates . . . . . . . . . . . . . . . . . . . . . . . . . . . . . . . . .85 Adding an e-mail address entry to the address book . . . . . . . . . . . . . . .86 Deleting an e-mail address entry from the address book . . . . . . . . . . . .86 Modifying an e-mail address entry from the address book . . . . . . . . . . .87 Adding a group entry to the address book . . . . . . . . . . . . . . . . . . . . . .87 Deleting a group address entry from the address book . . . . . . . . . . . . .88 Modifying a group address entry from the address book. . . . . . . . . . . . .88
Printing . . . . . . . . . . . . . . . . . . . . . . . . . . . . . . . . . . . . . . . . . . . . . . . . . .89
Job lists . . . . . . . . . . . . . . . . . . . . . . . . . . . . . . . . . . . . . . . . . . . . . . . .89 Print job (MC562dn, MC562dw, ES5462 MFP and MPS2731mc only) . . . . . .90 Print from USB memory . . . . . . . . . . . . . . . . . . . . . . . . . . . . . . . . . . . . .91 Basic operation . . . . . . . . . . . . . . . . . . . . . . . . . . . . . . . . . . . . . . . . .91 Advanced operation . . . . . . . . . . . . . . . . . . . . . . . . . . . . . . . . . . . . . .92 Switching online/offline . . . . . . . . . . . . . . . . . . . . . . . . . . . . . . . . . . . . .93
Contents > 6
Faxing - MC342dn, MC342dw, MC362dn, MC362dw, MC562dn, MC562dw, ES5462 MFP and MPS2731mc only . . . . . . . . . . . . . . . . . . . .94
Sending a fax from the MFP . . . . . . . . . . . . . . . . . . . . . . . . . . . . . . . . . .94 Basic operation . . . . . . . . . . . . . . . . . . . . . . . . . . . . . . . . . . . . . . . . .94 Advanced operation . . . . . . . . . . . . . . . . . . . . . . . . . . . . . . . . . . . . . .95 Fax receiving . . . . . . . . . . . . . . . . . . . . . . . . . . . . . . . . . . . . . . . . .104 Managing the phone book . . . . . . . . . . . . . . . . . . . . . . . . . . . . . . . . . .107 Adding a speed dial entry to the phone book . . . . . . . . . . . . . . . . . . .107 Adding a group entry to the phone book . . . . . . . . . . . . . . . . . . . . . .108 Deleting a speed dial entry from the phone book. . . . . . . . . . . . . . . . .108 Deleting a group dial entry from the phone book. . . . . . . . . . . . . . . . .108 Modifying a speed dial entry . . . . . . . . . . . . . . . . . . . . . . . . . . . . . . .109 Modifying a group dial entry . . . . . . . . . . . . . . . . . . . . . . . . . . . . . . .109 Registering an entry from reception or transmission history . . . . . . . . .109 Internet fax . . . . . . . . . . . . . . . . . . . . . . . . . . . . . . . . . . . . . . . . . . . .110 Sending a fax from your PC . . . . . . . . . . . . . . . . . . . . . . . . . . . . . . .110 Receiving an internet fax . . . . . . . . . . . . . . . . . . . . . . . . . . . . . . . . .113 Adding fax numbers to the phone book . . . . . . . . . . . . . . . . . . . . . . .114 Adding new groups to the phone book . . . . . . . . . . . . . . . . . . . . . . . .114 Importing and exporting fax numbers . . . . . . . . . . . . . . . . . . . . . . . .115
Functions common to copy, fax and scan operations . . . . . . . . . . . . . .116
Continuous scan mode . . . . . . . . . . . . . . . . . . . . . . . . . . . . . . . . . . . . .116 Job macros (MC562dn, MC562dw, ES5462 MFP and MPS2731mc only) . . .117
Maintenance . . . . . . . . . . . . . . . . . . . . . . . . . . . . . . . . . . . . . . . . . . . . .119
Replacing consumable items. . . . . . . . . . . . . . . . . . . . . . . . . . . . . . . . .119 Toner cartridge replacement. . . . . . . . . . . . . . . . . . . . . . . . . . . . . . .119 Image drum replacement . . . . . . . . . . . . . . . . . . . . . . . . . . . . . . . . .124 Replacing the transfer belt unit . . . . . . . . . . . . . . . . . . . . . . . . . . . . .124 Fuser replacement. . . . . . . . . . . . . . . . . . . . . . . . . . . . . . . . . . . . . .127
Cleaning. . . . . . . . . . . . . . . . . . . . . . . . . . . . . . . . . . . . . . . . . . . . . . .129
...the unit casing . . . . . . . . . . . . . . . . . . . . . . . . . . . . . . . . . . . . . . .129
...the LED head . . . . . . . . . . . . . . . . . . . . . . . . . . . . . . . . . . . . . . . .129
...the paper path in the ADF . . . . . . . . . . . . . . . . . . . . . . . . . . . . . . .131
...the underside of the ADF. . . . . . . . . . . . . . . . . . . . . . . . . . . . . . . .131
...the document glass . . . . . . . . . . . . . . . . . . . . . . . . . . . . . . . . . . .132
Installing upgrades . . . . . . . . . . . . . . . . . . . . . . . . . . . . . . . . . . . . . . . .133
Memory upgrade . . . . . . . . . . . . . . . . . . . . . . . . . . . . . . . . . . . . . . . . .133 SD card (MC562dn, MC562dw, ES5462 MFP and MPS2731mc only). . . . . .136 Additional paper tray . . . . . . . . . . . . . . . . . . . . . . . . . . . . . . . . . . . . . .138 Setting the driver device options. . . . . . . . . . . . . . . . . . . . . . . . . . . . . .139 Windows . . . . . . . . . . . . . . . . . . . . . . . . . . . . . . . . . . . . . . . . . . . .139 Mac OS X . . . . . . . . . . . . . . . . . . . . . . . . . . . . . . . . . . . . . . . . . . . .139
Troubleshooting . . . . . . . . . . . . . . . . . . . . . . . . . . . . . . . . . . . . . . . . . .141
Checking the machine’s status . . . . . . . . . . . . . . . . . . . . . . . . . . . . . . .141 Checking the device and job status . . . . . . . . . . . . . . . . . . . . . . . . . . . .141 Checking the LED indicator in the power switch . . . . . . . . . . . . . . . . . . .141 Clearing paper jams . . . . . . . . . . . . . . . . . . . . . . . . . . . . . . . . . . . . . .142 In the scanner ADF section... . . . . . . . . . . . . . . . . . . . . . . . . . . . . . .142 In the printer section... . . . . . . . . . . . . . . . . . . . . . . . . . . . . . . . . . .143 Dealing with unsatisfactory printing. . . . . . . . . . . . . . . . . . . . . . . . . . . .150 Dealing with unsatisfactory copying. . . . . . . . . . . . . . . . . . . . . . . . . . . .151
Fax problem checklist (MC342dn, MC342dw, MC362dn, MC362dw,
MC562dn, MC562dw, ES5462 MFP and MPS2731mc) . . . . . . . . . . . . . . . .152
Specifications . . . . . . . . . . . . . . . . . . . . . . . . . . . . . . . . . . . . . . . . . . . .154
Contents > 7
Appendix A - menu system . . . . . . . . . . . . . . . . . . . . . . . . . . . . . . . . . .158
Reports . . . . . . . . . . . . . . . . . . . . . . . . . . . . . . . . . . . . . . . . . . . . . . .159 Paper setup . . . . . . . . . . . . . . . . . . . . . . . . . . . . . . . . . . . . . . . . . . . .160 Address book . . . . . . . . . . . . . . . . . . . . . . . . . . . . . . . . . . . . . . . . . . .162 Phone book . . . . . . . . . . . . . . . . . . . . . . . . . . . . . . . . . . . . . . . . . . . .163 Profile . . . . . . . . . . . . . . . . . . . . . . . . . . . . . . . . . . . . . . . . . . . . . . . .164 Network scan destination . . . . . . . . . . . . . . . . . . . . . . . . . . . . . . . . . . .166 Store document settings . . . . . . . . . . . . . . . . . . . . . . . . . . . . . . . . . . .166 View information . . . . . . . . . . . . . . . . . . . . . . . . . . . . . . . . . . . . . . . . .167 Easy setup . . . . . . . . . . . . . . . . . . . . . . . . . . . . . . . . . . . . . . . . . . . . .168 Admin setup . . . . . . . . . . . . . . . . . . . . . . . . . . . . . . . . . . . . . . . . . . . .169 Wireless Setting . . . . . . . . . . . . . . . . . . . . . . . . . . . . . . . . . . . . . . . . .190
Index. . . . . . . . . . . . . . . . . . . . . . . . . . . . . . . . . . . . . . . . . . . . . . . . . . .191 Oki contact details. . . . . . . . . . . . . . . . . . . . . . . . . . . . . . . . . . . . . . . . .192
Contents > 8

NOTES, CAUTIONS AND WARNINGS
NOTE
A note provides additional information to supplement the main text.
CAUTION!
A caution provides additional information which, if ignored, may result in equipment malfunction or damage.
WARNING!
A warning provides additional information which, if ignored, may result in a risk of personal injury.
For the protection of your product, and in order to ensure that you benefit from its full functionality, this model has been designed to operate only with genuine original toner cartridges. Any other toner cartridge may not operate at all, even if it is described as “compatible”, and if it does work, your product's performance and print quality may be degraded.
Use of non-genuine products may invalidate your warranty.
Specifications subject to change without notice. All trademarks acknowledged.
Notes, cautions and warnings > 9

ABOUT THIS GUIDE
NOTE
Images used in this manual may include optional features that your product does not have installed.
DOCUMENTATION SUITE
This guide is part of a suite of online and printed documentation provided to help you become familiar with your product and to make the best use of its many powerful features. The documentation is summarised below for reference and is found on the manuals DVD unless indicated otherwise:
>Installation Safety booklet: provides information for safe use of your product.
This is a paper document that is packaged with the product and should be read before setting up your machine.
>Set-up guide: describes how to unpack, connect and turn on your product. This is a paper document that is packaged with the product.
>User’s Guide: helps you become familiar with your product and make the best use of its many features. Also included are guidelines for troubleshooting and maintenance to ensure that it performs at its best. Additionally, information is provided for adding optional accessories as your printing needs evolve.
>Configuration Guide: provides machine, fax and network configuration information.
>Printing Guide: helps you become familiar with the many features of the driver software supplied with your product.
>Barcode Printing Guide: helps you become familiar with your product’s built in barcode printing feature.
>Security Guide: helps you become familiar with your product’s security features.
>Installation Guides: accompany consumable items and optional accessories to describe how to install them.
These are paper documents that are packaged with the consumables and optional accessories.
>On-line Help: on-line information accessible from the printer driver and utility software.
PURPOSE OF THIS GUIDE
The purpose of this guide is to provide you with in-depth information on how to use your machine efficiently and effectively for printing, copying, scanning and faxing1.
NOTE
The User Guide assumes that the machine has been set up and fully configured. Refer to the Setup Guide and Configuration Guide for guidance.
1. MC342dn, MC342dw, MC362dn, MC362dw, MC562dn, MC562dw, ES5462 MFP and MPS2731mc only.
About this guide > 10
ON-LINE USAGE
This guide is intended to be read on screen using Adobe Reader. Use the navigation and viewing tools provided in Adobe Reader.
There are many cross-references within this book, each highlighted as blue text. When you click on a cross-reference the display will instantly jump to the part of the manual containing the referenced material.
By using the  button in Adobe Reader, you can navigate directly back to where you were before.
You can access specific information in two ways:
>In the list of bookmarks down the left hand side of your screen, click on the topic of interest to jump to the required topic. (If the bookmarks are not available, use the “Contents” on page 5.)
>In the list of bookmarks, click on Index to jump to the Index. (If the bookmarks are not available, use the “Contents” on page 5.) Find the term of interest in the alphabetically arranged index and click on the associated page number to jump to the page containing the term.
PRINTING PAGES
The whole manual, individual pages, or sections may be printed. The procedure is:
1.From the toolbar, select File > Print (or press the Ctrl + P keys).
2.Choose which pages you wish to print:
(a)All pages, (1), for the entire manual.
(b)Current page, (2), for the page at which you are looking.
1
2
3
(c)Pages from and to, (3), for the range of pages you specify by entering their page numbers.
(d)Click OK.
About this guide > 11
INTRODUCTION
Congratulations on choosing this Multi Function Product (MFP). It is designed with advanced features, to give you clear, vibrant colour prints and crisp black and white pages at high speed on a range of office print media.
With this MFP, you can instantly scan paper-based documents and deliver the electronic image to various destinations including e-mail addresses, printers, ftp servers or someone else's computer on the network. This MFP also has a “walk-up” fax facility allowing you to send your documents to a destination fax number instantly.
Your MFP includes these features:
>Multi-tasking to allow scanning one job while printing another to ensure greater productivity.
>Digital Copying - An intuitive control panel, makes digital copying fast and easy.
>Up to 600 x 600dpi (dots per inch) copy resolution.
>Actkey utility - enables the MFP to receive one key touch commands from a locally connected computer (“pull scan”).
>Scan to E-mail - Connected to an Ethernet network and a SMTP server, this MFP allows you to transmit document(s) over the internet via e-mail. With a touch of the e-mail on-screen button and the selection of your recipients' e-mail addresses, the document(s) is/are first scanned and converted into an image file, and then transmitted to remote recipients within minutes.
>Scan to Network PC - Allows you to send scanned documents to a server or a personal computer's file folder over an intranet with FTP (File Transfer Protocol), HTTP (Hypertext Transfer Protocol), CIFS (Common Internet File System) protocol. The scan to filing feature removes the need for the mail server to handle large attachments.
>Multiple Pages Sending - With the Auto Document Feeder (ADF), the MFP allows a stack of up to 50 page document(s) to be continuously scanned.
>MC342dn, MC342dw, MC362dn, MC362dw, MC562dn, MC562dw, ES5462 MFP and MPS2731mc: Faxing - An intuitive control panel, makes direct faxing fast and easy.
>MC342dn, MC342dw, MC362dn, MC362dw, MC562dn, MC562dw, ES5462 MFP and MPS2731mc: Advanced fax transmission and reception, including delayed transmissions, sending to multiple locations, confidential transmission and reception, and polling.
>Address Book/Phone Book/Profiles Managing - This provides a convenient way to manage all the e-mail addresses, fax numbers and profiles (filing destinations).
>ProQ/High Quality, multi-level technology produces subtler tones and smoother gradations of colour to lend photographic quality to your documents.
>600 x 600, 1200 x 600 dpi (dots per inch) and ProQ/High Quality print resolution for high quality image production showing the finest detail.
>Internet Protocol version 6 (IPv6).
>Single Pass colour Digital LED technology for high speed processing of your printed pages.
>PostScript 3, PCL 5C, PCL 6, IBM PPR and Epson FX emulations for industry standard operation and wide compatibility with most computer software.
>10Base-T and 100Base-TX network connection lets you share this valuable resource among users on your office network.
Introduction > 12
>Photo Enhance mode to improve printouts of photographic images (not available on PS drivers).
>Automatic two-sided (duplex) printing for economical use of paper and compact printing of larger documents.
Additionally, the following optional features are also available:
>Additional paper tray for loading a further 530 sheets to minimise operator intervention, or different paper stocks for letterhead stationery, alternative paper sizes or other print media.
>Additional memory allows printing of more complex pages. For example, high resolution banner printing.
>MC562dn, MC562dw, ES5462 MFP and MPS2731mc: SD card for storage of overlays, macros and downloadable fonts, and automatic collation of multiple copies of multipage documents and the download of ICC Profiles.
>Four modes of toner save function (Default: Off, Low, Middle, High) are available when using Copy/DirectPrint/Fax function.
>MC342dw, MC362dw and MC562dw: Can use wireless LAN.
Introduction > 13
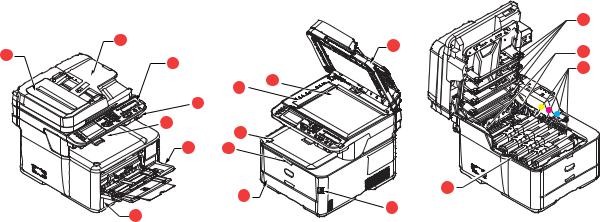
OVERVIEW
FRONT VIEW
13
|
2 |
|
|
12 |
|
1 |
|
|
|
14 |
|
|
|
|
|
||
3 |
|
|
|
|
|
|
|
|
|
15 |
|
|
|
|
|
|
|
|
|
10 |
|
|
|
|
|
11 |
|
|
|
|
|
4 |
|
|
|
|
5 |
9 |
|
|
|
|
|
|
|
|
|
|
7 |
8 |
|
|
|
|
|
6 |
|
16 |
|
|
|
|
|
|
|
|
6 |
|
|
17 |
|
|
|
|
|
|
|
1. |
ADF unit. |
|
8. Multi-purpose tray release recess. |
|
|
2. |
ADF paper tray. |
|
9. Top cover release button. |
|
|
3. |
Operator panel. |
|
10. |
Document glass. |
|
|
Menu driven operator controls and LCD panela. |
11. |
ADF document glass. |
|
|
4. |
USB memory port. |
|
12. |
Document cover. |
|
5. |
Output stacker, face down. |
|
13. |
LED heads. |
|
|
Standard printed copy delivery point. Holds up to |
14. |
Fuser release levers. |
|
|
|
150 sheets at 80g/m². |
|
15. |
Toner cartridges (C,M,Y,K). |
|
6. |
Paper tray. |
|
16. |
ID unit. |
|
|
Standard paper tray. Holds up to 250 sheets of |
17. |
Power Switch. |
|
|
|
80g/m² paper. |
|
|
|
|
7.Multi purpose tray.
Used for feeding heavier paper stocks, envelopes and other special media. Also for manual feeding of single sheets when required.
a.The display language can be changed to show different languages. (see “Changing the display language” on page 19).
Introduction > 14

REAR VIEW
LINE TEL
7 


 8
8
6 |
|
|
3 |
|
|
4 |
5 |
|
5 |
||
4 |
||
|
||
|
3 |
1
2
MC342dw, MC362dw, MC562dw only
1.Access panel.
2.AC power socket.
3.USB interface.
4.SD card slot (MC562dn, MC562dw, ES5462 MFP and MPS2731mc only).
5.Network interface.a
6.Rear, face up stacker.
7.LINE connection.
8.TEL connection.
a.The Network Interface may have a protective “plug” which must be removed before connection can be made.
When the rear paper stacker is folded down paper exits the printer through the rear of the printer and is stacked here face up. This is mainly used for heavy print media. When used in conjunction with the multi purpose feed tray, the paper path through the printer is essentially straight. This avoids bending the paper around curves in the paper path and enables feeding of up to 220g/m² media.
Introduction > 15
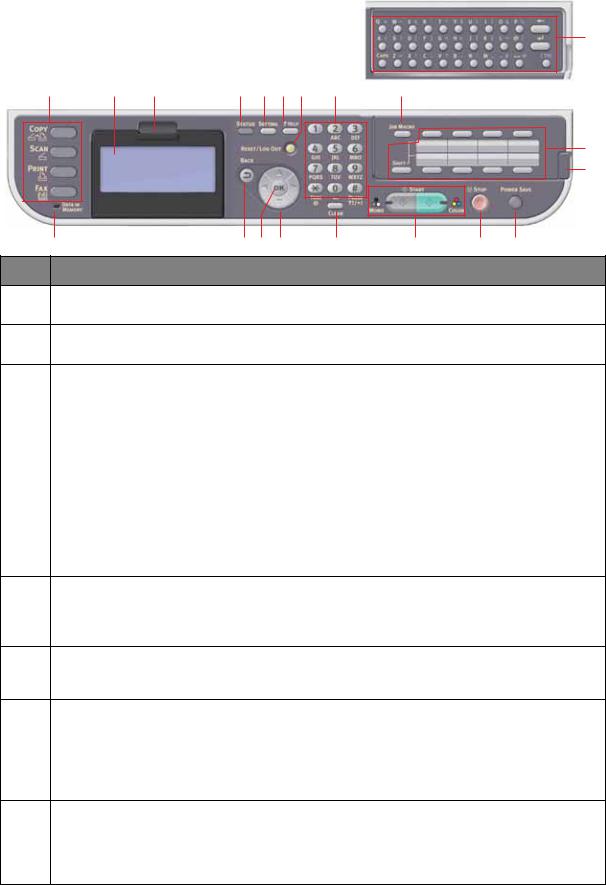
CONTROL PANEL
20
3 |
1 |
2 |
12 |
13 5 |
4 |
6 |
11 |
18
19
15 |
9 17 16 |
14 |
7 |
8 |
10 |
REF. DESCRIPTION
1.Liquid crystal display (LCD)
Displays operating instructions and status of your machine.
2.Panel adjust recess
The LCD panel can be swivelled upwards from its base position for ease of use.
3.Main function buttons
COPY: Pressing this button selects copy mode. This allows you to control the copying process whereby documents to be copied are scanned in the scanner unit (document glass or ADF) and the copies are automatically printed in the printer unit.
SCAN: Pressing this button gives access to several send modes. These allow you to select and control the process whereby a document is scanned and the scanned data is sent: by email as an attachment, to a local PC, to a network PC, to a USB memory stick. It also allows you to arrange for a document to be scanned from a remote PC.
PRINT: Pressing this button selects print mode. This allows you to select and print out a stored job, an encrypted print job or a job stored on a USB memory stick. It also allows you to print out a job list of all recent prints, or switch the machine to an “offline” state.
FAX (MC342dn, MC342dw, MC362dn, MC362dw, MC562dn, MC562dw, ES5462 MFP and MPS2731mc): Pressing this button selects fax send mode. This allows you to control the process whereby a document is scanned and then the scanned data is sent as a fax.
4.RESET/LOG OUT:
Pressing this button returns all settings of a selected function to their default values, but does not stop any jobs that are already in progress.
At the top level screen, pressing this button logs the user out (if access control is enabled and active).
5.?HELP:
Pressing this button when the green LED on the START button is flashing, displays help information on the LCD screen.
6.Keypad
Use the numeric buttons to enter, for example, number of copies or a fax number.
MC342dn, MC342dw, MC362dn, MC362dw, MC562dn, MC562dw, ES5462 MFP and MPS2731mc: The * and # buttons are also used to navigate menus in touch-tone systems such as voice mail (if you have a telephone handset connected), or in vertical service codes.
Refer to “Keypad - character switching” on page 18.
7.START:
>MONO - Pressing this button starts the copying, faxing or scanning process in black & white.
>COLOR - Pressing this button starts the copying or scanning process in colour.
Green LED illuminates when copying/scanning is possible, if the LED is unlit then that function is not possible, e.g only the Mono button LED illuminates when faxing (colour faxing is not possible).
Introduction > 16
20
3 |
1 |
2 |
12 |
13 5 |
4 |
6 |
11 |
18
19
|
15 |
9 17 16 |
14 |
7 |
8 |
10 |
|
|
|
|
|
|
|
|
|
REF. |
|
DESCRIPTION |
|
|
|
|
|
|
|
|
|
|
|||
8. |
|
STOP: Pressing this button stops the copying or scanning process. |
|
|
|||
|
|
|
|||||
9. |
|
BACK: Used to cancel selections and go back to the top level of the setting. The key is also used to |
|||||
|
|
cancel any previous input. |
|
|
|
|
|
|
|
|
|||||
10. |
|
POWER SAVE: Pressing this button switches the power save mode on or off, its LED being |
|||||
|
|
illuminated when power save mode is on. If the machine has gone into power save mode as |
|||||
|
|
indicated by the screen being black and the LED being illuminated, you can return to normal mode |
|||||
|
|
by pressing the POWER SAVE button. |
|
|
|
|
|
|
|
|
|||||
11. |
|
JOB MACRO (MC562dn, MC562dw, ES5462 MFP and MPS2731mc only): Pressing this button |
|||||
|
|
allows you to program short-cuts to your most used operations. For example a fax number you send |
|||||
|
|
to every day can be programmed in and then allows you to perform that operation at the touch of a |
|||||
|
|
button. Refer to “Job macros (MC562dn, MC562dw, ES5462 MFP and MPS2731mc only)” on |
|||||
|
|
page 117. |
|
|
|
|
|
|
|
|
|||||
12. |
|
STATUS: Pressing this button gives access to the status menu screen. Use to check detailed status |
|||||
|
|
information about the machine. Flashes/illuminates if there is a status item to be displayed. |
|||||
|
|
|
|||||
13. |
|
SETTING: Pressing this button gives access to several setup options on the LCD screen, including |
|||||
|
|
the administrator menu, profile options and address books settings. |
|
|
|||
|
|
|
|||||
14. |
|
CLEAR: Executes the following actions according to the entered items when pressed or held: |
|||||
|
|
> Minimizes a setting value. |
|
|
|
|
|
|
|
> Enters zero as a setting value. |
|
|
|
|
|
|
|
> Clears what is entered. |
|
|
|
|
|
|
|
> Cancels a selected item. |
|
|
|
|
|
|
|
|
|
|
|
|
|
15. |
|
DATA IN MEMORY indicator light |
|
|
|
|
|
|
|
LED illuminates to show data is stored in the MFP memory. |
|
|
|
||
|
|
|
|
|
|
|
|
16. |
|
Arrow keys |
|
|
|
|
|
|
|
Up: moves the cursor up. |
|
|
|
|
|
|
|
Down: moves the cursor down. |
|
|
|
|
|
|
|
Left: moves the cursor left. Can also be used to return to the previous screen. |
|
||||
|
|
Right: moves the cursor right. Can also be use to proceed to the next screen. |
|
||||
|
|
|
|
|
|
||
17. |
|
OK: Used to select and confirm current setting selections. |
|
|
|
||
|
|
|
|||||
18. |
|
One-touch speed dial keys (MC342dn, MC342dw, MC362dn, MC362dw, MC562dn, MC562dw, |
|||||
|
|
ES5462 MFP and MPS2731mc only): Provides one-touch dialling of your most often used or favourite |
|||||
|
|
fax numbers or email addresses. Eight keys x two groups (press the SHIFT key to switch the groups). |
|||||
|
|
|
|||||
19. |
|
Panel lift handle (MC562dn, MC562dw, ES5462 MFP and MPS2731mc only): Lift panel to |
|||||
|
|
reveal qwerty keyboard. |
|
|
|
|
|
|
|
|
|||||
20. |
|
Qwerty keyboard (MC562dn, MC562dw, ES5462 MFP and MPS2731mc only): Refer to |
|||||
|
|
“Qwerty keyboard (MC562dn, MC562dw, ES5462 MFP and MPS2731mc only)” on page 19. |
|||||
|
|
|
|
|
|
|
|
Introduction > 17

KEYPAD - CHARACTER SWITCHING
Numbers, upper and lower case letters and symbols can be entered using the keypad. Press the key multiple times to switch between characters.
NOTE
When pressing multiple times, you must re-press the key within 2 seconds of the previous press.
The example below is based on English being the display language:
KEY |
AVAILABLE CHARACTER |
|
|
1 |
1 -> 1 |
|
|
2 |
a -> b -> c -> 2 -> A -> B -> C |
|
|
3 |
d -> e -> f -> 3 -> D -> E -> F |
|
|
4 |
g -> h -> i -> 4 -> G -> H -> I |
|
|
5 |
j -> k -> l -> 5 -> J -> K -> L |
|
|
6 |
m -> n -> o -> 6 -> M -> N -> O |
|
|
7 |
p -> q -> r -> s -> 7 -> P -> Q -> R -> S |
|
|
8 |
t -> u -> v -> 8 -> T -> U -> V |
|
|
9 |
w -> x -> y -> z -> 9 -> W -> X -> Y -> Z |
|
|
0 |
SP (space) -> 0 -> SP (space) |
|
|
* |
@ -> * -> @ |
|
|
# |
. -> _ -> - -> P -> SP (space) -> + -> ! -> “ -> $ -> % -> & -> ‘ -> ( |
|
-> ) -> , -> / -> : -> ; -> < -> = -> > -> ? -> [ -> £ -> ] -> ^ -> # |
|
|
Introduction > 18
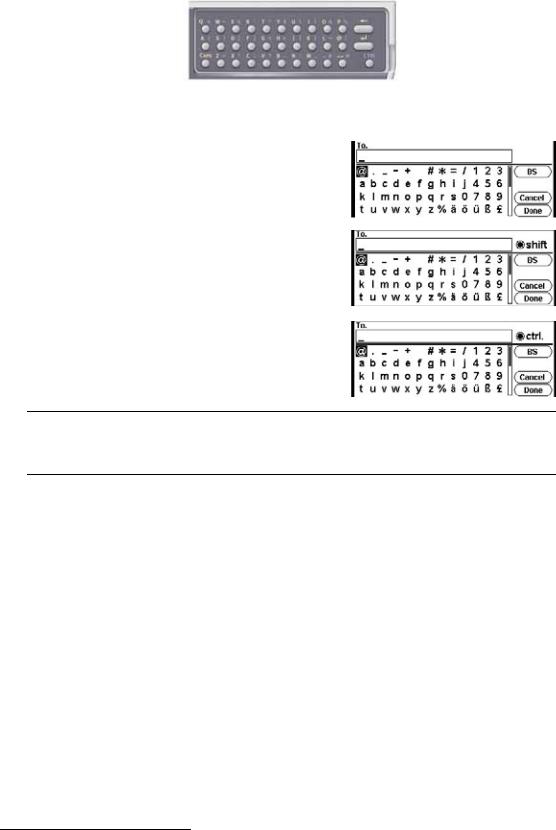
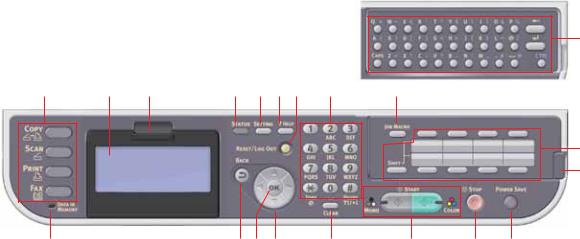
QWERTY KEYBOARD (MC562dn, MC562dw, ES5462 MFP AND MPS2731mc ONLY)
You can also enter upper and lower case letters and symbols using the qwerty keyboard.
You can switch the entry mode from normal mode, CAPS mode and CTRL mode. The mode change is reflected on the screen keyboard display.
Normal mode You can enter lower-case letters.
CAPS mode By pressing the CAPS key, you can enter upper-case letters.
CTRL mode By pressing the CTRL key, you can enter symbols.
NOTE
Numbers and certain characters cannot be entered using the qwerty keyboard. To enter them, use the screen keyboard or keypad.
CHANGING THE DISPLAY LANGUAGE
The default language used by your MFP for display messages and for report printing is English1. If required, this can be changed using the Panel Language Setup utility.
1.To ensure your product contains the latest firmware updates, it is recommended that you download the language files from this utility during setup.
Introduction > 19
GETTING STARTED
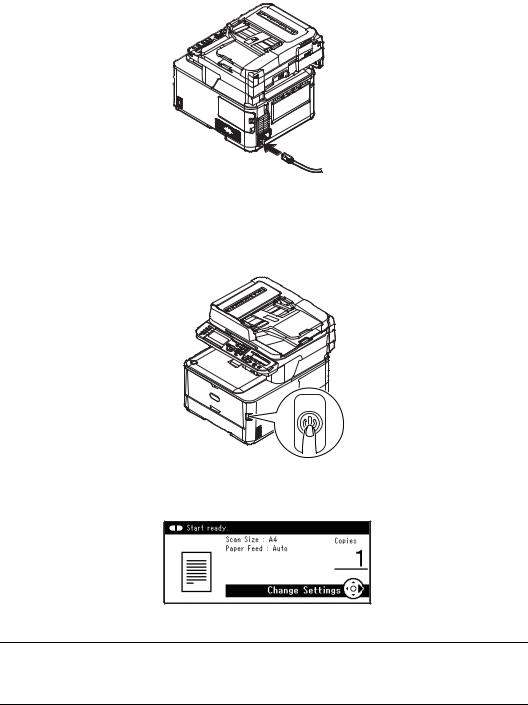
TURNING ON YOUR MACHINE
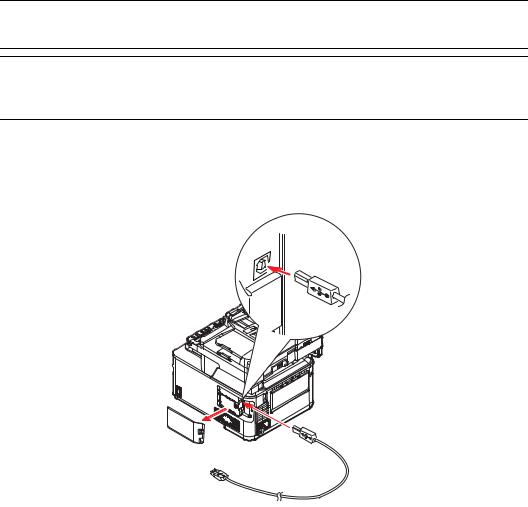
1.Plug the AC cable into the AC power socket of your machine.
2.Plug the AC cable into the electric socket.
3.Check that no documents are on the document glass or ADF, and the ADF cover is closed.
4.Hold down the power switch for about a second to turn on the power.
The copy standby screen is displayed after your machine became ready status.
NOTE
Turn the power off, and when turning the power back on again, push the power switch after waiting for a few seconds.
Getting started > 20
TURNING OFF YOUR MACHINE
Be sure to follow the procedure below every time you turn off the machine.
1.Hold down the power switch for about a second.
NOTE
Press the power switch for less than 5 seconds.
The message Shutdown in progress. Please wait. The machine turns off automatically. appears in the operator panel, and power switch indicator blinks every 1 second. Then the machine turns off automatically and power switch indicator goes out.
NOTE
Turn the power off, and when turning the power back on again, push the power switch after waiting for a few seconds.
WHEN THE MACHINE IS NOT USED FOR LONG TIME
When the machine is not used for long time due to holidays or trips, pull the power cord from the socket.
NOTE
The machine does not have functional failures if removing the power plug for long time (more than 4 weeks).
Getting started > 21
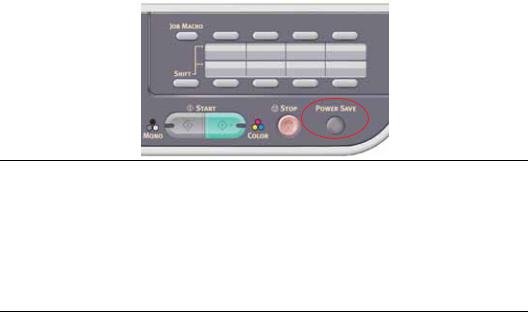
POWER SAVING MODE
If you do not use the machine for a while, it will enter power saving mode to control the power consumption of the device. To cancel or initiate power saving mode, press the Power Save button on the control panel.
NOTE
If your machine is connected locally (via USB), when it transitions to Sleep mode its status is viewed as off-line. To use the printer in this state, you must press the Power Save button to exit sleep mode.
By default, the time interval to enter the power saving mode is set to 1 minute. Refer to “Power Save Time” on page 187.
You can enable or disable the power saving mode. Refer to “Power Save Enable” on page 188.
Getting started > 22
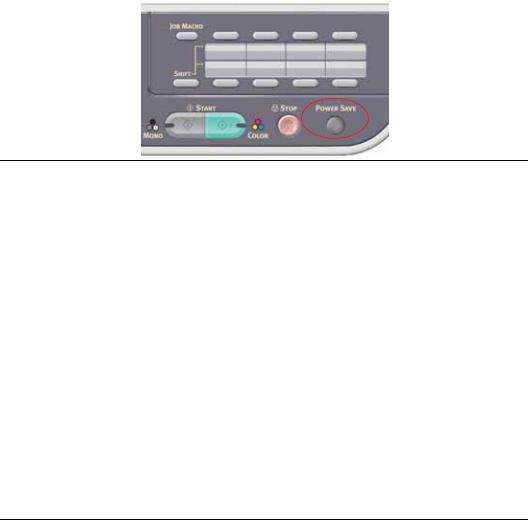
SLEEP MODE
Your machine transitions from power saving mode to sleep mode after a set period of time. In sleep mode the power consumption of the device in minimal. To cancel or initiate sleep mode, press the Power Save button on the control panel.
NOTE
The machine will not enter sleep mode if an error occurs and the machine requires attention.
By default, the time interval to enter sleep mode is set to 30 minutes. Refer to “Sleep Time” on page 187.
You can enable or disable sleep mode. Refer to “Sleep” on page 189.
>When the network connection is switched from wired to wireless, sleep mode is disabled. To enable sleep mode for devices connected using wireless LAN, enable sleep mode from the sleep mode setting menu. (MC342dw, MC362dw, MC562dw only)
>When a device using the wireless LAN connection goes into sleep mode, the wireless LAN connection is broken. To reconnect to the wireless LAN, press the power save mode on the device to recover from sleep mode.
(MC342dw, MC362dw, MC562dw only)
>After the device connected to the wireless LAN has recovered from sleep mode, it automatically connects to the wireless access point using the same settings as before it went into sleep mode. However, it may take up to
1 minute to connect. (MC342dw, MC362dw, MC562dw only)
>When the network connection is switched from wireless LAN to wired LAN, sleep mode is enabled. (MC342dw, MC362dw, MC562dw only)
Getting started > 23

AUTO POWER OFF
When your machine is not used for a certain period of time, it turns off the power automatically. Once the machine turns off the power, you need to turn on to use it.
The machine has three settings to select the machine's behavior on Auto Power Off.
>Enable
>Auto Config
>Disable Enable:
When your machine is not used for a certain period of time, it turns off the power automatically.
Auto Config:
The machine will not turn off the power automatically under the conditions listed below.
>An Ethernet cable is plugged to network interface connection
>A telephone cable is plugged to LINE connection
Disable:
The Auto Power Off function is disabled. The machine will not turn off the power automatically.
NOTE
In the following cases, the Auto Power Off function is also disabled.
>When an error occurs
>When time-set transmission is scheduled
>When the fax transmission is waiting for a redial
By factory default, the time interval to turn off the power is set to 4 hours. You can change the time interval by pressing the SETTING key on the operator panel and then selecting
Admin Setup > Management > Power Save > Auto Power Off Time.
By factory default, Auto Power Off is set to Auto Config or Disable. You can change the setting by pressing the SETTING key on the operator panel and then selecting Admin Setup > User Install > Power Save > Auto Power Off.
Getting started > 24

INSTALLING DRIVERS AND UTILITIES
NOTE
Example screenshots have been used throughout and may not represent your machine, however the procedure is the same.
NOTE
You must be logged on as an administrator or a member of the Administrators group in order to complete this procedure. If your computer is connected to a network, network policy settings may also prevent you from completing this procedure.
The installation instructions below refer to USB connection. For network connection details refer to the Configuration Guide.
If you are running Windows Server 2003 or Server 2008, you may need to follow these steps to ensure the WIA service starts when using the scanner driver and ActKey Utility:
NOTE
In the case of Server 2008, Desktop Experience needs to be installed.
1.Click Start > Administrative Tools > Services.
2.Double-click Services.
3.Double-click Windows Image Acquisition (WIA).
4.From the Startup type menu, select Automatic.
5.Under Service status, click Start.
6.Click OK.
Getting started > 25
WINDOWS - SCANNER AND PRINTER DRIVERS
The scanner driver is used for “Pull Scan”, i.e. Initiating a scan from your PC via software. Compare this to “Push Scan” where you start the scan by pressing a button on the MFP's front panel.
NOTE
The Oki driver installer program is the recommended installation method.
NOTE
Do not connect the USB cable at this time. You will be instructed when to connect the USB cable when you run the Oki driver installer program.
1.Insert the DVD-ROM and click Install bunch to start the Oki driver installer program.
2.Follow the on-screen instructions to install the drivers.
3.Attach the printer to a USB port of your computer.
4.Switch on the printer.
Getting started > 26
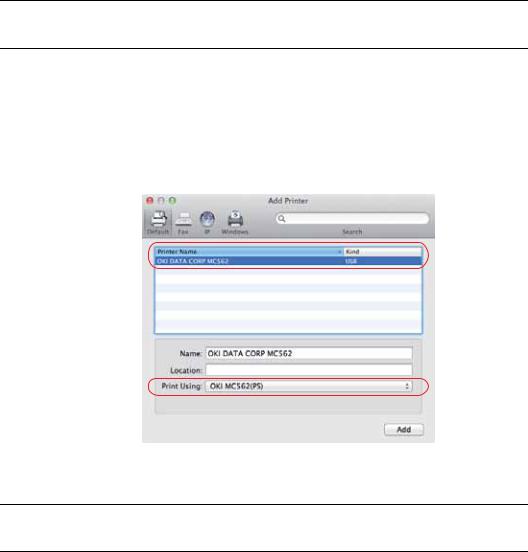
MAC - PRINTER DRIVER
The information in this section is based on Mac OS X Lion (10.7). Other versions may appear slightly different, but the principles are the same.
1.Insert the DVD-ROM and run the Oki driver installer program.
2.Follow the on-screen instructions to install the printer driver.
3.Attach the printer to a USB port of your computer.
4.Switch on the printer.
5.Choose Apple Menu > System Preferences > Print & Scan.
6.If the printer is already in the list of printers, click “-” to remove it.
NOTE
This is necessary as Lion may not be using the correct Oki printer driver files.
7.Click “+” to add a new printer.
8.Ensure:
>The Default tab is selected and select your machine from the list.
>Your machine is displayed as Kind “USB” in the list of available printers.
>The Print Using: selection matches your machine.
If “Generic PostScript Printer” is displayed, select a driver that matches.
9.Click Add.
10.Click Configure... and ensure the hardware options displayed match your machine.
NOTE
Hardware options are not configured automatically.
11.The printer is added to the list of printers.
12.Restart your computer.
Getting started > 27

FAX DRIVER (MC342dn, MC342dw, MC362dn, MC362dw, MC562dn, MC562dw, ES5462 MFP AND MPS2731mc)
The fax driver allows you to send faxes directly from your computer without printing the document first.
Windows XP has built-in fax support - you can use your computer's modem to send faxes directly from your computer.
With Oki's fax driver you are sending the fax data from your computer to the MFP, and then the MFP automatically sends the document.
NOTE
Before using the internet fax function, you need to configure the server settings. Refer to the Configuration Guide for details.
Installing the fax driver
This is installed as part of the Oki driver installer wizard.
Getting started > 28
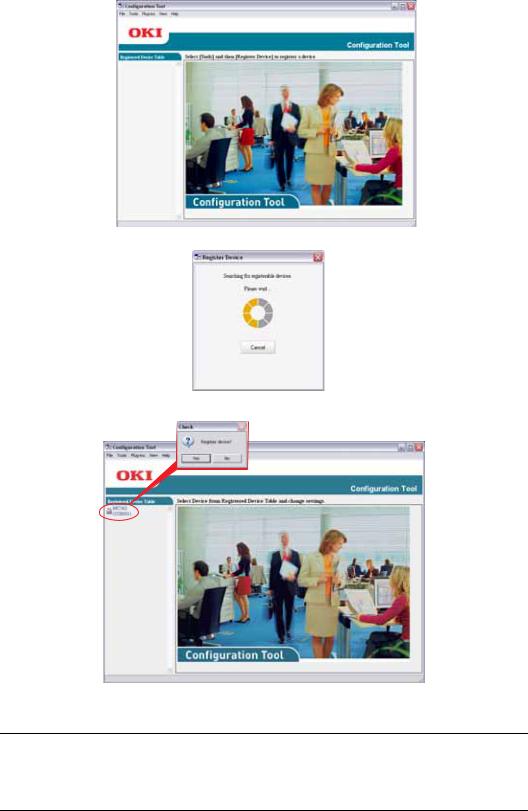
CONFIGURATION TOOL
Installation of the Configuration Tool is optional and can be found on the DVD in the Utilities folder. Follow the on-screen instructions to complete the Configuration Tool installation.
The Configuration Tool can discover devices over USB or network connections.
1.To search and install, select Tools > Register Device.
2.Highlight the required search result and when prompted click Yes.
The Configuration Tool allows you to set up and manage your MFP. Refer to the Configuration Guide for detailed instructions.
NOTE
Network settings, such as LDAP configuration, cannot be saved to the MFP from the Configuration Tool. For such settings, use the MFP operator panel or MFP web page.
Getting started > 29
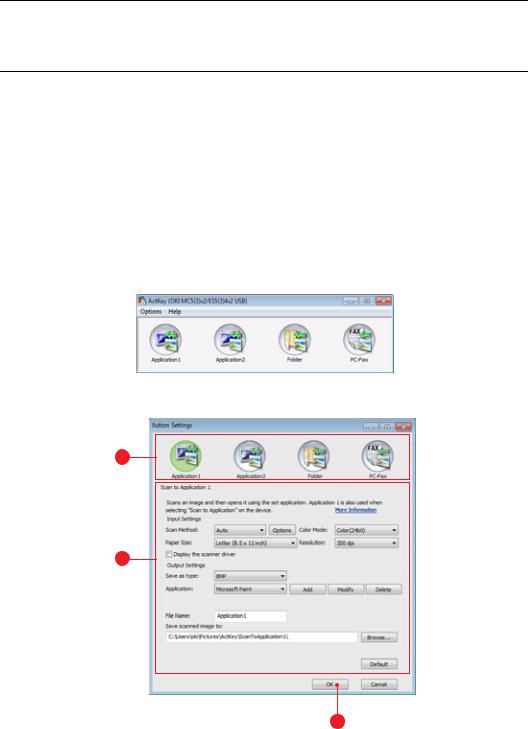
ACTKEY UTILITY
NOTE
The ActKey utility only supports Windows.
You must have the scanner driver installed.
The ActKey utility enables the MFP to receive one key touch commands from a connected computer.
Installation of the ActKey utility is optional and can be found on the DVD in the Utilities folder.
Information on using the ActKey utility can be found in “Scan to Remote PC” on page 73.
Setting up the ActKey utility
1.Install the ActKey utility from the DVD:
Set-up will place an “ActKey” icon on your desktop.
2.Double-click this icon to open the ActKey console.
3.Select Options > Button Settings. The following screen displays.
1
2
3
4.Select the function you want to set in section (1).
5.Set the parameters for this function in section (2).
6.When you have completed settings, press OK (3). The Utility will return to the ActKey console.
Getting started > 30
Loading...