


Ranger™ 3000 Series
Instruction Manual

Ranger™ 3000 Series |
EN-1 |
1. INTRODUCTION |
|
This manual contains installation, operation and maintenance instructions for the Ranger™ 3000 Series. Please read the manual completely before using the scale.
1.1 Definition of Signal Warnings and Symbols
Safety notes are marked with signal words and warning symbols. These show safety issues and warnings. Ignoring the safety notes may lead to personal injury, damage to the instrument, malfunctions and false results.
Signal Words |
|
CAUTION |
for a hazardous situation with low risk, resulting in damage to the device or |
|
the property or in loss of data, or injuries if not avoided. |
Note |
(No symbol) |
|
For useful information about the product |
Warning Symbols |
|
|
Attention Symbol |
Alternating Current
1.2 Safety Precautions
Please follow these safety precautions:
Verify that the AC input voltage printed on the data label matches the local AC power supply.
Do not drop loads on the platform.
Make sure that the power cord does not pose a potential obstacle or tripping hazard.
Do not position the scale in a way that makes it difficult to pull the power plug.
Use only approved accessories and peripherals.
Operate the scale only under ambient conditions specified in these instructions.
Disconnect the scale from the power supply when cleaning.
Do not operate the scale in hazardous or unstable environments.
Do not immerse the scale in water or other liquids.
Do not place the scale upside down on the platform.
Only use weights within the scale’s capacity as specified in these instructions.
Service should be performed only by authorized personnel.
2.INSTALLATION
2.1 Package Contents
Scale |
Power Cord |
Warranty Card |
Pan |
Instruction Manual / CD |
|
Sub-platform |
Weigh Below Hook |
|
EN-2 |
Ranger™ 3000 Series |
2.2 Installing Components
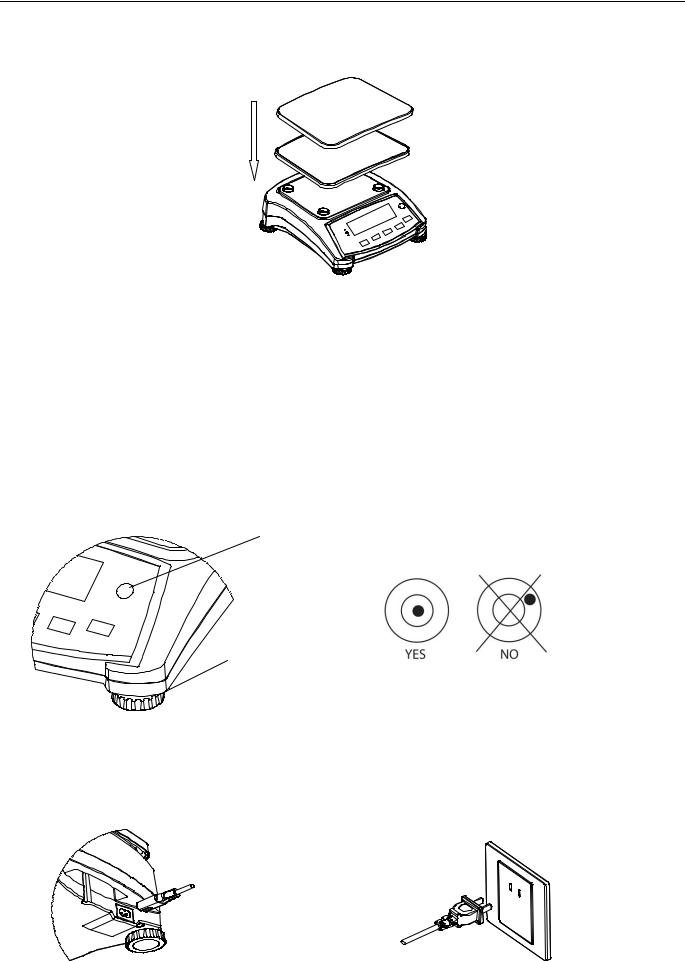
Install the sub-platform and metal pan as shown below. Press to lock the sub-platform into place.
Figure 2-1. Installing sub-platform and metal pan
2.3 Selecting the Location
Use the scale on a firm, steady surface. Avoid locations with excessive air current, vibrations, heat sources or rapid temperature changes. Allow sufficient space around the scale.
2.4 Leveling the Equipment
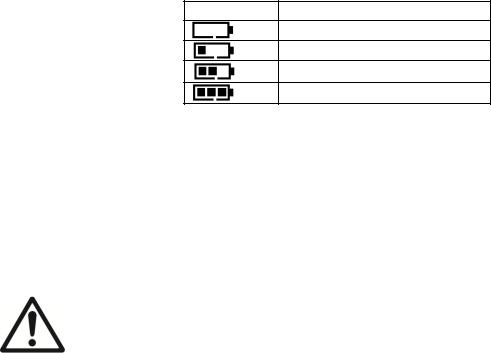
The Ranger Series has a level indicator as a reminder that the scale should be leveled for accurate weighing. There is a level bubble in a small round window on the front of the scale. To level the scale, adjust the feet so the bubble is centered in the circle.
Be sure the equipment is level each time its location is changed.
Level Indicator
Adjustable feet
Figure 2-2. Level indicator
2.5 Connecting Power
AC power is used to power the scale when battery power is not needed. First, connect the AC power cord (supplied) to the power input jack then connect the AC plug to an electrical outlet.
Figure 2-3A. Connect the power plug to the input jack on the back of scale.
Figure 2-3B. Connect AC power plug to the proper AC supply.
Ranger™ 3000 Series |
EN-3 |
2.5.1 Battery Power:
The scale can be used on AC power immediately. Allow the battery to charge for 12 hours before using the scale on battery power. The Scale will automatically switch to battery operation if there is a power failure or the power cord is removed. With AC power, the scale is constantly charging, so the battery charge indicator (see item 10 in table 3-2) will remain lit. The scale can be operated during charging, and the battery is protected against overcharging.
For maximum operating time, the battery should be charged at room temperature.
During battery operation, the battery symbol indicates the battery charge level remaining. The indicator will automatically turn off when the batteries are fully charged.
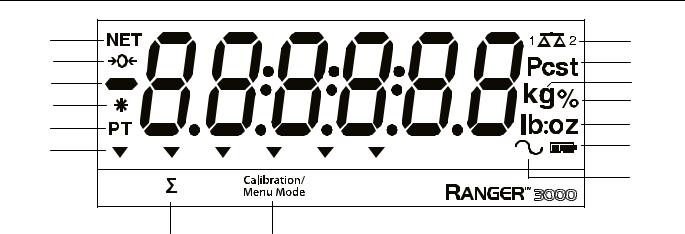
TABLE 2-1
Symbol Charge level
0 to 10 % Remaining
11 to 40 % Remaining
41 to 70 % Remaining
71 to 100 % Remaining
Notes:
When battery symbol blinks fast, approximately 30 minutes working time is left. When [lo.bat] is displayed, the scale will shut off.
Charging the scale must be performed in a dry environment.
CAUTION: Battery is to be replaced only by an authorized Ohaus service dealer. Risk of explosion can occur if the rechargeable battery is replaced with the wrong type or if it is not properly connected. Dispose of the lead acid battery according to local laws and regulations.

EN-4 |
Ranger™ 3000 Series |
3. OPERATION |
|
3.1 Controls |
|
Figure 3-1. Ranger 3000 Control Panel with LCD display
TABLE 3-1. Button Functions
Button |
|
|
|
|
|
|
|
|
|
|
|
Primary Function |
On/Zero |
Function |
M+ |
Tare |
|
(Short Press) |
Turns the |
Sends the current |
Initiates an |
Accumulates |
Enter/clear a |
|
scale on |
value to the |
application mode. |
the weight or |
tare value. |
|
|
selected COM |
|
displays the |
Clears the |
|
If scale is On, |
ports if |
|
accumulated |
accumulation |
|
|
information at |
|||
|
sets Zero |
AUTOPRINT is |
|
when the |
|
|
|
0 load. |
|||
|
|
set to Off. |
|
accumulation |
|
|
|
|
|
|
information is |
|
|
|
|
|
displayed. |
Secondary |
Off |
Units |
Mode |
Menu |
Function |
Turns the |
Changes the |
Allows changing |
Enter the User |
(Long Press) |
scale Off. |
weighing unit. |
the application |
menu. |
|
|
|
mode. |
|
Menu Function |
Yes |
No |
Back |
Exit |
(Short Press) |
Accepts the |
Advances to the |
Moves Back to |
Exits the User |
|
current setting |
next menu or |
previous menu |
menu. |
|
on the display. |
menu item. |
item. |
Aborts the |
|
|
Rejects the |
|
calibration in |
|
|
current setting on |
|
progress. |
|
|
the display and |
|
|
|
|
advances to the |
|
|
|
|
next available |
|
|
|
|
setting. |
|
|
Notes: 1 Short Press: Press less than 1 second.
2 Long Press: Press and hold for more than 2 seconds.
Ranger™ 3000 Series |
EN-5 |
1 |
15 |
2 |
14 |
3 |
13 |
4 |
12 |
5 |
11 |
6 |
10 |
|
|
|
9 |
7 |
8 |
|
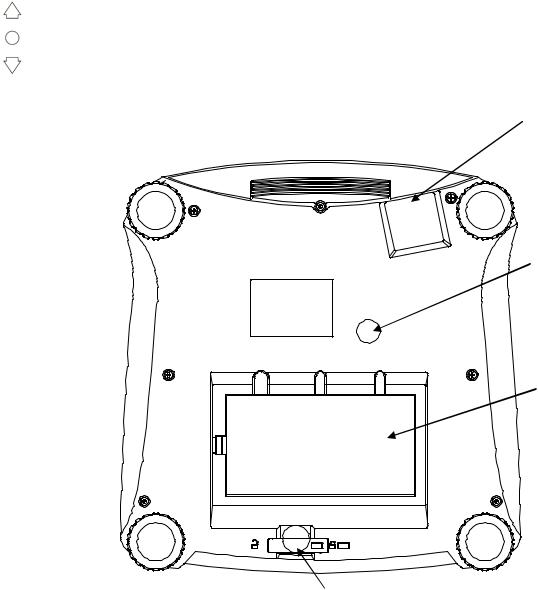
Figure 3-2. LCD Display |
TABLE 3-2. LCD Symbols
Item |
Description |
Item |
Description |
1 |
NET symbol |
9 |
Dynamic (tilde) symbol |
2 |
Center of Zero symbol |
10 |
Battery charge symbol |
3 |
Negative symbol |
11 |
Pound, Ounce, Pound:Ounce symbols |
4 |
Stable weight symbol |
12 |
Percent symbol |
5 |
Preset Tare, Tare symbols |
13 |
Kilogram, gram symbols |
6 |
Pointer symbols |
14 |
Pieces symbol, tonne symbol (not used) |
7 |
Accumulation symbol |
15 |
Scale symbol (not used) |
8 |
Calibration / Menu Mode symbol |
|
|
EN-6 |
Ranger™ 3000 Series |
The colored LED indicators on the left side of the control panel are used in Check mode (section 3.6) and will light up according to the following rules:
(Red) Loads > Upper limit
(Green) Loads ≥ Lower limit and ≤ Upper limit (Yellow) Loads < Lower limit
Power Input
Weigh Below
Access
RS232 and Option Interface Port (below cover)
Lock Switch
Figure 3-4. Below view of Ranger 3000
3.2 Turning Scale On/Off
To turn the scale on, press and hold the On/Zero Off button for 1 second. The scale performs a display test, momentarily displays the software version, and then enters the active weighing mode.
To turn the scale off, press and hold the On/Zero Off button until OFF is displayed.
Ranger™ 3000 Series |
EN-7 |
3.3 Weigh Mode
This mode is the factory default setting.
1.If needed, press and hold Mode until [wWeIGH] (Weigh) is displayed.
2.If required, place an empty container on the pan and press Tare.
3.Add sample to the pan or container. The display shows the weight of the sample.
3.4Percent Mode
This mode measures the weight of a sample as a percentage of a reference weight.
1.If required place an empty container on the pan and press Tare.
2.Press and hold Mode until [Percnt] is displayed. [Clr.ref] (clear reference) will then display. If no reference weight exists, the scale will display [Put.ref], proceed to step 5.
3.Press No to use the stored reference weight and proceed to step 6.
4.Press Yes to establish a new reference. Scale will now display [Put.ref].
5.Add the desired reference material to the pan or container. Press Yes to store the reference weight. The display shows 100%.
6.Replace the reference material with the sample material. The display shows the percentage of the sample compared to reference weight.
7.To clear the stored reference press and hold Mode until [Percnt] is displayed. Press Yes when [Clr.ref] is displayed.
Note: Press Function to view the current reference weight.
3.5 Counting Mode
This mode counts large numbers of items based on the weight of a reference count.
1.Place an empty container on the pan and press Tare.
2.Press and hold Mode until [Count] (Count) is displayed. [CLr.PwW] (Clear Average Piece Weight, APW) will then display.
If no APW exists, the scale will display [Put.10], proceed to step 5.
3.Press No to use the stored APW. Proceed to step 7.
4.Press Yes to establish an APW.
5.The scale will then display the stored sample size, i.e. [Put 10]. Press No or Back to toggle the choices (5, 10, 20, 50 or 100).
6.Put the indicated number of pieces on the pan then press Yes to calculate the APW. The display shows the piece count.
7.Add additional pieces until the desired count is reached.
8.To clear the stored APW press and hold Mode until [Count] is displayed. Press Yes when [Clr.pwW] is displayed.
Note: Press Function to view the current APW.

EN-8 |
Ranger™ 3000 Series |
3.6 Check Mode
Use this mode to compare the Weight, Percent or Count of items to a target range. The scale supports positive, negative and zero check weighing.
Refer to section 4.5 to set the desired Check sub-mode.
3.6.1 Check Weighing
Set Checkweigh to Weight in the Mode menu. Use this mode to compare the weight of items to a target weight range.
1.Press and hold Mode until [CHeCk] (Check) is displayed. [CL.lImM] (clear check limits) will then display.
2.Press No to use the stored check limits and proceed to step 5.
3.Press Yes to establish new check limits. The scale will then display [Set. Lo]. Press Yes to view the “Low” limit value. Press Yes to accept or No to edit the “Low” limit value. The
stored value then displays with the first digit highlighted [000.000 kg]. Repeatedly press No until the desired number appears. Press Yes to accept and highlight the next digit. Repeat until all the digits are correct. Press Yes to accept the “low” limit value, [Set. Hi] will be displayed.
4.Repeat the same procedure to accept or edit the “high” value.
5.If required, place an empty container on the pan and press Tare.
6.Place sample material on the pan or in the container. If the sample weight is under the target weight range, the yellow LED will light.
If the sample is within the target weight range, the green LED will light. If the sample is over the target weight range, the red LED will light.
Note: Press Function to view the low and high check limits.
3.6.2 Check Percent
Set Checkweigh to Percent in the Mode menu. Use this mode to compare the percentage of items to a target percent range.
1.Press and hold Mode until [CHeCk] (Check) is displayed. [CLr.ref] (clear reference) will then display. If no reference weight exists, the scale will display [Put.ref], proceed to step 4.
2.Press No to use the stored reference weight and proceed to step 5.
3.Press Yes to establish a new reference. Scale will now display [Put.ref].
4.Add the desired reference material to the pan or container. Press Yes to store the reference weight.
5.The scale will display [CL.lImM] (clear Check limits).
6.Press No to use the stored check limits and proceed to step 9.
7.Press Yes to establish new check limits. The scale will then display [Set. Lo]. Press Yes to view the “Low” limit value. Press Yes to accept or No to edit the “Low” limit value. The stored value then displays with the first digit highlighted [000.000 %]. Repeatedly press No until the desired number appears. Press Yes to accept and highlight the next digit. Repeat until all the digits are correct. Press Yes to accept the “low” limit value, [Set. Hi] will be displayed.
8.Repeat the same procedure to accept or edit the “high” value.
9.If required, place an empty container on the pan and press Tare.
Ranger™ 3000 Series |
EN-9 |
10.Place sample material on the pan or in the container. If the sample weight is under the target percentage range, the yellow LED will light. If the sample is within the target percentage range, the green LED will light. If the sample is over the target percentage range, the red LED will light.
Note: Press Function to view the low and high check limits.
3.6.3 Check Count
Set Checkweigh to Count in the Mode menu. Use this mode to compare the quantity of items to a target quantity range.
1.Press and hold Mode until [CHeCk] (Check) is displayed. [CLr.PwW] (clear APW) will then display.
If no APW exists, the scale will display [Put.10], proceed to step 5.
2.Press No to use the stored APW and proceed to step 5.
3.Press Yes to establish a new APW. Scale will now display [Put.10]. Press No or Back to toggle the choices (5, 10, 20, 50 or 100).
4.Put the indicated number of pieces on the pan then press Yes to calculate the APW.
5.The scale will display [CL.lImM] (clear Check limits).
6.Press No to use the stored check limits and proceed to step 9.
7.Press Yes to establish new check limits. The scale will then display [Set. Lo]. Press Yes to view the “Low” limit value. Press Yes to accept or No to edit the “Low” limit value. The stored value then displays with the first digit highlighted [000000 Pcs]. Repeatedly press No until the desired number appears. Press Yes to accept and highlight the next digit. Repeat until all the digits are correct. Press Yes to accept the “low” limit value, [Set. Hi] will be displayed.
8.Repeat the same procedure to accept or edit the “high” value.
9.If required, place an empty container on the pan and press Tare.
10.Place sample material on the pan or in the container. If the sample weight is under the target quantity range, the yellow LED will light. If the sample is within the target quantity range, the green LED will light. If the sample is over the target quantity range, the red LED will light.
Note: Press Function to view the low and high check limits.
Positive Check
Positive check is used to determine when the material added to the scale is within the target range. In this case the UNDER and OVER limits must be positive values. (The OVER limit must be greater than the UNDER limit.)
Add material to the scale until it is within the ACCEPT (green) range.
Negative Check
Negative check is used to determine when the material removed from the scale is within the target range. In this case the UNDER and OVER limits are both negative values.
The UNDER limit must be greater than the OVER limit (for example: UNDER = -10/OVER =-15). Place the item to be weighed on the scale and press TARE.
Remove a portion of the item until it is within the ACCEPT range.
EN-10 |
Ranger™ 3000 Series |
Zero Check
Zero check is used when comparing subsequent samples to an initial reference sample. In this case, the UNDER limit must be a negative value and the OVER limit must be a positive value. Place the reference item on the scale and press TARE. Remove the reference sample and place the item to be compared on the scale to determine if it is within the ACCEPT range.
3.7 Dynamic Mode
This mode allows the user to weigh an unstable load such as a moving animal. The weight is held on the display until reset. Manual, semi-automatic and automatic start/reset methods are available.
Manual operation (DYNAMIC is set to MANUAL in the Mode menu):
1.Press and hold Mode until [dYNAmM] (Dynamic) is displayed. [rEAdY] (Ready) will then be displayed.
2.Place the load on the pan and press the Function key to start measurement.
During the average period, the countdown timer decreases in one second increments.
3.After completed countdown, the average weight will be displayed. The tilde (dynamic) symbol will blink indicating that the current weight is being held.
4.Manually reset the countdown timer by pressing the Function key. [rEAdY] (Ready) will then be displayed.
Note: If Set0 has been selected, the countdown timer is not displayed. The first stable weight larger than 5d will be displayed and held.
Semi-automatic operation (DYNAMIC is set to SEMI in the Mode menu):
1.Press and hold Mode until [dYNAmM] (Dynamic) is displayed. [rEAdY] (Ready) will then be displayed.
2.Place the load on the pan to start measurement.
During the average period, the countdown timer decreases in one second increments.
3.After completed countdown, the average weight will be displayed. The tilde (dynamic) symbol will blink indicating that the current weight is being held.
4.Manually reset the countdown timer by pressing the Function key. [rEAdY] (Ready) will then be displayed.
Note: If Set0 has been selected, the countdown timer is not displayed. The first stable weight larger than 5d will be displayed and held.
Automatic operation (DYNAMIC is set to AUTOMATIC in the Mode menu):
1.Press and hold Mode until [dYNAmM] (Dynamic) is displayed. [rEAdY] (Ready) will then be displayed.
2.Place the load on the pan to start measurement.
During the average period, the countdown timer decreases in one second increments.
3.After completed countdown, the average weight will be displayed. The tilde (dynamic) symbol will blink indicating that the current weight is being held.
4.Remove the load and the display will reset after 10 seconds, [rEAdY] (Ready) will then be displayed.
Notes: If Set0 has been selected, the countdown timer is not displayed. The first stable weight larger than 5d will be displayed and held.
Alternatively, the display may be manually reset by pressing the Function key.
 Loading...