


Ohaus NV222, NV422, NV622, NV221, NV621 User Manual
...NavigatorTM Series Balances
Instruction Manual
Balanzas serie NavigatorTM
Manual de instrucciones
Balances de la série NavigatorTM
Manuel d’instructions
Bedienungsanleitung
für die Waagen der NavigatorTM-Serie
Bilance Serie NavigatorTM
Manuale per l’utente
NavigatorTM |
EN-1 |
1. INTRODUCTION
This manual contains installation, operation and maintenance instructions for the NavigatorTM Series. Please read the manual completely before using the balance.
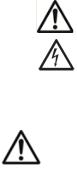
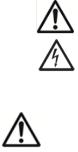
1.1 Definition of Signal Warnings and Symbols
WARNING |
For a hazardous situation with medium risk, possibly resulting in |
|
injuries or death if not avoided. |
CAUTION |
For a hazardous situation with low risk, resulting in damage to the |
|
device or the property or in loss of data, or injuries if not avoided. |
Attention |
For important information about the product |
Note |
For useful information about the product |
|
General hazard |
|
Electrical shock hazard |
1.2 Safety Precautions
CAUTION: Read all safety warnings before installing, making connections, or servicing this equipment. Failure to comply with these warnings could result in personal injury and/or property damage. Retain all instructions for future reference.
Verify that the AC adapter’s input voltage range and plug type are compatible with the local AC mains power supply.
Position the instrument such that the AC adapter can be easily disconnected from the wall socket.
Position the power cord so that it does not pose a potential obstacle or tripping hazard.
Operate the equipment only under ambient conditions specified in these instructions.
The equipment is for indoor use only.
Do not operate the equipment in hazardous or explosive environments.
Only use the equipment in dry locations.
Only use approved accessories and peripherals.
Disconnect the equipment from the power supply when cleaning.
Service should only be performed by authorized personnel.
1.3 Intended Use
Use the instrument exclusively for weighing as described in the operating instructions. Any other type of use and operation beyond the limits of technical specifications without written consent from OHAUS, is considered as not intended. This instrument complies with current industry standards and the recognized safety regulations; however, it can constitute a hazard in use. If the instrument is not used according to these operating instructions, the intended protection of the instrument may be compromised and OHAUS assumes no liability.

EN-2 |
NavigatorTM |
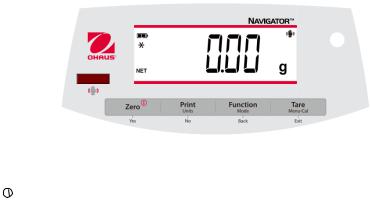
1.4 Controls |
|
Button |
Functions |
Zero |
Short Press (when on): Sets display to zero |
|
(when off): Turns balance on |
|
Long Press (when on): Turns the balance off |
Yes |
Short Press (in Menu): Selects/accepts displayed setting |
Short Press: See Interface Manual for operation description. |
|
Units |
Long Press: Toggles through active units |
No |
Short Press (in Menu): Toggles through available settings |
Function |
Short Press: Selects function setting |
Mode |
Long Press: Selects active Mode |
Back |
Short Press (in Menu): returns to previous settings |
Tare |
Short Press: Enter / clear a Tare value |
Menu-Cal |
Long Press: Enters User Menu |
Exit |
Short Press (in Menu): Quickly exit User Menu |
IR Sensor * |
IR Sensors can be programmed to act as a “touchless” button. See the |
|
User Menu section 4.3 for the available settings. |
The IR Sensors can be activated by a hand or other object that is placed about 12mm (½ inch) above the sensor location. The sensor activation distance will vary based on the reflective nature of the object. If unwanted activations occur due to unique situations the sensor can be turned off.
*Availability of IR Sensor is dependent on model and region.

NavigatorTM EN-3
2. INSTALLATION
2.1 Package Contents
|
Balance |
|
Power Adapter |
Warranty Card |
|
Pan |
|
User Guide |
|
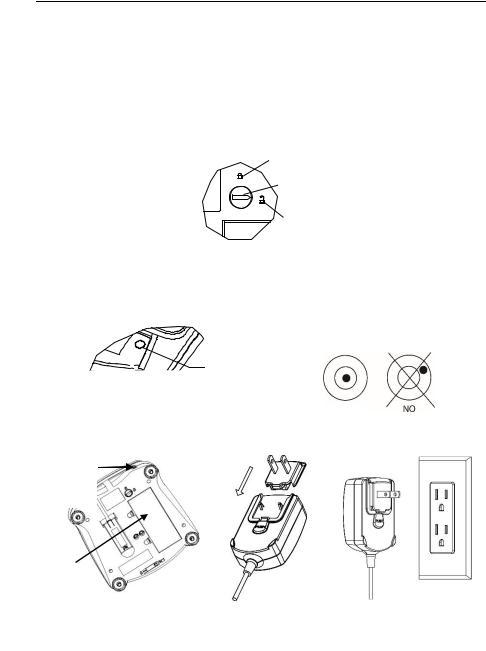
2.2 Transportation Lock
The Transportation Lock is located under the balance. Rotate the pointer to the unlocked position.
2.3 Location
Use the balance on a firm, steady surface. Avoid locations with excessive air current, vibrations, heat sources, or rapid temperature changes.
Adjust the leveling feet so the bubble is centered in the circle.
when battery power is not needed.
Input Jack
Battery
Cover
Connect the AC Adapter plug to the input jack.
Connect AC Adapter to the proper AC supply.
EN-4 NavigatorTM
Battery installation (without optional internal battery):
Remove battery cover and install 4 batteries using the polarity indications as shown in the compartment.
Optional rechargeable battery
Balances with the optional rechargeable battery will need to be charged for 12 hours before the balance can be operated on battery power for the first time. The battery is protected from overcharging so the balance can remain connected to the AC power. When the battery is fully charged the battery indicator on the display will stop blinking.
To remove the rechargeable battery option and install C cell batteries, reference the Recharging Battery Option instruction manual for step by step instructions as well as disposal instructions.
CAUTION: Risk of explosion can occur if the rechargeable battery is replaced with the wrong type or if it is not properly connected.
Note:
After power on, it is recommended to warm up the balance for at least 5 minutes before using it.
2.5 Initial Calibration
When the balance is first installed it should be calibrated to ensure accurate results.
Press and hold Menu-Cal until [mMeNU] (Menu) is displayed. When the button is released, the display will display [.C.A.L.]. Press Yes to accept, [SpaN] will then be shown. Press Yes again to begin the
span calibration. [--C--] blinks while zero reading is stored. Next, the display shows the calibration weight value. Place the specified calibration mass on the pan. [--C--] blinks while the reading is stored. The balance returns to the previous application mode and is ready for use.
Required Span Calibration Mass (sold separately)
Capacity |
Mass |
Capacity |
Mass |
Capacity |
Mass |
200 g – 420 g |
200 g |
1.6 kg – 2.2 kg |
1 kg |
16 kg – 22 kg |
10 kg |
600 g – 620 g |
300 g |
3.2 kg – 4.2 kg |
2 kg |
|
|
1 kg – 1.2 kg |
500 g |
6 kg – 12 kg |
5 kg |
|
|
NavigatorTM |
EN-5 |
3. OPERATION
All modes except for weighing must be activated in the User Menu before they are available, see Section 4.
3.1Weigh Mode
1.Press and hold Mode until [wJeIGH] (Weigh) is displayed.
2.If required, place an empty container on the pan and press Tare.
3.Add material to the container. The display shows the weight of the material.
3.2Parts Counting Mode
This mode counts large numbers of items based on the weight of a reference count.
1.Place an empty container on the pan and press Tare.
2.Press and hold Mode until [Count] (Count) is displayed. [CLr.APU] (Clear Average Piece Weight) will then display.
3.Press No to use the stored APW. Proceed to step 6.
4.Press Yes to establish an APW. The balance will then display the stored sample size, i.e. [Put 10]. Press No or Back to toggle the choices (5, 10, 20, 50 or 100).
5.Put the indicated number of pieces on the pan then press Yes to calculate the APW. The display shows the piece count. Note: Press Function to view the current APW.
6.Add additional pieces until the desired count is reached.
7.To clear the stored APW press and hold Mode until [Count] is displayed. Press Yes when [Clr.APU] is displayed.
3.3Percent Mode
This mode measures the weight of a sample as a percentage of a reference weight.
1.Place an empty container on the pan and press Tare.
2.Press and hold Mode until [Percnt] is displayed. [Clr.ref] (clear reference) will then display.
3.Press No to use the stored reference weight and proceed to step 6.
4.Press Yes to establish a new reference. Balance will now display [Put.ref].
5.Add the desired reference material to the container. Press Yes to store the reference weight. The display shows 100%.
Note: Press Function to view the current reference weight.
6.Replace the reference material with the sample material. The display shows the percentage of the sample compared to reference weight.
7.To clear the stored reference press and hold Mode until [Percnt] is displayed. Press Yes when [Clr.ref] is displayed.

EN-6 |
NavigatorTM |
3.4 Checkweigh Mode
This mode sets low and high weight limits for portion control processes.
1.Press and hold Mode until [CHeCk] (Check) is displayed. [CLr.ref] (clear references) will then display.
2.Press No to use the stored reference weight limits and proceed to step 5. Note: Press Function to view the low and high reference weight limits.
3.Press Yes to establish new reference values. The balance will then display [Set. Lo]. Press
Yes to view the “Low” limit value. Press Yes to accept or No to edit the “Low” limit value. The stored value then displays with the first digit highlighted [000.000 kg]. Repeatedly press No until the desired number appears. Press Yes to accept and highlight the next digit. Repeat until all the digits are correct. Press Yes to accept the “low” limit value, [Set. Hi] will be displayed.
4.Repeat the same procedure to accept or edit the “high” value.
5.Place sample material on the Pan. The “Accept” indicator will now show that the sample weight is within the acceptable range.
6.To clear the stored reference values press and hold Mode until [CHeCk] is displayed. Press Yes when [Clr.ref] is displayed.
4.SETTINGS
The User Menu allows the customizing of balance settings.
Note: Additional Sub-Menus may be available if Interface Options are installed. See Interface User Manual for the additional setting information.
4.1 Menu Navigation
User Menu:
Sub-Menus: |
.C.a.l. |
.S.e.t.u.p.* |
.M.o.d.e. |
.U.n.i.t.* |
.E.n.d. |
|
Span |
A-off |
Count |
g |
|
|
Lin |
Disply |
Percnt |
kg |
|
Menu Items: |
|
Bright |
Check |
… |
|
|
|
IR.Func** |
|
|
|
|
End |
End |
End |
End |
|
* Note: Available settings vary by models and regions **Availability of IR Sensor is dependent on model and region.
Press and hold Menu until [mMeNU] (Menu) is displayed. When released the first sub-menu [.C.a.l.] (Cal) will be shown.
Press Yes to enter the displayed sub-menu or press No to advance to the next.
Selecting a sub-menu will display the first menu item. Press Yes to view the menu item setting or press No to move to the next menu item. When viewing the setting, press Yes to accept the setting, or press No to change the setting. When [End] is displayed, press Yes to return to the sub-menu selections or No to return to the first item in the current menu.
4.2Cal Sub-Menu
Span [SpaN] (yes, no) - Initiates a span calibration procedure (zero and span). A span calibration is important when initially setting up the balance.
Lin [Lin] (yes, no) - Initiates a linearity calibration procedure (zero, mid-point and span).

NavigatorTM |
EN-7 |
4.3 Setup Sub-Menu
The backlit LCD display will have different menu items or settings based on the functionality.
Auto Off [A-Off] (on, off) - When Auto Off is set to “on” the balance will turn off automatically after 5 minutes of inactivity. Auto off is used to save battery power.
Display [disply] (on, auto, off ) - This setting controls the LCD backlight; constant on, automatic turn off after 5 seconds of balance inactivity, or always off.
IR Sensor [Ir.Func] (Off, Tare, Function, Print, Zero, Display) - These settings determine the role of the IR Sensor. “Zero”, “Print”, “Function” or “Tare” allows the IR sensor to act the same as the related button. “Display” activates the display if Display-Auto is set. “Off” disables the sensor.*
*Availability of IR Sensor is dependent on model and region.
4.4 Mode Menu
This sub-menu activates modes so they will be available for use with the Mode button. Weigh mode is always active.
Parts Count [Count] (on, off) - Set on for the mode to be active.
Percent [Percnt] (on, off) - Set on for the mode to be active.
Check Weigh [CHECk] (on, off) - Set on for the mode to be active.
4.5Units Menu
This sub-menu activates units so they will be accessible with the Units button. The units in the menu must be turned “on” to be active.
Note: Available units and modes vary by model and local regulations.
4.6 Sealing access to balance settings
The Menu Lock switch limits changes to the Cal, Setup, Mode and Unit menus. The switch in type approved models may set some balance settings as required by the approval agency. The switch may be secured using paper seals, wire seals or plastic ties.
Locked |
Unlocked |

EN-8 |
NavigatorTM |
5. MAINTENANCE
5.1 Cleaning
WARNING: Electric Shock Hazard. Disconnect the equipment from the power supply before cleaning.
Make sure that no liquid enters the interior of the instrument. Attention: Do not use solvents, harsh chemicals, ammonia or abrasive cleaning agents.
The exterior surfaces of the instrument may be cleaned with a cloth dampened with water and a mild detergent.
5.2 Troubleshooting
The following table lists common problems and possible causes and remedies. If the problem persists, contact OHAUS or your authorized dealer.
Symptom |
Possible Cause |
Remedy |
|||
Cannot turn on |
No power to balance |
Verify connections and voltage |
|||
Poor accuracy |
Improper calibration |
Perform calibration |
|||
Unstable environment |
Move balance to suitable location |
||||
|
|
||||
Cannot calibrate |
Unstable environment |
Move the balance to suitable location |
|||
Incorrect calibration weight |
Use correct calibration weight |
||||
|
|
||||
Cannot access mode |
Mode not enabled |
Enter menu and enable mode |
|||
Cannot access unit |
Unit not enabled |
Enter menu and enable unit |
|||
Lo ref |
|
Reference weight is too low |
Increase reference weight. |
||
ref err |
|
Parts counting– sample weight <1d. |
Shows error - exits mode or goes to [Clr.ApU]. |
||
Err 3.0 |
Cal |
Incorrect calibration weight |
See section 2.5 for correct weights |
||
Err 4.4 full |
RS232 buffer is full |
Set Handshake on, see Interface User Manual. |
|||
Err 8.1 |
ˉLoadˉ |
Power on zero range exceeded |
Clear pan, check Shipping Lock setting |
||
|
|
|
|
||
Err 8.2 |
_Load_ |
Power on zero under range |
Install pan, check Shipping Lock setting |
||
Err 8.3 |
ˉLoadˉ |
Overload (>cap+9e) |
Load exceeds balance maximum capacity |
||
Err 8.4 |
_Load_ |
Under load |
Reading below min. range - Re-install pan. |
||
Err 8.6 |
999999 |
Displayed value >999999 |
Result exceeds display capability. |
||
Err 9 |
Data |
Internal data error. |
Contact an authorized service agent |
||
Err 13 mMEmM |
Fail to write EEPROM. |
Contact |
an authorized service agent |
||
|
|
|
|
|
|
Err 53 |
CSumM |
Invalid checksum data |
Contact |
an authorized service agent |
|
5.3 Service Information
If the troubleshooting section does not resolve or describe your problem, contact your authorized OHAUS service agent. For service assistance or technical support in the United States call toll-free 1- 800-526-0659 between 8:00 AM and 5:00 PM EST. An OHAUS product service specialist will be available to provide assistance. Outside the USA, please visit our web site, www.ohaus.com to locate the OHAUS office nearest you.
NavigatorTM |
EN-9 |
6. TECHNICAL DATA
Equipment Ratings:
-Pollution degree 2;
-Installation category II;
-Altitude 2000m;
-Humidity: Maximum 80% for temperatures up to 31° C decreasing linearly to 50% at 40° C; noncondensing;
-Electrical supply: Rated 12VDC 500mA for use with a Certified/Listed power adapter or battery operated;
-Indoor use only;
-Temperature range: 10° C to 40° C, Approved models (M) 0° C to 40° C
-The mains supply voltage fluctuations are not to exceed ± 10 % of the nominal supply voltage.
6.1 Specifications
Typical specifications:
Stabilization Time |
1 seconds |
|
|
Tare range |
To capacity by subtraction |
||
Application Modes |
weigh, percent, parts count, check weigh |
||
Weighing Units* |
Non-Approved: ct, g, kg, grn, lb, oz, lb:oz, ozt, N, dwt, tael (3), tola, tical |
||
M models: g, kg, ct |
|
||
|
|
||
AC Power |
AC Adapter (supplied) - 12 VDC, 500 mA output |
||
Battery Power |
4 C (LR14) batteries (not supplied) or rechargeable battery option |
||
Calibration |
Digital with external weight |
||
LCD Display |
6-digit 7-segment LCD with white LED backlight |
||
Display Size |
20 mm / 0.78” digits |
|
|
Keypad |
4-button overlay plus one programmable IR sensors |
||
Pan Size (W x D) |
NV: Ø 145 mm / 190 mm x 144 mm |
||
NVT: 230 mm x 174 mm |
|||
|
|||
Net Weight |
NV: 1.0 kg / 2.2 lb |
NVT: 1.5 kg / 3.3 lb |
|
Shipping Weight |
NV: 1.5 kg / 3.3 lb |
NVT: 2.3 kg / 5.1 lb |
|
* Availability vary by models and regions
|
EN-10 |
|
|
|
|
|
|
NavigatorTM |
|||
|
Non-Approved Models: |
|
|
|
|
|
|
|
|
||
|
Model* |
Capacity |
|
Readability |
Repeatability |
Linearity |
Span Cal. Wt. |
Lin. Cal. Wt. |
|
||
|
|
(d) |
(Std. Dev.) |
|
|||||||
|
|
|
|
|
|
|
|
|
|
||
|
NV222 |
220g |
|
0.01g |
1d |
± 2d |
200g |
100g, |
200g |
|
|
|
NV422 |
420g |
|
0.01g |
2d |
± 2d |
200g |
200g, |
400g |
|
|
|
NV622 |
620g |
|
0.01g |
2d |
± 2d |
300g |
300g, |
600g |
|
|
|
|
|
|
|
|
|
|
|
|
|
|
|
NV221 |
220g |
|
0.1g |
1d |
± 2d |
200g |
100g, |
200g |
|
|
|
NV621 |
620g |
|
0.1g |
1d |
± 2d |
300g |
300g, |
600g |
|
|
|
NV1201 |
1200g |
|
0.1g |
1d |
± 2d |
500g |
500g, 1kg |
|
||
|
NV2201 |
2200g |
|
0.1g |
1d |
± 2d |
1kg |
1kg, 2kg |
|
||
|
|
|
|
|
|
|
|
|
|
||
|
NVT2201 |
2200g |
|
0.1g |
1d |
± 2d |
1kg |
1kg, 2kg |
|
||
|
NVT4201 |
4200g |
|
0.1g |
2d |
± 2d |
2kg |
2kg, 4kg |
|
||
|
NVT6201 |
6200g |
|
0.1g |
2d |
± 2d |
5kg |
3kg, 6kg |
|
||
|
NVT2200 |
2200g |
|
1g |
1d |
± 2d |
1kg |
1kg, 2kg |
|
||
|
NVT6200 |
6200g |
|
1g |
1d |
± 2d |
5kg |
3kg, 6kg |
|
||
|
NVT12000 |
12000g |
|
1g |
1d |
± 2d |
5kg |
5kg, 10kg |
|
||
|
NVT22000 |
22000g |
|
1g |
1d |
± 2d |
10kg |
10kg, 20kg |
|
||
|
|
|
|
|
|
|
|
|
|
|
|
Approved Models:
Model* |
Max= |
e= |
Approval Class |
Span Cal. Wt. |
Lin. Cal. Wt. |
NVT1601M |
1600g |
0.5g |
III |
1kg |
1kg,1.5kg |
NVT3200M |
3200g |
1g |
III |
2kg |
2kg, 3kg |
NVT6400M |
6400g |
2g |
III |
5kg |
3kg, 6kg |
NVT16000M |
16000g |
5g |
III |
10kg |
10kg, 15kg |
* Availability is dependent on region.
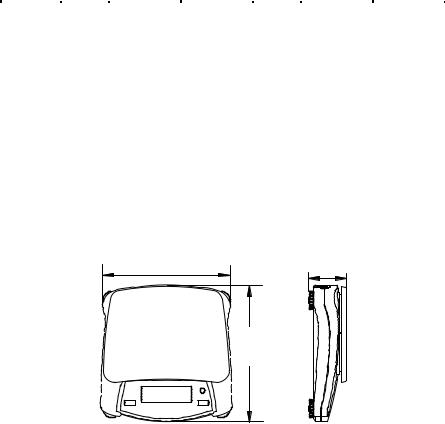
6.2 Drawings
A C
B
|
A |
B |
C |
NV |
230 mm / 9 in. |
204 mm / 8 in. |
70 mm / 2.8 in. |
NVT |
240 mm / 9.5 in. |
250 mm / 9.8 in. |
74 mm / 2.9 in. |
NavigatorTM |
EN-11 |
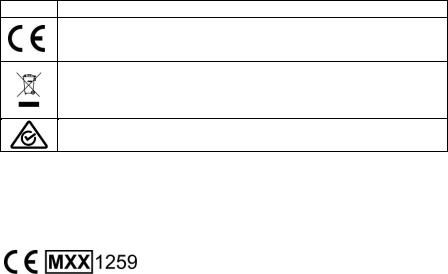
6.3 Compliance
Compliance to the following standards is indicated by the corresponding mark on the product.
Mark Standard
This product complies with the EU Directives 2011/65/EU (RoHS), 2014/30/EU (EMC), 2014/35/EU (LVD) and 2014/31/EU (NAWI). The EU Declaration of Conformity is available online at www.ohaus.com/ce.
This product complies with the EU Directive 2012/19/EU (WEEE). Please dispose of this product in accordance with local regulations at the collecting point specified for electrical and electronic equipment. For disposal instructions in Europe, refer to www.ohaus.com/weee.
EN 61326-1
Verified weighing instruments in the EU
When the instrument is used in trade or a legally controlled application it must be set up, verified and sealed in accordance with local weights and measures regulations. It is the responsibility of the purchaser to ensure that all pertinent legal requirements are met.
Weighing Instruments verified at the place of manufacture bear the following supplementary metrology marking on the descriptive plate.
Weighing Instruments to be verified in two stages have no supplementary metrology marking on the descriptive plate. The second stage of conformity assessment must be carried out by the applicable weights and measures authorities.
If national regulations limit the validity period of the verification, the user of the weighing instrument must strictly observe the re-verification period and inform the weights and measures authorities.
As verification requirements vary by jurisdiction, the purchaser should contact their local weights and measures office if they are not familiar with the requirements.
EN-12 |
NavigatorTM |
FCC Note
This equipment has been tested and found to comply with the limits for a Class B digital device, pursuant to Part 15 of the FCC Rules. These limits are designed to provide reasonable protection against harmful interference in a residential installation. This equipment generates, uses and can radiate radio frequency energy and, if not installed and used in accordance with the instructions, may cause harmful interference to radio communications. However, there is no guarantee that interference will not occur in a particular installation. If this equipment does cause harmful interference to radio or television reception, which can be determined by turning the equipment off and on, the user is encouraged to try to correct the interference by one or more of the following measures:
-Reorient or relocate the receiving antenna.
-Increase the separation between the equipment and receiver.
-Connect the equipment into an outlet on a circuit different from that to which the receiver is connected.
-Consult the dealer or an experienced radio/TV technician for help.
Changes or modifications not expressly approved by the party responsible for compliance could void the user’s authority to operate the equipment.
Industry Canada Note
This Class B digital apparatus complies with Canadian ICES-003.
ISO 9001 Registration
The management system governing the production of this product is ISO 9001 certified.
NavigatorTM |
EN-13 |
LIMITED WARRANTY
OHAUS products are warranted against defects in materials and workmanship from the date of delivery through the duration of the warranty period. During the warranty period OHAUS will repair, or, at its option, replace any component(s) that proves to be defective at no charge, provided that the product is returned, freight prepaid, to OHAUS. This warranty does not apply if the product has been damaged by accident or misuse, exposed to radioactive or corrosive materials, has foreign material penetrating to the inside of the product, or as a result of service or modification by other than OHAUS. In lieu of a properly returned warranty registration card, the warranty period shall begin on the date of shipment to the authorized dealer. No other express or implied warranty is given by OHAUS Corporation. OHAUS Corporation shall not be liable for any consequential damages.
As warranty legislation differs from state to state and country to country, please contact OHAUS or your local OHAUS dealer for further details.
Product Registration
Protect your investment. Register your product with your local OHAUS dealer. In the US and Canada register online at www.ohaus.com.
NavigatorTM |
ES-1 |
1. INTRODUCCIÓ N
Este manual contiene las instrucciones de instalació n, de operació n y de mantenimiento para la serie NavigatorTM. Por favor, lea todo el manual antes de usar la balanza.
1.1 Definició n de señ ales y símbolos de advertencia
ADVERTENCIA |
Para una situació n peligrosa con riesgo medio, esto podría causar |
|
lesiones o la muerte si no se evita. |
PRECAUCIÓ N |
Para una situació n peligrosa con riesgo bajo, esto podría causar |
|
dañ os al dispositivo, a la propiedad; una pé rdida de datos, o |
|
lesiones si no se evita. |
Atenció n |
Para informació n importante sobre el producto |
Nota |
Para informació n ú til sobre el producto |
|
Peligro general |
|
Riesgo de descarga elé ctrica |
1.2 Precauciones de seguridad
PRECAUCIÓ N: Lea todas las precauciones de seguridad antes de instalar, de realizar conexiones, o dar servicio té cnico a este equipo. El incumplimiento de estas advertencias puede resultar en lesiones personales y/o dañ os a la propiedad. Conserve todas las instrucciones para referencias futuras.
Verifique que el rango de tensió n de entrada del adaptador de CA y el tipo de enchufe sean compatibles con la fuente de alimentació n de la red local de CA.
Posicione el instrumento, de manera que el adaptador de CA se pueda desconectar fá cilmente de la toma de pared.
Posicione el cable de alimentació n, de manera que no se vuelva un obstá culo potencial o un peligro de tropiezo.
Opere el equipo solo segú n las condiciones ambientales especificadas en estas instrucciones.
Este equipo es solo para usos en interiores.
No opere el equipo en entornos peligrosos o explosivos.
Solo utilice el equipo en ubicaciones secas.
Use solamente accesorios y perifé ricos aprobados.
Desconecte el equipo de la fuente de alimentació n al limpiarlo.
El servicio té cnico solo debe ser realizado por personal autorizado.
1.3 Uso previsto
Use el instrumento exclusivamente para pesar como se describe en las instrucciones operativas. Cualquier otro tipo de uso y de operació n má s allá de los límites de las especificaciones té cnicas sin el consentimiento por escrito de OHAUS se lo considerará incorrecto. Este instrumento cumple con las normas industriales vigentes y los reglamentos de seguridad reconocidos; sin embargo, su uso puede constituir un riesgo. Si el instrumento no se usa segú n estas instrucciones operativas, la protecció n prevista del instrumento puede ser comprometida, y OHAUS no asume la responsabilidad.
ES-2 |
NavigatorTM |
1.4 Controles |
|
Botó n |
Funciones |
Cero |
Pulsació n corta (encendido): Establece la pantalla en cero |
|
(apagado): Enciende la balanza |
|
Pulsació n larga (encendido): Apaga la balanza |
Sí |
Pulsació n corta (en menú ): Selecciona/acepta el ajuste mostrado |
Imprimir |
Pulsació n corta: Ver manual de interfaz para descripció n de la |
Unidades |
operació n. |
No |
Pulsació n larga: Cambia entre las unidades activas |
|
Pulsació n corta (en menú ): Cambia entre los ajustes disponibles |
Funció n |
Pulsació n corta: Selecciona el ajuste de funció n |
Modo |
Pulsació n larga: Selecciona el modo activo |
Volver |
Pulsació n corta (en Menú ): Regresa a los ajustes anteriores |
Tara |
Pulsació n corta: Ingresar/borrar un valor de Tara |
Menu-Cal |
Pulsació n larga: Ingresa al Menú del usuario |
Salir |
Pulsació n corta (en menú ): Cierra rá pidamente el Menú del usuario |
IR Sensor* |
Los sensores infrarrojos pueden programarse para actuar como botones |
|
“sin tacto”. Consulte la sección 4,3 del Menú del usuario para ver los |
|
ajustes disponibles. |
Los sensores infrarrojos pueden activarse por una mano u otro objeto que se coloque alrededor de 12 mm (½ pulgada) por encima de las ubicaciones de los sensores. La distancia de activació n del sensor variará sobre la base de la naturaleza reflectiva del objeto. Si ocurren activaciones no deseadas debido a situaciones aisladas, los sensores pueden apagarse.
* La disponibilidad del sensor IR depende del modelo y la regió n.
NavigatorTM ES-3
2.INSTALACIÓ N
2.1 Contenidos del paquete
|
Balanza |
|
Adaptador de alimentació n |
Tarjeta de garantía |
|
Bandeja |
|
Guía del usuario |
|
2.2 Bloqueo de transporte
El Bloqueo de transporte está ubicado debajo de la balanza. Rote el indicador a la posició n desbloqueada.
 Posició nbloqueada
 Puntero
Posició ndesbloqueada
2.3 Ubicació n
Utilice la balanza en una superficie firme y estable. Evite ubicaciones con fuertes corrientes de aire, vibraciones, fuentes de calor, o cambios de temperatura bruscos.
Ajuste la pata de nivelació n para que la burbuja esté centrada en el círculo.
Burbuja de nivel |
|
Pataajustable |
SÍ |
|
Conector de entrada
Cubierta de la batería
Conecte la toma del adaptador de CA en el conector de entrada.
balanza cuando se prefiere no usar la batería.
Conecte el adaptador de CA a unafuente de CA adecuada.

ES-4 NavigatorTM
Instalació n de la batería (sin la batería interna opcional):
Retire la cubierta de la batería e instale las 4 baterías usando las indicaciones de polaridad que se muestran en el compartimento.
Batería recargable opcional
Las balanzas con batería recargable opcional necesitará n ser cargadas durante 12 horas antes de que la balanza pueda ser operada con la energía de la batería por primera vez. La batería está protegida de sobrecarga, por lo tanto, la balanza puede permanecer conectada a la alimentació n de CA. Cuando la batería esté cargada por completo, el indicador de batería en la pantalla dejará de parpadear.
Para retirar la opció n de batería recargable e instalar baterías de celdas tipo C, consulte el manual de instrucciones en la secció n Batería recargable opcional para obtener instrucciones del paso a paso, así como las instrucciones para deshacerse de estas.
PRECAUCIÓ N: Puede ocurrir un riesgo de explosió n si la batería recargable es reemplazada con el tipo incorrecto o si no se conecta adecuadamente.
Nota:
Despué s de la alimentació n, se recomienda dejar que el equilibrio caliente durante al menos 5 minutos antes de usarla.
2.5 Calibració n inicial
Cuando se instala la balanza por primera vez, esta debe ser calibrada para asegurar resultados precisos.
Mantenga pulsado Menu-Cal hasta que se visualice [mMeNU] (Menú ). Cuando se suelte el botó n, la pantalla mostrará [.C.A.L.]. Pulse Yes para aceptar, luego, se visualizará [SpaN] en la pantalla. Pulse
Yes de nuevo para iniciar la calibració n de intervalo. [--C--] parpadea mientras se almacena la lectura de cero. Luego, la pantalla muestra el valor del peso de calibració n. Coloque la masa de calibració n especificada en la bandeja. [--C--] parpadea mientras se almacena la lectura. La balanza vuelve al modo de aplicació n anterior y está lista para usar.
Masas de calibració n de intervalo requeridas (se venden por separado)
Capacidad |
Masa |
Capacidad |
Masa |
Capacidad |
Masa |
200 g – 420 g |
200 g |
1,6 kg – 2,2 kg |
1 kg |
16 kg – 22 kg |
10 kg |
600 g – 620 g |
300 g |
3,2 kg – 4,2 kg |
2 kg |
|
|
1 kg – 1,2 kg |
500 g |
6 kg – 12 kg |
5 kg |
|
|
NavigatorTM |
ES-5 |
3.OPERACIÓ N
Todos los modos, salvo el modo de pesaje, deben ser activados en el Menú del usuario antes de que esté n disponibles, consulte la Secció n 4.
3.1Modo de pesaje
1.Mantenga pulsado Mode hasta que se visualice [wJeIGH] (Pesar).
2.Si es necesario, coloque un contenedor vacío en la bandeja y pulse Tare.
3.Agregue material al contenedor. La pantalla muestra el peso del material.
3.2Modo de conteo de piezas
Este modo cuenta grandes cantidades de elementos sobre la base del peso de una referencia.
1.Coloque un contenedor vacío en la bandeja y pulse Tare.
2.Mantenga pulsado Mode hasta que se visualice [Count] (Contar). Luego, se visualizará [CLr.APU] (Borrar peso de pieza promedio).
3.Pulse No para usar el APW almacenado. Proceda al paso 6.
4.Pulse Yes para establecer un APW. La balanza mostrará el tamañ o de la muestra almacenado, por ejemplo. [Put 10]. Pulse No o Back para cambiar entre las opciones (5, 10, 20, 50 o 100).
5.Coloque la cantidad indicada de piezas en la bandeja y pulse Yes para calcular el APW. La pantalla muestra el conteo de piezas. Nota: Pulse Function para ver el APW actual.
6.Añ ada piezas adicionales hasta que se alcance el conteo deseado.
7.Para borrar el APW almacenado, mantenga pulsado Mode hasta que se visualice [Count]. Pulse Yes cuando se visualice [Clr.APU].
3.3Modo porcentual
Este modo mide el peso de una muestra como un porcentaje de un peso de referencia.
1.Coloque un contenedor vacío en la bandeja y pulse Tare.
2.Mantenga pulsado Mode hasta que se visualice [Percnt]. Luego, se visualizará [Clr.ref] (borra referencia).
3.Pulse No para usar el peso de referencia almacenado y proceda al paso 6.
4.Pulse Yes para establecer una nueva referencia. La balanza ahora mostrará [Put.ref].
5.Añ ada el material de referencia deseado al contenedor. Pulse Yes para almacenar el peso de referencia. La pantalla ahora muestra 100 %.
Nota: Pulse Function para ver el peso de referencia actual.
6.Reemplace el material de referencia con el material de muestra. La pantalla muestra el porcentaje de la muestra comparado al peso de referencia.
7.Para borrar la referencia almacenada mantenga pulsado Mode hasta que se visualice [Percnt]. Pulse Yes cuando se visualice [Clr.ref].

ES-6 |
NavigatorTM |
3.4 Modo controlador de peso
Este modo establece límites de peso mínimo y má ximo para procesos de controles de porciones.
1.Mantenga pulsado Mode hasta que se visualice [CHeCk] (Revisar). Luego, se visualizará [CLr.ref] (borrar referencias).
2.Pulse No para usar los límites de peso de referencia almacenados y proceda al paso 5. Nota: Pulse Function para ver los límites de peso de referencia mínimo y má ximo.
3.Pulse Yes para establecer los nuevos valores de referencia. La balanza ahora mostrará [Set. Lo]. Pulse Yes para ver el valor de límite “Inferior”. Pulse Yes para aceptar o No para cambiar el valor de límite “Inferior”. Luego, el valor almacenado se mostrará con el primer dígito resaltado [000,000 kg]. Pulse repetidamente No hasta que aparezca el nú mero deseado. Pulse Yes para aceptar y resaltar el pró ximo dígito. Repita el paso hasta que todos los dígitos sean correctos. Pulse Yes para aceptar el valor de límite “Inferior”, se vitalizará [Set.Hi].
4.Repita el mismo procedimiento para aceptar o cambiar el valor “Superior”.
5.Coloque el material de muestra en la Bandeja. El indicador “Aceptar” ahora mostrará que el peso de muestra está dentro del rango aceptable.
6.Para borrar los valores de referencia almacenados, mantenga pulsado Mode hasta que se visualice [CHeCk]. Pulse Yes cuando se visualice [Clr.ref].
4.AJUSTES
El Menú del usuario permite personalizar los ajustes de la balanza.
Nota: Pueden existir submenú s adicionales si se instalan las Opciones de interfaz. Consulte Interfaz en el Manual del usuario para má s informació n sobre los ajustes adicionales.
4.1 Navegació n del menú
Menú del usuario:
Sub-Menú s: |
.C.a.l. |
.S.e.t.u.p.* |
.M.o.d.e. |
.U.n.i.t.* |
.E.n.d. |
|
Span |
A-off |
Count |
g |
|
|
Lin |
Disply |
Percnt |
kg |
|
Elementos del |
|
Bright |
Check |
… |
|
menú : |
|
IR.Func** |
|
|
|
|
End |
End |
End |
End |
|
*Nota: Los ajustes disponibles varían segú n los modelos y las regiones
**La disponibilidad del sensor IR depende del modelo y la regió n.
Mantenga pulsado Menú hasta que se visualice [mMeNU] (Menú ). Al soltarlo, se visualizará el primer submenú [.C.a.l.] (Cal).
Pulse Yes para entrar en el submenú mostrado o pulse No para avanzar al pró ximo.
Al seleccionar un submenú ,se visualizará el primer elemento del menú . Pulse Yespara ver el ajuste del elemento del menú o pulse No para ir al pró ximo elemento del menú . Al ver el ajuste, pulse Yes para aceptarlo, o pulse No para cambiarlo. Cuando se visualice [End], pulse Yes para regresar a las selecciones del submenú o No para regresar al primer elemento en el menú actual.
 Loading...