


MB23 / MB25 Moisture Analyzer
Instruction Manual
Analizador de humedad MB23 / MB25
Manual de Instrucciones
Analyseur d’humidité MB23 / MB25
Guide de I’utilisateur
MB23 / MB25 Feuchtebestimmer
Bedienungsanleitung
MB23 / MB25 Analizzatore di umidità
Manuale d’instruzioni

MB23 / MB25 |
EN-1 |
1. INTRODUCTION
Safety Precautions
For safe and dependable operation of this moisture Analyzer, please comply with the following safety precautions:
Use the Analyzer exclusively for determination of moisture in samples. Improper operation of the Analyzer can endanger personnel and cause property damage.
If the Analyzer is used in a manner not specified in this manual, the protection provided may be impaired.
Verify that the input voltage printed on the voltage identification label information and the plug type matches the local AC power supply.
The Analyzer has a 3-pin power cable that includes a ground connection. Intentionally disabling the equipment grounding connection is prohibited.
Do not position the Analyzer so that it is difficult to disconnect the Power Plug from the local AC power supply.
Make sure that the power cord does not pose any obstacle or tripping hazard.
Do not operate the Analyzer in hazardous, wet or unstable environments.
Disconnect the Analyzer from the power supply when cleaning the Analyzer.
Ensure sufficient free space around the Analyzer as a safety zone. Allow at least 1 meter of free space above the Analyzer.
The Analyzer must be operated only by trained personnel who are familiar with the properties of the samples being tested and with the equipment operation.
Use appropriate personal safety equipment such as safety glasses, gloves, protective clothing and respirators.
Do not make any modifications to the Analyzer.
Service should be performed only by authorized personnel.
The Moisture Analyzer works with heat!
Never place flammable materials on, below or next to the Analyzer.
Use caution when removing a test sample. The sample, the sample chamber, the heating element and the surrounding areas may be very hot and can cause burns.
Some samples require special care!
Should there be any uncertainty regarding the safety of a substance, perform a careful risk analysis. In such cases, never leave the Analyzer unattended.
Fire or explosion: Substances which contain solvents or release flammable or explosive vapors when heated. With such samples, work at drying temperatures low enough to prevent the formation of flames or an explosion.
Poisoning or burning: Substances which contain toxic or caustic components should only be dried in a fume hood.
Corrosive: Substances which release corrosive vapors when heated should be tested in small amounts.
The user assumes responsibility for any damage caused by the use of these types of samples.
Application Disclaimer
Moisture determination applications must be optimized and validated by the user according to local regulations. Application specific data provided by OHAUS is for reference purposes only. OHAUS waives all liability for applications based on this data.

|
EN-2 |
MB23 / MB25 |
2. INSTALLATION |
|
|
|
Package Contents |
|
|
Moisture Analyzer |
50 Sample Pans |
|
Draft Shield |
Glass Fiber Pad |
|
In-Use Cover |
Instruction Manual |
|
Pan Support |
Sample Pan Handler (MB25 only) |
|
Power Cable |
|
Selecting the Location
Operate the Analyzer on a firm, level surface.
Select a location that is safe and with adequate ventilation. Fire, corrosive or toxic fumes and other hazards associated with the test samples will require specially prepared locations.
Ensure that the location has easy access to the local AC power supply.
Avoid locations with rapid temperature changes, excessive humidity, air currents, vibrations, electromagnetic fields, heat or direct sunlight.
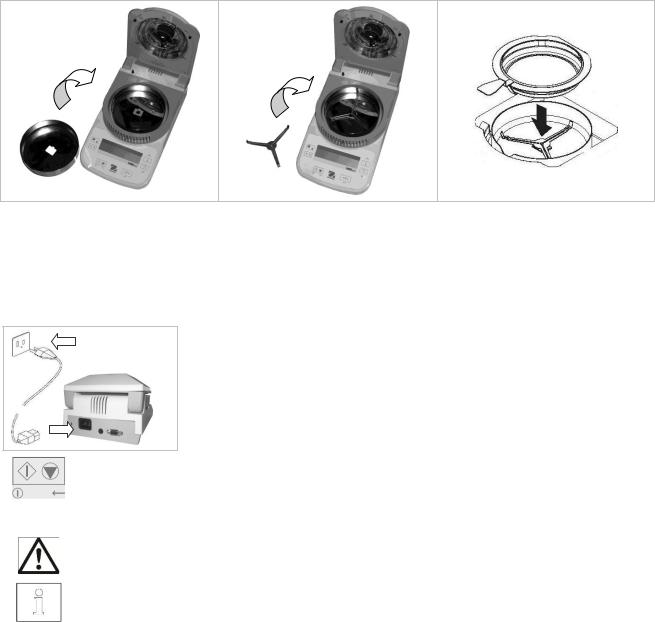
Installing Components
(1) Install and position Draft Shield |
(2) Install Pan Support, turn until it |
Optional Sample Pan Handler - Slide an |
|
engages into position |
empty sample pan under the pan |
|
|
handler, then place over the pan |
|
|
support. |
Connecting Power
Verify that the input voltage printed on the voltage identification label information and the plug type matches the locations AC power supply.
Connect the supplied power cable to the power input receptacle at the rear of the
Analyzer and into a properly grounded power outlet.
Power: On (short press) / Off / Standby Mode (long press)
When powered on from standby mode, the Analyzer is ready for immediate use.
See also Section 1, Safety Precautions.
After connecting the Analyzer to the AC supply (standby mode), allow the Analyzer to warm up for at least 15 minutes for best results.
MB23 / MB25 |
EN-3 |
3. OPERATION
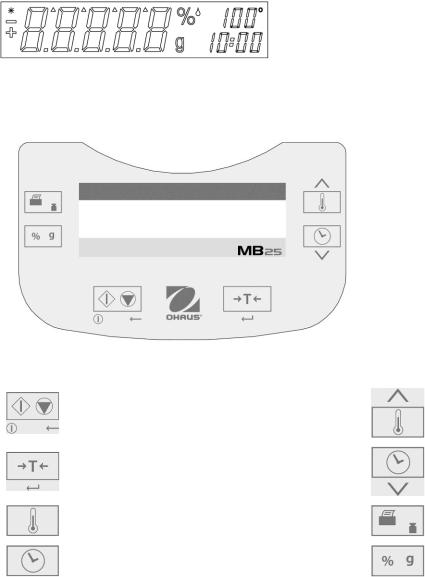
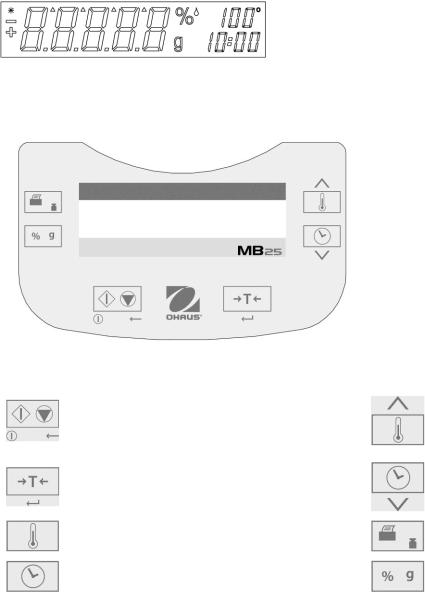
Display
Stable indicator
%Percent solids
% |
Percent moisture |
g |
grams |
100° |
Temperature setting or current chamber temperature (Celsius) |
10:00 |
Time setting (minutes : seconds) |
Controls
Button: |
Name: |
Quick Functions: |
Button: |
Name: |
Quick Functions: |
|
|
|
|
|
|
|
|
On (short press) / Off (long press) |
|
|
Increase value |
|
Start / Stop |
Start/Stop (short press) |
|
Set |
|
|
|
(short or long press) |
|||
|
|
Back (short press) |
|
|
|
|
|
|
|
|
|
|
|
|
|
|
|
|
Tare |
Tare (short press) |
|
Set |
Decrease value |
|
Enter / Accept value (short press) |
|
(short or long press) |
||
|
|
|
|
||
|
|
|
|
|
|
|
Temp |
Temperature Setting (short press) |
|
Print / Cal |
Print (short press) |
|
|
Calibrate (long press) |
|||
|
|
|
|
|
|
|
|
|
|
|
|
|
Time |
Time Setting (short press) |
|
%g |
Result Unit (short press) |
|
|
|
|
|
|
There are also several modes of operation which affect how each button operates. Please refer to the following section.
Operating Modes
Standby Mode
When the Analyzer is connected to AC power and the display is off, the unit is in Standby mode. Start (Short press) Turns on the display and enters Weigh mode.
Print (Long press) Displays the RS232 settings (see Section 6, RS232 Data Connection.). Thereafter, (Short press) Re-enters Standby mode (off).
Weigh Mode
The display shows the weight of items placed on the pan support.
Tare (Short press) Sets the displayed weight value to zero
Start (Long press) Enters Standby mode (Off)
The following operations can be initiated:
Temp (Short press) Enters Edit mode for the temperature setting, the value will blink
Time (Short press) Enters Edit mode for the time setting, the value will blink
Start (Short press) Activates Run mode, initiates test with a sample greater than 0.5 g
Cal (Long press) Initiates weight or temperature Calibration (see Section 5, Maintenance)
Temperature / Time Edit Mode (Preparing a Test)
Temperature editing: (50°to 160°C in 5°steps)
Temp (Short press) Enters Edit mode for the temperature setting, the value will blink.

EN-4 |
MB23 / MB25 |
Set (Short or long press) Increases the value of the temperature setting. Set (Short or long press) Decreases the value of the temperature setting. Tare (Short press) Accepts the blinking value and returns to Weigh mode. Start (Short press) Exits Edit mode without saving changes.
Note: After 5 seconds of no activity the blinking setting is automatically saved and the mode returns to Weigh.
Time editing: (1 to 60 minutes in 30 second steps, 61 to 99 minutes in 1 minute steps)
The time parameter can be set to timed duration or AUTO (the test ends when the Analyzer detects the weight loss has ended). Selecting AUTO or timed duration:
Time (Short press) Enters Edit mode for the time setting, the value will blink.
Time (Short press) While the time setting is blinking, toggles between AUTO and a time value. Tare Accepts the blinking setting.
If AUTO is selected Weigh mode is entered. If time duration is selected:
Set (Short or long press) Increases the value of the time setting. Set (Short or long press) Decreases the value of the time setting.
Tare (Short press) Accepts the blinking value and returns to Weigh mode. Start (Short press) Exits Edit mode without saving changes.
Note: After 5 seconds of no activity the blinking setting is automatically saved and the mode returns to Weigh.
Run Mode (Performing a Test)
A moisture determination test is initiated. The results in progress are displayed.
Start (Short press) Activates Run mode, initiates test with a sample greater than 0.5 g. %g Changes the unit of the displayed result: weight (grams) > % Moisture > % Solids. Stop (Short press) Manually stops the test in progress.
Print Sends the current displayed value to the RS232.
Result Mode
At the end of the test (Run Mode), the display blinks the test result.
%g Changes the unit of the displayed result: weight (grams) > % Moisture > % Solids. Tare Exits to Weigh mode.
Print Sends the current displayed value to the RS232.
How to Prepare a Test
Moisture determinations can be made very simply. The three steps are:
(1)Setting the drying temperature (see Section 3).
(2)Setting the drying time, and (see Section 3).
(3)Preparing the sample to be tested:
Place the Pan Handler with empty test pan on the Pan Support (see Section 2).
Press Tare to zero out the pan weight.
Remove the test pan and place the test sample onto the test pan. The sample must be greater than 0.5g.
Spread the sample evenly across the test pan.
Place the test pan with the sample on the Pan Support. The weight value of the sample will be displayed.
Section 4. Test Optimization gives hints on determining optimal drying temperatures and times, sample sizes, and proper preparation of samples.
How to Perform a Test
(1)Close the Heater Cover.
(2)Press Start to begin the test (press Start again to stop the test in progress).
(3)When the test is over the display will blink showing the final result.
(4)To change the displayed units, press %g.
(5)To print the current displayed value, press Print.
(6)Press Tare to exit to Weigh mode.
Performing a Trial Test
Prior to actual testing, a test run can be performed with these suggested settings:
(1)Temperature = 120
(2)Time = AUTO
(3)Sample = 3g of water. Place a glass fiber pad (included with the Analyzer) on the test pan, place on Pan Support.

MB23 / MB25 |
EN-5 |
Press Tare to zero the pan weight. Add 3g of water to the fiber pad.
(4) Press Start to initiate the test. A perfect result on the trial test would be: 0g, 100% moisture or 0%solids.
Results may vary slightly due to weighing errors involved with a small sample, or other experimental errors. See also Section 4. Test Optimization.
4. TEST OPTIMIZATION
Moisture is determined from the weight loss of a sample dried by heating.
The speed and quality of the measurement process will rely on the following parameters. Experimentation will also help ascertain the optimal setup of these parameters:
Drying temperature
Drying time
Sample weight
Sample preparation
Type of sample
Drying Temperature
The drying temperature exerts a controlling influence on the drying time (e.g., a low temperature can prolong the drying time unnecessarily).
Select a drying temperature that neither decomposes nor changes the chemical structure of the sample.
Some samples can give off different amounts of moisture at different drying temperatures. In these cases, deviations can be compensated by changing the drying temperature.
Drying Time
This analyzer has three methods to establish the drying time.
Manual, where the user stops the test in progress by pressing the Stop button. The test must be longer than 30 seconds to be a valid test.
Automatic, which ends the drying process when detecting less than 1mg loss in 60 seconds. To keep the drying time short, select a small sample weight that still maintains the required measurement accuracy.
Timed duration, where the test ends when the pre-set drying time elapses.
Sample Weight
The weight of a sample influences the measurement time and repeatability of the results. With large amounts of samples, more moisture must be vaporized and the process takes longer. Generally, the sample weight should be between 3g and 20g. 3g samples give fast results with some sacrifice in accuracy. 20g samples generally give more consistent results but require a longer test time.
Another way to determine the sample weight is to use the relation between sample weight and repeatability, as shown in the following table. If requiring repeatability results better than ±0.3%, for example, the table indicates that a sample weight of at least 2g will be needed.
Sample Weight |
Repeatability |
0.5g |
±1.0% |
1g |
±0.6% |
2g |
±0.3% |
5g |
±0.12% |
10g |
±0.06% |
Sample Preparation
Samples must always be uniform and representative of the total amount to obtain accurate and reproducible results. When preparing samples, it is essential to ensure thin and uniform distribution of the sample on the test pan (i.e., avoid piling and excessive amounts).
Types of Samples
Pasty, fat containing and melting substances
Use a glass fiber filter to increase the surface area of these types of samples (e.g., butter). The moisture in these substances is more uniformly distributed through the filter. The increased surface area results in faster and more complete vaporization of the moisture.

EN-6 |
MB23 / MB25 |
Liquid substances
Liquids (e.g., dispersions) tend to form drops on the test pan, which prevents rapid drying. Use of a glass fiber filter shortens the drying time significantly as the filter distributes the liquid sample over a larger surface area.
Skin-forming and temperature sensitive substances
Formation of a film on the surface of these samples can prevent complete determination of moisture. Using a glass fiber filter to cover the sample allow gentler and more beneficial heating, improving reproducitility.
Sugar-containing substances
Samples containing large amounts of sugar tend to caramelize. Ensure that a thin and uniform layer is applied and a moderate temperature selected. The sample can also be covered with a glass fiber filter that improves reproducitility.
The following substances present risk of fire, explosion, damage or injury.
Should there be any uncertainty regarding the safety of a substance, always perform a careful risk analysis. In such cases, never leave the Analyzer unattended.
Volatile substances
With volatile samples, rapid application of the sample on the test pan is advisable, to limit the moisture from escaping before the initial weight is recorded. These substances also include samples treated with solvents, and substances which contain solvents or release flammable or explosive vapors. Work at drying temperatures low enough to prevent the formation of flames or an explosion. Always work with small samples (maximum 1g).
Poisonous and toxic substances
Substances which contain toxic or caustic components should only be dried in a fume hood.
Corrosive substances
Substances which release corrosive vapors when heated (e.g. acids) should be tested in small amounts. The vapors can condense on the Analyzer parts causing corrosion.
5. MAINTENANCE
Weight Calibration
Weight calibration is rarely required. Moisture analyzers use relative weight values to determine the results, so a minor offset from the absolute weight has little effect on accuracy. OHAUS moisture analyzers have rugged, high quality temperature stabilized weighing modules that retain their calibration over long periods of time.
(1)Remove any load on the Pan Support including the sample pan.
(2)Press and hold Cal while in the Weigh mode. “CAL” will appear followed by “50.00g”.
(3)Place a 50g calibration mass on the Pan Support. The display will show “-----”.
(4)Remove the mass when “--0--” is shown on the display. The display will show “-----”.
(5)The Analyzer will return to Weigh mode when calibration is complete.
Note: Pressing START will cancel the calibration without saving the changes.
Temperature Calibration
Temperature calibration is rarely required under normal use. If the heating elements become dirty, the usual setting may no longer produce the same results. A temperature calibration can correct for these changes.
Use only the OHAUS Temperature Calibration Kit (accessory) to perform temperature calibration.
Damage to the Analyzer can occur if using other methods.
(1)Remove the Pan Support for the temperature calibration to start.
(2)Place the OHAUS Temperature Calibration Kit into the temperature chamber (see Kit Instructions). Close Cover.
(3)Press and hold Cal until “Cal” is displayed. When Cal is released “TC100” will appear and the heater turns on.
(4)After 15 minutes, the unit will beep and blink “100” on the display.
(5)Read the thermometer on the Temperature Calibration Kit and press Set to change and match the displayed value to the thermometer reading.
(6)Press Tare to enter the value. The display will show “TC160” as the heater turns on again.
(7)After 15 minutes, the unit will beep and blink “160” on the display.
(8)Read the thermometer on the Temperature Calibration Kit and press Set to change and match the displayed value to the thermometer reading.
(9)Press Tare to enter the value. The Analyzer returns to Weigh mode.
(10)Temperature calibration is now complete.
Note: If Tare is not pressed within 10 minutes the calibration will be aborted.
MB23 / MB25 |
EN-7 |
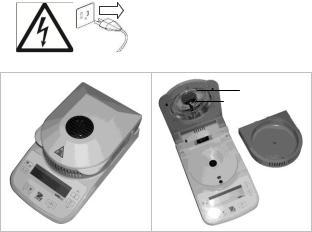
Cleaning
Disconnect the Analyzer from the power supply before cleaning the Analyzer.
Make sure that no liquid enters the interior of the Analyzer.
Make sure the Analyzer is cooled down before cleaning.
Protective glass Temperature sensor
Clean the Analyzer at regular intervals.
Housing surfaces and the temperature sensor may be cleaned with a lint-free cloth slightly dampened with water or a mild cleaning agent.
Glass surfaces may be cleaned with a commercial glass cleaner.
Do not use solvents, harsh chemicals, ammonia or abrasive cleaning agents.
Troubleshooting
Symptom / Display |
Possible Cause |
Remedy |
Cannot turn on |
No power to analyzer |
Verify connections, fuse and voltage |
Weight value blinking |
Sample weight less than 0.5g |
Increase sample size |
“Tare” shown |
Pan weight needs set to zero |
Press Tare |
“Close Cover” shown |
Cover needs to be closed before starting test |
Close cover |
Poor accuracy |
Improper calibration |
Perform calibration |
|
Unstable environment |
Move the analyzer to suitable location |
Cannot calibrate |
Unstable environment |
Move the analyzer to suitable location |
|
Incorrect calibration masses |
Use correct calibration masses |
Err 7.0 |
Time out |
|
Err 8.1 |
Pan support has load during power on |
Remove weight from pan support |
Err 8.2 |
Pan support was removed prior to power on |
Install pan support |
Err 8.3 |
Weight on pan support exceeds capacity |
Remove weight from the pan support |
Err 8.4 |
Pan support was removed during weighing |
Re-install pan support |
Err 8.5 |
Cannot perform temperature calibration |
Cool down the analyzer |
Err 8.6 |
Current temperature is higher than setting |
Cool down the analyzer |
Err 9.5 |
Factory calibration data corrupted |
Contact an Ohaus-authorized dealer |
Err 10.3 |
Temperature sensor out of range – high |
Contact an Ohaus-authorized dealer |
Err 10.4 |
Temperature sensor out of range – low |
Contact an Ohaus-authorized dealer |
Err 10.5 |
Temperature sensor defective |
Contact an Ohaus-authorized dealer |
Err 10.6 |
Temperature sensor defective |
Contact an Ohaus-authorized dealer |
Err 10.7 |
Temperature out of control |
Contact an Ohaus-authorized dealer |
Err 11.0 |
AC power is unstable |
Use a power line conditioner |
Err 53 |
EEPROM checksum error |
Contact an Ohaus-authorized dealer |
Err 54 |
Loading of calibration parameters failed |
Contact an Ohaus-authorized dealer |
Service Information
If the troubleshooting section does not resolve or describe your problem, contact your authorized OHAUS service agent. Please visit our web site: www.ohaus.com to locate the OHAUS office nearest you.
Accessories
Description |
Part No. |
Description |
Part No. |
Security Locking Cable |
76288-01 |
STP103 Thermal Printer, US |
80251992 |
Security Lock (Kensington® type) |
470004-010 |
STP103 Thermal Printer, EU |
80251993 |
Temperature Calibration Kit |
11113857 |
STP103 Thermal Printer, UK |
80251994 |
Sample Pans (50/Box) |
80850086 |
CBM910 Impact Printer, JP |
80252041 |
Pads, Glass Fiber (200/Box) |
80850087 |
CBM910 Impact Printer, US |
80252042 |
Reusable Sample Pans (3/pk) |
80850088 |
CBM910 Impact Printer, EU |
80252043 |
Reusable Deep Sample Pans (3/pk) |
80252479 |
Cable, STP103 |
80252581 |
Reusable Wire Cage |
80252477 |
Cable, CBM910 |
80252571 |
Sample Pan Handler |
80252476 |
Data collection Software |
SW12 |
50g Calibration Weight |
51054-16 |
|
|
|
EN-8 |
|
|
|
MB23 / MB25 |
||
6. TECHNICAL DATA |
|
|
|
|
|||
|
Admissible Ambient Conditions |
|
|
|
|
||
|
Location: |
Indoor use only |
|
|
|
|
|
|
Temperature: |
10°C to 40°C |
|
|
|
|
|
|
Relative humidity: |
15 % to 80 % at 30°C non-condensing |
|
|
|||
|
Warm up time: |
At least 15 minutes after connecting the Analyzer to the AC supply; |
|
|
|||
|
|
|
when switched from standby mode the Analyzer is ready for immediate use. |
||||
|
Height above sea level: |
Up to 2000 m |
|
|
|
|
|
|
Power Input: |
100VAC - 120VAC, 3A, 50/60Hz or 200VAC -240VAC, 3A, 50/60Hz |
|
|
|||
|
Voltage fluctuations: |
-15% +10% |
|
|
|
|
|
|
Power load: |
MB25: 250W; MB23:300W (Maximum during drying process) |
|
|
|||
|
Power line fuse: |
1 piece, 5 x 20mm, 2.5A 250V |
|
|
|||
|
Protected against dust and water, Pollution degree: 2, Installation category: Class II |
|
|
||||
|
Specifications |
|
|
|
|
|
|
|
|
MODEL |
|
MB25 |
|
MB23 |
|
|
|
Capacity |
|
110g |
|
|
|
|
|
Readability (% requires >10g sample) |
0.005g ; 0.05% |
|
0.01g, 0.1% |
|
|
|
|
Temperature Settings |
50°C to 160°C (5°increments) |
|
|||
|
|
Heat Source |
|
Halogen |
|
Infrared |
|
|
|
Calibration - Weight |
50g |
|
|
||
|
|
Calibration - Temperature |
OHAUS Temperature Calibration Kit |
||||
|
|
Pan Size |
|
90mm diameter |
|
|
|
|
|
Unit Dimensions (DxWxH) |
11.0x6.5x5.0 in / 28.0x16.5x12.7 cm |
||||
|
|
Unit Weight |
|
4.6 lb / 2.1 kg |
|
|
|
|
|
Shipping Dimensions (LxWxH) |
20.2x15.5x13.5 in / 51x40x35 cm |
||||
|
|
Shipping Weight |
|
10 lb / 4.5 kg |
|
|
|
Communication
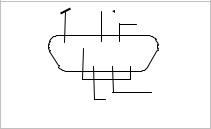
RS232 Pin Connections
GND |
|
RxD |
|
||
|
|
 TxD
TxD
5 


 1
1
9


 6
6
 CTS
CTS
 RTS
RTS
Female DB9 connector
Pin 2: Analyzer transmit line (TxD) Pin 3: Analyzer receive line (RxD) Pin 4 and 6: Internally connected Pin 5: Ground signal (GND)
Pin 7: Clear to send (hardware handshake) (CTS) Pin 8: Request to send (hardware handshake) (RTS)
RS232 Data Settings (default) |
|
|
|
|
Baud Rate: 2400 |
Data Bits: 7 |
Parity: N |
Stop Bits: 2 |
Flow Control: Xon/Xoff |
RS232 Commands
The RS232 Interface allows a computer to control the Analyzer, as well as to receive data such as displayed weight.
Command |
Function |
ON |
Turns Analyzer ON |
OFF |
Turns Analyzer OFF |
T |
Same as pressing Tare |
U |
Same as pressing %g |
START |
begins a test |
STOP |
ends a test |
P |
Same as pressing Print |
xP |
Interval Print x = Print Interval (1-3600 sec) |
PSN |
Print Serial Number |
PV |
Print software version |
? |
Print Header |
H |
Header on or off |
RS |
Print current RS232 settings |
MB23 / MB25 |
|
EN-9 |
|||
|
|
|
|
|
|
|
|
|
Change RS232 setting (The current RS232 setting can be displayed on the LCD by pressing |
||
|
|
|
Print for 2 seconds while in standby mode.) |
||
|
|
|
Baud:1200,2400,4800,9600,19200 |
||
|
RS:2400,7,N,2,X |
Data Bits: 7 or 8 |
|
|
|
|
|
|
Parity: N = none, O = odd, E = even |
||
|
|
|
Stop Bits: 1 or 2 |
|
|
|
|
|
Handshake: X = xon/xoff (software), R = RTS-CTS (hardware), N = none |
|
|
|
|
|
The Analyzer will return “ES” for invalid commands. |
||
|
|
|
All communication uses standard ASCII format. |
||
|
|
|
Sent commands must terminate with a Line Feed or Carriage Return Line Feed (CRLF). |
||
|
RS232 Output |
|
|
|
|
^^^^^^^^^^^^^^^^^^^^^^^^ |
|
|
|||
|
MOISTURE DETERMINATION |
Header on |
|||
|
OHAUS MB2x SN ######### |
Header on |
|||
|
Switchoff Mode |
TIMED 10:00 |
Header on |
||
|
Drying Temp |
100C |
Header on |
||
|
Result Units |
%Moisture |
Header on |
||
00:10 |
0.0%MC |
|
If Print pressed or print interval set. |
||
00:20 |
0.0%MC |
|
If Print pressed or print interval set. |
||
|
Elapsed Time |
00:02:21 |
Printed at successful end of test. |
||
|
Initial Weight |
8.560 g |
Printed at successful end of test. |
||
|
Final Weigh |
8.555 g |
Printed at successful end of test. |
||
|
Final Result |
0.0%MC |
Printed at successful end of test. |
||
^^^^^^^^^^^^^^^^^^^^^^^^
Compliance
Compliance to the following standards is indicated by the corresponding mark on the product.
Marking Standard
This product conforms to the EMC directive 2004/108/EC and the Low Voltage Directive 2006/95/EC. The complete Declaration of Conformity is available from Ohaus Corporation
AS/NZS4251.1 Emission, AS/NZS4252.1
CAN/CSA-C22.2 No. 61010-1-04; UL Std. No. 61010A-1
Disposal
In conformance with the European Directive 2002/96/EC on Waste Electrical and Electronic Equipment (WEEE) this device may not be disposed of in domestic waste. This also applies to countries outside the EU, per their specific requirements.
Please dispose of this product in accordance with local regulations at the collecting point specified for electrical and electronic equipment.
If you have any questions, please contact the responsible authority or the distributor from which you purchased this device.
Should this device be passed on to other parties (for private or professional use), the content of this regulation must also be related.
Disposal instructions in Europe are available online at www.ohaus.com. Choose your, country then search for
“WEEE“.
Thank you for your contribution to environmental protection.
EN-10 |
MB23 / MB25 |
FCC Note
This equipment has been tested and found to comply with the limits for a Class A digital device, pursuant to Part 15 of the F CC Rules. These limits are designed to provide reasonable protection against harmful interference when the equipment is operated in a commercial environment. This equipment generates, uses, and can radiate radio frequency energy and, if not installed and used in accordance with the instruction manual, may cause harmful interference to radio communications. Operation of this equipment in a residential area is likely to cause harmful interference in which case the user will be required to correct the interference at his own expense.
Industry Canada Note
This Class A digital apparatus complies with Canadian ICES-003.
Cet appareil numérique de la classe A est conforme àla norme NMB-003 du Canada.
ISO 9001 Registration
In 1994, Ohaus Corporation, USA, was awarded a certificate of registration to ISO 9001 by Bureau Veritus Quality International (BVQI), confirming that the Ohaus quality management system is compliant with the ISO 9001 standard’s requirements. On June 21, 2012, Ohaus Corporation, USA, was re-registered to the ISO 9001:2008 standard.
LIMITED WARRANTY
OHAUS products are warranted against defects in materials and workmanship from the date of delivery through the duration of the warranty period. During the warranty period OHAUS will repair, or, at its option, replace any component(s) that proves to be defective at no charge, provided that the product is returned, freight prepaid, to OHAUS.
This warranty does not apply if the product has been damaged by accident or misuse, exposed to radioactive or corrosive materials, has foreign material penetrating to the inside of the product, or as a result of service or modification by other than OHAUS. In lieu of a properly returned warranty registration card, the warranty period shall begin on the date of shipment to the authorized dealer. No other express or implied warranty is given by OHAUS Corporation. OHAUS Corporation shall not be liable for any consequential damages.
As warranty legislation differs from state to state and country to country, please contact OHAUS or your local OHAUS dealer for further details.

MB23 / MB25 |
ES-1 |
1. INTRODUCCIÓN
Precauciones de seguridad
Para una operación segura y confiable de este analizador de humedad, implemente las siguientes medidas de seguridad:
Use el analizador exclusivamente para determinar la humedad en muestras. La operación incorrecta de analizador puede poner en riesgo al personal y causar daños físicos.
Si el analizador se usa en una forma no especificada en este manual, la protección que se proporciona podría deteriorarse.
Verifique que el voltaje de alimentación impreso en la información de la etiqueta de voltaje y el tipo de enchufe coincidan con la alimentación de corriente alterna local.
El analizador tiene un cable de tres patillas que incluyen una conexión a tierra. Estáprohibido suprimir intencionalmente la conexión a tierra.
No coloque el analizador en tal forma que sea difícil desconectar el enchufe de la toma de la corriente eléctrica alterna.
Asegúrese de que el cordón eléctrico no represente un obstáculo o riesgo de tropezarse.
No opere el analizador en ambientes peligrosos o inestables.
Desconecte el analizador de la fuente de energía antes de limpiarlo.
Asegúrese de que haya suficiente espacio libre alrededor del analizador como zona de seguridad. Deje por lo menos 1 metro de espacio libre encima del analizador.
El analizador debe ser operado solamente por personal capacitado que estéfamiliarizado con las propiedades de las muestras que se prueban y con el funcionamiento del equipo.
Use equipo de protección personal adecuado tal como lentes de seguridad, guantes, ropa protectora y respiradores.
No haga ninguna modificación al analizador.
El servicio debe proporcionarse solamente por personal autorizado.
¡El analizador de humedad funciona con calor!
Nunca coloque materiales inflamables sobre, debajo ni junto al analizador.
Tenga cuidado cuando retire las muestras de prueba. La muestra, la cámara de muestras, el elemento de calentamiento y las áreas cercanas pueden estar muy calientes y causar quemaduras.
¡Algunas muestras requieren atención especial!
En caso de duda en relación a la seguridad de una sustancia, lleve a cabo un análisis de riesgo cuidadoso. En tales casos nunca deje el analizador solo.
Incendio o explosión: Las sustancias que contienen solventes o que liberan vapores inflamables o explosivos cuando son calentadas. Con dichas muestras, trabaje a temperaturas de secado suficientemente bajas para prevenir que se formen flamas o una explosión.
Envenenamiento o quemaduras: Las sustancias que contienen componentes tóxicos o cáusticos deben secarse sólo en una capucha para humo.
Corrosivas: Las sustancias que liberan vapores corrosivos cuando se calientan deben probarse en cantidades pequeñas.
El usuario asume la responsabilidad de cualquier daño causado por el uso de estos tipos de muestras.
Exención de responsabilidad de la aplicación
El usuario debe optimizar y validad las aplicaciones para determinar humedad de acuerdo con las regulaciones locales. Los datos específicos de aplicación que proporciona OHAUS son sólo para referencia. OHAUS renuncia a cualquier responsabilidad para las aplicaciones que se basen en estos datos.
|
ES-2 |
MB23 / MB25 |
2. INSTALACIÓN |
|
|
|
Contenido del paquete |
|
|
Analizador de humedad |
Bandeja para 50 muestras |
|
Pantalla contra corrientes de aire |
Almohadilla de fibra de vidrio |
|
Cubierta para uso |
Manual de instrucciones |
|
Soporte para bandeja |
Manipulador de bandeja para muestras (sólo MB25) |
|
Cordón eléctrico |
|
Selección del lugar de instalación
Opere el analizador sobre una superficie firme y nivelada.
Seleccione un lugar seguro y con ventilación adecuada. El fuego y los vapores corrosivos y tóxicos y otros riesgos asociados con las muestras de prueba requerirán lugares preparados especialmente.
Asegúrese de que el lugar tenga fácil acceso a la corriente eléctrica alterna local.
Evite lugares donde ocurran cambios rápidos de temperatura, con humedad, corrientes de aire, vibraciones, campos electromagnéticos, luz solar directa o calor excesivos.
Instalación de los componentes
(1) Instale y coloque la pantalla contra corrientes de aire
(2) Instale el soporte de la bandeja y gírelo |
Soporte opcional para bandeja: Deslice |
hasta que encaje en su lugar |
una bandeja para muestras vací debajo |
|
del manipulador de bandeja y colóquela |
|
sobre el soporte de la bandeja. |
Conexión de la energía
Verifique que el voltaje de alimentación impreso en la información de la etiqueta de voltaje y el tipo de enchufe coincidan con la alimentación de corriente alterna local.
Conecte el cordón eléctrico en el receptáculo de entrada de energía en la parte posterior del analizador y en una toma eléctrica con conexión a tierra adecuada.
Energía eléctrica: Encendido (presión corta) / Off / Modo En espera (presión larga) Cuando se enciende estando en modo en espera, el analizador puede usarse de inmediato.
Vea también la Sección 1 Precauciones de seguridad.
Despué de conectar el analizador en la corriente alterna (modo En espera), espere a que se caliente por lo menos durante 15 minutos para obtener los mejores resultados.
MB23 / MB25 |
ES-3 |
3. OPERACIÓN
Pantalla
Indicador estable
%Porcentaje de sólidos
% |
Porcentaje de humedad |
g |
gramos |
100° |
Ajuste de temperatura o temperatura actual de la cámara (°C) |
10:00 |
Ajuste de la hora (minutos : segundos) |
Controles
Botón: |
Nombre: |
Funciones rápidas: |
Botón: |
Nombre: |
Funciones rápidas: |
|
|
|
|
|
|
|
|
Encendido (presión corta) / Off |
|
|
|
|
Iniciar/ |
(presión larga) |
|
Ajustar |
Aumentar el valor |
|
detener |
Iniciar/Detener (presión corta) |
|
(presión corta o larga) |
|
|
|
Regresar (presión corta) |
|
|
|
|
|
|
|
|
|
|
Tara |
Tarar (presión corta) |
|
Ajustar |
Disminuir el valor |
|
|
Ingresar / Aceptar valor (presión corta) |
|
|
(presión corta o larga) |
|
|
|
|
|
|
|
Temp |
Ajuste de temperatura (presión corta) |
|
Imprimir / |
Imprimir (presión corta) |
|
|
Calibrar |
Calibrar (presión larga) |
||
|
|
|
|
||
|
|
|
|
|
|
|
Hora |
Ajustar la hora (presión corta) |
|
%g |
Unidad de resultado (presión |
|
|
corta) |
|||
|
|
|
|
|
|
|
|
|
|
|
|
También hay varios modos de operación que modifican el funcionamiento de cada botón. Vea la siguiente sección. |
|||||
Modos de operación
Modo En espera
Cuando el analizador estáconectado a la corriente alterna y la pantalla estáapagada, la unidad estáen modo En espera. Iniciar (Presión corta) Enciende la pantalla e ingresa en el modo Pesar.
Imprimir (Presión larga) Muestra los ajustes del RS232 (vea la Sección 6, Comunicación.) Despué de eso, (Presión corta) Reingresa al modo En espera (apagado).
Modo Pesar
La pantalla muestra el peso de los artículos colocados en el soporte de la bandeja. Tara (Presión corta) Establece el valor del peso mostrado a cero
Iniciar (Presión larga) Ingresa al modo En espera (apagado). Se pueden iniciar las siguientes operaciones:
Temp (Presión corta) Ingresa en el modo Modificar para ajustar la temperatura; el valor destellará Hora (Presión corta) Ingresa en el modo Modificar para ajustar la hora; el valor destellará
Iniciar (Presión corta) Activa el modo Ejecutar; inicia la prueba con una muestra mayor de 0.5 g
Cal (Presión larga) Inicia la calibración del peso o temperatura (vea la Sección 5. Mantenimiento)

ES-4 |
MB23 / MB25 |
Modo Modificar Temperatura / Hora (preparación de una prueba)
Modificación de temperatura: (50 a 160 °C en pasos de 5°)
Temp (Presión corta) Ingresa en el modo Modificar para ajustar la temperatura; el valor destellará. Ajustar (Presión corta o larga) Aumenta el valor del ajuste de temperatura.
Ajustar (Presión corta o larga) Disminuye valor del ajuste de temperatura.
Tara (Presión corta) Acepta el valor que estádestellando y regresa al modo Pesar. Iniciar (Presión corta) Sale del modo Modificar sin guardar los cambios.
Nota: Despué de 5 segundos de inactividad, el ajuste que destella se guarda automáticamente y el modo regresa a Pesar.
Modificación de la hora: (1 a 60 minutos en pasos de 30 segundos, 61 a 99 minutos en pasos de 1 minuto)
El parámetro de la hora puede fijarse en una duración de tiempo o en AUTOMÁTICO (la prueba finaliza cuando el analizador detecta que ha finalizado la pérdida de peso). Selección de AUTOMÁTICO o duración de tiempo:
Hora (Presión corta) Ingresa en el modo Modificar para ajustar la hora; el valor destellará.
Hora (Presión corta) Mientras el ajuste de hora destella, alterna entre AUTMÁTICO y un valor de tiempo. Tara Acepta el valor que estádestellando.
Si se seleccionóAUTOMÁTICO, ingresa en el modo Pesar. Si se seleccionóduración de tiempo:
Ajustar (Presión corta o larga) Aumenta el valor del ajuste de hora. Ajustar (Presión corta o larga) Disminuye el valor del ajuste de hora.
Tara (Presión corta) Acepta el valor que estádestellando y regresa al modo Pesar. Iniciar (Presión corta) Sale del modo Modificar sin guardar los cambios.
Nota: Despué de 5 segundos de inactividad, el ajuste que destella se guarda automáticamente y el modo regresa a Pesar.
Modo Ejecutar (realización de una prueba)
Se inicia una prueba de determinación de humedad. Se muestran los resultados en curso.
Iniciar (Presión corta) Activa el modo Ejecutar; inicia la prueba con una muestra mayor de 0.5 g. %g Cambia la unidad del resultado mostrado: peso (gramos) > % de humedad > % de sólidos. Detener (Presión corta) Detiene manualmente la prueba en curso.
Imprimir Envía el valor actual mostrado al puerto RS232.
Modo Resultado
Al final de la prueba (modo Ejecutar), la pantalla destella el resultado de la prueba.
%g Cambia la unidad del resultado mostrado: peso (gramos) > % de humedad > % de sólidos. Tara Sale del modo Pesar.
Imprimir Envía el valor actual mostrado al puerto RS232.
Cómo preparar una prueba
Las determinaciones de humedad pueden hacerse de manera muy simple. Los tres pasos son:
(1)Ajuste de la temperatura de secado (vea la Sección 3).
(2)Ajuste del tiempo de secado (vea la Sección 3).
(3)Preparación de la muestra a ser probada:
Coloque el manipulador de la bandeja con una bandeja de prueba vací en el soporte de la bandeja (vea la Sección 2).
Presione Tara para poner en cero el peso de la bandeja.
Retire la bandeja de prueba y coloque la muestra de prueba en la bandeja de prueba. La muestra debe ser mayor de 0.5 g.
Esparza la muestra uniformemente en la bandeja de prueba.
Coloque la bandeja de prueba con la muestra sobre el soporte de la bandeja. Se mostraráel valor del peso de la muestra.
Sección 4. Optimización de la prueba da sugerencias para determinar temperaturas y tiempos óptimos de secado, tamaños de muestras y preparación correcta de muestras.
Cómo realizar una prueba
(1)Cierre la tapa del calentador.
(2)Presione Iniciar para comenzar la prueba (presione Iniciar nuevamente para detener la prueba en curso).
(3)Cuando termine la prueba, la pantalla destellarápara mostrar el resultado final.
(4)Para cambiar las unidades mostradas, presione %g.
(5)Para imprimir el valor actual mostrado, presione Imprimir.
(6)Presione Tara para salir del modo Pesar.

MB23 / MB25 |
ES-5 |
Realización de una prueba de ensayo
Antes de la prueba real, puede realizar una prueba con estos ajustes sugeridos:
(1)Temperatura = 120
(2)Hora = AUTOMÁTICO
(3)Muestra = 3 g de agua. Coloque una almohadilla de fibra de vidrio (incluida con el analizador) sobre la bandeja de prueba y coloque ésta sobre el soporte. Presione Tara para poner en cero el peso de la bandeja. Agregue 3 g de agua a la almohadilla de fibra.
(4)Presione iniciar para comenzar la prueba. Un resultado ideal de la prueba de ensayo sería: 0 g, 100% de humedad o 0% de sólidos.
Los resultados pueden variar ligeramente debido a errores de pesaje involucrados con una muestra pequeña u otros errores experimentales. Vea también la Sección 4. Optimización de la prueba.
4. OPTIMIZACIÓN DE LA PRUEBA
La humedad se determina mediante la pérdida de peso de una muestra secada mediante calentamiento.
La velocidad y calidad del proceso de medición dependen de los siguientes parámetros. La experimentación también ayudará a determinar el ajuste óptimo de estos parámetros:
Temperatura de secado
Tiempo de secado
Peso de la muestra
Preparación de la muestra
Tipo de muestra
Temperatura de secado
La temperatura de secado ejerce una influencia controladora sobre el tiempo de secado (es decir, una temperatura baja puede prolongar el tiempo de secado innecesariamente).
Seleccione una temperatura de secado que no descomponga ni cambie la estructura química de la muestra.
Algunas muestras pueden emitir diferentes cantidades de humedad a diferentes temperaturas de secado. En esos casos, las desviaciones pueden compensarse al cambiar la temperatura de secado.
Tiempo de secado
El analizador tiene tres métodos para establecer el tiempo de secado.
Manual, en el que el usuario detiene la prueba en curso al presionar el botón Detener. La prueba debe durar más de 30 segundos para que sea válida.
Automático, el cual termina el proceso de secado cuando detecta una pérdida menor de 1 mg en 60 segundos. Para mantener el tiempo de secado corto, seleccione un peso de muestra pequeño que aún mantenga la precisión de medición requerida.
Duración de tiempo, en el que la prueba termina cuando transcurre el tiempo de secado preestablecido.
Peso de la muestra
El peso de la muestra influye en el tiempo de medición y repetibilidad de los resultados. Con mayores cantidades de muestras, más humedad debe evaporarse y el proceso dura más tiempo. Generalmente el peso de la muestra debe ser entre 3 g y 20 g. Las muestras de 3 g dan resultados más rápidos con un poco de sacrificio de la precisión. Las muestras de 20 g generalmente dan resultados más consistentes pero necesitan tiempos de prueba más largos.
Otra forma de determinar el peso de la muestra es con el uso de la relación entre el peso de la muestra y la repetibilidad, según se muestra en la tabla siguiente. Si se requieren resultados de repetibilidad mejores de ±0.3%, por ejemplo, la tabla indica que se necesitaráun peso de muestra de por lo menos 2 g.
Peso de la muestra |
Repetibilidad |
0.5 g |
±1.0% |
1 g |
±0.6% |
2 g |
±0.3% |
5 g |
±0.12% |
10 g |
±0.06% |
Preparación de la muestra
Las muestras siempre deben ser uniformes y representativas de la cantidad total para obtener resultados precisos y reproducibles. Cuando prepara muestras, es esencial asegurar la distribución delgada y uniforme de la muestra sobre la bandeja (es decir, evitar apilar y cantidades excesivas).
 Loading...