


INSTRUCTION MANUAL
AdventurerTM Balances
MANUAL DE INSTRUCCIONES
Balanzas AdventurerTM
MANUEL D’INSTRUCTIONS
Balances AdventurerTM
On |
|
|
|
||
Mode |
|
|
Off |
|
|
On |
|
|
On |
|
|
|
||
M |
ode |
|
Off |
||
|
||
On |
|

Ohaus Corporation, 19A Chapin Road, P.O. Box 2033, Pine Brook, NJ, 07058-2033, USA
Declaration of Conformity We, Ohaus Corporation, declare under our sole responsibility that the balance models listed below are in conformity with the directives and standards mentioned.
Declaración de Conformidad Nosotros, Ohaus Corporation, declaramos bajo responsabilidad exclusiva que los modelos de balanzas indicados a continuación - están conformes con las directivas y normas citadas.
Déclaration de conformité Nous, Ohaus Corporation, déclarons sous notre seule responsabilité, que les types de balance ci-dessous cité - sont conformes aux directives et aux normes mentionnées ci-après.
Model/Type Adventurer Series ARx (where AR is the series name abbreviation and x is any combination of alpha and numeric characters. Modelo/Tipo Adventurer Series ARx (donde AR es la abreviatura del nombre de serie y x es cualquier combinación de caracteres alfa-numéricos). Modèle/Type Série Adventurer ARx (avec AR représentant l’abréviation du nom de la série et x une combinaison de caractères alphanumériques).
|
|
|
|
|
|
|
EC Marking: |
EC Directive |
Applicable Standards |
|
|
|
Marcado EC |
Directiva EC |
Normas aplicables |
|
|
|
Marquage CE |
Directive CE |
Normes applicable |
|
|
|
|
|
|
|
|
|
|
73/23/EEC |
EN61010-1:2001 |
|
|
|
|
Low Voltage |
|
|
|
|
|
Baja tensión |
|
|
|
|
|
Basse tension |
|
|
|
|
|
|
|
|
|
|
|
89/336/EEC |
EN61326:1997 +A1:98 +A2:01 (class B) |
|
|
|
|
Electromagnetic compatibility |
EN61326:1997 +A1:98 +A2:01 |
|
|
|
|
Compatibilidad electromagnética |
(Minimal requirements) |
|
|
|
|
Compatibilité électromagnétique |
|
|
|
|
|
|
|
|
|
|
|
|
|
|
|
Date: March 11th, 2004 |
|
|
|
||
|
|
|
Urs Müller |
|
|
|
|
Ted Xia |
Urs Müller |
|
|
|
|
President |
General Manager |
|
|
|
|
Ohaus Corporation |
Ohaus Europe |
|
|
|
|
Pine Brook, NJ USA |
Greifensee, Switzerland |
|
|
i
Mark Standard
CAN/CSA-C22.2 No. 1010.1-92; UL Std. No. 3101-1
Safety requirements for Electrical Equip. for measurement, Control and Laboratory Use, Part 1; General Requirements
C US
AS/NZS4251.1, AS/NZS4252.1 Emission and Immunity
Note: This equipment has been tested and found to comply with the limits for a Class A digital device, pursuant to Part 15 of the FCC Rules. These limits are designed to provide reasonable protection against harmful interference when the equipment is operated in a commercial environment. This equipment generates, uses, and can radiate radio frequency energy and, if not installed and used in accordance with the instruction manual, may cause harmful interference to radio communications. Operation of this equipment in a residential area is likely to cause harmful interference in which case the user will be required to correct the interference at his own expense.
This Class A digital apparatus complies with Canadian ICES-003.
Cet appareil numérique de la classe A est conforme à la norme NMB-003 du Canada
ISO 9001 Registration
In 1994, Ohaus Corporation, USA, was awarded a certificate of registration to ISO 9001 by Bureau Veritus Quality International (BVQI), confirming that the Ohaus quality management system is compliant with the ISO 9001 standard’s requirements. On May 15, 2003, Ohaus Corporation, USA, was re-registered to the ISO 9001:2000 standard.
Registro ISO 9001
En 1994, Bureau Veritus Quality International (BVQI) le otorgó a Ohaus Corporation, EE.UU., un certificado de registro ISO 9001 el cual confirma que el sistema administrativo de calidad de Ohaus cumple con los requerimientos del estándar ISO 9001. En mayo 15 del 2003, Ohaus Corporation, EE.UU., fue registrada nuevamente al estándar ISO 9001:2000.
Enregistrement ISO 9001
En 1994, le Bureau Veritus Quality International (BVQI) a octroyé la certification d’enregistrement ISO 9001 à Ohaus Corporation, États-Unis d’Amérique, confirmant que le système de gestion de la qualité Ohaus était conforme aux conditions normalisées de l’ISO 9001. Le 15 mai 2003, Ohaus Corporation, États-Unis d’Amérique, a été ré-enregistrée à la norme ISO 9001:2000.
ii
INTRODUCTION
This manual covers installation, operation and troubleshooting for the OHAUS® AdventurerTM Balances. To ensure proper operation of your balance, please read this manual completely.
DESCRIPTION
The Ohaus AdventurerTM balances are precision weighing instruments, designed to provide years of service with virtually no maintenance. Models are available with capacities from 65 to 4100g. The 65g through 310g balances include a draft shield. Weigh below operation is made possible with a built-in weigh below hook.
The AdventurerTM balances are constructed with a durable housing, leveling feet, built-in leveling bubble, and a large custom LCD. Control buttons are clearly marked as to their function, with large Tare buttons located on either side of the front panel.
All AdventurerTM balances are initially factory set to measure in grams and can be set to measure in *kilograms, milligrams, carats, Newtons, pounds, ounces, troy ounces, grains, pennyweight, mommes, mesghals, Hong Kong Taels, Singapore Taels, Taiwan Taels, Ticals, and Parts Counting. Simple three button operation allows for the selection of measuring units, calibration and printing parameters. A standard RS232 interface permits communication to an external printer or computer.
*See specifications for measuring units which are available.
Power is supplied through an AC adapter. Accessories include: an in-use cover, security device, calibration masses, printer, and scoops. See accessory section.
Behind your instrument stands OHAUS Corporation, a leading manufacturer of precision weighing equipment. An Aftermarket Department with trained instrument technicians is dedicated to provide you with the fastest service possible in the event your instrument requires servicing. OHAUS Corporation also has a Customer Service Department to answer any inquiries regarding applications and accessories.
MENUS
AdventurerTM balances contain four display menus which enable you to select measuring units, calibrate the balance, turn on a tone signal which operates with each key stroke, and set up communication/print parameters.
•UNITS Menu - Allows up to 16 measuring units to be selected plus parts counting.
•LIN Calibration Menu - Allows the balance to be calibrated by using linearity calibration methods. Two masses are required.
•SYS Menu - Enables tone signal with each keystroke.
•PRINT Menu - Allows communication parameters to be set which include Baud rate, Parity, Data and Stop bits. A Reset function permits returning the communication parameters to factory settings.
•MENU END - When selected, balance returns to weigh mode.
UNPACKING
All AdventurerTM balances are supplied with a weighing platform, AC power adapter, built-in weigh below hook, instruction manual and warranty card. Draft shields are supplied with 65g through 310g balances.
Carefully unpack all items.
•Check the instrument for transport damage. Immediately inform your Ohaus dealer if you have complaints or if parts are missing.
•Store all parts of the packaging. This packaging guarantees the best possible protection for the transport of your instrument.
INSTALLATION Selecting the Location
The balance should be used indoors only and in an environment which is free from excessive air currents, corrosives, vibration, and temperature or humidity extremes (Max. 85%). Maximum altitude not to exceed 4000 m above sea level. These factors will affect displayed weight readings.
DO NOT install the balance:
•Next to open windows or doors causing drafts or rapid temperature changes.
•Near air conditioning or heater vents.
•Near vibrating, rotating or reciprocating equipment.
•Near magnetic fields or equipment that generates magnetic fields.
•On an unlevel or unstable work surface.
NOTE: Manufacturer cannot guarantee the safety of the product if it is not used according to the instructions.
Setting Up and Leveling the Balance
Exact horizontal positioning and stable installation are prerequisites for repeatable results. To compensate for small irregularities or inclinations at the location, the instrument can be leveled.
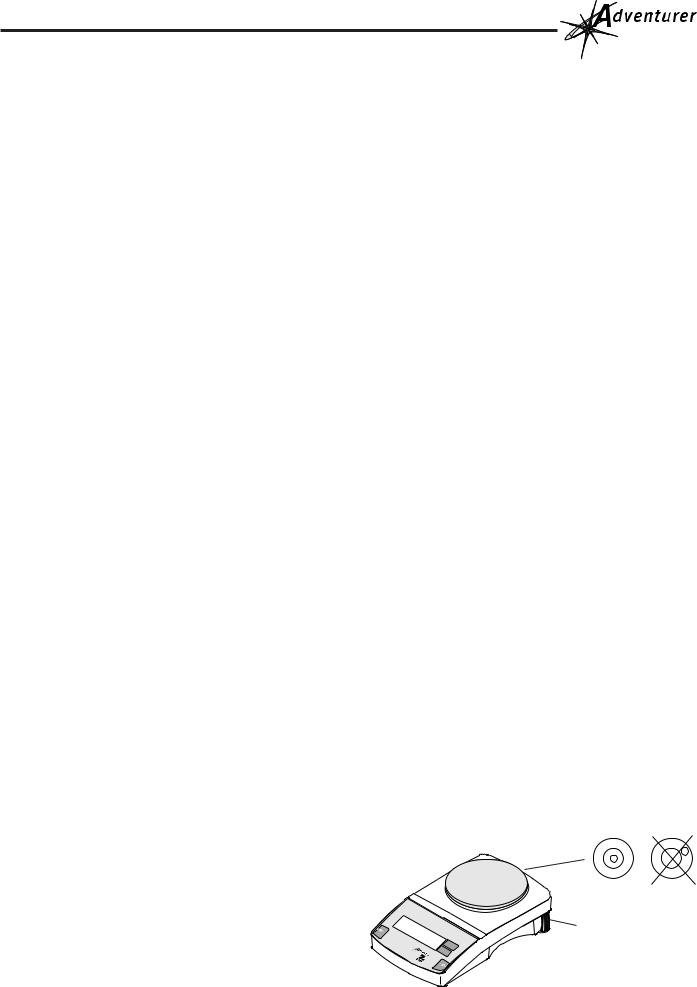
For exact horizontal positioning, the balance is equipped with a level indicator and two leveling feet located at the rear of the balance.
Position the balance in the intended operating location. Adjust the leveling feet at the rear of the balance until the air bubble in the indicator is centered.
NOTE: The instrument should be leveled each time its location is changed.
|
BUBBLE LEVEL |
On |
LEVELING FEET (2) |
|
|
|
M |
|
Off ode |
|
On |
1

Connecting Power
NOTICE:
The socket/outlet must be installed near the equip ment and shall be easily accessible. For use with an certified (CSA or equivalent) power supply, which
must have a limited and SELV circuit output.
Connect the AC Adapter cord to the connector located at the rear of the balance and to a suitable power source.
Pan Installation
Place the pan support and pan on the balance. The balance is now ready for operation. Balances with a draft shield do not have a pan support.
Weigh Below Hook
For below balance weighing applications (eg. density determination), a weigh below hook is installed at the bottom of the balance and is part of the balance. To use, remove the protective plug cover located at the bottom of the balance. The balance should then be supported on an elevated level surface which allows access to the weigh below hook. The balance should be releveled. Measurements are made by the use of a fine wire attached to the internal weigh below hook.
CAUTION:
Do not attempt to remove the weigh below hook from the balance as the balance may be damaged.
Security Bracket
A security bracket which is cast in the lower housing is provided at the rear of the balance under the leveling bubble. This bracket allows the balance to be secured by an optional cable and lock accessory.
OPERATION
Turning the Balance ON
Press >O/T<, all segments will appear briefly followed by a software revision number (when plugged in first time) or after a power interruption and then * 0.00g. Allow 20 minutes warm-up time. When the balance is first turned on, it can be used to weigh in grams or tare items without setting the menus.
Not used
Stability Indicator
Turning the Balance OFF
To turn the balance OFF, press and hold Mode Off until the display indicates OFF then release.
Weighing
With the balance turned ON, it is ready to weigh in grams.
1.If other measuring units are desired, refer to Menu Section for setup procedure.
2.If it is necessary to rezero the display, momentarily press
>O/T<.
3.Place item(s) to be weighed on the pan and read the weight
on the display. The stability indicator * appears when the reading is stable.
Taring
When weighing items that must be held in a container, taring subtracts the container's weight from the total weight on the pan.
1.With an empty container on the pan, press >O/T< to zero the display.
2.As material is added to the container, the net weight is displayed. Tared weight remains in balance memory until >O/T< is pressed again.
MENU
The setup menu permits you to activate available weighing units, parts counting, linearity calibration, keystroke tone and print parameters. To enter the menu, the balance must first be turned off. Press and hold the>O/T< until MENU is displayed then release. To advance through the menus, press Mode Off. To enter a selected menu, press >O/T<. After you make selections in any menu, you may continue to make additional changes in other menus before exiting and saving. To exit a menu and return to weigh mode without saving settings, press and hold Mode Off until full display appears, then release.
NOTE: Selecting END in the UNITS, SYS and PRINT menus will save the settings for each menu.
MENU
UNITS - g, kg, mg, ct, N, lb, oz, ozt, GN, dwt, mo, m, Hong Kong taels, Singapore taels, Tai wan taels, cL, and PCS. - Set each to ON
or OFF. NOTE: Only one Tael may be on at
a time. See specifications table for available units.
LIN - Performs linearity calibration.
SYS - Permits setting tone ON or OFF, with each keystroke.
PRINT - Permits setting communication and print parameters.
MENU - Exit menu and return to weigh mode.
END
Activating Units and Parts Counting (PCS)
1.With the balance OFF, press and hold >O/T< until MENU is displayed, then release, UNITS is displayed.
2.Press >O/T<, On g is displayed. To turn this unit of measure ON or OFF, press Mode Off to select ON or OFF condition.
3.To advance through all of the measuring units including parts counting and to set each ON or OFF, press >O/T< to advance to next unit then press Mode Off to select ON or OFF. You must continue until END appears. NOTE: Only one Tael can be activated at a time.
4.When END is displayed, press >O/T< to store unit selections.
5.To exit the menu, repeatedly press Mode Off until MENU END is displayed, then press >O/T<. Balance returns to a weighing mode.
2

Setting Tone Signal On or Off
1.With the balance OFF, press and hold >O/T< until MENU is displayed, release it and UNITS is displayed.
2.Press Mode Off until SYS is displayed.
3.Press >O/T<, BEEP ON is displayed.
4 Press Mode Off to select ON or OFF.
5.To store, press >O/T<, END is displayed, then press >O/T<.
6.To exit the menu, press Mode Off until MENU END is displayed, then press >O/T<. Balance returns to a weighing mode.
Resetting Communication and Printing Parameters to Factory Defaults
Factory defaults are: Baud Rate= 2400, Parity = No, Data = 7, Stop Bit = 2, Stbl = ON, Auto = OFF.
1.With the balance OFF, press and hold >O/T< until MENU is displayed, release it and UNITS is displayed.
2.Press Mode Off repeatedly until PRINT is displayed.
3.Press >O/T<, RESET n is displayed (n=no). Select y=yes by pressing Mode Off.
4.Repeately press >O/T< until MENU END is displayed, then press >O/T<. The balance displays all of the communication settings as you advance through the menu. Balance returns to a weighing mode.
Setting Communication and Print Parameters
Bolded setting shown below are the factory settings.
1.To enter the Print Menu, with the balance OFF, press and hold >O/T< until MENU is displayed, release it and UNITS is displayed.
2.Press Mode Off repeatedly until PRINT is displayed.
Setting Baud Rate
Press >O/T<, until bd 2400 is displayed. Using the Mode Off button, you can select baud rates of 600, 1200, 2400, 4800 or 9600. Once you have selected the proper baud rate for your system, press >O/T<, the display advances to PAR no (parity).
Setting Parity
Repeatedly press Mode Off, to select either no, odd or E for even. Once the desired parameter is selected, press >O/T<, the display advances to DATA 7.
Setting Data
Pressing the Mode Off button allows the selection of DATA 7 or DATA 8. Once the desired parameter is selected, press >O/T<, the display advances to STOP 2.
Setting Stop Bit
Pressing Mode Off, you can select STOP 1 or 2. Press >O/T<, the display advances to STBL ON.
Setting Print Modes
The AdventurerTM balance offers a choice of manually printing only stable or all data (STBL ON/OFF) at any time by pressing the Print button or printing stable readings automatically (AUTO ON/OFF). The default setting for automatic stable readings is OFF. Only one of these may be set on at a time.
Stable Data On or Off
When STBL ON is displayed, press Mode Off to select ON or OFF, then press >O/T< , AUTO OFF is displayed.
Auto Print On or Off
With Auto Print ON, the balance automatically prints stable data when the display changes by at least five counts. Press Mode Off and select ON or OFF, then press >O/T<, END is displayed. To save settings, press >O/T<. MENU END is displayed. Press >O/T< to return to weigh mode.
Parts Counting
To use Parts Counting, it must first be activated in the Menu. Refer to Menu section to activate parts counting. The balance will count parts based on the weight of a reference sample of 5, 10, 20, 50 or 100 parts. For optimum results, the parts should be uniform in weight.
1.Place a container on the pan and press >O/T< to tare it.
2.With the balance ON, press and hold >O/T< until SEt PCS is displayed, then release it. The display shows SEt XX, where XX is the last used counting sample. To change the sample size, repeatedly press Mode Off and stop at the desired sample number. Choices are 5, 10, 20, 50 or 100 pieces.
3.Add the selected number of parts to the container, then press >O/T<. The display shows the number of parts added.
4.Add parts as desired and read the quantity on the display.
5.To read the weight of the parts, press Mode Off to change to any of the activated weighing units. You can return to parts counting at any time by repeatedly pressing Mode Off until the parts counting indicator is displayed. Sample weight is retained as long as the balance remains plugged in or you change it by the procedure above.
6.To exit to weighing mode, press Mode Off until desired unit is displayed. Press >O/T< to tare the balance.
CALIBRATION
AdventurerTM balances are calibrated before shipment, however, calibration can be affected by changes in location, temperature, or rough handling. AdventurerTM balances can be calibrated in two ways: Span calibration or Linearity calibration. Span calibration resets the balance's weighing range using two weight values: zero and a weight value at or near the balance's capacity. Linearity calibration minimizes deviation between actual and displayed weights within the balance's weighing range. Three weight values are used: zero, a weight value within the balance's weighing range and a weight value at or near the balance's specified capacity.
3
CALIBRATION (Cont.)
Calibration Masses
Before beginning calibration, make sure masses are available. If you begin calibration and realize calibration masses are not available, exit the exit the procedure by pressing and holding Mode Off until balance returns to weigh mode. The balance will retain previously stored calibration data. Calibration should be performed as necessary to ensure accurate weighing. Masses required to perform the procedures are listed in the following
table.
CALIBRATION MASSES
|
LINEARITY |
SPAN ONLY |
CAPACITY |
MASSES |
MASSES |
65g |
20g/50g |
50g |
110g |
50g/100g |
100g |
150g |
100g/150g |
150g |
210g |
100g/200g |
200g |
310g |
100g/300g |
300g |
510g |
300g/500g |
500g |
1500g |
500g/1500g |
1500g |
3100g |
1000g/3000g |
3000g |
4100g |
2000g/4000g |
4000g |
Masses must meet or exceed ASTM Class 1 Tolerance. Calibration masses are available as accessories.
Span Calibration
1.With the balance turned ON, press and hold >O/T< until CAL is displayed.
2.Release >O/T< , -C- is momentarily displayed followed by the value of the calibration mass which is to be placed on the pan.
Do not disturb the balance when -C- is displayed. Incorrect calibration may result.
3.Place the indicated span calibration mass on the pan.
4.Press >O/T<, -C- is momentarily displayed, then the weight of the mass on the pan is displayed.
5.Remove the calibration mass from the pan. The balance is now calibrated and returns to the weighing mode.
Linearity Calibration
1.With the balance OFF, press and hold >O/T< until MENU is displayed, then release it and UNITS is displayed. Press Mode Off, LIN is displayed.
2.Press >O/T<, -C- is displayed followed by the value of the first mass which must be placed on the pan.
3.Place the required mass on the pan and momentarily press >O/T<, -C- is displayed followed by the value of the next mass to be placed on the pan.
Do not disturb the balance while -C- is displayed.
4.Place the second required mass on the pan and momentarily press >O/T<, -C- is displayed. When the weight on the pan is displayed with the stability indicator, the balance is calibrated and returns to the weighing mode.
5.Remove the calibration masses from the pan.
CARE AND MAINTENANCE
To keep the balance operating properly, keep the housing and platform clean. If necessary, a cloth dampened with a mild detergent may be used. Keep calibration masses in a safe dry place.
RS232 COMMAND DATA TABLE
Command |
|
Character |
Description |
|
|
P |
Print command |
T |
Tare command |
? |
Displays current mode |
XS |
X=0 (zero) Stable off |
XS |
X=S Stable on (default setting in balance) |
XS |
X=A Auto print on stabilty |
|
|
NOTE: Print commands entered through the computer are temporary. When the balance is turned off, it will return to balance menu settings when turned on again.
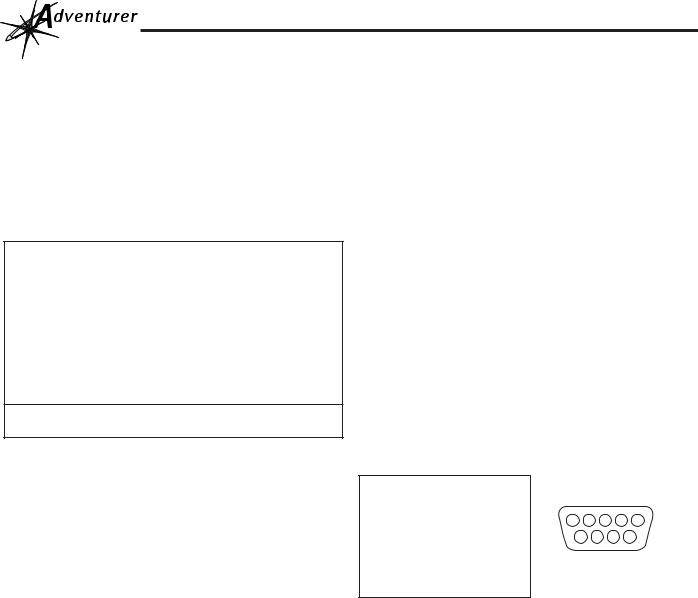
1 |
N/C |
|
|
|
|
2 |
Data Out (TXD) |
|
|
|
|
3 |
Data In (RXD) |
1 |
2 3 |
4 |
5 |
4 |
N/C |
||||
5 |
Connected to pin 8 |
6 |
7 |
8 |
9 |
6 |
N/C |
|
|
|
|
7 |
Ground |
|
|
|
|
8 |
Connected to pin 5 |
|
|
|
|
9 |
N/C |
|
|
|
|
TROUBLESHOOTING
SYMPTOM |
|
PROBABLE CAUSE |
REMEDY |
||
|
|
|
|
||
No Display. |
|
Power Adapter not |
Connect AC Adapter. |
||
|
|
|
connected. |
|
|
|
|
|
|||
Incorrect weight |
Balance out of cali- |
Calibrate the bal- |
|||
reading. |
|
bration. |
|
ance. |
|
|
|
|
Balance |
was not |
Press >O/T< with no |
|
|
|
rezeroed |
before |
weight on the pan, |
|
|
|
weighing. |
|
then weigh item. |
|
|
|
|||
Calibration proce- |
Incorrect calibration |
Use correct masses. |
|||
dure |
does |
not |
masses being used. |
|
|
work. |
|
|
|
|
|
|
|
|
|||
Unable to display |
Weighing unit not ac- |
Use Units menu to |
|||
weight in a particu- |
tivated in menu. |
set desired units ON |
|||
lar weighing unit. |
|
|
(see menu). |
||
|
|
|
|
||
Balance |
won't |
END selection was |
You must use END to |
||
store |
selections |
not used |
to exit |
exit each menu and |
|
made in menu. |
menu. |
|
save selections. |
||
|
|
|
|
|
|
4
 Loading...