


All products are trademarks of Nostalgia Products Group, LLC. Worldwide design & utility patented or patents pending.
© 2010 Nostalgia Products Group, LLC.
www.nostalgiaelectrics.com
(rev. 05/25/10)

CCP200
Vintage Collection™
Old Fashioned Movie Time Popcorn Cart
Instructions and Recipes Instructions et Recettes Instrucciones y Recetas


CONTENTS
IMPORTANT PRECAUTIONS . |
|
|
|
|
|
3 |
IMPORTANT SAFEGUARDS . . . . |
. |
. . |
. . |
. . |
. |
3 |
INTRODUCTION . . . . . . . . |
. |
. . |
. |
|
|
4 |
PARTS & ASSEMBLY . . . . . . . |
. |
. . |
. . |
|
|
5 |
HOW TO OPERATE . . . . . . . |
. . |
. . |
. |
|
10 |
|
HELPFUL TIPS . . . . . . . . . |
. |
. . |
|
|
11 |
|
CLEANING & MAINTENANCE . . . |
. . |
. . |
. . |
. . |
. 11 |
|
RECIPES . . . . . . . . . . . |
. |
|
|
|
12 |
|
RETURNS & WARRANTY . . . . . |
. . |
. . |
. . |
. |
14 |
|
SAFETY
Your safety and the safety of others are very important.
We have provided many important safety messages in this manual and on your appliance. Always read and obey all safety messages.
This is the safety alert symbol.
This symbol alerts you to potential hazards that can kill or hurt you and others.
All safety messages will follow the safety alert symbol.
All safety messages will tell you what the potential hazard is, tell you how to reduce the chance of injury, and tell you what can happen if the instructions are not followed.
ENGLISH
Appliance Specifications:
120 Volts, 60 Hz
325 Watts, 2.71 Amps
2

|
|
IMPORTANT PRECAUTIONS |
ENGLISH |
|
|
4. |
NEVER use a scouring pad on the appliance. |
|
|
1. |
NEVER immerse in water. |
|
2. |
NEVER use near water. |
|
3. |
NEVER use an abrasive sponge nor cloth. |
|
5. |
NEVER leave appliance unattended while in use. |
|
6. |
NEVER force Kettle in or out of the brackets as this may cause gears |
|
||
|
|
to become misaligned and appliance will not operate properly. |
|
7. |
Unplug unit from outlet when not in use and during cleaning. |
|
8. |
DO NOT operate this appliance with a damaged cord or |
|
|
plug, nor if the appliance ever malfunctions. |
|
9. |
DO NOT clean any parts of this appliance in a dishwasher. |
|
10. |
Keep out of reach of children. |
|
11. |
This appliance is NOT A TOY. |
|
12. |
Unsupervised young children and cognitively challenged |
|
|
individuals should never operate this appliance. |
|
13. |
Young children should be supervised while in proximity of the |
|
|
appliance to ensure that they do not play with it. |
|
|
IMPORTANT SAFEGUARDS |
|
Basic safety precautions should always be followed when |
|
|
using electrical appliances, including the following: |
|
|
1. |
Read all instructions before operating this appliance. |
|
2. |
Keep door of Main Unit closed while operating. Do not |
|
|
touch Kettle while operating; it gets very HOT. |
|
3. |
To protect against electrical shock do not immerse cord, plug |
|
|
or any part of this appliance in water or other liquids. |
|
4. |
Close supervision is necessary when any appliance is used near children. |
|
5. |
Unplug from outlet when not in use, before removing parts and before cleaning. |
|
6. |
DO NOT operate any appliance with a damaged cord or plug, |
|
|
nor if the appliance has been damaged in any manner. Return the |
|
|
appliance to the nearest repair shop for examination or repair. |
|
7. |
The manufacturer does not recommend the use of accessory |
|
|
attachments. Use of accessory attachments may cause injuries. |
|
8. |
DO NOT use outdoors. |
|
9. |
Position the appliance as close to the outlet as possible |
|
|
to prevent injury due to tripping over cord. |
|
10. |
DO NOT leave Kettle motor running once popping has ceased. |
3

11. |
Extreme caution must be used when moving this appliance. |
|
|
||
12. |
DO NOT use the appliance for other than its intended use. |
ENGLISH |
15. |
Make sure the Kettle is properly attached to brackets before |
|
13. |
An appliance that is plugged into an outlet should |
|
|
not be left unattended while in operation. |
|
14. |
Check Kettle for presence of foreign objects prior to use. |
|
|
operating and that the motor plug is plugged into the Kettle. |
|
16. |
A short power supply cord is provided to reduce the risk resulting |
|
|
from becoming entangled or tripping over a long cord. |
|
17. |
Longer detachable power supply cords can be used if care is exercised in their use. |
|
18. |
The marked electrical rating of an extension cord should be at |
|
|
least as great as the electrical rating of the appliance. |
|
19. |
This appliance has a polarized plug (one blade is wider than |
|
|
the other). To reduce the risk of electrical shock, this plug is |
|
|
intended to fit into a polarized outlet only one way. |
|
20. |
Save these instructions! |
|
INTRODUCTION
Thank you for purchasing the OLD FASHIONED MOVIE TIME POPCORN CART, a product in Nostalgia Electrics’ Vintage Collection™. This 48” tall vendor-style popcorn cart will be the hit of every party. It pops up to eight cups of hot, fresh, kettle cooked popcorn per batch. Providing a vintage look and feel, reminiscent of silent movie houses and carnivals circa-early 1900s, the OLD FASHIONED MOVIE TIME POPCORN CART is designed for home use. It features a large, stainless steel kettle with a built-in stirring system and kernel catcher to
keep unpopped kernels out of each perfect batch. There is a compartment in the base of the unit to store supplies, making it easy to keep the cart well
stocked and organized. The OLD FASHIONED MOVIE TIME POPCORN CART has an easy-to-clean design. Its accessible height makes serving a snap.
4
ENGLISH
PARTS & ASSEMBLY
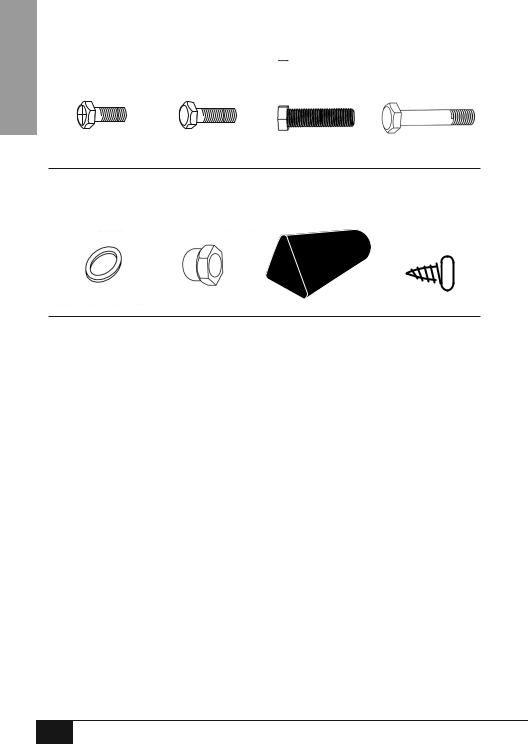
Hardware
#1 Screw (10mm) |
#2 Bolt (10mm) |
#3 Bolt (20mm) |
#4 Bolt (65mm) |
Qty. 4 |
Qty. 6 |
Qty. 4 |
Qty. 4 |
#5 Flat Washer |
#6 Nut Cap |
#7 Kernel Tray Handle |
#8 Kernel Tray |
Qty. 8 |
Qty. 6 |
Qty. 1 |
Handle Screw |
|
|
|
Qty. 1 |
5
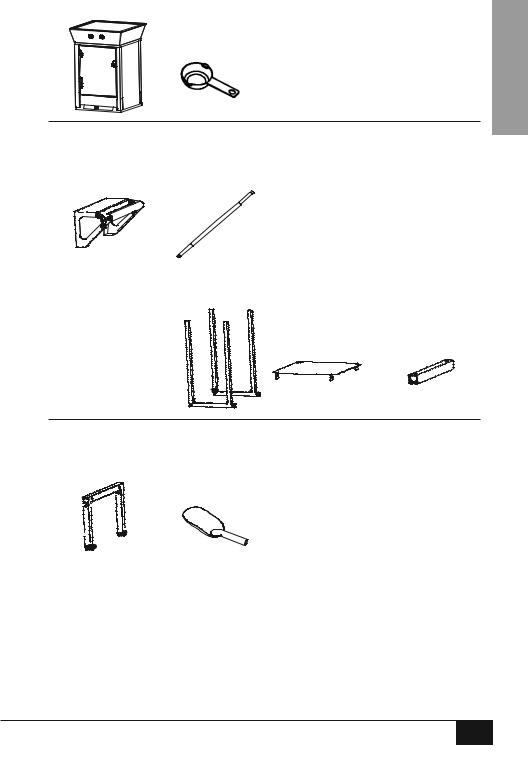
Parts
ENGLISH
(A) Main Unit |
(B) Kernel Measuring |
(C) Storage |
(D) Oil Measuring |
|||||
|
|
|
|
|
|
Cup (2 ounces) |
Compartment |
Spoon (1 Tbsp.) |
|
|
|
|
|
|
|
|
|
|
|
|
|
|
|
|
|
|
|
|
|
|
|
|
|
|
|
|
|
|
|
|
|
|
|
|
|
|
|
|
|
|
|
|
|
|
|
|
|
|
|
|
|
|
(E) Push Handle |
(F) Axle Rod |
(G) Wheel |
(H1) Wrench |
(H2) Wrench |
(I) Base Support |
(J) Bottom Plate |
(K) Cross Bar |
|||||||||
|
|
|
|
|
|
|
|
|
|
|
|
|
|
|
|
|
|
|
|
|
|
|
|
|
|
|
|
|
|
|
|
|
|
|
|
|
|
|
|
|
|
|
|
|
|
|
|
|
|
|
|
|
|
|
|
|
|
|
|
|
|
|
|
|
|
|
|
|
|
|
|
|
|
|
|
|
|
|
|
|
|
|
|
|
|
|
|
|
|
|
(L) Leg Assembly (M) Popcorn Scoop
6

|
Assembly of Base Support |
|
ENGLISH |
1. |
Attach Push Handle (E) from inside Storage |
|
Compartment (C) using supplied #1 Screws. |
|
|
|
|
|
2. |
Insert Cross Bar (K) into the square inserts on the inside of Base Support (I) |
|
|
and secure from above with two #2 Bolts. Insert the Leg Assembly (L) over |
|
|
the protruding ends of the Base Support (I) and fasten from the inside of Base |
|
|
Support (I) using four #4 Bolts, four #5 Flat Washers, and four #6 Nut Caps. |
3.Secure Bottom Plate (J) to Base Support (I) using four #2 Bolts.
4.Assemble Base Support (I) into the bottom of the Storage Compartment (C) and secure with four #3 Bolts.
7
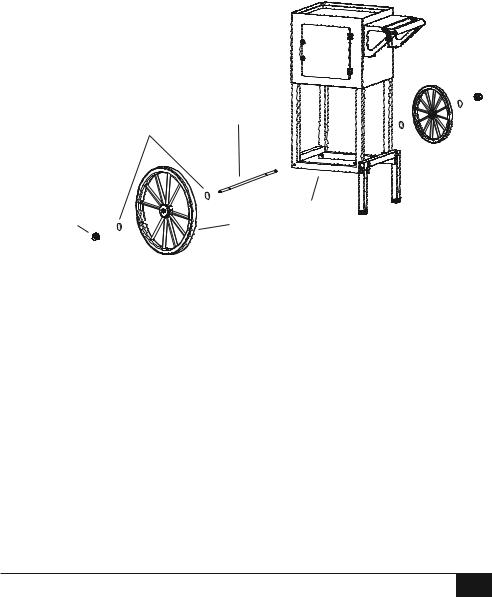
Assembly of Wheels |
|
|
|
||
1. |
Insert Axle Rod (F) into Base Support (I). |
ENGLISH |
|
While holding Axle Rod (F) in place, tighten the #6 Nut Cap with Wrench (H1). |
|
2. |
Put on #5 Flat Washer. Slide Wheel (G) into Axle Rod (F) |
|
|
and add a second #5 Flat Washer. |
|
3. |
Use the end of Wrench (H2) with small notch to hold the Axle Rod notch in place. |
|
4. |
Add #5 Flat Washer, second Wheel (G), another #5 Flat Washer, and #6 Nut |
|
|
Cap to the other side of the Axle Rod (F), following the directions above. |
|
(#5) |
(F) |
Axle |
|
Flat |
Rod |
Washer |
|
(#6) |
|
|
|
Nut |
|
(I) |
|
Cap |
|
||
(G) |
Base |
||
|
|||
|
Wheel |
Support |
8
ENGLISH
Assembly of Main Unit
ON / OFF &
Light Switches
Crank Handle
 Stainless Steel Kettle
 Kernel Tray
1.Remove Power Cord from underneath Main Unit (A).
2.Place Main Unit (A) onto the top of the Storage Compartment (C).
3.Ensure that the two inserting pins at the bottom of the Main Unit (A) line up correctly so that Main Unit (A) can be locked under the beam of the Storage Compartment (C).
4.Remove Kernel Tray from Main Unit (A) and turn right side up. Attach #7 Kernel Tray Handle with #8 Kernel Tray Screw and correctly place inside Main Unit (A).
Cord Location
Cord is located at the bottom of the Main Unit (A).
9

HOW TO OPERATE
Before first use, clean the inside of the unit by wiping with a moist, non-abrasive sponge, towel or cloth and then wipe with a nonabrasive dry towel. Wipe down the inside of the Kettle and be sure it is properly placed in the brackets before starting.
1.First, find a flat surface near an electrical outlet before starting. Make sure your cord is away from any water source. It is acceptable to use an extension cord if needed.
2.Gather your popcorn making supplies: popcorn, seasonings, bowls or bags for holding the popcorn, cooking oil, Kernel Measuring Cup (B) and Oil Measuring Spoon (D). (Kernel Measuring Cup and Oil Measuring Spoon are included with your unit).
3.Plug in the appliance while switch is flipped to OFF position.
4.Make sure Kettle is properly secured in support brackets.
5.Make sure Kettle motor is plugged in.
6.Turn appliance ON by flipping the switch on the top of the machine (see illustration above for location of switches). Allow the appliance to run 3-5 minutes to heat up Kettle.
7.Turn unit OFF.
8.Use the Oil Measuring Spoon supplied with your OLD FASHIONED MOVIE TIME POPCORN CART to add 1 tablespoon of your favorite popcorn cooking oil to the Kettle. For best popping results, it is suggested to use light vegetable oil.
9.Add popcorn kernels to the Kettle using supplied Kernel Measuring Cup (B).
10.Turn the unit ON and close the door. In no time at all, you will hear the popping begin. Fresh, hot popcorn will begin to burst out of the flip lids on the Kettle - just like at the theater!
ENGLISH
10

ENGLISH
HELPFUL TIPS
SMOKING
If your OLD FASHIONED MOVIE TIME POPCORN CART begins to smoke during cooking, it may be due to grease build up. In order to reduce smoking, make sure that you clean the inside of the Kettle between uses.
CLEANING & MAINTENANCE
1.Make sure appliance is unplugged before cleaning. Unplug the outer plug to the outlet as well as the Kettle motor plug inside the Main Unit (A).
2.Use slightly damp, non-abrasive sponge, towel or cloth to wipe down the inside and outside of Main Unit (A), then wipe with a non-abrasive towel to dry.
3.Unplug Kettle motor and remove Kettle from support brackets.
4.Take Kettle out of the Main Unit (A). After removing Kettle from Main Unit (A), fill ²/3 of Kettle with hot, soapy water.
5.Let the Kettle sit for 15 – 20 minutes to cut the grease. (time may vary – use your own judgment depending on the amount of cleaning necessary)
6.Empty water. If necessary, use the scrubber side of a cleaning sponge to scrub inside of Kettle.
7.Rinse inside carefully and dry.
8.Wipe outside of Kettle with damp cloth and dry.
NOTE: To protect the motor plug from getting wet, never immerse the Kettle in any liquid. Never place any parts in the dishwasher. Always wash by hand.
11

RECIPES
The OLD FASHIONED MOVIE TIME POPCORN CART makes hot, fresh, theater style popcorn every time – anytime!
Enjoy your freshly popped corn in a variety of ways:
•Regular theater style popcorn – add butter and salt.
•Add a pinch of sugar and salt to popcorn for a sweet kettle corn taste.
•Flavored popcorn – add seasoning from any gourmet popcorn seasoning kit.
•Try some of these fun recipes:
1 Gallon = 16 Cups
PARMESEAN POPCORN
•1 Gallon of Popped Corn
•1 Tsp Garlic Powder
•3 Green Onions, finely chopped
•½ Tsp Cracked Pepper
•1 Tsp Sea Salt
•1 Cup Parmesean Cheese, grated (more or less
to taste)
•3 Tbsps Olive Oil, heated
Pop corn kernels using the OLD FASHIONED MOVIE TIME POPCORN CART as directed on page 10.
Combine garlic powder, green onions, cracked pepper, sea salt and parmesean cheese. Set aside.
In a large mixing bowl, drizzle hot olive oil over popcorn.
Toss until well coated.
Slowly add in dry ingredients while continuously strirring popcorn until well coated.
You may also shake the dry ingredients over popcorn in a large paper or muslin bag.
TRADITIONAL POPCORN BALLS
•½ Cup Popcorn
•½ Cup Corn Syrup
•½ Cup Granulated Sugar
•½ Teaspoon Salt
•1 Stick of Butter, softened
Pop corn kernels using the OLD FASHIONED MOVIE TIME POPCORN CART as directed on page 10.
Mix corn syrup, sugar and salt together in pot and dissolve over medium heat for about 3 minutes.
Add popcorn to pot, stirring and tossing consistently until popcorn is evenly coated at low heat.
Remove from heat.
Use softened butter to form balls while popcorn mixture is still warm.
Wrap individual balls in plastic wrap, tie and store at room temperature.
ENGLISH
12
 Loading...