


Foreword
Welcome to the growing family of new NISSAN owners. This vehicle has been delivered to you with confidence. It has been produced using the latest techniques and strict quality control.
This manual was prepared to help you understand the operation and maintenance of your vehicle so that you may enjoy many kilometres (miles) of driving pleasure. Please read through this manual before operating your vehicle.
A separate Warranty Information & Maintenance Booklet explains in detail the warranty coverage that applies to your vehicle.
Your NISSAN dealer knows your vehicle best. When you require any service or have any questions, your NISSAN dealer will be glad to assist you with the extensive resources available for you.
IMPORTANT SAFETY INFORMATION
REMINDERS FOR SAFETY!
Follow these important driving rules to help ensure a safe and complete trip for you and your passengers!
•NEVER drive under the influence of alcohol or drugs.
•ALWAYS observe posted speed limits and never drive too fast for conditions.
•ALWAYS use your seat belts and appropriate child restraint systems. Preteen children should be seated in the rear seat.
•ALWAYS provide information about the proper use of vehicle safety features to all occupants of the vehicle.
•ALWAYS review this Owner’s Manual for important safety information.
WHEN READING THE MANUAL
This manual includes information for all options available on this model. Therefore, you may find some information that does not apply to your vehicle.
All information, specifications and illustrations in this manual are those in effect at the time of printing. NISSAN reserves the right to change specifications or designs at any time without notice and without obligation.
MODIFICATION OF YOUR VEHICLE
This vehicle should not be modified. Modifications could affect its performance, safety or durability, and may even violate governmental regulations. In addition, damage or performance problems resulting from modifications may not be covered under NISSAN warranties.
READ FIRST — THEN DRIVE SAFELY
Before driving your vehicle, read this Owner’s Manual carefully. This will ensure familiarity with controls and maintenance requirements, assisting you in the safe operation of your vehicle.
Throughout this manual the following symbols and words are used:
WARNING
Indicates the presence of a hazard that could cause death or serious personal injury. To avoid or reduce the risk, the procedures described must be followed precisely.
CAUTION
Indicates the presence of a hazard that could cause minor or moderate personal injury, or damage to your vehicle. To avoid or reduce the risk, the procedures described must be followed carefully.
NOTE
Indicates additional helpful information.
Downloaded from www.Manualslib.com manuals search engine

ON-PAVEMENT AND OFF-ROAD DRIVING (4WD models)
This vehicle will handle and manoeuvre differently from an ordinary passenger vehicle, because it has a higher centre of gravity for off-road use. As with other vehicles with features of this type, failure to operate this vehicle correctly may result in loss of control or an accident.
Be sure to read “On-pavement and off-road driving precautions” and “Fourwheel drive (4WD)” in the “5. Starting and driving” section of this manual.
The NISSAN GREEN PROGRAM symbol indicates environmentally friendly information and best practices.
This symbol means “Do not do this” or “Do not let this happen”.
Arrows in an illustration that are similar to these point to the front of the vehicle.
Arrows in an illustration that are similar to these indicate movement or action.
Arrows in an illustration that are similar to these call attention to an item in the illustration.
BATTERY DISPOSAL
CAUTION
An improperly disposed battery can harm the environment. Always confirm local regulations for battery disposal.
Examples of the batteries that the vehicle contains:
•Vehicle battery
•Remote controller battery (for Intelligent Key and/or Remote keyless entry system)
•Tyre Pressure Monitoring System (TPMS) sensor battery
•Remote controller battery (for Mobile Entertainment system)
If in doubt, contact your local authority, or a NISSAN dealer, or a qualified workshop for advice on disposal.
Downloaded from www.Manualslib.com manuals search engine
Bluetooth® is a trademark owned by Bluetooth SIG, Inc.
iPod® is a trademark of Apple Inc.
Downloaded from www.Manualslib.com manuals search engine
Contents
Illustrated table of contents
Safety — seats, seat belts and supplemental restraint system
Instruments and controls
Pre-driving checks and adjustments
Display screen, heater and air conditioner, and audio system
Starting and driving
In case of emergency
Appearance and care
Maintenance and do-it-yourself
Technical information
Index
0
1
2
3
4
5
6
7
8
9
10
Downloaded from www.Manualslib.com manuals search engine

Downloaded from www.Manualslib.com manuals search engine

0 Illustrated table of contents
Air bag system......................................................... |
0-2 |
Exterior front and rear .............................................. |
0-3 |
Instrument and control layout ................................... |
0-4 |
Left (LHD) and Right-hand drive (RHD) |
|
models ............................................................... |
0-5 |
Meters and gauges .................................................. |
0-6 |
Engine compartment................................................ |
0-7 |
HR16DE engine (Type A) ................................... |
0-8 |
HR16DE engine (Type B) ................................... |
0-8 |
MR20DE engine ................................................. |
0-9 |
Euro 4 K9K engine ............................................. |
0-11 |
Euro 5 K9K engine ............................................. |
0-11 |
M9R engine........................................................ |
0-12 |
R9M engine........................................................ |
0-13 |
Downloaded from www.Manualslib.com manuals search engine
AIR BAG SYSTEM
NPA986
1.Pre-tensioner seat belt retractors (P. 1-12)
2.Side air bag modules (P. 1-14)
3.Curtain air bag modules (P.1-14)
4.Driver air bag module (P. 1-14)
5.Front passenger air bag module (P. 1-16)
6.Front passenger air bag deactivate switch (P. 1-17)
7.Diagnosis sensor unit
0-2 Illustrated table of contents
Downloaded from www.Manualslib.com manuals search engine
EXTERIOR FRONT AND REAR
NPA1091
j1 Towing eye (P. 6-15) j2 Bonnet (P. 3-14)
j3 Headlights, front side lights, turn signal lights (Switch P. 2-24, Location and bulb replacement P. 8-25)
j4 Windscreen (Wiper and washer switch
P. 2-21, Wiper replacement P. 8-22, Washer fluid P. 8-16)
j5 Side turn signal light (P. 2-24, Location and bulb replacement P. 8-27)
j6 C-View® (Glass roof)* (P. 2-36) j7 Power windows (P. 2-34)
j8 Roof rail* (P. 2-32)
j9 Tyres (Tyres and wheels P. 8-31, P. 9-7, Flat tyre P. 6-2)
j10 Front view camera* (Around view monitor, P. 4-4)
j11 Back door (Door locks P. 3-12, Remote keyless entry system P. 3-3)
j12 Rear view camera* (Rear-view monitor, P. 4-2, around view monitor, P. 4-4)
j13 Rear window (Defogger switch P. 2-23, Wiper and washer switch P. 2-21, Wiper replacement P. 8-23, Washer fluid P. 8-16)
j14 Rear combination light (Switch P. 2-24, Location and bulb replacement P. 8-25)
j15 Fuel filler lid (P. 3-15)
j16 Doors (Keys P. 3-2, Door locks P. 3-9, Remote keyless entry system P. 3-3)
j17 Outside rear-view mirrors (P. 3-17)
Side view camera* (Around view monitor,
P.4-4)
*where fitted
Illustrated table of contents 0-3
Downloaded from www.Manualslib.com manuals search engine

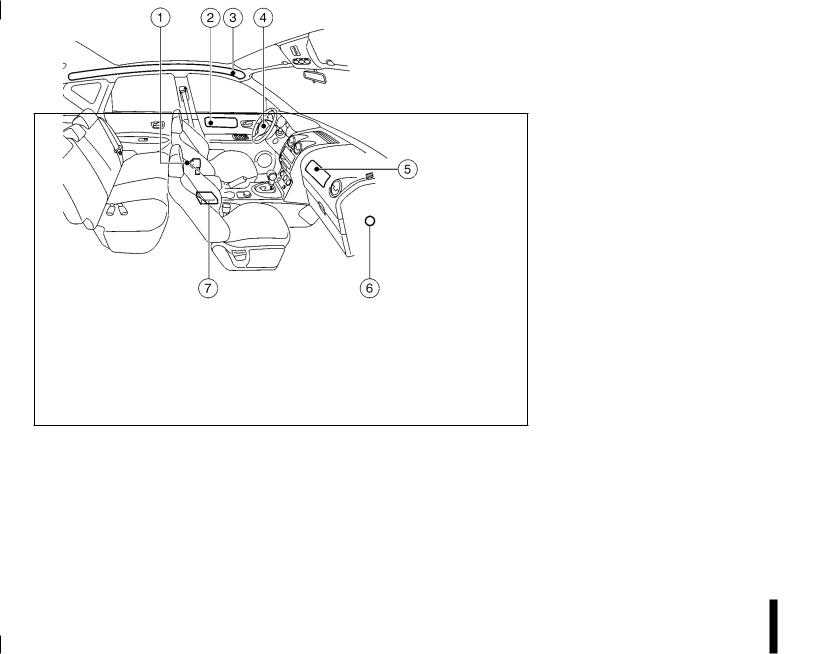
INSTRUMENT AND CONTROL LAYOUT
NIC1601
0-4 Illustrated table of contents
Downloaded from www.Manualslib.com manuals search engine

LEFT (LHD) AND RIGHT-HAND DRIVE (RHD) MODELS
1.Driver’s main power window switch (P. 2-35)
2.Vents (P. 4-12)
3.Headlight and turn signal switch (P. 2-24)
4.Horn (P. 2-29)
5.Meters, gauges, and warning/indicator lights (P. 2-2, 2-3)
6.Wiper/washer switch (P. 2-21) Headlight cleaner*1 (P. 2-28)
7.Hazard warning flasher switch (P. 2-28)
8.Passenger power window switch (P. 2-36)
9.ESP OFF switch*1 (P. 5-40) Headlight aiming control*1 (P. 2-27)
Outside mirror folding switch*1 (P. 3-18) Outside mirror remote control (P. 3-18) Stop/Start System OFF switch* (P. 5-21)
10.Fuse box (P. 8-23)
11.Steering wheel switches*1
Audio control*1 (P. 4-43) Cruise control*1 (P. 5-29) Speed limiter*1 (P. 5-31)
Trip computer display control*1 (P. 2-16)
12.Bonnet lock release lever (P. 3-14)
Fuel filler lid opener lever (P. 3-15)
13.Steering wheel lock lever (P. 4-16)
14.Ignition switch or Ignition knob (Intelligent Key models) (P. 5-6, 5-8)
15.Climate controls (P. 4-12)
16.High level vent control*1 (P. 4-12) Storage*1 (P. 4-31)
17.Gear selector lever (P. 5-12)
18.Handbrake (P. 3-16)
19.4WD mode control*1 (P. 5-24) Power door lock switch (P. 3-10) Seat heater switches*1 (P. 2-29)
20.Power outlet (P. 2-30)
21.Audio system (P. 4-21, 4-23) NISSAN Connect*2
Rear–view monitor*1 (P. 4-2) Around view monitor*1 (P. 4-4)
22.Glove box (P. 2-31)
23.Front passenger air bag deactivate switch (P. 1-17)
*1 where fitted
*2 Refer to the separately provided NISSAN Connect Owner’s Manual.
See the page number indicated in parentheses for operating details.
Illustrated table of contents 0-5
Downloaded from www.Manualslib.com manuals search engine
METERS AND GAUGES
j10
j11
j12
NIC1560
Gear indicator (CVT and AT models only) (P. 2-14)
 switch (Settings control and trip computer control) (P. 2-11)
Fuel gauge (P. 2-2)
j1 Tachometer (P. 2-2)
j2 Warning/indicator lights (P. 2-3) j3 Turn signal (P. 2-26)
Hazard warning indicator lights (P. 2-28)
j4 Outside temperature display/Clock display. Clock setting, see (P. 2-19)
0-6 Illustrated table of contents
j5 Vehicle information display (P. 2-11) j6 Speedometer (P. 2-2)
j7 Engine coolant temperature gauge (P. 2-2)
j8  switch (Twin trip odometer control and brightness level control) (P. 2-11)
j9 Odometer/Twin trip odometer display (P. 2-16)
Downloaded from www.Manualslib.com manuals search engine

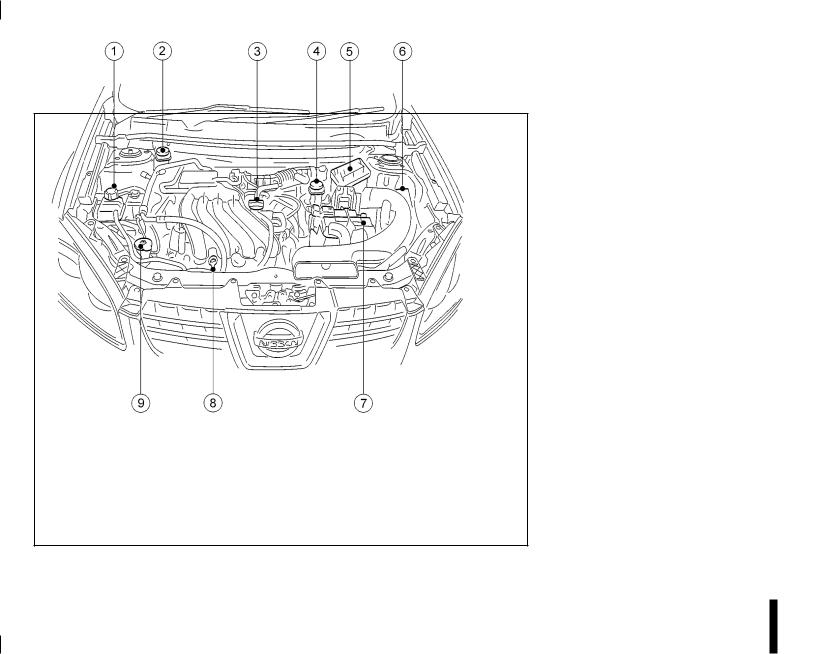
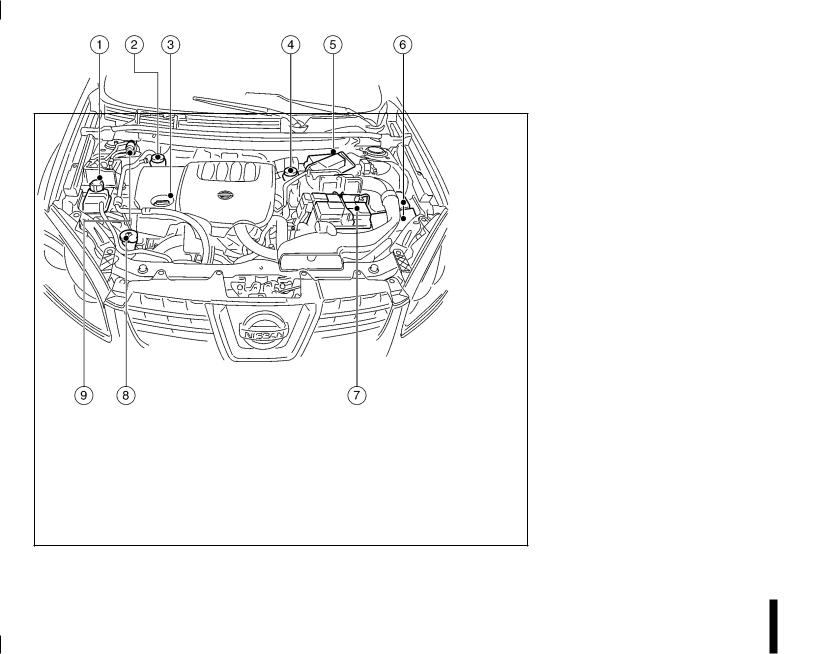
ENGINE COMPARTMENT
HR16DE ENGINE (Type A)
j1 Engine coolant reservoir (P. 8-6)
j2 Brake/clutch fluid reservoir (RHD models) (P. 8-15)
j3 Engine oil filler cap (P. 8-8)
j4 Brake/clutch fluid reservoir (LHD models) (P. 8-15)
j5 Air cleaner filter (P. 8-21)
j6 Fuses/fusible link box (P. 8-23) j7 Battery (P. 8-17)
j8 Engine oil dipstick (P. 8-8)
j9 Window washer/headlight cleaner (where fitted) fluid reservoir (P. 8-16)
NDI905
Illustrated table of contents 0-7
Downloaded from www.Manualslib.com manuals search engine
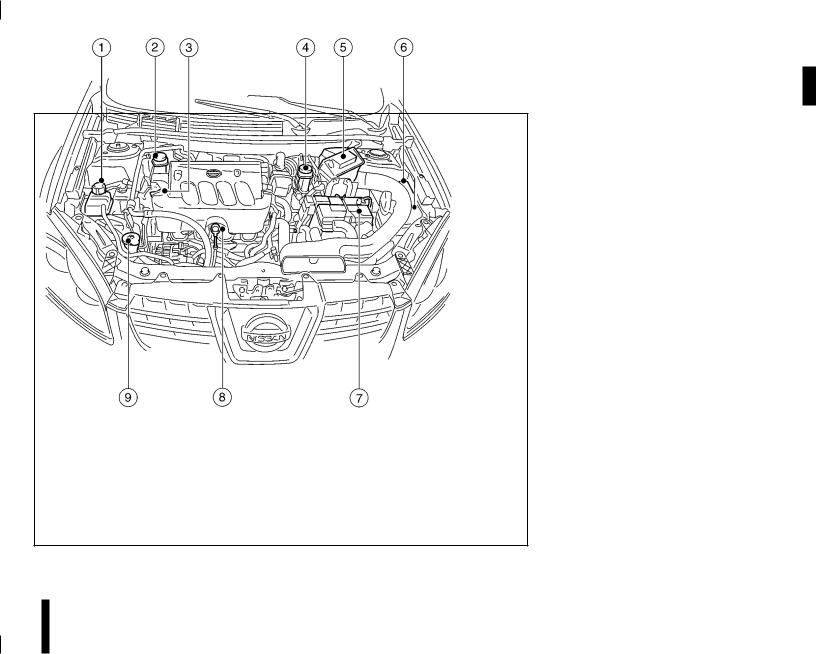
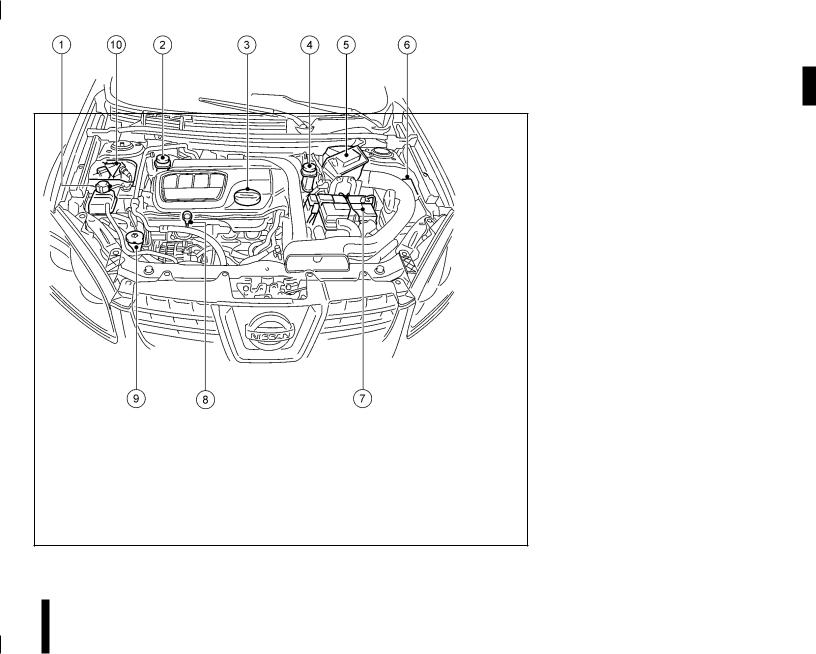
HR16DE ENGINE (Type B)
j1 Engine coolant reservoir (P. 8-6)
j2 Brake/clutch fluid reservoir (RHD models) (P. 8-15)
j3 Engine oil filler cap (P. 8-8)
j4 Brake/clutch fluid reservoir (LHD models) (P. 8-15)
j5 Air cleaner filter (P. 8-21)
j6 Fuses/fusible link box (P. 8-23) j7 Battery (P. 8-17)
j8 Engine oil dipstick (P. 8-8)
j9 Window washer/headlight cleaner (where fitted) fluid reservoir (P. 8-16)
NDI1270
0-8 Illustrated table of contents
Downloaded from www.Manualslib.com manuals search engine
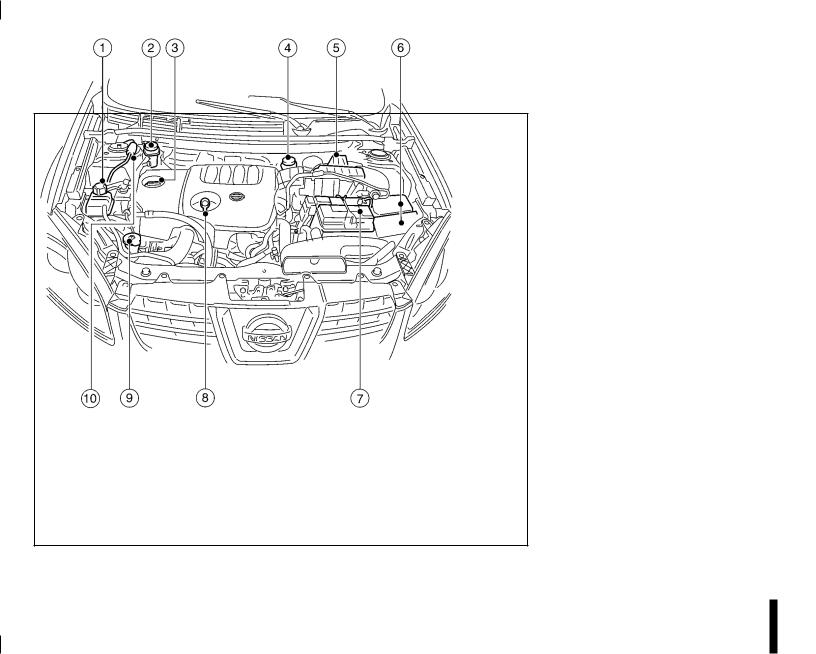
MR20DE ENGINE
j1 Engine coolant reservoir (P. 8-6)
j2 Brake/clutch fluid reservoir (MT (RHD) models), Brake fluid reservoir (CVT (RHD) models) (P. 8-15)
j3 Engine oil filler cap (P. 8-8)
j4 Brake/clutch fluid reservoir (MT (LHD) models), Brake fluid reservoir (CVT (LHD) models) (P. 8-15)
j5 Air cleaner filter (P. 8-21)
j6 Fuses/fusible link box (P. 8-23) j7 Battery (P. 8-17)
j8 Engine oil dipstick (P. 8-8)
j9 Window washer/headlight cleaner (where fitted) fluid reservoir (P. 8-16)
NDI906
Illustrated table of contents 0-9
Downloaded from www.Manualslib.com manuals search engine
Euro 4 K9K engine
j1 Engine coolant reservoir (P. 8-6)
j2 Brake and clutch fluid reservoir (RHD models) (P. 8-15)
j3 Engine oil filler cap (P. 8-8)
j4 Brake/clutch fluid reservoir (LHD models) (P. 8-15)
j5 Air cleaner filter (P. 8-21)
j6 Fuses/fusible link box (P. 8-23) j7 Battery (P. 8-17)
j8 Engine oil dipstick (P. 8-8)
j9 Window washer/headlight cleaner (where fitted) fluid reservoir (P. 8-16)
j10 Fuel filter priming bulb (P. 8-13)
NDI908
0-10 Illustrated table of contents
Downloaded from www.Manualslib.com manuals search engine
Euro 5 K9K engine
j1 Engine coolant reservoir (P. 8-6)
j2 Brake and clutch fluid reservoir (RHD models) (P. 8-15)
j3 Brake/clutch fluid reservoir (LHD models) (P. 8-15)
j4 Air cleaner filter (P. 8-21)
j5 Fuses/fusible link box (P. 8-23) j6 Battery (P. 8-17)
j7 Engine oil filler cap (P. 8-8) Engine oil dipstick (P. 8-8)
j8 Window washer/headlight cleaner (where fitted) fluid reservoir (P. 8-16)
j9 Fuel filter priming bulb (P. 8-13)
NDI1065
Illustrated table of contents 0-11
Downloaded from www.Manualslib.com manuals search engine
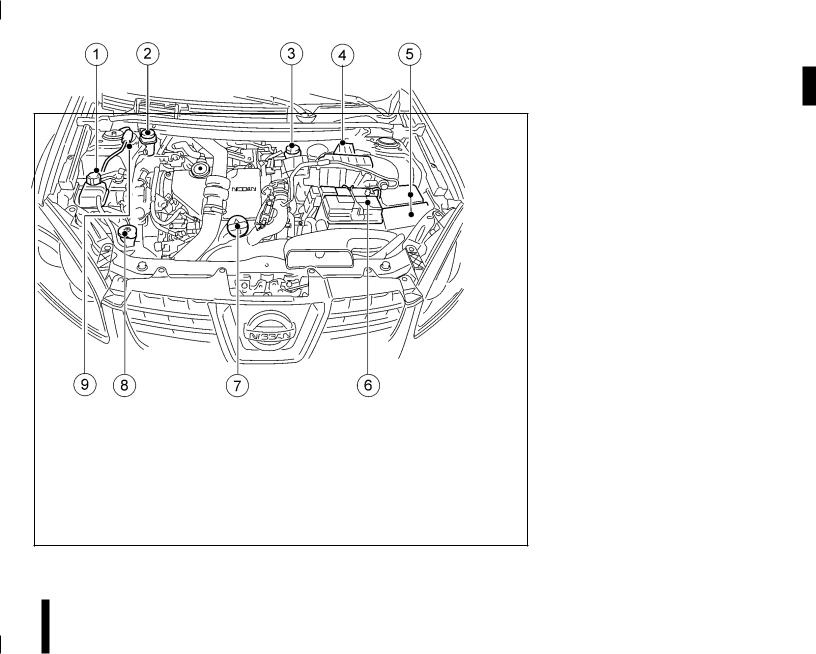
M9R ENGINE
j1 Engine coolant reservoir (P. 8-6)
j2 Brake/clutch fluid reservoir (MT (RHD) models), Brake fluid reservoir (AT (RHD) models) (P. 8-15)
j3 Engine oil filler cap and dipstick (P. 8-8)
j4 Brake/clutch fluid reservoir (MT (LHD) models), Brake fluid reservoir (AT (LHD) models) (P. 8-15)
j5 Air cleaner filter (P. 8-21)
j6 Fuses/fusible link box (P. 8-23) j7 Battery (P. 8-17)
j8 Window washer/headlight cleaner (where fitted) fluid reservoir (P. 8-16)
j9 Fuel filter priming bulb (P. 8-13)
NDI975
0-12 Illustrated table of contents
Downloaded from www.Manualslib.com manuals search engine
R9M ENGINE
j1 Engine coolant reservoir (P. 8-6)
j2 Brake/clutch fluid reservoir (MT (RHD) models), Brake fluid reservoir (AT (RHD) models) (P. 8-15)
j3 Engine oil filler cap (P. 8-8)
j4 Brake/clutch fluid reservoir (MT (LHD) models), Brake fluid reservoir (AT (LHD) models) (P. 8-15)
j5 Air cleaner filter (P. 8-21)
j6 Fuses/fusible link box (P. 8-23) j7 Battery (P. 8-17)
j8 Oil dipstick (P. 8-8)
j9 Window washer/headlight cleaner (where fitted) fluid reservoir (P. 8-16)
j10 Fuel filter assembly (P. 8-13)
NDI1264
Illustrated table of contents 0-13
Downloaded from www.Manualslib.com manuals search engine

NOTE
0-14 Illustrated table of contents
Downloaded from www.Manualslib.com manuals search engine

1Safety — seats, seat belts and supplemental restraint system
Seats....................................................................... |
1-2 |
Front seats ......................................................... |
1-2 |
Rear seat(s)........................................................ |
1-3 |
Armrests (where fitted) ....................................... |
1-5 |
Head restraints ................................................... |
1-5 |
Active head restraints (front seats) ...................... |
1-6 |
Seat belts ................................................................ |
1-6 |
Seat belt warnings.............................................. |
1-6 |
Precautions on seat belt usage ........................... |
1-7 |
Child safety ........................................................ |
1-8 |
Pregnant women ................................................ |
1-8 |
Injured persons................................................... |
1-9 |
Three-point type seat belts.................................. |
1-9 |
Seat belt maintenance ........................................ |
1-11 |
Pre-tensioner seat belt system ................................. |
1-12 |
Supplemental Restraint System (air bag system) ...... |
1-13 |
Air bag system.................................................... |
1-14 |
Air bag warning labels ........................................ |
1-16 |
Air bag warning light........................................... |
1-16 |
Front passenger air bag indicator light ................ |
1-17 |
Child restraints ........................................................ |
1-18 |
Precautions on child restraint usage.................... |
1-18 |
Installation of a child restraint system on the |
|
front passenger seat ........................................... |
1-23 |
Installation of a child restraint system on rear |
|
seats .................................................................. |
1-24 |
ISOFIX system (where fitted).............................. |
1-26 |
Top tether strap for child restraint ....................... |
1-27 |
Downloaded from www.Manualslib.com manuals search engine
SEATS
WARNING
•Do not adjust the driver’s seat while driving. The seat may move suddenly and could cause loss of control of the vehicle.
•After adjustment, gently rock in the seat to make sure it is securely locked.
•The seatback should not be reclined any more than needed for comfort. Seat belts are most effective when the passenger sits well back and upright in the seat. If the seatback is reclined, the risk of sliding under the lap belt and being injured is increased.
•When returning the seatbacks to the upright position, be certain that they are completely secured in the latched position. If they are not completely secured, passengers may be injured in an accident or sudden stop. When operating the seatback release always rock the seatback afterward to check that it is locked.
•When the vehicle is being used to carry cargo, properly secure all cargo to help prevent it from sliding or shifting. Do not place cargo higher than the seatbacks. In a sudden stop or collision, unsecured cargo could cause personal injury.
•Never allow anyone to ride in the luggage area or on the rear seat when it is in the foldeddown position. Use of these areas by passengers without proper restraints could result in serious injury in an accident or sudden stop.
•Closely supervise children when they are around the vehicle to prevent them from playing and being locked in the luggage compartment where they could be seriously injured. Keep the vehicle locked with the rear seatback securely latched when not in use, and prevent children from having access to the vehicle’s keys.
1-2 Safety — seats, seat belts and supplemental restraint system
FRONT SEATS
NDI1100
Adjustment
j1 Slide the seat forward and backward
j2 Reclining the seatback
j3 Lift or lower the seat (driver’s side only)
j4 Lumbar support (where fitted)
Downloaded from www.Manualslib.com manuals search engine
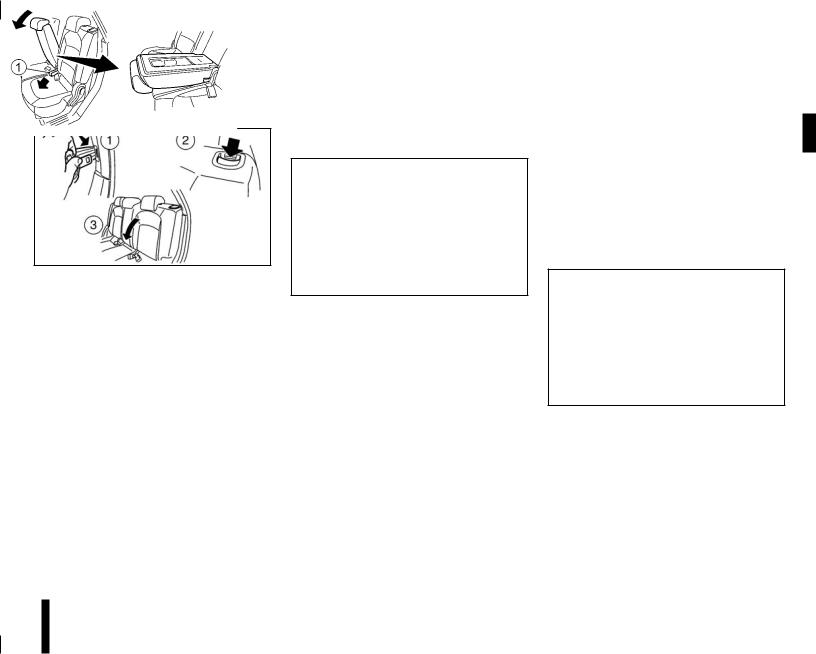
REAR SEAT(S)
NPA928Z
5–seater
Folding (5-seater)
The luggage compartment loading capacity can be increased by folding the rear seats forward.
To fold the seat:
1.Insert the side seat belt tongue into the slot located on the rear door pillar j1 as illustrated.
2.Release the seatback lock by pulling on the latch j2 .
3.Fold the seat forward j3 .
To return the seat to an upright position:
1.Make sure the seat belt is clear of the seat latch mechanism.
2.Lift the seatback up and push firmly onto the latch.
3.If the red lock tab is visible then the seat has not latched properly — release and then re-latch the seat.
CAUTION
Always ensure that the seat belt is not trapped in the release lever or any other vehicle part.
NPA977
Adjustment 2nd row (7-seater)
Pull the lever j1 up while you slide the seat forward or backward to the desired position. Release the lever to lock the seat in position. Rock the seat to check the slides have locked. Pull the lever j2 to set the angle of the seatback as desired.
Folding 2nd row (7-seater)
To fold the outer seats:
1.Push the release button of the head restraint and push the head restraint down. See “Head restraints” later in this section.
2.Release the seatback lock by pulling the lever j2 up. The lever must be held up until the seatback
is folded past the vertical position. If the lever is released early the seat will go into Easy entry mode, see “Easy entry to the 3rd row (7-seater)” later in this section.
3. Fold the seat forward.
To return the 2nd row outer seat to the seating position, pull and hold the lever j2 up to push the seatback up until it locks into position. Pull the lever again to set the angle of the seatback as desired. Pull the head restraint into the correct position for the occupant using the seat.
NPA978
To fold the centre seat:
1.Push the release button of the head restraint and push the head restraint down. See “Head restraints” later in this section.
2.Make sure the seat belt tongue of the centre seat is in the store position, see “Fastening the seat belts” later in this section.
3.Release the seatback lock by pulling the strap j1 .
Safety — seats, seat belts and supplemental restraint system 1-3
Downloaded from www.Manualslib.com manuals search engine
4. Fold the seatback forward.
To return the 2nd row centre seat to its seating position, pull the strap to push the seatback up until it latches into position. Pull the strap again to set the angle of the seatback as desired. Pull the head restraint into the correct position for the occupant using the seat.
NPA981
Easy entry to the 3rd row (7-seater)
1.The seating positions on the 2nd row can be slid forward for easy entry or exit from the 3rd row
seat. To slide the 2nd row bench seat, lift up the latch j1 located on the upper corner of the seatback and pull the seatback forward. When pulling the seatback, the seat bench then slides forward.
2.To return the seat to its seating position, push the seat bench rearward then lift the seatback.
The seat will lock into position. Rock the seat to confirm it is locked in position. Adjust the seat if necessary, see “Adjustment 2nd row (7-seater)” earlier in this section.
NOTE
•Instead of using the latch, it is also possible to pull the lever j2 up. Pull the seatback past the vertical position and release the lever. The seat will slide forward.
•The 2nd row centre seat slides forward together with the right outer seat.
NPA979
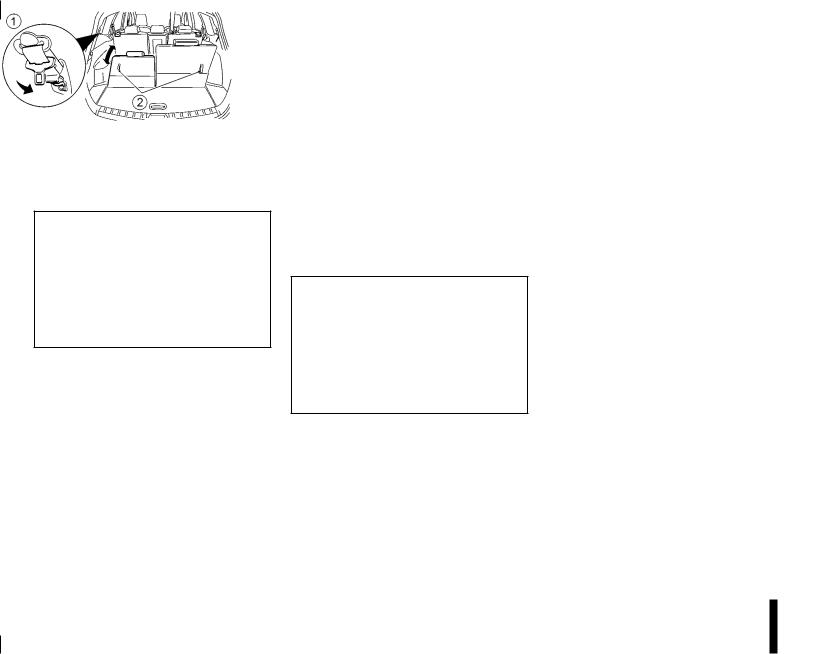
Folding 3rd row (7-seater)
1.Push the release button of the head restraint and push the head restraint down. See “Head restraints” later in this section.
2.Attach the side seat belt tongue to the stowage hook located on the rear pillar j1 as illustrated.
3.Release the seatback lock by pulling the strap j2 .
1-4 Safety — seats, seat belts and supplemental restraint system
4. Fold the seatback forward.
To return the 3rd row seat to its seating position, pull the strap to pull the seatback up until it locks into position. Pull the strap again to set the angle of the seatback as desired. Pull the head restraint into the highest position.
Downloaded from www.Manualslib.com manuals search engine
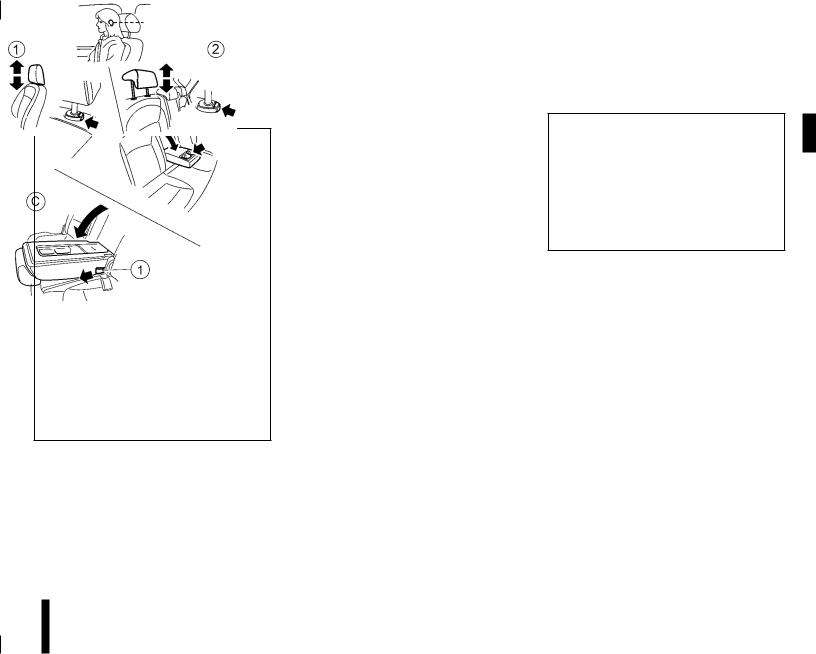
ARMRESTS (where fitted)
NPA980
1.Front armrest jA
Slide the console box lid forwards to use as an armrest.
2.Rear armrest (5–seater) jB
Pull the armrest of the rear seat and lay it horizontally.
3.Rear armrest (7–seater) jC
Pull the strap j1 at the centre seat bench and lay the centre seatback/armrest horizontally.
HEAD RESTRAINTS
WARNING
•Do not drive and/or ride in the vehicle with the head restraint removed. This can be dangerous.
•Head restraints should be adjusted properly as they may provide significant protection against injury in an accident. Check the height after someone else uses the seat.
•If the head restraints are removed for any reason, they should be securely stored to prevent them from causing injury to passengers or damage to the vehicle in case of sudden braking or an accident.
•7–seater: The head restraints of the 3rd row should always be put into the highest position when the seat is occupied.
NPA925Z
Front and Rear (where fitted) seat head restraints
Adjustment
1.Pull up the head restraint to raise to the proper position.
2.Push in the lock knob as illustrated to lower the head restraint to the proper position.
Adjust the head restraint so that the centre is level with your ears.
Safety — seats, seat belts and supplemental restraint system 1-5
Downloaded from www.Manualslib.com manuals search engine
SEAT BELTS
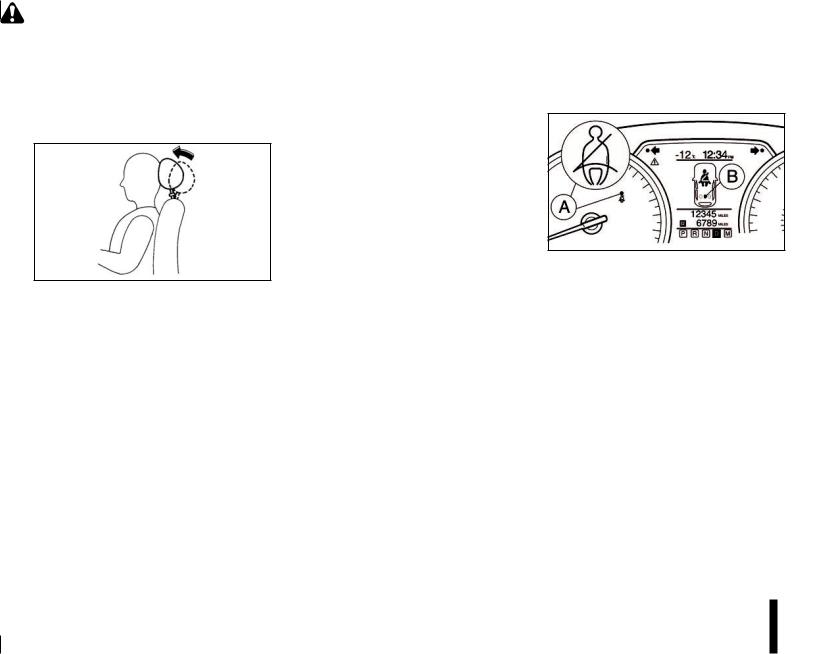
ACTIVE HEAD RESTRAINTS (front seats)
SPA1025Z
WARNING
•Always adjust the head restraints properly as specified in the previous section. Failure to do so can reduce the effectiveness of the active head restraint.
•Active head restraints are designed to supplement other safety systems. Always wear seat belts. No system can prevent all injuries in an accident.
•Do not attach anything to the head restraint stalks. Doing so could impair the active head restraint’s function.
The head restraint moves forward utilising the force that the seatback receives from the occupant in a rear-end collision. The movement of the head restraint helps support the occupant’s head by reduc-
ing its backward movement and by helping to absorb some of the forces that may lead to whiplash type injuries.
Active head restraints are effective for collisions at low to medium speeds in which it is said that whiplash injury occurs most.
Active head restraints operate only in certain rearend collisions. After the collision, the head restraints return to their original positions.
Properly adjust the active head restraints as described in the previous section.
1-6 Safety — seats, seat belts and supplemental restraint system
NPA1051
WARNING
7–seater: Seat belts for 3rd row seats are not part of the seat belt warning monitoring system.
SEAT BELT WARNINGS
jA Driver and front passenger
The seat belt warning lights, located in the instrument panel jA , will light up if the driver and/or front passenger seat belts have not been fastened. See “Warning/indicator lights and audible reminders” in the “2. Instruments and controls” section for further details.
jB Rear passengers
The rear passenger seat belt warning is shown in the vehicle information display jB . See “Vehicle information display” in the “2. Instruments and controls” section.
The seat belt warning alerts the driver and/or front passenger if a (rear) seat belt is not securely fas-
Downloaded from www.Manualslib.com manuals search engine
tened. The seat belt warning shows a filled circle when the ignition switch is turned to the ON position and an empty circle when the related seat belt has been securely fastened, or after approximately 35 seconds after engine start, or when acknowledged by the driver pushing the steering wheel switch ji (where fitted).
NOTE
•If there is a change in (2nd row) rear seat belt status during a journey then the applicable symbol for any unbuckled seat will show again for a further 35 seconds.
•The front passenger seat belt warning light will not illuminate if the seat is unoccupied.
•Seat belts for 3rd row seats (where fitted) are not part of the seat belt warning monitoring system.
PRECAUTIONS ON SEAT BELT USAGE
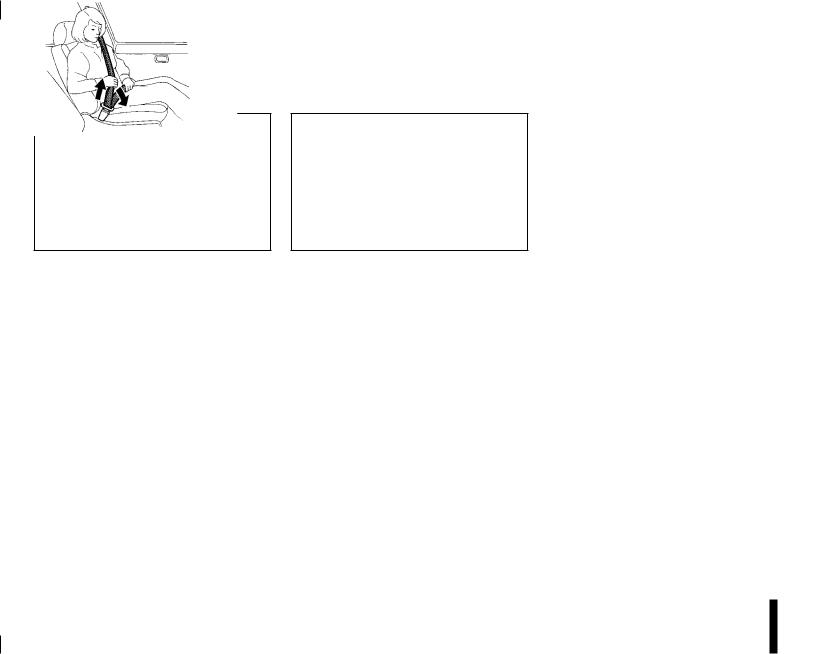
SSS0136Z
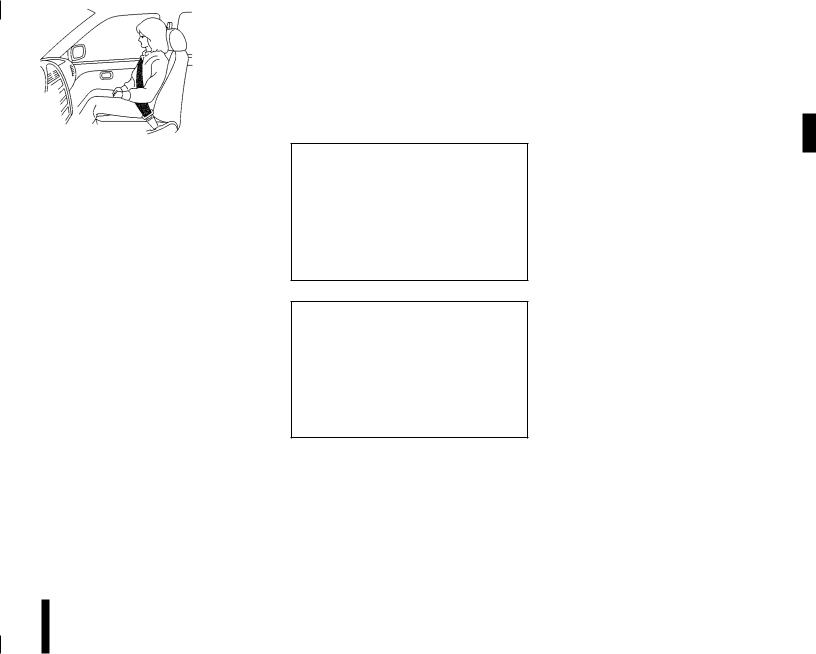
Sit upright and well back
SSS0134Z
Sit upright and well back
Your chances of being injured in an accident and/or the severity of injury may be greatly reduced if you are wearing your seat belt and it is properly adjusted. NISSAN strongly encourages you and all of your passengers to buckle up every time you drive, even if your seating position is equipped with an air bag.
WARNING
Be sure to observe the following warnings when using seat belts. Failure to do so could increase the chance and/or severity of injury in an accident.
•Seat belts are designed to bear upon the bony structure of the body, and should be worn low across the front of the pelvis or the pelvis, chest and shoulders, as applicable; wearing the lap section of the belt across the abdominal area must be avoided.
•No modifications or additions should be made by the user which will either prevent the seat belt adjusting devices from operating to remove slack, or prevent the seat belt assembly from being adjusted to remove slack.
•Seat belts should be adjusted as firmly as possible, consistent with comfort to provide the protection for which they have been designed. A slack belt will greatly reduce the protection afforded to the wearer.
•Care should be taken to avoid contamination of the webbing with polishes, oils and chemicals, and particularly battery acid. Cleaning may safely be carried out using mild soap and water. The belt should be replaced if webbing becomes frayed, contaminated or damaged.
•It is essential to replace the entire assembly after it has been worn in a severe impact even if damage to the assembly is not obvious.
Safety — seats, seat belts and supplemental restraint system 1-7
Downloaded from www.Manualslib.com manuals search engine

•Belts should not be worn with straps twisted.
•Each belt assembly must only be used by one occupant; it is dangerous to put a belt around a child being carried on the occupant’s lap.
•Every occupant in this vehicle should wear a seat belt at all times.
•Never carry more people in the vehicle than there are seat belts.
•All seat belt assemblies, including retractors and attaching hardware, should be inspected by a NISSAN dealer or qualified workshop after any collision. NISSAN recommends that all seat belt assemblies in use during a collision should be replaced unless the collision was minor and the belts show no damage and continue to operate properly. Seat belt assemblies not in use during a collision should also be inspected and replaced if either damage or improper operation is noted.
•Once the pre-tensioner seat belt has been activated, it cannot be re-used. It must be replaced together with the retractor. See a NISSAN dealer or qualified workshop.
•Removal and installation of the pre-tensioner seat belt system components should be done by a NISSAN dealer or qualified workshop ONLY.
•If the seat belt warning light glows continuously while the ignition switch is in the ON position, all doors are closed and occupied seat belts are fastened, it may indicate a mal-
function in the system. Have the system checked by a NISSAN dealer or qualified workshop.
•Always route the shoulder belt over your shoulder and across your chest. Never run the belt under your arm. Serious injury can occur if the seat belt is not worn properly.
•Position the lap belt as low as possible AROUND THE HIPS, NOT THE WAIST.
CHILD SAFETY
SSS0099Z
Infants or small children
NISSAN recommends that infants or small children should be seated in a child restraint on the rear seats if available. According to accident statistics, children are safer when properly restrained in the rear seat than in the front seat. See “Child restraints” later in this section. You should choose a child restraint system which fits your vehicle and always follow the manufacturer’s instructions for installation and use.
1-8 Safety — seats, seat belts and supplemental restraint system
Children
Children who are too large for child restraints should be seated and restrained by the seat belts that are provided.
The use of a booster seat (commercially available) may help to avoid the shoulder belt coming across the face or neck area of a child’s seating position. The booster seat should raise the child so that the shoulder belt is properly positioned across the top, middle portion of the shoulder and the lap belt is low on the hips. The booster seat should fit the vehicle’s seat. Once the child has grown so the shoulder belt is no longer on or near the face and neck, use the shoulder belt without the booster seat.
WARNING
Never let a child stand or kneel on any seat and do not allow a child in the cargo areas while the vehicle is moving.
PREGNANT WOMEN
NISSAN recommends that pregnant women use seat belts. Contact your doctor for specific recommendations. The seat belt should be worn snug, always position the lap belt as low as possible around the hips, place the shoulder belt over your shoulder and across your chest. Never run the lap/ shoulder belt over your abdominal area.
Downloaded from www.Manualslib.com manuals search engine
INJURED PERSONS
NISSAN recommends that injured persons use seat belts, depending on the injury. Check with your doctor for specific recommendations.
THREE-POINT TYPE SEAT BELTS
Every person who drives or rides in this vehicle should wear a seat belt at all times.
Fastening the seat belts
1.Adjust the seat.
 WARNING
The seatback should not be reclined any more than needed for comfort. Seat belts are most effective when the passenger sits well back and upright in the seat. If the seat is reclined, the risk of sliding under the lap belt and being injured is increased.
SSS0292Z
CAUTION
The seat belt retractor is designed to lock during a sudden impact. A slow pulling motion will permit the belt to move and allow you some freedom of movement in the seat.
NPA827Z
2nd row centre seat (5-seater)
2nd row centre seat (5-seater)
a.Unclip the seat belt buckles from the ceiling stowage point.
b.Slowly pull the seat belt out of the ceiling retrac-
tor and insert the end tongue into the buckle with the black button j1 until it clicks.
c.Pull the tongue and insert it into the buckle j2 until it clicks.
NPA966
2nd row rear centre (7-seater)
2nd row centre seat (7-seater)
a.Unclip the seat belt buckles from the (magnetic) ceiling stowage point j1 .
b.Slowly pull the seat belt out of the ceiling retrac-
tor and pass the buckles through the comfort loop j2 .
c.Insert the end tongue into the buckle with the black button j3 until it clicks.
d.Pull the second tongue and insert it into the buckle with the red button j4 until it clicks.
2.Slowly pull the seat belt out of the retractor and insert the tongue into the buckle until it clicks.
Safety — seats, seat belts and supplemental restraint system 1-9
Downloaded from www.Manualslib.com manuals search engine
NPA972
3rd row rear (7-seater)
3rd row outer seat (7-seater)
a.Unclip the end tongue from stowage hook on the side trim j1 .
b.Insert the end tongue into the buckle with the black button until it clicks j2 .
c.Pull the second tongue and insert it into the buckle with the red button j3 until it clicks. The tongue holder can be slid to a preferred position on the webbing for easy access the next time the seat belt is used.
SSS0467Z
3.Position the lap belt portion low on the hips as shown.
4.Pull the shoulder belt portion towards the retractor to take up extra slack. Make sure the shoulder belt is routed over your shoulder and snug across your chest.
 WARNING
•The seat belt should rest on the middle of the shoulder. It must not rest against the neck.
•Make sure that the seat belt is not twisted in any way.
Unfastening the seat belts
WARNING
Make sure, when releasing the centre seat belt from the 2nd row, that the seat belt tongues do not come into contact with any occupants on the 3rd row.
To unfasten the seat belt, press the button on the buckle. The seat belt will automatically retract.
2nd row centre seat (5-seater)
Rear centre seat:
a.Press the red button on the inner buckle j2 . The
seat belt will automatically retract to the outer buckle with the black button j1 .
b.To fully stow the seat belt, press the black button on the outer buckle j1 . The seat belt will retract fully.
c.Stow the seat belt buckles in the ceiling stowage point.
2nd row centre seat (7-seater)
a.Press the red button on the inner buckle j4 . The
seat belt will automatically retract to the outer buckle with the black button j3 .
b.While holding the seat belt, press the black button on the outer buckle j3 . The seat belt will retract fully.
c.Stow the seat belt buckles in the ceiling stowage point.
1-10 Safety — seats, seat belts and supplemental restraint system
Downloaded from www.Manualslib.com manuals search engine

3rd row outer seat (7-seater)
a.Press the red button on the inner buckle j3 . The
seat belt will automatically retract to the outer buckle with the black button j2 .
–If desired, the 3rd row seatback can be folded flat for further information see “Folding 3rd row (7-seater)” earlier in this section.
b.Press the black button to release the end tongue.
When the seat belt has retracted fully, place the end tongue onto stowage hook j1 . Move the tongue holder downwards if required.
NPA816Z
Shoulder belt height adjustment (front seats only)
The shoulder belt anchor height should be adjusted to the position best for you (see “Precautions on seat belt usage” earlier in this section).
To adjust, depress the adjustment button as illustrated and move the shoulder belt anchor to the appropriate position, so that the belt passes over
the centre of the shoulder. Release the adjustment button to lock the shoulder belt anchor into position.
WARNING
•After adjustment, release the adjustment button and check by moving the shoulder belt assembly up and down to make sure the shoulder belt anchor is securely fixed in position.
•The seat belt should be away from your face and neck, but not falling off your shoulder.
Checking the seat belt operation
Your seat belt retractors are designed to lock the belt movement in two separate situations:
•When the belt is pulled quickly from the retractor.
•When the vehicle slows down rapidly.
To increase your confidence in the belts, check the operation as follows:
Take place in the seat for which you wish to check the belt operation. Grasp the shoulder belt and pull quickly forward. The retractor should lock and restrict further belt movement.
If the retractor does not lock during these checks or if you have any questions about the seat belt operation, see a NISSAN dealer or qualified workshop.
SEAT BELT MAINTENANCE
•To clean the seat belt webbing, apply a mild soap solution or any solution recommended for cleaning upholstery or carpets. Then brush it, wipe with a cloth and allow it to dry in the shade. Do not allow the seat belts to retract until they are completely dry.
•If dirt builds up in the shoulder belt guide of the seat belt anchors, the seat belts may retract slowly. Wipe the shoulder belt guide with a clean, dry cloth.
•Periodically check to see whether the seat belt and the metal components such as buckles, tongues, retractors, flexible wires and anchors work properly. If loose parts, deterioration, cuts or other damage to the webbing is found, the entire belt assembly should be replaced.
Safety — seats, seat belts and supplemental restraint system 1-11
Downloaded from www.Manualslib.com manuals search engine
 Loading...