


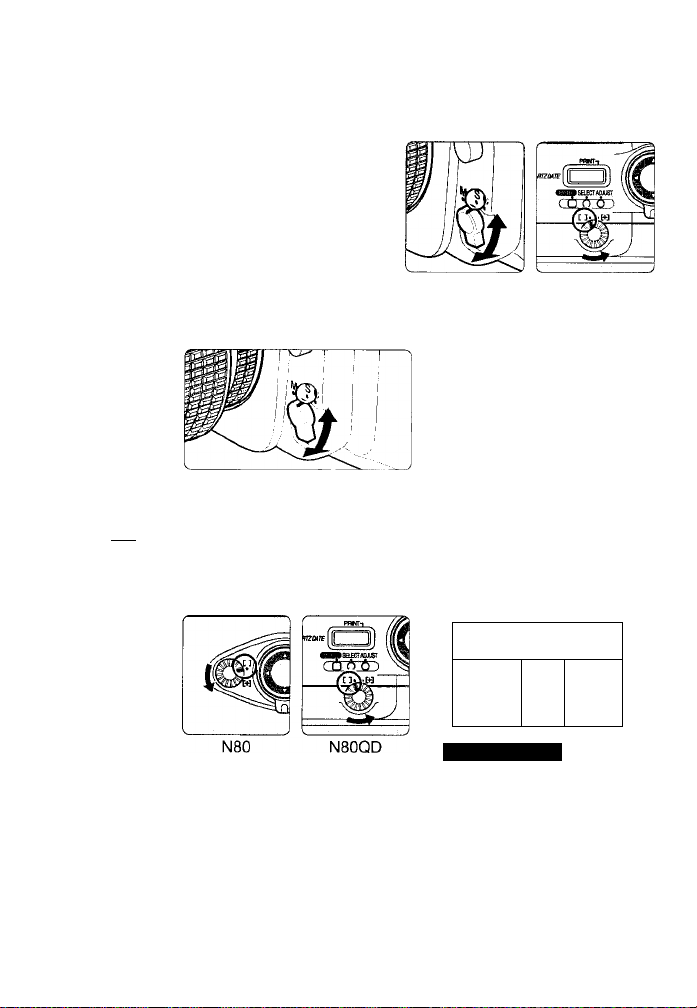
N80
Table of contents
 Loading...
Nikon
§
o
§
o
D
m
3
N80qd
INSTRUCTION MANUAL
I
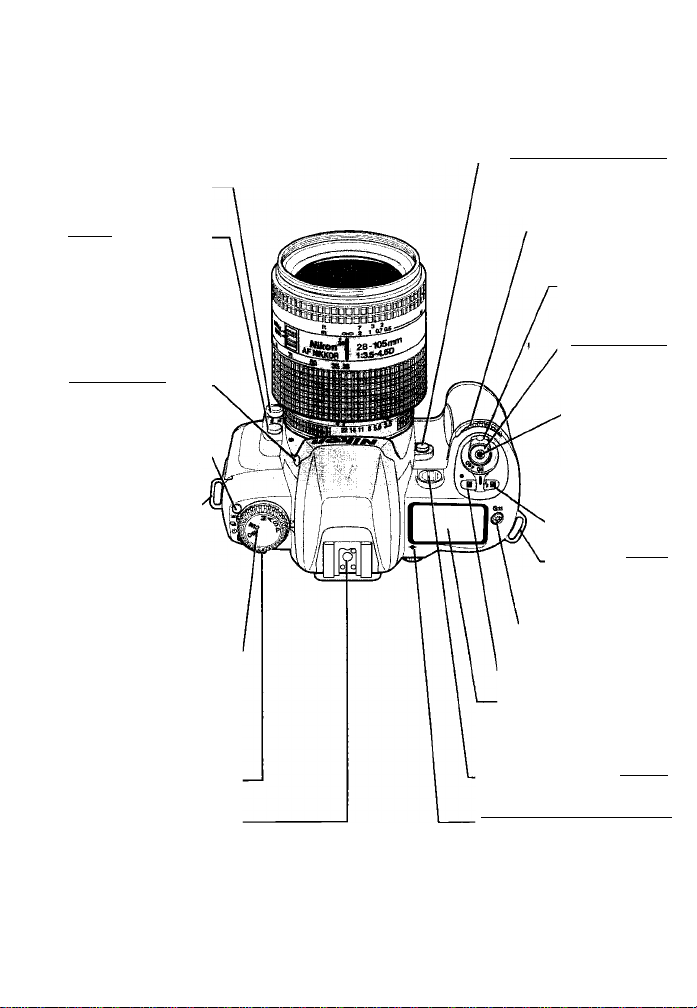
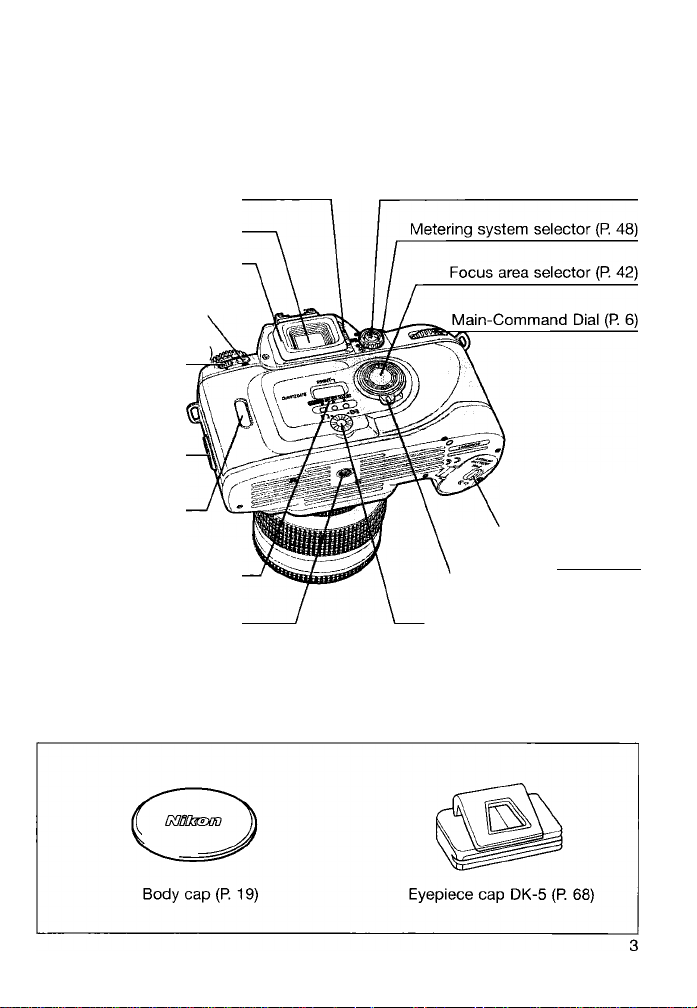
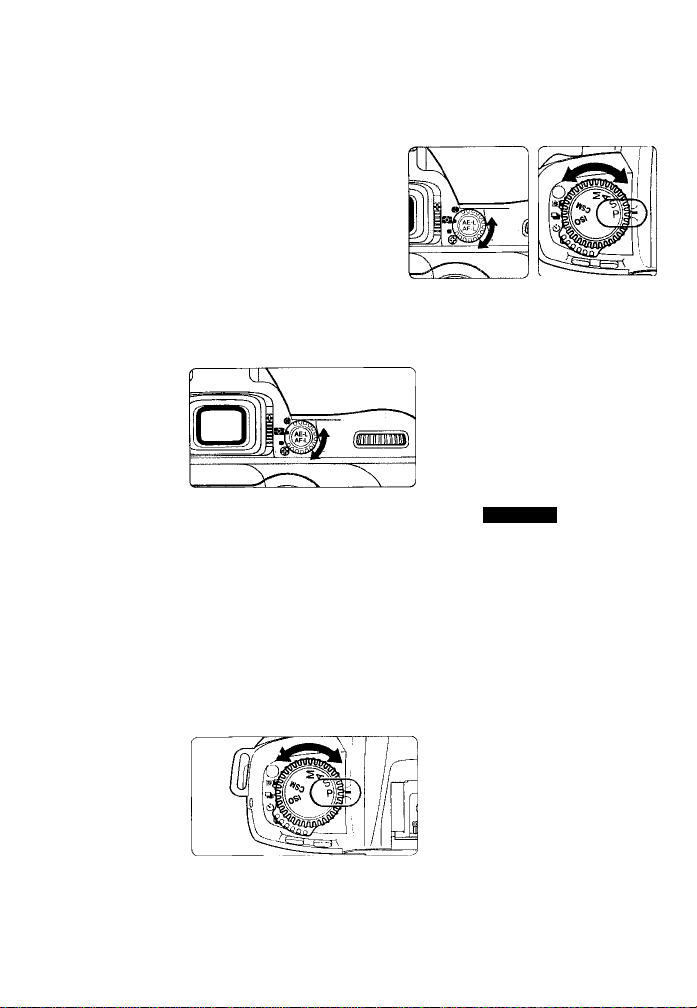
Nomenclature
Depth-of-field preview button (P. 67)
Focus mode selector (P. 38, 47)
Lens release button
(P-19)
__________
Flash lock-release
button (P. 30)
Film advance
mode selector lock
release (P. 37)
Camera strap
eyelet
Exposure mode (P.50)/
Custom Setting(P. 70)/
ISO film speed select
dial (P. 36)
Film advance mode
selector (P. 37)
Accessory shoe (P. 79)
Sub-Command Dial
iPJ)
Power switch (P. 16)
Shutter release
button (P. 17)
Release terminal
(R 65)
Flash Exposure
compensation
button {P. 85)
Camera strap
eyelet
LCD illuminator{ P.66)/
Film rewind button
(P. 36)
Exposure compensation
button (P. 60)
LCD panel (P. 4)
Self-timer (P. 68)/
AF assist illuminator (P.43)/
Red-Eye Reduction lamp
(P- 81)
Film plane indicator (P. 67)
Diopter adjustment lever (P. 66)
Viewfinder eyepiece
Rubber eyecup (P. 66)
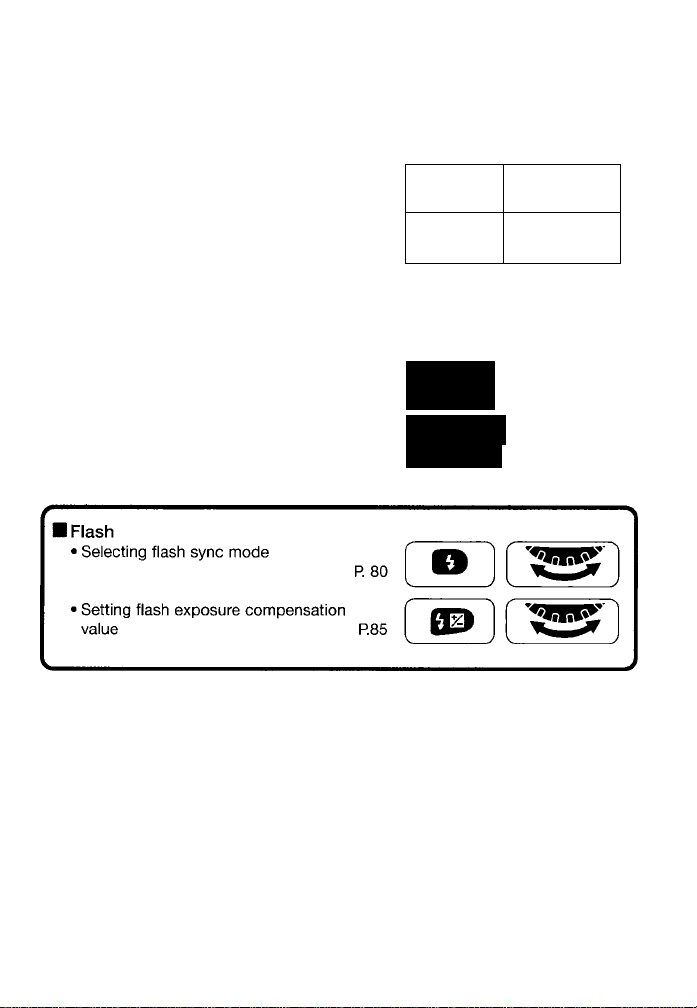
Flash sync mode (P. 80)/
Film rewind button (P. 36)
Auto Exposure
Bracketing button (P. 61
Camera back lock
release lever (P. 20)
Film confirmation
window
Data imprint LCD panel/
buttons (N80QD only) (R 90)
AE-L/AF-L (Auto Exposure[R58]/
Autofocus Lock [R. 44]) button
Tripod socket
Battery chamber
cover lock lever
(R 16)
Focus area selector lock
__________
lever (R 42)
AF Area mode selector (P. 39)
Illustration shown is the N80QD. The camera back of the N80 differs from the
N80QD.
Supplied accessories
J I CD Panel/Viewfinder Display
■ LCD panel
Shutter speed/
Exposure compensation value
Flash exposure
compensation (P. 85)
CM?
jiqlq.q o
Flexible Program (P. 51)
rn f REAR
Bracketing bar graphs (P. 61)
Aperture
Custom Setting
(P. 70)
com°pe^nsation (P. 60)—|-0I 00 0^
DX indication (P. 36)
Flash sync mode (P. 80)
M
S M 2
L w
Battery power
(P. 16)
Frame counter
(P-21)
Focus area (P. 42)
Auto Exposure Bracketing (P. 61)
* The illustrations are fully labeled for your reference.
About Nikon Advanced Focusing Screen Display
The new Nikon Advanced Focusing Screen Display of the N80/N80QD employs the
convenient Vari-Brite Focus Area display system; it enables clear display of the focus
brackets at the selected focus area in the viewfinder for easy identification. When the finder
image is bright, the focus brackets are displayed in black and when the finder image is
dark, the focus brackets are momentarily illuminated in red. The selected focus area can be
identified easily in both bright and dark conditions with this function (page 72).
Also, the new Nikon Advanced Focusing Screen Display allows the superimposition of On-
Demand Grid Lines. The grid lines can be displayed by using Custom Setting Menu #4
(page 71). These grids assist you in composing the frame, in taking landscape pictures or In
shifting/tllting PC-NIkkor lenses.
* Due to characteristics of the LCD used in the Vari-Brite Focus Area display system, a thin line
outside the selected focus area may also be displayed or the entire viewfinder may be
illuminated in red under certain conditions. These are not malfunctions.
About LCD
The LCD panel and viewfinder displays tend to turn darker at high temperatures and slower
response time at low temperatures. On the other hand, the LCD in the Nikon Advanced
Focusing Screen Display tends to turn lighter at high temperatures and darker with slower
response time at low temperatures. In either case, when the temperature returns to normal
the displays also return to normal.
4
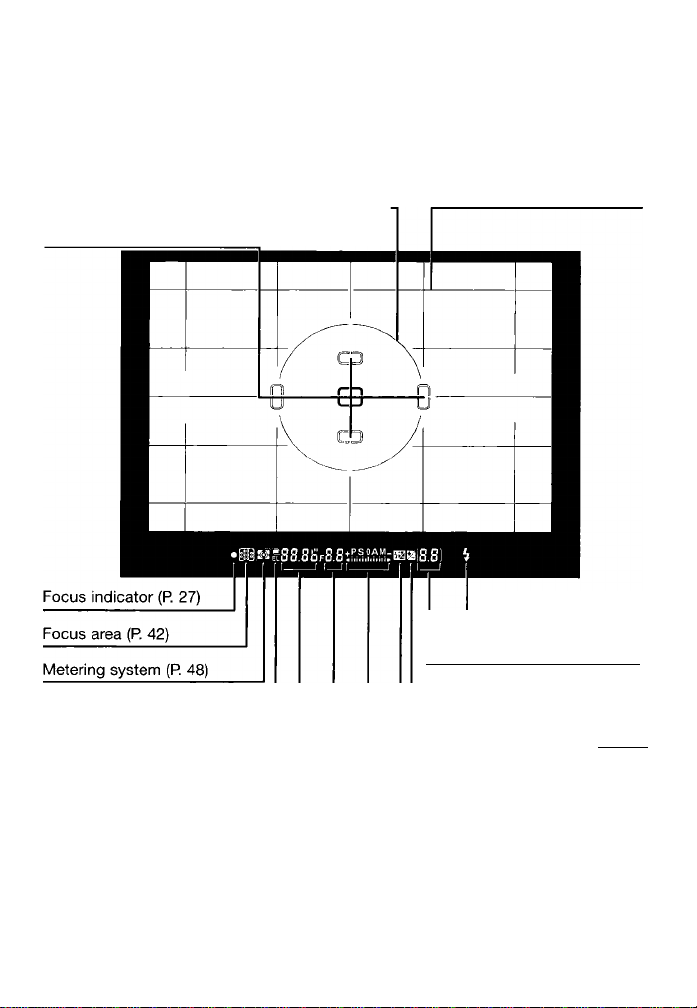
■ Viewfinder Display
12mm-dia. reference circle for Center-Weighted
Metering area (P. 49)
Focus brackets (focus area) (R 42)/
Spot Metering area (P. 49)
On-Demand Grid Lines (R 71)
Multiple exposure (R 63)/
AE-L (Auto exposure lock)
indicator (R 58)
Shutter speed
Aperture
Flash ready-light (R 79)
Frame counter (P. 21)/Exposure
compensation value (P. 60)/Flash
exposure compensation value (P. 85)
Exposure compensation (P. 60)
Flash exposure compensation
___________________
(P- 85)
Exposure mode (P. 50-57)/Electronic
analog exposure display (P. 57)/
Exposure compensation value
display (P. 60)
CAUTION: About viewfinder
The viewfinder will be dark without battery power but brightens after installation
of fresh batteries. This is not a malfunction.
I
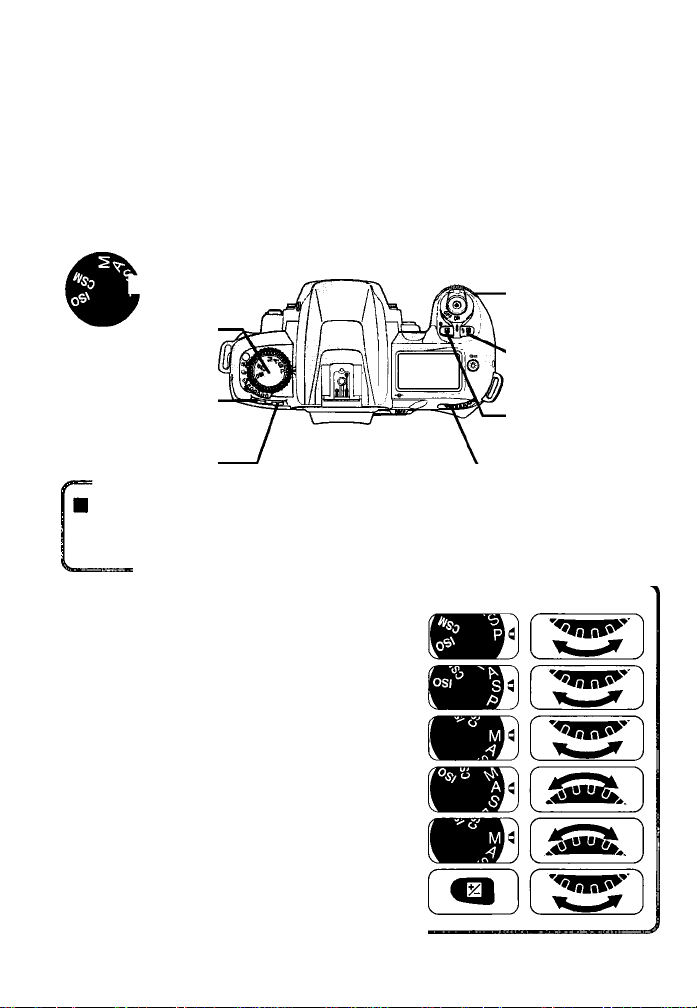
Command Dials
I The N80/N80QD’s Main- and Sub-Command Dials are used alone or in
combination with other buttons to select/set various functions or
modes.
See “Basic Operation” on pages 15 to 31 if you want to start shooting
immediately with N80/N80QD’s basic mode.
Exposure mode/
3 Custom Setting/
ISO film speed
select dial
Auto Exposure
Bracketing button
Flash sync mode
button
Sub-Command,
Diak<l!
Rash exposure
compensation
button
Exposure
compensation^i^»
button
Main-Command ”
Film
• Setting film speed
P. 36
j Exposure
• Performing Flexible Program in Auto-Multi
Program P. 51
• Setting shutter speed in Shutter-Priority
Auto exposure mode* * P. 52
• Setting shutter speed in Manual exposure
mode* P. 56
• Setting aperture in Aperture-Priority Auto
exposure mode* P. 54
• Setting aperture in Manual exposure mode*
P. 56
__
Performing exposure compensation P. 60
' Setting/canceling Auto Exposure
Bracketing P. 61
> Setting number of shots and
compensating EV vaiue in Auto Exposure
Bracketing R 61
V )
/ s
IS1B8
I Custom Setting
• Seiecting menu number of Custom
Setting P. 70
• Seiecting and making Custom Setting
R 70
U “"1
r w
csmQ
k M
* BHii ii: Shutter speed can be set to change with the Sub-Command Diai (in
Shutter-Priority Auto or Manuai exposure mode) and aperture with the
Main-Command Diai (in Aperture-Priority Auto or Manual exposure
mode) (page 74).

1
Introduction
I Thank you for purchasing the Nikon N80/N80QD—a camera that is sure
to make photography a bigger part of your life.
Get to know your N80/N80QD camera, and be sure to read this manual
thoroughly before using it. We recommend that you keep this manual
handy.
Main features of the N80/N80QD:
• SLR camera with built-in Speedlight makes taking pictures easy
and enjoyable, even for the most inexperienced beginner.
• The Dynamic AF, which utilizes five-area autofocusing, enables
sharp focus on irregularly moving subjects (page 39).
• The Vari-Brite Focus Area display system clearly displays focus
brackets at selected focus area in the viewfinder (page 4).
• Nikon’s exclusive 10-segment 3D Matrix Metering provides correct
exposure in various shooting situations (page 48).
• Custom Setting enables you to choose customized combinations
of various functions/modes (page 70).

I Take trial shots
Take trial shots before shooting at important occasions like weddings
or graduations.
I Have Nikon spot-check your camera regularly
Nikon recommends that you have your camera serviced by an
authorized dealer or service center at least once every two years.
I Using your camera correctly
The Nikon N80/N80QD’s performance has been optimized for use with
Nikon brand accessories. Accessories made by other manufacturers
may not meet Nikon’s criteria for specifications, and nonconforming
accessories could damage the N80/N80QD’s components. Nikon
cannot guarantee the N80/N80QD’s performance when it is used with
other than Nikon brand accessories.
Note: [ggm uD
ESU Du (numbers from ! to 18): indicates that the function/mode changes
according to Custom Setting menu number.

Contents
The “Basic Operation” section introduces battery, lens, film, focusing,
metering, exposure and shooting in basic steps easy enough even for SLR
camera beginners to take pictures.
“Detailed Operation” explains each function, from lens to exposure functions,
in detail, in approximately the same order as the steps in the “Basic Operation”
section. After becoming familiar with basic shooting, refer to the detailed
explanation of each operation/function and start using advanced shooting
techniques.
“Flash Photography” introduces flash photography using the N80/N80QD’s
built-in Speedlight or an optional Speedlight in darkness and flash-shooting
situations in bright conditions.
PREPARATION....................................................................................2-13
Nomenclature..................................................................................................2-3
LCD PanelA/iewfinder Display........................................................................4-5
Command Dials...............................................................................................6-7
Introduction.....................................................................................................8-9
About This Manual......................................................................................12-13
BASIC OPERATION..........................................................................15-31
1. Install Batteries and Check Battery Power
.............................................
16-17
2. Mount Lens.............................................................................................18-19
3. Load Film................................................................................................20-21
4. Set Focus Mode, AF Area Mode and Focus Area
..................................
22-23
5. Set Metering System and Exposure Mode
.............................................
24-25
6. Hold Camera and Focus.........................................................................26-27
7. Confirm Indications in Viewfinder and Release Shutter
.........................
28-29
8. Using Built-In Speedlight........................................................................30-31
About Metering System and Exposure
............................................................
32
DETAILED OPERATION....................................................................33-68
Lens Compatibility.......................................................................................34-35
Film (film speed, mid-roll rewind, film advance mode, etc.)
.......................
36-37
Autofocus (Single Servo AF, Continuous Servo AF)
.......................................
38
AF Area Mode............................................................................................39-41
Focus Area.......................................................................................................42
AF-Assist Illuminator........................................................................................43
Focus Lock (Single Servo AF, Continuous Servo AF)
...............................
44-45
Situations Where Autofocus May Not Work As Expected
...............................
46
Manual Focus...................................................................................................47
10

t
Exposure Metering System (Matrix, Center-Weighted, Spot)
....................
48-49
Shooting in Each Exposure Mode..............................................................50-57
Auto-Multi Program (Flexible Program, Program Chart)........................50-51
Shutter-Priority Auto Exposure Mode ....................................................52-53
Aperture-Priority Auto Exposure Mode...................................................54-55
Manual Exposure Mode .........................................................................56-57
Auto Exposure Lock
...................................................................................
58-59
Exposure Compensation.................................................................................60
Auto Exposure Bracketing..........................................................................61-62
Multiple Exposure.......................................................................................63-64
Long Time Exposure
.......................................................................................
65
Diopter Adjustment/LCD Illuminator................................................................66
Depth-of-Field Preview/Film Plane Indicator...................................................67
Self-Timer Operation
.......................................................................................
68
CUSTOM SETTING
...........................................................................
69-76
Menu/Features of Custom Setting
.............................................................
70-75
Two-Button Reset............................................................................................76
FLASH PHOTOGRAPHY
..................................................................
77-87
Flash Photography using Built-In Speedlight
..................................................
78
Ready-Light/Accessory Shoe..........................................................................79
Flash Sync Mode Features........................................................................80-81
Using the Built-In Speedlight......................................................................82-83
Usable Lenses with Built-In Speedlight...........................................................84
Flash Exposure Compensation.......................................................................85
Usable Optional Speedlights......................................................................86-87
About Depth of Field and Focus Tracking
.......................................................
88
DATA BACK......................................................................................89-93
Adjusting Date and Time and Imprinting Data
...........................................
90-93
MISCELLANEOUS
..........................................................................
95-113
Optional Accessories..................................................................................96-97
Camera Care..............................................................................................98-99
Notes on Batteries.........................................................................................100
Troubleshooting........................................................................................101 -103
Specifications
.........................................................................................
104-109
Index......................................................................................................110-111
Custom Setting Menu.............................................................................112-113
11
12

Detailed Operation and Notes on Batteries
P.33-93,100
Notes on Batteries.....................................................................
.....................
P. 100
Lens Compatibility.....................................................................
.................
P. 34-35
.
.................
P. 36-37
ti
Cü
ca
Autofocus (P. 38), AF Area Mode (P. 39-41), Focus Area (P. 42),
AF-Assist Illuminator (P. 43), Focus Lock (R 44-45),
Situations Where Autofocus May Not Work As Expected (P. 46),
Manual Focus (P. 47)
Exposure Metering System (P. 48-49), Shooting in Each Exposure Mode (R 50-57),
Auto Exposure Lock (P. 58-59), Exposure Compensation (R 60),
Auto Exposure Bracketing (R 61 -62), Multiple Exposure (R 63-64),
Long Time Exposure (P. 65)
Diopter Adjustment/LCD Illuminator...
..............................................................
P. 66
Depth-of-Field Preview/Film Plane Indicator
....................................................
P. 67
Self-Timer Operation
.
..............
.
.....
.
.............
.......
.
...........................................P. 68
Custom Setting
.......
.
.........................................
.
..........................................P. 69-75
Two-Button Reset
........
.
................
.
.......................................................................76
Data Back.j
........
.................................
.
............
.
...........................................P. 89-93
Flash Photography (Flash Photography Using Built-In Speedlight/Ready-Light/
Accessory Shoe/Flash Sync Mode Features/Using the Built-In Speedlight/
Usable Lenses with Built-In Speedlight/Flash Exposure Compensation/
Usable Optional Speedlights)
......................................................................
P. 77-87
13

14

f-
BASIC OPERATION
This section features the settings for most
common picture-taking situations when
using Auto-Multi Program. The shooting
modes explained in this section cover most
of your shooting situations.
Shooting modes/functions explained in this section
are as follows:
Lens attached
,n--- -
.................................
......
D-type AF Nikkor
Film speed setting l!E3
Film advance mode Single frame ([H)
AF mode Single Servo AF (AF-S)
AF Area mode Single Area AF ([ ])
Focus area Center
Exposure metering
system
3D Matrix Metering (Sfl)
Exposure mode
Auto-Multi Program (P)
Flash sync mode
Front-Curtain Sync (i)
1
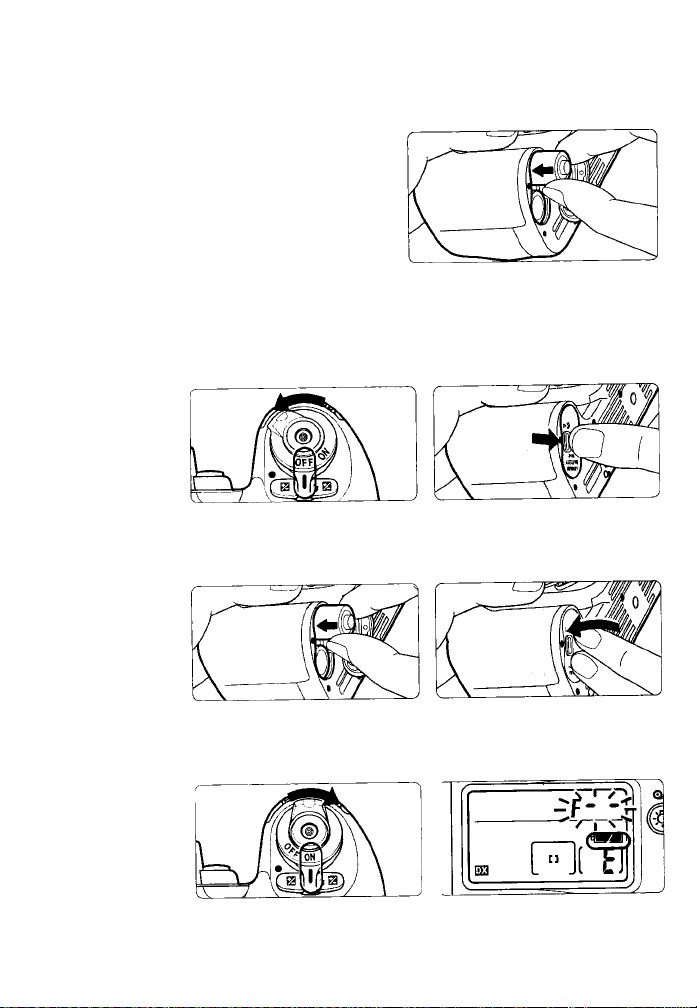
Install Batteries and Check Battery Power
Use two CR123A or DL123A-
type 3V lithium batteries. (For
other power sources, see page
96.)
1.1
1.2
Turn the power switch off and open the battery
chamber cover by sliding the battery chamber cover
lock lever toward indicated direction.
Insert batteries with the “
0
” and “
0
” ends
positioned as marked inside the battery chamber
■ f!
_______
I.. * A«-k A r* Al
1.3
• Incorrect positioning of @ and 0 poles may damage the camera.
Turn the power switch on and confirm battery power
with the indication.
16
[71 Check points
□ Keep the batteries out of children’s reach. If swallowed, contact a
doctor immediately. (For “Notes on Batteries”, see page 100.)
□ When replacing batteries, be sure to turn the power switch off and
replace both batteries at the same time. Always use fresh batteries of
the same brand.
□ We recommend that you take spare batteries with you, especially when
traveling.
□ For the number of film rolls that can be shot with fresh batteries, see
page 108._____________________________________________________
z
g
¡5
cc
HI
Q.
o
o
U)
<
CO
1.4
appears:
appears:
blinks:
Sufficient battery power.
Batteries are nearing exhaustion. Have a fresh set ready.
(Viewfinder indications turn off when you release your finger
from any button.)
Batteries are exhausted. Replace batteries. (Shutter locks.)
• Shutter speed and aperture indications in the LCD panel automatically
turn off 6 sec. after the power switch is turned on and the camera
remains unused. (All indications in the viewfinder turn off.)
• For N80QD only: Batteries in the camera body also power the Quartz
Date. After installing batteries for the first time, set the date and time
(page 90).
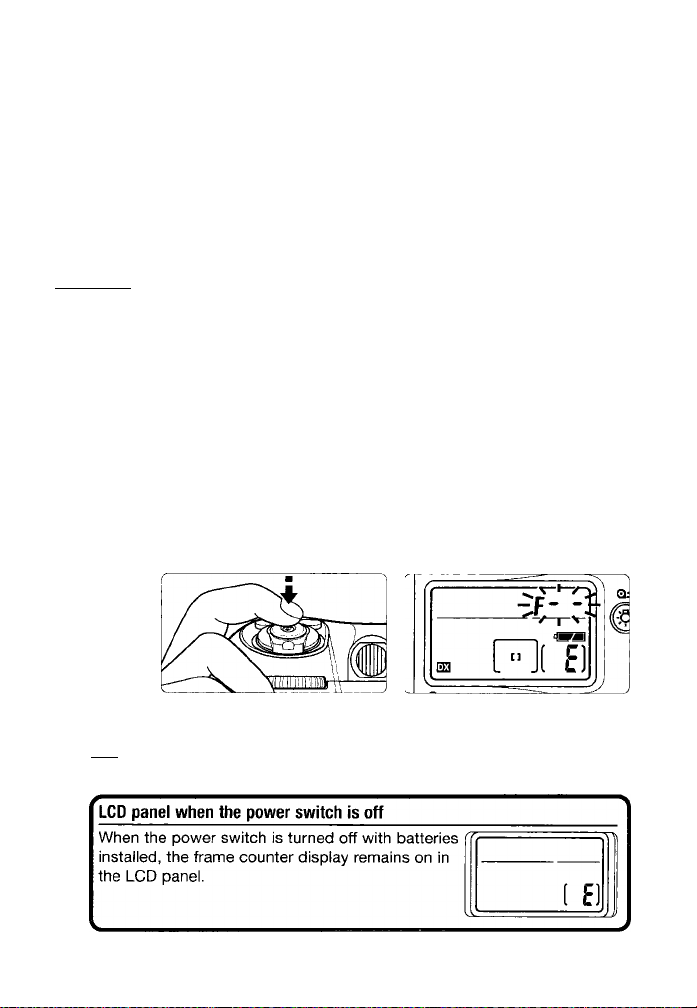
Lightly press the shutter release button to activate
the exposure meter.
• Lightly pressing the shutter release button reactivates the exposure meter
and indications in the LCD panel and viewfinder for approx. 6 sec.
[gm 15: It is possible to change the duration of inactive time before
automatic meter switch-off occurs (page, 74).
17
2
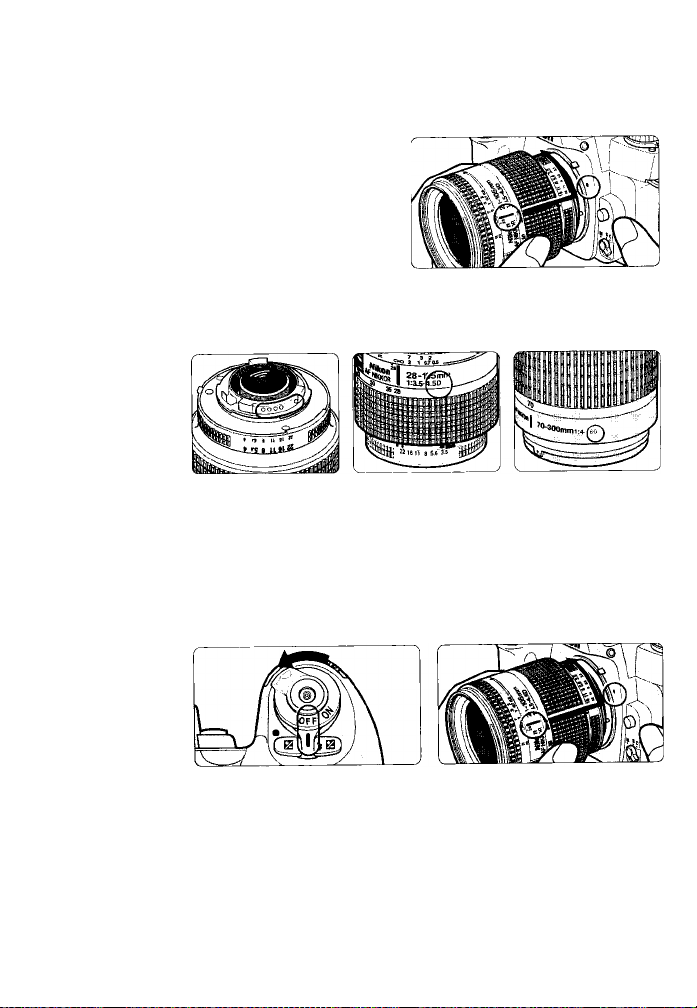
Mount Lens
Turn the power switch off and
mount the lens to the camera
body.
2. 1
2.2
Check the lens type.
CPU contacts of CPU
lens
© CPU Nikkor lens
other than G-type
@ G-type Nikkor lens
©CPU Nikkor lens other than G-type (Illustration is D-type Nikkor lens),
with aperture ring
@ G-type Nikkor lens, without aperture ring
Turn the power switch off and mount the lens to the
camera body.
' Position lens in the camera’s bayonet mount so that the mounting
indexes on lens and camera body are aligned, then twist lens
counterclockwise until it locks into place. (Be sure not to touch the lens
release button.)
• When the lens is not attached or when a non-CPU Nikkor lens is attached
and the power switch is turned on, f- ■ blinks in the LCD panel and
viewfinder, and the shutter cannot be released. See page 34 for a non-
CPU lens.
18
[ZI Check points
□ Use a D- or G-type AF Nikkor lens to utilize all of this camera’s
functions. (See page 34 for Lens Compatibility.)
□ Make sure to turn the power switch off when attaching/detaching the
lens.
5
a:
lU
CL
o
o
55
z
o
□ When attaching the lens, take care not to press the lens release button. <
□ Avoid direct sunlight when attaching/detaching the lens.
2.3
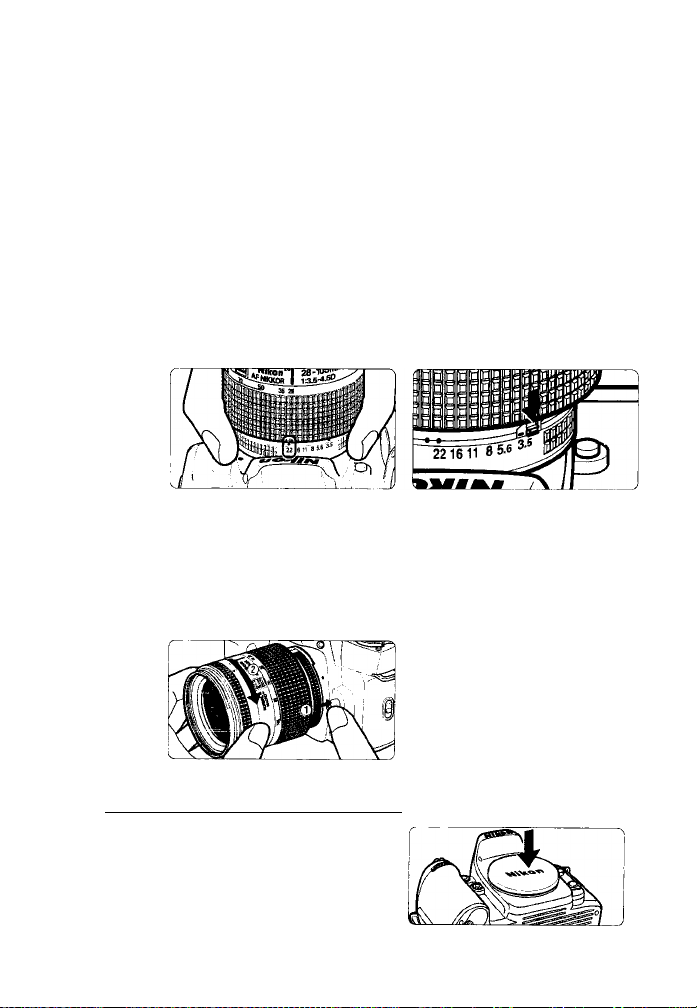
2.4
With CPU Nikkor lens with aperture ring (other than G-
type), set the lens aperture to its minimum and lock.
• When CPU Nikkor lens other than G-type is not set to its minimum
aperture setting (iargest f-number) and the power switch is turned on, FEE
biinks in the LCD panei and viewfinder and the shutter cannot be released.
• The G-type Nikkor lens has no aperture ring; aperture should be selected
from camera body. Unlike other CPU Nikkor iens, aperture does not need
to be set to minimum.
Detaching the lens.
• Push and hoid the iens release button, then turn the lens clockwise.
I When camera is left unattended without lens
_____________________
When you ieave the camera unattended
without a lens attached, be sure to attach
the supplied body cap (page 3), or
optionai body cap BF-1A. (BF-1 body cap
! cannot be used.)
19
3
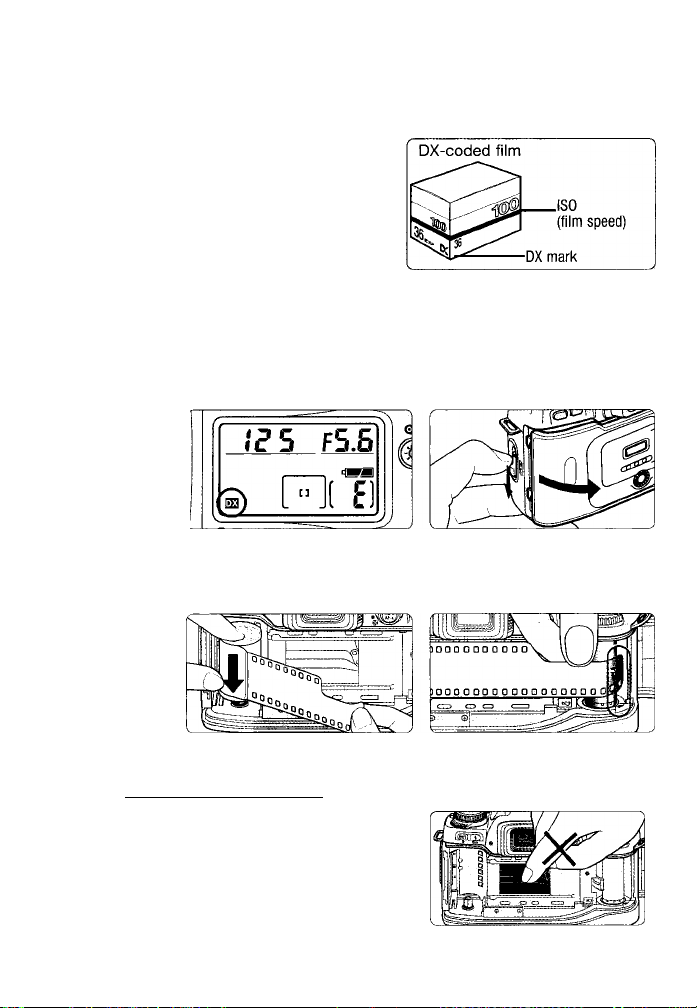
Load Film
Turn the power switch on and
load DX-coded film. With DX-
coded film, film speed will be set
automatically (ISO 25-5000).
When the camera Is turned on,
film is loaded and the camera
back is closed, the film
automatically advances to the
first frame.
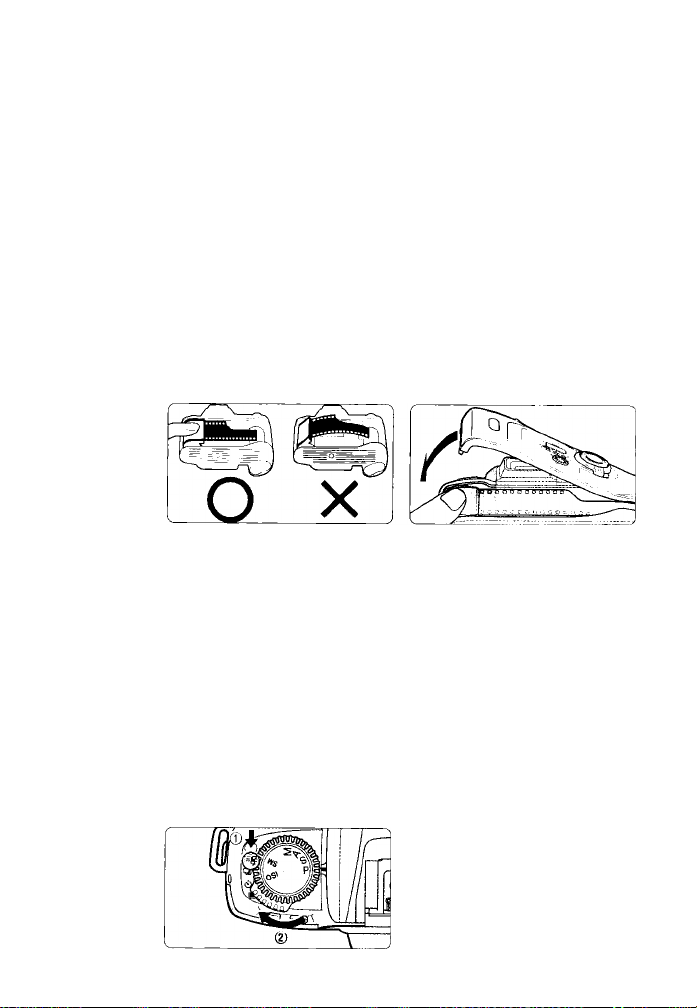
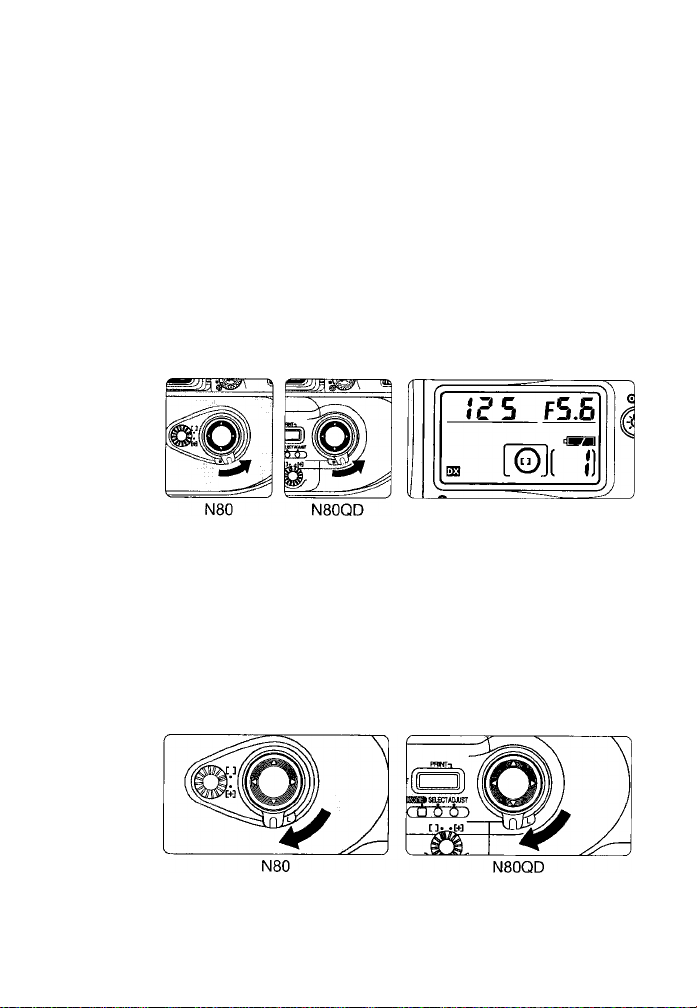
3. 1
Turn the power switch on, confirm that the film
speed setting is set to E0, then open the camera
back by sliding the camera back lock release lever.
3. 2
• If the film speed setting is not set to BH, see page 36.
Insert film from the bottom side and pull film leader
out to red index mark.
> Do not insert the film leader beyond the red index mark.
NOTE: Loading/removing filin
__________________________
Shutter curtains are very thin. Do not
touch the shutter curtains with your finger
or the film leader.
20
IZI Check points
□ To change film speed with DX-coded film or select film advance mode,
see pages 36-37.
□ Shutter curtains are very thin. Do not touch the shutter curtains with
your finger or the film leader.
□ Avoid direct sunlight when changing film outdoors.
z
o
oc
UJ
Q.
o
o
m
3. 3
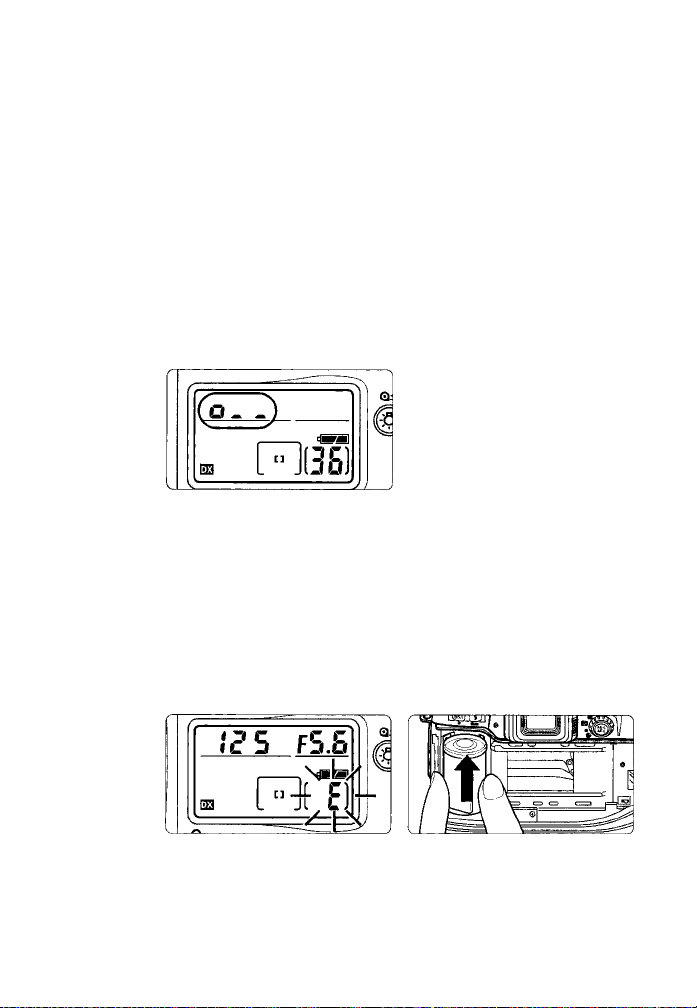
3. 4
Hold the film cartridge and ensure film is properly
positioned with no slack, then gently close the
camera back until the camera back snaps closed.
Film automatically advances to the first frame.
• When i appears on the LCD panel, the film has advanced to the first frame.
•When Err and E blink in the LCD panel and viewfinder, fiim is not
properiy installed. Open the camera back again and reioad film.
• QH and Err in the LCD panel and Err in viewfinder blink and the shutter
locks when a non-DX-coded film is loaded with camera film speed set to
IH. Set film speed manually (page 36).
• Frame number display remains when the power switch is off.
• You can check the number of avaiiabie exposures on the fiim roll through
the film cartridge confirmation window.
• Infrared films cannot be used since an infrared sensor is used for the
detection of the film frame position.
8: Camera can be set to advance the film to the first frame not until
the shutter release button is pressed (page 72).
Set the film advance mode selector to E] (single
frame shooting) while pressing the film advance
mode selector lock release.
21
4
Set Focus Mode, AF Area Mode and Focus Area
Set the focus mode to S (Single
Servo AF), AF Area mode to C ]
(Single Area AF) and focus area
to center.
4. 1
Set the focus mode selector to S (Single Servo AF).
4. 2
• Make sure to turn the focus mode selector until it clicks into position.
• To focus, lightly press the shutter release button (page 27).
[gffl f I: Autofocus detection can be set to start by pressing the AE-L7
AF-L button only (page 73).
Set the AF Area mode selector to [ ] (Single Area AF).
•
IE 5 f5.S
an
L0J
( i)
——y
019 i?5 f5.6 ”
• Set the AF Area mode selector firmly.
22
\Z Check points
□ Do not attempt to rotate the lens focus ring manually while the focus
mode is set to S or C.
□ With the focus mode set at S (Single Servo AF), the shutter cannot be
released when the subject is out of focus.
□ See pages 38-42 for details regarding focus mode, AF Area mode and
focus area.
□ See page 46 for situations where autofocus may not work as expected.
z
g
cc
LU
O.
o
o
CO
<
ffl
4. 3
4. 4
Rotate the focus area selector lock lever and select
center focus area with the focus area selector.
• Pressing the focus area selector up/down/right/left shifts the focus area
toward the desired direction. Press the focus area selector while the
exposure meter is on (page 42).
• Selected focus area is indicated in the LCD panel and vie\wfinder (page
42).
ED 5: Focus area indication in red when the subject is dark can be
canceled or can be set to appear in any situation (page 72).
Rotate the focus area selector lock lever to lock
focus area.
> When the focus area is locked, pressing the focus area selector does not
change the focus area.
23
5
Set Metering System and Exposure Mode
Set metering system to K
(Matrix Metering) and exposure
mode to P (Auto-Multi
Program).
5. 1
Set the metering system selector to K (Matrix
Metering).
□
,5.6'
5. 2
' Matrix Metering indication HI appears in the viewfinder.
' The frame is divided into 10 segments in Matrix Metering, and data from
each segment is used to determine correct exposure. Use of a D- or G-
type Nikkor iens automaticaily activates 3D Matrix Metering (page 48),
which accounts for scene brightness and contrast, as weli as subject
distance (Distance information) in order to determine exposure accurateiy.
Set the exposure mode select dial to P (Auto-Multi
Program).
I When the shutter reiease button is iightly pressed, shutter speed and
aperture appear in the LCD panel and viewfinder.
24

Z] Check points
□ Three metering systems—the N80/N80QD features Matrix, Center-
Weighted and Spot Metering (page 48).
□ Four exposure modes—the N80/N80QD features Auto-Multj Program,
Shutter-Priority Auto, Aperture-Priority Auto and Manual exposure
modes. Each exposure mode provides a choice of exposure controls
for various shooting situations. See step 5.2 for a summary of each
exposure mode and its reference page for operating instructions and
details.
!<
QC
UJ
Q.
O
O
in
<
CO
z
o
Shooting characteristics of exposure modes
Symbol Exposure mode
Shooting characteristics
P
Auto-Multi
Program P. 50
Camera controls shutter speed and
aperture automatically—allowing you to
freely take pictures, concentrating only on
the shutter release opportunity. In addition,
other settings, such as Flexible Program
(page 51) or exposure compensation (page
60) are possible.
s
Shutter-Priority
Auto P. 52
You set desired shutter speed, and the
camera selects the correct aperture.
“Freeze” the motion of a moving subject
using a fast shutter speed or “blur" the
subject using a slower speed.
A
Aperture-Priority
Auto P. 54
You set the desired aperture, and the
camera selects the correct shutter speed.
Lets you determine depth of the in-focus
area (page 88), so you can choose whether
near or far subjects are in sharp focus, or
whether foreground or background is to be
blurred.
M
Manual P. 56
Shutter speed and aperture are set
manually. Suitable for situations where it is
difficult to attain the desired effect using
other exposure modes. Also, use Manual
exposure mode when using a non-CPU
Nikkor lens. (Camera’s exposure meter
cannot be used.)
25
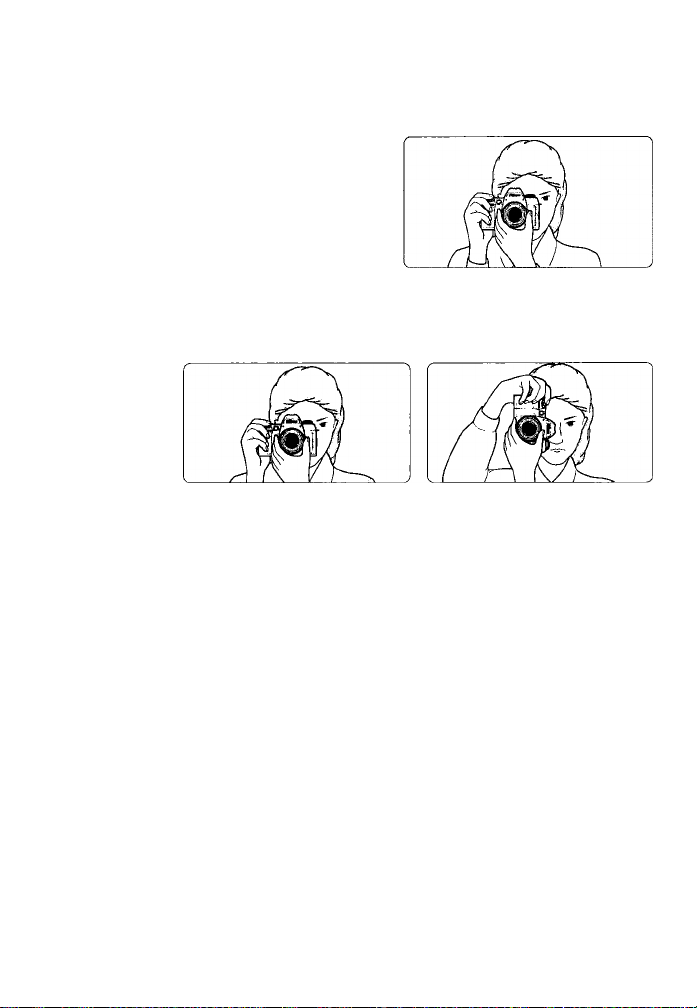
6
Hold Camera and Focus
Lightly pressing the shutter
release button automatically
focuses the camera on the
subject and when the subject is
in focus, causes • to appear in
the viewfinder.
6. 1
Hold the camera properly.
> Keep your elbow propped against your body for support.
• Stand with one foot forward a half step and keep your upper body still.
• Grasp the camera handgrip with your right hand and use your left hand to
cradle the camera (or lens).
Camera shake and shutter speed
Preventing camera shake is crucial when taking photographs. In
general, you should set the shutter speed faster than 1/60 sec. Use of a
tripod or Speedlight (pages 30, 78) is recommended for shooting at
shutter speeds slower than 1/60 sec.
NOTE; Composing frame
This camera’s viewfinder frame shows approximately 92% of the image
actually exposed on the film frame. Therefore, the actual exposed frame
is somewhat larger than the image you see through the viewfinder. Note
that the edges of a negative film are partially cropped by most labs.
26
ZI Check points
----------------------------------------------------------------------- o
□ Diopter adjustment (page 66) enables you to see more clearly through ^
the viewfinder. o|
□ To take a picture of a subject outside the focus area, shift the focus °
area by using the focus area selector (page 42) or use focus lock (page jg
44). 2
□ N80QD only: You can imprint date and/or time on your photos/
negatives (page 90).
z
6.2
Compose frame and focus by lightly pressing the
shutter release button.
• Center the focus brackets on your subject and lightly press the shutter
release button. The camera focuses automatically and focus indicator
appears or blinks as follows.
• appears: Subject is in focus.
• blinks: Unable to focus using autofocus.
• With dark subjects, the camera’s AF-Assist Illuminator (page 43) is
automatically activated to guide autofocus.
• To take a picture of a subject outside the focus area, shift the focus area
by using the focus area selector (page 42) or use focus lock (page 44).
• In situations where autofocus may not work as expected, see page 46.
27
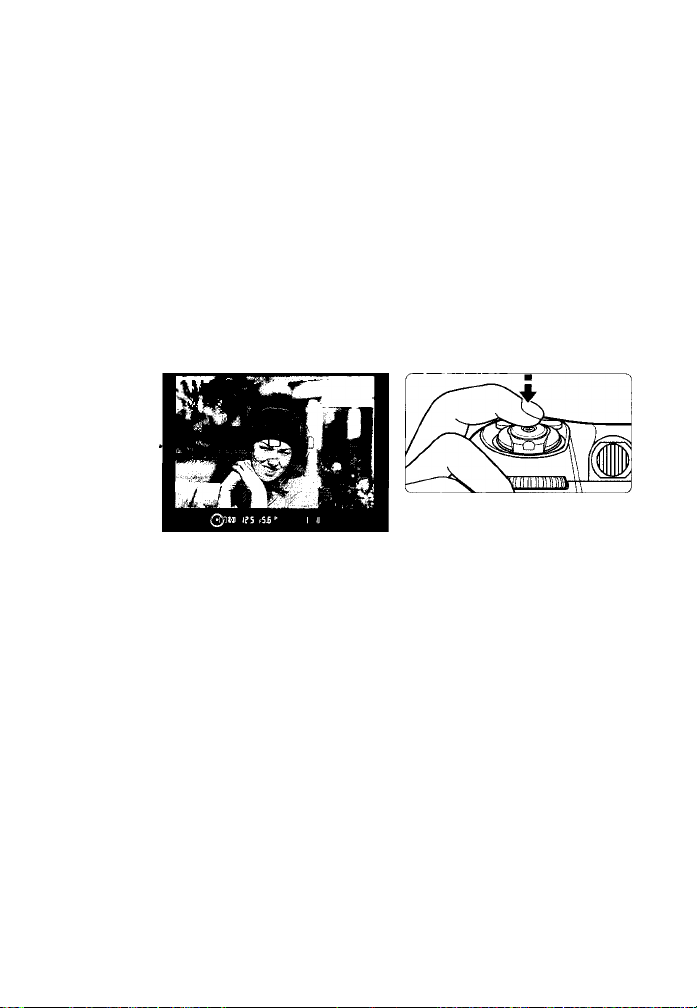
7
Confirm Indications in Viewfinder and Release Shutter
Confirm that • (in-focus
indicator) appears in the
viewfinder, then slowly, fully
depress the shutter release
button. Camera automatically
tracks subject that has been
moving (page 88).
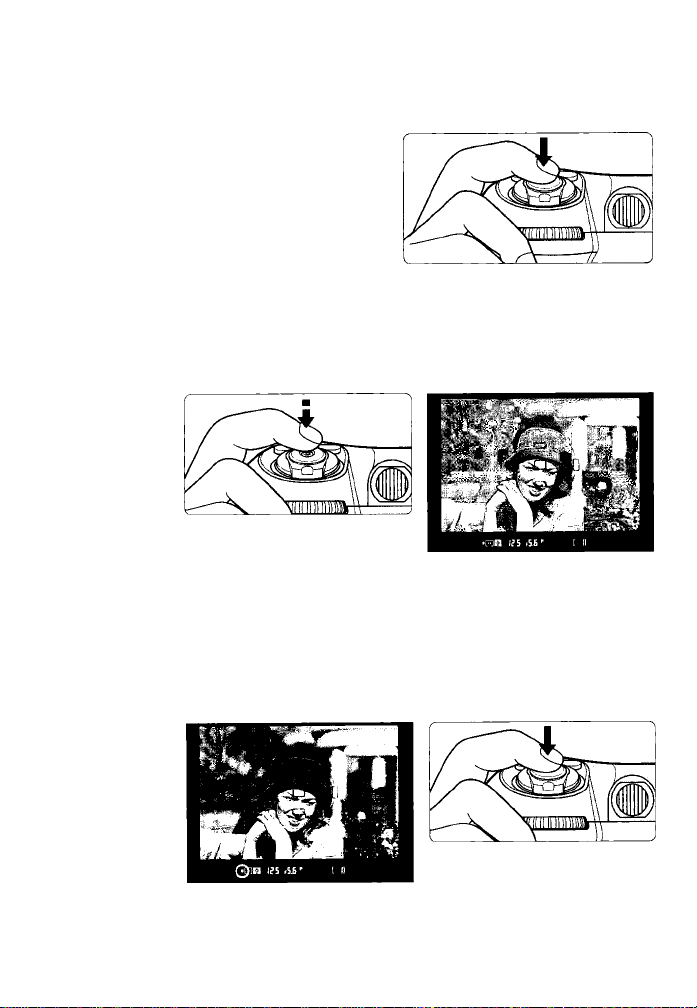
7. 1
Confirm indications in the viewfinder while lightly
pressing the shutter release button. (Shutter speed
and aperture are shown in 1/2 steps.)
7. 2
• When the subject is dark or the shutter speed is slower than 1/60 sec.,
use the built-in Speedlight to avoid picture blur (page 30).
• If any warning indications appear in the LCD panel or view/finder, see
page 101.
Confirm that focus indicator • appears and slowly
depress the shutter release button.
> After shutter is released, the film automatically advances to the next
frame and the next shot can be taken.
28
Check points
□ Focus, shutter speed and aperture can be confirmed in the viewfinder. If any
other warning indications appear, see page 101.
□ When you reach the end of the film roll, the film starts to rewind automatically.
□ For mid-roll rewind, see page 36.
□ For self-timer operation, see page 68.
Q When the camera back is opened before the film is completely rewound
(before f blinks), warning indication (blinking o.. and frame counter) appears
in the LCD panel and viewfinder. Refer to page 103 for troubleshooting.
<
cc
lU
Q.
O
g
M
<
m
7.3
7.4
Film starts to rewind automatically when film reaches
the end of the roll.
• o.., o. and then o appear in the LCD panel and viewfinder during film
rewind and the frame counter counts down until rewind is complete.
• Pictures taken on frames beyond the indicated number of the exposures
for the film roll may be discarded in the process of developing.
I: Film rewind can be changed not to start automatically when the
end of a film roll is reached (page 71).
13: Fligh-speed film rewind is normally executed. This film rewind can
be changed to quiet film rewind (page 74).
Confirm that film is completely rewound, then
remove film cartridge.
• Film Is completely rewound when the frame counter shows blinking in
the LCD panel and viewfinder, (f appears without blinking when the
exposure meter is off.) Make sure the film is completely rewound (E is
blinking in the LCD panel and viewfinder), open the camera back away
from sunlight and remove the film cartridge by tilting it to one side.
29
8
Using Built-In Speedlight
When the subject is dark or the
shutter speed is slower than
1/60 sec., use the built-in
Speedlight to avoid picture blur.
Speedlight photography is also
suitable for shooting backlit
subjects.
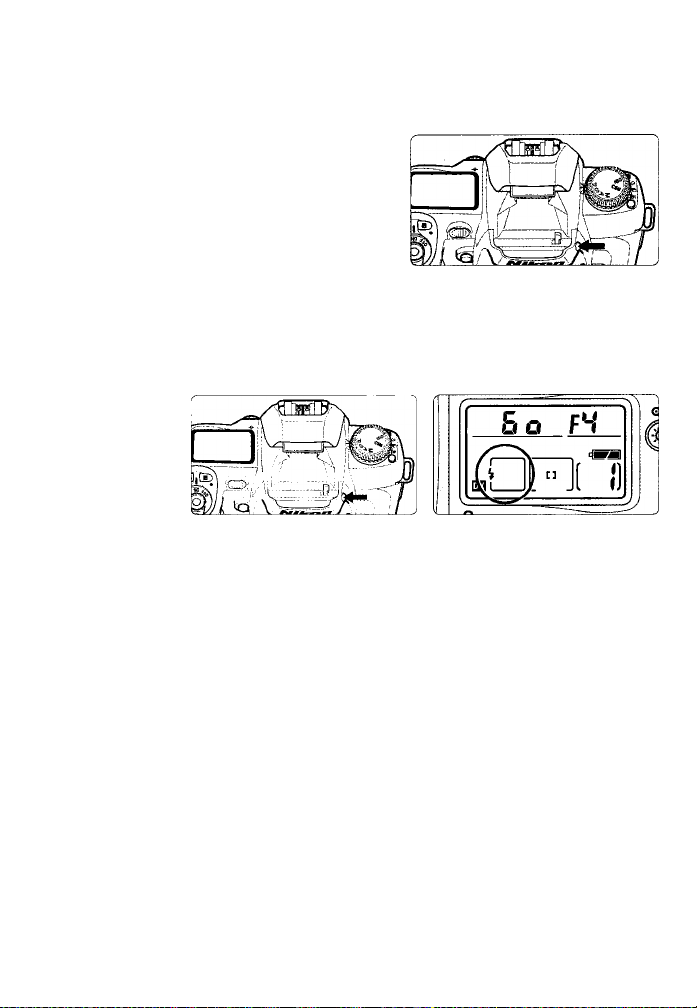
8.1
Press the Speedlight lock-release button to release
the Speedlight. The Speedlight starts charging
automatically.
> See page 80 if the flash sync mode is not set to the normal Front-Curtain
Sync.
> When the Speedlight is ready to fire, i appears without blinking in the
viewfinder (when the camera’s meter is on).
> To close the Speedlight, press gently until it clicks shut. (To conserve
power, keep the Speedlight closed when it is not in use.)
Suitable situations for use of Speedlight
' Shutter speed is slower than 1/60 sec.
• Subject is dark at night or indoors.
• Subject is backlit or when more light is desired on the main subject,
such as the subject’s face.
NOTE: Continuous use of built-in Speedlight
After continuous use of the built-in Speedlight, it may stop firing to
protect the firing tube. Wait for a while before using the Speedlight
again.
30
Loading...