


FG
Nikon
INSTRUCTION
MANUAL
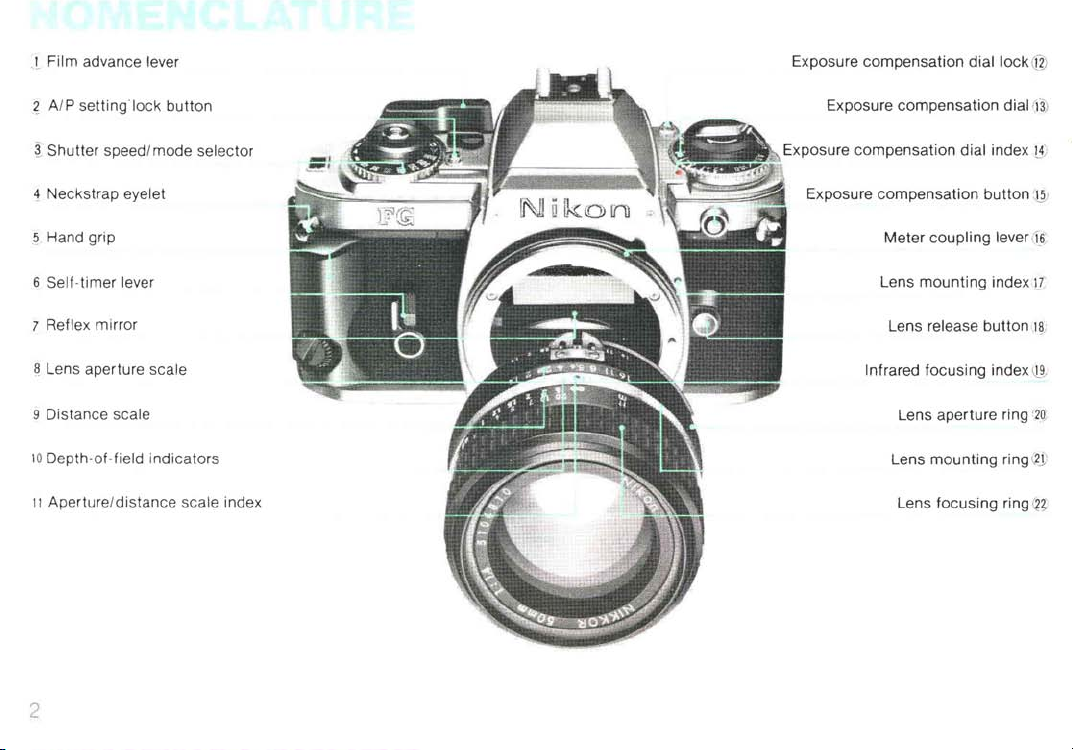
J Film advance lever
Exposure compensation dial lock@
.
~
Al P setting lock button
~
•..
Shutter speedl mode selector
Neckstrap eyelet
4
5. Hand grip
6
Self-timer lever
7 Reflex mirror
8 Lens aperture
scale
9 Distance scale
10 Depth-of-field indicators
11 Aperture/distance scale index
Exposure compensation dial 1-
Exposure compensation dial index lj)
Exposure compensation
Meter coupling
Lens
mounting
button~)
lever(f_6~
index
lJ
Lens release button'I§;
focusing index Q9/
Infrared
Lens aperture ring 12
Lens
mounting
ring
(2J;
Lens focusing ring (n
3)
~
11;
2
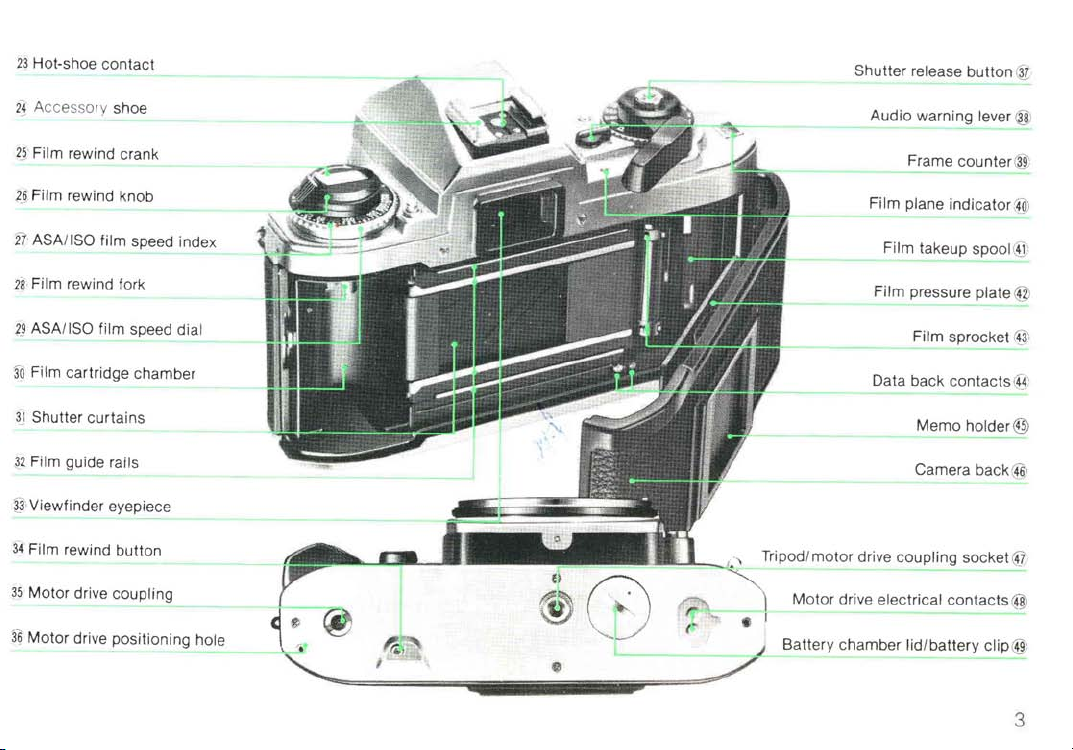
n Hot-shoe contact
21'
Accessory shoe
2§
Film rewind crank
2§
Film rewind knob
2't
ASAIISO film speed index
28
-Film rewind fork
release button ®
Shutter
Audio warning
Frame
Film plane indicator@
Film takeup spool @
Film pressure plate @
lever @
counter@
)~ASA/ISO
'3d
Film cartridge chamber
3-1 Shutter curtains
JZ Film guide rails
~J
'
Viewfinder eyepiece
34
Film rewind button
35
Motor drive coupling
film speed dial
3g Motor drive positioning hole
~
~.' ~"
~~==i=-"='~
:,:.-
~,.
....
e
..
?A
r'
~~~
Tripod/motor drive
'''' • I
~
~
sprocket @
Film
Data back contacts
Memo
Camera back@
coupling socket @
Motor drive electrical contacts @
Battery chamber lid/battery clip@
(f4
holder @
3
;
NOMENCLATURE ...........................
FOREWORD ................................
BASIC
OPERATION .........................
NIKON
AND
FOR
THE
CONTROLS
NIKON
NIKKOR
IN
LENSES
FG
.......................
DETAIL .....................
Shutter Speed! Mode Selector Dial.
Exposure Measuring System
LED
Viewfinder Indications
Exposure information
...............
................
..................
Improper exposure warning information . .
Flash ready-light information
How
To
Determine Shooting Modes
P-
programmed exposure mode
A-automatic
exposure mode
Manual exposure mode
Shutter Release Button
Film Advance Lever
Frame Counter.
Audio Warning Lever
ASAIISO Film Speed
.......................
..........................
......................
DiaL
Exposure Compensation Dial
Exposure Compensation Button
Self-Timer Lever
Film Plane Indicator
Handgrip
Memo Holder
..........................
......................
................................
............................
Infrared Focusing Index
4
...................
...................
...........
................
.............
..............
.........
.........
.........
.......
..........
2
FLASH
PHOTOGRAPHy
5 Accessory Shoe .
6 Viewfinder Ready-Light.
Nikon
FG
19
CLOSE·UP
20
ACCESSORIES ............................
20
21
22 Data Back
22 Other Accessories
23
23
24
24
Electronic Flash Units
Motor Drive
TIPS
OPTIMUM
SPECIFICATIONS
IMPORTANT ...............................
and Speedlight Combinations
PHOTOGRAPHY ................
MF-15
ON
CAMERA
BATTERY
28
35
38
39
39
40
'"
.
41
42
"
43
44
44
45
46
46
....................
.........................
..................
.....................
MD-14
........................
.........................
........................
CARE ...................
PERFORMANCE ......
..........................
....
47
48
48
49
50
52
52
53
54
55
58
59
60
63
As
Nikon's selective-exposure 35mm
the Nikon
exposure programming but also aperture-priority
automatic exposure as well as full manual control.
Compact and lightweight, the
such advanced photographic features as
sure compensation dial,
button and
matching electronic flash with TTL measurement,
automatic motor drive and automatic data back.
And of course with the
into the comprehensive Nikon
interchangeable lenses and a host of accessories
and equipment.
study the instructions
basic operation and all controls and features are
explained in detail. Practise using your
film until you are familiar with the simple operating
instructions, then keep this manual
ready reference. A few minutes now
surance of the best future results as you enter the
exciting world of selective-exposure photography
with the Nikon
FG
gives you the choices not only of total-
FG
an
an
audio warning system, plus its own
To
FG.
exposure compensation
FG,
you've full admission
get the most out of your
in
this manual carefully. Every
SLR
camera,
additionally offers
System of over sixty
FG
on
is
an
expo-
FG,
without
hand for
your as-
5
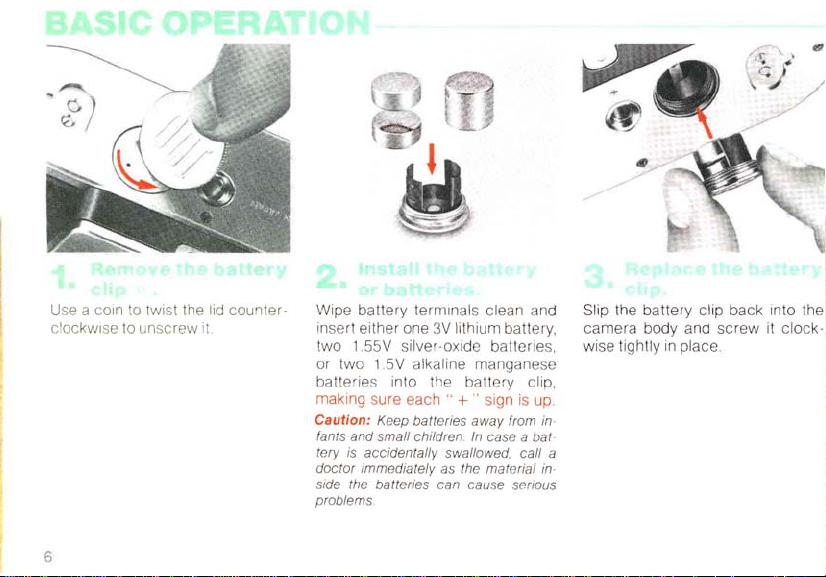
U
se a cO
in
to twist the lid counter-
cloc kwi se to unscrew
6
clip,
in
Slip the
camera
wise tightly
a
Wipe battery terminals clean and
it
insert either one
two 1.
SSV
or
two
batte ries into the
making sure
Caution: Keep batteries away from in-
fants and small children
tery
is accidentally swallowed,
doctor
immediately as the material
side the batteries can cause serious
problems
3V
lithium battery,
silver-oxide batteries ,
1
SV
alkaline manganese
battery
each"
+ " sign is up
In
case a bat
call
battery
clip back into the
body and
in
place.
screw
it clock-
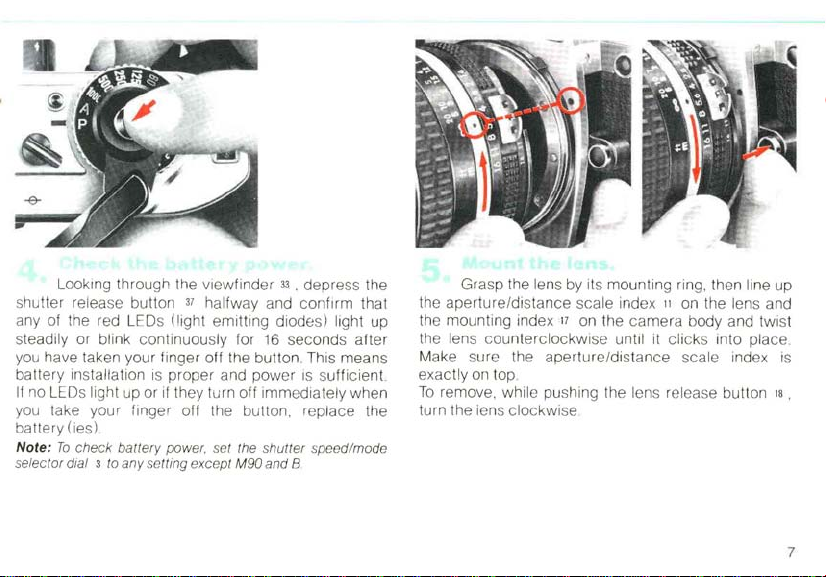
Looking through the view
shutter release button
any of the red LEDs
(light emitting diodes) light up
steadily or blink continuous ly for
finder
37
halfway and
33
. , depress the
confirm
16
seconds
that
after
you have taken your finger off the button. This means
battery installation is proper and
If
no LEDs light up or if they turn off immediately when
you take yo ur finger off the
power
IS s
ufficient
bulton, replace
the
battery (ies)
Note:
To
check
battery
powe
r,
set the
shutter
speed/
selector dial
3 to any setting except
M90
and
mode
B
Grasp the lens by its mounting ring, then line up
aperture/distance
the
the mounting index
the lens cou
nterclock
scale index
17 on the ca
lion
mer
the lens and
a bo
dy
and twist
wise until it clicks into place.
Make sure the apertur e/d istance scale index is
exa ctly orl top
To remove, while pushing the lens release button
turn the iens
clockwise
18
7
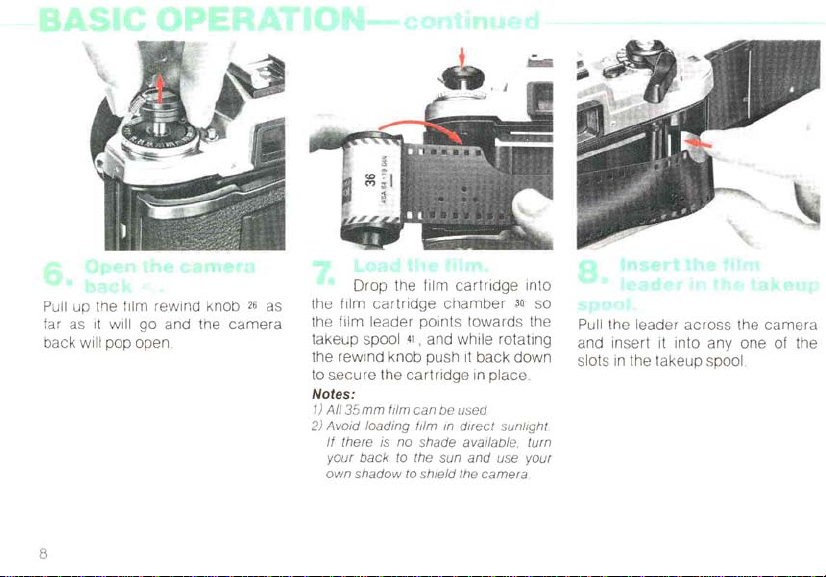
Pull up the film rewind knob
far as
It
will go and the
back will pop open .
8
26
as
camera
Drop the film
the film
the
cartridge
film leader pOints towards the
takeup spool
the rewind knob push
to
secure
Notes:
1)
2) Avoid loading
the
AI135mm
If
your
own
film
there is no shade available. turn
back
shadow
cartridge
chamber
.41,
and while rotating
It
cartridge
can
film
to the sun
to shield the
in
be used
In
direct
and
back down
camera
,10.
place
sunlight
use your
into
so
Pull the leader
and insert it into
slots
across
in
the takeup spool
the
anyone
camera
of the

Advanc e the takeup spool slightly with your finger to
engage
th
takeu
located properly between both guide rails
that there is no film slack
e film's perfo rations with t
p spool and the sprocket 43 Confirm the film is
he
tee
th
of the
nand
Alternately wind the film advance lever a
the shutter release button until the perforation s on
both film edges are securely engaged with the
sprocket teeth a
nd the film
is
adva nced properly
nd
depress
9
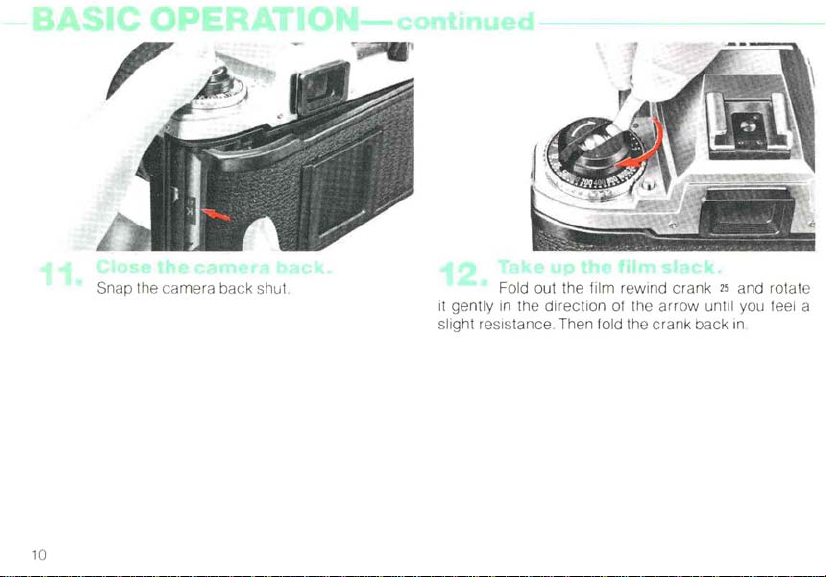
10
Snap the camera back
shu1.
Fold out the film rewind crank
it
gently
in
the direction of the arrow until you leel a
slight resistance. Then
fold the crank back
25
and rotate
in
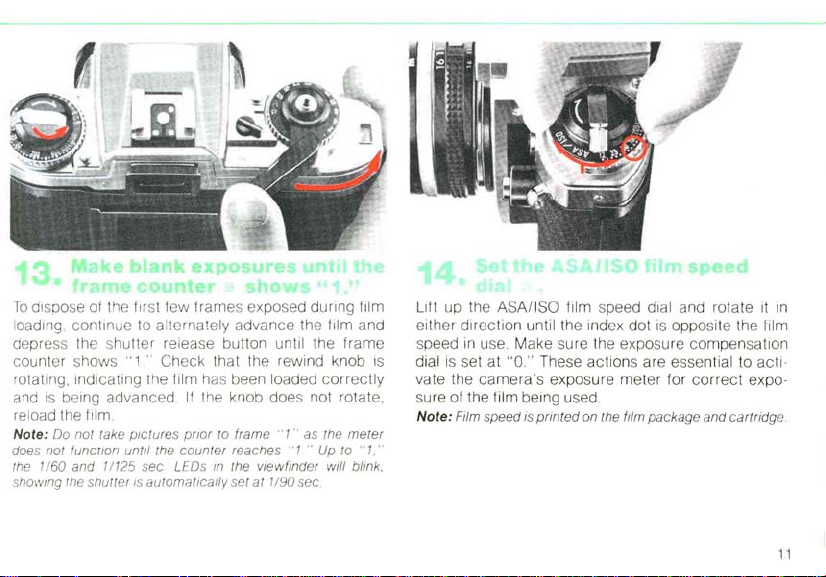
To
dispose of the first few frames exposed during film
loading continue to alternately advance the tilm and
depress the shutter
counter shows
rotatin
g,
and
re
Note:
does not funcflon until the
the 1/60 and 11
showing the shutter is automatically set
indicating the film has been loaded
IS
being advanced
load the film
00
not take pictures prior to frame ., 1 .. as the
re
lease button until the
"1
' Check that the rewind knob IS
If
the knob does not rotate.
counter
125
sec
reaches
LEO
s in the viewfinder will blin
at
1/90 sec
'1"
frame
correctly
meter
Up to
"1
Lift up the ASAIISO film speed dial and rotate it
either direction until the index dot
speed
in
dial is set at
vate the
su
Note: Film speed
,"
k.
use. Make sure the exposure compensation
"0
..
These actions are essential to acti·
camera's
re
of the film being used.
is
printed on the film package and cartridge.
exposure
is
meter
opposite the film
for
correct
expo-
in
11
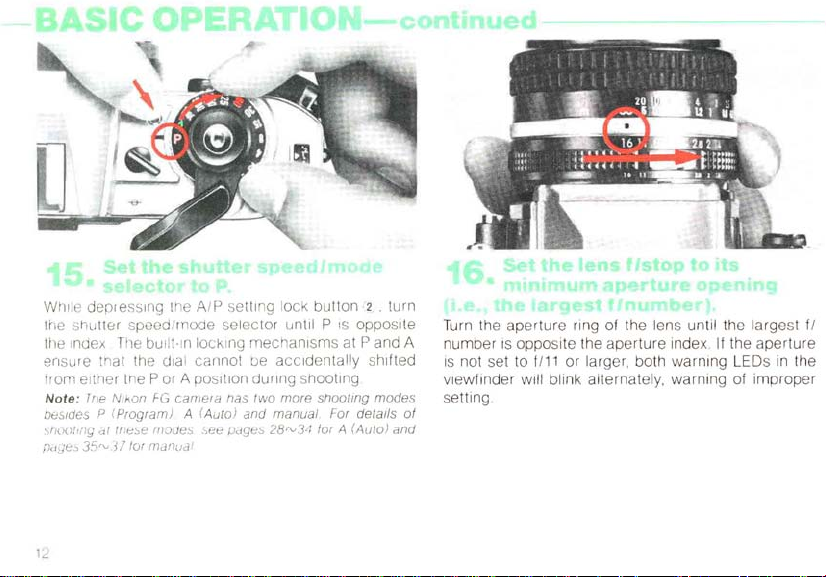
While depre ssing the AlP setting lock
th
e srlutter speed/mode sel ector until P
[fI
e Index The
su
re trlat the dial carmot be ac c identally shifted
en
tram eltrler- the P or A position
Note
: Tfl e Nikon FG
oesldes P (Progra
st-;oot
lng
[JdJ8
"
35,v37
il
bU
m)
"I
tnc:"e moUes ,s
tor
manua
ilt-In locking
ca
mera
tlas two more sh
A (Auto) a
ee
;Jage0
l
mechani
dur
nd manua
button
sms at P and A
ing shooting
l For
28,v3,1 for A (Auto) a
is
oali
(2 . turn
oppos ite
ng
modes
det
ails
Turn the aperture ring
numb
er IS
IS
not set to
der
view fin
setting
of
nd
of
oppo
site the aperture index,
t111
or larger, both
the lens until the largest fl
If
warning
will blink alternately, warning of
the a
LEDs
pertur
in
improp
e
the
er
,
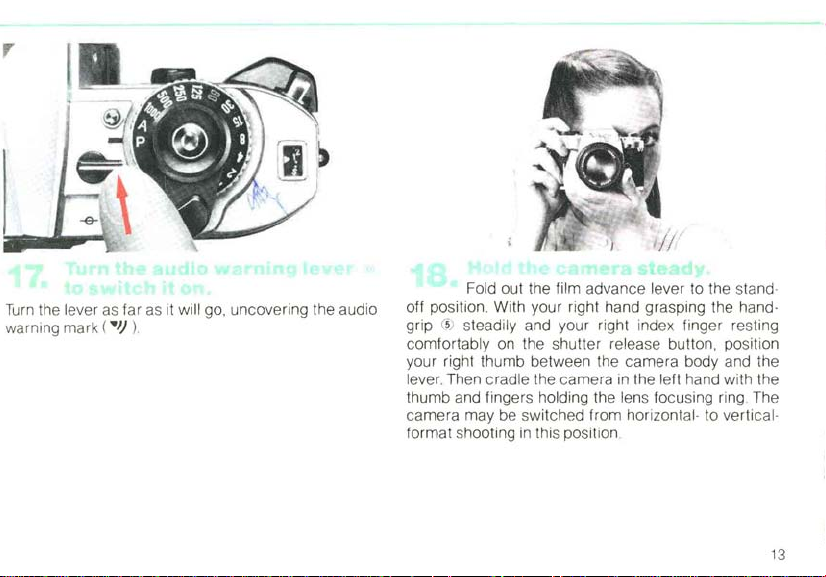
Turn
the lever
warning mark
as
(
"J)
far
as
it
will go, uncovering the audio
).
off position. With your right hand grasping the hand·
grip
comfortably
your right thumb between the camera body and the
lever. Then cradle the camera
thumb and fingers holding the
camera may be switched from
format shooting
Fold out the film advance lever to the stand·
(5
) steadily and your right index finger resting
on
the shutter release button, position
in
the left hand with the
lens focusing ring The
in
this position
horizontal· to vertical·
13
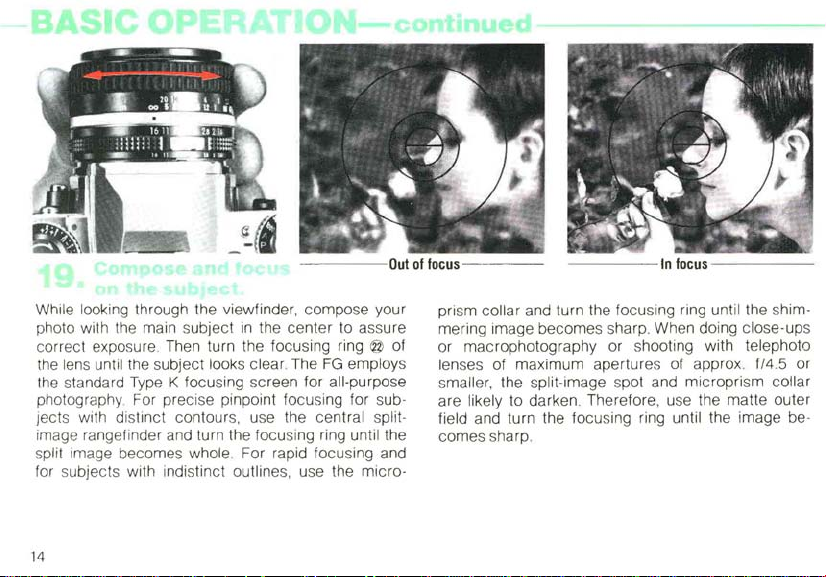
While looking through the viewfinder, compose your
photo with the main subject
correct exposure. Then turn the focusing ring
the lens until the subject looks clear. The
in
the center to assure
FG
employs
@ of
the standard Type K focusing screen for all-purpose
photography. For precise pinpoint focusing for sub-
jects with distinct contours, use the central split-
image rangefinder and turn the focusing ring until the
split image becomes whole . For rapid focusing and
for subjects with indistinct outlines, use the micro-
14
prism collar and turn the focusing ring until the shim-
mering image becomes sharp. When doing close-ups
or macrophotography or shooting with telephoto
lenses of maximum apertures of approx.
f/4.5 or
smaller, the split-image spot and microprism collar
are likely to darken. Therefore, use the matte outer
field and turn the focusing ring until the image becomes sharp.
6
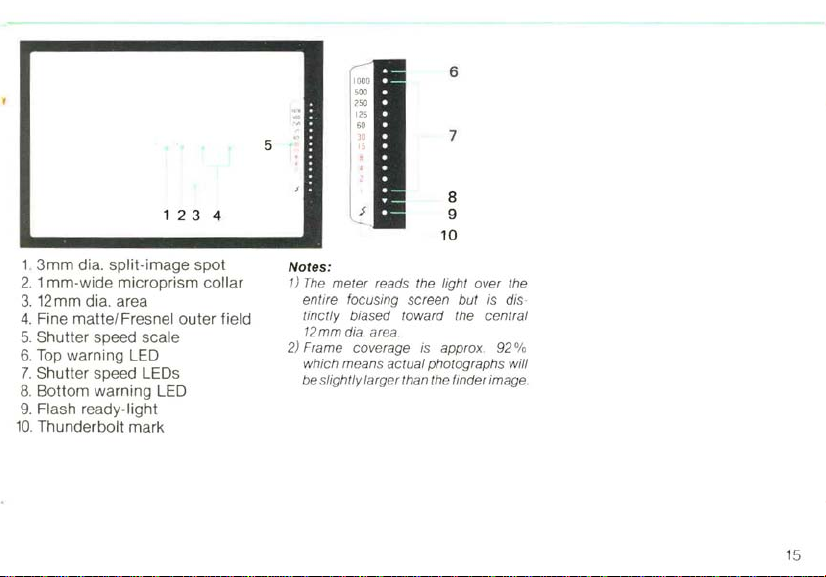
1
3mm
dia. split-image spot
1.
2. 1 mm-wide microprism
3.
12mm dia. area
4. Fine matte/
Fresnel outer field
5. Shutter speed scale
6.
Top
warning LED
7.
Shutter speed LEDs
8. Bottom warning LED
9.
Flash ready-light
10.
Thunderbolt mark
23
4
collar
5
Notes:
1)
The
meter
entire focusing
tinctly biased toward the
12mm dia area.
2)
Frame coverage
which means
be slightly larger than the finder image
reads the light over the
sc
reen but
is
actu
al photographs will
7
8
9
10
is
dis·
centr
approx 92 %
al
15
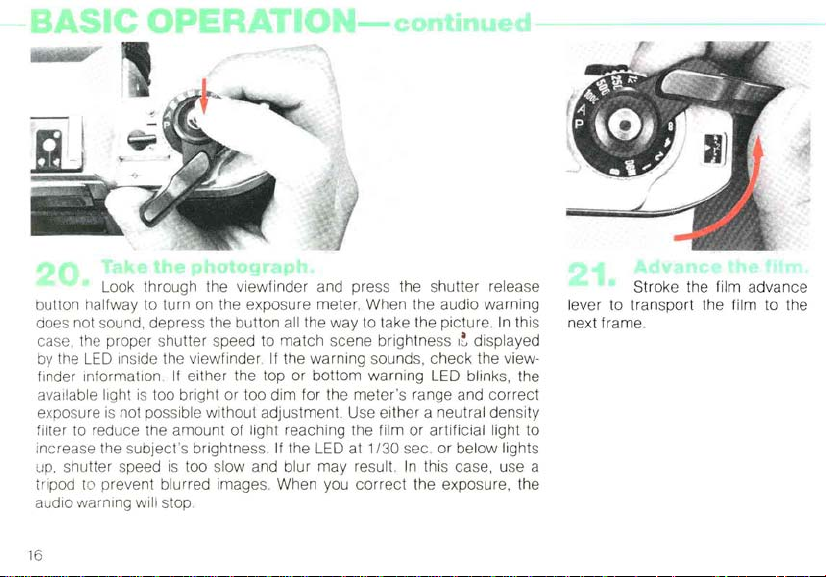
button halfway to turn on the exposure meter. When the audio warning
does not sound. depress the button
case, the proper shutter speed to
by
finder Information.
available light
exposure
filter to reduce the amount of light reaching the film or artificial light to
increase the subject's brightness
up.
tripod to prevent
audio warning
Look through the viewfinder and press the shutter release
all the way to take the picture .
match
the
LED
Inside the viewfinder. If the warning sounds, check the view-
If
either the top or bottom warning LED blinks, the
is
too bright or too dim for the meter's range and
is
not possible without adjustment. Use either a neutral density
shutter speed
is
too slow and blur may result.
blurred images. When you
will stop
scene brightness It displayed
If the LED at
1/30
sec or below lights
In
correct
the exposure, the
this case, use a
In
correct
16
lever to transport the film to the
this
next frame.
Stroke the film advance
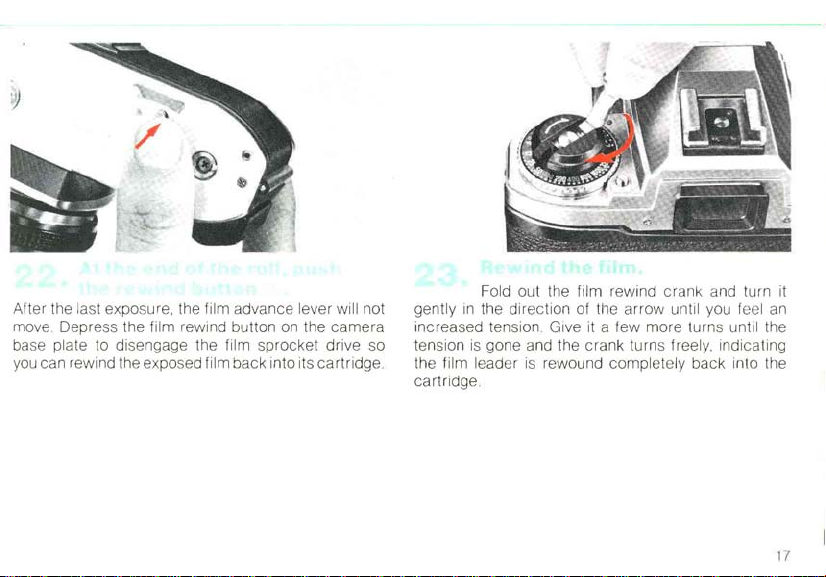
After the last exposure, the film advance lever will not
move Depress the film rewind button
base plate to disengage the film
you can rewind the exposed film back into its
on
the
sprocket
camera
drive so
cartridge
gently
increased tension . Give it a
tension
.
the film leader
cartridge
Fold out the film rewind crank and turn it
in
the direction of the
is
gone and the crank turns freely. indicating
is
.
arrow
until you feel an
few
more turns until the
rewound completely back into the
17
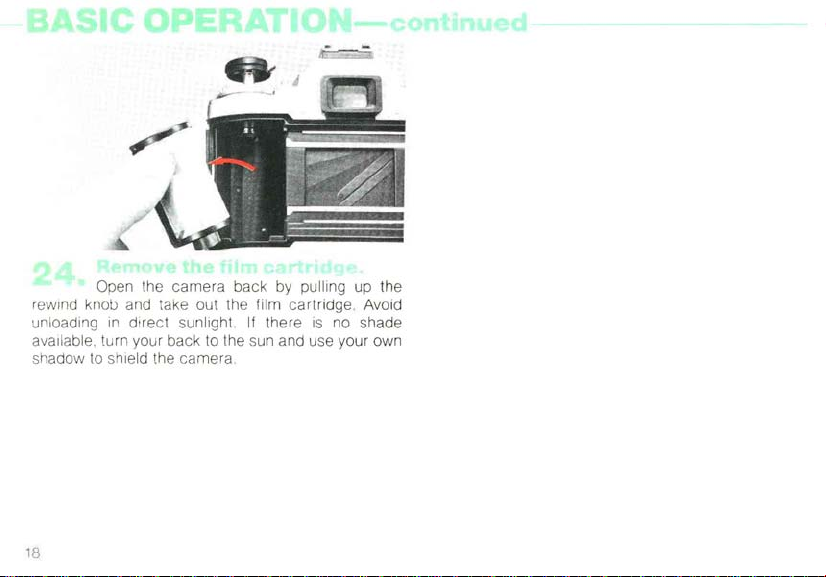
Open the camera back by pulling up the
knoll and take out the film cartridge. Avoid
rewind
unloading
available, turn your back to the s
shadow
in
direct sunlight
to shield the camera
If
there
un
18
is
no shade
and use your own
The
lenses usable for the Nikon
Nikon/Nikkor lenses, including most of the
lenses, certain Reflex Nikkor and
verted
lenses. Non-AI Nikkor lenses and lenses of other
manufacturers which do not have the
not
be
forcibly mounted
such
lenses will damage the camera's indexing
mechanism. Note that
the following lenses cannot
AI-converted
AI-converted
AI-converted
Fisheye Nikkor
Fisheye Nikkor lOmm f/5.6
Reflex
Reflex
PC
Nikkor
PC
Nikkor 35mm f/2.8 (No. 851001"-'906200)
Zoom Nikkor 180,,-,600mm
(No. 174180 or smaller)
Zoom Nikkor 200"-'600mm f/9.5
(No.
Zoom Nikkor 360"-'1200 mm
(No. 174127 or smaller)
Focusing Unit
55mm
f/1.2 (No.
28mm
f/3.5 (No. 625611,,-,999999)
35mm
f/1.4 (No. 385001 "-'400000)
6mm
Nikkor 1000mm
Nikkor 2000mm f/11(No. 200310 or smaller)
28mm
f/4 (No. 180900 or smaller)
301922 or smaller)
AU-1
FG
are
all
the AI-type
PC
AI
on
the
FG.
in
addition to non-AI lenses
be
used: '
f/5.6 (all lenses)
OP
f/11
(No. 143000 or smaller)
fl8
f/11
feature must
Attempts to mount
184711
"-'970110)
(all lenses)
ED
ED
AI
con-
Nikkor
When
TC·200,
using
TC·201,
the
Teleconverter
TC·301
or
TC·14A
Exposure compensation, which
when using Nikon
having a maximum aperture faster than f/2 or
faster than f/1.8 (when using the
not necessary when using the
mode.
In
actual shutter speed will
indicated
step. Therefore, before shooting,
the shutter speed LED(s)
indicates a speed
the manual mode, exposure compensation
using the
See
complete details.
ASA/ISO film speed dial
the teleconverter's instruction manual for
AI-type cameras with lenses
the A mode, however, note that the
in
the viewfinder by less than one
slower than 1/250 sec.
is
TC-14A),
FG
in
its P or A
be
faster than that
be
sure that
in
the viewfinder
is
necessary.
required
is
In
19
 Loading...