


fe
Table of contents
 Loading...
HP • - ^
i ]
TTr
Э;иКЛ0ДЭ1 OjpUH§ JO ÁS0;jn03
nvriNVIA) tvOlOnyiSNI
4
p ;
;'f
laN DNISNai MMAV ^4 painquisiQ
■ j *.
11
[
I I
411
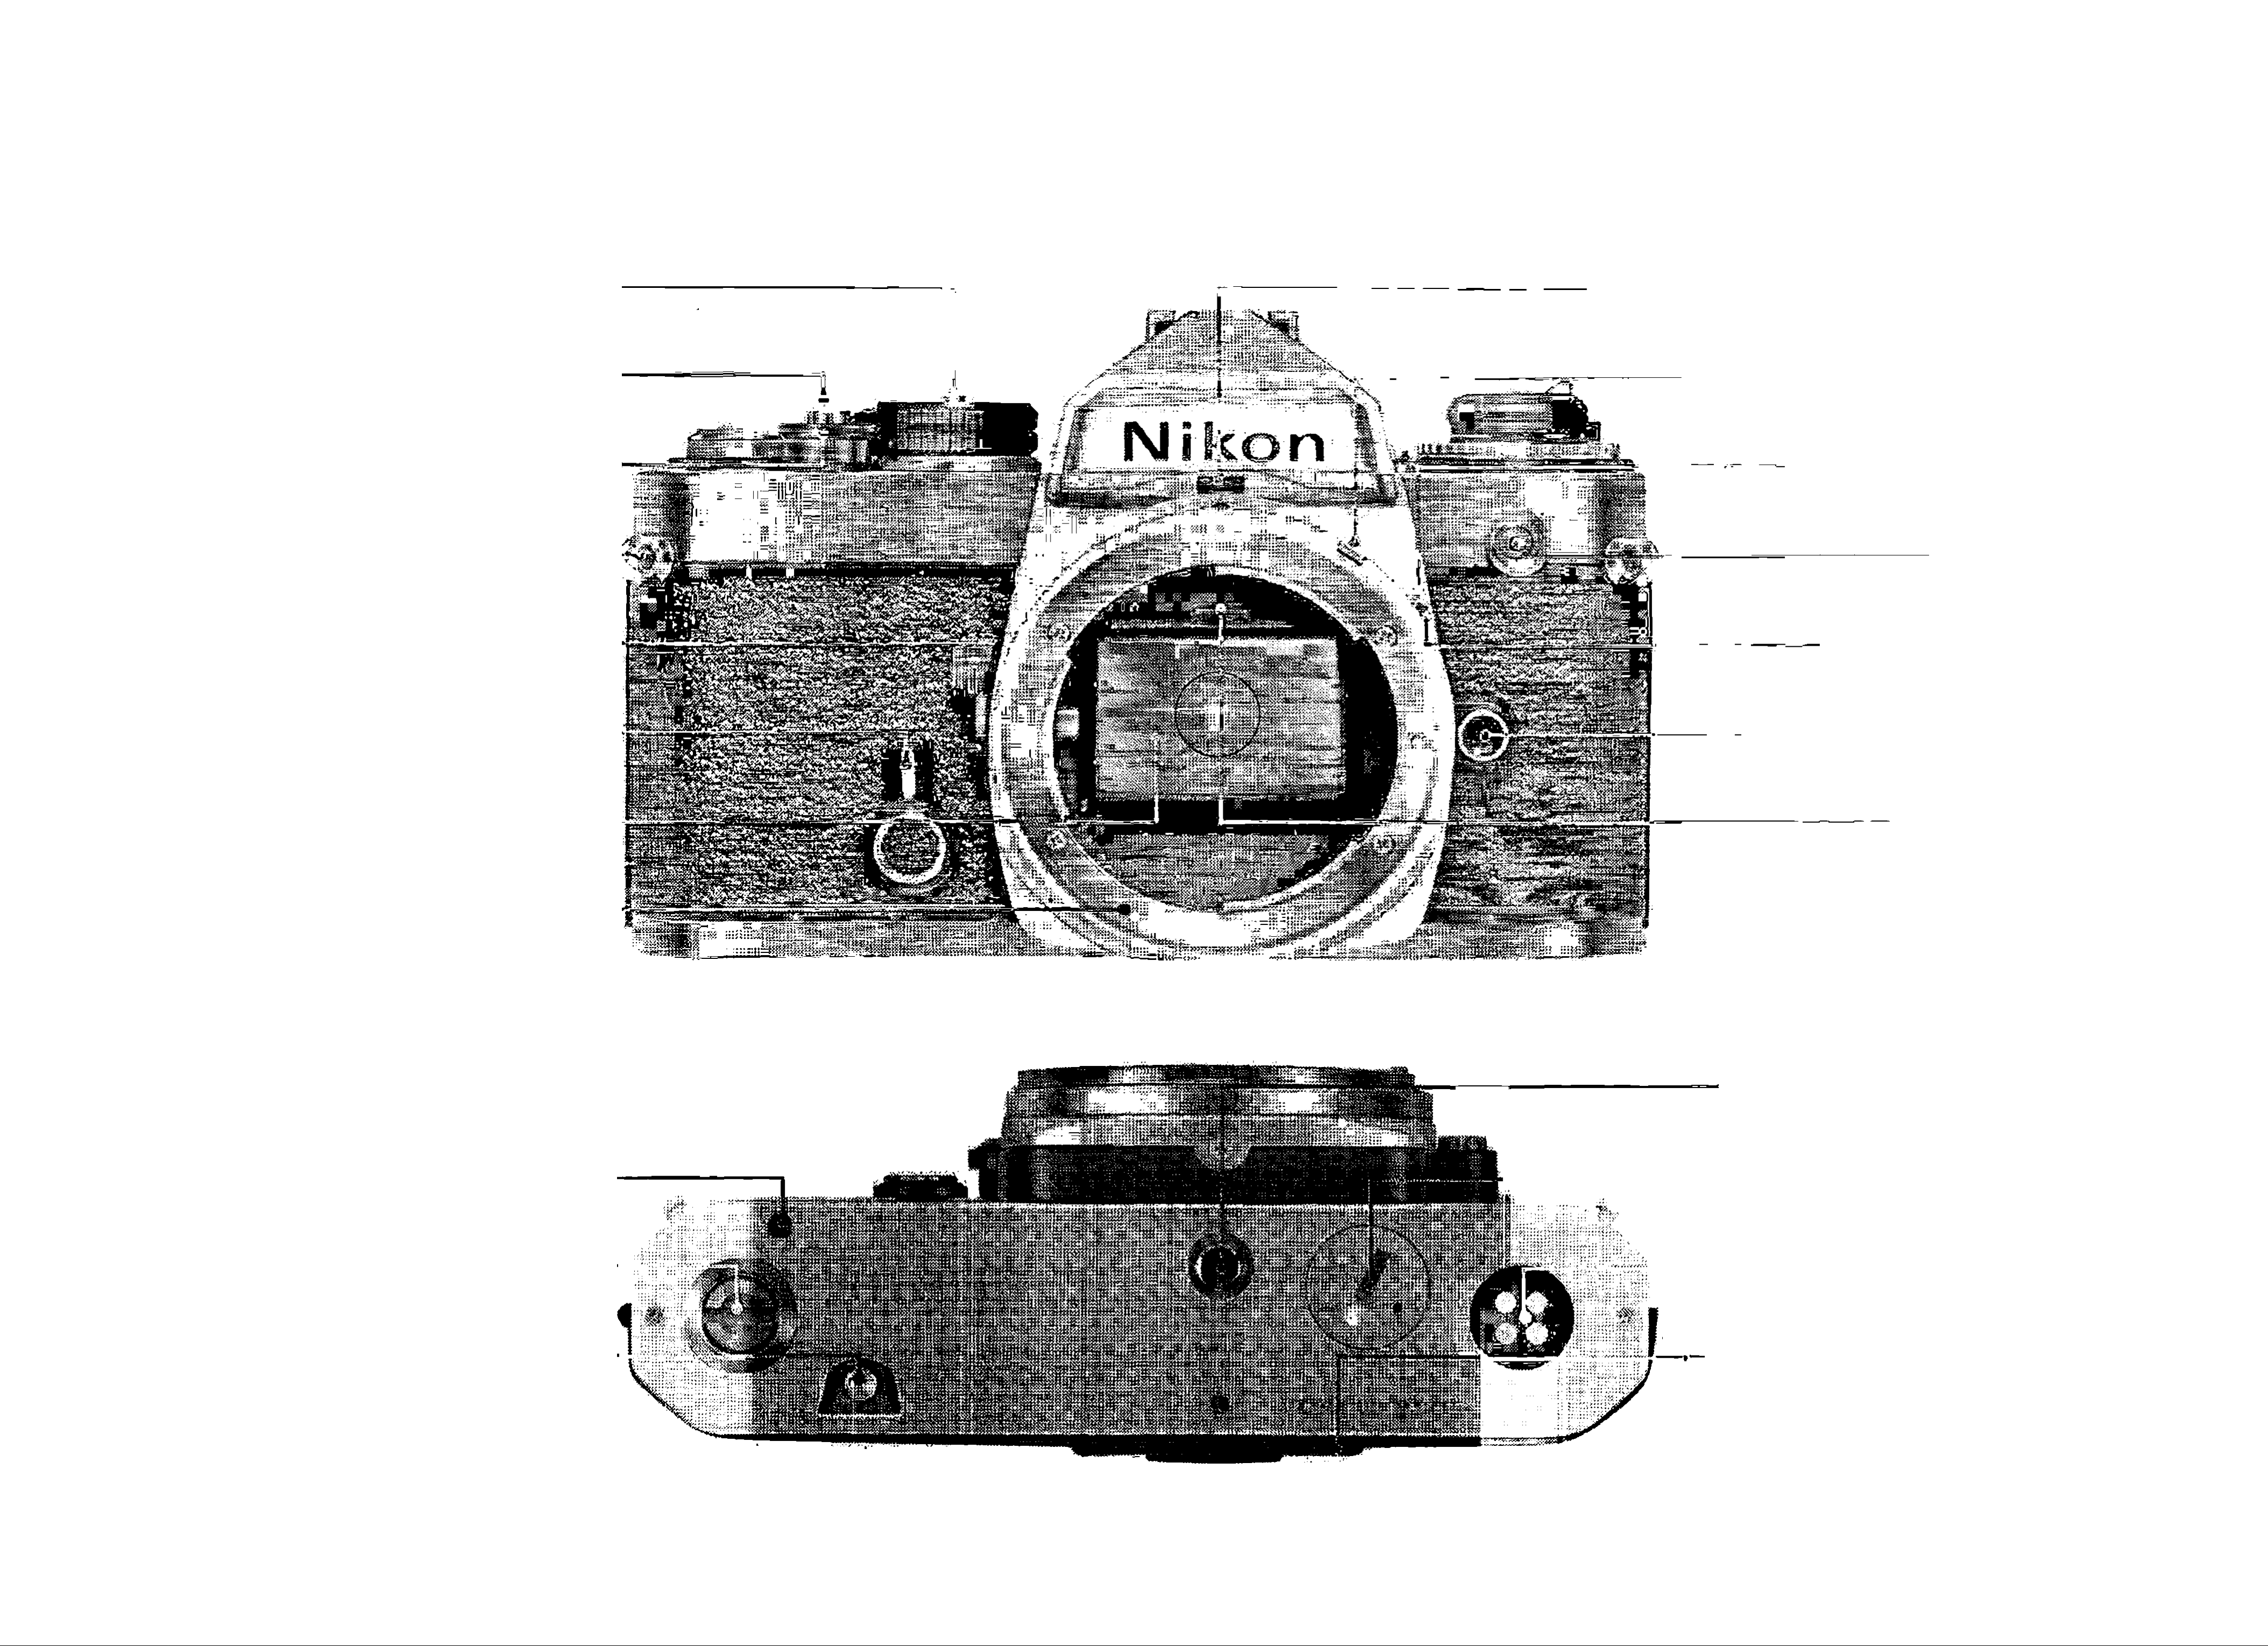
NOMENCLATURE
Shutter-speed dial lock
Shutter release button
Shutter release fingerguard
Neckstrap eyelet
Lens aperture direct readout window
Meter coupling lever
Meter coupling lever release
Sync terminal (cover provided)
Depth-of-fi eld preview lever
Self-timer/memory lock
Reflex mirror
Lens mounting flange
Lens mounting index
Lens release button
Focusing screen holder release
Motor drive shutter coupling
Motor drive coupling
Film rewind button
Tripod socket
Battery chamber lid
Motor drive electrical contacts
Memo holder
Distributed by WWW.LENSINC.NET
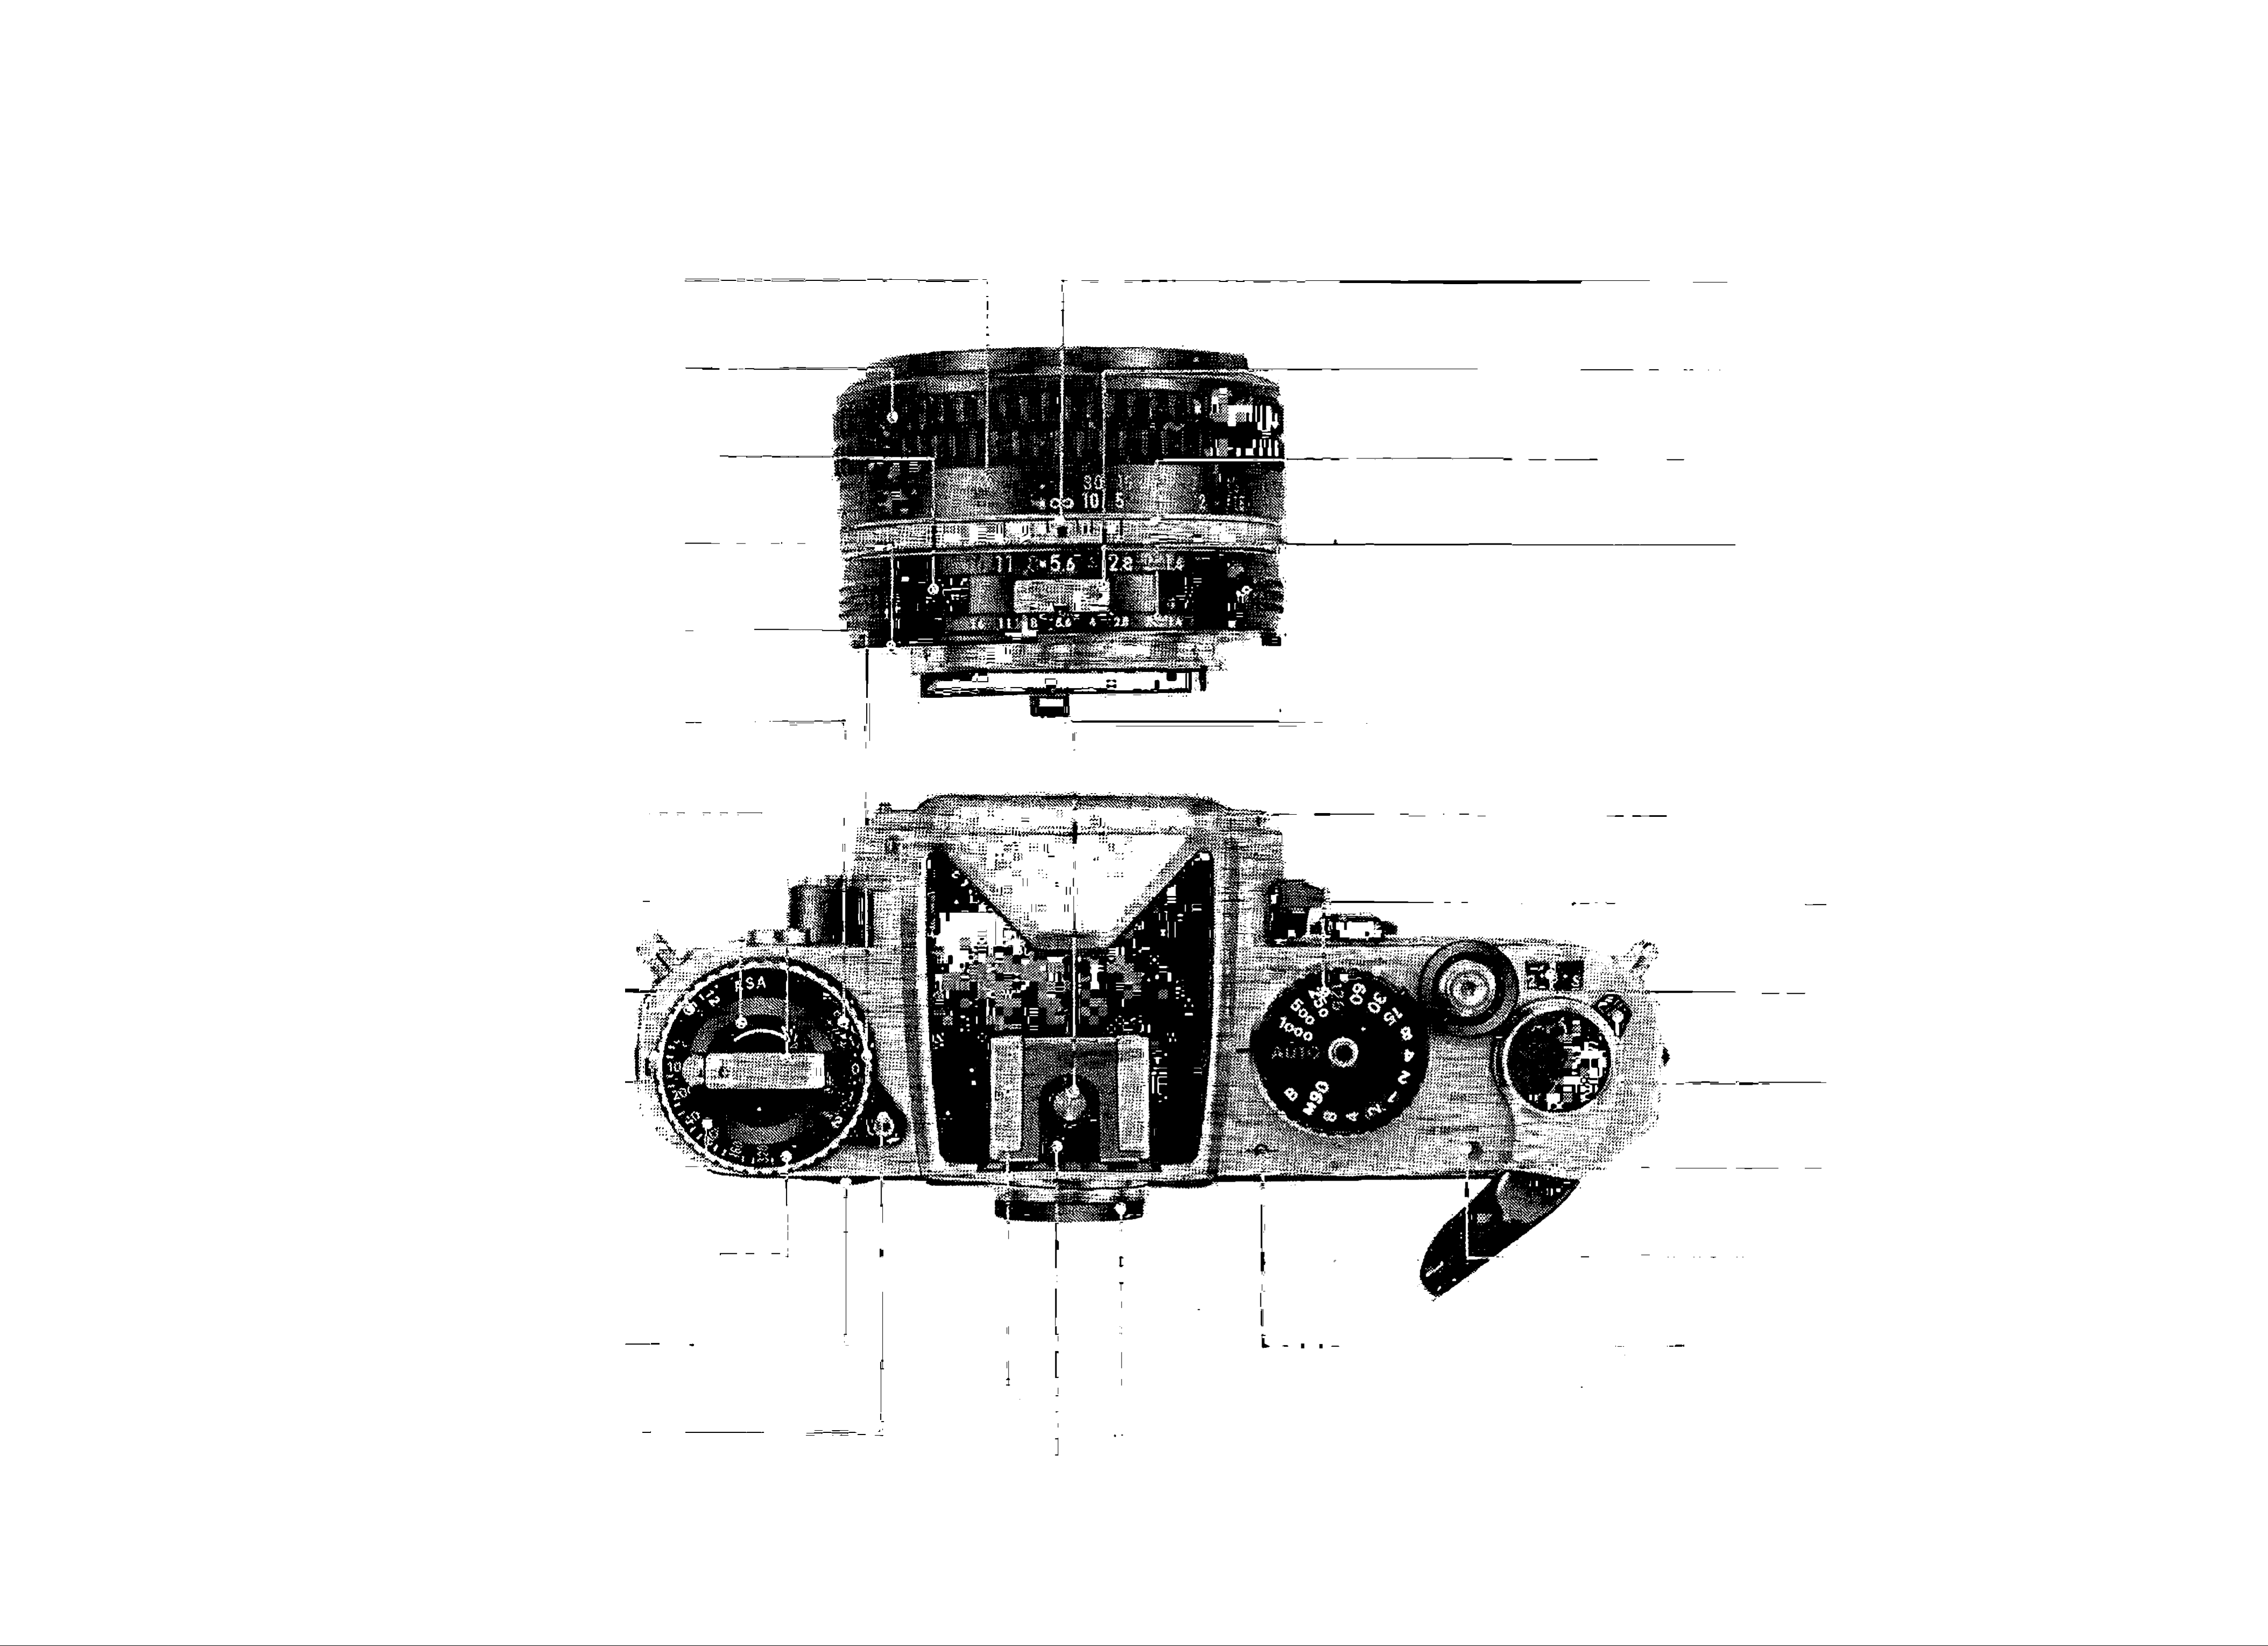
Distance scale
Aperture/distance scale index
Focusing ring
Aperture ring
Meter coupling ridge
Exposure compensation index
Meter coupling shoe
Depth-of-field indicators
Aperture-direct-readout scale
Exposure compensation scale
Film rewind crank
Film rewind knob
Safety lock
Hot-shoe contact
Shutter-speed Index
Shutter-speed scale
Frame counter
Film-speed scale index
ASA film-speed scale/dial
Exposure compensation ring
Power check lever/lamp
Multi-exposure lever
Film-advance lever
Meter ON Index
Film-plane indicator
ASA film-speed dial lock
Accessory shoe
Viewfinder eyepiece (w/ready-llght)
Ready-light contact
Distributed by WWW.LENSINC.NET

CONTENTS
Foreword 5
Preparation for use
Installing the batteries...........................................6
Checking battery power
Loading film
Prior to shooting....................................................8
Setting the film speed
..........................................................
....................................................
........................................
...........................................
6
6
7
9
Exposure measurement...........................................24
Automatic shutter speed selection
Manual shutter speed selection
Exposure control.................................................27
Metering range....................................................28
Fligh-contrast lighting situations..........................28
Stop-down exposure measurement
..........................
.........................
......................
24
26
30
Memo holder.........................................................9
Operation of camera controls...................................10
Setting the shutter speed
Film-advance lever
Frame counter
Self-timer.............................................................13
Memory lock........................................................14
....................................................
.............................................
....................................
10
12
12
Exposure compensation adjustments
EV range of the camera...........................................33
Multiple exposures...................................................36
Elash synchronization..............................................37
Ready-light........................................................ 38
Tips on camera care
Mounting and removing lenses
................................................
................................
......................
32
39
40
Unloading film..........................................................15
Flolding the camera
Shutter release operation.........................................17
Operation with cable release
Focusing..................................................................18
Infrared photography
Film-plane indicator
.................................................
..............................
..........................................
............................................
16
17
20
20
Changing focusing screens
Focusing screen selector guide
Lens/screen compatibility chart
Accessories..............................................................44
Features/specifications............................................46
.....................................
..........................
..........................
41
42
43
Depth of field...........................................................21
Depth-of-field preview lever
Depth-of-field indicators.................................... 22
...............................
21
Distributed by WWW.LENSINC.NET

Distributed by WWW.L

mREWORD
The Nikon FE is a compact 35mm single-lens reflex
camera with a host of outstanding features. It offers
aperture-priority automatic exposure control with shut
ter speeds from 1/1000 second down to 8 seconds, has
interchangeable focusing screens, and accepts the option
al MD-12 for motor-driven exposures up to 3.5 frames
per second. In addition, the FE incorporates automatic
flash speed setting when used in conjunction with the
accessory Speedlight Unit SB-10. When the SB-10 Is
mounted on the camera’s hot shoe and turned on, the
shutter speed Is automatically set to the proper synchro
nization speed of 1/90 second when the camera is set to
“automatic.” The FE will also accept virtually every
accessory in the Nikon System—the most comprehensive
ever created for photography. To get the most out of
this camera, study the instructions in this manual care
fully, and practice using the controls before loading the
camera with film. Keep the manual on hand for ready
reference until you have mastered operation. The few
minutes you spend familiarizing yourself with the
camera will guarantee you the best results and increase
your pleasure in taking pictures many times over.
INSINC.NET
PREPARATION FOR USE
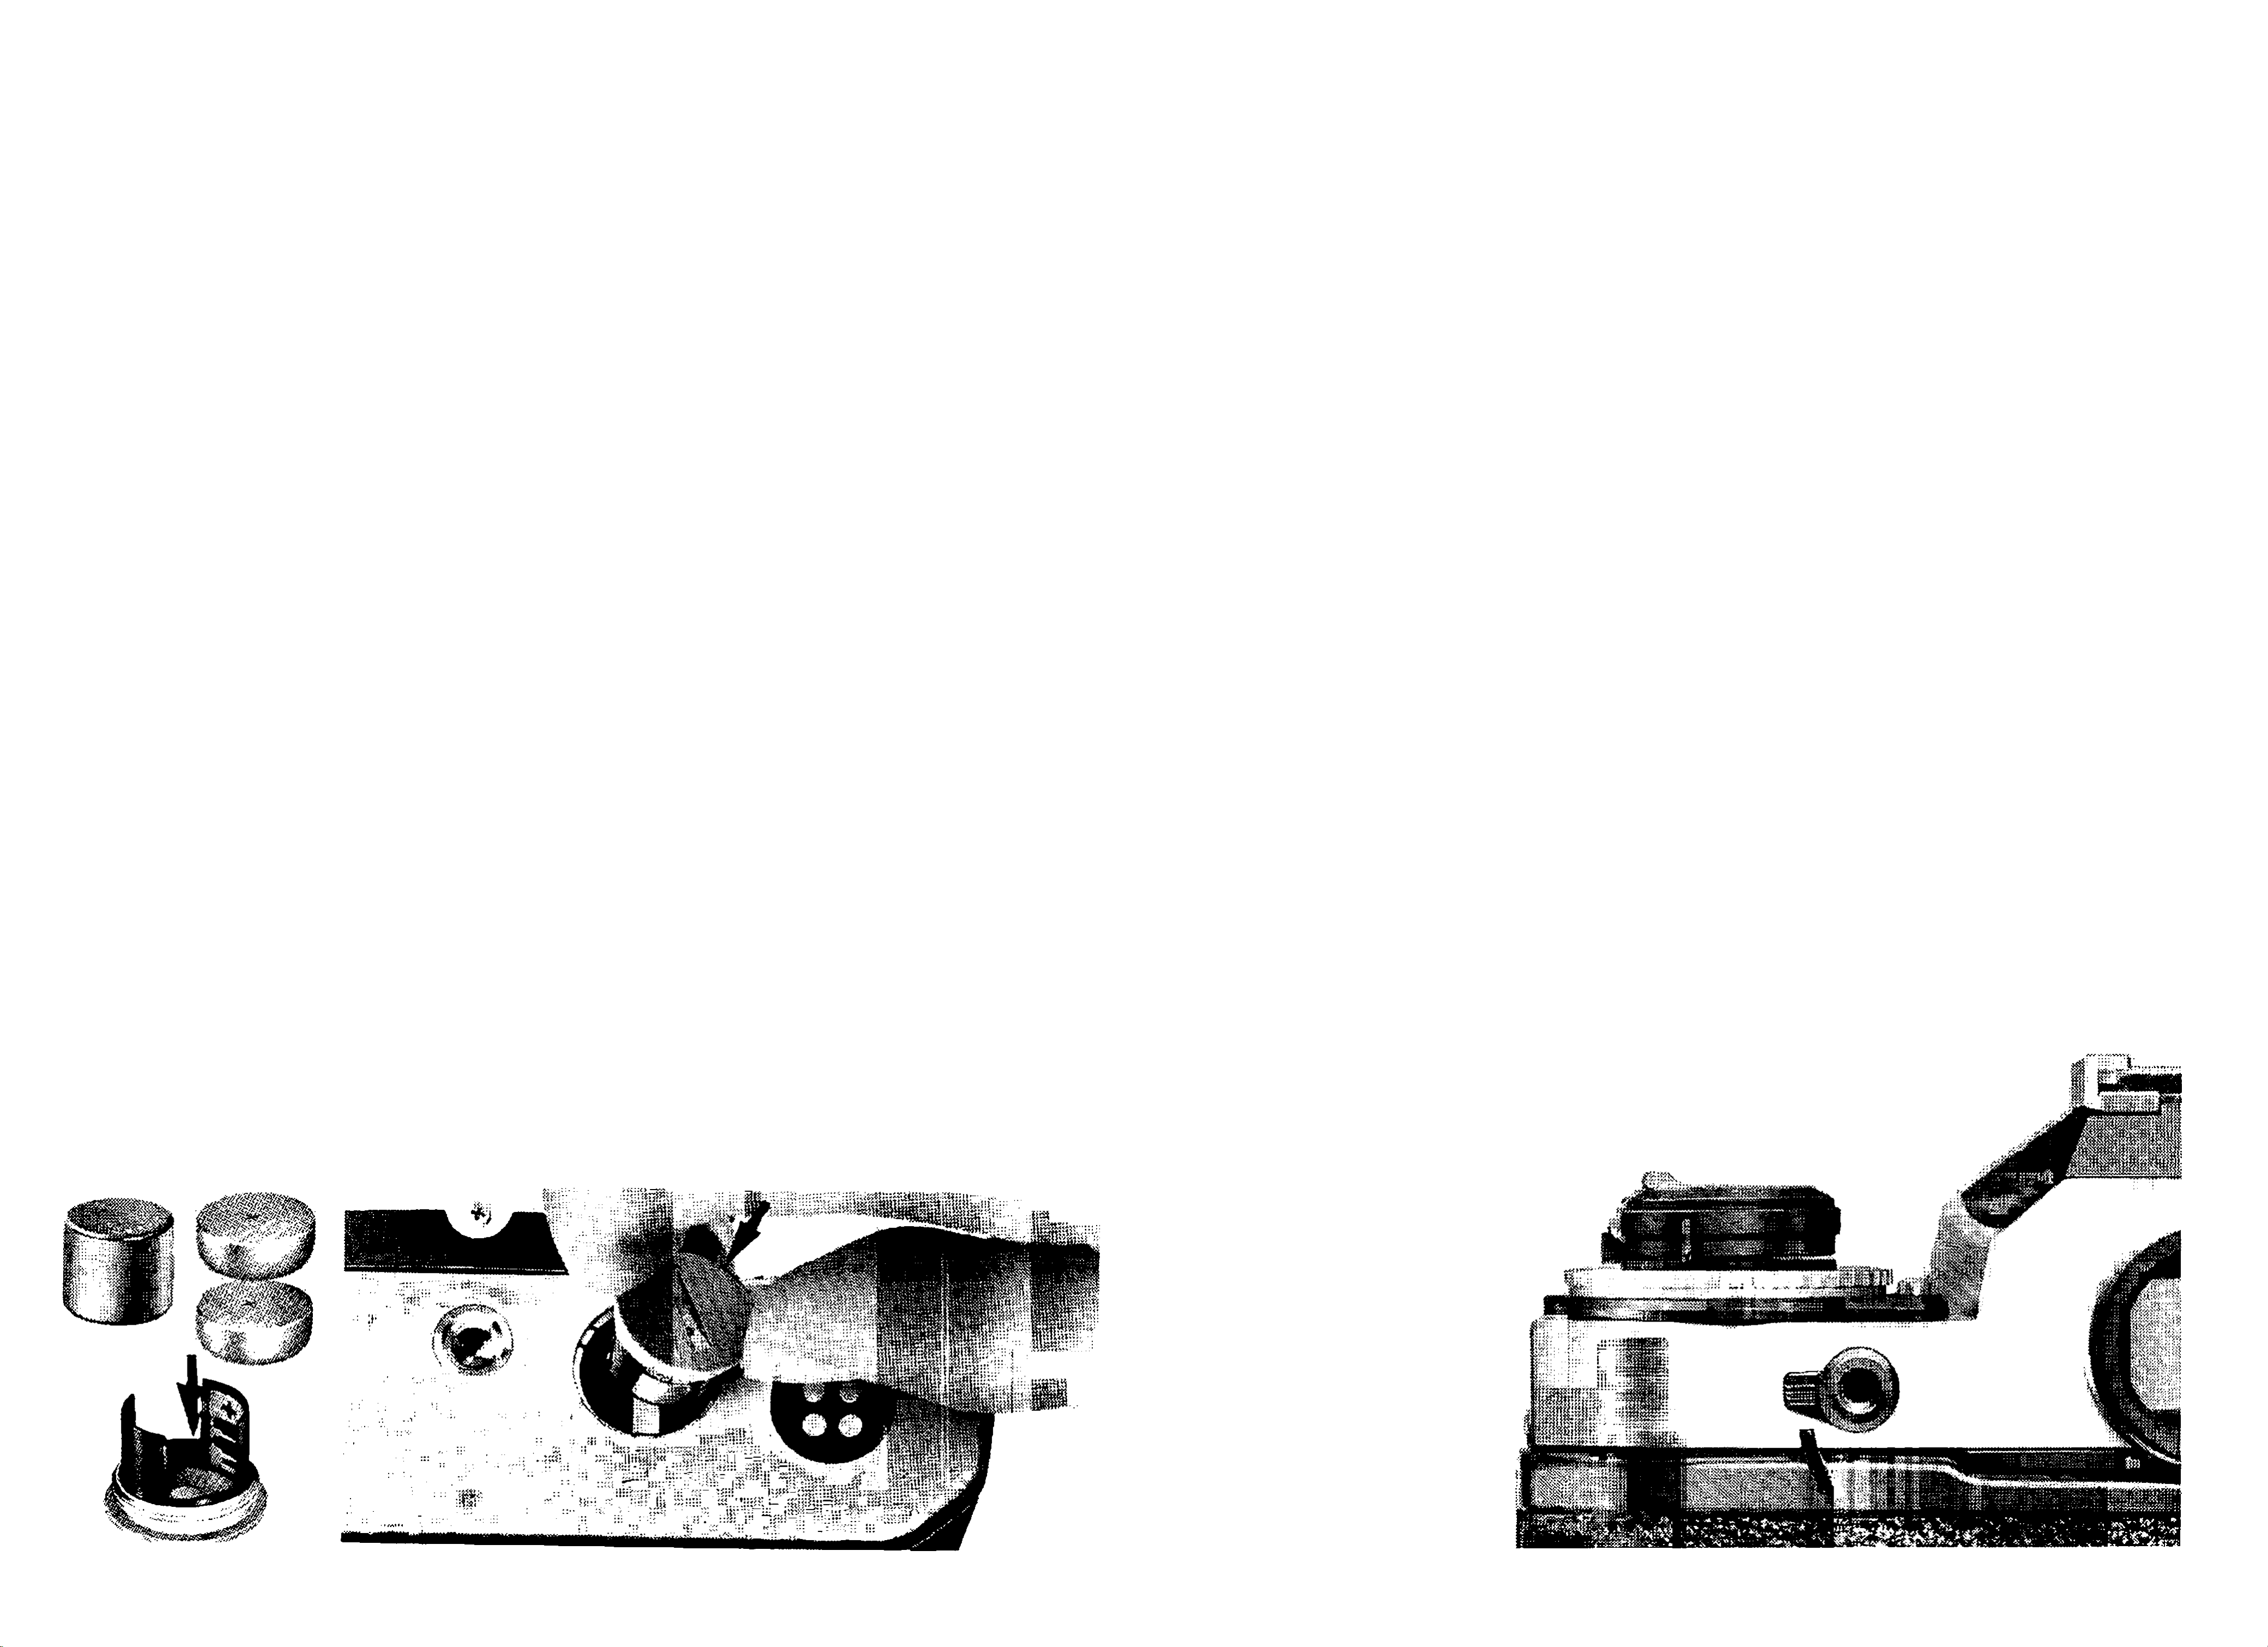
Installing the Batteries
The Nikon FE’s built-in exposure meter and the elec
tronic shutter control circuits are powered by two
button-cell type 1.55V silver-oxide batteries or one 3V
lithium battery. These are mounted in the battery clip,
which forms a single unit with the battery chamber’s
coin-slotted lid, in the camera’s baseplate. To install the
Checking Battery Power
To check battery power, simply turn the power check
lever downward and watch the power check lamp. If the
lamp fails to glow, check the battery seating and make
any necessary adjustments. Should the lamp still fail to
ight up. Install new batteries.
Caution:
battery or batteries, first unscrew the lid by turning it
counterclockwise, with a coin or something similar, until
it can be freely removed by hand. Then, seat the battery,
or the two batteries one on top of the other, in the bat
tery clip, making sure that the respective plus (+) and
minus (—) signs correspond with similar marks provided
in the clip. After seating the batteries correctly, replace
1) When the camera is not in use, make sure that the film-ad
vance lever is positioned flush with the camera body. As the
lever doubles as the meter on-off switch, leaving it in the
stand-off position will result in the camera's battery being
completely drained In just a few days.
2)
When the camera is attached to the MD-12 motor drive, make
sure the motor drive is switched off when It is not in use to
prevent drain of both the camera and the motor drive's
batteries.
the lid, and secure the connection by turning it clock
wise with the coin as far as it will go. It is advisable to
remove the batteries, when the camera is not to be used
for a long period, to prevent battery leakage within the
camera; for additional information, refer to “Tips on
Camera Care” on page 39.
3) When the batteries are dead or there are none installed in the
camera, the only two settings which can be used are “M90"
and “B.” If you trip the shutter with the camera set to any
other speed, the shutter won't open or the reflex mirror may
remain In the “up" position. If the mirror locks
up, simply turn the shutter speed dial to “M90"
and the mirror will return to Its normal viewing
position. Then you can
install new batteries.
To avoid wasting
a frame, stroke
the winding lever
while holding in
the multiple-
exposure lever.
Distributed by WWW.LENSINC.NET
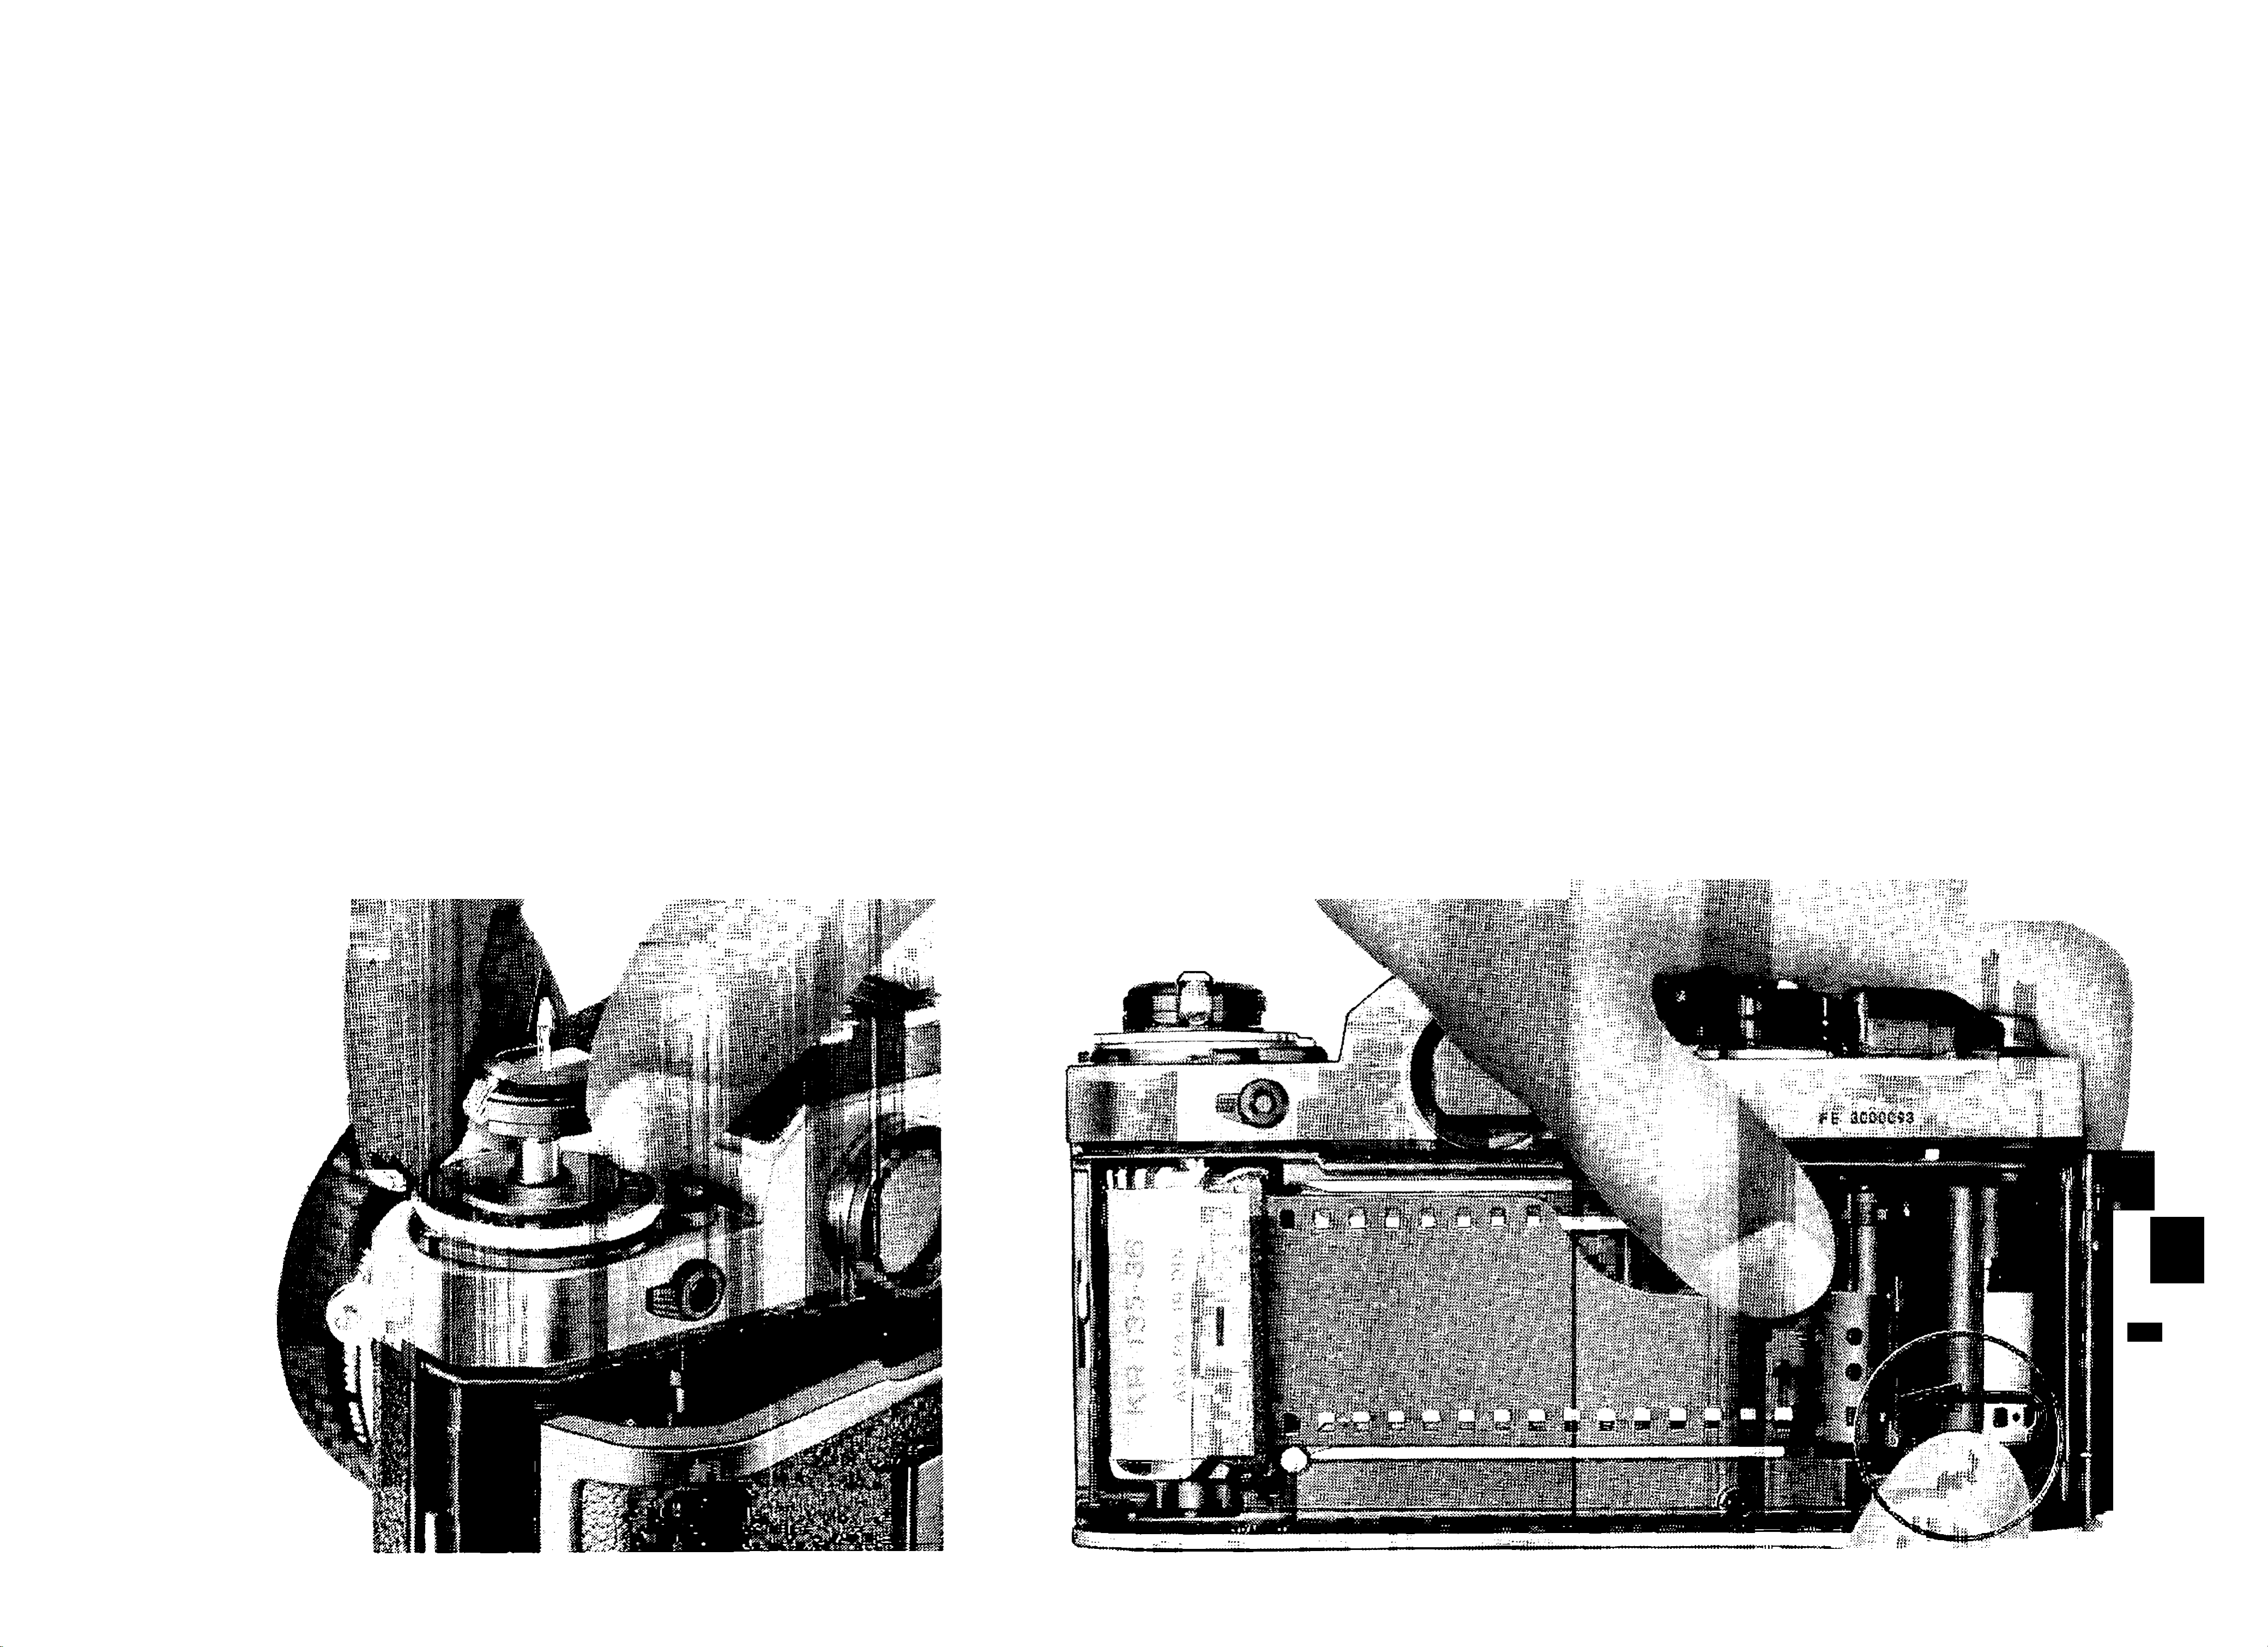
Loading Film
side (dull side) facing out. Make sure that the perfo
First, open the camera back by sliding its safety lock to
the rear and lifting the film rewind knob as far as it will
go. Position the film cartridge or cassette in the film
chamber, which is located on the left-hand side, with the
film leader aligned along the film guide rails; then, push
the rewind knob down to hold the cartridge in place. Pull
the film leader out sufficiently for feeding into the film
rations along the edges of the film mesh with the
sprockets. If necessary, release the shutter by pushing
the shutter release button, and stroke the film-advance
lever slowly to make sure that the leader winds smoothly
on the spool and that the film edge perforations engage
the film sprocket roller. When you are certain that the
film is being fed properly onto the spool and traveling
take-up spool, and insert its end into any of the spool’s
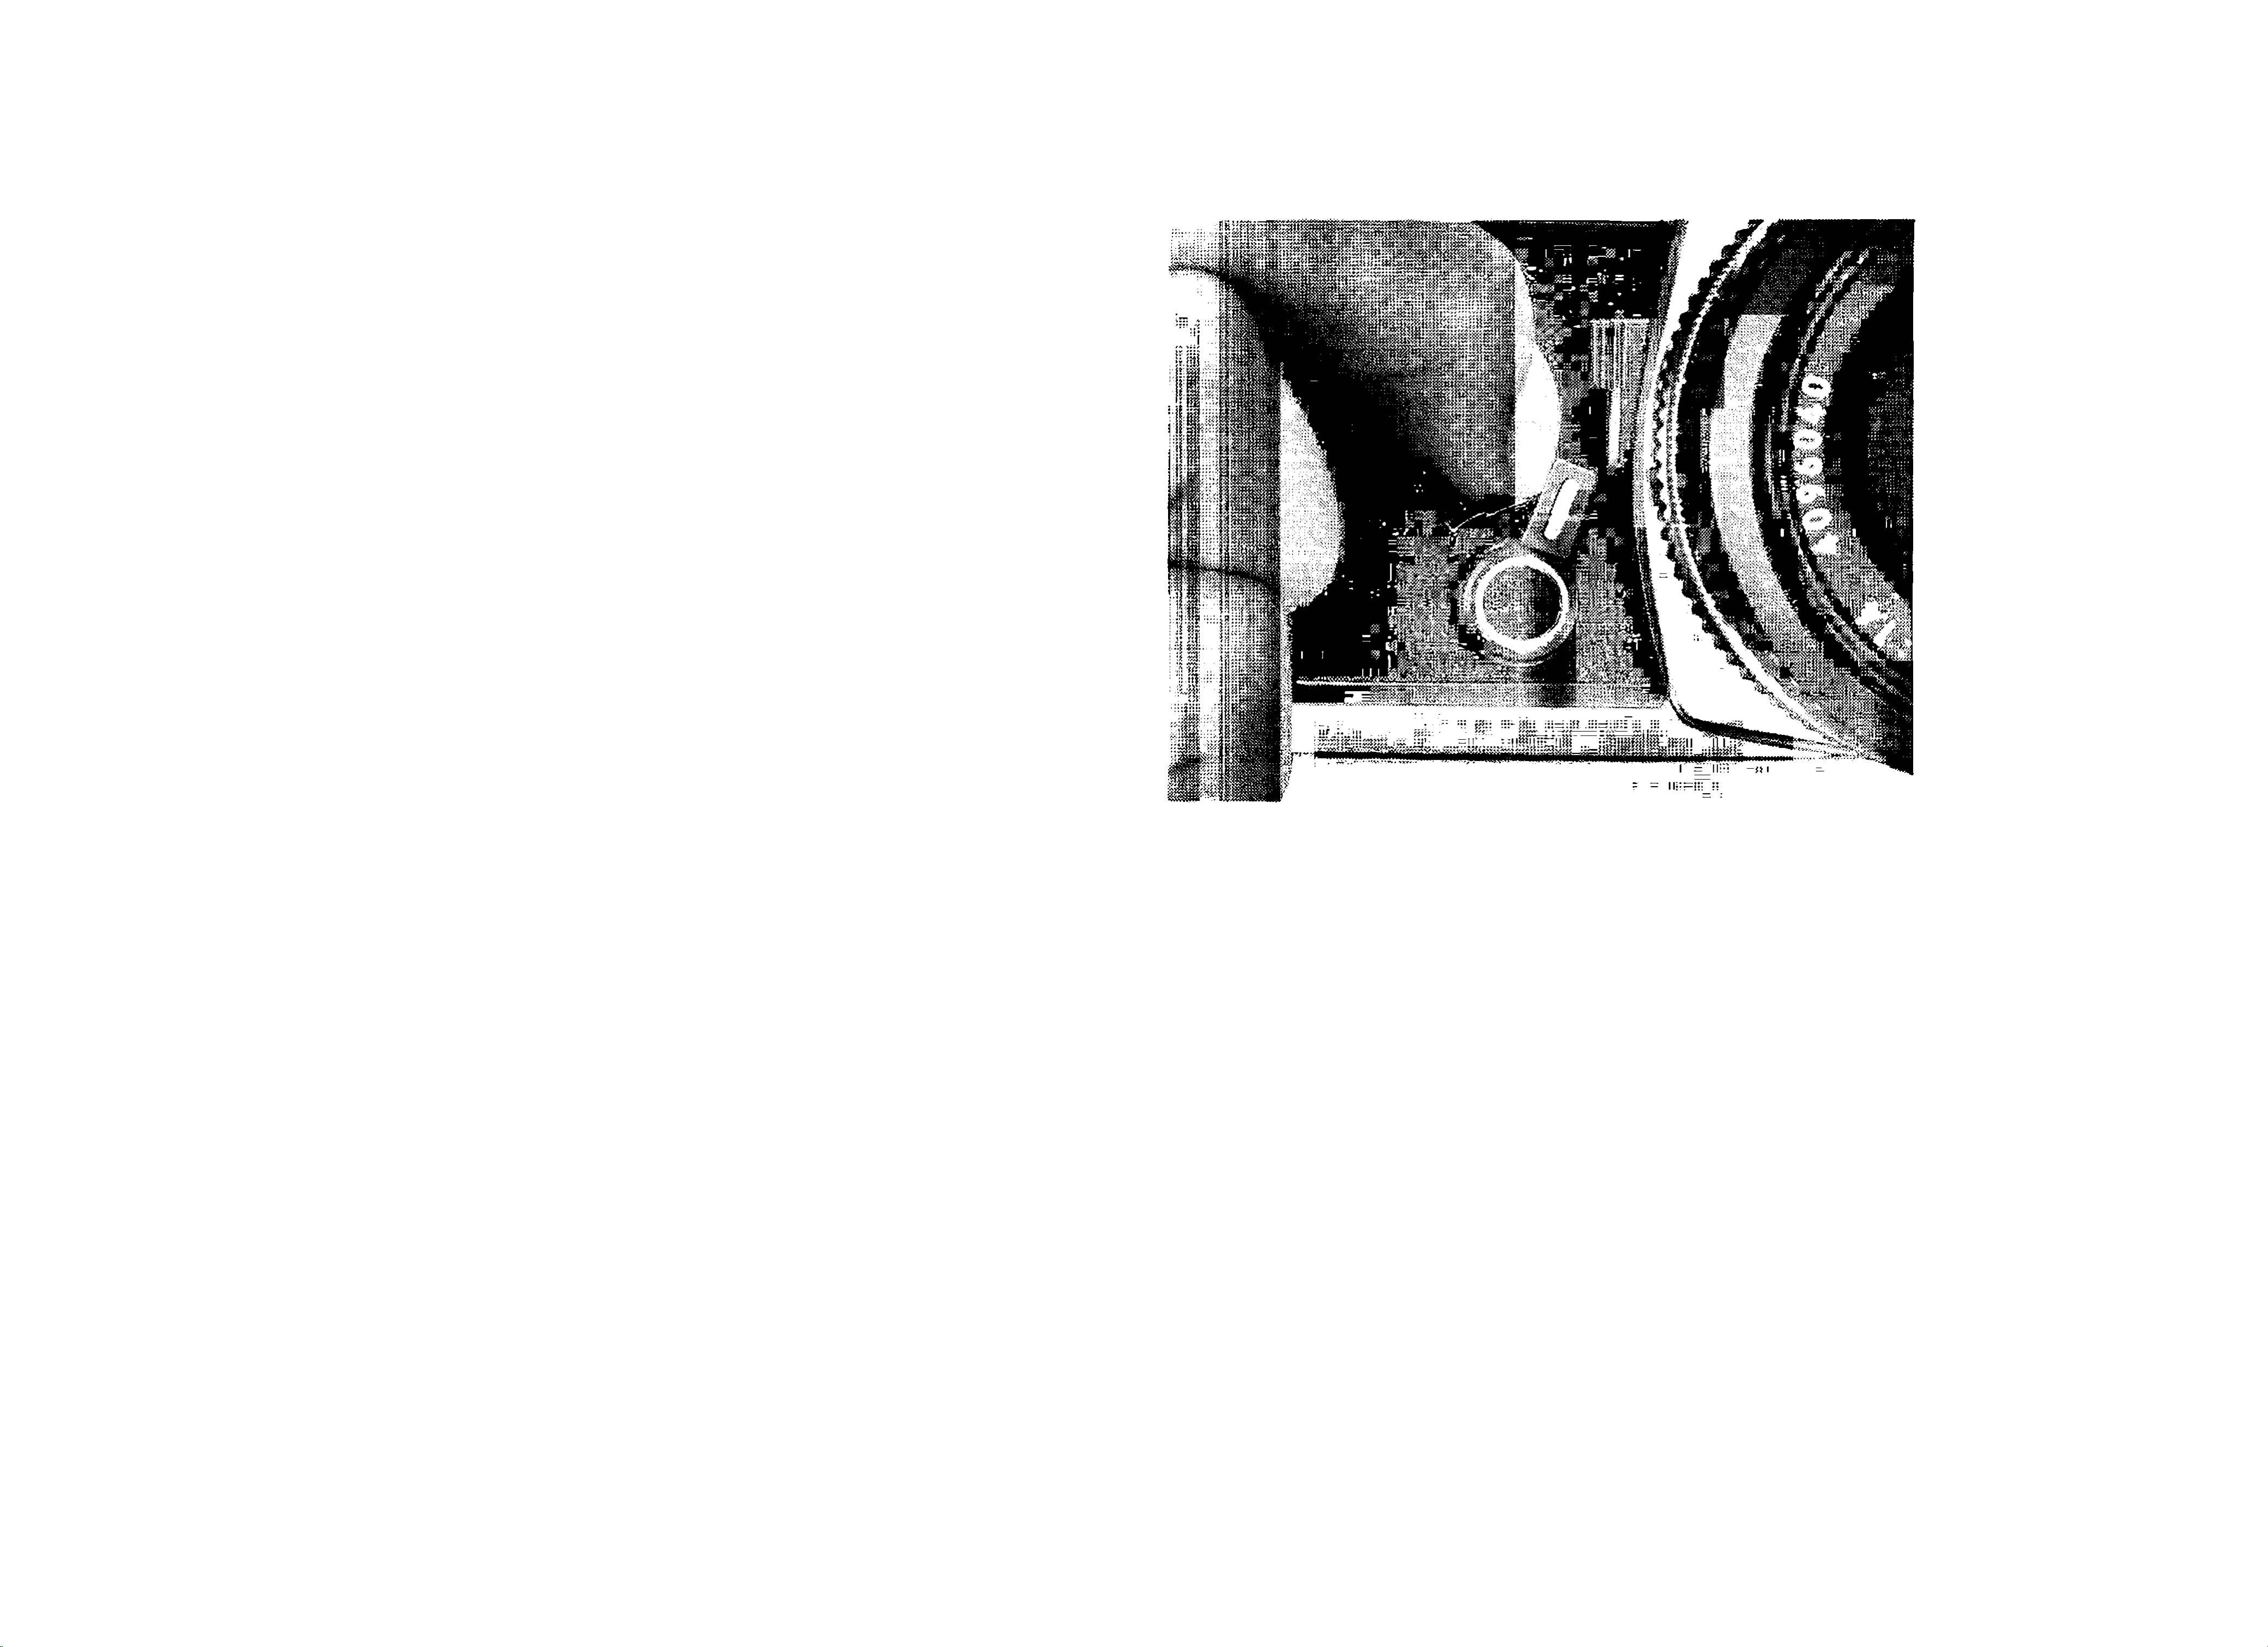
slots. Rotate the take-up spool as shown in the illustration
so that the film passes under the spool with its emulsion
correctly along the film guide rails, close the camera
back by pressing it until it snaps into place.
* f
iSi
■uuuMAuuim
Hi.
Distributed by WWW.LENSINC.NET
7
PREPARATION FOR USE—continued
Prior to Shooting
Fold out the film rewind crank, and turn it gently in the
direction of the engraved arrow until you feel a slight
resistance; this will indicate that any slack in the film
cartridge has been taken up. Then, fold the rewind crank
into place.
Advance the film (refer to page 12 for film advance oper
After advancing the film two frames, check that the
frame counter is at “0”; then, advance the film one more
frame to prepare the camera for taking the first picture.
Note: Setting the shutter-speed dial to a manual position (rather
than “AUTO”) will speed up film loading by preventing the
camera from selecting a slow speed, as might be the case when
the lens cap is in place. However, be sure to reset the dial to
“AUTO” if automatic operation is desired.
ation), and make two blank exposures; this will dispose
of the initial portion of the film exposed during loading.
As you advance the film, confirm that the rewind crank
turns in the direction opposite the arrow. This indicates
that the film has been loaded properly and is being
advanced.
When load
ing film
1 St blank
exposure
5»vV:
2nd blank
exposure
3rd blank expo
sure; now ready
for 1 St shot
8
Distributed by WWW.LENSINC.NET

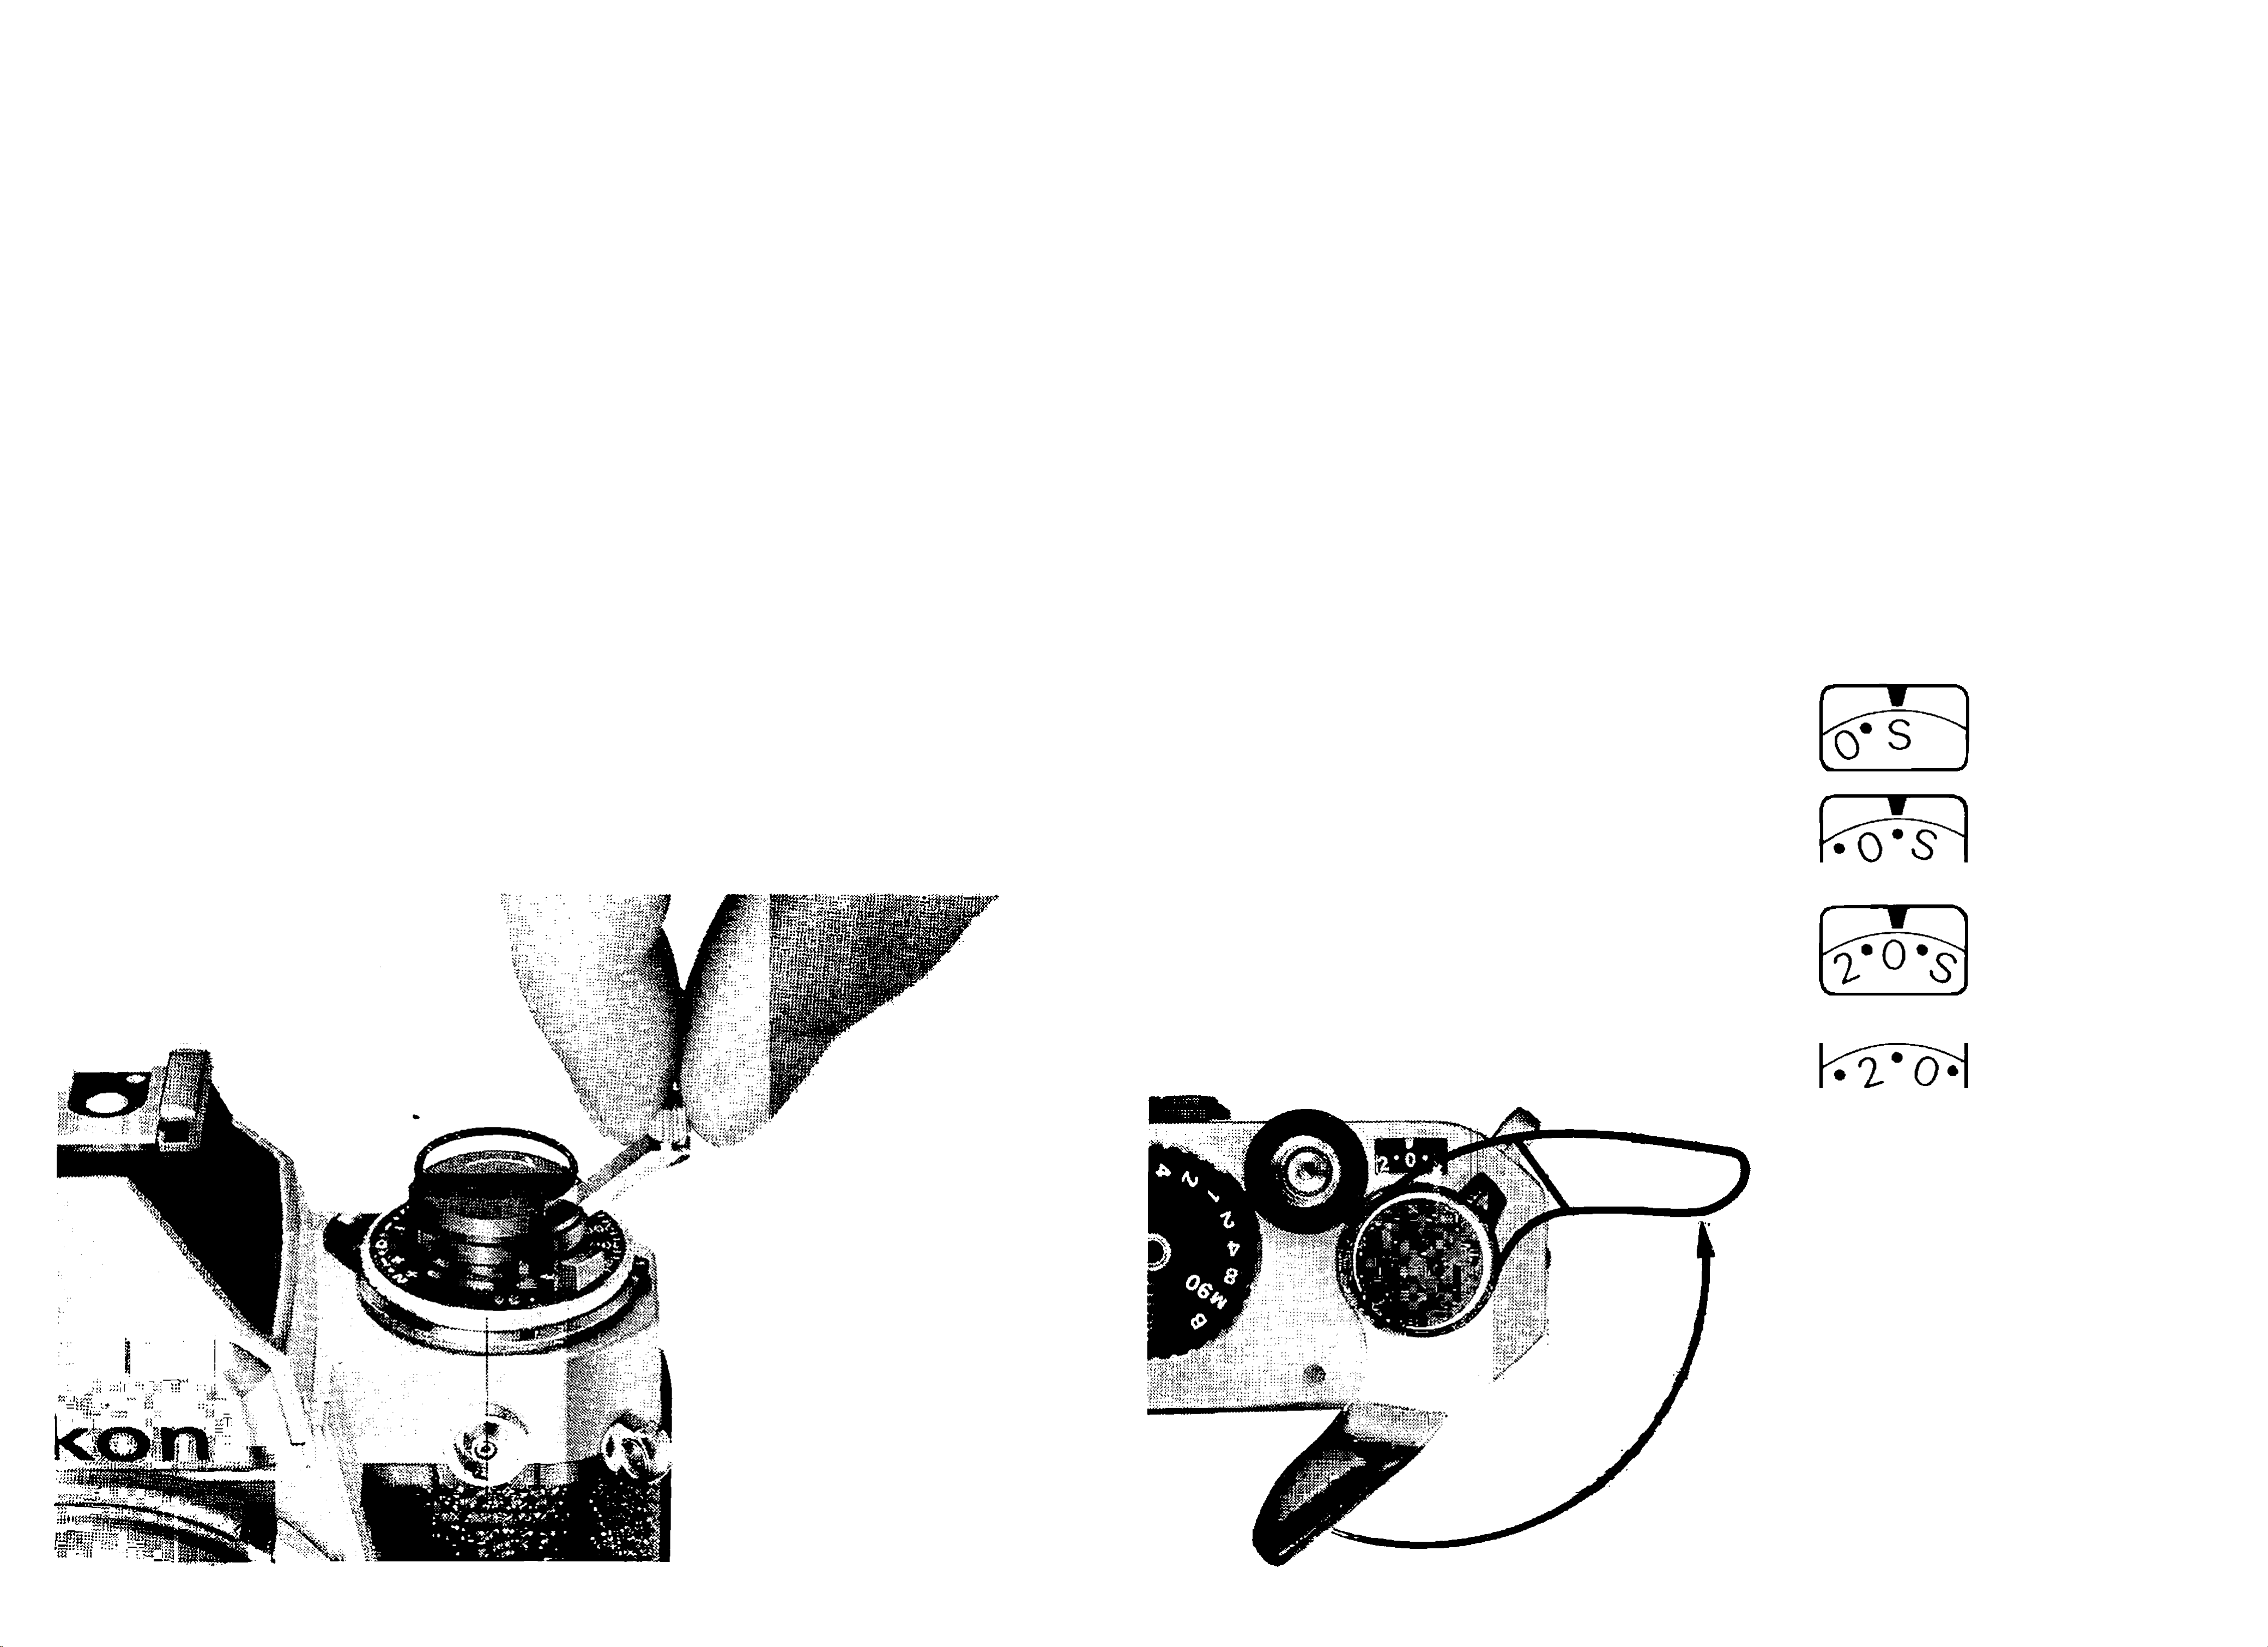
Setting the Film Speed
Memo Holder
As film sensitivity to light (called “film speed”) varies
with film type, adjustment of the camera’s metering
circuit is essential to ensure uniform exposures under all
conditions. Thus, a film-speed dial is provided for this
purpose, with a safety lock mechanism built in to
prevent accidental shifting of the dial during shooting.
To set the film speed, hold in the film-speed dial lock
A special holder is provided on the camera back for con
venient storage of any relevant information. You can use
it, for instance, to hold the end flap of a film carton to
remind you of the type of film loaded in the camera, the
ASA film speed and the total number of exposures
available.
and turn the ASA film-speed dial until the ASA number
is aligned with the red index. After setting the dial,
release the lock and test the dial to ensure that it is set
firmly at the desired ASA value. The meter is sensitive
from ASA 12 to ASA 4000. The film-speed dial has two
graduations between each pair of numbers for inter
mediate settings such as 64, 80, 125, etc. The illustration
41 y.K'.* • w V*. %
- - [ UW'
below indicates all intermediate settings.
1000
1.250, \
''2000
2500.
4000
Distributed by WWW.LENSINC.NET
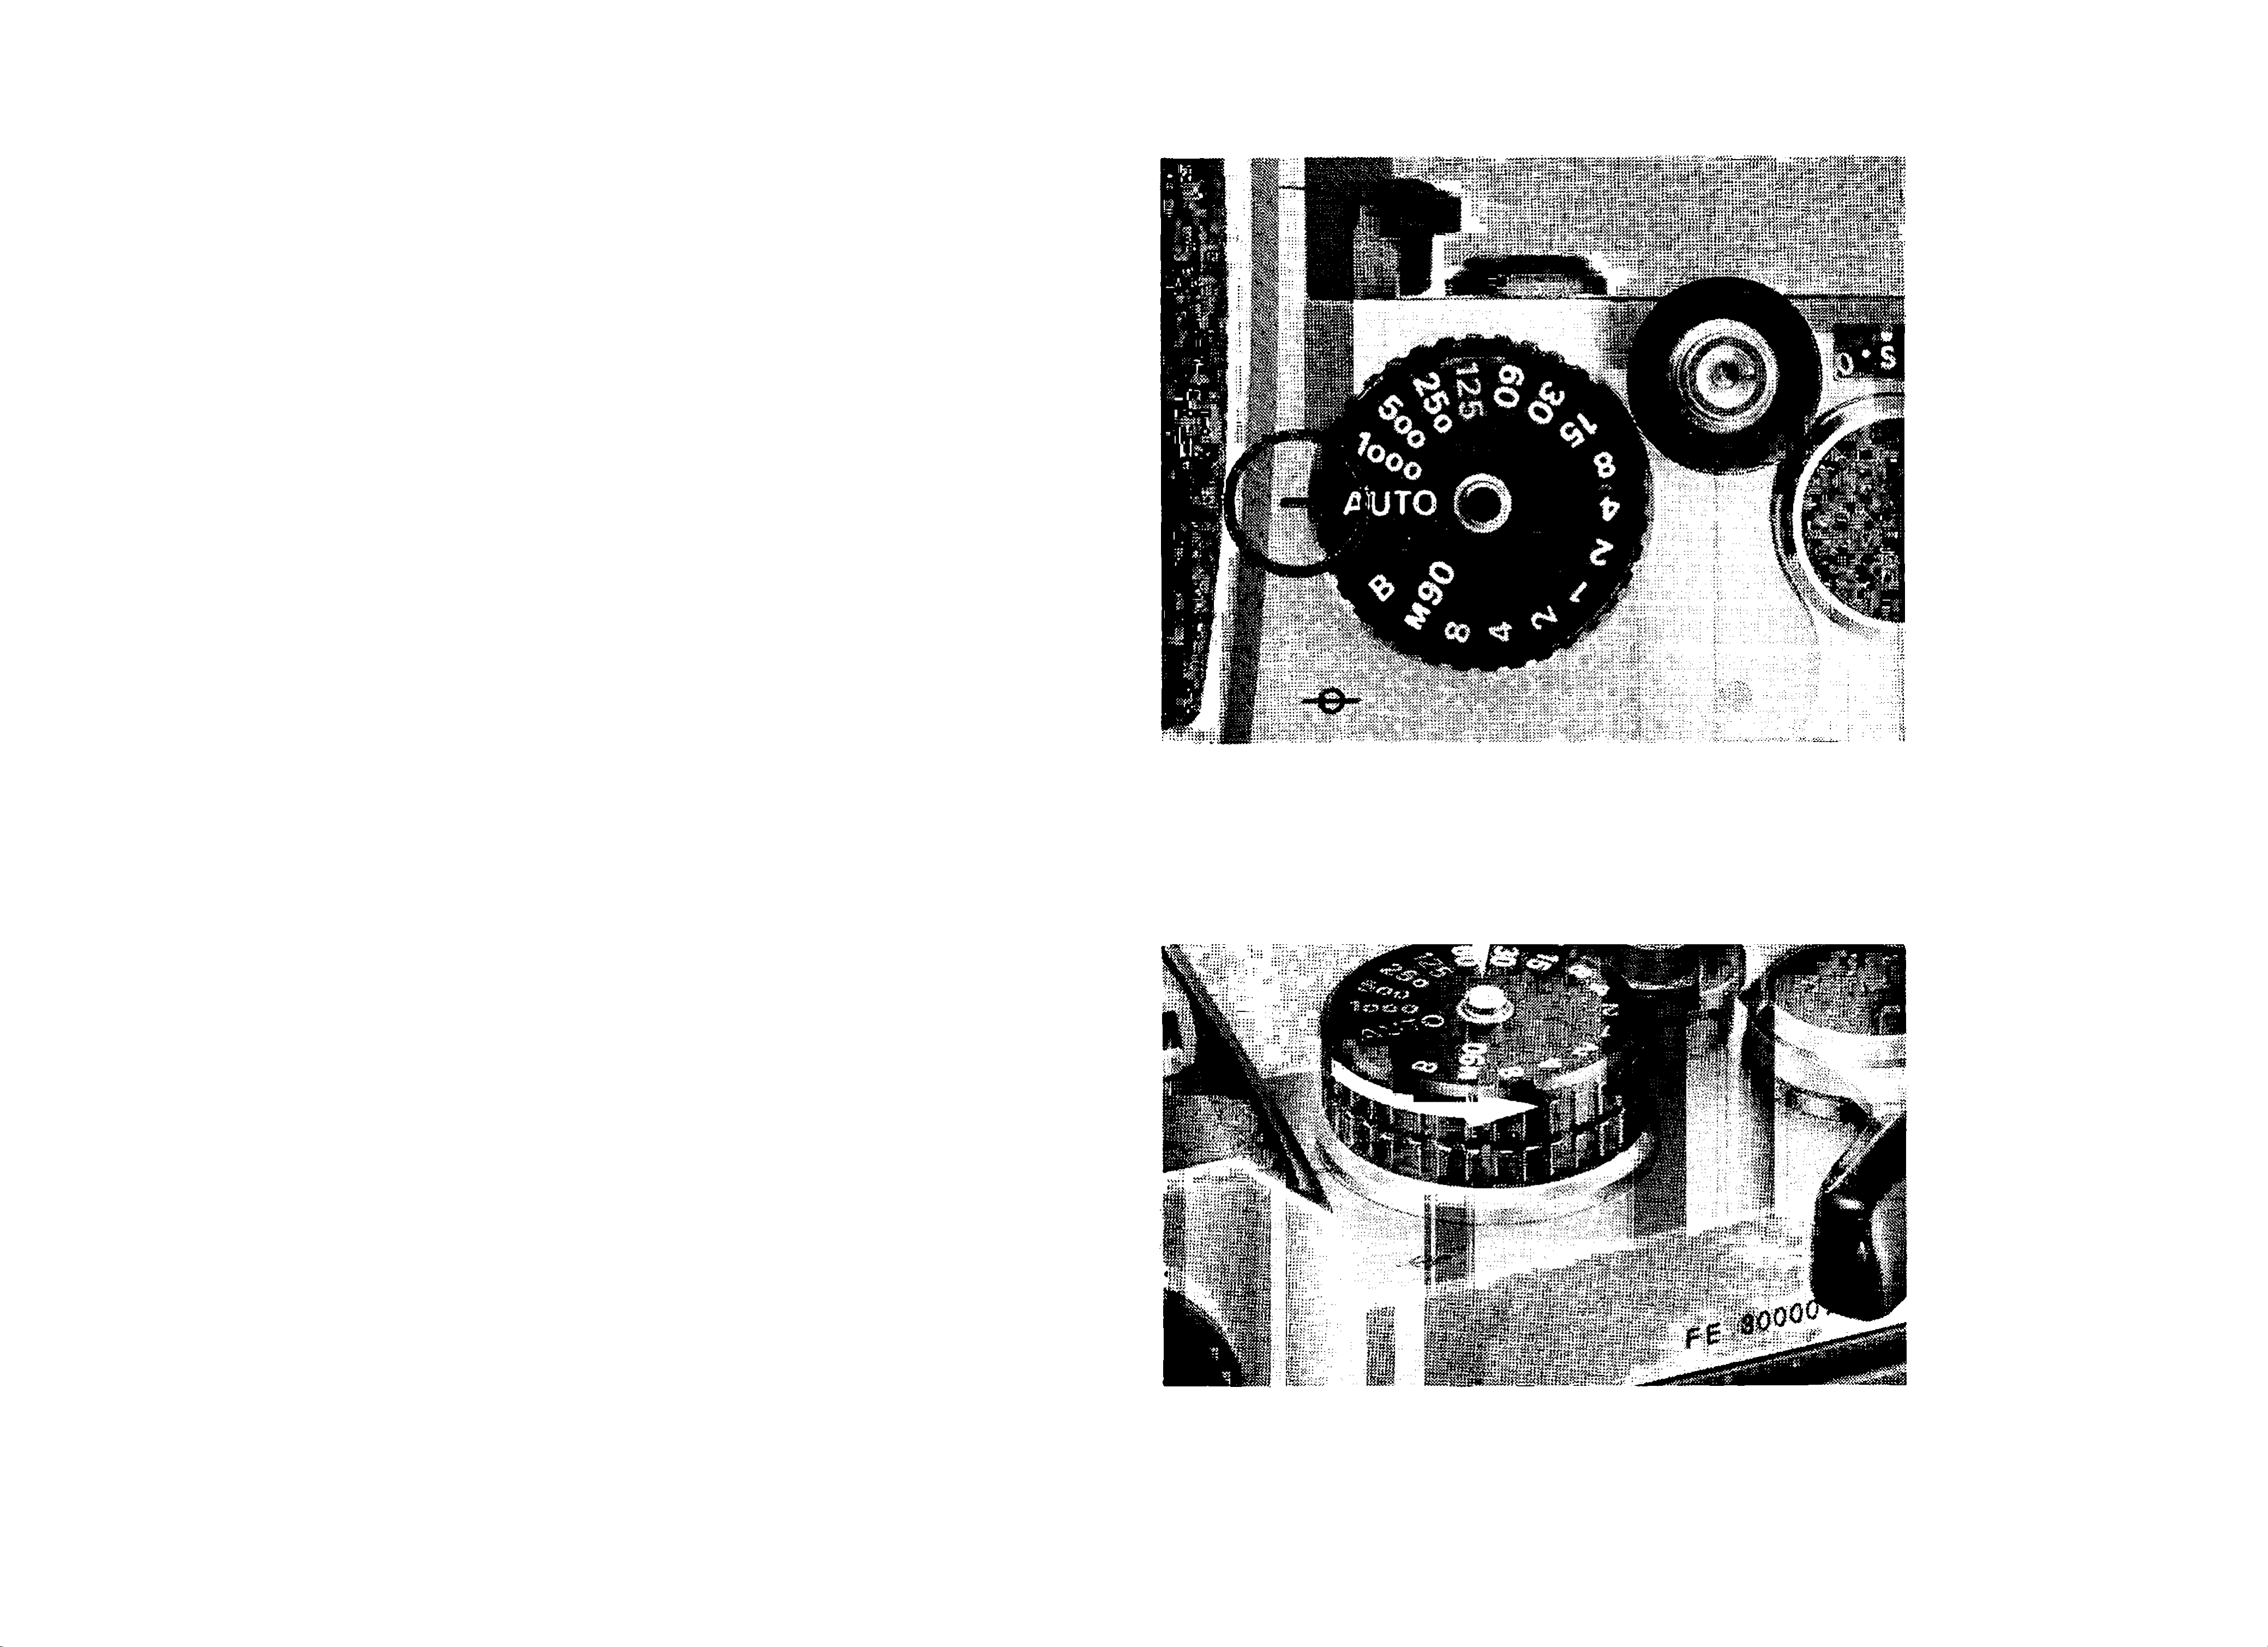
OPERATION OF CAMERA CONTROLS
Setting the Shutter Speed
The Nikon FE is set for automatic or manual shutter
speed selection via the shutter-speed dial positioned to
the right of the finder, with setting operation possible
at any time either before or after the shutter is wound.
The dial is provided with positions for automatic (AUTO),
and manual speeds from 8 seconds to 1/1000 second. To
set the dial for automatic shutter speed selection, simply
rotate the dial clockwise until the green AUTO (auto
matic) setting clicks and locks Into place aligned with
the shutter-speed scale index at the base of the dial; the
built-in locking mechanism ensures that the dial cannot
be accidently shifted from the automatic position during
shooting.
To set the dial for manual shutter speed selection used
during “match-needle” exposure measurement, simply
hold in the shutter-speed dial lock and rotate the dial
counterclockwise off the “AUTO” position; when the
dial is aligned with white settings from 2 to 1000, the
I ’
• ''s
• i ... ,/•'1 »...л; J. .,: Л':*'**»*;;, . .*• ;;
.. ' 'i' :|; iXi; , Л-'С; :Xpbi--
=" Л:..' “ Л::-'-" x
.....
.A* i ^г’/ i III
U
actual shutter speed Is a fractional value from 1/2 second
to 1/1000 second, while the remaining settings indicate
the actual values from 8 seconds to 1 second. The “M90”
setting indicates a mechanical shutter speed of 1/90 sec
ond which operates independently of battery power. This
is the only setting (except “B”) which can be used when
10
Distributed by WWW.LENSINC.NET
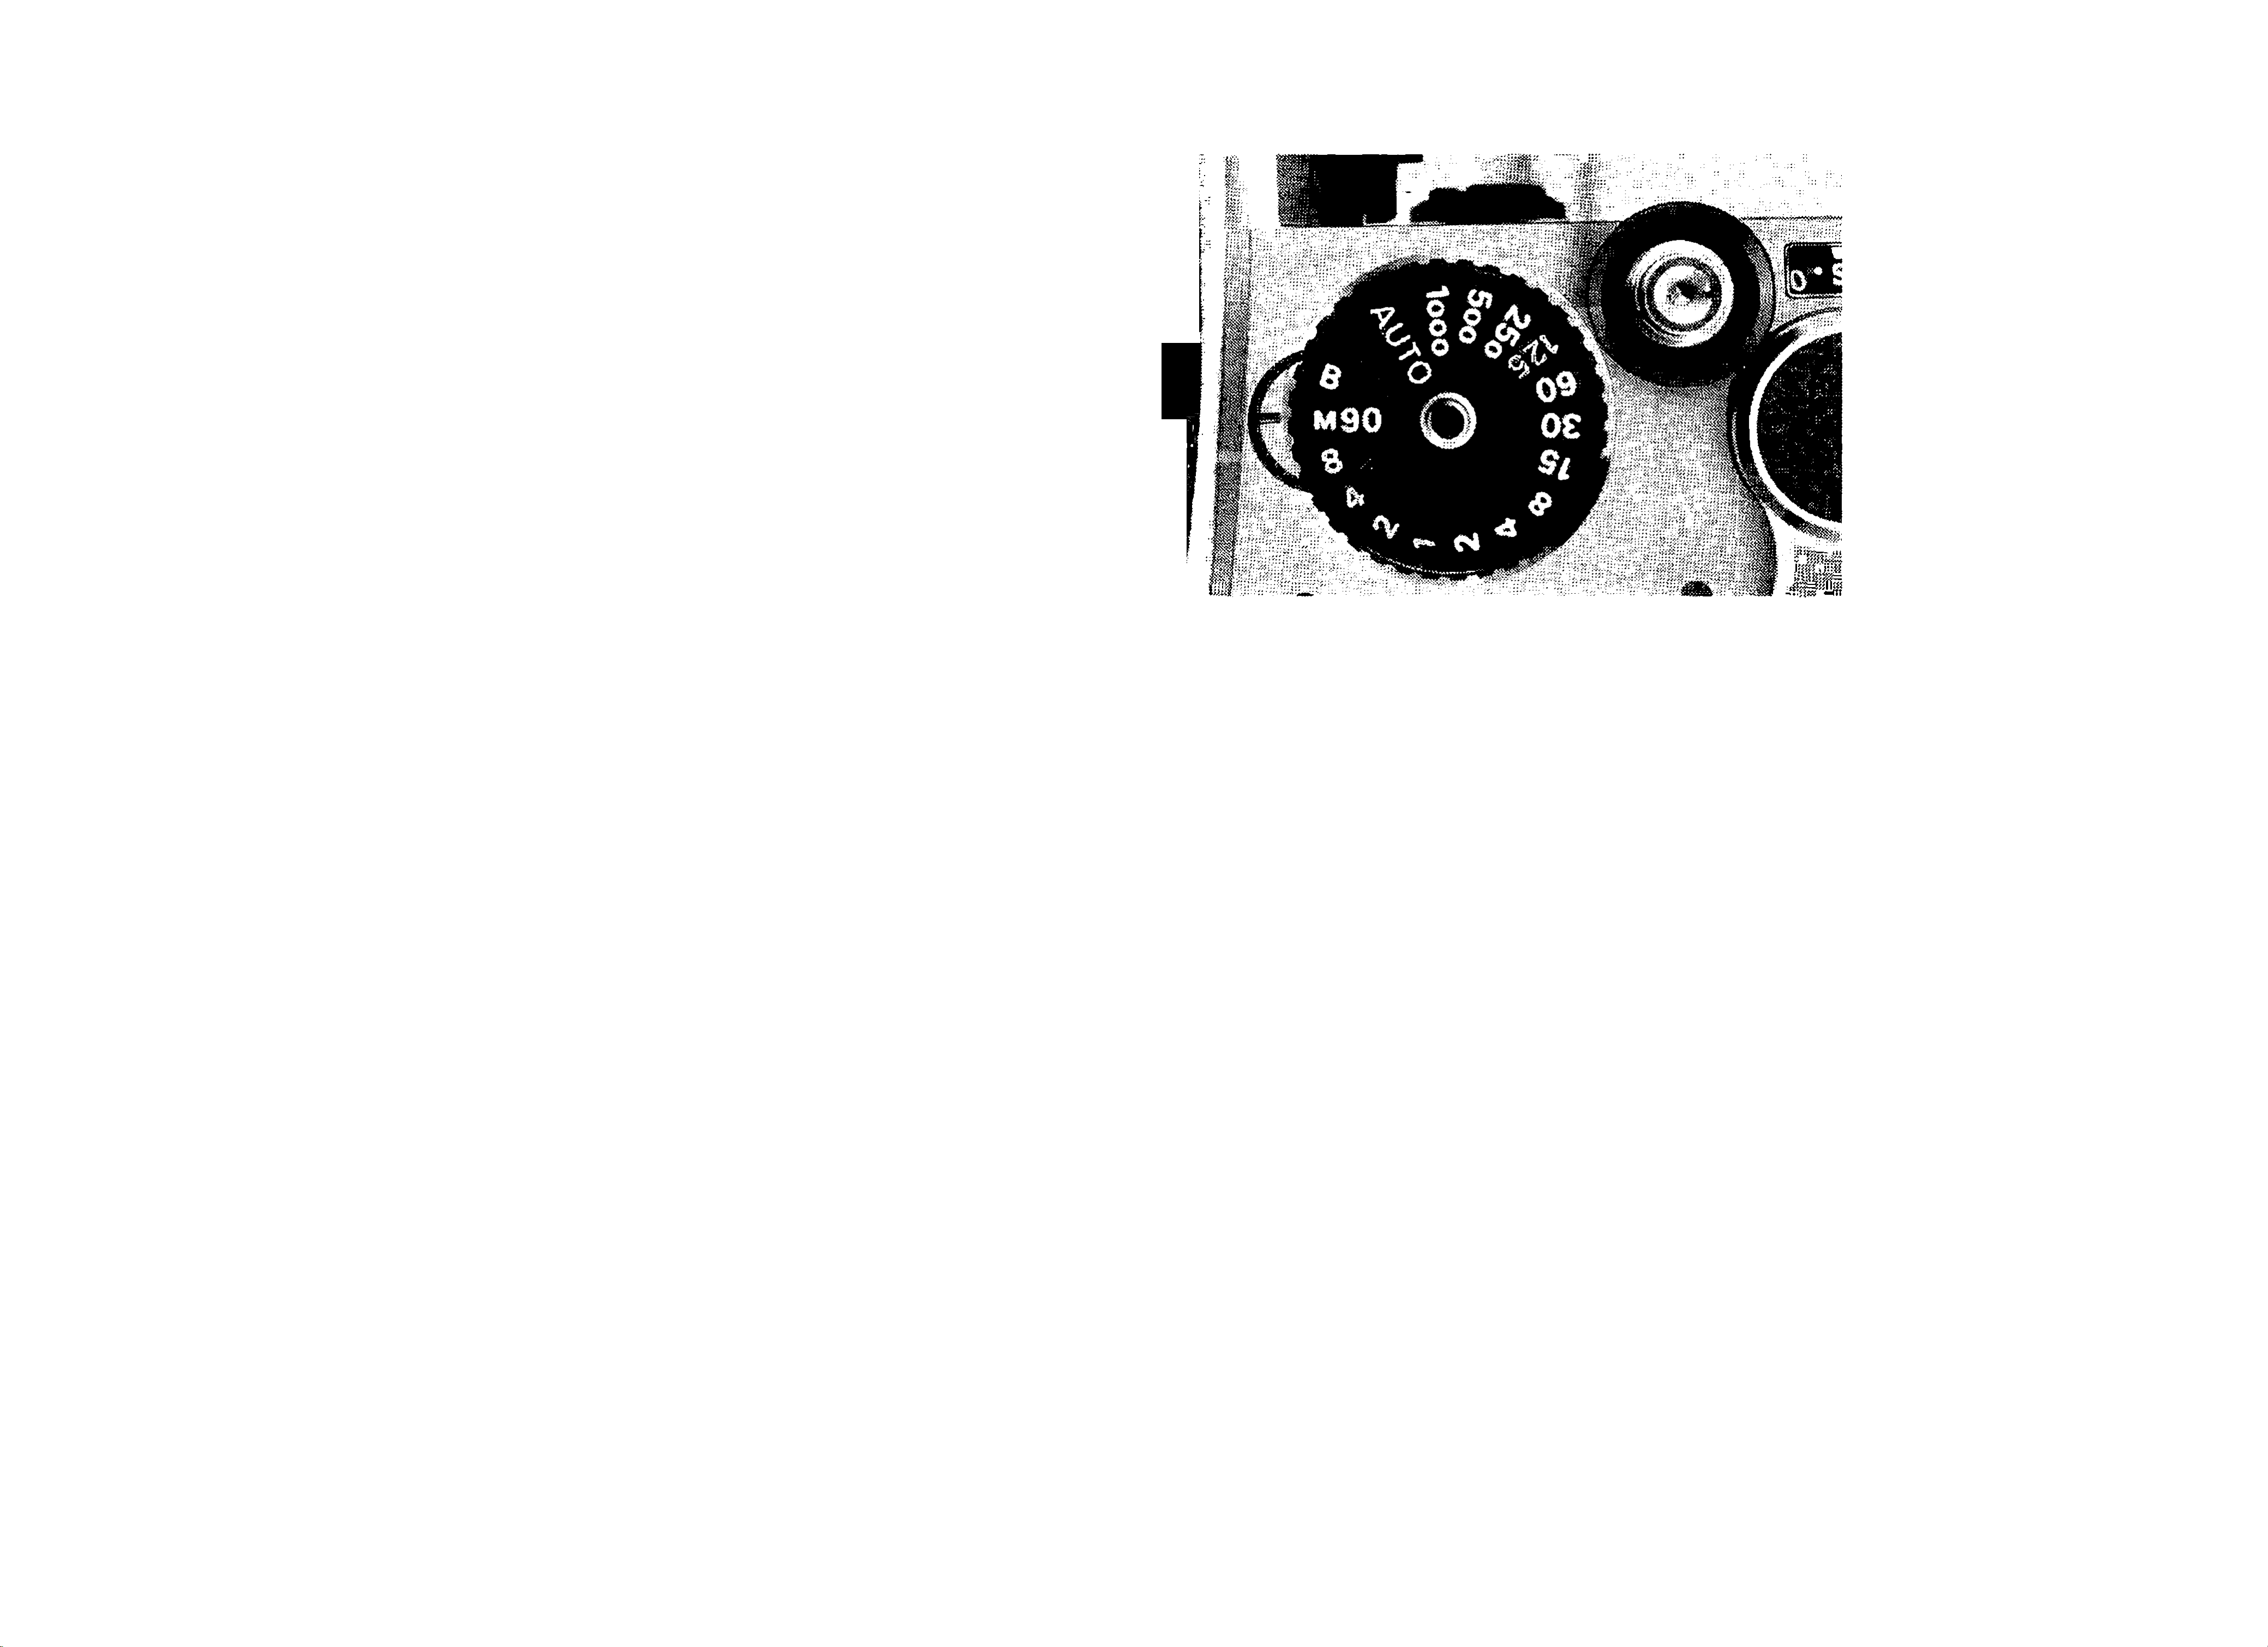
the batteries are exhausted or none are loaded in the
camera. The ‘‘M90” setting also serves as a known
shutter speed when shooting with electronic flash. At
the “B” setting, the shutter remains open as long as the
shutter release button is depressed. “B” is also a me
chanical shutter speed, so there is no battery drain when
shooting time exposures. To conserve battery power
when making really long time exposures, use a cable
release and then push the film-advance lever back in
flush with the camera body after opening the shutter.
Note that the 125 setting is engraved in red; this indi
.'tv
llU » '
■
cates 1/125 second, the fastest shutter speed available
for synchronization with electronic flash units. (Refer to
page 37 for additional information on flash photography.)
Distributed by WWW.LENSINC.NET
n
OPERATION OF CAMERA CONTROLS-continued
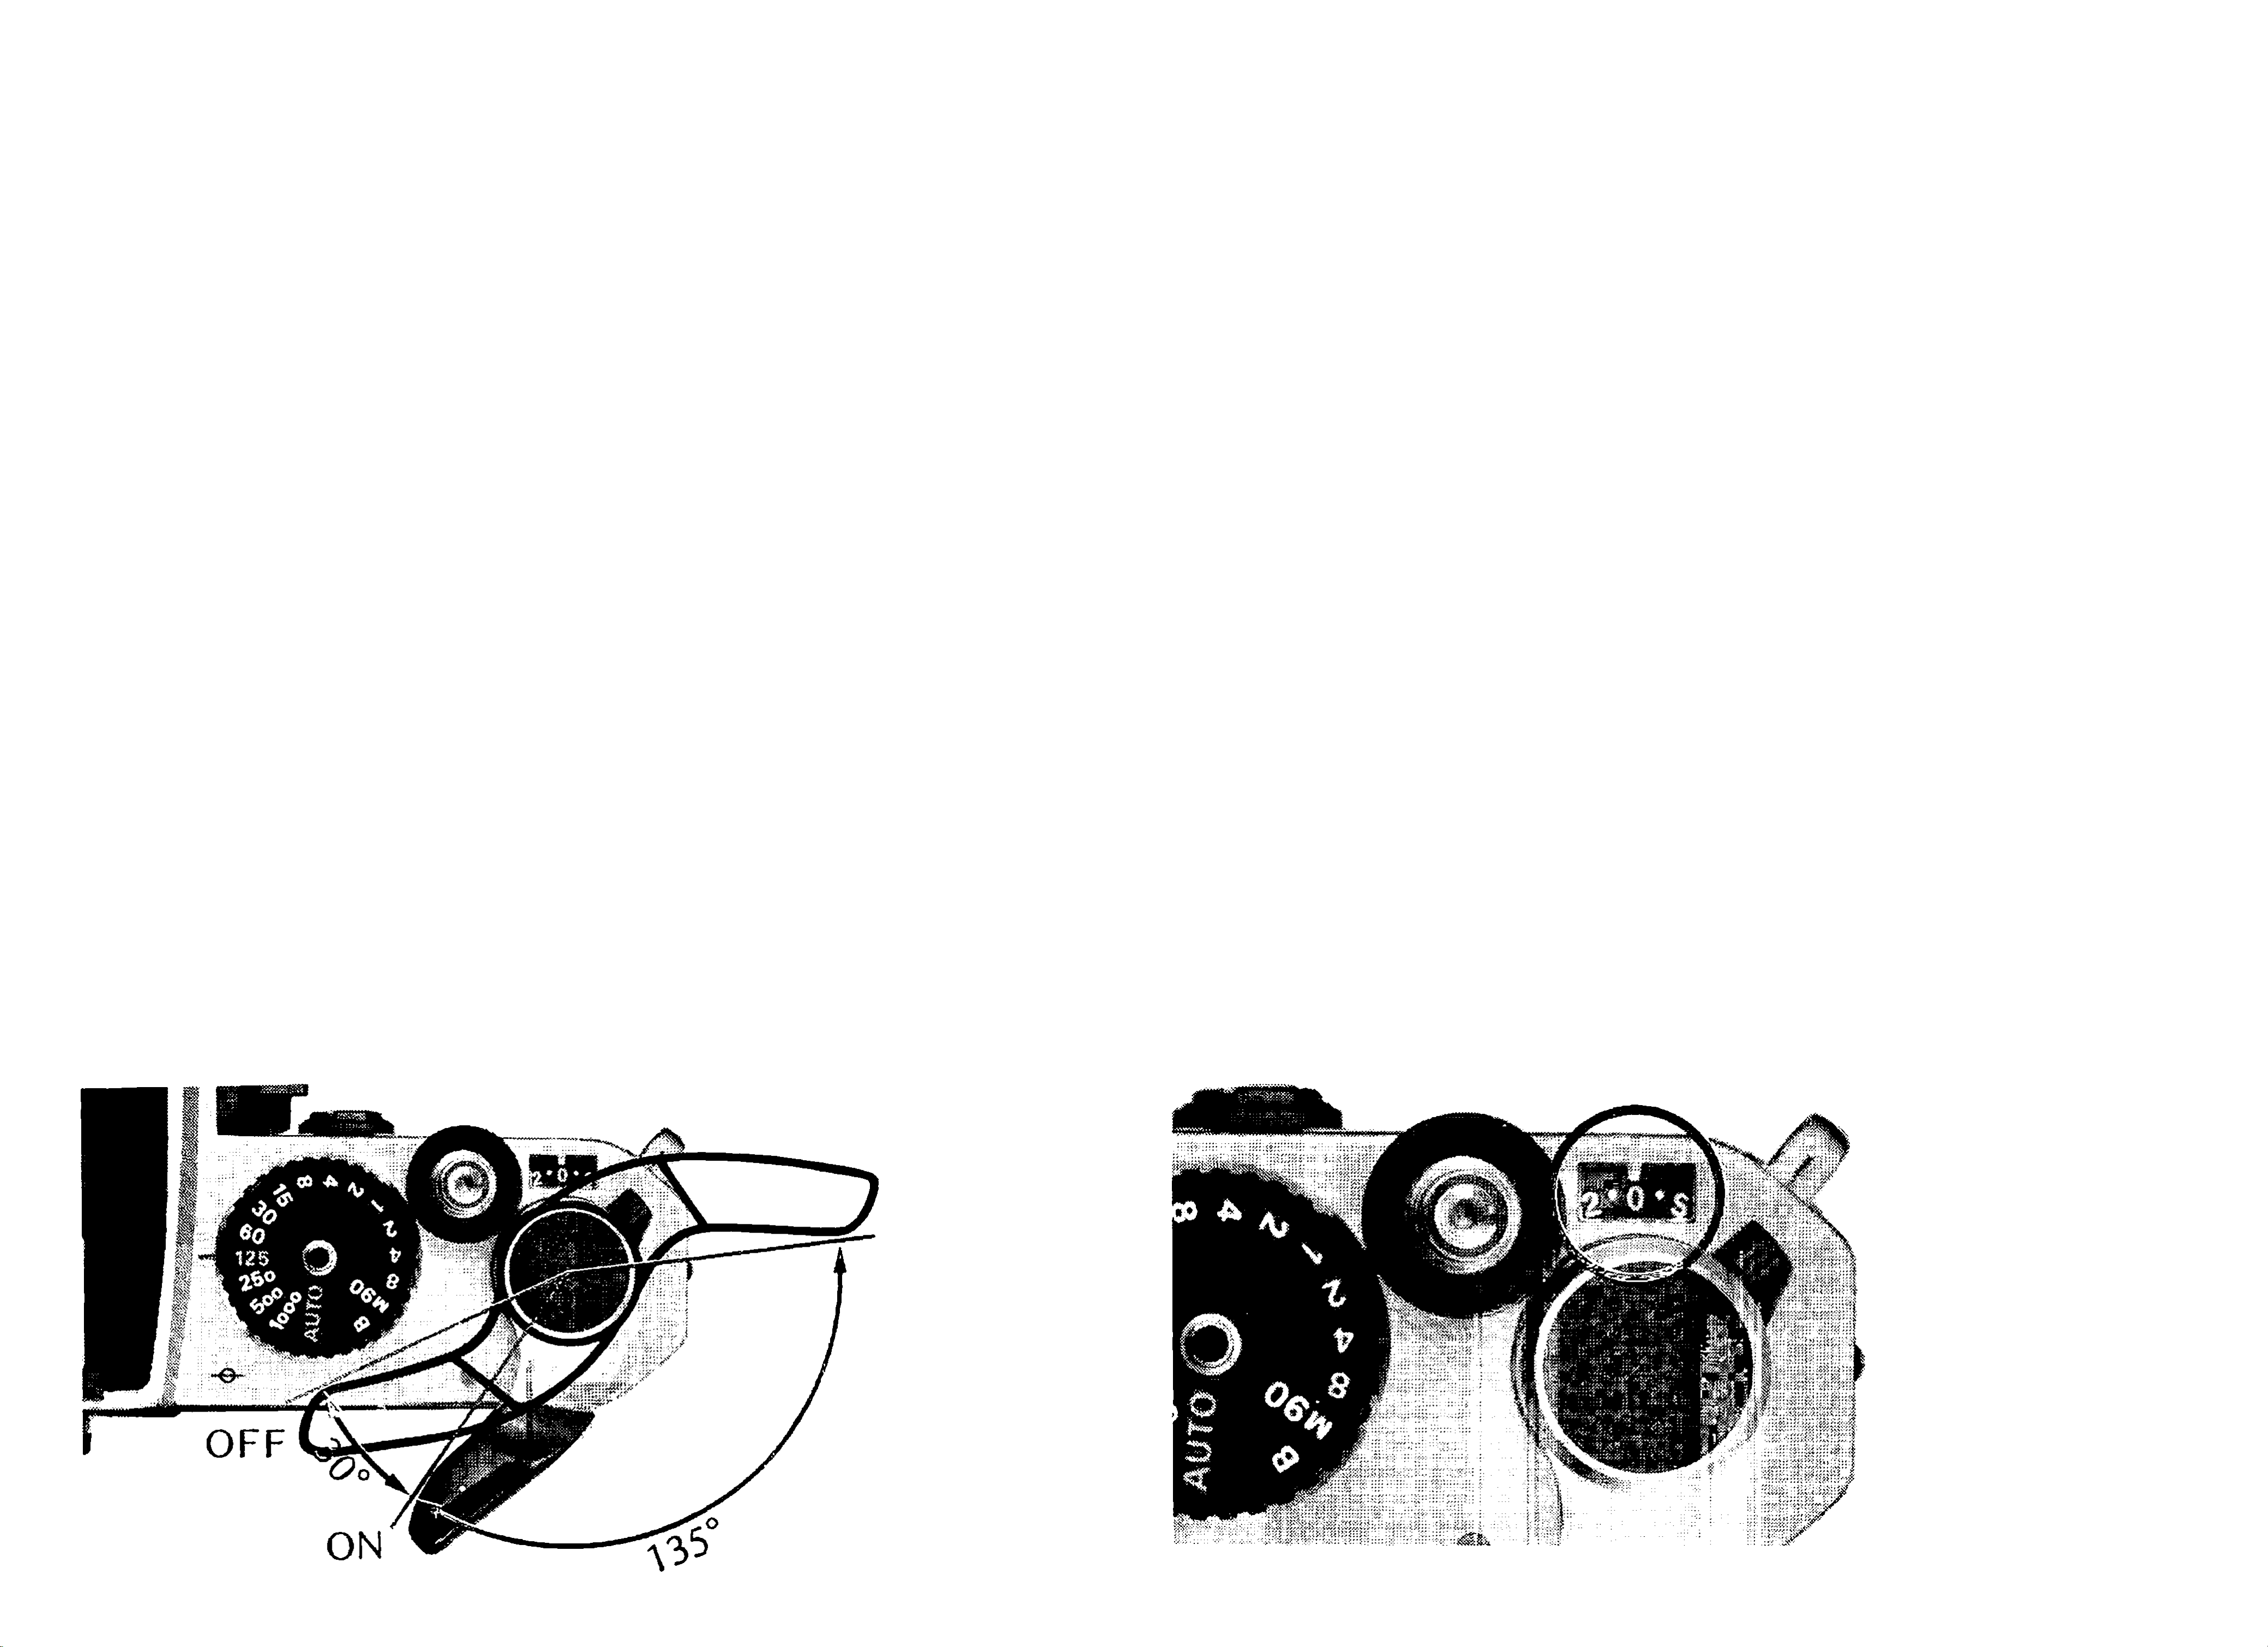
Film-Advance Lever
The film-advance lever simultaneously advances the film,
cocks the shutter and operates the frame counter. It also
doubles as the Nikon FE’s meter on/off switch and
shutter button lock.
To advance the film, stroke the lever with your right
thumb as far as it will go. The film will be advanced a
Frame Counter
Each time the film is advanced one frame by a full
stroke of the film-advance lever, the frame counter
operates to show how many frames have been exposed.
It is automatically reset to S (start), two frames before
0, when the camera back is opened to remove an ex
posed film cartridge and/or to load a new roll of film.
full frame. The lever automatically returns to its 30°
stand-off position when released upon the completion of
film advance.
The film-advance lever switches the meter on when
moved to its stand-off position; it switches the meter off
when moved back flush with the camera body. With the
lever set flush against the camera body, it serves also as a
The fram’e counter has indications for up to a maximum
of 36 frames, with all odd numbers calibrated in dots
and all even numbers in figures. The figures are in white,
except for 1 2, 20 and 36 which appear in red to indicate
the maximum number of exposures available, respective
ly, with standard film cartridges.
lock to prevent accidental tripping when the shutter is
cocked. In this position (when the meter is off), the
meter needle in the viewfinder rests below “B” on the
shutter-speed scale.
12
Distributed by WWW.LENSINC.NET

Self-Timer
simply turn It back upwards and push It towards the lens
The built-in self-timer can be used to trip the shutter
after a delay of approximately 8—14 seconds. To take
a picture using the self-timer, first set the aperture and
shutter speed controls, advance the film, and cock the
self-timer by turning the self-timer lever downwards.
Then, depress the shutter release button and the timer
will start (note that the mirror will rise as the shutter
mount. Then you can resume normal shutter tripping
operation. The self-timer works at all shutter speed set
tings, except “B.” For critical close-up photography, the
self-timer, in combination with a tripod, is particularly
useful in preventing vibration.
Note: When using the self-timer with the camera on automatic,
cover the eyepiece with your hand only at the instant you
button is depressed and return at the end of the cycle).
A unique feature of the FE’s self-timer lever is that its
setting is “cancellable.’’ In other words, should you
decide not to use the self-timer after setting it, you
release the shutter; this will prevent light from entering into the
eyepiece and adversely affecting exposure measurement.
Distributed by WWW.LENSINC.NET
13
OPERATION OF CAMERA CONTROLS-continued
Memory Lock
The convenient location of the self-timer lever, making
for ready finger access, proves advantageous when using
the built-in memory lock. Memory lock enables the
photographer to “lock in” a close-up reading of the
subject. To operate the memory lock, view through the
finder and meter on the selected area; then, simply push
the lever toward the lens to hold the reading until the
completion of the exposure. The reading will be retained
as long as the control is held in this position. Even
though the meter needle continues to move while the
memory lock is activated, the shutter speed is still
“locked in” electronically. Thus, several frames can be
exposed using the same locked reading. Also, the aper
ture can be adjusted without affecting the locked-in
shutter speed. (See “High-Contrast Lighting Situations”
on page 28 for details on the use of the memory lock.)
14
Distributed by WWW.LENSINC.NET
Loading...