


 NET.LENSINC.WWW
(E)
 INSTRUCTION MANUAL
E
.LENSINC.WWW |
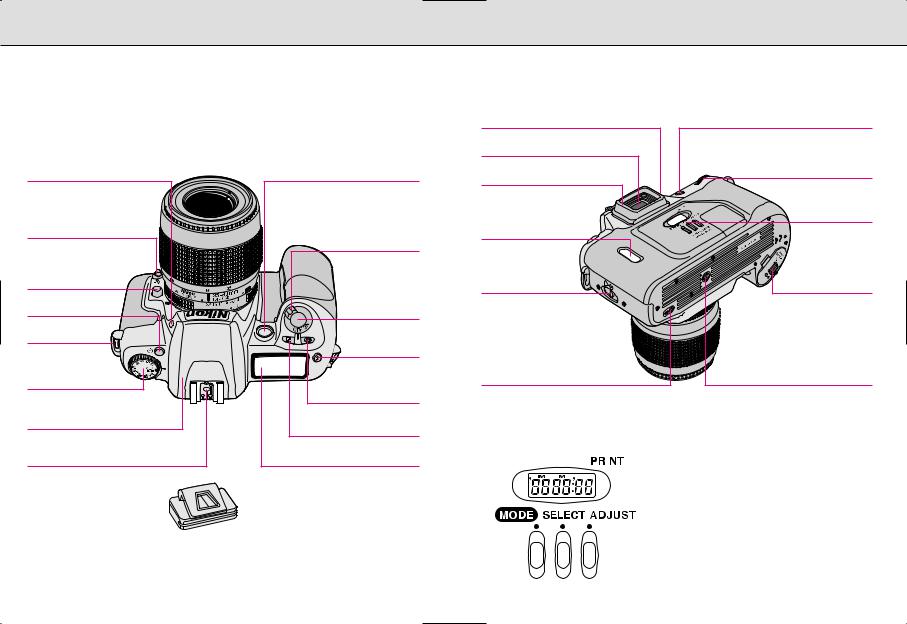
Nomenclature |
|
|
AF-Assist Illuminator/Self-timer/ |
|
NET |
Speedlight lock-release button |
Red-Eye Reduction lamp |
|
P. 28 |
PP. 36, 55, 59 |
|
Focus mode selector |
|
|
P. 20, 36, 37 |
Main switch P. 14 |
|
|
|
|
Lens release button |
|
|
P. 17 |
|
|
Self-timer button |
Shutter release |
|
P. 55 |
|
|
button P. 15 |
|
|
Camera strap |
|
|
|
|
|
eyelet |
Flash sync mode |
|
|
button P. 60 |
|
Exposure mode dial |
|
|
P. 22 |
|
|
|
Aperture button P. 43 |
|
Built-in Speedlight P. 28 |
Exposure compensation |
|
button P. 50 |
|
|
|
|
|
Accessory shoe |
LCD panel P. 4 |
Eyepiece cap DK-5 (page 56)
2
Dioptre adjustment lever P. 56 |
AE-L (auto exposure lock) button P. 49 |
|
Finder eyepiece P. 56 |
|
|
Rubber eyecup P. 56 |
Command Dial P. 41 |
|
|
||
|
Data imprint LCD |
|
Film cartridge |
panel/buttons |
|
(F60D only) P. 52 |
||
confirmation window |
||
|
||
P. 19 |
|
|
|
Battery chamber |
|
Camera back lock |
cover lock release |
|
release P. 18 |
P. 14 |
Mid-roll rewind button P. 34 |
Tripod socket |
F60D only: Data imprint LCD/buttons
1 |
|
|
|
|
|
|
|
|
5 |
1. |
Date/time display LCD |
||||
|
|
|
|
|
|
|
2. |
’: Year indicator |
|||||||
2 |
|
|
|
|
|
|
|
|
|
|
|
|
6 |
||
|
|
|
|
|
|
|
|
|
|
|
|
3. |
MODE button: Push to select one of five |
||
|
|
|
|
|
|
|
|
|
|
|
|
||||
|
|
|
|
|
|
|
|
|
|
|
|
4. |
available displays. |
||
|
|
|
|
|
|
|
|
|
|
|
|
|
|
SELECT button: Push to select date/time |
|
|
|
|
|
|
|
|
|
|
|
|
|
|
|
|
to be adjusted. |
|
|
|
|
|
|
|
|
|
|
|
|
|
|
5. |
M: Month indicator |
|
|
|
|
|
|
|
|
|
|
|
|
|
|
6. |
: Data imprint indicator: Blinks |
3 |
|
|
|
|
|
|
|
|
|
|
|
|
7 |
7. |
–approx. 2 sec. when data is imprinted. |
|
|
|
|
|
|
|
ADJUST button: Push to adjust date/time. |
||||||||
4 |
|
|
|
|
|
|
|
|
|
|
|
|
|
|
3 |
|
|
|
|
|
|
|
|
|
|
|
|
|
|
||
|
|
|
|
|
|
|
|
|
|
|
|
|
|
|
|

.WWW |
LCD/Viewfinder Displays |
|
|
1 |
6 |
||
.LENSINC |
|||
2 |
|
||
NET |
|
||
3 |
7 |
||
|
|||
|
|
||
|
4 |
8 |
|
|
5 |
||
|
9 |
1. |
Shutter speed |
6. |
Aperture |
|
2. |
Flexible program (page 40) |
7. |
Exposure compensation (page 50) |
|
3. |
Flash sync mode (page 59) |
8. |
Frame counter/exposure |
|
4. |
Battery power (page 15) |
|
compensation value (page 19, 50) |
|
9. |
Film (page 19) |
|||
5. |
Self-timer (page 55) |
|||
|
|
About LCD
•At high temperatures of 60°C or above, the display turns black, making it impossible to read. It returns to normal when the temperature drops to 20°C.
•At temperatures below freezing, the LCD’s response time slows; when the temperature rises, it returns to normal.
4
1
2
3
4
1.Focus brackets (page 25)
2.Focus indicator (page 25)
3.Shutter speed
4.Aperture
5
6
7
8
5.12mm-dia. reference circle for Centre-Weighted Metering (page 48)
6.Flash ready-light (page 28)
7.Exposure compensation mark (page 50)
8.Electronic analogue display (page 43)
5

NET.LENSINC.WWW
Introduction
Thank you for purchasing the Nikon F60/F60D camera. We are sure that you will enjoy using this camera and that it will make photography a bigger part of your life.
Get to know your F60/F60D camera, but before using it, be sure to read this manual thoroughly. Also, we recommend that you keep this manual handy.
Main features of the F60/F60D:
•SLR camera with built-in Speedlight makes taking pictures easy and enjoyable, even for the most inexperienced beginner.
•The individual exposure modes are displayed on the exposure mode dial for one-touch change of modes and quick set-up for advanced picture-taking.
•The F60/F60D’s new Auto-Servo AF is so advanced that it can detect whether a subject is stationary or moving, and also detects direction. According to the detected information, it automatically chooses to lock focus or activate focus tracking—either way, you’re assured autofocusing that works fast, accurately, and easily.
Take trial shots
Take trial shots before shooting at important occasions like wedding or graduations.
Have Nikon spot check your camera regularly
Nikon recommends that you have your camera serviced by an authorised dealer or service centre at least once every two years.
Using your camera correctly
The Nikon F60/F60D’s performance has been optimised for use with Nikon brand accessories. Accessories made by other manufacturers may not meet Nikon’s criteria for specifications, and nonconforming accessories could damage the F60/F60D’s components. Nikon cannot guarantee the F60/F60D’s performance when it is used with other than Nikon brand accessories.
6 |
7 |

.WWW |
Contents |
|
|
|
|
|
The “Basic Operation” section introduces battery, lens, film, focusing, exposure |
|
.LENSINC |
|
|
|
and shooting in basic steps for easy picture-taking even for SLR camera |
|
|
|
|
|
|
beginners. |
|
|
“Detailed Operation” explains each function, from lens to exposure, in detail, in |
|
|
approximately the same order as the steps in the “Basic Operation” section. |
|
|
After becoming familiar with basic shooting, refer to the detailed explanation of |
NET |
|
each operation/function to step up to advanced shooting that requires more |
|
advanced techniques. |
|
|
“Flash Photography” introduces flash photography using the F60/F60D’s built-in |
|
|
|
Speedlight and optional Speedlight in the dark, as well as other flash-shooting |
|
|
situations in bright conditions. |
|
|
Please read this manual thoroughly and carefully to get the most out of your |
|
|
Nikon F60/F60D. |
|
|
|
|
|
|
|
|
|
|
....................................................PREPARATION |
2-11 |
|
||
|
|
|
|
|
|
|
Nomenclature..................................................................................... |
2-3 |
|
||
|
LCD/Viewfinder Displays.................................................................... |
4-5 |
|
||
|
Introduction ........................................................................................ |
6-7 |
|
||
|
About This Manual ......................................................................... |
10-11 |
|
||
|
|
|
|
|
|
|
..........................................BASIC OPERATION |
13-30 |
||
|
1. |
Install Batteries and Check Battery Power............................... |
14-15 |
|
2. |
Mount Lens............................................................................... |
16-17 |
||
3. |
Load Film .................................................................................. |
18-19 |
||
4. |
Set Focus Mode Selector to AF ............................................... |
20-21 |
||
5. |
Set Exposure Mode Dial to z.................................................. |
22-23 |
||
6. |
Hold Camera and Focus........................................................... |
24-25 |
|
|
7. |
Confirm Indications in Viewfinder and Release Shutter ........... |
26-27 |
||
8. |
Using Built-In Speedlight.......................................................... |
28-29 |
|
|
|
About Focus and Exposure ................................................................. |
30 |
|
|
|
|
|
|
|
8
DETAILED OPERATION ................................... |
31-64 |
Lens Compatibility.......................................................................... |
32-33 |
Film................................................................................................. |
34-35 |
Focus Mode ................................................................................... |
36-37 |
Focus Lock .......................................................................................... |
38 |
Shooting in Each Exposure Mode.................................................. |
39-44 |
Vari-Program .................................................................................. |
45-47 |
Exposure Metering System ................................................................. |
48 |
Auto Exposure Lock ............................................................................ |
49 |
Exposure Compensation................................................................ |
50-51 |
Imprinting Date/Time (for F60D only).............................................. |
52-54 |
Self-Timer Operation ........................................................................... |
55 |
Dioptre Adjustment/Eyepiece Cap ...................................................... |
56 |
Two-Button Reset................................................................................ |
57 |
Flash Photography ......................................................................... |
58-63 |
Built-in Speedlight and Matrix Balanced Fill-Flash........................ |
58 |
Flash shooting distance range....................................................... |
58 |
Flash sync mode features.............................................................. |
59 |
Using built-in Speedlight .......................................................... |
60-61 |
Usable lenses with built-in Speedlight........................................... |
61 |
Usable Optional Speedlights.......................................................... |
62-63 |
Available Mode Combinations............................................................. |
64 |
MISCELLANEOUS............................................ |
65-77 |
Optional Accessories........................................................................... |
66 |
Camera Care .................................................................................. |
67-68 |
Notes on Batteries ............................................................................... |
69 |
Troubleshooting ............................................................................. |
70-71 |
Specifications................................................................................. |
72-75 |
Index............................................................................................... |
76-77 |
9

.WWW |
About This Manual |
|
|
Basic Operation |
P. 13-30 |
||
NET.LENSINC |
|||
2 |
|
||
|
1 |
|
3 |
Load film |
P. 18-19 |
ISO (film |
speed) |
|||
|
|
|
DX mark |
4 Set Focus Mode Selector to AF P. 20-21
5 Set Exposure Mode Dial to z P. 22-23
6
7
8 Using Built-In Speedlight |
P. 28-29 |
10 |
|
Detailed Operation |
P. 31-64, 69 |
Notes on Batteries (P. 69)
Lens Compatibility Chart (P. 32-33)—CPU Nikkor lens (P. 32-33)/ Non-CPU lens (P. 32-33)
Film (P. 34)—Confirming an automatically set film speed (P. 34)/
Mid-roll rewind (P. 34)/In case film does not start rewind or film rewind stops at midroll (P. 35)/Film advance mode (P. 35)
Focus Mode (P. 36-37)—Autofocus (P. 36)/AF-Assist Illuminator (P. 36)/ Manual focus (P. 37)
Focus Lock (P. 38)
Shooting in Each Exposure Mode (P. 39-44)—z: General Purpose (P. 39)/P: Auto-Multi (P. 40)/S: Shutter-Priority Auto (P. 41)/A: Aperture-Priority Auto (P. 42)/ M: Manual (P. 43-44); Vari-Program (P. 45-47)—x: Portrait (P. 46)/c: Landscape
(P. 46)/v: Close-Up (P. 46)/b: Sport (P. 47)/n: Night Scene (P.47); Exposure Metering System (P. 48)—Matrix/3D Matrix (P. 48)/Centre-Weighted (P. 48); Auto Exposure Lock (P. 49); Exposure Compensation (P. 50-51)
Imprinting Date/Time (P. 52-54); Self-Timer Operation (P. 55); Dioptre Adjustment/Eyepiece Cap (P. 56); Two-Button Reset (P. 57)
Flash Photography (P. 58-63)—Built-in Speedlight and Matrix Balanced Fill-Flash (P. 58)/Flash shooting distance range (P. 58)/Flash sync mode features (P. 59)/ Using built-in Speedlight (P. 60-61)/Usable lenses with built-in Speedlight (P. 61)/ Usable Optional Speedlights (P. 62)
11

NET.LENSINC.WWW
12
BASIC OPERATION
This section guides you through basic operations with the camera set to z mode.
Settings are as follows:
Attached lens |
D-type AF Nikkor |
|
|
Focus mode |
Autofocus |
|
|
Exposure mode |
z (General-Purpose |
|
Program) |
|
|
Exposure metering |
3D Matrix Metering* |
|
|
Built-in Speedlight |
Normal sync* |
|
|
* Automatically set when exposure mode is set to z.
13
WWW1 .LENSINC
.NET 1.1
1.2
14
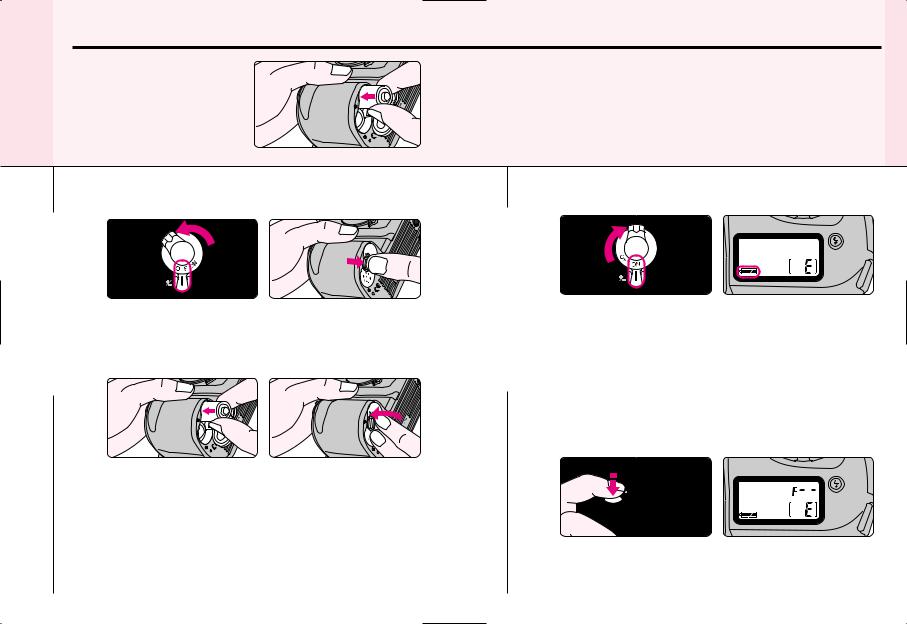
Install Batteries and Check Battery Power |
yCheck points |
|
i Keep the batteries out of children’s reach. If swallowed, contact a |
|
doctor immediately. (For “Notes on Batteries”, see page 69.) |
|
i When replacing batteries, be sure to turn the main switch off and |
|
replace both batteries at the same time. Always use fresh batteries of |
|
the same brand. |
|
i We recommend that you take spare batteries with you, especially when |
|
traveling, since the batteries used may be difficult to obtain in some |
|
areas. |
Turn off the main switch and open the battery chamber cover.
Insert batteries with the “+” and “-” ends positioned as marked inside the battery chamber cover, then firmly close the battery chamber cover.
•Incorrect positioning of + and - poles may cause damage to the camera.
1.3 |
Turn on the main switch and confirm battery power |
with the I indication. |
•Shutter speed and aperture indications in the LCD panel and viewfinder automatically turn off 5 sec. after turning the main switch on and camera is left unused.
•Battery power
I appears: Sufficient battery power.
O appears: Batteries are nearing exhaustion. Have a fresh set ready. O blinks: Batteries are exhausted. Replace batteries. (No indication appears in the viewfinder and shutter locks.)
1.Lightly press the shutter release button to activate 4 the exposure meter.
•Lightly pressing the shutter release button reactivates the exposure meter and shutter speed and aperture indications in the LCD panel and viewfinder. The indications automatically turn off 5 sec. after you remove your finger from the shutter release button.
15
BASIC OPERATION
WWW2 .LENSINC
.NET 2.1
2.2
16
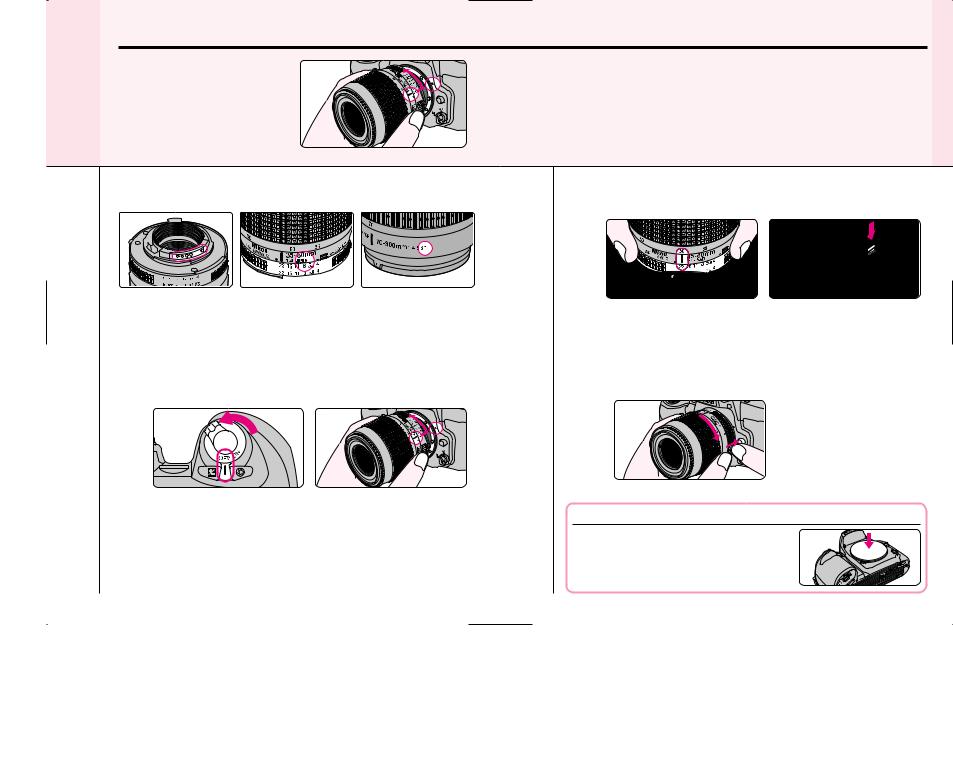
Mount Lens
Mount body.
Check the lens type.
CPU contacts of CPU |
ΠCPU Nikkor lens |
„ G-type Nikkor lens |
Nikkor lens |
other than G-type |
|
ŒCPU Nikkor lenses other |
|
is D-type Nikkor lens), |
with aperture ring |
|
|
„G-type Nikkor lens, without |
|
|
Turn the main switch |
lens to the |
|
camera body. |
|
|
• Position lens in the camera’s |
the mounting indexes |
on lens and camera body |
counterclockwise |
until it locks into place. (Be |
release button.) |
• When the lens is not |
lens is attached and |
the main switch is turned |
panel and viewfinder |
and the shutter cannot be |
blink and shutter can be |
released when the exposure |
.) |
yCheck points |
OPERATION |
||
i Use D-or G-type AF Nikkor lens to utilize all the functions of this |
|||
|
|||
camera. (See page 32 for Lens Compatibility.) |
|
||
i Make sure to turn the main switch off when attaching/detaching the |
BASIC |
||
i When attaching the lens, take care not to press the lens release button. |
|||
lens. |
|
||
i When attaching/detaching the lens, make sure to avoid direct sunlight. |
|
||
2.3 |
With CPU Nikkor lens with aperture ring (other than G- |
|
|
type), set the lens’ aperture to its minimum and lock. |
|
||
• When CPU Nikkor lens other than G-type is not set to its minimum aperture setting and the main switch is turned on, ‡ blinks in the LCD panel and viewfinder and the shutter cannot be released.
• The G-type Nikkor lens has no aperture ring; aperture should be selected from camera body. Unlike other CPU Nikkor lenses, aperture does not need to be set to minimum.
2. Detaching the lens.
4
• Push and hold the lens release button, then turn the lens clockwise.
When camera is left unattended without lens
When you leave the camera unattended without a lens attached, be sure to attach supplied body cap, or optional body cap BF-1A. (BF-1 body cap cannot be used.
17

WWW3 .LENSINC
.NET 3.1
3.2
18
Load Film
Use a DX-coded film. Film speed is set automatically (ISO255000).
When the camera is turned on, film is loaded and the camera back is closed, the film automatically advances to the first frame.
 ISO (film
speed)
DX mark
Turn on the main switch, then and insert film.
• Insert from the bottom of the film cartridge.
Pull film leader out to red index mark.
•Do not insert the film leader beyond the red index mark.
•Hold the film cartridge and ensure film is properly positioned with no slack.
yCheck points |
OPERATION |
|
film can be used with this camera. When film other than |
||
|
||
is inserted, T blinks and fl appears on the LCD panel. |
|
|
are very thin. Make sure not to touch the shutter |
BASIC |
|
your finger or film leader. |
||
|
||
be confirmed on the LCD panel. |
|
|
film outdoors, avoid direct sunlight. |
|
|
|
|
3. Gently close the camera back until the lock release 3 snaps closed. Film automatically advances to first
frame.
•When T and 1 appear on the LCD panel, the film has advanced to the first frame.
•When ‹ and T blink on the LCD panel, film is not properly installed. Open the camera back again and reload film.
•Film is automatically rewound when the film reaches the end of the roll. (See page 27.)
•Number of available exposures of the film roll can be checked through the film cartridge confirmation window.
NOTE: Loading/removing film
Shutter curtains are very not to touch the shutter your finger or film leader
19
WWW4 .LENSINC
.NET 4.1
4.2
20
Set Focus Mode Selector to AF
When the focus mode selector is set to AF (autofocus), the camera focuses automatically.
Set the focus mode selector to AF (autofocus).
•Make sure to turn the focus mode selector until it clicks into position.
•To focus, lightly press the shutter release button. (See page 24.)
Situations where autofocus may not work as expected:
•Autofocus may not work as expected in the following situations. In such situations, focus on a different subject located at the same distance, use focus lock (page 38) then recompose.
•When you are unable to perform focus lock, set the focus mode selector to M (manual) and focus manually using the clear matte field.
yCheck points |
OPERATION |
|
i Do not attempt to rotate the lens’ focus ring manually with the focus |
||
|
||
mode set to AF. |
|
|
i With the focus mode set at AF, the shutter cannot be released when the |
BASIC |
|
subject is out of focus. For details on focus mode, see page 36. |
||
|
||
|
|
Low contrast scenes
For example, where the subject is wearing the same colour clothing as a wall or other background.
Patterned subject or scene
For example, building windows.
Scenes with the subject located at different distance within the focus brackets
For example, when shooting an animal inside a cage or a person in a forest.
Scenes in which there is pro-

 nounced difference in brightness
within the focus brackets
For example, when the sun is in the
background and your main subject is in shadow.
21

WWW5 .LENSINC
.NET 5.1
5.2
22
Set Exposure Mode Dial to z
With the exposure (General-Purpose camera will
your exposure.
Set the exposure mode dial to z.
•Shutter speed and aperture appear in the LCD panel and viewfinder when shutter release button is lightly pressed.
About exposure mode and type of program
Symbol |
Exposure mode/ |
Characteristics/shooting situations |
|
|
Type of program |
|
|
|
General-Purpose |
The easiest exposure mode for general |
|
z |
shooting. Suitable for portraits and other |
||
Program |
|||
general pictures, or when you want to take |
|||
|
P. 39 |
||
|
pictures first-hand. |
||
|
|
||
|
Auto-Multi |
Camera controls exposure automatically, |
|
P |
while allowing you to make other settings, |
||
Program |
|||
such as Flexible Program or exposure |
|||
|
P. 40 |
||
|
compensation. |
||
|
|
||
|
|
You set your desired shutter speed, and the |
|
S |
Shutter-Priority |
camera selects the correct aperture. You can |
|
Auto |
“stop” the motion of a moving subject with a |
||
|
P. 41 |
fast shutter speed or create blur with a |
|
|
|
slower speed. |
|
|
|
|
yCheck points |
OPERATION |
|
i Ten exposure modes are available with this camera. Five types of Vari- |
||
|
||
Programs enable you to easily choose proper exposure controls in |
|
|
various shooting situations. |
BASIC |
|
See step 5.2 for the summary of each exposure mode and each |
||
|
reference page for the operating instructions and details.
Symbol |
Exposure mode/ |
Characteristics/shooting situations |
||
|
|
|
Type of program |
|
|
|
|
|
You set the desired aperture, and based on |
|
|
|
Aperture-Priority |
that, the camera selects the correct shutter |
|
A |
speed. Lets you determine the depth of the |
||
|
Auto |
|||
|
|
|
P. 42 |
in-focus area; near and far subjects can be |
|
|
|
sharply focused or the background can be |
|
|
|
|
|
|
|
|
|
|
blurred. |
|
M |
Manual |
Shutter speed and aperture are set |
|
|
manually. Suited to situations where it is |
|||
|
|
|
P. 43-44 |
difficult to attain your desired effect with |
|
|
|
|
other exposure modes. |
|
|
|
Portrait Program |
Use this program to take portraits. With a |
|
|
x |
shallow depth of field (in-focus area), it |
|
|
|
P. 46 |
creates a blurred background to accentuate |
|
|
|
|
|
your main subject. |
|
|
|
Landscape |
Use this program to take pictures of distant |
|
|
c |
Program |
scenes. With a deep depth of field, the |
Program-Vari |
|
|
P. 46 |
overall landscape will be sharply focused. |
|
|
Close-Up Program |
Use this program to take up-close pictures. |
|
|
|
v |
With a shallow depth of field, your close- |
|
|
|
P. 46 |
ups will be taken with an artistically blurred |
|
|
|
|
|
background. |
|
|
|
Sport Program |
Use this program to take sports pictures. |
|
|
b |
Using a fast shutter speed, it freezes the |
|
|
|
P. 47 |
motion of fast-moving subjects to create |
|
|
|
|
|
exciting action photos. |
|
|
|
Night Scene |
Use this program in the evening or at night. |
|
|
n |
Even a very dark subject will be exposed so |
|
|
|
Program |
||
|
|
it captures the beauty of all the light |
||
|
|
|
P. 47 |
|
|
|
|
available in your night scene. |
|
|
|
|
|
|
|
|
|
|
|
23
WWW6 .LENSINC
.NET 6.1
24
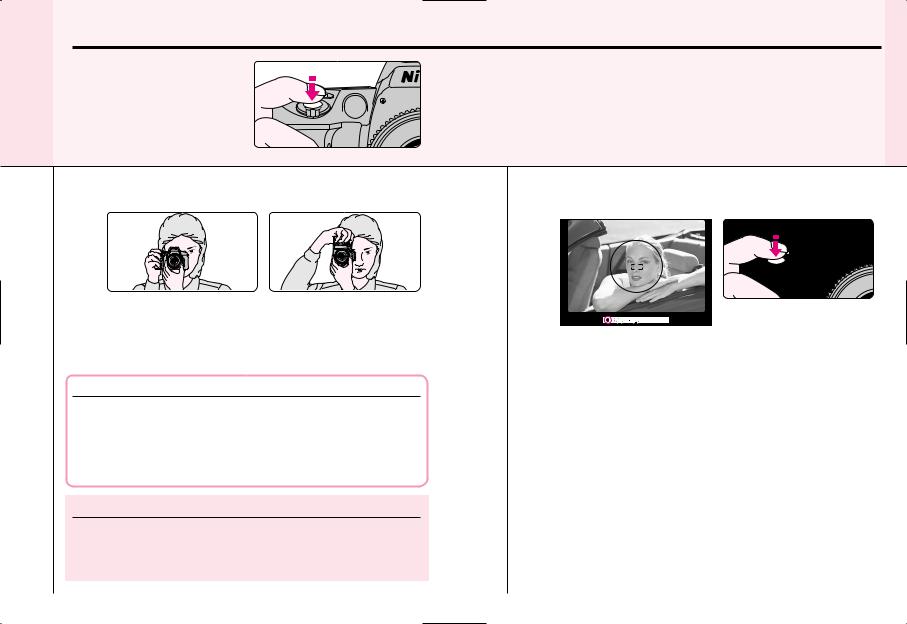
Hold Camera and Focus
Lightly pressing release button focuses the subject and
in focus, causes the viewfinder.
Hold the camera properly.
• Keep |
body for support. |
• Stand |
and keep your upper body still. |
• Grasp |
right hand and use your left hand to |
cradle |
|
Camera shake and shutter speed
Preventing camera shake is crucial when taking photographs. In general, you should set the shutter speed faster than ‘1/focal length of your lens’ sec. (Example: when using a 50mm lens, set the shutter speed faster than 1/50 sec.) Use of a tripod is recommended for shooting at slower shutter speeds.
yCheck points |
OPERATION |
|
i Dioptre adjustment (page 56) is available to enable you to see through |
||
|
||
the viewfinder more clearly. |
|
|
i To take a picture of a off-centre subject, use focus lock (page 38). |
BASIC |
|
i For F60D only: Date or time can be imprinted on your photos/negatives |
||
|
(page 52).
6.2 |
Compose frame and focus by lightly pressing the |
shutter release button. |
•Centre the focus brackets on your subject and lightly press the shutter release button. The camera focuses automatically and focus indicator u appears or blinks.
u appears: Subject is in focus. Automatically tracks moving subject. u blinks: Unable to focus with autofocus.
When the subject is dark, the camera’s AF-Assist Illuminator is activated to achieve correct focus. For details on focusing, see page 36.
•To take a picture of a subject outside the focus brackets, use focus lock (page 38).
•In situations where autofocus may not work as expected, see page 20.
25
 Loading...