


 Loading...
Nomenclature
1. Shutter-speed dial locking button
2. Depth-of-field preview button
3. Mirror lockup lever
4. Neckstrap eyelet
5. Self-timer LED
6. Backup mechanical release lever
7. Expose memory lock button
8. Lens mounting flange
9. Reflex mirror
14. ADR window
15. Film rewind knob
16. ASA/ISO film speed/Exposure compensation dial
17. Sync terminal
18. Lens mounting index
19. Lens release button
20. Meter coupling lever release button
21. Meter coupling lever
22. Viewfinder illuminator
10. Motor drive coupling
11. Motor drive positioning hole
12. Film rewind button
13. Memo holder
23. Tripod/Motor drive coupling socket
24. Motor drive electrical contacts
25. Battery chamber lid
26. Motor drivecoupling cover
27. Depth-of-field indicators/Mounting ring
28. Focusing ring
29. Aperture ring
30. Meter coupling ridge
31. Finder mounting/release levers
32. Exposure compensation scale
33. Exposure compensation index
34. Film rewind crank
35. Hot-shoe contacts
36. Accessory shoe
37. Camera back lock lever
38. Exposure compensation locking button
39. ASA/ISO film-speed scale
40. Eyepiece shutter lever
41. Viewfinder eyepiece
42. Shutter speed index
43. Aperture/Focusing index
44. Meter coupling shoe
45. Distance scale
46. Aperture-direct-readout scale
47. Viewfinder illuminator button
48. Self-timer lever
49. Self-timer ON index
50. Power switch ON index
51. Power switch
52. Multiple exposure lever
53. Shutter release button
54. Frame counter
55. Film advance lever
56. Shutter-speed scale
57. Shutter speed dial
58. Film plane indicator
TABLE OF CONTENTS
|
2 - 3 |
FOREWORD |
5 |
BASIC OPERATION |
6 - 16 |
CONTROLS IN DETAIL |
17 - 31 |
Shutter speed dial |
17 - 19 |
Exposure memory lock button |
20 |
Exposure compensation dial |
21 |
ASA film speed dial |
21 |
Memo holder |
22 |
Shutter release button |
22 |
Film advance lever |
23 |
Frame counter |
23 |
Multiple exposure lever |
24 |
Batteries |
24 |
Backup mechanical release lever |
25 |
Depth-of-field preview button |
25 - 26 |
Meter coupling lever |
27 |
Mirror lockup lever |
28 |
Self-timer |
28 |
Eyepiece shutter lever |
29 |
Accessory shoe |
29 |
Sync terminal |
30 |
Viewfinder illuminator |
30 |
Film plane indicator |
31 |
Infrared focusing index |
31 |
ABOUT THE LIQUID CRYSTAL DISPLAY (LCD) |
32 |
EV RANGE OF THE CAMERA |
33 - 35 |
ACCESSORIES |
36 - 41 |
Interchangeable viewfinders |
36 |
Interchangeable focusing screens |
37 |
Focusing screen selector guide |
38 |
Motor Drive MD-4 |
39 |
Speedlights |
40 |
Other accessories |
41 |
TIPS ON CAMERA CARE |
42 - 43 |
SPECIFICATIONS |
44 - 45 |
IMPORTANT |
46 |
FOREWORD
Congratulations! You now own one of the most advanced and easy-to-use cameras on the market today. With a wealth of exciting new features, the Nikon F3 is designed to be as up-to-date as you are in your approach to photography. However, before actually taking
pictures with the F3, |
you should familiarize yourself |
with its basic operation as presented in |
|
the first section. For |
more detailed explanations and |
special picture-taking situations, refer |
|
to the |
second section, CONTROLS IN DETAIL. A few minutes wisely invested now will pay |
||
off in |
years of rewarding photographic experiences. |
|
|
BASIC OPERATION
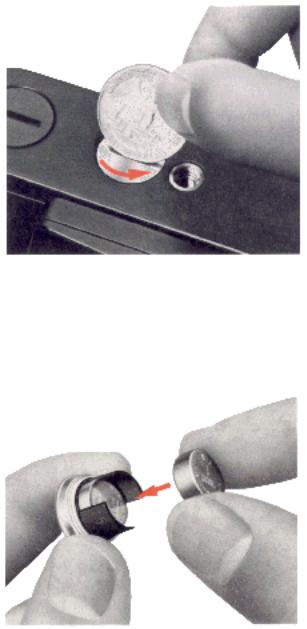
1. Remove the battery chamber lid  .
.
Use a coin to twist the lid counter clockwise to unscrew it.
2. Install the batteries.
Insert the two l.5V silver-oxide batteries supplied with the camera, making sure that the "+" signs are up.
3. Replace the battery chamber lid.
Slip the battery clip back into the camera body and screw it tightly into place.
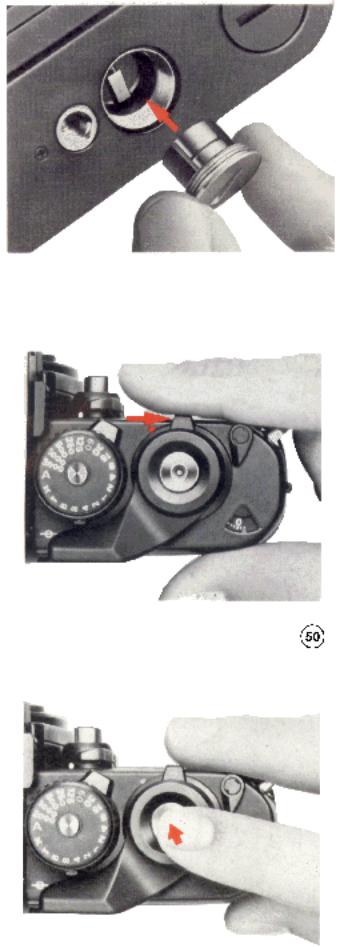
4. Move the power switch  to uncover the red dot
This turns the camera on and makes it ready for exposure reading and shooting.
5. Touch the shutter release button  lightly.
This activates the exposure meter. The meter stays on for 16 seconds after you take your finger off the button and turns itself off automatically to conserve battery power.
6. Check battery power.
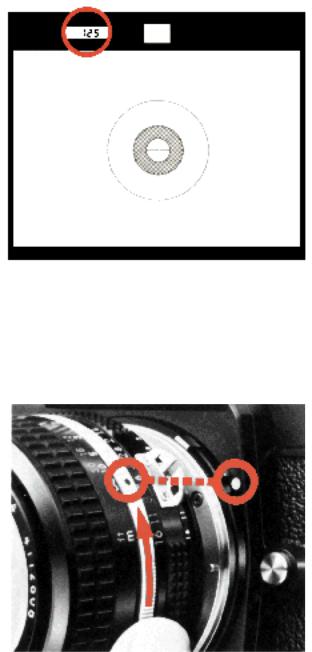
Look through the viewfinder  at the liquid crystal display (LCD). The shutter speed should be displayed to show that the batteries have been properly installed and their power is adequate. If not, replace both batteries.
7. Mount the lens onto the camera.
Grasp the lens by its mounting ring  . Then line up the focusing index
  ) on the lens with the white dot
  ) on the camera body and twist the lens counterclockwise until it clicks into place.
To remove: Push the lens release button  and turn the lens clockwise until it comes off.
8. Open the camera back.
Push the camera back lock lever  to the right with your thumb while lifting the film rewind knob
  ). The camera back will pop open.
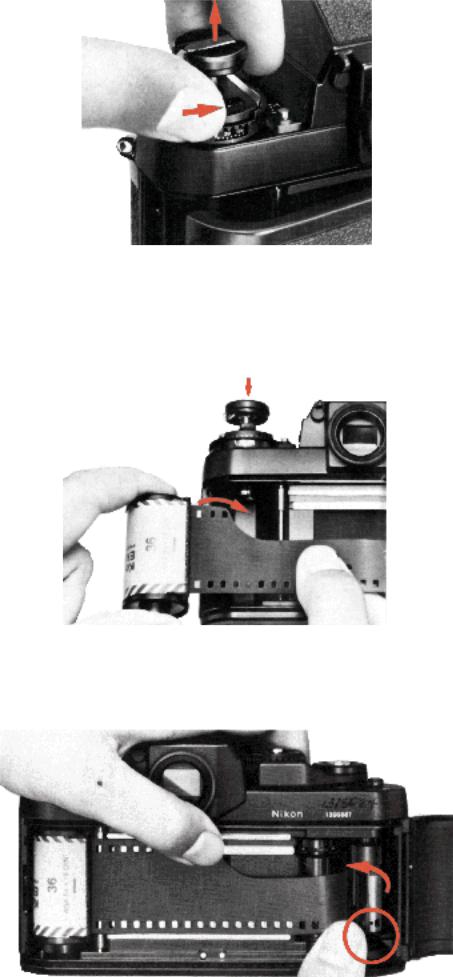
9. Install the film cartridge.
Drop the film cartridge into the film cartridge chamber so that the film leader points towards the takeup spool, and push the rewind knob back down into place.
10. Insert the film leader in the takeup spool.
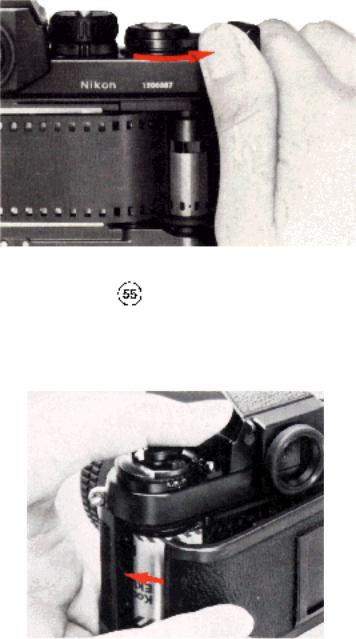
Pull the leader across the camera and insert it into one of the slots in the film takeup spool.
Note: The two data back contacts located inside the camera below the film guide rails are for use with a data back available in the future.
11. Wind the film advance lever |
to advance film onto the takeup sprocket. |
Wind the film advance lever and depress the shutter release button until the film sprockets engage the perforations on the edges of the film.
12. Close the camera back.
Close the camera back until it snaps shut.
13. Take up the film slack.
Fold out the film rewind crank  and rotate it in the direction of the arrow until it stops. Then fold the crank back in.
14. Make blank exposure until the frame counter  shows "1."
Continue to wind the film advance lever and depress the shutter release button until the frame counter shows "1." While making blank exposures, watch the rewind knob to see that it rotates. This indicates that the film has been
loaded correctly and is being advanced.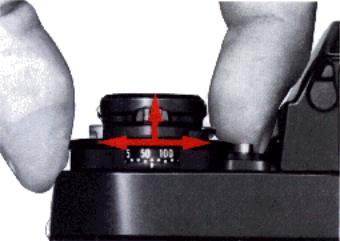
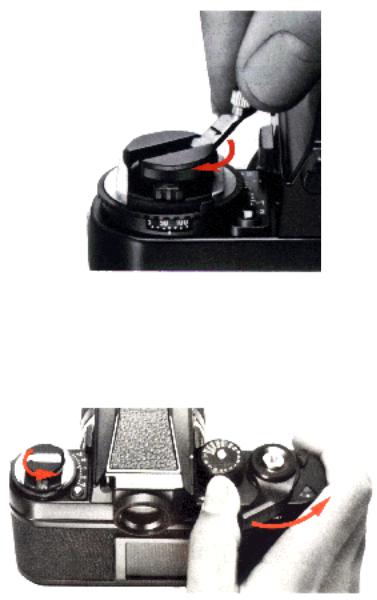
15. Set the ASA film speed.
Lift up the ASA film speed dial  and rotate it in either direction until the white dot is opposite the ASA film
speed in use. Also make sure the exposure compensation dial is set to the red "0." This programs the camera's exposure meter so that it may provide a proper exposure for the type of film being used.
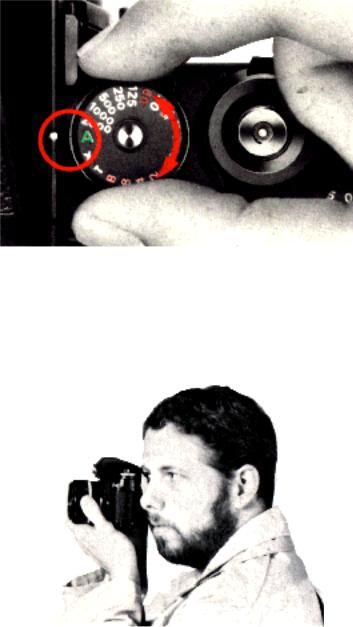
16. Set the camera for automatic operation.
Rotate the shutter speed dial  until the "A" is opposite the white dot
  . The built-in locking mechanism ensures that the dial cannot be accidentally shifted from the auto position during shooting.
17. Hold the camera steady.
Wrap the finqers of your right hand around the camera body so that the index finqer rests comfortably on the shutter release button and the thumb fits between the body and film advance lever.
Then, cradle the camera in the left hand with the thumb and fingers grasping the lens locusing ring  . The camera may be switched from horizontal to vertical format shooting in this position.
Out of focus
In focus
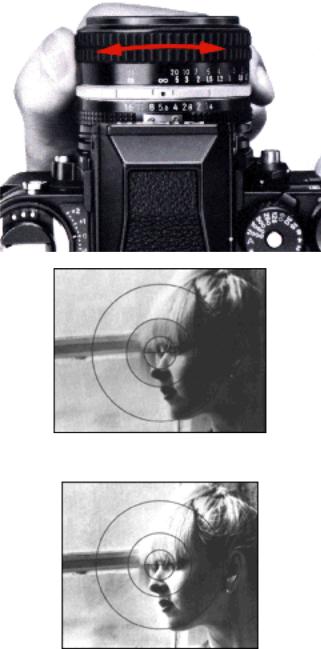
18. Focus on the subject.
Turn the lens focusing ring until the image in the viewfinder becomes sharp.
The K focusing screen comes with the camera as standard equipment. With the split-image rangefinder, turn the ring until the split image becomes whole. With the microprism grid, turn the ring until the shimmering image appears sharp. With the matte outer field, turn the rinq until thc image appears sharp. The split image rangefinder works well for subjects having definite lines or boundaries. The microprism collar is for fast-moving subjects or ones with indistinct lines, while the matte outer field is suitable for close-ups. In fast moving or candid shooting situations, you can measure or estimate the distance between you and the subject and preset it on the lens using
the distance scale  engraved both in feet and meters.
Inside the viewfinder
1.LCD exposure information
2.ADR f/number
3.Fine matte/Fresnel outer field
4.Microprism collar
5.Split-image rangefinder spot
6.12mm ¢ reference circle
Note: The meter reads the light over the entire focusing screen but is distinctly biased toward the central 12mm ¢ area.
19. Set the lens aperture.
Turn the lens aperture ring  until the desired f/number is opposite the index mark on the lens. The selected f/number appears in the viewfinder for convenient reference.
20. Take the picture
Look through the viewfinder and press the shutter release button lightly to turn on the exposure meter. The shutter speed display indicates the shutter speed selected by the camera. As long as neither + 2000 nor –8– appears in the shutter speed display, the camera gives the correct exposure. If either indication appears, adjust the aperture ring on the lens until a desirable shutter speed is indicated. Should either indication appear even after all possible lens apertures have been tried, then the available light is too bright or too dim for the meter's range. Use either artificial light to increase the subject's brightness or a neutral density filter to reduce the amount of light reaching the film.
21. Advance the film.
Stroke the film advance lever to transport the film to the next frame and get the camera ready for the next shot.

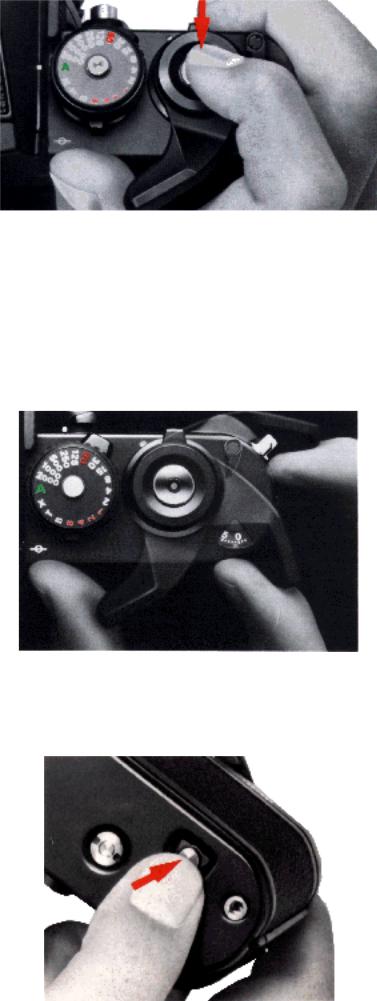
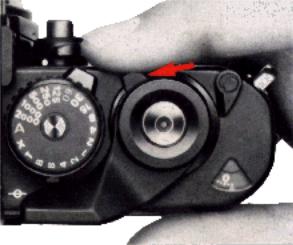
22. Push in the rewind button  .
.
After the last exposure has been made, the film advance lever will stop working. You must then rewind the exposed film back into its cartridge. To do this, first turn the camera upside down and depress the rewind button to disengage the film sprocket drive.
23. Rewind the film.
Lift the film rewind crank and turn it in the direction of the arrow to rewind the film. When you feel the tension lessen, continue winding one or two more turns until the film leader is rewound completely back into the cartridge.
24. Remove the film cartridge.
Open the camera back and take out the film cartridge. Avoid unloading the film in direct sunlight. If there is no shade available, turn your back on the sun and use your own shadow to shield the camera while unloading film.
25. Turn the camera off.
To conserve battery power between takes, return the power switch to the "off" position.
Loading...