


Nikon D40 User's Guide
© 2007 KenRockwell.com
Nikon D40 with new 18-55mm lens.
Original files at
http://www.kenrockwell.com/nikon/d40/users-guide/index.htm
January 2007
Converted to PDF by Sándor Nagy nasa@delfin.unideb.hu
© 2007 KenRockwell.com |
1 |
converted by Sándor Nagy |
Ken Rockwell
Post Office Box 8778
La Jolla, California 92038-8778
United States of America
http://www.kenrockwell.com/
© 2007 Ken Rockwell
All rights reserved. Permission is granted to make one print for yourself. All other uses are absolutely forbidden, especially emailing this to others, making multiple copies, posting or mirroring, or handing this
out to others. Instead, please send others this link to the newest version:
http://KenRockwell.com/nikon/d40/users-guide
where they may download the most recent version free for themselves. Please contact me via my website for any other permissions.
Thanks!
PLUG
No one pays me anything to write all this. I do it because I love to help. If you find this as helpful as a book you might have had to buy or a workshop you might have had to take, please help me share more (http://www.kenrockwell.com/donate.htm).
Thanks!
Ken
REMARKS
by Sándor Nagy
The original html files contain high number of internal and external links. Each internal link was converted to an index to the relevant page of the PDF document, while the external links are left unchanged in the PDF as embeded links. Some of the external links (the most important ones) were typed explicitely too (especially on this page), or copied to the Appendix with the appropriate index to the relevant page.
© 2007 KenRockwell.com |
2 |
converted by Sándor Nagy |
CONTENTS
|
|
|
page |
INTRODUCTION |
|
6 |
|
BASICS |
|
6 |
|
|
CAMERA SETTINGS |
|
6 |
|
RESET |
|
7 |
|
Quality |
|
7 |
|
Exposure Compensation |
|
7 |
|
Shutter Advance Mode |
|
7 |
|
ISO |
|
7 |
|
WHITE BALANCE |
|
8 |
|
OPTIMIZE IMAGE |
|
8 |
|
FOCUS (AF) Mode |
|
9 |
|
METERING |
|
9 |
|
LENS SETTINGS |
|
9 |
EXPLICIT DETAILS |
|
11 |
|
|
CONTROLS |
|
11 |
|
TOP PANEL CONTROLS |
|
11 |
|
Exposure Mode Selector Knob |
|
11 |
|
OFF, ON and Shutter Release Button |
13 |
|
|
+/- and Diaphragm (*) Button |
|
13 |
|
Info and Green Dot button |
|
14 |
|
REAR PANEL CONTROLS |
|
14 |
|
[>] (Play) Button |
|
14 |
|
MENU Button |
|
15 |
|
Minifying Glass / ? / Checkerboard Button |
15 |
|
|
< i > / Magnifying Glass / Green Dot Button |
15 |
|
|
AE-L AF-L / Key Button |
|
16 |
|
Rear Dial |
|
16 |
|
Up/Down/Left/Right/OK Keys |
|
16 |
|
Trash Can Button |
|
17 |
|
Almost Invisible (when off) Green Light |
17 |
|
|
SIDE CONTROLS |
|
17 |
|
+/- Lighting Bolt (Flash) Button |
17 |
|
|
Fn - Backwards Clock Button |
|
19 |
|
Big Button Below "D40" |
|
19 |
|
MENUS |
|
19 |
|
PLAYBACK MENU ("[ > ]" icon) |
|
19 |
|
Delete |
|
20 |
|
Playback Folder |
|
20 |
|
Rotate Tall |
|
20 |
|
Slide Show |
|
20 |
|
Print Set |
|
20 |
SHOOTING MENU (camera icon) |
|
20 |
|
|
Optimize Image |
|
21 |
|
Preset Choices |
|
21 |
|
Custom (pencil icon) |
|
22 |
|
Done |
|
22 |
|
|
|
|
|
© 2007 KenRockwell.com |
3 |
converted by Sándor Nagy |
Image Sharpening |
|
22 |
Tone Compensation (Contrast) |
|
22 |
Color Mode |
|
23 |
Saturation |
|
23 |
Hue Adjustment |
|
23 |
Image Quality |
|
23 |
Image Size |
|
24 |
White Balance |
|
24 |
ISO Sensitivity |
|
25 |
Noise Reduction |
|
26 |
CUSTOM SETTING MENU (Pencil icon) |
26 |
|
[R] Reset |
|
27 |
01 Beep |
|
27 |
02 Focus Mode |
|
27 |
03 AF-Area Mode |
|
28 |
04 Shooting Mode |
|
28 |
05 Metering |
|
29 |
06 No Memory Card? |
|
30 |
07 Image Review |
|
30 |
08 Flash Level |
|
30 |
09 AF Assist |
|
30 |
10 ISO Auto |
|
30 |
11 Self Timer / Fn Button |
|
31 |
12 AE-L/AF-L |
|
32 |
13 AE Lock |
|
32 |
14 Built In Flash |
|
32 |
15 Auto Off Timers |
|
33 |
16 Self Timer |
|
34 |
17 Remote On Duration |
|
34 |
SET UP MENU (wrench icon) |
|
34 |
CSM/Setup Menu |
|
35 |
Format Memory Card |
|
35 |
Info Display Format |
|
35 |
Auto Shooting Info |
|
37 |
World Time |
|
37 |
LCD Brightness |
|
38 |
Video Mode |
|
38 |
Language |
|
38 |
Image Comment |
|
38 |
USB |
|
39 |
Folders |
|
39 |
File No. Sequence |
|
39 |
Mirror Lock-up |
|
40 |
Firmware Version |
|
40 |
Dust Off Ref Photo |
|
40 |
Auto Image Rotation |
|
40 |
RETOUCH MENU (brush icon) |
|
41 |
D-Lighting |
|
41 |
Red-Eye Correction |
|
42 |
Trim |
|
42 |
|
|
|
© 2007 KenRockwell.com |
4 |
converted by Sándor Nagy |
Monochrome |
42 |
Filter Effects |
42 |
Small Picture |
43 |
Image Overlay |
43 |
APPENDIX |
43 |
A1 How to Set White Balance |
44 |
A1/2 White Balance Examples |
50 |
A2 All About Exposure |
55 |
A2/2 Correct Digital Exposure and Do Nikons Underexpose? |
57 |
A2/3 The Nikon Matrix Meter |
60 |
A2/4 How to Use the Nikon Spot Meter |
68 |
A2/5 The Zone System |
69 |
A2/6 What are LV and EV |
75 |
A2/7 Exposure Meters |
77 |
A2/8 How to Use Histograms |
79 |
A2/9 How to Use Color Histograms |
83 |
A2/10 How to Use a Digital Camera as an External Light Meter |
87 |
A3 What are Shutter Speed, Aperture and ISO? |
88 |
© 2007 KenRockwell.com |
5 |
converted by Sándor Nagy |

INTRODUCTION
Want free live phone support? In the USA, call (800) NIKON-UX, 24 hours a day, 365 days a year.
Looking for a specific control? Use my Search page. Be sure to mention the D40 in your search.
This lengthy article will teach you to be an expert on the Nikon D40's controls and menus. It also includes a lot of tips, tricks, and the settings I prefer to use.
To get great photos you still need to get yourself to the right place at the right time and point the camera in the right direction, which is a lot harder than mastering the D40. Right out of the box at default settings the D40 does a great job so long as you preset the exposure compensation to -0.7
. Making a great photo involves locations, timing, patienceand a whole lot more. I cover general photography issues here.
For more examples of why you'd want to change these settings and why, also see my Maui Photo Expedition page.
Below are the basics. Explicit details follow in later pages.
Many tricks are in the pages below, like inserting your © and contact info automatically into every fájl(page 38), Secret RGB Histograms (page 16) and Auto ISO (page 30).
BASICS:
CAMERA SETTINGS
I leave most settings at their defaults.
I shoot with the top mode dial in P, Program Exposure mode.
Many of these menu options are shown only after you select the FULL MENUS option in the Setup Menu (page 34) and are often deactivated in anything except the P, S, A and M modes (page 11).
I reset everything ery time I use my camera, much as a pilot uses a checklist before flight to prevent any switches from being in the wrong position. When I don't check first, I often have left my D40 in some screwy mode from shooting in the dark the night before.
© 2007 KenRockwell.com |
6 |
converted by Sándor Nagy |

Nikon has an easy reset feature. I use it every time! My standard operating setting is only a few clicks different from the defaults.
RESET
Unlike my other Nikons, I don't use the green reset feature. I find it easier to press the I button and run down the items on the left and bottom of the screen.
Quality
I use Large, JPG, BASIC
I'm a data cheapskate. I prefer small files. For most people not shooting hundreds of throw-away images a day, feel free to leave it in NORMAL, the default. NORMAL makes files twice as large with a tiny bit less blockiness if you're looking closely at the files printed 3 feet (1m) wide. I prefer smaller files in exchange for almost invisible levels of blockiness.
See my D200 Quality Settings page for more explicit detail and examples of these settings on a D200. My D40 does about the same thing, but lacks the Optimize Quality JPG Compression mode I prefer on my D200, and its image sizes are one size smaller.
Exposure Compensation
I set my exposure compensation to -0.7 because my D40's metering firmware is defective, just like the D80's meter. It usually overexposes.
Set -0.7 by holding the +/- button (page 13) near the shutter and turning the rear dial two clicks to the right.
Sadly we'll often have to adjust this depending on the subject. It's no big deal: just look at the image on the LCD and click it towards the left (+) to lighten the image, and to the right (-) to darken it for the next shot. This is why I prefer my D200, which has a superior meter because it rarely needs any fiddling.
Shutter Advance Mode
I use Continuous (the bearded rectangle) (page 28). I get one shot with one press of the shutter, and if I hold the shutter button my D40 shoots 2.5 frames per second. I do this in dim light so I can pick the sharpest image. For most shots of moving things I fire several rounds and pick the one with the best expressions and gestures. Of course I use a professional sorting tool (iVIEW MediaPro ) on a 30" screen to make selecting files trivial.
ISO
I use ISO 200 and Auto ISO (page 30).
Auto ISO increases the ISO automatically as it gets dark so I don't have to. It shoots at ISO 200 in good light, and at 1/15 of a second (or any speed you choose) it starts ramping up the ISO to a
© 2007 KenRockwell.com |
7 |
converted by Sándor Nagy |
maximum of 1,600 (or any ISO you choose) as it gets darker. Only if it gets still darker will it let the shutter speed go below 1/15 at ISO 1,600, exactly as I'd do manually.
I explain how to set Auto ISO and select the shutter speed at which the ISO starts to increase and the maximum ISO to which it will increase in the Custom Setting 10 (page 30).
I set Auto ISO to 1,600 max because the noise from the D40 at ISO 1,600 looks much better than blur. I set 1/15 because my Nikon 18-200mm and the kit 18-55mm lens gives great results down to 1/15. I adjust the lowest shutter speed setting in the AUTO ISO menu if I change conditions or lenses. Unlike film, my D40 looks great at high ISOs, so I use them anytime I need them.
More details on setting ISO at the ISO Menu (page 25).
WHITE BALANCE
I use AUTO and a clear UV filter to protect my lens. The D40 has a much warmer color balance than earlier cameras like the D70 so I don't need the 81A filter or the -3 trim. See examples of different settings here (page 50) and details on my White Balance (page 44) page. White balance is how you set the color balance, and color is critical. It's also personal preference. Use whatever looks right to you. My D40's LCD is very accurate. If it looks different in print or on your computer, your printer or computer are out of calibration.
Luckily AUTO works great most of the time. I look at my LCD, and if it's not right, I'll set it to whatever looks good. Usually that's the Direct Sun or Cloudy positions. These settings give much warmer results than earlier cameras. I rarely use the warmer Shade setting on my D40 while I used Shade often on my D1H and D70.
OPTIMIZE IMAGE
This is set in the Shooting Menu (page 21). I crave vivid color! I tweak my D40 to give color as vivid as I can get. If it went to 11 I'd use that, too. I go to MENU > Shooting Menu (green camera icon) > Optimize Image > Custom. Here's how I set each item under Custom:
Image Sharpening: Auto (default).
Tone Compensation (contrast): Auto (default). The D40 automatically adjusts its contrast and dynamic range to each and every shot. It works great.
Color Mode: IIIa (three-a, default). This gives brighter colors than the other modes. Color mode II is pronounced "two" and not to be confused with 11 (eleven). You don't want Mode II even if you could use it. Details are here (page 24).
Saturation: +, of course. This gives brighter colors that the default.
Hue: 0 (Default). Don't touch this! it will subtly mess around with your colors. Leave it at 0.
After setting this it's critical to save it by selecting " Done" and clicking to the right actively to select OK. If you forget to hit OK it won't remember all these settings!
© 2007 KenRockwell.com |
8 |
converted by Sándor Nagy |

Read more at Shooting Menu (page 21).
FOCUS (AF) Mode
I use the default of AF-A. This mode automatically selects between the two older modes, AF-C and AF-S. These are explained under Focus Modes (page 27).
METERING
I use Matrix, the default. You set metering in Custom Setting 05 (page 29) or with the <i> Button (page 15).
Seeing how poor the matrix meter has become in the D40 (it requires constantly varying levels of compensation) I intend to try center weighted metering. With my intimate knowledge of the Zone System (page 69).it might let me nail the correct exposures more quickly. That would be a big step backwards; center weighting went obsolete in the mid 1980s then the Matrix meter was invented.
See my Exposure (page 55) page for details on getting perfect exposures.
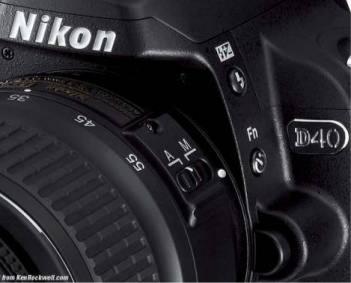
LENS SETTINGS
Nikon D40 with new 18-55mm lens.
Many lenses have no switches or settings. If so, don't worry.
If a lens has an "A - M" switch, like the included 18-55mm above, leave it at "A." To get manual
© 2007 KenRockwell.com |
9 |
converted by Sándor Nagy |
focus with the included lens, move it to "M."
If the switch says "M/A - M " then use M/A. These lenses may be focused manually at any time in either position. As soon as you tap the shutter button in M/A you return to autofocus.
More advanced lenses, like the 18-200mm, 70-300mm VR and 18-135mm, and any lens with an M/A position, may be focused manually at any time without moving any switches. Leave them in their A or A/M positions.
Non-AF-S and non-AF-I lenses, like the new 10.5mm fisheye, won't autofocus at all.
The old 300mm f/4 AF has to be put in the M position to focus, and it only focuses manually.
Read your lens' manual, or in the USA ask Nikon 24/7/365 at (800) NIKON-UX.
Non-G lenses will have an aperture ring on the base of the lens where it's attached to the camera. Set this this ring to the smallest aperture (largest number), usually 22, if not 32 or 16. This number will be orange on autofocus lenses. There usually is a lock to keep this ring set there, since if it comes off that setting you'll get an error message from most cameras.
© 2007 KenRockwell.com |
10 |
converted by Sándor Nagy |
EXPLICIT DETAILS
These were the basics. Keep reading for explicit details.
CONTROLS
TOP PANEL CONTROLS
Nikon D40 Top Panel Controls.
Exposure Mode Selector Knob
(shown above.) Spin it to select among P, S, A and M exposure modes. I ignore the green AUTO (as shown above) and the other convenience modes (flower, lady in hat, etc.).
Many of the menu options are shown only after you select the FULL MENUS option in the Setup Menu (page 35) and are often deactivated in anything except the P, S, A and M exposure modes.
P: Program Automatic Exposure Mode
I use "P" for program auto exposure. In this mode the camera chooses the f/stop and shutter speed for you.
It's easy to get to any aperture or shutter speed you prefer in this mode: simply move the rear dial to shift them. This selects alternate combinations of f/stops and shutter speeds (page 88) which
give the same exposure. Nikon calls this "Program Shift." A *P symbol appears on the bottom left of the viewfinder, to the left of the shutter speed.
© 2007 KenRockwell.com |
11 |
converted by Sándor Nagy |
Three easy ways to return to the standard program combination are to:
1.) flip to a different mode and back to P, or
2.) turn the D40 off and back on, or
3.) spin the rear dial back to its original position.
The *P symbol goes away when you've returned to the standard combinations.
The standard combinations are f/4 at 1/60, f/5.6 @ 1/125, f/8 @ 1/250, f/11 @ 1/500, etc.
A shifted set might use f/4 @ 1/1,000, f/8 @ 1/500 or might use f/4 @ 1/2, f/5.6 @ 1 sec, etc. Don't worry, just flick the rear dial until you get the combination you prefer.
A, S and M Modes
If you want to use only one aperture or one shutter speed then use S or A mode and the camera will automatically pick the other value. I never use these; I shift the program instead.
If you want to set both the hard way, use M, manual, mode.
In A or S mode you can only set one of the two values because the camera is setting the other one for you.
A Mode: Aperture Priority
In A mode you choose the Aperture and the D40 chooses the shutter speed.
S Mode: Shutter Priority
In S mode you set the Shutter and the D40 sets the aperture.
If the D40 runs out of available apertures you easily can get under or over exposure in S mode: watch that the D40 can select a correct aperture for your lighting.
M Mode: Manual Exposure
You have to set everything the hard way.
No one uses this mode except in complex conditions. Ignore old-timers who tell you you need Manual mode; they say that because that's the only mode cameras had back in the 1950s.
I look at the LCD to check exposure. You can use the bar graph in the finder - but why? If you wanted to do that use another mode and let the D40 do the setting for you.
The rear dial sets the shutter speed in manual exposure. To set the aperture, hold the +/- (*) (diaphragm) button near the shutter and turn the rear dial.
© 2007 KenRockwell.com |
12 |
converted by Sándor Nagy |
Firmware Defect: When turned ON, Auto ISO (page 30) remains active in Manual mode. I always turn off AUTO ISO when I enter Manual Mode, otherwise Auto ISO changes the ISO and ruins whatever you were hoping to accomplish with manual exposure mode.
OFF, ON and Shutter Release Button
Leave it ON unless you're putting it away. It draws no more power in ON than OFF. OFF is a lock to prevent accidental operation.
+/- and Diaphragm (*) Button
This button is next to the shutter button.
In manual exposure mode, hold this and turn the rear dial to change the aperture.
In every other mode, hold it and turn the rear dial to change the exposure compensation (brightness).
This exposure compensation button is very important. You'll probably wear the paint off this one. This button makes the photos lighter or darker. + is lighter, and - is darker.
This only affects photos as you take them. Use whatever setting looks best to you; there is no correct setting.
A flaw in the D40's meter firmware (same issue as the D80) makes most photos too light, so I leave mine set to -0.7. If your photo is too light, hold the +/- button and spin the rear dial to a more negative number, like -1.3. If your photo is too dark, hold it and spin the dial to a more positive number, like -0.3 or 0.0. It's perfectly OK to go to any number you need, like -3.3 or +1.0.
This error isn't a simple calibration issue. The D40 does different weird things with different subjects and different compositions. The D40's meter firmware is designed erroneously to expose for the darkest part of the image, so it's almost impossible to get the right exposure of someone wearing black, especially as they move around the image. You may need -2.0 or -3.0 compensation, while other shots of light objects may be fine with 0.0.
The need for constant variation and supervision is what makes this meter so bad. I prefer my D200, which rarely requires any correction.
Flash exposure is Nikon's usual perfection. You can change it's brightness along with the flash button (page 17).
HINT: You can see the + or minus value displayed in the finder as well as the rear LCD, so you can adjust this without taking your eye from the finder. The finder display only reads the value when the button is pressed, otherwise those digits read exposures remaining.
© 2007 KenRockwell.com |
13 |
converted by Sándor Nagy |
Info and Green Dot button
Tap this to wake up the D40 and show you what's going on with your settings on the LCD. Tap it again to turn off the LCD.
To change the settings, tap the other < i > and Green Dot button (page 15)on the rearof the D40.
Hold both Green Dot buttons at the same time for a few seconds to reset most of the tactical parameters, like exposure compensation, autofocus modes, ISO, White Balance, etc, to their defaults. I don't use this reset often, since I set enough things away from defaults. I would use it if I loaned my D40 to a friend and had it returned later.
REAR PANEL CONTROLS
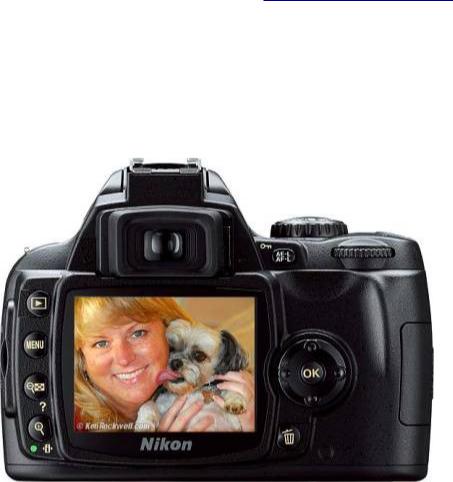
Nikon D40 Rear (wife and dog front).
From top left to bottom right:
[>] (Play) Button
This plays an image, or stops playing an image.
You don't need this often, since the LCD turns off the instant you tap the shutter button, and if you set Image Review ON in Custom Setting 07 (page 30) it plays automatically after each shot.
With Custom Setting 07 (page 30) set to ON, you can do anything and everything to the image immediately after shooting without having to press Play. Want to zoom, scroll, or see other images? Just move the appropriate controls.
© 2007 KenRockwell.com |
14 |
converted by Sándor Nagy |

I thank my lucky stars with my Nikon, because on my idiotic Canon 5D I have to wait and press the Play button just to zoom in on a shot I just made! No need for this with Nikon, so long as you have Image Review (page 30) set to ON.
The only reason you may want Image Review OFF (its default) is if you prefer to make many immediate changes to your next shots.
If Image Review is ON, the image pops up after your shot, and the D40 responds to your dial inputs by showing the the next or previous image. My D40 won't change apertures or shutter speeds until I wait a moment and tap the shutter to put my D40 back into Shooting mode. If you want to change your settings immediately, turn off Image Review. (The Canon Rebel XTi is smarter than these, since the XTi has a sensor to determine if you have your eye at the viewfinder and switches automatically.)
MENU Button
This gets you into the menus, as explained at the many menu pages below.
You set almost everything about the D40 here.
You also can set many shooting parameters with the < i > Button (page 15) and Fn Button (page 19). They are different ways of setting the same things.
Minifying Glass / ? / Checkerboard Button
If playing, it reduces the images to fit 2x2 or 3x3 on the screen. If the image was zoomed, it zooms out.
If working in the menus, often this button will give more information about the setting at hand.
If the "?" is flashing in the bottom right of the viewfinder, that means you have a message waiting from your D40. This is a first! Press the "?" button and your D40 will tell you what's on its mind! It's usually telling you to turn on the flash.
< i > / Magnifying Glass / Green Dot Button
If the D40 is resting (LCD off), the < i > button wakes up the LCD and shows you the shooting info exactly as the info button (page 14) does.
If the LCD is in the Info (showing shutter speeds, etc.) mode, press the < i > button to change these settings. Use the Up/Down/Left/Right/OK buttons.
If playing, this button zooms in. Use the up/down/left/right button to scroll around.
Hold both Green Dot buttons at the same time for a few seconds to reset most of the tactical parameters, like exposure compensation, autofocus modes, ISO, White Balance, etc, to their
© 2007 KenRockwell.com |
15 |
converted by Sándor Nagy |
defaults. I don't use this reset often, since I set enough things away from defaults. I would use it if I loaned my D40 to a friend and had it returned later.
AE-L AF-L / Key Button (Top Right Center)
This can lock the focus and/or exposure or turn on the autofocus.
You set what it locks in Custom Setting 12 (page 32). I set mine to lock exposure for as long as I hold the button (AE lock only).
Rear Dial (top right)
Click this left and right to control most of the D40's functions.
Up/Down/Left/Right/OK Keys
This is the five-way thumb switch.
It works and feels much better than the mushy one on the D80 and earlier cameras. This excellent feel and interaction is a strong reason why I like my D40 so much, and prefer it to my doubly expensive D80.
While playing, this moves among your images (left/right) and the data for them (up/down). I find it more convenient to spin the rear dial to go forward and back; try it.
When playing a zoomed image, it scrolls around the image.
While shooting, it selects among the AF areas if you're in a mode which allows you to select an AF area. The selected AF area glows in red.
In the menus, it moves around your selections.
It feels good!
SECRET RGB HISTOGRAM TRICK: In playback, the OK button calls up the Retouch Menu (page 41). Select Filter Effects, then Color Balance to see an RGB histogram (page 83),critical for precise exposure. This trick and the huge RGB display are among the reasons I prefer my D40 to my six-times-as-expensive Canon 5D with double the pixels. The 5D has a dim screen with an illegible, tiny, RGB display.
If zoomed in (or zoomed out to the 2x2 or 3x3 modes), the OK button returns you to a normal sized image.
© 2007 KenRockwell.com |
16 |
converted by Sándor Nagy |
Trash Can Button
This is the D40's flush lever.
Press it while a photo is displayed to erase that photo. You'll get an "are you sure?" screen, and press it again to dump that shot.
Meatheads like me get used to double pressing it every time out of habit, which means I accidentally erase some shots. Serves me right.
It doesn't do anything else. It ignores you if pressed without an image displayed, except it is used for deleting bad characters in the secret message embed mode (page 38).
Almost Invisible (when off) Green Light
This light should be red, because it means the D40 is talking to the SD memory card and you must not remove it. If you're dumb enough to yank out the card with the light on, you not only will lose some photos, you may destroy your SD card.
This normally blinks when the D40 is turned on or off or wakes up to shoot. It blinks for a moment after each shot to record it to the card. it blinks as you select different playback images as it reads them from the card. It can stay lit for a minute or more while data gets written, if you insist on shooting a lot of fast sequences in raw.
You may ignore it while shooting. You don't have to wait for it, except to pull out your SD card. The D40 has a fat buffer to let you shot as fast as you want without having to wait for this light.
SIDE CONTROLS
Nikon D40 with new 18-55mm lens.
© 2007 KenRockwell.com |
17 |
converted by Sándor Nagy |
From the top down:
+/- Lighting Bolt (Flash) Button
1.) Press once to pop up the built-in flash.
2.) Hold it and the +/- (*) diaphragm button (page 13) at the same time and spin the rear dial to alter the brightness of the flash. 0.0 is normal and I leave it there almost all the time. Only in rare instances do I ever need to adjust it towards the minus side to make it darker, or the plus side to make it lighter.
This is much easier to do than it sounds; it's quite natural.
3.) Hold it and spin the rear dial to select the flash sync mode. The sync mode is displayed on the lower left of the LCD.
Here are the modes and what they do:
Normal (a lightning bolt, which is the default): In Program and A exposure modes, the shutter won't stay open longer than 1/60 second.
I always use Normal mode and it looks great.
In this mode you won't get blur indoors, but you may get black backgrounds. The best way to avoid dark backgrounds with the D40 is to use an external flash like the SB-400 and bounce it off the ceiling (flip it up. I love the look of the bounced SB-400 external flash; you can see a zillion examples at my baby Ryan Rockwell's website.
Unlike other Nikons, the D40 doesn't have a custom function to choose a longer speed, like 1/8, in P and A exposure modes (page 11) to lighten backgrounds indoors. You'll have to use S or M mode which takes more cunning to setup. You can use the Slow Sync (page 18) mode below, but indoors or at night it often results in uncontrolled crazy long speeds up to 30 seconds, which lead to blur.
Red-Eye (eyeball and bolt icon): I never use this. It shines an obnoxious light in your subject's eyes for a couple of seconds and then releases the shutter. If I set this mode by accident it bugs the heck out of me, because the camera doesn't go off until several seconds after I've pressed the shutter, but I have no idea why because I've set no self timer! It doesn't do much to reduce redeye anyway. Skip this mode.
SLOW (SLOW and bolt icon): This mode can be very useful. It lets the shutter stay open as long as it needs to so dim ambient light can expose properly with flash. Of course if it's dark these exposure times can get long. You can get blur from subject motion and camera shake.
In daylight SLOW is the same as NORMAL, since exposure times are short. SLOW unlocks the camera in P and A exposure modes (page 11) to make exposures as long as it wants to in dim light.
Have a look at most issues of National Geographic and you'll see many indoor shots made in this
© 2007 KenRockwell.com |
18 |
converted by Sándor Nagy |
mode. The background exposes correctly, people may be blurred, and a burst of flash freezes them along with the blurry ghost images.
Normal and SLOW do the same thing in S and M exposure modes (page 11), since you or the camera may select any shutter speed in these modes regardless of flash sync. I usually prefer to choose an exact slowest shutter speed in the M or S exposure modes (page 11). In SLOW mode and dark conditions the shutter speeds can become too long for comfort.
Red-Eye SLOW (eye and SLOW icon): This is the SLOW mode and redeye. I don't use it for the same reason I don't use Redeye.
REAR (REAR and Bolt icon): Normally the flash goes off the instant the shutter opens. With long exposures and blurred ghost images you ordinarily get the ghost streaming out in front of the subject. Think about it: if a car is driving, the flash goers off and freezes it, then the car moves forward. You'll have a ghost image ahead of the car, which usually looks stupid. Select REAR mode to have the flash go off as the shutter closes. Now you'll have motion blurring behind the frozen flash image.
Another reason to select REAR is because the flash goes off at the end of the exposure. People presume photos are made the instant a flash fires, then leave. This wreaks havoc with long exposures. If you use REAR mode with long exposures they'll stay put and not move until the end. Of course you'll also want to select manual flash mode (page 32) to eliminate the preflash.
REAR doesn't do anything with short exposures.
Fn - Backwards Clock Button
By default, press this to set the self timer.
Custom Setting 11 (page 31) lets me set this to do other things instead. I prefer to have it give me more direct access to White Balance. See Custom Setting 11 (page 31) for details.
Big Button Below "D40"
This unlocks the lens. Push this straight in and rotate the lens to remove it. It's a bayonet mount.
MENUS
PLAYBACK MENU ("[ > ]" icon)
Want free live phone support? In the USA, call (800) NIKON-UX, 24 hours a day, 365 days a year.
How to Get Here
Press MENU, click to the left and then up to select the top "[ > ] " (play) icon. You'll then see PLAYBACK MENU at the top of the color LCD.
© 2007 KenRockwell.com |
19 |
converted by Sándor Nagy |

What it Does
It sets a few playback options.
What I Change
I leave it alone.
Delete
This is helpful if you want to delete all images while saving those you locked with the Key / AE-L AF-L button (page 16).
I don't use this. I do all my editing and selection in my computer and I do my in-camera deletions one-by-one with the trash can key.
Playback Folder
The camera can record to and play back from different folders.
CURRENT ignores photos in folders other than the one to which you're recording.
ALL shows you everything on the card. I leave my D40 set to ALL. It tends to reset itself to Current, meaning it won't play images made on a different camera if they are on your card.
Rotate Tall
This is Japanese for rotating the vertical shots on playback, presuming you've set Auto Rotate to ON in the Setup Menu (page 40).
It doesn't affect your images or files; it only changes how they are displayed on the D40.
Slide Show
This lets you amaze your friends with an exciting slide show on the tiny screen. I don't bother with this. I guess it's popular in Japan. Whoo hoo! Let's all watch a show on a 2.5" screen! You could plug the D40 into a TV or video projector, but video resolution is so bad everything will look awful.
Print Set
I never use this. I guess it's popular in Japan. This lets you mark images for printing if you sorted and then printed directly from your D40, and had a lab which could read this data.
SHOOTING MENU (camera icon)
Many of these menu options are shown only after you select the FULL MENUS option in the Setup Menu (page 35) and are often deactivated in anything except the P, S, A and M modes (page 11).
© 2007 KenRockwell.com |
20 |
converted by Sándor Nagy |
This menu really should be called the Film menu and shown with an icon of a roll of film. More camera settings, like autofocus, flash and timers, are set in the Custom Settings Menu (page 26), shown by a pencil. This is Nikon's mistake; don't penalize yourself if the menu names and icons make little sense at face value.
How to Get There
Press MENU, click left and then up and down to select the camera (shooting) menu. You'll see "SHOOTING MENU" on the top of the LCD monitor.
What it Sets
It sets parameters related to what film used to do. The Shooting Menu sets ISO, grain, contrast, color and a zillion other critical things that set the look of your images.
The shooting menu would make more sense if it were called the Film menu, since many other menus also affect shooting.
The D40 appears to have all the custom image tweaks of the D2Xs and other Nikons. I can't see anything missing except the high ISO NR strength. The D40 does have selectable dark-frame subtraction noise reduction!
What I Change
I change a lot here. This is where I get the wild colors I love from my D40.
Optimize Image
This is where you set the look of your image, like the saturation I love.
These choices are art. There is no right or wrong if you know what you're doing and know what you want.
I'll tell you what I use. Ignore me and Be Yourself if you prefer a different look.
Preset Choices
There are six fixed preset modes. They cannot be altered. They are:
N Normal
SO Softer
VI Vivid
VI* More Vivid
PO Portrait
© 2007 KenRockwell.com |
21 |
converted by Sándor Nagy |
BW Black-and-White
You might think I would use Vivid or More Vivid, except that they crank up some of the contrast and sharpness settings and leave them there. I want vivid colors, but leave the contrast and sharpness on Auto. This way as subjects get contrastier I don't have to stop and turn the contrast back down. In VI* you can easily blow out a slightly high-contrast scene.
Therefore I use the Custom (pencil icon) setting:
Custom (pencil icon)
This is where Nikon hides the critical adjustments other camera makers make more obvious.
Canon lets you define many of these and recall them easily. Nikon only gives you one setting. Canon also gives you a wider and more precise range of adjustments, and therefore it's easier to make bad mistakes with Canon. The extreme settings here aren't very extreme. Play to your heart's content and see what you prefer.
Done
"Done" is the most important Custom Optimize Image menu item. If you forget to select it and then click to the right to select OK it forgets everything! Always remember to select DONE and OK after you change any of the settings below, otherwise they will be ignored.
Image Sharpening
I leave mine on AUTO. I've never messed with the manual settings. Sharpening is an artificial effect not to be confused with sharpness. When I first got a digital camera I thought: "cool, I'm cranking this to 11," and realized my error. Don't turn it up for no reason, since the image can start to look artificial. Play with it if you want. I've played with it out of curiosity, and always leave it on AUTO.
Tone Compensation (Contrast)
Nikon meant to say Contrast. I always leave mine set to AUTO. In AUTO the D40 automatically applies the Zone System (page 69) and adjusts contrast to match your subject, for each and every shot!
If Nikon's marketing department was paying attention, they would promote this as Automatic Dynamic Range Optimization, since that's what it does and Canon has nothing like this.
The D40 automatically lowers contrast and increases dynamic range for very contrasty subjects, and cranks up contrast for dull subjects.
Saturation also varies with this setting. If you crank it to + it looks vivid and bold for flatter subjects, but when you have a contrasty subject it's too much and blows out. Leave it in AUTO and you won't have to piddle with it.
Avoid Custom tone compensation. Most people call this a custom curve. I've never used it. To
© 2007 KenRockwell.com |
22 |
converted by Sándor Nagy |
use it you have to buy Nikon Capture and create a curve. You then use Nikon capture to load it into the D40. Once you've done that you select it here. If you haven't loaded your own custom curve and select this you get the default Normal curve. Custom curves are way beyond anything with which I want to bother. The curves in the camera are the best ones anyway. Real photographers pay more attention to their subject's lighting.
Color Mode
Color Mode has three settings:
Color Mode Ia (one-a, sRGB) is default. It's normal and boring.
Color Mode II (two, Adobe RGB) gives dull colors. Don't touch this unless you really know what you're doing and print your own work. See Adobe RGB vs. sRGB.
Color Mode IIIa (three-a, also sRGB) gives bolder colors. I use it all the time.
I have no idea how Nikon cooked up these numeric designations.
Saturation
This sets the vividness (strength) of colors.
A Auto: I don't use this. I suspect it cranks up the color for dull scenes and puts it back to normal for scenes that are already colorful. I prefer always to have my saturation cranked up.
0 Normal: For normal people shots you're probably better off with 0. This is the default.
- Moderate: tones down the colors, which I've never liked. "Moderate" sounds like British understatement. In America we call this "dull and boring." Personally I want colors so bright you have to put on sunglasses, or I go directly to B/W. Your interests and taste will differ.
+ Enhanced: I prefer violent color, so I crank it up to +. I'd use ++ or +++ if my D40 had it, but that's me.
Hue Adjustment
Don't touch this! This rotates all your colors to different spots around the color wheel. If you use this to fix one color it screws up all the other colors. God only knows why this adjustment is here.
Image Quality
This selects the kind of file (raw, JPG or both), and the size of the JPG file (FINE, NORMAL or BASIC).
I always use JPG, never raw. (see JPG vs. Raw.)
© 2007 KenRockwell.com |
23 |
converted by Sándor Nagy |
I usually use BASIC JPG and sometimes NORMAL JPG.
BASIC JPG looks almost the same as NORMAL, unless you're making six foot wide prints. It also makes a file half the size of Normal, which speeds up everything and saves space on my hard drives and backup CDs.
I never use FINE; it looks the same as NORMAL and wastes space. Feel free to use any settings you like; that's why they're here.
You can see examples from my D200 at D200 Quality Setting Examples.
Image Size
This selects L, M or S image (pixel) size for the JPG images. I always use L.
I print L BASIC JPG files at 12 x 18" (30 x 50 cm) and they look great.
I might use M if I'm shooting many hundreds and hundreds of images of something I don't expect to print larger than 8 x 12" (20 x 30cm), like sports, weddings and parties.
White Balance
I leave my WB at AUTO. See also How to Set White Balance (page 44) and White Balance Examples (page 50).
Trick: to fine-tune (make warmer or cooler) each setting individually, after selecting it in the menu, press OK (or click right) to get to the +3/-3 trim setting. + is cooler (bluer) and - is warmer (more orange). This delicate, but critical, adjustment is missing from the D50, and it was my biggest complaint about the D50.
The WB settings are:
Auto (A): I use this all the time. It makes its best guess for WB. It's usually very good. Indoor tungsten can be too orange unless you have some bright tungsten light also in the image. If you do, it removes the orange and compensates completely. If not, the D40 only partly compensates and you get a nice warm image instead.
Tungsten (hanging light bulb icon that's easy to confuse with the sun icon): This makes the picture very blue. Use this only for deliberate Arctic freezing effects, or under conventional tungsten light bulbs.
Fluorescent (glowing tube icon): Used to make crappy fluorescent light look less crappy. These settings rarely work; use the preset setting for better results.
Direct Sunlight (sun icon): Use this in direct frontal sunlight. Use other settings for shadows or indirect sunlight.
Flash (lightning bolt): I never use this. It's almost the same as direct sun. I'm told it's really for studio strobes, since the Auto mode compensates magically for flash if you use it on-camera. The
© 2007 KenRockwell.com |
24 |
converted by Sándor Nagy |

reason to use this is if you use a different trim value for your strobes than you do for sunlight.
Cloudy (cloud): Warmer (more orange) than the sunlight position. I use this in shade, too.
Shade (house casting a shadow): very warm (orange). Use this for sunset shots and deep shade.
Preset (PRE): You use this setting with a white or gray card to get perfect color matching.
I use this in bizarre artificial light that I wish no make look natural, or to get exact color with my studio strobes. An Expodisc makes this easier, but even without an Expodisc or white card I shoot off anything neutral, like a piece of paper or a T shirt.
Any light weird enough to need this setting won't care about small inaccuracies in the neutral reference. To set this:
1.) Ensure your card or other neutral object is in the light representative of the light on the subject.
2.) Select PRE via the menu button (or the Fn button (page 17) and spinning the dial).
3.) Press OK (or click to the right).
4.) Select Measure and click OK (or to the right). (The Use Photo option is a backwards bow to Canon's convoluted setting method. Canon Jihadists used to brag about this. It does the same thing, but requires twice as many steps. Ignore this option.)
5.) Select YES.
6.) Point your camera at the card or neutral colored thing and press the shutter.
7.) If the LCD says "data acquired or the viewfinder flashes "Gd," you're set. Shoot away!
8.) If the display flashes "unable to acquire" or the viewfinder flashes "no Gd" then repeat from step 2.).
ISO Sensitivity
I usually set my ISO to 200 and let the D40's Auto ISO (page 30) adjust as needed.
Auto ISO makes all the ISO adjustments for you. I always use Auto ISO since it's as smart as I am.
Firmware Defect #1: the Auto ISO (page 30) options are hidden in the Custom Settings Menu (page 26), where I explain them in depth.
Firmware Defect #2: The Auto setting in this ISO menu refers instead to letting the D40 preset the ISO as it guesses appropriate to the preset scene modes (sports, portrait, macro, etc.) as they are selected. This Auto setting isn't Auto ISO, and it isn't available in the P, S A and M modes (page 11) I use.
© 2007 KenRockwell.com |
25 |
converted by Sándor Nagy |

Higher ISOs can give sharper images in dimmer light because they let the D40 shoot at faster shutter speeds or smaller apertures, but they also can add more grain (noise) to your photos.
ISO 200 gives the cleanest images, but the most potential for blur in dim light.
ISO 400 and ISO 800 are perfect for outdoor sports.
ISO 1,600 gives the noisiest images, with the least potential for blur. ISO 1,600 still looks pretty good if you need it, but I only use it indoors.
ISO 3,200 is for use as a last resort. It is grainy, and lets you shoot in the dimmest light without flash.
Auto ISO selects magically among all these (except for ISO 3,200) so you and I don't have to worry about it. See Auto ISO (page 30).
Hint: ISO goes from 200 to 3,200. Nikon code-names ISO 3,200 as "HI 1" to scare amateurs away from using it, because these same amateurs would clog up Nikon's (800) NIKON-UX support lines complaining about grainy photos.
Hint: If you've set AUTO ISO ON, Auto ISO turns off if you select ISO 3,200. Auto ISO come back on when you set a lower ISO.
Noise Reduction
This is short for Long Exposure Dark-Frame Subtraction Noise Reduction.
It doesn't reduce noise or grain. It will eliminate the occasional hot pixel, and correct purple fog around the edges of insanely long astronomical exposures.
OFF: Default. Leave it here.
ON: Don't use this. If you do, the D40 will double the amount of time you have to wait around for time exposures of a second or longer. You people who need this know who you are, and even for you I suggest trying the D40 with out NR first. it may save you a lot of time waiting around out in the cold.
I have details with examples from my D200 at D200 Dark Exposures.
CUSTOM SETTING MENU (Pencil icon)
Many of these menu options are shown only after you select the FULL MENUS option in the Setup Menu (page 35) and are often deactivated in anything except the P, S, A and M modes (page 11).
This menu really should be called the camera menu and shown with an icon of a camera, except
© 2007 KenRockwell.com |
26 |
converted by Sándor Nagy |
that Nikon used the Camera icon for the shooting menu (page20), which really should be called the Film menu. Camera settings, like focus, flash and timers, are set here in the Custom Settings Menu, shown by a pencil. This is Nikon's mistake; don't penalize yourself if it makes little sense.
How to Get Here
Press MENU, go to the left and select up and down to the pencil icon. You'll see CUSTOM SETTING MENU on the top of the color LCD.
What it Does
This menu sets many things related to the camera and taking pictures, like autofocus, exposure, timers, flash and more.
What I Change
I change a lot here, so read on.
[R] Reset
This resets everything in this menu to its defaults. I don't use this, unless my camera was loaned out.
01 Beep
Turn this OFF!!!
This is the idiotic and annoying focus confirmation beep. Turn it off!
The beep annoys others and is very rude. Focus confirmation is indicated by a dot in the lower left of the finder.
02 Focus Mode
This sets the autofocus mode for still or moving subjects.
AF-A, the default I use, magically selects between the next two modes.
AF-S stands for AF-Single. The D40 focuses once, then locks AF for you to recompose and shoot.
AF-C stands for AF-Continuous. The D40 keeps focusing as the subject moves. Use this for sports and vehicles in motion, like cars, birds and aircraft.
MF Is manual focus. I'm unsure why'd you'd use this setting, since lenses that autofocus on the D40 (AF-S and AF-I) have these switches on the lenses, and older AF lenses that can't autofocus on the D40 default to manual focus whether you want them to or not.. I suspect this option is here because it isn't anyplace else on the D40, and there probably is, or will be, lenses that need this to revert to manual focus.
© 2007 KenRockwell.com |
27 |
converted by Sándor Nagy |
 Loading...