


 Loading...
%N
4HEH.IKON.'UIDEOTO $IGITAL 0HOTOGRAPHY
WITH THE
$)')4!, #!-%2!
%N

Trademark Information
Macintosh, Mac OS, and QuickTime are registered trademarks of Apple Computer, Inc. Microsoft and Windows are registered trademarks of Microsoft Corporation. The SD logo is a trademark of the SD Card Association. Adobe and Acrobat are registered trademarks of Adobe Systems Inc. PictBridge is a trademark. D-Lighting technology is provided by
 Apical Limited. Face-priority AF technology is provided by Identix®. All other trade names mentioned in this manual or the other documentation provided with your Nikon product are trademarks or registered trademarks of their respective holders.

Symbols and Conventions
To make it easier to fi nd the information you need, the following symbols and conventions are used:
This icon marks cautions, information that should be read before use to prevent damage to the camera.
This icon marks notes, information that should be read before using the camera.
This icon marks tips, additional information that may be helpful when using the camera.
This icon indicates that more information is available elsewhere in this manual or in the
Quick Start Guide.
 Memory Cards
Pictures taken with this camera can be stored in the camera’s internal memory or on removable memory cards. If a memory card is inserted, all new pictures will be stored on the memory card and delete, playback, and format operations will apply only to the pictures on the memory card. The memory card must be removed before the internal memory can be formatted or used to store, delete, or view pictures.
Introduction
Basic Photography and
Playback
Scene and Movie Modes
Viewing Pictures on the Camera
Connecting to Televisions, Computers, and Printers
Basic Camera Setup:
The Setup Menu
Shooting Options:
The Shooting Menu
Playback Options:
The Playback Menu
Movie Options:
The Movie Menu
Technical Notes
i

For Your Safety
To prevent damage to your Nikon product or injury to yourself or to others, read the following safety precautions in their entirety before using this equipment. Keep these safety instructions where all those who use the product will read them.
The consequences that could result from failure to observe the precautions listed in this section are indicated by the following symbol:
This icon marks warnings, information that should be read before using this Nikon product to prevent possible injury.
WARNINGS
Turn o in the event of malfunction
Should you notice smoke or an unusual smell coming from the camera or AC adapter, unplug the AC adapter and remove the batteries immediately, taking care to avoid burns. Continued operation could result in injury. After removing or disconnecting the power source, take the equipment to a Nikon-authorized service representative for inspection.
Do not disassemble
Touching the product’s internal parts could result in injury. Repairs should be performed only by qualified technicians. Should the camera break open as the result of a fall or other accident, take the product to a Nikon-authorized service representative for inspection after unplugging the product and/or removing the batteries.
Do not use the camera or AC adapter in the presence of flammable gas
Do not use electronic equipment in the presence of flammable gas, as this could result in explosion or fire.
Handle the camera strap with care
Never place the strap around the neck of an infant or child.
Keep out of reach of children
Particular care should be taken to prevent infants from putting the batteries or other small parts into their mouths.
Observe caution when handling batteries
Batteries may leak or explode if improperly handled. Observe the following precautions when handling batteries for use in this product:
•Before replacing the batteries, turn the product o . If you are using an AC adapter, be sure it is unplugged.
•Use only the batteries listed on page 6 of this manual. Do not use other types. Do not mix old and new batteries or batteries of di erent makes or types.
•Charge and use each pair of Nikon rechargeable Nikon EN-MH1-B2 NiMH batteries together as a set. Do not mix batteries from di erent pairs.
•Insert batteries in the correct orientation.
•Do not short or disassemble batteries or attempt to remove or break the covering.
•Do not expose batteries to flame or to excessive heat.
•Do not immerse in or expose to water.
•Do not transport or store with metal objects such as necklaces or hairpins.
•Batteries are prone to leakage when fully discharged. To avoid damage to the product, be sure to remove the batteries when no charge remains.
•Discontinue use immediately should you notice any change in the batteries, such as discoloration or deformation.
•If liquid from damaged batteries comes in contact with clothing or skin, rinse immediately with plenty of water.
ii

Observe the following precaution when handling the battery charger
If an MH-71 battery charger is provided with the camera, observe the following precautions:
•Keep dry. Failure to observe this precaution could result in fire or electric shock.
•Dust on or near the metal parts of the plug should be removed with a dry cloth. Continued use could result in fire.
•Do not handle the power cable or go near the battery charger during thunderstorms. Failure to observe this precaution could result in electric shock.
•Do not damage, modify, forcibly tug or bend the power cable, place it under heavy objects, or expose it to heat or flame. Should the insulation be damaged and the wires become exposed, take it to a Nikonauthorized service representative for inspection. Failure to observe these precautions could result in fire or electric shock.
•Do not handle the plug or battery charger with wet hands. Failure to observe this precaution could result in electric shock.
Use appropriate cables
When connecting cables to the input and output jacks, use only the cables provided or sold by Nikon for the purpose, to maintain compliance with product regulations.
Handle moving parts with care
Be careful that your fingers or other objects are not pinched by the lens cover or other moving parts.
CD-ROMs
The CD-ROMs supplied with this device should not be played back on audio CD equipment. Playing CD-ROMs on an audio CD player could cause hearing loss or damage the equipment.
Observe caution when operating the flash
Using the flash close to your subject’s eyes could cause temporary visual impairment. Particular care should be observed if photographing infants, when the flash should be no less than one meter (39in.) from the subject.
Do not fire the flash while it is touching a person or object
Such use can result in the person being burned, and/or their clothes igniting from the heat of the flash.
Avoid contact with liquid crystal
Should the monitor break, care should be taken to avoid injury due to broken glass and to prevent liquid crystal from the monitor touching the skin or entering the eyes or mouth.
iii

Notices
•No part of the manuals included with this product may be reproduced, transmitted, transcribed, stored in a retrieval system, or translated into any language in any form, by any means, without Nikon’s prior written permission.
•Nikon reserves the right to change the speci- fi cations of the hardware and software described in these manuals at any time and without prior notice.
•Nikon will not be held liable for any damages resulting from the use of this product.
•While every e ort has been made to ensure that the information in these manuals is accurate and complete, we would appreciate it were you to bring any errors or omissions to the attention of the Nikon representative in your area (address provided separately).
Notice for Customers in the U.S.A.
Federal Communications Commission (FCC) Radio Frequency Interference Statement
This equipment has been tested and found to comply with the limits for a Class B digital device, pursuant to Part 15 of the FCC rules. These limits are designed to provide reasonable protection against harmful interference in a residential installation. This equipment generates, uses, and can radiate radio frequency energy and, if not installed and used in accordance with the instructions, may cause harmful interference to radio communications. However, there is no guarantee that interference will not occur in a particular installation. If this equipment does cause harmful interference to radio or television reception, which can be determined by turning the equipment o and on, the user is encouraged to try to correct the interference by one or more of the following measures:
• Reorient or relocate the receiving antenna.
• Increase the separation between the equipment and receiver.
• Connect the equipment into an outlet on a circuit di erent from that to which the receiver is connected.
• Consult the dealer or an experienced radio/ television technician for help.
Notice for Customers in Canada
CAUTION
This class B digital apparatus meets all requirements of the Canadian Interference Causing Equipment Regulations.
iv

Symbol for Separate Collection in European Countries
This symbol indicates that this product is to be collected separately.
The following apply only to users in European countries:
•This product is designated for separate collection at an appropriate collection point. Do not dispose of as household waste.
•For more information, contact the retailer or the local authorities in charge of waste management.
Notice Concerning Prohibition of Copying or Reproduction
Note that simply being in possession of material that has been digitally copied or reproduced by means of a scanner, digital camera or other device may be punishable by law.
•Items prohibited by law from being copied or reproduced
Do not copy or reproduce paper money, coins, securities, government bonds, or local government bonds, even if such copies or reproductions are stamped “Sample.”
The copying or reproduction of paper money, coins, or securities which are circulated in a foreign country is prohibited.
Unless the prior permission of the government has been obtained, the copying or reproduction of unused postage stamps or post cards issued by the government is prohibited.
The copying or reproduction of stamps issued by the government and of certifi ed documents stipulated by law is prohibited.
•Cautions on certain copies and reproductions
The government has issued cautions on copies or reproductions of securities issued by private companies (shares, bills, checks, gift certifi cates, etc.), commuter passes, or coupon tickets, except when a minimum of necessary copies are to be provided for business use by a company. Also, do not copy or reproduce passports issued by the government, licenses issued by public agencies and private groups, ID cards, and tickets, such as passes and meal coupons.
•Comply with copyright notices
The copying or reproduction of copyrighted creative works such as books, music, paintings, woodcut prints, maps, drawings, movies, and photographs is governed by national and international copyright laws. Do not use this product for the purpose of making illegal copies or to infringe copyright laws.
Disposing of Data Storage Devices
Please note that deleting images or formatting data storage devices such as memory cards or builtin camera memory does not completely erase the original image data. Deleted fi les can sometimes be recovered from discarded storage devices using commercially available software, potentially resulting in the malicious use of personal image data. Ensuring the privacy of such data is the user’s responsibility.
Before discarding a data storage device or transferring ownership to another person, erase all data using commercial deletion software, or format the device and then completely refi ll it with images containing no private information (for example, pictures of empty sky). Be sure to also replace any pictures selected for the welcome screen. Care should be taken to avoid injury or damage to property when physically destroying data storage devices.
v

Table of Contents |
|
For Your Safety....................................................................................................................................................................... |
ii |
Introduction |
1 |
Parts of the Camera..................................................................................................................................... |
2 |
The Monitor ................................................................................................................................................... |
4 |
First Steps........................................................................................................................................................ |
6 |
Inserting Batteries .............................................................................................................................................................. |
6 |
Basic Setup.............................................................................................................................................................................. |
7 |
Inserting Memory Cards................................................................................................................................................. |
9 |
Basic Photography and Playback |
10 |
Mode ....................................................................................................................................................... |
10 |
Viewing Pictures......................................................................................................................................... |
13 |
Using the Flash ........................................................................................................................................... |
14 |
Taking Pictures with the Self-Timer..................................................................................................... |
15 |
Macro Close-up Mode.............................................................................................................................. |
16 |
Exposure Compensation......................................................................................................................... |
16 |
Scene and Movie Modes |
17 |
Scene Mode ................................................................................................................................................. |
17 |
Assist Modes ........................................................................................................................................................................ |
18 |
Other Scenes ....................................................................................................................................................................... |
22 |
Movie Mode................................................................................................................................................. |
25 |
Viewing Pictures on the Camera |
26 |
Viewing Multiple Pictures: Thumbnail Playback............................................................................................ |
26 |
Deleting Pictures............................................................................................................................................................... |
26 |
Taking a Closer Look: Playback Zoom.................................................................................................................. |
27 |
Enhancing Contrast: D-Lighting.............................................................................................................................. |
28 |
Voice Memos: Recording and Playback.............................................................................................................. |
29 |
Movie Playback .................................................................................................................................................................. |
30 |
Connecting to Televisions, Computers, and Printers |
31 |
Viewing Pictures on TV ............................................................................................................................ |
31 |
Viewing Pictures on a Computer.......................................................................................................... |
31 |
Printing Pictures ......................................................................................................................................... |
34 |
Menus |
39 |
Basic Camera Setup: The Setup Menu................................................................................................ |
41 |
Welcome Screen ............................................................................................................................................................... |
41 |
Date........................................................................................................................................................................................... |
42 |
Monitor Settings................................................................................................................................................................ |
43 |
Date Imprint......................................................................................................................................................................... |
44 |
Sound Settings................................................................................................................................................................... |
45 |
Blur Warning ........................................................................................................................................................................ |
45 |
Auto O .................................................................................................................................................................................. |
45 |
vi |
|

Format Memory/ Format Card ................................................................................................................................. |
46 |
Language............................................................................................................................................................................... |
46 |
Interface.................................................................................................................................................................................. |
46 |
Reset all................................................................................................................................................................................... |
47 |
Battery Type.......................................................................................................................................................................... |
47 |
Menus ...................................................................................................................................................................................... |
47 |
Firmware Version............................................................................................................................................................... |
47 |
Shooting Options: The Shooting Menu............................................................................................. |
48 |
Image Mode ........................................................................................................................................................................ |
48 |
White Balance ..................................................................................................................................................................... |
49 |
Metering................................................................................................................................................................................. |
50 |
Continuous........................................................................................................................................................................... |
51 |
BSS.............................................................................................................................................................................................. |
51 |
Color Options...................................................................................................................................................................... |
52 |
AF-Area Mode..................................................................................................................................................................... |
52 |
Auto-focus Mode.............................................................................................................................................................. |
52 |
Playback Options: The Playback Menu .............................................................................................. |
54 |
Print Set................................................................................................................................................................................... |
54 |
Slide Show............................................................................................................................................................................. |
54 |
Delete....................................................................................................................................................................................... |
55 |
Protect ..................................................................................................................................................................................... |
55 |
Transfer Marking................................................................................................................................................................ |
55 |
Small Pic.................................................................................................................................................................................. |
56 |
Copy.......................................................................................................................................................................................... |
56 |
Movie Options: The Movie Menu ......................................................................................................... |
57 |
Movie Options.................................................................................................................................................................... |
57 |
Auto-focus Mode.............................................................................................................................................................. |
57 |
Technical Notes |
58 |
Optional Accessories ................................................................................................................................ |
58 |
Caring for the Camera .............................................................................................................................. |
59 |
Cleaning ................................................................................................................................................................................. |
60 |
Storage.................................................................................................................................................................................... |
60 |
Error Messages............................................................................................................................................ |
61 |
Troubleshooting......................................................................................................................................... |
63 |
Appendix ...................................................................................................................................................... |
66 |
Specifications .............................................................................................................................................. |
70 |
Index............................................................................................................................................................... |
72 |
vii

Use Only Nikon Brand Electronic Accessories
Nikon COOLPIX cameras are designed to the highest standards and include complex electronic circuitry. Only Nikon brand electronic accessories (including battery chargers, batteries, and AC adapters) certifi ed by Nikon specifi cally for use with this Nikon digital camera are engineered and proven to operate within the operational and safety requirements of this electronic circuitry.
THE USE OF NON-NIKON ELECTRONIC ACCESSORIES COULD DAMAGE THE CAMERA AND MAY VOID YOUR NIKON WARRANTY.
For more information about Nikon brand accessories, contact a local authorized Nikon dealer.
viii
Introduction
Thank you for your purchase of a Nikon COOLPIX L1 digital camera. This manual has been written to help you enjoy taking pictures with your Nikon digital camera. Read this manual thoroughly before use, and keep it where all those who use the product will read it.
The documentation for this product also includes the manuals listed below. Please be sure to read all instructions thoroughly to get the most from the camera.
•Quick Start Guide: The Quick Start Guide takes you through the process of unpacking and setting up your Nikon digital camera, taking your fi rst photographs, and transferring them to your computer.
•PictureProject Reference Manual (on CD): The PictureProject Reference Manual contains information on using the PictureProject software provided with your camera. For information on viewing the reference manual, see the Quick Start Guide.
Introduction
 Before Taking Important Pictures
Before taking pictures on important occasions (such as at weddings or before taking the camera on a trip), take a test shot to ensure that the camera is functioning normally. Nikon will not be held liable for damages or lost profi ts that may result from product malfunction.
 Life-Long Learning
As part of Nikon’s “Life-Long Learning” commitment to ongoing product support and education, continually-updated information is available on-line at the following sites:
•For users in the U.S.A.: http://www.nikonusa.com/
•For users in Europe and Africa: http://www.europe-nikon.com/support
•For users in Asia, Oceania, and the Middle East: http://www.nikon-asia.com/
Visit these sites to keep up-to-date with the latest product information, tips, answers to fre- quently-asked questions (FAQs), and general advice on digital imaging and photography. Additional information may be available from the Nikon representative in your area. See the URL below for contact information:
http://nikonimaging.com/
1

Parts of the Camera
Introduction
|
Power-on lamp |
Microphone |
|
|
|
|||||
( |
|
10) |
( |
|
25, 29) |
Speaker |
||||
Power switch ( |
|
10) |
|
|
|
( |
|
29, 30, 45) |
||
|
|
|
|
|
||||||
|
|
|
|
|
|
|
||||
Shutter-release
button (
 12)
12)
Built-in flash (
 14)
14)
Eyelet for |
Self-timer lamp |
||
camera |
|||
( |
15) |
||
strap |
|||
|
|
||
|
Lens ( |
11) |
|
|
Lens cover |
||
|
closed |
||
Power cord channel cover for optional AC adapter ( 58)
58)
Battery-chamber |
Lens cover |
cover ( 7, 9) |
|


 Memory card slot (
 9)
9)
Battery chamber ( 7)
7)
Attaching the Camera Strap |
|
|
Attach the strap as shown at right. |
|
|
2
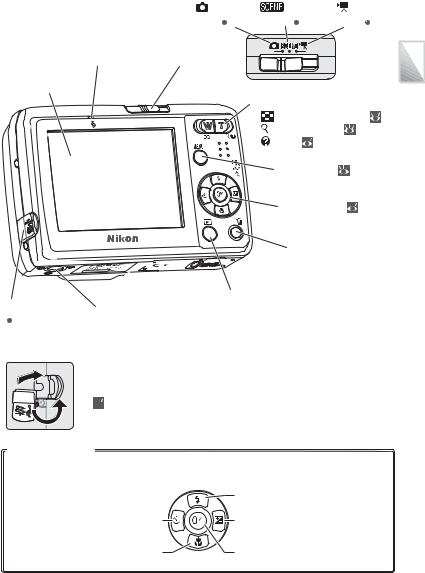
Flash lamp ( 14)
14)
Monitor
( 4–5, 10, 13)
Connector cover |
Tripod socket |
||
( |
|
31, 32, 35) |
|
|
|
||
Replacing the connector cover


 Cable connector
( 31, 32, 35)
(auto) |
(scene) |
(movie) |
||||||
mode ( |
|
10) |
mode ( |
|
17) |
mode ( |
|
25) |
Mode selector ( 10, 17, 25)
Zoom button ( 11). See also:
• |
(thumbnail playback): 26 |
|
• |
(playback zoom): |
27 |
• |
(help): 40 |
|
|
MENU button ( |
39) |
|
Multi selector ( |
7, 39) |
 (delete) button (
 13, 26, 27)
 (playback) button (
 13, 26)
Introduction
The Multi Selector
Press the multi selector up, down, left, or right to highlight pictures and menu items, then press the center to select. The buttons on the multi selector are also used to:
 : Display self-timer menu (
 15)
15)
 : Display macro mode menu (
 16)
16)
 : Display fl ash mode menu (
 14)
14)
 : Display exposure compensation menu (
 16)
16)
 : Perform D-lighting (
 28)
28)
 : Transfer pictures (
 31–32)
3
Introduction
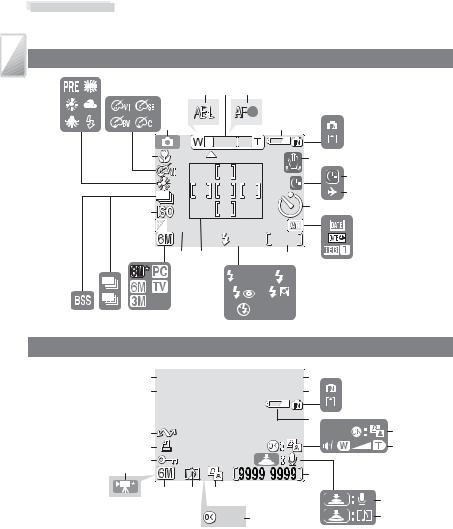
The Monitor
The following indicators may appear in the monitor during shooting and playback (actual display varies with current camera settings):
Shooting
21 |
22 |
|
2 |
3 |
4 |
|
|
|
|
||||
|
|
1 |
|
|
5 |
6 |
|
|
20 |
|
|
|
7 |
|
|
|
|
|
|
8 |
|
|
|
|
|
10 |
9 |
|
|
17 |
|
|
10 |
|
|
|
|
|
|
||
|
|
|
|
|
11 |
|
|
|
+1.0 |
|
|
|
|
|
|
|
|
AUTO 9999 |
|
|
|
|
|
|
|
|
|
|
|
15 |
14 |
|
12 |
|
|
|
|
|
|
AUTO |
|
19 |
18 |
16 |
|
|
|
13 |
Playback
19 |
10.10.2005 |
100NIKON |
1 |
3 |
||
18 |
00:00 |
|
9999.JPG |
2 |
||
|
|
|||||
|
|
|
|
|
4 |
5 |
17 |
|
|
|
|
|
|
16 |
|
|
|
|
|
6 |
14 15 |
|
|
9999/9999 |
9 |
|
|
|
|
|
|
|||
|
13 |
12 |
10 |
|
|
7 |
|
|
|
|
|
|
|
|
|
|
:Start |
11 |
|
8 |
4

|
|
|
|
...................................1 Shooting mode |
10, 17, 25 |
12 Number of exposures |
|
2 Exposure lock ....................................................... |
24 |
remaining ....................................................... |
10, 67 |
3 Zoom indicator............................................ |
11, 16 |
Movie length ................................................ |
25, 67 |
4 Focus indicator.................................................... |
12 |
13 Flash mode ............................................................ |
14 |
5 Battery level indicator ..................................... |
10 |
14 Focus areas..................................................... |
12, 52 |
6 Internal memory/memory card |
|
15 Exposure compensation ............................... |
16 |
indicator...................................................................... |
9 |
16 Image mode ................................................. |
48, 67 |
7 Camera shake icon............................................ |
12 |
17 Sensitivity................................................................ |
12 |
8 “Date not set” indicator .................................. |
61 |
18 Continuous shooting mode ....................... |
51 |
9 Time zone indicator.......................................... |
42 |
19 Best Shot Selector (BSS)................................. |
51 |
10 Self-timer indicator ........................................... |
15 |
20 Macro close-up mode .................................... |
16 |
11 Date imprint/date counter.......................... |
44 |
21 White balance...................................................... |
49 |
|
|
22 Color option.......................................................... |
52 |
|
|
|
|
.......................................................1 Current folder |
68 |
...................................................10 D-Lighting icon |
28 |
2 File number and type...................................... |
68 |
11 Movie playback indicator.............................. |
30 |
3 Internal memory/memory card |
|
12 Voice memo icon............................................... |
29 |
indicator...................................................................... |
9 |
13 Image mode ......................................................... |
48 |
4 Battery level indicator ..................................... |
10 |
14 Movie indicator ................................................... |
30 |
5 D-Lighting guide................................................ |
28 |
15 Protect icon ........................................................... |
55 |
6 Volume indicator........................................ |
29, 30 |
16 Print-order icon................................................... |
38 |
7 Voice memo recording guide.................... |
29 |
17 Transfer icon.................................................. |
32, 55 |
8 Voice memo playback guide...................... |
29 |
18 Time of recording ........................................... |
7–8 |
9 Current frame number/ |
|
19 Date of recording............................................ |
7–8 |
total number of frames |
|
|
|
Movie length ........................................................ |
30 |
|
|
Introduction
5
First Steps
Introduction
Inserting Batteries
The camera uses two AA batteries. Depending on the country or region of purchase, the package will include either alkaline batteries or an MH-71 battery charger with rechargeable EN-MH1-B2 batteries.
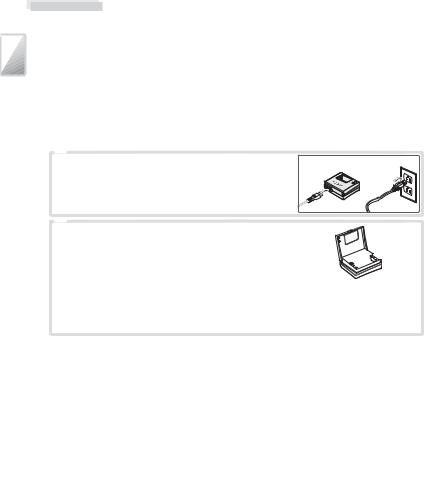
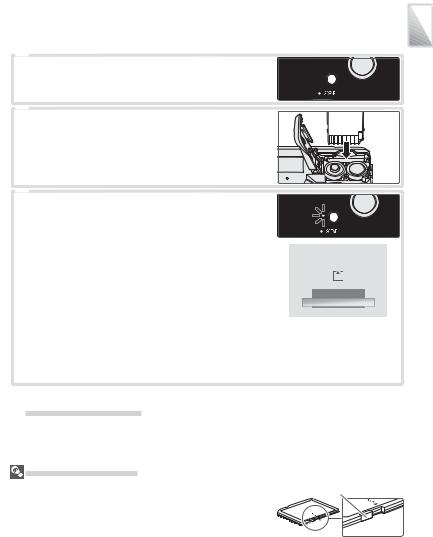
1 Charge the batteries (EN-MH1-B2 batteries only)
If the camera came with a battery charger and rechargeable Nikon EN-MH1-B2 NiMH batteries, charge the batteries as described below. If the camera came with a pair of alkaline batteries, skip to Step 2 on the following page.
1.1 |
Plug the charger in |
|
|
Connect the power cable to the charger ( ) |
|
|
and then plug it into a power outlet ( ). The |
|
|
CHARGE lamp will light ( ). |
|
1.2 |
Charge the batteries |
|
|
Insert the batteries as indicated on the char- |
|
|
ger. The CHARGE lamp will start to blink. |
|
|
Charging is complete when the CHARGE |
|
|
lamp stops blinking. |
|
A pair of new or fully exhausted batteries will charge in about two and a half hours.
 Batteries
Read and follow the warnings and cautions on pages ii–iii and 59 of this manual. The camera can be used with AA alkaline (LR6) batteries, Nikon rechargeable EN-MH1-B2 NiMH batteries, ZR6 oxy-nickel batteries, and FR6/L91 lithium batteries. Do not mix old and new batteries or batteries of di erent makes or types. Batteries with the following defects can not be used:
Peeling or |
Insulation does |
Flat negative |
damaged |
not reach negative |
terminal |
insulation |
terminal |
|
 EN-MH1-B2 Batteries
Charge EN-MH1-B2 batteries before fi rst use. Charge and use as a set: do not charge batteries one at a time or mix batteries from di erent pairs. Note that the batteries may tend to discharge more quickly when new or after a long period of disuse. The batteries will retain a charge longer once they have been used and recharged several times. “Memory” e ects that result in reduced battery capacity can be avoided by periodically refreshing the batteries as described in the Appendix ( 69).
69).
6
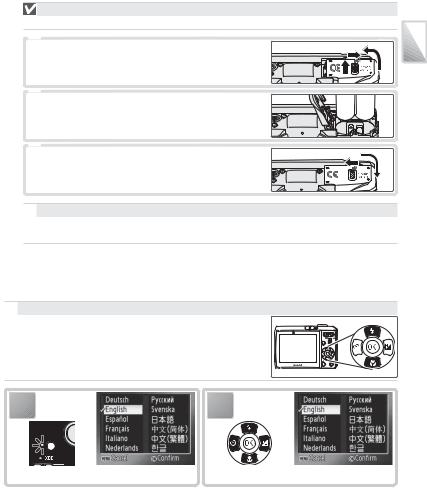
2 Insert the batteries
Is the Camera O ?
Confirm that the power-on lamp is o before inserting or removing batteries.
2.1 |
Open the battery chamber |
|
|
|
Hold the camera upside down to prevent the |
|
|
|
batteries from falling out. |
|
|
2.2 |
Insert the batteries |
|
|
|
Insert the batteries as shown. |
|
|
2.3 |
Close the battery chamber |
|
|
 The Battery Type Menu
After replacing the batteries, check that the option selected for Battery Type in the setup menu matches the type of battery used ( 47).
47).
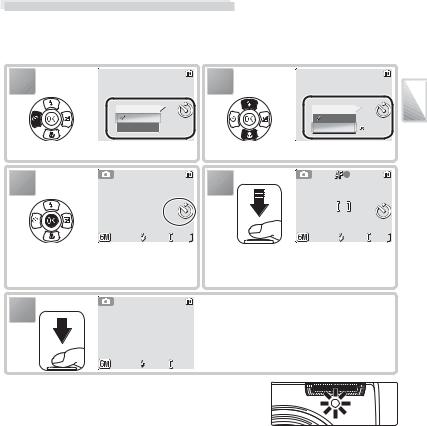
Basic Setup
A language-selection dialog is displayed the fi rst time the camera is turned on. Choose a language and set the time and date as described below.
 The Multi Selector
The multi selector is used in the steps that follow. The buttons needed to perform a task are shown in black; if more than one button is highlighted, any of the highlighted buttons can be used. For example, “press the multi selector up or down” is shown as illustrated at right.
Introduction
1 |
2 |
Turn camera on. |
Highlight language. |
7

3 |
4 |
Introduction
Confirmation dialog displayed. |
TIME ZONE menu displayed.* |
*If daylight saving time is in e ect, press multi selector down to highlight DaylightSaving and press center of multi selector.
5 |
6 |
Display map of world time zones. |
Select home time zone. |
7 |
8 |
Display DATE menu. |
Edit Day (order of Day, Month, and Year |
|
may di er in some areas). |
9 |
10 |
Select Month. Repeat steps 8–9 to edit |
Highlight D M Y. |
|
Month, Year, hour, and minute. |
|
|
11 |
12 |
|
|
AUTO |
6 |
Choose date display order. |
Exit DATE menu. Camera is now ready |
|
|
for use. |
|
8
Inserting Memory Cards
Pictures are stored in the camera’s internal memory (approximately 10 MB) or on removable Secure Digital (SD) memory cards ( 58). Internal memory is used for recording and deleting pictures only if no memory card is inserted.
To insert a memory card:
1 Turn the camera o
Confirm that the power-on lamp is o before inserting or removing memory cards.
2 Insert the memory card
Open the battery chamber, holding the camera upside down to keep the batteries from falling out. Slide the memory card in as shown until it clicks into place. Close the battery chamber.
3 Turn the camera on
If no message is displayed in the monitor, the camera is ready for use.
If the message shown at right is displayed, the memory card must be formatted before use. Note that formatting permanently deletes all pictures and other data on the memory card. Be sure to make copies of any pictures you wish to keep before beginning formatting.
CARD IS NOT FORMATTED
Format
No
 Confirm
To begin formatting, press the multi selector up to highlight Format and then press the center of the multi selector. Do not turn the camera o or remove the batteries or memory card until formatting is complete.
Introduction
 Removing Memory Cards
Before removing memory cards, turn the camera o and confi rm that the power-on lamp is o . Open the battery-chamber cover and press the card in to partially eject the card. The card can then be removed by hand.
The Write Protect Switch |
|
SD cards are equipped with a write protect switch. Pictures |
Write protect switch |
can not be recorded or deleted and the memory card can not |
|
be formatted when this switch is in the “lock” position. |
|
9
Basic Photography and Playback
 Mode
Mode
This section describes how to take pictures in (auto) mode, an automatic,“point- and-shoot” mode recommended for fi rst-time users of digital cameras.
Playback and Photography Basic
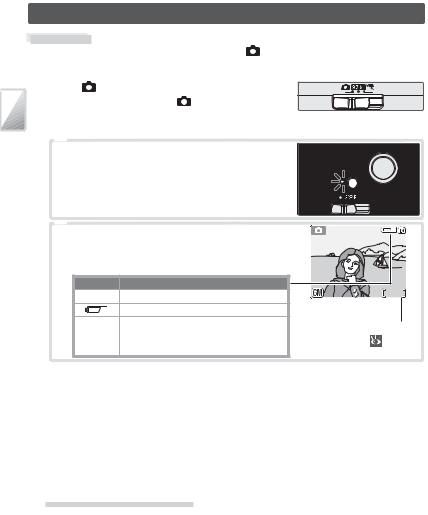
1 |
Select mode |
Slide the mode selector to . |
|
2 |
Turn the camera on |
2.1 Turn the camera on
The power-on lamp will light and the monitor
will turn on. To turn the camera o at any time, press the power switch again. Do not remove
the batteries while the power-on lamp is lit.
2.2 |
Check indicators in the monitor |
|
|
|
|
Check the battery level and number of expo- |
|
|
|
|
sures remaining. |
|
|
|
|
Display |
Battery level |
AUTO |
6 |
|
NO ICON |
Batteries fully charged. |
||
|
|
Low battery; ready spare batteries. |
|
|
|
WARNING!! |
|
Number of exposures |
|
|
BATTERY Batteries exhausted. Replace batteries. |
|||
|
remaining ( |
67) |
||
|
EXHAUSTED |
|
||
|
|
|
|
|
 Auto Power o (Stand-by Mode)
If no operations are performed for about a minute, the monitor will turn o and the camera will enter stand-by mode to reduce the drain on the battery. While the camera is in standby mode, the power-on lamp will blink and the monitor can be reactivated by pressing the shutter-release button halfway. The camera will turn o automatically if no operations are performed for another three minutes.
10
3 Frame a picture
3.1 Ready the camera
Hold the camera steadily in both hands, keeping your fi ngers and other objects away from the lens, fl ash, and microphone.
3.2 |
Frame the picture |
|
|
|
Frame the subject near the center of the |
|
|
|
monitor. |
|
|
|
AUTO |
6 |
Basic |
|
Playback and Photography |
||
|
|
|
Zoom |
|
|
|
|
|
|
|
|
|
|
||
Use the |
|
|
|
button to frame the subject in the moni- |
|
|
|
|
||||
|
|
|
|
|
|
|||||||
|
|
|
|
|
||||||||
|
|
|
|
|
||||||||
tor. Press |
to zoom out, increasing the area visible in the |
|
|
|
|
|||||||
frame. Press |
|
to zoom in up to 5 × so that the subject |
|
|
|
|
||||||
|
|
|
|
|
||||||||
|
|
|
|
|
||||||||
fi lls a larger area of the frame. Pressing |
|
|
for about two |
Zoom out Zoom in |
||||||||
|
|
|||||||||||
|
|
|||||||||||
seconds at 5 × zoom will trigger digital zoom, allowing the |
||||||||||||
subject to be magnifi ed up to 4 × more, for a total of magni- |
|
|
|
|
||||||||
|
|
|
|
|||||||||
fi cation of 20 ×. Note that unlike optical zoom, digital zoom |
|
|
|
|
||||||||
does not increase the amount of detail visible in the picture. |
Zoom indicator turns yel- |
|||||||||||
Instead, details visible at 5 × zoom are simply enlarged, pro- |
low when digital zoom is |
|||||||||||
ducing a slightly “grainy” image. |
|
|
|
|
in e ect. |
|||||||
11
4 |
Focus and shoot |
|||
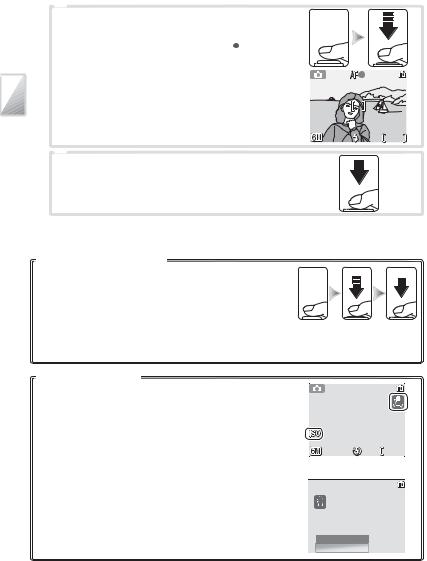
4.1 |
Focus |
|||
|
|
Press the shutter-release button halfway. The |
||
|
|
camera will select the focus area ( |
|
4–5) con- |
|
|
|
||
|
|
taining the subject closest to the camera. If |
||
|
|
the camera is able to focus on this subject, |
||
|
|
the focus (AF●) indicator and focus area will |
||
|
|
be displayed in green. If they blink red, the |
||
Basic |
|
camera was unable to focus. Change the |
||
|
composition and try again. |
|||
|
|
|
|
|
Photography |
4.2 |
Take the picture |
||
|
Press the shutter release button the rest of the |
|||
|
way down to take the picture. Note that the |
|||
|
fl ash may fi re if the subject is poorly lit. |
|||
Playbackand |
|
|||
|
|
|
|
|
The Shutter-Release Button
To set focus and exposure, lightly press the shutter-release button about halfway, stopping when you feel resistance ( ). Focus and exposure lock while the shutter-release button is held in this position. To release the shutter and take a picture, press the shutter-release button down the rest of the way ( ). Use a gentle touch; moving the camera while pressing the shutter-release button can result in blurred pictures.
When Lighting Is Poor
If lighting is poor and the fl ash is o , a 
 icon will be displayed to warn that pictures may be blurred as a result of the slow shutter speeds. If an ISO icon is displayed, sensitivity has been raised to compensate for poor lighting and pictures may be a ected by “noise”in the form of randomlyspaced, brightly-colored dots. The camera may process pictures to reduce noise, doubling recording times.
If the warning at right is displayed after a picture is taken, the picture may be blurred. Select No to exit without recording the picture.
AUTO |
6 |
5
PICTURE IS BLURRED. 
 SAVE PICTURE?
No
Yes  :Confirm
12
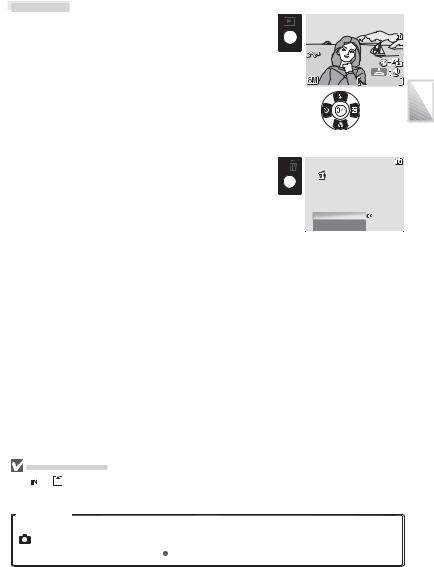
Viewing Pictures
Press the  button to display a picture in the monitor Use the multi selector to view additional pictures: press the multi selector down or right to view pictures in the order recorded, up or left to view pictures in reverse order. Keep the multi selector pressed to scroll quickly to the desired picture. Pictures may be displayed briefl y at low resolution while being read from memory.
Press the  button again to return to shooting mode.
Deleting Unwanted Pictures
To delete the picture currently displayed in the monitor, press the  button. A confi rmation dialog will be displayed; highlight one of the following options and press the center of the multi selector:
•No: Exit without deleting the picture.
•Yes: Delete the picture.
10.10.2005 |
100NIKON |
|
15:30 |
0005.JPG |
|
|
5/ |
5 |
|
|
Basic |
Erase 1 image (s)? |
Photography |
|
|
||
No |
:Confirm |
and |
Yes |
|
Playback |
|
|
|
 During Recording
The or icon will blink while pictures are recorded. Removing memory cards or batteries while these icons are blinking could a ect pictures or damage the camera or card.
Auto Mode
In addition to the fl ash, self-timer, and macro close-up options described on pages 14–16, (auto) mode o ers a menu of shooting options controlling such settings as image size,
picture color, and white balance ( 48–53).
13

Using the Flash
The fl ash has a range of 0.5–3.5 m (1 ft. 8 in.–11 ft. 6 in.) when the camera is zoomed all the way out. The range at maximum zoom is 0.5–2 m (1 ft. 8 in.–6 ft. 7 in.). The following fl ash modes are available:
Playback and Photography Basic
Mode |
Description |
|
AUTO Auto |
Flash fi res automatically when lighting is poor. |
|
Auto with red- |
Reduces “red eye” in portraits (see below). |
|
eye reduction |
||
O |
Flash will not fi re even when lighting is poor. |
|
Fill fl ash |
Flash fi res whenever picture is taken. Use to “fi ll-in” (illuminate) |
|
shadows and back-lit subjects. |
||
|
||
Slow sync |
Flash illuminates main subject; slow shutter speeds are used to cap- |
|
ture background at night or under dim light. |
||
|
1 |
Flash |
:Confirm |
2 |
Flash |
|
|
|||
|
|
|
|
|
|
|
|
|
:Confirm |
|
AUTO |
|
|
AUTO |
Display options. |
Highlight mode. |
3
Red-eye Reduction
 Make selection (to exit without changing mode, wait two seconds). Selection is shown by icon at bottom of display. Selection for
  mode is stored in memory even when camera is o .
6
The camera uses advanced red-eye reduction. Low-intensity light pulses cause the subject’s pupils to contract before the fl ash fi res. If the camera still detects red-eye, it will process the image to further its e ects (this may slightly increase the time needed to record the picture). This mode is not recommended where a quick shutter response is required; if the desired results are not achieved, try again at a di erent fl ash setting.
The Flash Lamp
The fl ash lamp shows fl ash status when the shutter-release button is pressed halfway.
• On: Flash will fi re when picture is taken
• Blinks: Flash charging. Wait a few seconds and try again.
• O : Flash will not fi re when picture is taken.
14
Taking Pictures with the Self-Timer
The camera is equipped with a ten-second timer for self-portraits. When using the self-timer, mount the camera on a tripod (recommended) or rest it on a fl at, level surface.
1 |
2 |
Self-timer |
OFF |
Off |
|
On |
|
Display options.
Self-timer |
OFF |
Off |
|
On |
:Confirm |
Highlight ON.
3 |
|
4 |
|
|
10 |
|
10 |
AUTO |
6 |
AUTO |
6 |
Make selection (to exit without changing |
Set focus and exposure. |
|
|
mode, wait two seconds). Selection is |
|
|
|
shown by icon in display. |
|
|
|
5
9
 AUTO 6
Start timer; display in monitor shows seconds remaining before shutter is released. To stop timer before picture is taken, press shutter-release button again.
The self-timer lamp will blink until one second before the picture is taken, staying lit during the fi nal second to warn that the shutter is about to be released.
Playback and Photography Basic
15
Macro Close-up Mode
Macro close-up mode is used for taking shots of objects as close as 4 cm (1.6 in.).
Playback and Photography Basic
1
3
4
OFF |
|
2 |
OFF |
|
Macro close-up |
|
|
Macro close-up |
|
Off |
:Confirm |
|
Off |
|
On |
|
|
On |
:Confirm |
Display options. |
|
|
Highlight ON. |
|
 Make selection (to exit without changing mode, wait two seconds). Selection is shown by icon in display.
 AUTO
AUTO  6
6
 Frame picture. Minimum focus distance varies with zoom position; if zoom is adjusted until
  icon turns green, camera can focus at distance of 4 cm (1.6 in.).
 AUTO
AUTO  6
6
5 |
Focus and shoot. Note that flash may be unable to light entire subject at distanc- |
es of less than 50 cm (1 ft. 8 in.); if flash fires, play picture back and check results. |
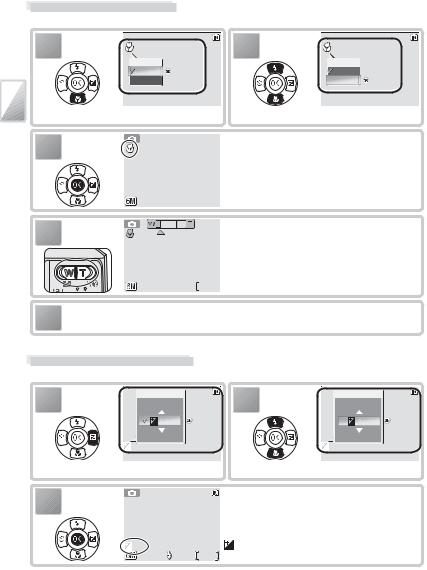
Exposure Compensation
Use exposure compensation to make the entire picture brighter or darker.
1 |
Exposure comp. |
|
+0.3 |
|
|
|
0 |
:Confirm |
|
– 0.3 |
|
|
0 |
|
Display options.
2 |
Exposure comp. |
|
+1.3 |
|
|
|
+1.0 |
:Confirm |
|
+0.7 |
|
|
0 |
|
Highlight option.
3 |
Make selection (to exit without changing se- |
lection, wait two seconds). If positive value |
|
|
is selected, pictures will be brighter; if nega- |
|
tive value is selected, pictures will be darker. |
+1.0 |
icon is displayed in monitor. |
AUTO |
6 |
16
Loading...