


Proprietary Notice and Liability Disclaimer
The information disclosed in this document, including all designs and related materials, is the valuable property of NEC Computers Inc. (hereinafter ìNEC Computersî) and/or its licensors. NEC Computers and/or its licensors, as appropriate, reserve all patent, copyright and other proprietary rights to this document, including all design, manufacturing, reproduction, use, and sales rights thereto, except to the extent said rights are expressly granted to others.
The NEC Computers product(s) discussed in this document are warranted in accordance with the terms of the Warranty Statement accompanying each product. However, actual performance of each such product is dependent upon factors such as system configuration, customer data, and operator control. Since implementation by customers of each product may vary, the suitability of specific product configurations and applications must be determined by the customer and is not warranted by NEC Computers.
To allow for design and specification improvements, the information in this document is subject to change at any time, without notice. Reproduction of this document or portions thereof without prior written approval of NEC Computers is prohibited.
As an ENERGY STAR partner, NEC Computers Inc. has determined that this product meets the ENERGY STAR guidelines for energy efficiency. ENERGY STAR is a U.S. registered mark.
NEC is a registered trademark; Versa is a U.S. registered trademark; DayLite, VersaGlide and UltraLite are trademarks; and UltraCare is a U.S. registered service mark of NEC Corporation and/or one or more of its subsidiaries. All are used under license.
Microsoft, Windows and Windows 2000 are registered trademarks of Microsoft Corporation.
Transmeta, Crusoe, and LongRun are trademarks of Transmeta Corporation.
All other trademarks and registered trademarks are the property of their respective trademark owners.
First Printing - March 2001
Copyright 2001
NEC Computers Inc.
15 Business Park Way
Sacramento, CA 95828
All Rights Reserved

Contents
Using This Guide |
|
Text Setup ........................................................................................................................... |
vii |
Related Documents ............................................................................................................ |
viii |
1 Introducing Your NEC Versa |
|
Before You Begin .............................................................................................................. |
1-2 |
About Your NEC Versa Notebook..................................................................................... |
1-3 |
Around the Front of the System ......................................................................................... |
1-3 |
LCD Panel................................................................................................................... |
1-4 |
Base Unit..................................................................................................................... |
1-4 |
Keyboard Panel........................................................................................................... |
1-6 |
Front Features ............................................................................................................. |
1-8 |
Around the Back of the System.......................................................................................... |
1-9 |
Around the Left Side of the System................................................................................... |
1-9 |
Around the Right Side of the System............................................................................... |
1-10 |
Power Button ............................................................................................................ |
1-11 |
Around the Bottom of the System.................................................................................... |
1-12 |
2 Getting Started |
|
NEC VersaGlide Touchpad................................................................................................ |
2-2 |
Making VersaGlide Adjustments................................................................................ |
2-3 |
VersaGlide Tips .......................................................................................................... |
2-3 |
Power Sources for Your NEC Versa Notebook ................................................................. |
2-3 |
AC Adapter ........................................................................................................................ |
2-3 |
Connecting the AC Adapter........................................................................................ |
2-4 |
Powering On Your System ......................................................................................... |
2-6 |
Primary Battery Pack ......................................................................................................... |
2-6 |
Secondary Battery Pack ..................................................................................................... |
2-6 |
Determining Battery Status......................................................................................... |
2-7 |
Low Battery Status...................................................................................................... |
2-7 |
Returning the Battery to its Normal State ................................................................... |
2-8 |
Extending Battery Life................................................................................................ |
2-8 |
Battery Handling......................................................................................................... |
2-8 |
Replacing the Battery.................................................................................................. |
2-8 |
Charging the Battery................................................................................................. |
2-11 |
Battery Precautions ................................................................................................... |
2-11 |
Precautions for Recharging the Battery .................................................................... |
2-12 |
System Batteries............................................................................................................... |
2-12 |
CMOS Battery .......................................................................................................... |
2-12 |
Optional Battery........................................................................................................ |
2-12 |
System Care ..................................................................................................................... |
2-12 |
Precautions for System Use ...................................................................................... |
2-13 |
Storage Requirements ............................................................................................... |
2-13 |
Routine Cleaning ...................................................................................................... |
2-14 |
Contents iii

3 Using the BIOS Setup Utility |
|
Introducing BIOS Setup ..................................................................................................... |
3-2 |
Entering BIOS Setup.......................................................................................................... |
3-2 |
BIOS Setup Main Menu.............................................................................................. |
3-3 |
How to Use Setup........................................................................................................ |
3-3 |
Main Menu.................................................................................................................. |
3-5 |
Advanced Menu .......................................................................................................... |
3-8 |
Security Menu ........................................................................................................... |
3-10 |
Boot Menu................................................................................................................. |
3-11 |
Exit Menu.................................................................................................................. |
3-11 |
Managing System Power.................................................................................................. |
3-12 |
Windows 2000 Power Options Properties................................................................. |
3-12 |
Windows 2000 Power Schemes ................................................................................ |
3-13 |
Windows 2000 Alarms.............................................................................................. |
3-14 |
Windows 2000 Power Meter..................................................................................... |
3-14 |
Windows 2000 Advanced ......................................................................................... |
3-15 |
Windows 2000 Hibernate.......................................................................................... |
3-15 |
Windows 2000 Power Management States ............................................................... |
3-16 |
Recognizing the Windows 2000 Power Management States .................................... |
3-16 |
Updating the BIOS ........................................................................................................... |
3-17 |
Obtaining the BIOS Update ...................................................................................... |
3-17 |
Preparing the BIOS Update Diskette......................................................................... |
3-17 |
Performing the BIOS Update .................................................................................... |
3-18 |
Configuring the Switch Settings....................................................................................... |
3-19 |
Accessing the DIP Switch......................................................................................... |
3-19 |
Identifying the Switch Settings ................................................................................. |
3-20 |
4 Using the Operating System and Utilities |
|
Microsoft Windows Introduction ....................................................................................... |
4-2 |
Windows 2000 ............................................................................................................ |
4-2 |
Desktop Icons....................................................................................................... |
4-2 |
Taskbar Icons....................................................................................................... |
4-3 |
Transmeta LongRun Utility................................................................................................ |
4-4 |
Setting LongRun Properties ........................................................................................ |
4-4 |
Product Recovery CD......................................................................................................... |
4-5 |
Guidelines for Using the Product Recovery CD ......................................................... |
4-5 |
Product Recovery CD Options.................................................................................... |
4-5 |
Full Disk Drive Restore............................................................................................... |
4-6 |
Partition Only Restore................................................................................................. |
4-7 |
5 Using the System Drives and Bays |
|
External Floppy Diskette Drive.......................................................................................... |
5-2 |
Connecting the External Floppy Diskette Drive.......................................................... |
5-3 |
Disconnecting the External Floppy Diskette Drive..................................................... |
5-3 |
External Variable-Speed CD-ROM Drive.......................................................................... |
5-3 |
Using the CD-ROM Drive with your NEC Versa Notebook ...................................... |
5-6 |
Disconnecting the CD-ROM Drive............................................................................. |
5-8 |
iv Contents

CD Care ...................................................................................................................... |
5-8 |
Hard Disk Drive ................................................................................................................. |
5-9 |
Memory Modules............................................................................................................... |
5-9 |
Installing a Memory Module..................................................................................... |
5-10 |
6 Communicating with Your NEC Versa |
|
PC Cards ............................................................................................................................ |
6-2 |
Type II Cards .............................................................................................................. |
6-2 |
Type II Extended Cards .............................................................................................. |
6-2 |
Communication Cards ................................................................................................ |
6-2 |
Storage Cards.............................................................................................................. |
6-3 |
Other Cards................................................................................................................. |
6-3 |
PC Card Slots.............................................................................................................. |
6-3 |
Inserting a PC Card..................................................................................................... |
6-4 |
Removing a PC Card .................................................................................................. |
6-4 |
Mini PCI LAN ................................................................................................................... |
6-5 |
Connecting the Mini PCI LAN ................................................................................... |
6-5 |
Internal Modem.................................................................................................................. |
6-6 |
Connecting the Internal Modem.................................................................................. |
6-6 |
Internet Connections .......................................................................................................... |
6-7 |
IR Port................................................................................................................................ |
6-7 |
Enabling/Disabling the IR Port in Windows 2000...................................................... |
6-8 |
Using the IR Port ........................................................................................................ |
6-8 |
7 Traveling Tips |
|
Preparing for Travel ........................................................................................................... |
7-2 |
Packing for Travel.............................................................................................................. |
7-2 |
Using Power Connections.................................................................................................. |
7-3 |
Getting Through Customs.................................................................................................. |
7-3 |
Connecting to the Internet.................................................................................................. |
7-4 |
Connecting Using a Modem ....................................................................................... |
7-4 |
Connecting Using a LAN............................................................................................ |
7-4 |
8 Using Peripheral Devices |
|
External Monitor................................................................................................................ |
8-2 |
External Audio Options...................................................................................................... |
8-3 |
USB Devices...................................................................................................................... |
8-4 |
9 Using Multimedia |
|
Audio ................................................................................................................................. |
9-2 |
Recording.................................................................................................................... |
9-2 |
Microphone................................................................................................................. |
9-3 |
Mixing......................................................................................................................... |
9-3 |
Playing Back............................................................................................................... |
9-3 |
Using Headphones ...................................................................................................... |
9-4 |
Using the Built-In Speaker.......................................................................................... |
9-4 |
Using External Stereo Speakers.................................................................................. |
9-4 |
MIDI Files................................................................................................................... |
9-4 |
Contents v

Video.................................................................................................................................. |
9-4 |
Using Digital Video Files............................................................................................ |
9-4 |
Using Animation Files ................................................................................................ |
9-5 |
Multimedia Applications.................................................................................................... |
9-5 |
10 Solving System Problems |
|
Problem Checklist ............................................................................................................ |
10-2 |
Start-Up Problems ............................................................................................................ |
10-3 |
Post Error Messages.................................................................................................. |
10-4 |
Beep Codes ............................................................................................................... |
10-6 |
If You Need Assistance.................................................................................................... |
10-7 |
11 Getting Service and Support |
|
Service and Support Contact Information ........................................................................ |
11-2 |
Web Site ........................................................................................................................... |
11-3 |
FTP Site............................................................................................................................ |
11-3 |
Support Services............................................................................................................... |
11-4 |
Email/Fax to Support Services ......................................................................................... |
11-4 |
A Setting Up a Healthy Work Environment |
|
Making Your Computer Work for You............................................................................. |
A-2 |
Arrange Your Equipment .................................................................................................. |
A-3 |
Adjust Your Chair ............................................................................................................. |
A-3 |
Adjust Your Input Devices................................................................................................ |
A-3 |
Adjust Your Screen or Monitor......................................................................................... |
A-4 |
Vary Your Workday.......................................................................................................... |
A-5 |
Pre-Existing Conditions and Psychosocial Factors ........................................................... |
A-5 |
B Specifications |
|
System Components.......................................................................................................... |
B-2 |
Memory Map..................................................................................................................... |
B-7 |
Interrupt Controllers.......................................................................................................... |
B-8 |
C Frequently Asked Questions |
|
External Mouse ................................................................................................................. |
C-2 |
Display .............................................................................................................................. |
C-2 |
PC Cards............................................................................................................................ |
C-3 |
Diskette Drive ................................................................................................................... |
C-3 |
Booting.............................................................................................................................. |
C-5 |
Power Management........................................................................................................... |
C-5 |
Miscellaneous.................................................................................................................... |
C-7 |
Glossary
Index
Regulatory Statements
vi Contents

Using This Guide
The NEC VersaÆ DayLiteô/UltraLiteô User's Guide gives you the information you need to maximize the use of your NEC Versa notebook computer. Read this guide to familiarize yourself with the NEC Versa and its features. For specific information see
!Chapter 1, ìIntroducing Your NEC Versa,î to acquaint yourself with system hardware.
!Chapter 2, ìGetting Started,î for instructions on how to connect, power on, and care for your system.
!Chapter 3, ìUsing the BIOS Setup Utility,î for details about modifying system parameters and managing system power.
!Chapter 4, ìUsing the Operating System and Utilities,î for an understanding of your MicrosoftÆ WindowsÆ operating system.
!Chapter 5, ìUsing the System Drives and Bays,î to master procedures for connecting the external floppy disk drive, connecting the external CD-ROM drive, and installing a memory module.
!Chapter 6, ìCommunicating with Your NEC Versa,î for essential information about using PC Cards and other communication features of the system.
!Chapter 7, ìTraveling Tips,î for a variety of checklists to help you to prepare your notebook computer for getting through customs and accessing the internet when you are on the road.
!Chapter 8, ìUsing Peripheral Devices,î to master procedures for connecting external devices like an external monitor, headphones, a printer, or speakers.
!Chapter 9, ìUsing Multimedia,î for steps on integrating video and sound clips into impressive presentations.
!Chapter 10, ìSolving System Problems,î for simple solutions to common problems that may arise while operating your notebook.
!Chapter 11, ìGetting Service and Support,î for information about getting help when you need it from NEC Computers Inc.
!Appendix A, ìSetting Up a Healthy Work Environment,î for guidelines that help promote a healthy work setting.
!Appendix B, ìSpecifications,î to review NEC Versa system specifications.
Using This Guide vii

!Appendix C, ìFrequently Asked Questions,î (FAQs) for a look at questions that users commonly ask and the answers to those questions.
Text Setup
To make this guide as easy to use as possible, text is set up as follows.
! Warnings, cautions, and notes have the following format:


 Warnings alert you to situations that could result in serious personal injury or loss of life.


 Cautions indicate situations that can damage the system hardware or software.
Note Notes give particularly important information about whatever is being described.
!Names of keys are printed as they appear on the keyboard, for example, Ctrl, Alt, or
Enter.
!Text that you must type or keys that you must press are presented in bold type. For example, type dir and press Enter.
Related Documents
See the NEC Versa DayLite/UltraLite Quick Setup sheet to help get your system up and running.
viii Using This Guide

1
Introducing Your NEC Versa
!Before You Begin
!About Your NEC Versa Notebook
!Around the Front of the System
!Around the Back of the System
!Around the Left Side of the System
!Around the Right Side of the System
!Around the Bottom of the System

Before You Begin
This manual is the userís guide for both the NEC Versa UltraLite and Versa DayLite notebook computers. All information applies to both units unless otherwise specified. The coloring of your NEC Versa may vary from the units shown in this guide. The colors of the systems used in this Userís Guide are for illustrative purposes only.


 Prolonged or improper use of a computer workstation may pose a risk of serious injury. To reduce your risk of injury, set up and use your computer in the manner described in Appendix A, ìSetting Up a Healthy Work Environment.î
After completing the steps in the Quick Setup sheet that comes with your computer, your NEC Versa DayLite/UltraLite notebook computer is ready to go! To get started, do the following:
!Read Appendix A, ìSetting Up a Healthy Work Environment,î for guidelines that help you use your computer productively and safely. Information includes how to set up and use your computer to reduce your risk of developing nerve, muscle, or tendon disorders.
!Read through this guide to familiarize yourself with the NEC Versa.
1-2 Introducing Your NEC Versa
About Your NEC Versa Notebook
The NEC Versa notebook computer offers you a portable system filled with exciting resources for home, business, or travel. Standard features include a powerful Transmeta Crusoe TM5600 600MHz microprocessor that works together with the latest Peripheral Component Interconnect (PCI) architecture.
In addition, your system provides a high-performance hard disk drive, external CD-ROM and diskette drives, and PC Card support. As a multimedia system, your NEC Versa also provides the tools needed to create and present impressive images using video clips and sound.
NEC Versa notebook computer
To get comfortable with your notebook, read the following sections and take a tour around your system!
Around the Front of the System
The NEC Versa is compact with features on every side. First, look at the front of the NEC Versa. The following sections describe front features, beginning with the liquid crystal display (LCD) panel.
Introducing Your NEC Versa 1-3
LCD Panel
Your NEC Versa comes with a 10.4-inch color Thin Film Transistor (TFT) display that you can adjust for a comfortable viewing position. To adjust the viewing angle, gently tilt the LCD panel into position. The primary battery is located behind the display. The Versa UltraLite has an Extended Graphics Array (XGA) backlit panel. The Versa DayLite has a TFT Super Video Graphics Array (SVGA) reflective panel.
To adjust the LCD panel brightness press the Fn-F8 and Fn-F9 functions keys. For more details about using the systemís function keys, see the topic later in this chapter, ìKeyboard Panel.î
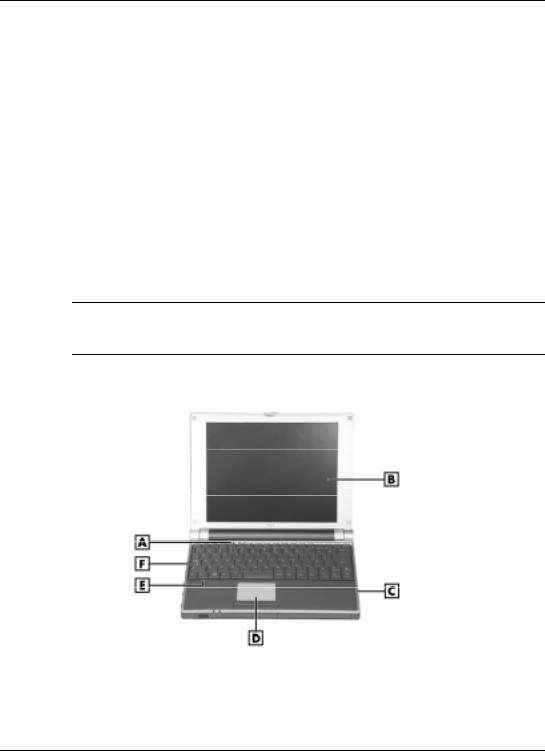
Base Unit
The base unit of your NEC Versa offers the following features, described after the figure.


 After extended use, the surface of the base unit, below the keyboard, may become hot to the touch.
LCD panel and base unit
A ñ Operating Status LEDs |
D ñ NEC VersaGlide touchpad |
B ñ LCD Panel |
E ñ Speaker |
C ñ Microphone |
F ñ Keyboard |
1-4 Introducing Your NEC Versa
!Keyboard ó 86 keys with a country-specific QWERTY-key layout.
!LCD Panel ó Provides a high-resolution display for sharp, effective visuals on your NEC Versa.
!Microphone ó A strategically positioned built-in microphone allows you to record monophonic sound directly into your notebook computer. See Chapter 9, ìUsing Multimedia,î for details about recording.
!NEC VersaGlide touchpad ó Works like a standard computer mouse. Simply move your fingertip over the VersaGlide to control the position of the mouse pointer. Use the selection buttons below the VersaGlide to select menu items. VersaGlide settings and features are described in detail in Chapter 2.
!Speaker ó Provides mono sound for your system when speakers are not plugged into the speaker jack.
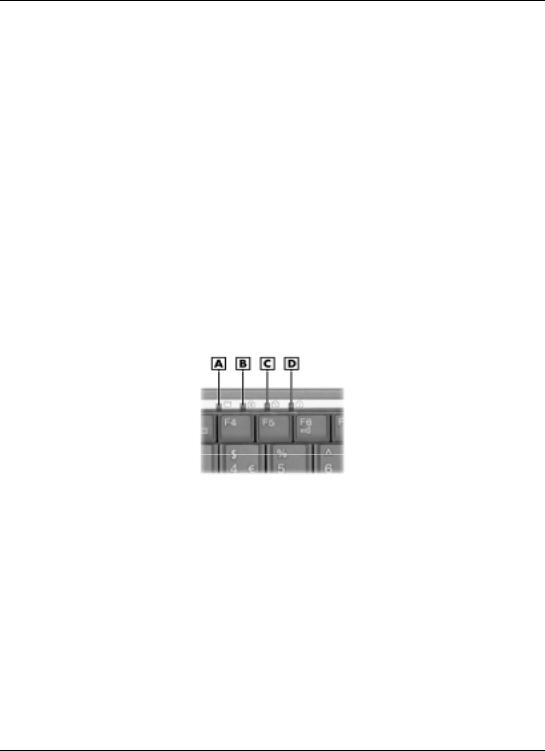
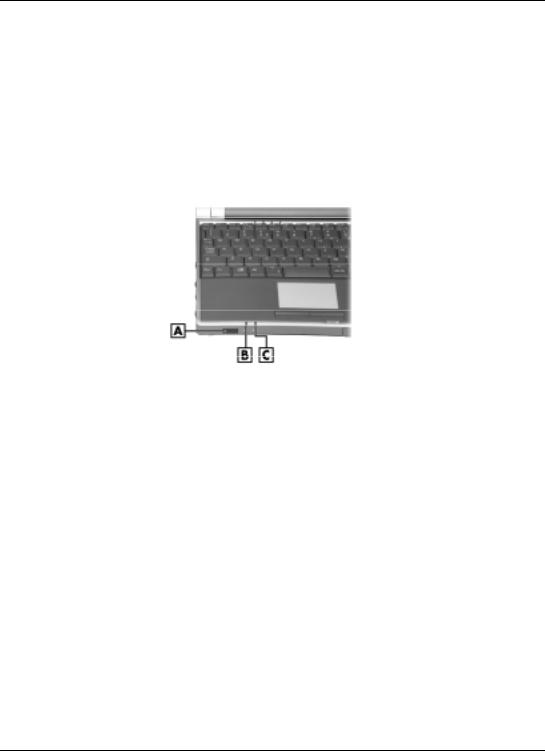
!Operating Status LEDs ó Keep you informed of your NEC Versa notebook's current operating status. See the following figure and list for each icon's meaning.
Operating status LEDs
A ñ Hard Disk Drive |
C ñ Scroll Lock |
B ñ Caps Lock |
D ñ Num Lock |
óHard Disk Drive ó lights when the NEC Versa writes data to or retrieves data from the internal hard disk drive.
óCaps Lock ó lights when Caps Lock is on.
óScroll Lock ó lights when Scroll Lock is on.
óNum Lock ó lights when Num Lock in on.
Introducing Your NEC Versa 1-5
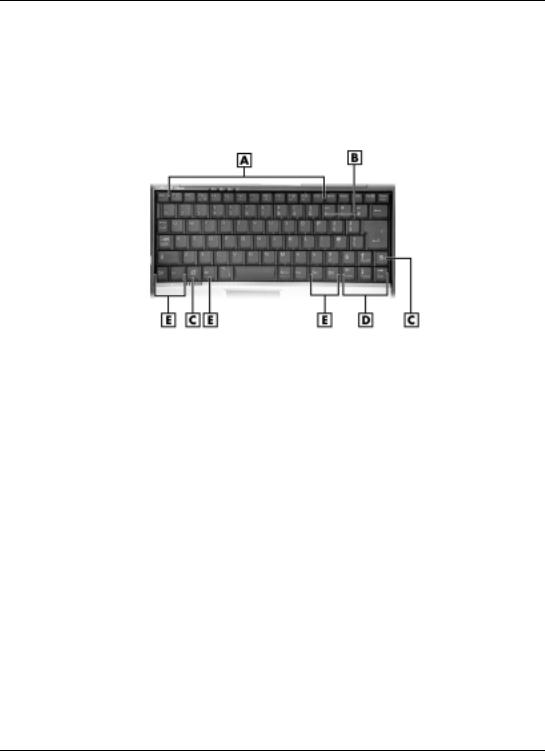
Keyboard Panel
The NEC Versa notebookís keyboard offers the following features, which are described after the figure.
Keyboard
A ñ Function Keys |
D ñ Cursor Control Keys |
B ñ Numeric Keys |
E ñ Control Keys |
C ñ Windows keys |
|
!Function keys ó Twelve function keys, F1 through F12, are available on the NEC Versa keyboard. These keys work together with the Fn key to activate special functions. Several keys are preprogrammed with dual functions and some are printed in blue on the key.
Function keys are application-driven. See the specific application's user guide for information about how each function key works within the application you are using.
The following function key combinations are preprogrammed for the NEC Versa computer.
Fn-F3 ó toggles between three video modes; LCD, CRT, or both (LCD and CRT).
Fn-F6 ó sets the beeper volume to low, medium, high, or mute.
Fn-F8 ó increases the LCD panel brightness.
Fn-F9 ó decreases the LCD panel brightness.
Fn-F10 ó increases the system speaker volume.
1-6 Introducing Your NEC Versa
Fn-F11 ó decreases the system speaker volume.
Fn-F12 ó toggles the scroll lock feature
Fn-Ins óprint screen
Fn-Del ó system request
Fn-Pause ó break
Fn-↑ ó page up
Fn-↓ ó page down
Fn-← ó end
Fn-→ ó home
!Numeric keypad ó Pressing NumLk on the keyboard activates the numeric keypad numbers and functions printed in blue on the keys.
The keypad lets you type numbers and mathematical operands (+, -) as you would on a calculator. The keypad is ideal for entering long lists of numbers.
When you press NumLk again, the keys revert to their normal functions as typewriter keys.
!Cursor Control keys ó Cursor control keys let you position the cursor on the screen where you want. On the screen, the cursor is a blinking underline, block, or vertical line depending on the application. The cursor indicates where the next text typed is inserted.
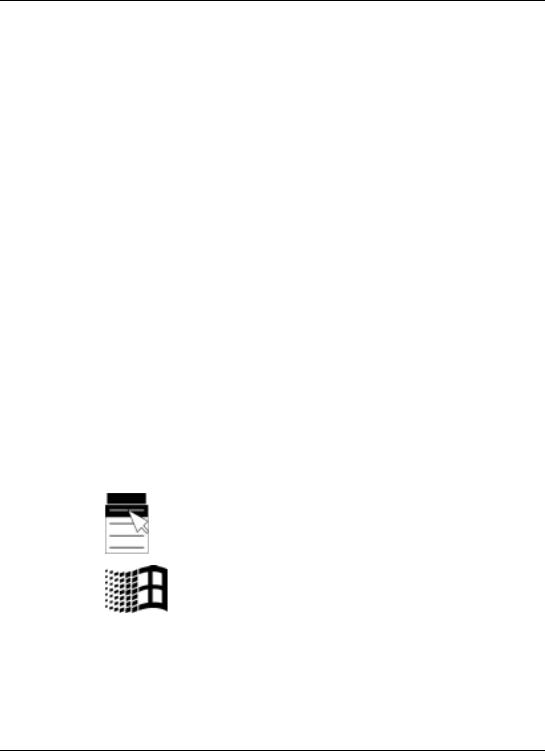
!Windows keys ó In Windows use the following two keys to facilitate your work.
Quick access to shortcut menus
Displays the Start menu
!Control keys ó Ctrl, Alt, Fn, and Shift are controls used in conjunction with other keys to change their functions. To use control keys, press and hold the control key while pressing another key. For example, ìpress Ctrl cî means to hold down the Ctrl key and type the letter c. How the key combination works depends on the application you are running.
Introducing Your NEC Versa 1-7
!Typewriter keys ó The typewriter keys (also called alphanumeric keys) are used to enter text and characters. Keys with blue printing on them behave differently when combined with control keys or the Fn key.
Front Features
The front features of your NEC Versa notebook are described after the figure.
Features on the front of the system
A ñ IR Port |
C ñ Power Status LED |
B ñ Battery Charging LED |
|
!Power Status LED ó This LED lights to indicate the following:
óLights green when the system power is on.
óBlinks green when the system is in Standby mode.
óLights yellow (blinks when in Standby mode) to indicate that battery power is at 8% capacity or less.
óLights amber (blinks when in Standby mode) to indicate that battery power is at 3% capacity or less.
!Battery Charging LED ó lights to indicate battery charging activity.
óLights amber when the primary battery is charging. Blinks amber to indicate an error. The primary battery is installed in the battery bay.
óLights green when the secondary battery is charging. Blinks green to indicate an error. The secondary battery is connected to the back of the system.
1-8 Introducing Your NEC Versa
!IR Port ó Use this infrared (IR) port to transfer files between your NEC Versa and an IR-equipped desktop or notebook computer or to print to an IR-capable printer.
Note Your NEC Versa ships with the IR port disabled. For detailed instructions on how to enable the IR port, see Chapter 6, ìCommunicating with Your NEC Versa.î
Around the Back of the System
The battery bay which contains the system's secondary lithium-ion (Li-Ion) battery is located at the back of your NEC Versa computer. For more detailed information on the battery bay, refer to the ìGetting Startedî chapter of this userís guide.
Around the Left Side of the System
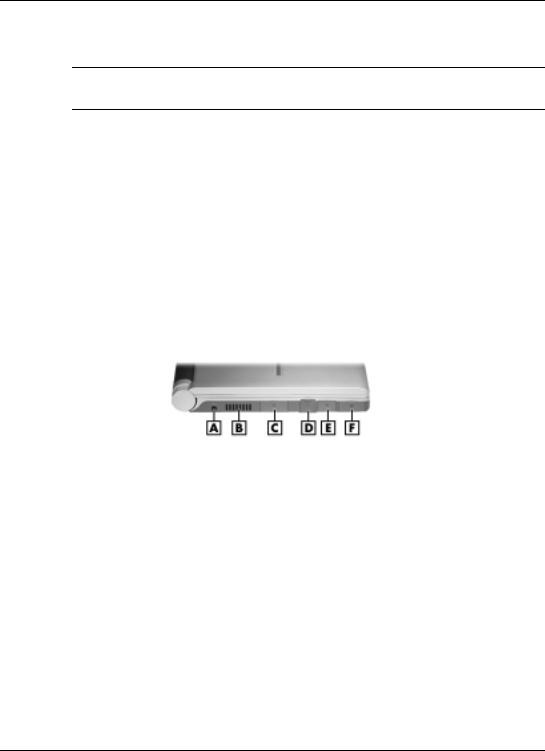
The left side of your NEC Versa notebook offers the following features, which are described after the figure.
Left-side features
A ñ AC Power Port |
D ñ RJ-11 Jack |
B ñ Vent |
E ñ USB Port |
C ñ External Monitor (Video) Port |
F ñ LAN Cable Jack |
!AC Power Port ó Attaches the NEC Versa to a power source, such as the AC adapter.
!Vent ó Allows your system to cool properly and maintain a safe operating temperature.
!External Monitor (Video) Port ó Use this port to attach an external monitor to your NEC Versa. You can run the LCD display and the external monitor simultaneously or run either alone.
!RJ-11 Jack ó Connects the internal modem to an analog telephone line.
Introducing Your NEC Versa 1-9
!USB Port ó The Universal Serial Bus (USB) port allows you to connect up to 127 USB-equipped peripheral devices (printers, monitors, scanners, etc.) to your NEC Versa.
!LAN Cable Jack (optional) ó If your system has this feature, it will have shipped with a LAN adapter cable to connect the jack to a local area network (LAN).


 Always keep the vents unobstructed to allow proper system cooling.
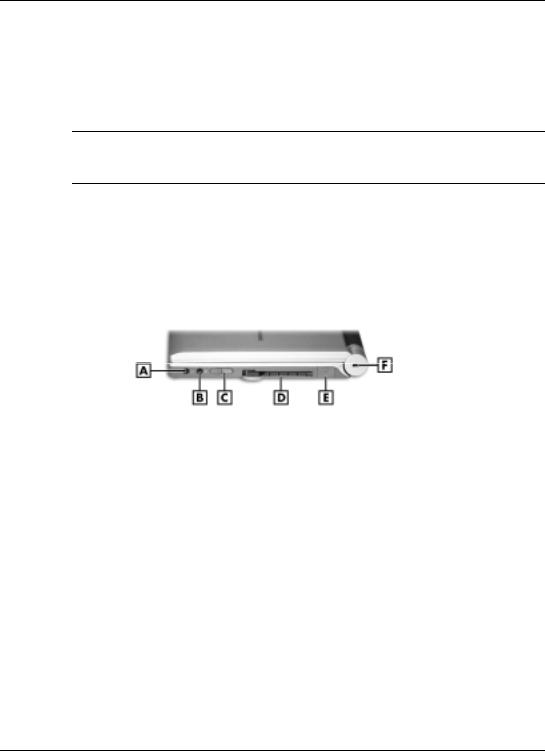
Around the Right Side of the System
The right side of the NEC Versa notebook offers the features, which are described after the figure.
Right-side features
A ñ Headphone Jack/External Speakers |
D ñ PC Card Slot |
B ñ External Microphone Jack |
E ñ USB Port |
C ñ Power Button |
F ñ KensingtonÆ Lock Slot |
!Power Button ó Slide the Power button forward to power on, power off, and to resume from Standby mode.
For more information about the Power button, see the following topic, ìPower Button.î
!Headphone Jack/External Speakers ó Lets you connect external headphones or speakers to your NEC Versa. Plugging in headphones disables the built-in system speakers.
!External Microphone (MIC) ó Allows you to connect an external microphone for monophonic recording or amplification through the unit. Plugging in an external microphone disables the built-in microphone.
1-10 Introducing Your NEC Versa

!PC Card Slot ó Accommodates one type II PC Card. These cards are often storage or communication devices such as Static Random Access Memory (SRAM), Read Only Memory (ROM), Flash Memory, LAN, and Small Computer System Interface (SCSI).
!USB Port ó The Universal Serial Bus (USB) port allows you to connect up to 127 USB-equipped peripheral devices (printers, monitors, scanners, etc.) to your NEC Versa.
!Kensington Lock Slot ó Provides a connection for an optional Kensington Lock.
Power Button
The Power button is a ìsmartî switch, meaning that it recognizes when the system is in Standby mode. If in Standby mode, you cannot power off until you slide the Power button to the right to resume operation. (The BIOS parameter ìSystem Switchî must be set to ìSleep.î)
Put the unit in Standby mode when you need to be away from your system for a short period of time and want to return to where you left off. Standby mode shuts down all devices in the system while retaining data and system status. Go to Start, Shut Down, Standby to put your system into Standby mode.
Use the Power button in the following ways:
óSlide the Power button forward to power on.
óSlide the Power button forward to resume from Standby mode and proceed with normal operation.
óHold the Power button in place for four or more seconds to power off the system (power override). Only use this option if you cannot power off your system using Start, Shut Down.
Introducing Your NEC Versa 1-11
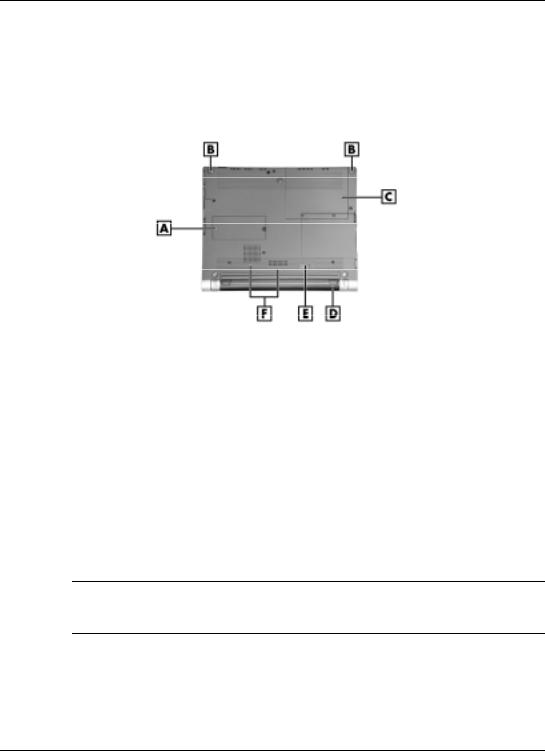
Around the Bottom of the System
The bottom of the NEC Versa notebook offers the following features, which are described after the figure.
Bottom features
A ñ Memory Module Bay |
D ñ Secondary Li-Ion Battery |
B ñ System Feet |
E ñ Battery Release Latch |
C ñ Hard Drive Bay |
F ñ Vents |
!Memory Module Bay ó Stores an optional memory module.
!System Feet ó Heightens the system to allow proper ventilation.
!Hard Drive Bay ó Stores the systemís hard drive.
!Secondary Li-Ion Battery ó Removable secondary power supply.
!Battery Bay Release Latch ó Releases and removes the systemís secondary battery.
!Vents ó Allow your system to cool properly and maintain a safe operating temperature.


 Always keep the vents unobstructed to allow proper system cooling.
1-12 Introducing Your NEC Versa
2
Getting Started
!NEC VersaGlide Touchpad
!Power Sources for Your NEC Versa notebook
!AC Adapter
!Primary Battery Pack
!Secondary Battery Pack
!System Batteries
!System Care
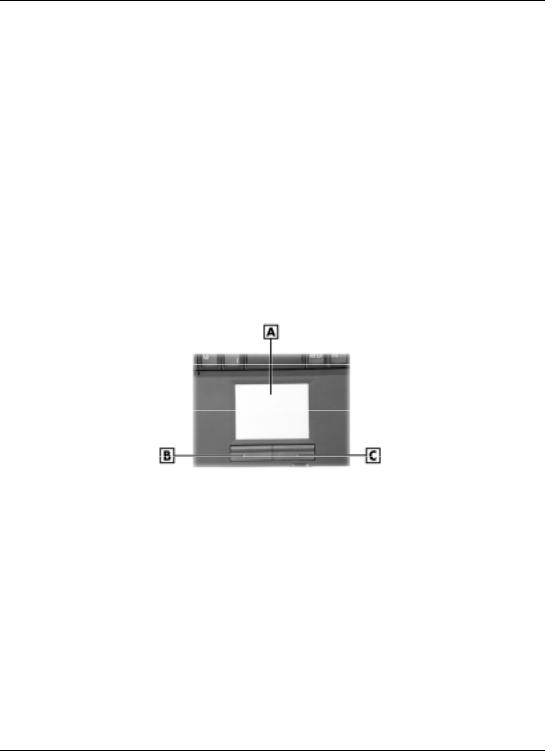
NEC VersaGlide Touchpad
The NEC VersaGlide is an easy way to control the cursor with your finger. Lightly glide your finger across the NEC VersaGlide and the cursor follows. The NEC VersaGlide provides standard mouse functionality, plus more. VersaGlide features include the:
!Single tap to the touchpad, equivalent to a single click of the primary mouse button.
!Double tap to the touchpad, equivalent to a double click of the primary mouse button.
!Click and hold, then drag your finger across the VersaGlide touchpad, equivalent to a click and drag of the primary mouse button.
!Slide your finger along the right side of the touchpad to scroll your document or screen.
VersaGlide
A ñ Touchpad |
C ñ Right Button |
B ñ Left (Primary) Button |
|
Try all of the features and decide which you prefer. If you find the double tap or any of the other features difficult to use, go to the next section for general directions about adjusting the touchpad properties.
2-2 Getting Started

Making VersaGlide Adjustments
The NEC VersaGlide offers a number of options that let you customize how it functions. The options let you control the cursor speed, select button orientation, enable or disable tapping, define auto jumps, enable easy-scrolling, and configure gestures to initiate selected functions by tapping in a designated area of the touchpad.
To access these options, locate the Control Panel and double click the mouse icon. Use the context-sensitive help to learn more about each option. Select the option, then press F1 to access the context sensitive help.
VersaGlide Tips
Follow these basic tips while working:
!Use a light touch on the VersaGlide surface.
!Set up the NEC Versa notebook with your keyboard and VersaGlide at a comfortable height. Keep your forearms parallel to the floor. Your wrists should be relaxed and straight.
!While using the keyboard and VersaGlide, keep your shoulders and arms as relaxed as possible.
!Take regular breaks from the computer to rest your eyes. Perform stretching exercises to relax your fingers, hands, wrists, forearms, and shoulders.
See Appendix A, ìSetting Up a Healthy Work Environment,î for more information.
Power Sources for Your NEC Versa Notebook
The NEC Versa notebook can be powered using three different sources, making it a truly portable system.
Operate your NEC Versa notebook just about anywhere using one of the following power sources:
!the AC adapter connected to an electrical wall outlet (using AC power)
!the primary and secondary batteries
Read the following sections for specific information about using the NEC power sources.
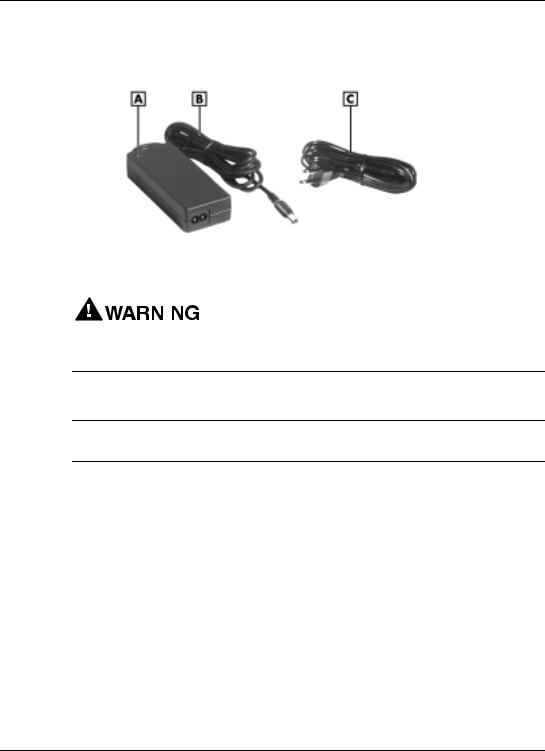
AC Adapter
Use the AC adapter and power cable that came with your NEC Versa notebook to run your computer on alternating current (AC) power, or to recharge the batteries. Use the AC adapter whenever a wall outlet is nearby.
Getting Started 2-3
Keep the adapter connected whenever possible. It charges the battery when it is connected, whether the NEC Versa notebook is powered on or off.
AC adapter
A ñ AC Adapter |
C ñ Power Cable |
|
B ñ Adapter Cable |
|
|
|
|
|
|
|
Do not attempt to disassemble the AC adapter. The AC |
|
|
|
|
|
|
adapter has no user-replaceable or -serviceable parts inside. Dangerous voltage in the AC adapter can cause serious personal injury or death. The AC adapter is intended for use with a computer and must meet EN609050 standards.
Connecting the AC Adapter
Note The AC power cable type that your system uses depends on the country where you are using it. Contact the local dealer to purchase the correct power cable.
Connect the AC adapter as follows:
1.Connect the AC adapter cable to the power port on the left side of your NEC Versa notebook.
2-4 Getting Started
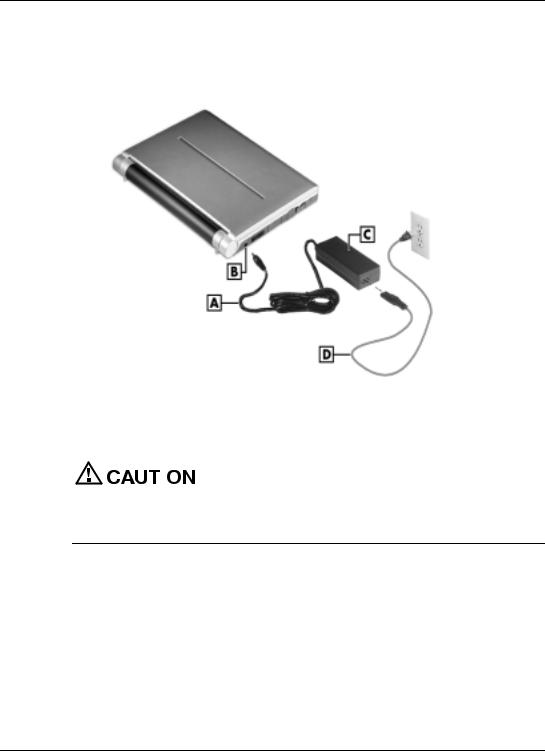
2.Plug one end of the AC power cable into the AC adapter and the other end into a properly grounded 120or 240-volt, 50or 60-Hz wall outlet.
Connecting the AC adapter
A ñ Adapter Cable |
C ñ AC Adapter |
|
B ñ AC Power Port |
D ñ Power Cable |
|
|
|
|
|
|
Do not cover or place objects on the AC adapter. Keeping the |
|
|
|
|
|
|
adapter clear of objects lets the adapter cool properly during use.
Only use the AC adapter that comes with your NEC Versa notebook. Although other adapters look similar, using them can damage your system.
Getting Started 2-5
Powering On Your System
Power on the system as follows:
1.Locate the latch on the front of the unit, slide it to the right, and raise the LCD panel.
2.Locate the Power button and slide it forward to turn on system power. For additional information about Power control buttons and power LEDs, refer to Chapter 1, ìIntroducing the NEC Versa.î
Note When powering on your NEC Versa notebook running the Windows 2000 operating system, you may encounter a warning message suggesting that a problem exists with the hibernation file on your system. The warning message is inaccurate. To disable this message, simply enable hibernate support. See the section, ìWindows 2000 Hibernate,î in Chapter 3, for details about enabling hibernate support.
Primary Battery Pack
The NEC Versa notebook comes with rechargeable Lithium Polymer (Li-Poly) battery behind the LCD panel. This battery is not user-replaceable.
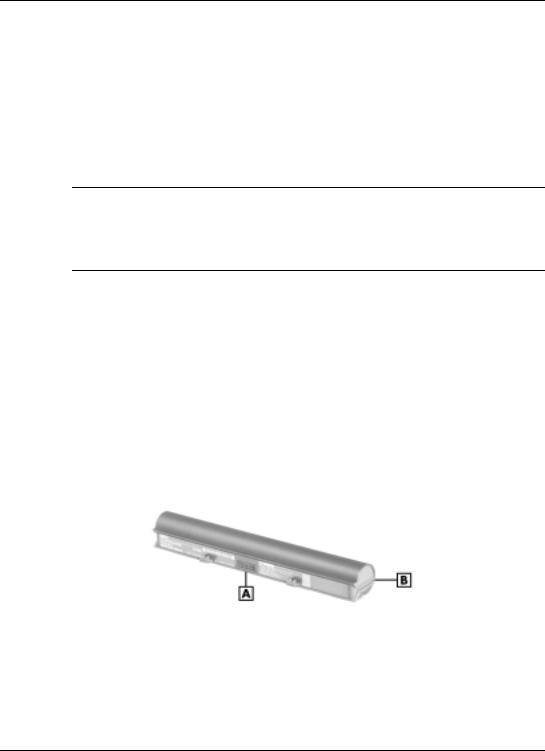
Secondary Battery Pack
The NEC Versa notebook comes with a secondary rechargeable Lithium Ion (Li-Ion) battery pack that is easy to install and remove.
Secondary Lithium-Ion battery
A ñ Battery Connectors |
B ñ Alignment Grooves |
2-6 Getting Started


 To prevent accidental battery ignition or explosion, adhere to the following:
!Keep the battery away from extreme heat.
!Keep metal objects away from the battery connectors to prevent a short circuit.
!Make sure the battery is properly installed in the battery bay.
!Read the precautions printed on the battery.
Determining Battery Status
Your NEC Versa notebook system provides tools to help you keep track of the power levels of the primary and secondary batteries. If your system is configured to display the power icon on the taskbar (default setting), an electrical plug appears when the system is connected to an AC power source or a battery icon appears when the system is not connected to an AC power source.
Use the systemís power meter to determine battery status. Access the systemís power meter in the following ways:
!Move the cursor over the power icon on the taskbar to display the remaining battery power for the systemís main battery.
!Right click the power icon on the taskbar to open the power meter or to adjust power properties.
!Double click the power icon on the taskbar to display the remaining power for both the main and secondary batteries.
!Go to Start, Settings, Control Panel, and double click the Power Management icon and select the Power Meter tab.
Low Battery Status
When combined battery power is
!low (8% or less), the power LED lights yellow when in use, and flashes yellow in standby.
!very low (3% or less) the power LED lights amber when in use, and flashes yellow in standby.
When your system is in a low battery status, do one of the following:
!Power off the system, remove the secondary battery pack and replace it with a fully charged battery.
Getting Started 2-7

!Leave the battery in the system and connect your NEC Versa notebook to the AC adapter and a wall outlet. If you connect the system to AC power and keep the system within standard operating temperatures, the batteries recharge in approximately 4.5 hours when off, and 8 hours when on.
Returning the Battery to its Normal State
To return the battery to its normal state, try the following:
!Remove and then reinstall the battery
!Reinstall the battery in your NEC Versa notebook and fully recharge the battery (to 100%).
Extending Battery Life
While on the road, it is important to be aware of the simple things you can do to extend the life of the system's main battery. One way is to keep the brightness setting low. Use the Fn-F8 and Fn-F9 function keys to control the brightness.
Battery Handling
Keep the following in mind when removing or replacing a battery.
!Use only the battery designed for your NEC Versa system. Mixing other manufacturersí batteries, or using a combination of very old and new batteries can deteriorate battery and equipment performance.
!Turn off power to the system after use. Keeping system power on can degrade battery performance and shorten battery life.
!Clean the battery connectors with a dry cloth when they get dirty.
!Keep the battery out of the reach of children.
Replacing the Battery
The following symptoms indicate that battery life is nearing an end. Replace batteries that display these symptoms.
!Shorter work times.
!Discoloration, warping.
!Hot to the touch.
!Strange odor.
2-8 Getting Started
Replace the secondary battery installed in your NEC Versa notebook system as follows.
Note Use the batteries in the NEC Versa notebook computer for which they are designed. Installing another manufacturerís battery, or using a combination of very old and new batteries can deteriorate battery and equipment performance.
1.Save your files, exit Windows and turn off system power.
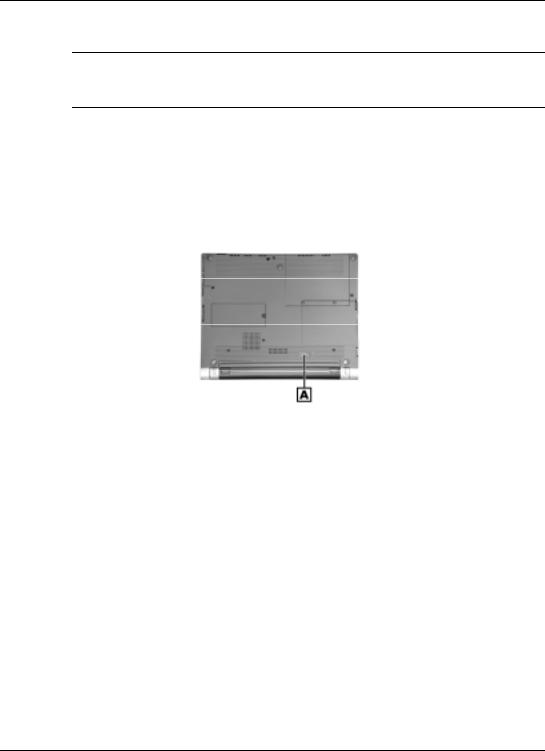
2.Close the LCD panel and turn over the system.
3.Slide the battery release latch toward the right side of the system and hold firmly.
Locating the battery bay release latch
A ñ Battery Release Latch
Getting Started 2-9
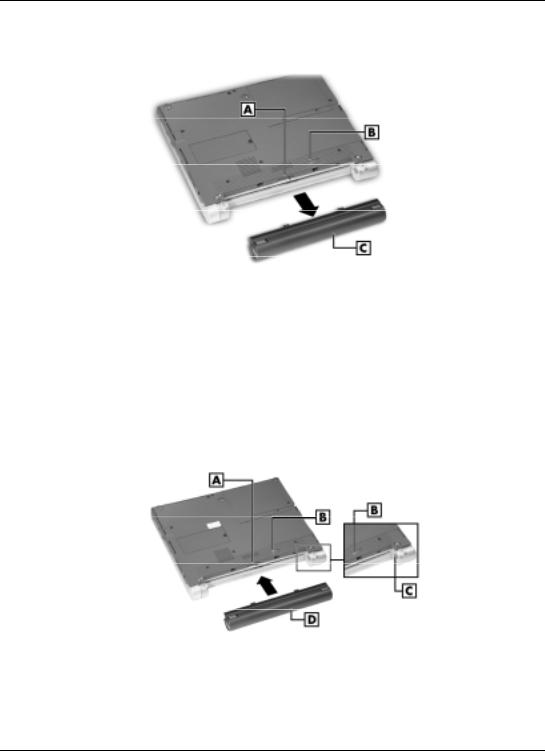
4.Continue to hold the battery release latch as you slide the battery out of the system.
Removing the battery
A ñ Battery Bay Connectors |
C ñ Secondary Li-Ion Battery |
B ñ Battery Bay Release Latch |
|
5.Insert the new battery as follows:
!Locate the alignment grooves on the edge of the battery.
!Locate the alignment grooves inside the battery bay.
!Align the grooves on the battery with the grooves in the bay.
!Slide the battery into the bay until securely locked into place.
Inserting the battery
A ñ Battery Bay Connectors |
C ñ Alignment Grooves |
B ñ Battery Bay Release Latch |
D ñ Secondary Li-Ion Battery |
6. Turn over the system. |
|
2-10 Getting Started
 Loading...