


NEC MobilePro™ Handheld Personal Computers
M O B I L E P R O 7 9 0
U S E R ’ S G U I D E
Proprietary Notice and Liability Disclaimer
The information disclosed in this document, including all designs and related materials, is the valuable property of NEC Computers Inc. in the United States and Canada (hereinafter “NECC”), of NEC Computers International in Europe (hereinafter “NEC CI”) and/or their licensors. NECC and NEC CI and/or its licensors, as appropriate, reserve all patent, copyright and other proprietary rights to this document, including all design, manufacturing, reproduction, use, and sales rights thereto, except to the extent said rights are expressly granted to others.
The NECC/NEC CI product(s) discussed in this document are warranted in accordance with the terms of the Warranty Statement accompanying each product. However, actual performance of each such product is dependent upon factors such as system configuration, customer data, and operator control. Since implementation by customers of each product may vary, the suitability of specific product configurations and applications must be determined by the customer and is not warranted by NECC/NEC CI.
To allow for design and specification improvements, the information in this document is subject to change at any time, without notice. Reproduction of this document or portions thereof without prior written approval of NECC or NEC CI is prohibited.
NEC and MobilePro are registered trademarks or trademarks of NEC Corporation and/or one or more of its subsidiaries. All are used under license.
Microsoft, MS, MSN, PowerPoint, ActiveX, ActiveSync, Outlook, InkWriter, Windows, Windows NT, Visual Basic, Visual C++, and the Windows logo are either registered trademarks or trademarks of Microsoft Corporation in the United States and/or other countries. Microsoft products are licensed to OEMs by Microsoft Licensing, Inc., a wholly owned subsidiary of Microsoft Corporation.
All other product, brand, or trade names used in this publication are the trademarks or registered trademarks of their respective trademark owners.
First Printing — March 2001
Copyright 2001
NEC Computers Inc.
15 Business Park Way
Sacramento, CA 95828
NEC Computers International B.V.
Nieuweweg 279 PO Box 337
6603 BN Wijchen
The Netherlands
All Rights Reserved

Contents
Using This Guide |
|
Text Conventions ........................................................................................ |
viii |
Getting Started |
1-1 |
Welcome ..................................................................................................... |
1-2 |
Unpacking Your MobilePro........................................................................ |
1-3 |
Getting to Know Your MobilePro............................................................... |
1-4 |
Accessories......................................................................................... |
1-5 |
Installing and Charging the Battery ............................................................ |
1-5 |
Connecting the AC Adapter ........................................................................ |
1-8 |
Taking a Quick Tour ................................................................................. |
1-10 |
Introducing the Software........................................................................... |
1-10 |
Connecting to Your PC via Serial............................................................. |
1-11 |
Verifying PC Connection Settings.................................................... |
1-11 |
Ensuring the Availability of the Serial Port...................................... |
1-12 |
Connecting the PC Connect Cable ................................................... |
1-12 |
Installing Microsoft ActiveSync....................................................... |
1-14 |
Network Requirements ............................................................ |
1-14 |
Installing ActiveSync............................................................... |
1-14 |
Creating a Partnership ...................................................................... |
1-15 |
Verifying Synchronization Settings.................................................. |
1-15 |
Connecting to Your PC via Infrared ......................................................... |
1-16 |
Modifying PC Connection Settings.................................................. |
1-17 |
Setting the Infrared Connection Speed ............................................. |
1-17 |
Enabling the Infrared Port ................................................................ |
1-17 |
Installing Microsoft ActiveSync....................................................... |
1-18 |
Network Requirements ............................................................ |
1-18 |
Installing ActiveSync............................................................... |
1-19 |
Creating a Partnership ...................................................................... |
1-20 |
Verifying Synchronization Settings.................................................. |
1-20 |
Synchronizing with Your Host PC............................................................ |
1-21 |
Synchronizing via the Serial Port ..................................................... |
1-21 |
Synchronizing via the Infrared Port.................................................. |
1-21 |
Resynchronizing Your MobilePro.................................................... |
1-21 |
Using other Communication Devices............................................... |
1-22 |
Connecting Remotely ....................................................................... |
1-22 |
Getting Help.............................................................................................. |
1-23 |
Introducing the NEC MobilePro |
2-1 |
Contents iii

Identifying System Features........................................................................ |
2-2 |
Around the Front of the System.......................................................... |
2-2 |
Display Panel ............................................................................. |
2-2 |
Keyboard Panel and Base Unit................................................... |
2-3 |
Around the Back of the System .......................................................... |
2-4 |
Around the Left Side of the System.................................................... |
2-5 |
Around the Right Side of the System.................................................. |
2-7 |
Around the Bottom of the System ...................................................... |
2-7 |
Opening the Display Panel .......................................................................... |
2-9 |
Using the Stylus .......................................................................................... |
2-9 |
Using MobilePro's Power Sources .............................................................. |
2-9 |
Determining Battery Status............................................................... |
2-10 |
Recharging the Main Battery Pack ................................................... |
2-10 |
Recharging the Backup Battery ........................................................ |
2-11 |
MobilePro Power Management ........................................................ |
2-11 |
Battery Replacement......................................................................... |
2-12 |
Removing and Inserting the Battery Pack................................ |
2-12 |
Battery Precautions........................................................................... |
2-14 |
Caring for the MobilePro .......................................................................... |
2-14 |
Precautions........................................................................................ |
2-15 |
Storage Requirements....................................................................... |
2-16 |
Routine Cleaning .............................................................................. |
2-16 |
Introducing Windows CE |
3-1 |
Windows CE Operating System.................................................................. |
3-2 |
Using Windows CE ............................................................................ |
3-2 |
Tapping ...................................................................................... |
3-2 |
Selecting Objects........................................................................ |
3-2 |
Dragging and Dropping.............................................................. |
3-3 |
Windows CE Desktop......................................................................... |
3-3 |
Pocket Applications ................................................................... |
3-4 |
Printing Features................................................................................. |
3-5 |
Network Capabilities .......................................................................... |
3-6 |
Creating a Network (Ethernet) Connection ........................................ |
3-6 |
Microsoft ActiveSync.................................................................................. |
3-7 |
Backing Up and Restoring Data ......................................................... |
3-8 |
Using Microsoft ActiveSync...................................................... |
3-8 |
Online Help ................................................................................................. |
3-8 |
Using the NEC MobilePro |
4-1 |
Powering On and Off .................................................................................. |
4-2 |
Making Display Panel Adjustments ............................................................ |
4-3 |
iv Contents

Backlight ............................................................................................ |
4-4 |
Automatic Off ............................................................................ |
4-4 |
Automatic On............................................................................. |
4-4 |
Enabling the Suspend Switch ............................................................. |
4-4 |
Using the Keyboard .................................................................................... |
4-5 |
Using Application Shortcut Keys ....................................................... |
4-7 |
Defining Application Shortcut Keys .................................................. |
4-8 |
Other Function Keys........................................................................... |
4-8 |
Adjusting MobilePro Settings..................................................................... |
4-9 |
Using the Scroll Dial................................................................................. |
4-10 |
Using the Voice Recorder ......................................................................... |
4-11 |
Recording Memos ............................................................................ |
4-11 |
Menu Selections ............................................................................... |
4-11 |
Using PC Cards......................................................................................... |
4-12 |
Inserting PC Cards............................................................................ |
4-12 |
Removing PC Cards ......................................................................... |
4-14 |
Using CompactFlash Cards....................................................................... |
4-14 |
Inserting CompactFlash Cards.......................................................... |
4-14 |
Removing CompactFlash Cards ....................................................... |
4-15 |
Using the IR Port ...................................................................................... |
4-16 |
Resetting the MobilePro............................................................................ |
4-17 |
Using the Soft Reset Button ............................................................. |
4-17 |
Using the Full Reset Button.............................................................. |
4-18 |
Using the FlashROM Configuration Utility.............................................. |
4-20 |
Setting Up a Remote Connection |
5-1 |
Preparing for Connection Setup .................................................................. |
5-2 |
Connecting the Internal Modem.................................................................. |
5-2 |
Connecting to an Internet Service Provider ................................................ |
5-3 |
Connecting to a Remote Access Server ...................................................... |
5-4 |
Sending and Receiving Email ..................................................................... |
5-5 |
Activating a Connection.............................................................................. |
5-6 |
Troubleshooting |
A-1 |
Specifications |
B-1 |
Index |
|
Contents v

Using This Guide
The NEC MobilePro™ 790 User's Guide gives you the information you need to maximize the use of your NEC MobilePro 790 Professional PC Companion. Read this guide to familiarize yourself with the MobilePro and its features. For specific information, see the following.
!Chapter 1, “Getting Started,” provides all the information you need to get your MobilePro 790 working and synchronized with your host PC.
!Chapter 2, “Introducing the NEC MobilePro,” introduces you to the MobilePro features, battery recharging, and general unit care.
!Chapter 3, “Introducing Windows CE,” provides an overview of Microsoft® Windows® CE and Windows CE applications.
!Chapter 4, “Using the NEC MobilePro,” shows you how to power on and off, make display panel adjustments, install PC and CompactFlash™ cards, and more.
!Chapter 5, “Setting Up a Remote Connection,” describes how to configure service connections for an internet service provider, a remote access service, and how to configure email for each new service connection.
!Appendix A, “Troubleshooting,” walks you through some common problems and possible solutions.
!Appendix B, “Specifications,” details the hardware specifications for your MobilePro.
Using This Guide vii

Text Conventions
This guide uses the following text conventions.
! Warnings, cautions, and notes have the following meanings:
 WARNING Warnings alert you to situations that could result in serious personal injury or loss of life.
 CAUTION Cautions indicate situations that can damage the hardware or software.
Note Notes give important information about the material being described.
!Names of keyboard keys are printed as they appear on the keyboard, for example, Ctrl, Alt, or Enter.
!Text or keystrokes that you enter appear in boldface type. For example, type abc123 and press Enter.
!File names are printed in uppercase or fixed-width letters. For example, AUTOEXEC.BAT.
viii Using This Guide
1
Getting Started
!Welcome
!Unpacking Your MobilePro
!Getting to Know Your MobilePro
!Installing and Charging the Battery
!Connecting the AC Adapter
!Taking a Quick Tour
!Introducing the Software
!Connecting to Your PC via Serial
!Connecting to Your PC via Infrared
!Synchronizing with Your Host PC
!Getting Help

Welcome
Congratulations on purchasing your NEC MobilePro 790 handheld PC. The size and instant-on capability of this device give you immediate access to your most important work no matter where you are, whether its email, Web access, word processing, spreadsheets, presentations, or enterprise class custom software. In addition, your MobilePro 790 can synchronize with other computers so your finished work is available where you need it. Picture yourself in the following situations:
!Before a business trip you synchronize all your unread email onto your MobilePro 790. In the air you read and reply to fifty messages, which get sent automatically the next time you connect your MobilePro to your office PC.
!You’re visiting an important customer, gathering feedback to discuss with colleagues back in the office. Using Calendar, Contacts, and Inbox, you schedule a meeting and send it to your colleagues while still on the road.
!You are on the road taking customer orders. Using custom software developed by your company, and any analog phone line (or perhaps a wireless modem), you connect to your company network to check inventory and place the order. The rich software development tools available for MobilePro’s Microsoft operating system make this scenario increasingly common.
!During a few spare minutes in the airport, you check your email and send a note to your daughter wishing her luck at the gymnastics meet. (Requires access to an analog phone line or wireless modem card and subscription to an Internet service provider or corporate network server.)
Before you start using your device for the first time, you will need to install the battery and connect the AC adapter to start charging. Then just turn it on and follow a few on-screen instructions to set the time and adjust the touch screen.
1-2 Getting Started

Unpacking Your MobilePro
Your NEC MobilePro ships with a number of accessories. When you unpack the NEC MobilePro, verify that you have all of the items listed here and that they are in good condition. If anything is missing or damaged, contact the vendor who sold you the unit.
Note Do not use the unit without the batteries installed. Be sure you have completed the sections, “Installing and Charging the Battery,” “Connecting the AC Adapter,” and “Taking a Quick Tour,” later in this chapter.
!NEC MobilePro 790 (a stylus ships in a holder in the MobilePro)
!NEC MobilePro AC Adapter (varies by country)
!NEC MobilePro PC Connect Cable (serial cable)
!NEC MobilePro RJ-11 cable (telephone cable)
!Modem adapters provided according to country requirements.
!One (1) rechargeable Lithium-Ion Battery pack (main battery)
!Microsoft ActiveSync software (CD-ROM inside a Microsoft-labeled bag)
!NEC MobilePro 790 User's Guide (this document)
!NEC MobilePro 790 Release Notes
Note The AC adapter provided with your model may vary based on country-specific requirements.
Getting Started 1-3
Getting to Know Your MobilePro
The NEC MobilePro 790 offers you a portable system designed for synchronization with your host PC. Standard features include a VR4121, 168-MHz, 48-MB memory (32-MB RAM plus 16-MB Internal Flash ROM), an 8.1-inch half-VGA STN, 64K color, enhanced touch screen, a V.90 internal modem, a built-in microphone, internal speaker, and Type I/II PC card and CompactFlash™ Type II card support.
NEC MobilePro 790
With your NEC MobilePro you can edit, create, send, and receive documents including text, spreadsheets, presentations, and email, manage your schedule and contacts, access the Internet with the internal modem, and synchronize data with your host PC.
Your MobilePro does not have a hard disk drive. The operating system and preloaded applications are deployed on a Read-Only Memory (ROM) module; files that you work on are stored in Random Access Memory (RAM) on a RAM module.
Your NEC MobilePro comes with a stylus, a pen-like device that allows you to touch, tap, or double tap objects on the MobilePro touch screen. The touch, tap, and double tap act just like a point, click, and double click of a mouse.
1-4 Getting Started

Accessories
The NEC MobilePro 790 ships with the following accessories:
!AC adapter (varies by country)
!PC Connect (serial port) cable
!Modem adapter (countries other than U.S.)
!RJ-11 Telephone cable
For a comprehensive list of MobilePro accessories, including optional extras such as the VGA monitor connector cable, refer to the MobilePro desktop. Tap Start, Help, and double tap the MobilePro Accessories link.
Note The AC adapter provided with your model may vary based on country-specific requirements.
Installing and Charging the Battery
Follow these steps to install and charge the main battery.
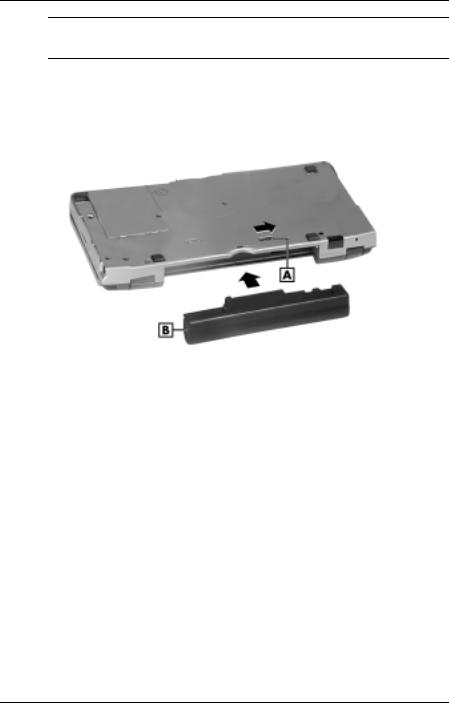
1.Unpack the contents of the MobilePro carton and locate the unit and the Lithium-Ion battery pack.
Lithium-Ion battery pack
A – Battery connectors |
B – Lithium-Ion battery pack |
2.Locate the release lock on the bottom of the system.
3.Slide the lock to the unlocked position in the direction of the arrow, as indicated in the upcoming figure.
Getting Started 1-5
Note You cannot use your MobilePro when the battery lock is in the unlocked position. Be sure to slide the lock back to the locked position.
4.Put the Lithium-Ion battery pack in the bay and slide the battery in the direction of the arrow, as indicated in the following figure.
Inserting the battery pack
A – Battery release lock |
B – Lithium-Ion battery pack |
5.Firmly press the battery until it is secure and clicks (locks) into place.
6.Slide the lock back to the locked position. The NEC MobilePro will not power on when the lock is in the unlocked position.
7.Connect the AC adapter to begin charging the battery. Refer to the next section, “Connecting the AC Adapter,” for connection information.
The color of the left status LED changes from amber to green when the battery is fully charged.
1-6 Getting Started

Note Before using the system for the first time, charge the MobilePro continuously for 6-10 hours to fully charge the main and backup batteries. Allow the 6-10 hours to pass even if the indicator light changes from amber to green before the 6-10 hours have passed.
To protect your data, do not use the system until the backup battery is fully charged. Recharge the battery whenever the battery charging LED lights amber.
You must repeat this full 10-hour charge cycle only if the backup battery becomes fully discharged.
Getting Started 1-7

Connecting the AC Adapter
NEC recommends using the AC adapter when you:
!Recharge the main battery pack or the backup battery
!Use PC cards or Compact Flash™ cards
!Use the internal modem
!Keep your MobilePro on for long periods


 Follow these precautions whenever you use the AC adapter and the NEC MobilePro.
When using the AC adapter, make sure the AC outlet is near the NEC MobilePro and is easily accessible.
Keep the main battery installed when running on AC power.
When communicating or sending transmissions for a long time, use the AC adapter to conserve power.
Follow these steps to connect the AC adapter.
1.Insert the plug on the AC adapter cable into the AC power port on the left side of the NEC MobilePro.
Note The AC adapter provided varies based on country-specific requirements.
1-8 Getting Started

Connecting the AC adapter
A – AC power port |
B – AC adapter cable (varies by |
|
country) |
2.Connect the AC adapter as follows.
!U.S./Canada model: plug the AC adapter to a working AC outlet.
!European model: plug one end of the AC power cable into the AC adapter and the other end into a working AC outlet.
3.Power on the NEC MobilePro using the Power button at the top right corner of the keyboard.
Using AC power saves battery life when you are on the go, ensures that the backup battery maintains its charge, and helps prevent data loss.


 If you power off, then quickly power on the NEC MobilePro, your system may erroneously report the presence of CompactFlash cards.
In addition, repeatedly powering off and quickly powering on, may cause data loss. NEC recommends that you wait ten seconds after powering off, before powering on the NEC MobilePro.
Continue working with the NEC MobilePro 790 as it charges and leave it connected to AC power after the light turns green.
Getting Started 1-9

Note Before using the system for the first time, allow ten hours for both the main and the backup batteries to fully charge, even if the indicator on the front of the MobilePro lights green before the full ten hours are passed.
Taking a Quick Tour
This section takes you through the process of setting up your system for the first time.
1.Open the display panel to start your NEC MobilePro 790 for the first time. Press the Power button if the system does not start automatically.
2.Follow the on-screen instructions to calibrate the touch screen. Press Ctrl Alt = to recalibrate at any time.
3.Enter your name, local city, and set the clock for your local time.
4.Be sure to specify a country for modem use. For details, see the section in Chapter 4, “Adjusting MobilePro Settings.”
Introducing the Software
Your NEC MobilePro 790 features the latest version of Microsoft Windows Handheld PC 2000 software along with an additional application on the accompanying CD.
Your NEC MobilePro 790 software includes:
!Microsoft ActiveSync CD (Install on your host PC for access and synchronization.)
!Microsoft Windows CE operating system pre-loaded (in ROM) applications.
For more information about your MobilePro software, refer to Chapter 3, “Introducing Windows CE.”
1-10 Getting Started

Connecting to Your PC via Serial
The MobilePro is designed to be a companion PC. Most users want to synchronize the MobilePro 790 with a host PC. The latest work done on either the MobilePro or the host PC automatically appears on both machines, once the synchronization process occurs.
The following section provides an overview of the synchronization process, using the serial port, followed by detailed instructions for each stage of the process.
Follow these procedures to configure your MobilePro for synchronization using the serial port.
!Verify the accuracy of the PC Connection default settings on your MobilePro.
!Ensure the availability of the serial port on your host PC.
!Connect the PC Connect (serial) cable to your host PC and to your MobilePro.
!Install Microsoft ActiveSync on your host PC.
!Create a partnership between your host PC and your MobilePro.
!Verify that the desired synchronization services are configured.
Verifying PC Connection Settings
Your MobilePro ships with PC Connection default settings. Follow these steps to verify the accuracy of the PC Connection settings.
1.Tap Start, Settings, Control Panel.
2.Double tap the Communications icon and select the PC Connection tab.
3.Verify the following settings.
!“Allow connection with desktop computer when device is attached” is checked.
!“Connect using Serial Port @ 115K” displays. (Change this setting to 115K, if necessary. If synchronization is unsuccessful, revert to the default setting of 19200, or check your PC to verify it is communicating at 115k.)
Getting Started 1-11

Proceed to the next section to check the availability of the serial port on your host PC.
Ensuring the Availability of the Serial Port
The serial port on your host PC must be available for synchronization with your NEC MobilePro. Follow these steps to ensure the availability of the serial port.
1.Access the Setup utility on your host PC to verify that the port is enabled.
2.Check the Windows device manager on your host PC to identify potential conflicts for the serial port.
!Go to Start, Settings, Control Panel.
!Double click the System icon and select the Device Manager tab.
!Check the Ports listing to determine if any conflicts exist (another device is assigned to or using the serial port). The port may be flagged with an exclamation point, for example, if any conflicts exist.
!If another device is assigned to or is using the serial port, you must reassign the device to free up the serial port for MobilePro synchronization.
!Make certain the port is communicating at 115k.
Proceed to the next section to connect the PC connect cable.
Connecting the PC Connect Cable
Before installing Microsoft ActiveSync, follow these instructions to connect the PC Connect (serial) cable that ships with your MobilePro to both your MobilePro and to your host PC.
1.Locate and open the serial port cover on the left side of your MobilePro.
2.Align and attach the PC Connect cable to the serial port on the MobilePro. (If your cable is labeled, insert the cable with the word Up visible on the top. If your cable has an arrow near the connector, insert the cable with the arrow visible on top.)
1-12 Getting Started
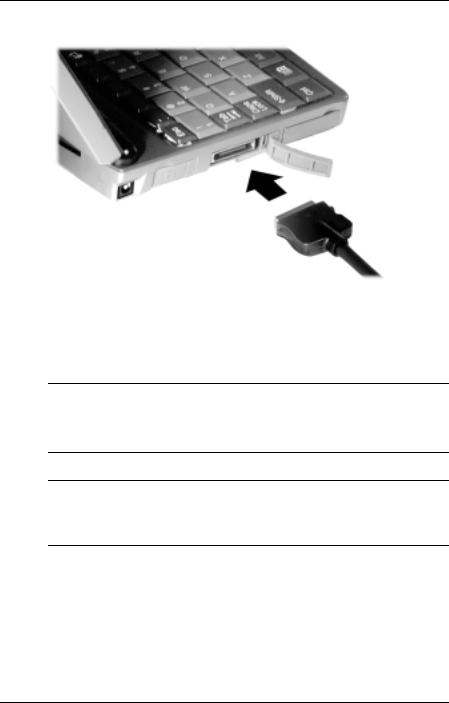
Connecting the PC connect cable
3.Connect the other end of the cable to the 9-pin serial port on your host PC. If your host PC has a 25-pin serial port, use an adapter (available in most computer stores).
Proceed to the next section to install Microsoft ActiveSync.
Note Before connecting the PC Connect cable to the serial port on your host PC, be sure that the serial port is enabled in the host PC's BIOS setup and that no conflicts exist for the port. For details, see a previous section in this chapter, “Ensuring the Availability of the Serial Port.”


 Be sure to properly align the cable connectors and ports. Incorrect connection can damage the MobilePro and the computer.
Getting Started 1-13
Installing Microsoft ActiveSync
You must install Microsoft ActiveSync on your host PC to enable synchronization with your MobilePro. The Microsoft ActiveSync CD that ships with your MobilePro contains the ActiveSync software designed for synchronization with Microsoft Office components. The following procedure assumes Microsoft Outlook as the host PC synchronization component.
Network Requirements
If your host PC is connected to a network, configure one of the following before installing Microsoft ActiveSync:
!Configure a WINS server on the host PC's network, or,
!Configure the host PC's IP address on the MobilePro as follows:
1.Tap Start, Settings, Control Panel, and double tap the network icon.
2.Highlight NE2000 Compatible Ethernet Driver and select the Properties button.
3.In the IP address tab, select (place a dot beside) “Obtain an IP address via DCHP.”
4.Select the Name Servers tab and enter the host PC's IP address in the “Primary WINS” field.
To identify the host PC's IP address, run an IP config utility. In Windows 95, 98, and 2000, run Win IP Config. In Windows NT, run IP Config. If you need assistance, see your network administrator.
Installing ActiveSync
Follow these steps to install Microsoft ActiveSync for synchronization with Microsoft Outlook. The installation sequence may vary depending upon the Microsoft components installed on your host PC.
Note If your host PC uses the Windows NT operating system, you must install Windows NT Networking before installing Microsoft ActiveSync to your host PC.
1-14 Getting Started

1.Insert the Microsoft ActiveSync CD in the CD-ROM drive of your host PC.
!If auto-insert is enabled on your host PC, the setup window appears.
!If auto insert is not enabled, go to Start, Run, browse for the CD-ROM drive, and run the setup.exe file.
2.Click Next to start the setup wizard. The Selection Installation folder appears.
3.Click Next to accept the default installation folder or modify the folder destination and click Next.
The Get Connected window appears.
4.Read the instructions about connecting your device and click Next.
The host PC verifies the availability of a COM port and polls the MobilePro for synchronization settings. The New Partnership window appears.
Proceed to the next section to complete the installation.
Creating a Partnership
Once the host PC verifies the availability of a COM port and polls the MobilePro for synchronization settings, the New Partnership window appears.
1.Click Next to display the Select Synchronization Settings window.
2.Select the desired synchronization settings and click Next. The Setup Complete window appears.
3.Click Finish to complete the installation process
Verifying Synchronization Settings
Look for the new Microsoft ActiveSync desktop icon on your host PC. Follow these steps to verify the synchronization settings on the MobilePro.
1.Double click the ActiveSync icon.
Getting Started 1-15

2.Click Tools, Options and verify that the desired synchronization services are checked. Modify the selections as required.
Note By default, synchronization of email messages is not checked. Be sure to select the checkbox for this service if you want to synchronize email between your MobilePro to your host PC.
Once installed, Microsoft ActiveSync automatically synchronizes your MobilePro 790 with your host PC's Microsoft Outlook email, contacts, calendar, and task list each time you attach the PC Connect cable to the MobilePro 790 and the host PC.
Note Whenever possible Microsoft ActiveSync automatically translates files and email attachments during synchronization. This allows you to use the MobilePro to view and work with files created on your host PC with Microsoft Word, Excel, and PowerPoint, among others.
However, as noted in the readme.doc file on the Microsoft ActiveSync CD, PowerPoint files created or modified on the MobilePro are not translated for viewing or modification on your host PC. This limitation does not apply to Pocket Word or Pocket Excel files.
Connecting to Your PC via Infrared
If your host PC is not equipped with a serial port or the serial port(s) is in use, use the infrared port to synchronize the NEC MobilePro with your host PC.
The following section provides an overview of the synchronization process, using the infrared port, followed by detailed instructions for each stage of the process.
Follow these procedures to configure your MobilePro for synchronization using the infrared port.
!Modify the PC Connection default settings on your MobilePro.
!Set the infrared connection speed.
!Enable the infrared port on your host PC.
!Install Microsoft ActiveSync on your host PC.
!Create a partnership between your host PC and your MobilePro.
1-16 Getting Started

! Verify that the desired synchronization services are configured.
Modifying PC Connection Settings
Your MobilePro ships with PC Connection default settings. Follow these steps to modify the PC connection settings.
1.Tap Start, Settings, Control Panel, Communications.
2.Select the PC Connection tab.
3.Select the Change tab, use the dropdown box to change the setting to Infrared port, and click OK.
Proceed to the next section to set the infrared connection speed, if necessary.
Setting the Infrared Connection Speed
Your NEC MobilePro supports both SIR (115 Kbps) and FIR (4 Mbps) IR communications. Follow these steps to set the infrared connection speed.
1.Tap Start, Settings, Control Panel, and double tap MobilePro Settings.
2.Select the IrDA tab and select the appropriate infrared connection speed. The infrared connection speed on your NEC MobilePro must be compatible with the infrared connection speed on your host PC.
3.Tap OK and close the Control Panel.
Proceed to the next section to enable the infrared port on your host PC.
Enabling the Infrared Port
The infrared port on your host PC must be available for synchronization with your NEC MobilePro. Follow these steps to enable the infrared port.
1.Access the setup utility on your host PC to verify that the port is enabled. If required, select FIR support in Setup.
2.Set up infrared software components on your host PC. In the Windows environment:
! Go to Start, Settings, Control Panel.
Getting Started 1-17

!If infrared is disabled, select the options tab and place a check in the box “Enable infrared communications.”
!Place a check in the boxes, “Search and provide status for devices in range,” and “Install software for Plug and Play devices within range.”
!Uncheck the box, “Limit connection speed to.”
3.Click Apply and click OK.
4.Check the device manager on your host PC to identify potential conflicts for the infrared port.
!Double click the System icon and select the Device Manager tab.
!Check the Ports listing to determine if any conflicts exist (another device is assigned to or is using the infrared port). The port may be flagged with an exclamation point, for example, if any conflicts exist.
!If another device is assigned to or is using the infrared port, you must reassign the device to free up the infrared port for MobilePro synchronization.
5.Reboot your host PC.
Once the system restarts, an infrared icon (gray vertical bar with a red bump) appears in the system taskbar. If there is an X to the right of the icon, infrared is not enabled. Repeat steps 1-4 to enable infrared.
Installing Microsoft ActiveSync
You must install Microsoft ActiveSync on your host PC to enable synchronization with your MobilePro. The Microsoft ActiveSync CD that ships with your MobilePro contains the ActiveSync software designed for synchronization with Microsoft Office components. The following procedure assumes Microsoft Outlook as the host PC synchronization component.
Network Requirements
If your host PC is connected to a network, configure one of the following before installing Microsoft ActiveSync:
! Configure a WINS server on the host PC's network, or,
1-18 Getting Started

!Configure the host PC's IP address on the MobilePro as follows:
1.Tap Start, Settings, Control Panel, and double tap the network icon.
2.Highlight NE2000 Compatible Ethernet Driver and select the Properties button.
3.In the IP address tab, select (place a dot beside) “Obtain an IP address via DHCP.”
4.Select the Name Servers tab and enter the host PC's IP address in the “Primary WINS” field.
To identify the host PC's IP address, run an IP config utility. In Windows 95, 98, and 2000, run Win IP Config. In Windows NT, run IP Config. If you need assistance, see your network administrator.
Installing ActiveSync
Follow these steps to install Microsoft ActiveSync for synchronization with Microsoft Outlook. The installation sequence may vary depending upon the Microsoft components installed on your host PC.
Note If your host PC uses the Windows NT operating system, you must install Windows NT Networking before installing Microsoft ActiveSync to your host PC.
1.Insert the Microsoft ActiveSync CD in the CD-ROM reader of your host PC.
!If auto insert is enabled on your host PC, the setup window appears.
!If auto insert is not enabled, go to Start, Run, browse for the CD-ROM drive, and run the setup.exe file.
2.Click Next to start the Setup wizard. The Selection Installation folder appears.
3.Click Next to accept the default installation folder or modify the folder destination and click Next.
Getting Started 1-19

The Get Connected window appears.
4.Place the NEC MobilePro so that the infrared port is within range of the host PC infrared port and read the instructions about connecting your device. Click Next.
5.On the NEC MobilePro, tap Start, Programs, Communication, and PC Link.
The host PC verifies the availability of an infrared port and polls the MobilePro for synchronization settings. The New Partnership window appears.
Proceed to the next section to complete the installation.
Creating a Partnership
Once the host PC verifies the availability of an infrared port and polls the MobilePro for synchronization settings, the New Partnership window appears.
1.Click Next to display the Select Synchronization Settings window.
2.Select the desired synchronization settings and click Next. The Setup Complete window appears.
3.Click Finish to complete the installation process.
Verifying Synchronization Settings
Look for the new Microsoft ActiveSync desktop icon on your host PC. Follow these steps to verify synchronization settings on the MobilePro.
1.Double click the ActiveSync icon.
2.Click Tools, Options and verify that the desired synchronization services are checked. Modify the selections as required.
Once installed, Microsoft ActiveSync automatically synchronizes your MobilePro 790 with your host PC's Microsoft Outlook email, contacts, calendar, and task list each time you attach the PC Connect cable to the MobilePro 790 and the host PC.
1-20 Getting Started

Note Whenever possible Microsoft ActiveSync automatically translates files and email attachments during synchronization. This allows you to use the MobilePro to view and work with files created on your host PC with Microsoft Word, Excel, and PowerPoint, among others.
However, as noted in the readme.doc file on the Microsoft ActiveSync CD, PowerPoint files created or modified on the MobilePro are not translated for viewing or modification on your host PC. This limitation does not apply to Pocket Word or Pocket Excel files.
Synchronizing with Your Host PC
Once your MobilePro is configured for synchronization with your host PC, synchronization occurs when the ActiveSync components on the NEC MobilePro and on the host PC are activated. When synchronizing via the serial port, the process occurs automatically. When synchronizing via the infrared port, manual intervention is required. Refer to the next two sections for details about synchronizing with your host PC.
Synchronizing via the Serial Port
Once the MobilePro is configured for synchronization the synchronization process automatically occurs each time you connect the MobilePro to your host PC, via the serial port. In addition, you can manually initiate the synchronization process using Microsoft ActiveSync on your host PC. Simply open the ActiveSync window, click File, and click Synchronize.
Synchronizing via the Infrared Port
Once the MobilePro is configured for synchronization via infrared, the ActiveSync component on the MobilePro must be manually activated to initiate the synchronization process. Simply tap Start, Programs, Communication, ActiveSync to initiate synchronization via infrared.
Resynchronizing Your MobilePro
Once synchronized, you may need to re-establish communication between the MobilePro and your host PC if you soft reset the MobilePro or you warm boot your host PC. To re-establish communication between the MobilePro and your host PC, do one of the following:
! Disconnect, then reconnect the PC Connect (serial) cable.
Getting Started 1-21

! Power off, then power on the MobilePro unit.
Using other Communication Devices
During synchronization, the PC Connect (serial) cable must be connected to your host PC. However, you must disconnect the serial cable before using the internal modem, IR port or a network card in your MobilePro.
Connecting Remotely
In addition to using your MobilePro as a companion PC, when you travel you can connect by modem directly to an internet service provider or a network remote access server, to get email and to view web pages.
Refer to Chapter 5, “Setting Up a Remote Connection” for details.
1-22 Getting Started

Getting Help
The following table provides a comprehensive list of where you can get help on your MobilePro 790, the software, connections, accessories, and support.
Help Resources |
|
|
|
Item |
Resource |
|
|
MobilePro Operation |
MobilePro User's Guide |
Windows CE |
Windows CE Main Help |
|
Help file included with Windows CE. Tap |
|
Start then Help on the MobilePro |
|
desktop taskbar. |
|
Microsoft Handheld PC 2000 website |
|
http://www.microsoft.com/mobile |
|
/handheldpc/features/default.asp |
|
Chris De Herrera's Windows CE |
|
Website Home |
|
http://www.cewindows.net |
ActiveSync |
ActiveSync Help |
|
After installing ActiveSync on your host |
|
PC, click on Start/Programs/ActiveSync |
|
to open the ActiveSync window. Select |
|
Help from the menu bar and click on |
|
Microsoft ActiveSync Help. |
Pocket Word, Excel, Access, |
Microsoft Windows CE for the |
PowerPoint, Internet Explorer, Inbox, |
Handheld PC Highlights |
Calendar, Contacts, Tasks |
http://support.microsoft.com/support |
|
/default.asp?PR=wce&FR=0&SD=SO& |
Connecting to Internet Service Providers |
Chris De Herrera's Windows CE |
|
Website ISP Settings |
http://www.cewindows.net/wce/isp.htm
Getting Started 1-23
 Loading...