


 Loading...
MA4000
Expense Management
Cable Management
User Guide
NEC NEC Infrontia Corporation
May 2009
NDA-310101, Issue 1

Liability Disclaimer
NEC Infrontia Corporation reserves the right to change the specifications, functions, or features, at any time, without notice.
NEC Infrontia Corporation has prepared this document for the exclusive use of its employees and customers. The information contained herein is the property of NEC Infrontia Corporation and shall not be reproduced without prior written approval from
NEC Infrontia Corporation
© 2009 NEC Infrontia Corporation
Windows®, and Microsoft® are registered trademarks of Microsoft Corporation.
All other brand or product names are or may be trademarks or registered trademarks of, and are used to identify products or services of, their respective owners.

i
Contents
Introduction |
1-1 |
How This Guide is Organized . . . . . . . . . . . . . . . . . . . . . . . . . . . . . . . . . . . . . . 1-1
Exploring Cable Management. . . . . . . . . . . . . . . . . . . . . . . . . . . . . . . . . . . . . . 1-2
Exploring the Cable Management Environment . . . . . . . . . . . . . . . . . . . . . . . . 1-2
The Cable Management Main Page . . . . . . . . . . . . . . . . . . . . . . . . . . . . . . . . . 1-2
Cable Management Main Menu . . . . . . . . . . . . . . . . . . . . . . . . . . . . . . . . . . . . 1-3
The Cable Management Environment . . . . . . . . . . . . . . . . . . . . . . . . . . . . . . . 1-4
Detail View . . . . . . . . . . . . . . . . . . . . . . . . . . . . . . . . . . . . . . . . . . . . . . . . . . . . 1-8
Cable Management Tools |
2-1 |
Cable Management Tools Available Within the Application . . . . . . . . . . . . . . . 2-1
Multi-View Multi-Task Capability . . . . . . . . . . . . . . . . . . . . . . . . . . . . . . . . . . . . 2-1
Quick Set/Quick Insert Buttons . . . . . . . . . . . . . . . . . . . . . . . . . . . . . . . . . . . . . 2-3
View Most Recently Added Items . . . . . . . . . . . . . . . . . . . . . . . . . . . . . . . . . . . 2-3
Copy Capabilities . . . . . . . . . . . . . . . . . . . . . . . . . . . . . . . . . . . . . . . . . . . . . . . 2-3
Circuit Trace Tool . . . . . . . . . . . . . . . . . . . . . . . . . . . . . . . . . . . . . . . . . . . . . . . 2-5
Cable Management Tools Accessed from the Cable Management Main Page 2-8
User Defined Fields . . . . . . . . . . . . . . . . . . . . . . . . . . . . . . . . . . . . . . . . . . . . . 2-8
Custom Fields . . . . . . . . . . . . . . . . . . . . . . . . . . . . . . . . . . . . . . . . . . . . . . . . . . 2-9
Security Log . . . . . . . . . . . . . . . . . . . . . . . . . . . . . . . . . . . . . . . . . . . . . . . . . . 2-10
General Settings . . . . . . . . . . . . . . . . . . . . . . . . . . . . . . . . . . . . . . . . . . . . . . . 2-11
Cable Management Wizards |
3-1 |
About Cable Management's Wizards . . . . . . . . . . . . . . . . . . . . . . . . . . . . . . . . 3-1
Infrastructure Setup Wizards. . . . . . . . . . . . . . . . . . . . . . . . . . . . . . . . . . . . . . . 3-2
Documentation Wizards . . . . . . . . . . . . . . . . . . . . . . . . . . . . . . . . . . . . . . . . . . 3-3
MA4000 Expense Management Cable Management User Guide - Issue 1

Contents ii
Setting Up Infrastructures |
4-1 |
Setting up the Geographical Infrastructure . . . . . . . . . . . . . . . . . . . . . . . . . . . . 4-1
About the Infrastructure . . . . . . . . . . . . . . . . . . . . . . . . . . . . . . . . . . . . . . . . . . 4-1
Setting Up Companies . . . . . . . . . . . . . . . . . . . . . . . . . . . . . . . . . . . . . . . . . . . 4-2
Setting Up Infrastructure within a Company . . . . . . . . . . . . . . . . . . . . . . . . . . . 4-2
Campuses. . . . . . . . . . . . . . . . . . . . . . . . . . . . . . . . . . . . . . . . . . . . . . . . . . . . . 4-2
Buildings . . . . . . . . . . . . . . . . . . . . . . . . . . . . . . . . . . . . . . . . . . . . . . . . . . . . . . 4-3
Floors . . . . . . . . . . . . . . . . . . . . . . . . . . . . . . . . . . . . . . . . . . . . . . . . . . . . . . . . 4-4
Indoor Spaces. . . . . . . . . . . . . . . . . . . . . . . . . . . . . . . . . . . . . . . . . . . . . . . . . . 4-5
Telecommunication Spaces . . . . . . . . . . . . . . . . . . . . . . . . . . . . . . . . . . . . . . . 4-6
Outdoor Spaces . . . . . . . . . . . . . . . . . . . . . . . . . . . . . . . . . . . . . . . . . . . . . . . . 4-7
Faceplates . . . . . . . . . . . . . . . . . . . . . . . . . . . . . . . . . . . . . . . . . . . . . . . . . . . . 4-8
Ports . . . . . . . . . . . . . . . . . . . . . . . . . . . . . . . . . . . . . . . . . . . . . . . . . . . . . . . . . 4-9
Setting Up the Cabling Infrastructure . . . . . . . . . . . . . . . . . . . . . . . . . . . . . . . 4-10
Termination Hardware . . . . . . . . . . . . . . . . . . . . . . . . . . . . . . . . . . . . . . . . . . 4-10 Assets . . . . . . . . . . . . . . . . . . . . . . . . . . . . . . . . . . . . . . . . . . . . . . . . . . . . . . . 4-12 Backbone Assets . . . . . . . . . . . . . . . . . . . . . . . . . . . . . . . . . . . . . . . . . . . . . . 4-13 Workstation Assets . . . . . . . . . . . . . . . . . . . . . . . . . . . . . . . . . . . . . . . . . . . . . 4-13 Financials . . . . . . . . . . . . . . . . . . . . . . . . . . . . . . . . . . . . . . . . . . . . . . . . . . . . 4-14 Horizontal Links . . . . . . . . . . . . . . . . . . . . . . . . . . . . . . . . . . . . . . . . . . . . . . . 4-14 Horizontal Link (HL) Info . . . . . . . . . . . . . . . . . . . . . . . . . . . . . . . . . . . . . . . . . 4-15 Splices . . . . . . . . . . . . . . . . . . . . . . . . . . . . . . . . . . . . . . . . . . . . . . . . . . . . . . 4-18 Backbones . . . . . . . . . . . . . . . . . . . . . . . . . . . . . . . . . . . . . . . . . . . . . . . . . . . 4-19 Backbone Source . . . . . . . . . . . . . . . . . . . . . . . . . . . . . . . . . . . . . . . . . . . . . . 4-21 Grounding . . . . . . . . . . . . . . . . . . . . . . . . . . . . . . . . . . . . . . . . . . . . . . . . . . . . 4-23 Firestops . . . . . . . . . . . . . . . . . . . . . . . . . . . . . . . . . . . . . . . . . . . . . . . . . . . . . 4-25 Pathways . . . . . . . . . . . . . . . . . . . . . . . . . . . . . . . . . . . . . . . . . . . . . . . . . . . . 4-26 Contacts . . . . . . . . . . . . . . . . . . . . . . . . . . . . . . . . . . . . . . . . . . . . . . . . . . . . . 4-27 Reports . . . . . . . . . . . . . . . . . . . . . . . . . . . . . . . . . . . . . . . . . . . . . . . . . . . . . . 4-29 How to Run a Report . . . . . . . . . . . . . . . . . . . . . . . . . . . . . . . . . . . . . . . . . . . 4-29 Sorting, Filtering, and Grouping Reports . . . . . . . . . . . . . . . . . . . . . . . . . . . . 4-30 The Print Details Button . . . . . . . . . . . . . . . . . . . . . . . . . . . . . . . . . . . . . . . . . 4-31 Available Reports . . . . . . . . . . . . . . . . . . . . . . . . . . . . . . . . . . . . . . . . . . . . . . 4-31 Spreadsheet Tool . . . . . . . . . . . . . . . . . . . . . . . . . . . . . . . . . . . . . . . . . . . . . . 4-32 Launching the Spreadsheet Tool . . . . . . . . . . . . . . . . . . . . . . . . . . . . . . . . . . 4-32 Using the Import Tool to Transfer Data to Cable Management . . . . . . . . . . . 4-33
Product Functionality |
Appendix-1 |
Termination Hardware . . . . . . . . . . . . . . . . . . . . . . . . . . . . . . . . . . . . . Appendix-1
Ability to see termination hardware port/position details/status . . . . . Appendix-1
MA4000 Expense Management Cable Management User Guide - Issue 1

iii
Figures
Figure |
Title |
Page |
1-1 |
Cable Management Main Page—Links . . . . . . . . . . . . . . . . . . . . . . . . |
. . 1-2 |
MA4000 Expense Management Cable Management User Guide - Issue 1

iv Figures
MA4000 Expense Management Cable Management User Guide - Issue 1

1-1
1
Introduction
The MA4000 Expense Management Cable Management User Guide provides all the information needed to use the Cable Management application. The following topics are included in this chapter.
Chapter Topics • How This Guide is Organized
• Exploring Cable Management
How This Guide is Organized
Chapter 1
Introduction
Chapter 2
Cable Management Tools
Chapter 3
Cable Management Wizards
Chapter 4
Setting Up Infrastructures
Appendix
Product Functionality
This chapter outlines how to use the manual including the organization and chapter layout of the MA4000 Expense Management - Invoice Management Module User Guide.
This chapter defines the tools available within the application as well as from the Cable Management main page.
This chapter describes the Wizards available to speed up the process of setting up and documenting your infrastructures.
This chapter provides information on setting up the Geographical, Companies, and Cabling infrastructures.
This chapter provides information for the Termination Hardware.
MA4000 Expense Management Cable Management User Guide - Issue 1

1-2 Introduction
Exploring Cable Management
Exploring the Cable Management Environment
The Cable Management interface is comprised of several helpful sections. In keeping everything uniform, the actual look of the software will remain the same throughout the different sections of the application. By reviewing the layout of the interface, one can see a navigator, a spreadsheet view area, a detail section, a locator area, and helpful links all from the uniform exploration view. This environment was built to satisfy all your documentation needs while remaining easy to use and navigate.
The Cable Management Main Page
When you login to Cable Management, the first screen will be the Main Page. The Main Page is the entry page to access all of Cable Management's features. Every additional page you view in Cable Management has a link back to the Main Page to make it easy to navigate between the application itself and Cable Management's setup tools and reports. The Main Page link is located near the top right-hand corner of all Cable Management screens.
Figure 1-1 Cable Management Main Page—Links
The Main Page links are located in a column of five menus along the right side of Figure 1-1.
MA4000 Expense Management Cable Management User Guide - Issue 1

Introduction 1-3
Cable Management Main Menu
The Cable Management Main Menu is on the right side of the Main Page and consists of five submenus. A brief description of each menu link is described below:
Cable Management menu:
•Launch Application - Launches the main Cable Management function of documenting your network components.
•Help - Opens the online help feature.
REPORTS menu:
•Report Creator - Opens a pop-up window from which you can generate a variety of reports.
TOOLS menu:
•User Defined Fields - Opens a pop-up window allowing you to view and edit user-defined fields that appear in Cable Management component detail views.
•Custom Fields - Opens a pop-up window allowing you to add, edit, and delete fields you've added for component tracking purposes.
•Security Log - Opens a pop-up window showing the user transaction log.
WIZARDS menu:
•Each link opens the component-specific auto-numbering wizard. This allows users to create multiple identifiers of documented records with the same default information at the same time.
SETUP menu:
•Companies - Opens a pop-up window allowing you to add, edit, or delete Companies in your documentation.
•Infrastructure - Opens a pop-up window allowing you to add, edit, or delete items documented at the Campus, Outdoor Space, Building, Floor, Indoor Space, Faceplate, and Port infrastructure levels.
•General Settings - Opens a pop-up window allowing you to hide or show certain sections of the application.
MA4000 Expense Management Cable Management User Guide - Issue 1

1-4 Introduction
The Cable Management Environment
Navigator Tree
The Navigator Tree, displayed in the upper left pane of the Cable Management application, shows the physical and geographical layout of your infrastructure. It allows you to move around the infrastructure quickly and efficiently, regardless of the complexity of your infrastructure. For instance, you can go to a faceplate in a work area, or to a telecommunication space.
The Navigator Tree functions similarly to Microsoft's Windows Explorer. Click the + (plus) sign at the Company level, and the next level, the Campus level, is displayed. This convention is followed throughout the Navigator Tree's hierarchy. Click the + sign (which changes to a minus sign) to display the next level on the tree.
Click the Company icon or anywhere on the Company name, and the List View and Detail View areas are populated with information filtered according to the selected category.
For example: If you click the Company icon, and then click the Assets selection in the drop-down field, all assets for your company are displayed in the List View spreadsheet. Click a building icon or a floor icon, and you will see assets specific to that building or floor.
The Navigator Tree is easy to set up, using the Company and Infrastructure setup functions on the Setup menu on the Cable Management Main Page. Once the tree is set up, any change, move, upgrade, or addition is easy to locate and perform.
See “Hierarchy Descriptions” on page 1-4 for further explanation and navigation assistance.
Hierarchy Descriptions
The hierarchy layout in the Navigator Tree is set up as follows:
MA4000 Expense Management Cable Management User Guide - Issue 1
Introduction 1-5
Company - The company is the highest-level component in Cable Management. It's the starting point for managing your cabling infrastructure. Even if you only manage the infrastructure for a single company, you still need to define the company before setting up cabling infrastructure.
Campus - Your company may have only one location, and in that case you would create only a single campus. But many companies conduct business in a number of locations. The campus feature in Cable Management makes it possible to manage infrastructure specific to each location.
Outdoor Space - You can also set up an outdoor space such as a Manhole or a Utility Pole. After spaces are in place, you can start to specify cabling and hardware.
Building - Each campus you set up will include buildings that contain spaces that house components of the infrastructure. Your company may have one building, or numerous buildings that can be interconnected by cabling components.
Floor - Floors in buildings are the next level of geographical infrastructure you create in Cable Management.
Indoor Space - In Cable Management, a Room, Telecommunications Space, Cubicle, Hallway, Warehouse, Kitchen, or Office is considered to be an Indoor Space.
Faceplate - While many elements of cabling infrastructure can be added at any time after the geographical infrastructure is set up, Faceplates should be set up first. Faceplates are usually attached to a Work Area such as an office.
Whatever level of the Navigation Tree you select is highlighted. In addition, when you let your cursor hover any item on the tree, a floating box will open with the name and type of infrastructure item. If the item is a Faceplate, the box will also include the ports connected with it.
Location Info
The Location Info section is directly beneath the Navigator Tree on the left side of the Cable Management screen. No matter how elaborate your infrastructure, the Location Info section displays where you are according to your highlighted selection in the Navigator Tree. See “Hierarchy Descriptions” on page 1-4.
MA4000 Expense Management Cable Management User Guide - Issue 1

1-6 Introduction
List View
The upper half of the right pane is the List View. Also referred to as the List View pane or List View area. The List View resembles a spreadsheet. Clicking any category in the drop-down list in the upper left corner of this pane displays a list of records in the chosen category for the Navigation Tree level you're at. The drop-down list includes the following infrastructure categories:
•All items
•Assets
•Termination Hardware
•Horizontal Links
•Backbone Cables
•Pathways
•Firestops
•Grounding
•Splices
•Contacts
Your location in the Navigator Tree filters the records seen in the List View pane.
For example: If you are at the building level in the Navigator Tree, and have selected Horizontal Links in the drop-down field, you will see all the records for Horizontal Links within that building.
Clicking a column heading sorts the records by that column in ascending order; clicking on the column heading again will sort it in descending order.
For example: If you select Horizontal Link and then click on the Cable ID column, the horizontal links are sorted in ascending order according to Cable ID. An up-arrow appears next to the column heading indicating that the list is sorted in ascending order. Click again and the arrow points downward, indicating the records are sorted in descending order.
The first column of the List View pane consists of a clickable button that allows you to display the detailed view for that component in a pop-up window. This lets you have side-by-side views of components, which you can minimize, expand, and move around on your screen. It also allows you to move to another section of Cable Management while keeping the detailed-view pop-up windows open.
MA4000 Expense Management Cable Management User Guide - Issue 1
Introduction 1-7
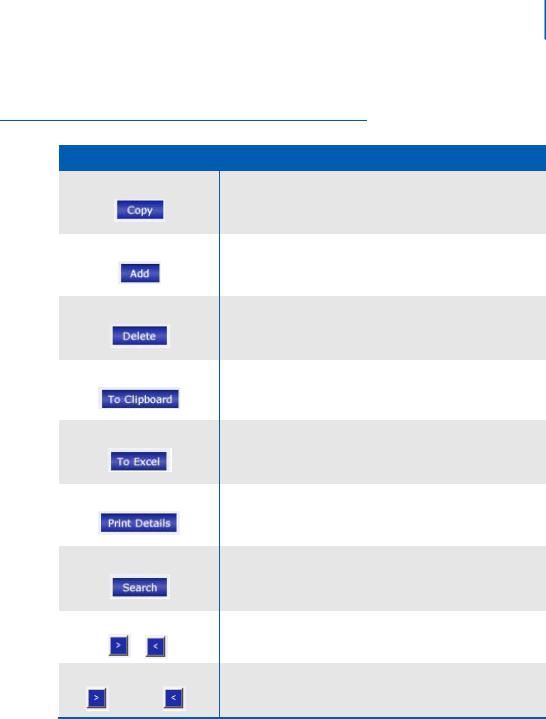
The following table describes the user buttons along the top of the List View pane (Table 1-1):
Table 1-1 User Buttons
Button
1of 6]
Description
The Copy button will allow you to duplicate the item being copied for an easier way of building specific network components.
The Add button allows you to create a new record in whichever area you have selected.
The Delete button allows you to delete a record.
The To Clipboard button copies whatever information is in the current table to the computer's clipboard for pasting into any other application.
The To Excel button opens a browser window with the data in the table formatted as a Microsoft Excel spreadsheet. You can print it or save it as an Excel file.
The Print Details button enables you to print details of an individual record (i.e., not everything in the list) as an HTML-formatted report in your Internet browser.
The Search button opens another window containing the records currently in the List View table, where you can enter a search string and initiate a search of the records in the table.
The Previous and Next buttons allow the user to navigate between pages of spreadsheet views.
This section also serves as a counter for the number of items viewable within a selected area.
MA4000 Expense Management Cable Management User Guide - Issue 1

1-8 Introduction
Detail View
When a List View category is selected, the Detail View in the lower half of the window displays details of the selected record from the List View table. You can change to a different record by selecting a different row in the spreadsheet, either by scrolling down through the records using the arrow keys or clicking on a record with your mouse pointer. The Detail View display is linked to the selection chosen in the List View.
For example: If Termination Hardware is selected, the Detail View shows tabs Termination HW Info and Port/Pos. Details. The tabs shown in the Detail area will change according to the category selected in the dropdown field, and sometimes will even change in the same category but with different types. This will occur throughout the application as the tabs are associated and used for each category and for the different types of items in those categories.
When an item in the List View area is selected, the Info tab in Detail View always gives detailed attributes of the selected record. The remaining Detail View tabs usually show information about how that record is connected to other cabling elements.
For example: When selecting a record on the Horizontal Links (HL) dropdown list in the List View, the Detail View tabs have specific data about the horizontal link:
•The Hardware Sequence tab shows the hardware sequence for the selected cable.
•The Connected Backbone tab lists backbone cables connected to the HL and permits the user to connect backbone cables to that horizontal link.
•The Pathways Used tab does the same for Pathways containing HLs.
•The Notes and Attachments tab shows all associated notes to the selected cable and all attached items.
•If the horizontal link is a voice link, an extra tab exists called Key Sheet that contains data input by the user about the phone connection.
•If the Horizontal Link category is selected, and you change to a different space on the Navigator Tree, the information populating the List View and Detail View will change as you move to the different space. If, for example, you move up to a higher level on the tree, all the horizontal links for that level and space are shown in List View. Detail View will contain details of the first record in that group by default, or the last record you highlighted.
MA4000 Expense Management Cable Management User Guide - Issue 1

NOTE
NOTE
Introduction 1-9
Attachments
Cable Management has attachment capability that can be found throughout the application. This capability can be found at every level of your infrastructure, along with everything being tracked about your infrastructure, down to each individual component. An attachment can be added at any level to better enhance your documentation needs.
An attachment may be any file needed to better illustrate needed information about your network. These attachments may be network drawings, digital photos, MS Excel documents, MS Word documents, and more. By using this capability and using it correctly, your documentation, network drawings, photos, and all other needed files are stored in one easy-to-reach location.
Adding an Attachment
Step 1 In the Attachment area, click Add.
Step 2 In the Attachment pop-up window, click Browse to locate your attachment.
You may type specific comments within the pop-up window.
Step 3 Click OK to close the Attachment pop-up window. Once the pop-up window closes, the attachment will be located in the Attachment area with a Time/Date/User stamp on it. A message stating "Attachment successfully attached " will appear. Click OK.
Step 4 Click the Save button so all attachments and changes will be saved correctly.
If an attachment is given an identical name of one already added in the same section of Cable Management, the second attachment will not be saved, even if the first attachment has been deleted. If this occurs, choose a different name for the attachment file.
Viewing an Attachment
Step 1 Locate your attachment within Cable Management.
Step 2 Click on the View link next to your attachment. The file will launch in an HTML-formatted window.
Step 3 Close the HTML window when you have finished viewing the file.
MA4000 Expense Management Cable Management User Guide - Issue 1

1-10 Introduction
Deleting an Attachment
Step 1 Locate your attachment within Cable Management.
Step 1 Click on the Delete link next to your attachment for complete deletion of the file.
Step 1 Click OK on the pop-up message that appears when you are positive that deletion of the selected note is needed.
Step 1 Click the Save button once deletion has completed to save and update all components.
Deleting an attachment does not delete the file from the Cable Management server; it only deletes its connection to the Cable Management component.
NOTE
Notes
Cable Management has Notes capability located throughout the application. This capability can be located at every level of your infrastructure and also within the Notes and Attachments tab in the Detail pane for every component being tracked. Beyond these areas of the application you can also attach notes down to the port level of a piece of hardware and also down to the strand level of a cable for example. With this capability, individuals can relay information to others and save specific needed notes for future use. By using this functionality, your notes can assist all users in recalling needed information and also better document your network by providing additional space for valuable information.
Adding Notes
Step 1 Within the Notes area of the application, type your notes into the given Notes box.
Step 2 Click Save in order for your notes to be saved properly. After the Save button has been clicked, the note will move below the Notes box. The newly created line with your entered notes will also contain a Time/Date/ User stamp.
Adding additional Notes to the Port or Strand Level
This capability can be found in both the hardware or backbone cable portion of the application.
•In the Termination Hardware area under the Port/Position tab this capability will be found down to the Port/Strand level.
•In the Backbone Cables area under the Pair/Strand Details tab this capability will be found down to the Pair/Strand level.
Within these tabs, to the far right of each row will be a Notes column.
Step 1 Click on the selection button for the item needed to receive a Notes popup window.
Step 2 Type in the needed notes and click OK to close the pop-up window.
MA4000 Expense Management Cable Management User Guide - Issue 1

Introduction 1-11
Step 3 Click Save in order for your notes to be saved properly. Once you have clicked the Save button, a check mark appears in the selection box illustrating a saved note for that item.
At this level, notes can be deleted or changed by going through the same steps (Step 1 thru Step 3), as stated above. No additional links will be found at this level, since all
capability is specific to the level being reviewed for the component in question.
NOTE
Deleting Notes
Step 1 Locate your Notes within Cable Management.
Step 2 Click on the Delete link next to the Note(s) you want to remove for complete deletion of the attached Note file.
Step 3 Click OK on the pop-up message that appears to complete deletion of the selected note.
Step 4 Click Save to save and update all components once deletion has been completed.
Revision Log
At every level of the infrastructure, each component's Detail View lists the user name of the individual who added the component to the structure and the date/time stamp of when it was added.
Any changes made to this component's documentation in Cable Management are tracked, and the last change made is also noted by user name and date/time stamp on the Detail View.
The Revision Log is view-only for an administrator level access; no fields can be changed.
MA4000 Expense Management Cable Management User Guide - Issue 1

1-12 Introduction
MA4000 Expense Management Cable Management User Guide - Issue 1

2-1
2
Cable Management Tools
The following topics are included in this chapter.
Chapter Topics • Cable Management Tools Available Within the Application
•Cable Management Tools Accessed from the Cable Management Main Page
Cable Management Tools Available Within the Application
Multi-View Multi-Task Capability
Cable Management has the ability to allow for multi-viewing and multitasking while navigating throughout the application. Within the application launch and in the spreadsheet view, each row will have a button to the far left of each row in every single area of the application. If this button is selected, a pop-up window will appear displaying the Detail area for the item selected. The User can then open another item for side-by-side comparisons as needed. You are not limited to the same area, as a user may open a piece of hardware, minimize that screen, and then open a backbone cable using the same technique for comparison viewing of those two items.
Pop-up windows are an essential part of Cable Management and will not limit but instead enhance your working capability. When any pop-up window appears that may be needed a short while later, you can minimize the screen and continue working and then restore the screen again without having to return to where the screen was originally accessed. For example, you can go to the home page and click on Report Creator, then minimize the creator screen and then launch the application to continue working. After a while you may need another report, so you simply restore the screen to create the report without having to go back to the home page to gain access to this tool. This Cable Management feature saves time and makes the application easier to use.
MA4000 Expense Management Cable Management User Guide - Issue 1

2-2 Cable Management Tools
Window Sizing
Cable Management allows for the different areas of the main screen within the normal application view to be resized as the user sees fit. After clicking on the Launch Application link on the Cable Management home page, the screen will be divided into four key areas: the Navigator Tree, the Location Info area, the List area, and the Detail area. The user can utilize Cable Management's grab-and-drag capability by placing the mouse pointer over any of the dividing lines between these areas and holding it down. Many users enjoy viewing several items in a spreadsheet view and can do so by grabbing the dividing line between the List and Detail areas and dragging it down to multiply the number of items accessible in the spreadsheet view.
These areas can be resized repeatedly and manipulated according to user need.
NOTE
Search Function
Records shown in the List View table of the Cable Management window can be searched across multiple fields, using whatever search text you enter.
Using the search function
Step 1 In the Navigation Tree, highlight the level of the records you wish to search for (for example, Company, Building, Floor, and so forth).
Step 2 In the List View, select from the drop-down category list to choose the records to search.
Step 3 Click the Search button above the table.
Step 4 A separate window will appear containing the records of the infrastructure level and category you already chose. In the Search Text box, enter your search string.
Step 5 Click the Search button. The data in the table will change to display only those records containing your search text. (If there are no records with that text, a message box will alert you.)
|
|
From the search window, you can change the component category from the drop- |
|
|
down list and perform another search. However, to change the level on the Navigator |
NOTE |
|
Tree, you must return to the Cable Management window and highlight the new |
|
location on the Navigation Tree. |
From the search window, you can also do the following:
• Copy the table data to the clipboard for pasting in another application.
• Export the table data to a Microsoft Excel spreadsheet.
• Print the detail report for the currently highlighted item in the table.
• Use the standard table sorting and item section features available on all Cable Management tables.
• Click the box in the first column by any item to open the Detail View for that item and make any changes.
MA4000 Expense Management Cable Management User Guide - Issue 1
Cable Management Tools |
2-3 |
Quick Set/Quick Insert Buttons
Throughout Cable Management where you choose a location for a component or, in the Cable Path, where you insert a component, you will find shortcut buttons (Quick Set and Quick Insert) that allow you to quickly choose a location.
When you click on the Quick Set or Quick Insert button, the Navigator Tree is highlighted (its background turns blue), and you can simply click on the location on the tree to incorporate the information for that location into the component's detail record.
View Most Recently Added Items
Many fields in the Detail View in Cable Management have a Recent button next to them. When you place your cursor over this button, a floating window will appear that displays the following:
•The 10 most recently modified items in that component category, and the date each was modified.
•The 10 most recently added items in that component category, and the date each was modified.
This information is particularly helpful when adding or modifying component information.
Copy Capabilities
Cable Management provides several options for copying existing data to other locations in Cable Management or to entirely separate applications, such as Microsoft Excel and Word. These copy capabilities are always available in the List View pane and can be used by clicking on any of these three buttons:
•Copy
•To Excel
•To Clipboard
Copy Button
Cable Management's Copy capability is a great time saver available throughout the application. This feature is always located in the List View pane and can be used by clicking on the Copy button. If used properly it will minimize typing time and user errors. The Copy capability allows a selected item to be completely copied into the Detail View area, where you can then modify any information. This is especially helpful for creating new components that closely resemble already-built components.
MA4000 Expense Management Cable Management User Guide - Issue 1

2-4 Cable Management Tools
Using the Copy function
Step 1 In the List View, select the component you wish to copy. Step 2 Click the Copy button.
Step 3 A **new record** row will be added to the List View table, and the data you copied will be displayed In the Detail View pane, where you can now make the necessary changes in the specific fields.
Step 4 When you've finished with your changes, click the Save button above the Detail View pane. The component information you just copied and modified will fill in the **new record** row on the List View table.
Ensure that before saving the newly duplicated item, you change all fields that must be unique from the copied original. Cable Management will display messages above
the Detail View when you save the copied data without making the necessary NOTE changes to those fields, and you cannot add the new record until you make the
required changes.
To Excel Button
The Copy to Excel feature allows you to export the entire spreadsheet in the List View directly to Excel.
Using the copy to Excel:
Step 1 With the information you want to copy displayed in the List View table, click the To Excel button.
Step 2 An Excel file will open with all the List View data displayed just as it is in Cable Management. You can now modify it, save it as an Excel spreadsheet, print it from Excel, and so forth.
To Clipboard Button
The Copy to Clipboard feature allows you to copy the entire spreadsheet in the List View to your computer's clipboard, from where you can paste it into any other application.
To copy to the clipboard
Step 1 With the information you want to copy displayed in the List View table, click the To Clipboard button.
Step 2 Open the application (for example, Word, Lotus, and so forth) you wish to paste the information into.
Step 3 In the application, choose the Paste function. All the data in the current List View spreadsheet will be copied as rows of text in that application, and you can save it in that file format, modify it, print it, and so forth.
MA4000 Expense Management Cable Management User Guide - Issue 1

Cable Management Tools |
2-5 |
Circuit Trace Tool
About the Circuit Trace Tool
Cable Management's Circuit Trace Tool allows you to view, in both text and graphic format, all the components of an individual circuit. Circuit tracing is especially helpful in identifying the source of a problem in the network or in viewing a circuit in diagram form.
With the Circuit Trace Tool, you can:
•Choose a port or pair/strand and view a table listing details of its circuit infrastructure.
•View a modifiable graphical diagram of the circuit infrastructure.
•Click to change the trace point, and thus the table and diagram information.
•Print the detailed information and graphical diagram.
Accessing the Circuit Trace Tool
The Trace Tool is accessible from four Detail View screens within Cable Management:
•Ports tab of the Assets Detail View
•Port/Position tab of the Termination Hardware Detail View
•Pair/Strand Details tab of the Backbone Cables Detail View
•Cross Connects tab of the Backbone Cables Detail View
To access the Circuit Trace Tool
Step 1 From the Cable Management Main Page, click Launch Application. Step 2 Highlight the trace point component in the List View.
Step 3 In the Detail View for that component, click the appropriate tab:
—Assets: Ports tab
—Termination Hardware: Port/Position tab
—Backbone Cables: Pair/Strand Details tab or Cross Connects tab
Step 4 Click the box in the Trace column for the component whose circuit you wish to view. A separate window will open displaying the details in table and graphic formats.
MA4000 Expense Management Cable Management User Guide - Issue 1
Loading...